Chapter Nine. Taking Travel & City Life Shots Like a Pro
Tips for Travel Photography
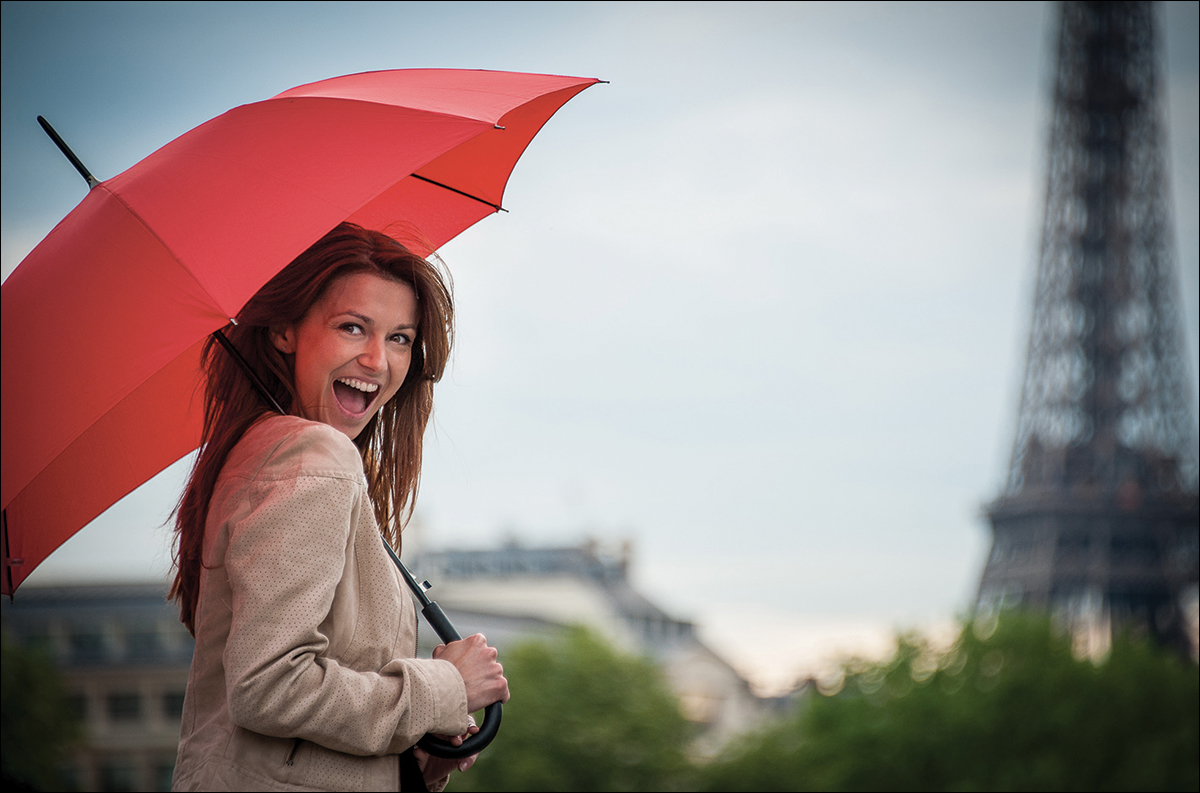
SHUTTER SPEED: 1/640 SEC F-STOP: F/5.3 ISO: 1600 FOCAL LENGTH: 112MM | PHOTOGRAPHER: SCOTT KELBY

Ya know what there’s not a whole lot of? Professional travel photographers. Ya know why? It’s because there are not a whole lot of travel magazines. I mean there’s Condé Nast Traveler, and National Geographic Traveler (one of my personal favorites), and Travel + Leisure, and well...I’m sure there are a couple more, but the thing is, there’s not like a whole bunch of them. But just because the market’s tight for jobs in the professional travel photographer market, that doesn’t mean we don’t want to take travel and city life shots like we’re trying to compete, right? Well, that’s what this chapter is all about—tips on beating the living crap out of a couple of those pro travel photographers, so they’re in the hospital for a while so we can snag some of their assignments. It’s the law of the jungle, and shooting in the jungle sounds like fun, except for the fact that some smug pro travel photographer already has the gig. Or did he just fall (was pushed?) off the side of a mountain in Trinidad and all his expensive gear went right along with him? What a shame. I wonder who’ll cover that assignment to shoot the sand dunes in Namibia? Hey, what the heck—I’ll do it (see, that’s the spirit behind this chapter—jumping in and taking over when one of your photographic comrades has a series of unexplained accidents while shooting on location). Hey look, I’m obviously kidding here, and I’m not actually recommending on any level that you learn the techniques in this chapter so you’ll be ready for a last-minute pro assignment, but hey—accidents do happen, right?
How to Be Ready for “The Shot”
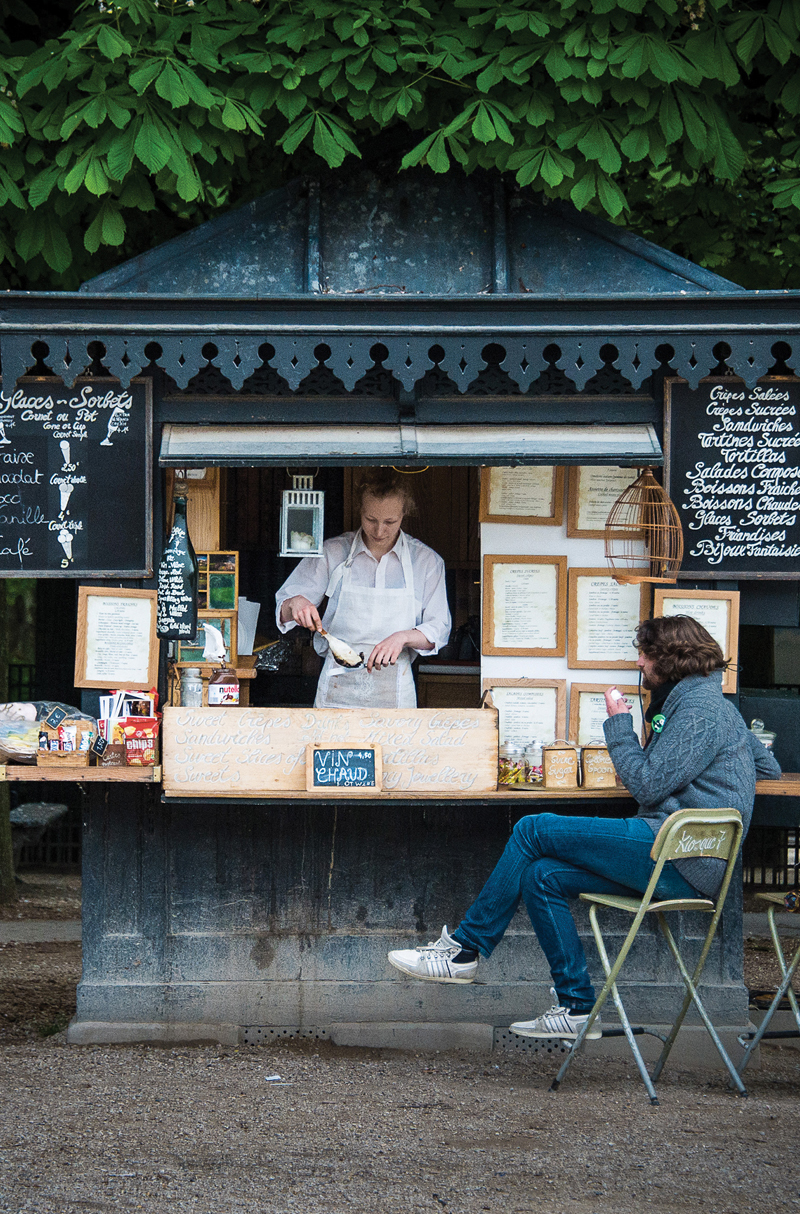
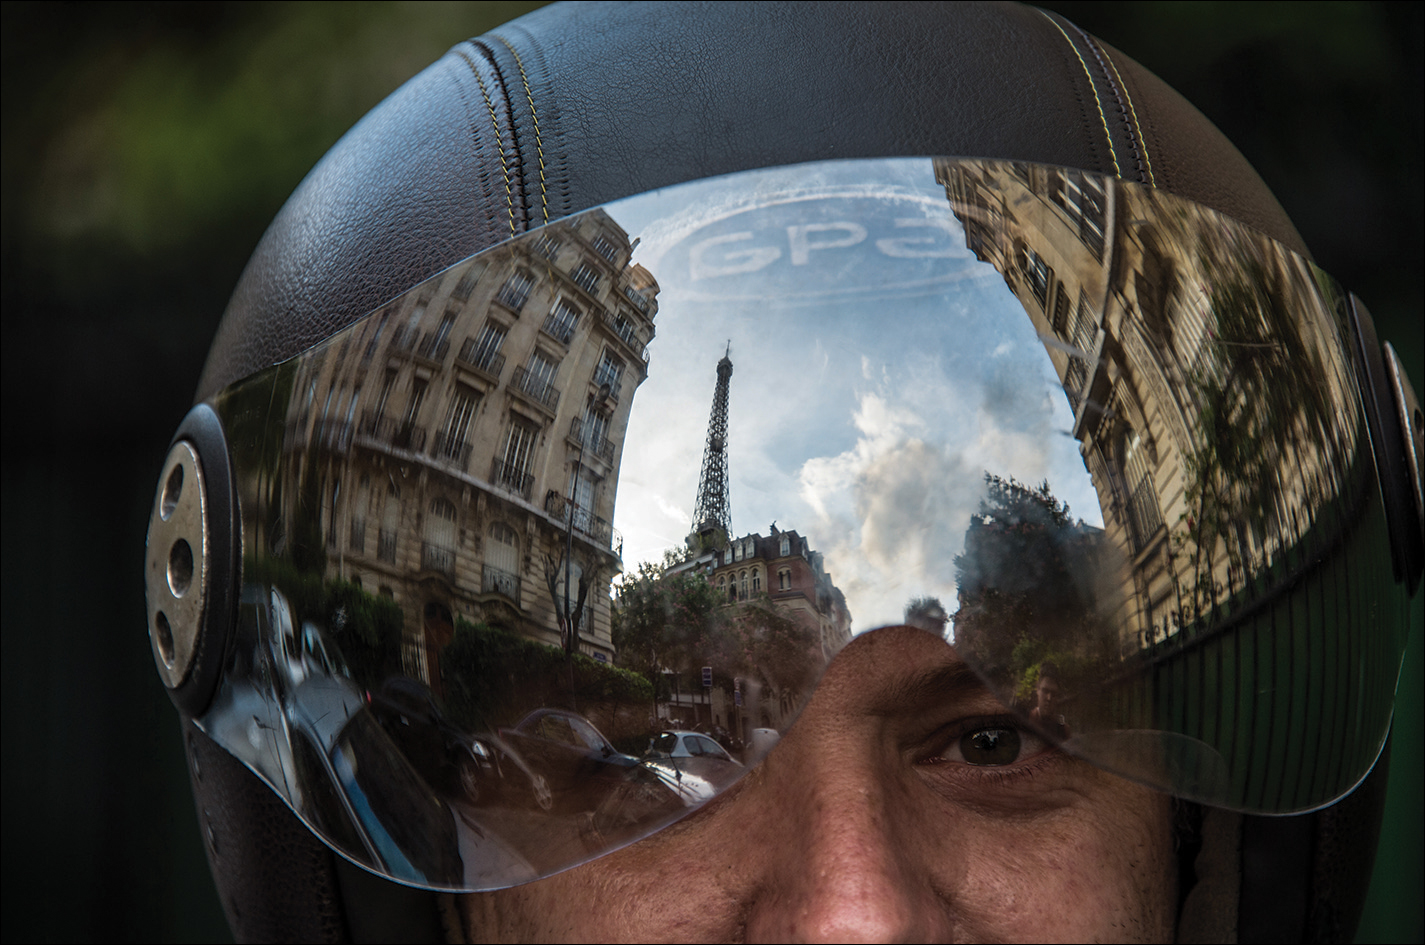
When you’re shooting urban (city) or travel photography, you’re looking for “the shot.” My buddy Dave calls it “the money shot.” You know, that shot where you turn the corner and something fascinating, amazing, or [insert your own adjective here] happens and you just happen to be there with a camera to record it. It happened to me in Barcelona when I walked by an alley and saw a man sitting in the dead center of the alley, facing the alley wall, reading a book. It was an incredibly compelling photo (so much so that many people have asked me if it was posed). So, how do you stay ready to catch a photo that just appears on the scene (or maybe drives by in a car)? You shoot in a mode that lets you concentrate on one thing—getting the shot. That’s right, when you’re walking the city streets, you shoot in program mode. I know, I know, this goes against all sacred rules of professional photography, except the one that says getting the shot is more important than the mode you shoot it in. So, switch your digital camera’s mode dial to program(med) mode (which sets both the aperture and shutter speed for you, without popping up the annoying on-camera flash every two seconds like auto mode does) and get the shot. Now, if you get to a scene that isn’t changing for a few minutes, you can always switch back to aperture priority (or manual) mode and take creative control of your shot, but for quickly getting the shot as you roam through the city, there’s no more practical mode than program. Note: Nikon’s program mode has a feature called Flexible Program Mode, which lets you change either the shutter speed or aperture setting while the camera automatically changes the opposite setting to keep the same exposure. If you don’t touch either dial, it does all the work for you. Sweet!
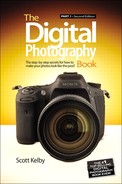
Shoot Kids and Old People. It Can’t Miss
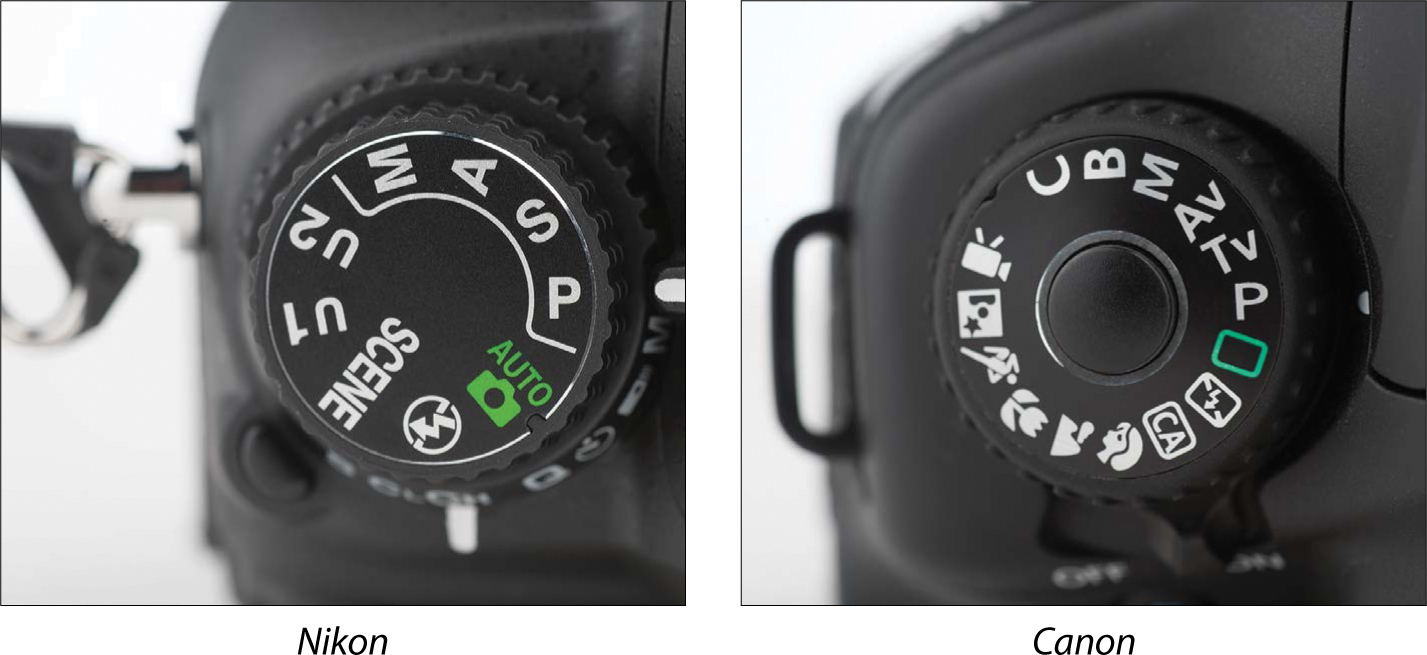
The next time you pick up a travel magazine, take a look at what’s in the photos they publish. I can save you the trouble. Their travel photos have two main people themes: old people and children. Now, when I say old people, I don’t mean people in their late 50s. I mean really old people, and by that I specifically mean old, wrinkly, craggy-looking women whose skin looks like shoe leather, and old, hobbly, crusty men with canes, wearing hats that haven’t been washed since the Korean War. As for kids, the younger the better (but skip the babies). As long as you shoot them on uncomplicated, simple backgrounds, kids make incredibly compelling additions to your urban and travel pics (that’s why the magazines love them). Also, if you get either age group to pose for you, make sure you spend some time talking with them before you start shooting—it can go a long way toward loosening them up, which will give you more natural looking poses and expressions (plus, they’ll probably let you shoot longer after you’ve built up a little rapport).
How do the pros get those amazing shots of people in exotic locales? One of their tricks is to hire a local model (especially if they’re shooting to sell the photos to a stock photo agency). Now, before you turn the page because you think hiring a model is out of your budget, it’s usually cheaper than you’d think (well, unless you were thinking it’s really, really cheap). Here’s a real world example: I hired a professional model recently for a shoot out in New Mexico, and the going rate was $15 per hour, plus I had to provide her prints from the shoot for her portfolio. Some models new to the business will work for free in exchange for you making prints for their portfolio (the term for this in the business is TFP, which stands for “Time For Prints,” [they are trading their time for your prints]), so ask your prospective model if they do TFP. If they look at you and ask, “Does that mean Tampa Free Press?” you should probably find another model. Two worldwide resources for finding working models online: www.modelmayhem.com and www.onemodelplace.com.
Many pros prefer to shoot urban and travel shots at dawn for a couple of reasons: (1) The light is perfect. That’s right, the same golden, magical light that looks great for landscape shots looks great for shooting in the city, too. And (2) the streets are usually empty, so there’s little distraction for your architecture shots, cathedral shots, or shots of charming little streets and alleys. You only have a limited time to shoot before the sun gets too light in the sky (and the lighting turns harsh) and the streets start to fill with traffic, so get set up before sunup and, of course, shoot on a tripod. Another great time to shoot is at dusk. The lighting will once again be golden, and the only major downside is that the streets won’t be empty. There are still some decent opportunities to shoot urban and people shots during the day, because cities often have lots of open shade (sometimes courtesy of the tall buildings in downtown areas). So unlike the landscape photographer, you can often get away with shooting all day, especially if it’s an overcast or cloudy day (remember, if the sky is gray, try to avoid including much sky in your photos). Afternoon is a perfect time to shoot charming doorways (in the shade), windows, kids playing in the park—pretty much anything you can find in decent open shade. So, to recap: The best time is probably morning. Second best is dusk, but you can still get away with shooting in open shade during the day, and there’s often plenty of it, so fire away (so to speak).

One of the things to keep an eye out for when you’re shooting urban and travel shots is the bold, vivid colors of the city. You’ll often find brilliantly colored walls, doors (shots with a bold-color wall with a contrasting colored door), shops, signs, cars, and bikes. One of my favorite urban shots was of a bright red Vespa scooter parked directly behind a bright yellow Lotus sports car. It almost looked set up for me, and I took dozens of shots of it because the colors were just so vivid, and so perfectly matched. Keep your eyes peeled for brightly painted walls (especially wonderful if you find someone working in front of the wall, or waiting patiently for a bus with the colorful wall in the background, or a bright yellow car parked in front of a bright blue wall). If you’re looking for these colorful combinations while you’re out exploring, you’ll be surprised at how often they’ll reveal themselves to you. By the way, I know I’m beating a dead horse here, but these colors will look richer and have more depth in (you guessed it) great light, which generally occurs (you know it) around dawn and dusk. Just remember, the next best thing to those two is open shade.
Shooting Travel? Visit 500px.com First
If you’re looking to find the shots everybody else misses (in other words, you don’t want shots that are too touristy), before you leave on your trip visit 500px.com, click on Photos in the top left, and in their search field, type in the city or location where you’re headed on your trip. You will find absolutely amazing shots, and often a fairly detailed description of where that scene is. (By the way, 500px is a site for serious photographers and a lot of the work there is really amazing, and shot in really amazing places, so it’s my go-to resource for researching where to shoot when I’m going to take a trip.)

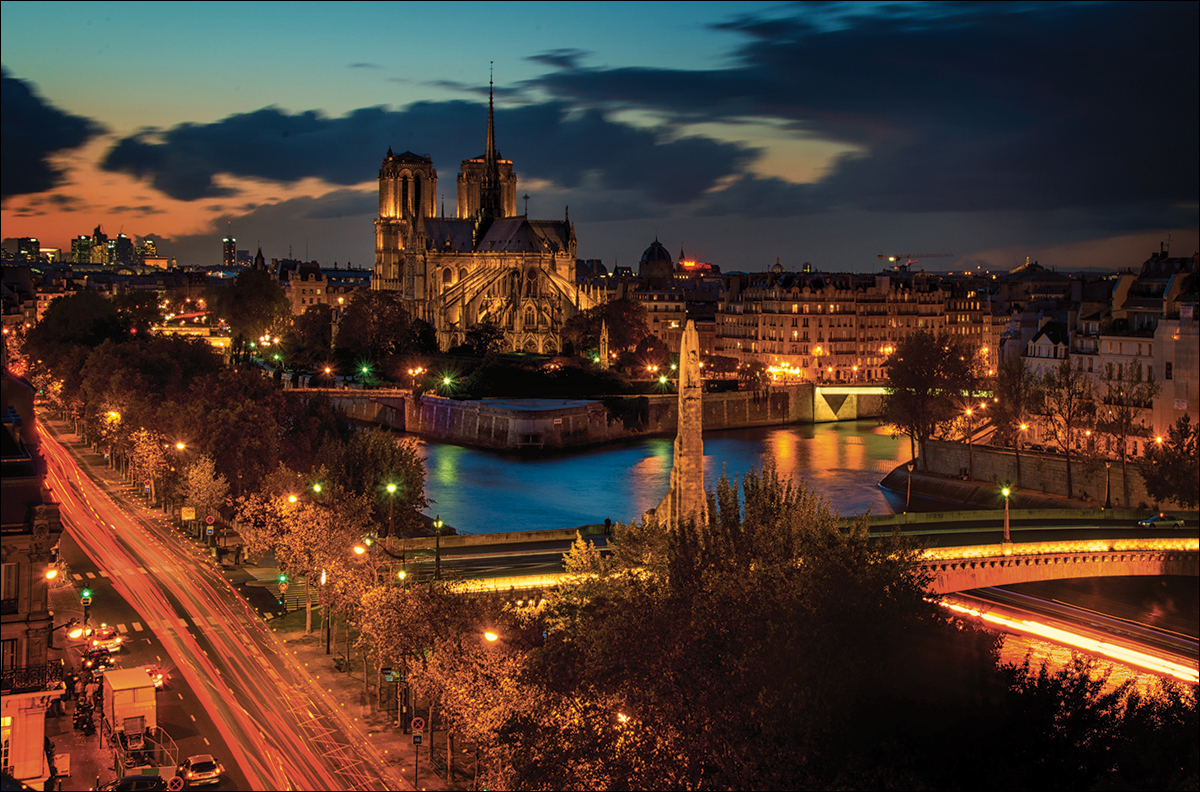
I’ve heard a lot of photographers complain about the results of their urban shooting, and much of the time it’s because they try to capture too much. What I mean by that is that they try to capture the entirety of a majestic building or the grandeur of a magnificent cathedral, but even with an ultra-wide-angle lens this is very, very hard to pull off. That’s why the pros shoot details instead. For example, instead of shooting to capture the entire cathedral at Notre Dame in Paris, instead capture details that suggest the whole—shoot the doors, a window, a spire, a gargoyle, the pigeons gathered on the steps, or an interesting architectural element of the church, rather than trying to capture the entire structure at once. Let your photo suggest the height, or suggest the craftsmanship, and the mind’s eye will fill in the blanks. By shooting just the details, you can engage in some very compelling storytelling, where a piece is often stronger than the whole. After all, if you want a photo of the entire cathedral, you can just buy one from the dozen or so gift shops just steps away. Instead, show your impression, your view, and your take on Notre Dame. Give this a try the next time you’re out shooting in a city and see if you’re not infinitely more pleased with your results.
The Best Shot May Be Just Three Feet Away
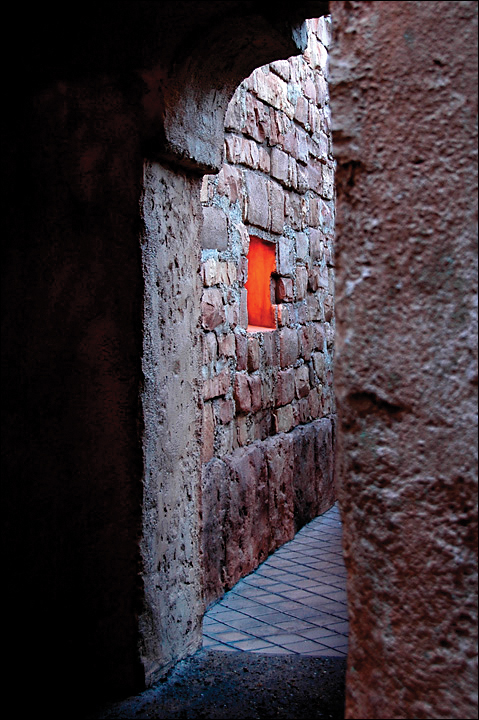
My good friend Bill Fortney said it best, “The biggest impediment to photographers getting great shots is the fact that they don’t move. The best shot, the best view, and the best angle is sometimes just 3 feet from where they’re standing, but they just don’t move—they walk up, set up, and start shooting.” It’s so true (that’s why I also made reference to this non-moving phenomenon in the landscape chapter). Once you find that fascinating detail, that vividly colored wall, that unique scene—walk around. Be on the lookout for other more interesting views of your subject and shoot it from there as well. Besides just moving left and right, you can present a different view by simply changing your shooting height: stand on a chair, squat down, lie on the ground and shoot up, climb up a flight of stairs and shoot down on the scene, etc. Remember, the best shot of your entire trip may be waiting there just 3 feet to your left (or 3 feet up). Note: The shot shown above is proof of this concept. It was taken in Morocco. Well, Disney’s version of it anyway (at Disney’s Epcot Center in Florida). If you were to walk 3 feet to the left (which is the shot I saw first), you’d see an outdoor courtyard full of park visitors eating dinner. But when I stepped 3 feet to the right, it hid the baskets of food and Coca-Cola cups and gave me this more authentic-looking view. By the way, that orange light through the open window is coming from a Disney gift shop. Another few feet to the right, and you’d see some stuffed Mickey Mouse dolls.
Want to save yourself from a lot of headaches? When you’re out shooting a cathedral, or a stadium, or a building, etc., take one extra shot—shoot the sign. That’s right, later on you may be scrambling to find out the name of that amazing church you shot, and without a lot of research, you may be out of luck. That is, unless you took a shot of the sign that has the name of the church (or building, bridge, etc.). This has saved me on more than one occasion, and if you ever wind up selling the photos, you will absolutely need this info (stock agencies generally won’t accept “Pretty Church in Cologne” as a saleable name for an image). Shoot the sign and you’ll thank yourself later.
If you want to show the hustle and bustle of a busy city, there’s a simple trick that will do just that—slow down your shutter speed and let the people and traffic create motion trails within your image. It’s easy (as long as you’ve got a tripod, which is absolutely required for this effect)—just switch your camera’s mode to shutter priority and set the shutter speed at either 1/16, 1/8, or 1/4 of a second (you can go longer if you have low enough light that it doesn’t blow the highlights out in your photo). Then press the shutter button, stand back, and in less than a second the motion of the city will reveal itself as the buildings, statues, lights, and signs stay still, but everything else has motion trails around it. If you’re shooting at night, you can really have a blast with motion. Try to find a high vantage point (like from a hotel room window, or on a bridge, etc.) where you have a good view of traffic. Then put your camera on a tripod (again, an absolute must for this effect to work), go to shutter priority mode, set your exposure to 30 seconds, and take a shot. Thirty seconds later, you’ll see long laser-like streaks of red lines (taillights and brake lights) and white lines (from the headlights), and you’ll have an amazingly cool image that most folks won’t get.
For Maximum Impact, Look for Simplicity
The single thing that probably kills more properly exposed city life photographs than anything else is clutter—all the distracting background items, foreground items, and just general stuff that gets in the way. So, one of the big secrets to creating powerful and dramatic urban and travel shots is to strive for simplicity. Look for simplicity in your backgrounds, in your people shots, in your architectural elements, in every aspect—the simpler the surroundings, the more powerful the impact. Go out shooting with that very goal in mind. Look for the absence of distraction. Look for the absence of clutter and noise, watch for distracting elements that sneak into the top and sides of your frame, and create some photos that have great impact, not because of what they have, but because of what they don’t have—lots of junk.
The Monopod Scam
Now, a lot of places simply won’t let you set up a tripod indoors (for example, try to set up a tripod in someplace like Grand Central Station. You can count the seconds before security arrives). However, here’s the weird thing: while many places have a strict policy on tripods, they don’t have a policy on monopods (a one-legged version of a tripod, often used for long-lens sports photography. Although they’re not quite as stable as a good tripod, they’re way more stable than hand-holding). So, the scam is this: if they say anything to you about shooting on a monopod, you can always counter with, “Hey, this isn’t a tripod.” It often stops them dead in their tracks. One reason they let you get away with a monopod is simply because they don’t take up much space, and since there are no extended legs, there’s nothing really for anyone to trip on (a concern for many building interiors, museums, etc.). So, if you know the indoor environment you’re planning to shoot doesn’t allow tripods, see if you can pull the old monopod scam. My guess is—you’ll float right by ‘em.
What to Do When It Has Been “Shot to Death”
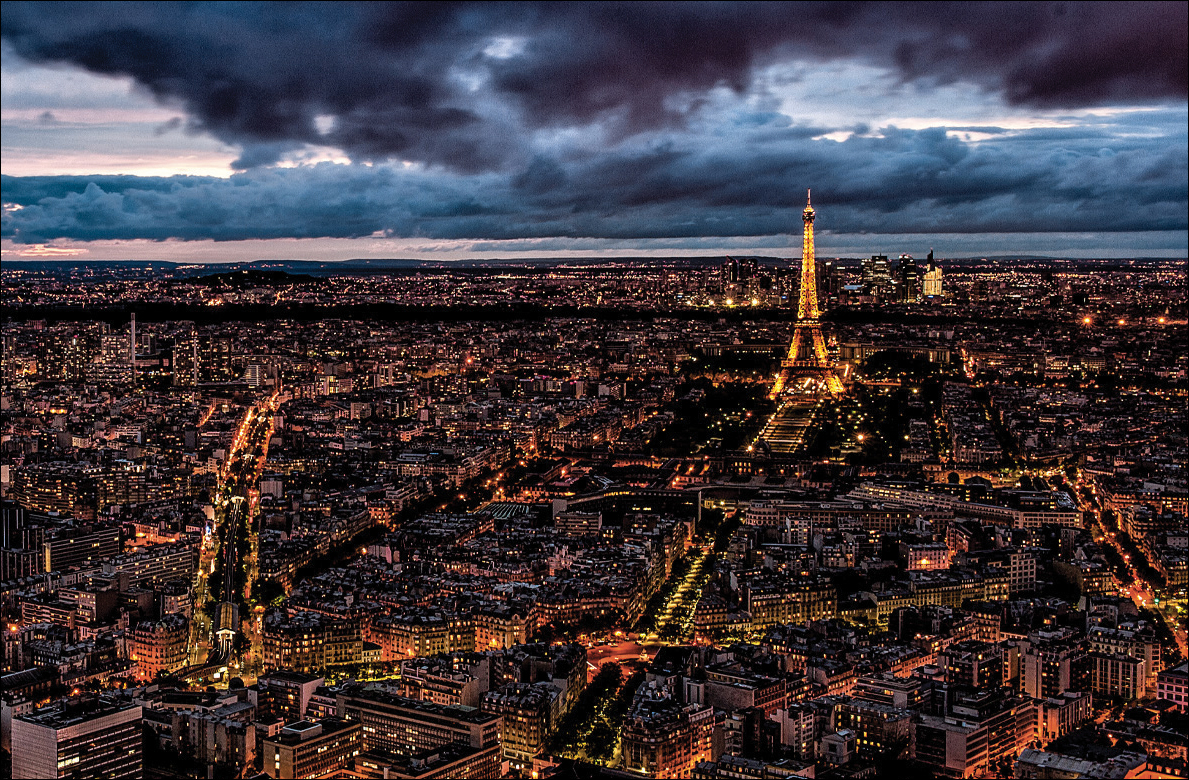
So, you’re standing in front of the Eiffel Tower (or the Lincoln Memorial, or the Golden Gate Bridge, etc.—any touristy landmark that’s been shot to death). You know you have to shoot it (if you go to Paris and don’t come back with at least one shot of the Eiffel Tower, friends and family members may beat you within an inch of your life with their bare hands), but you know it has been shot to death. There are a million postcards with the shot you’re about to take. So what do you do to show your touristy landmark in a different way? Of course, the obvious thing (you’ll find in every photography book) is to shoot it from a different angle. Frankly, I’d like to see an angle of the Eiffel Tower that hasn’t been shot. But since, in many cases, that angle just doesn’t exist, what do you do next? Try this: Shoot the landmark in weather it’s not normally seen in. That’s right—shoot it when nobody else would want to shoot it. Shoot it in a storm, shoot it when it’s covered in snow, shoot it when a storm is clearing, shoot it when the sky is just plain weird. Since the landmark doesn’t change, shoot it when its surroundings are changing to get that shot that you just don’t see every day. Here’s another idea: try shooting it from a difficult place to shoot from (in other words, shoot it from some view or vantage point that would be too much bother for most folks to consider. Find that “pain in the butt” viewpoint, and chances are you’ll pretty much be shooting it there alone). Hey, it’s worth a shot. (Get it? Worth a shot? Ah, forget it.)
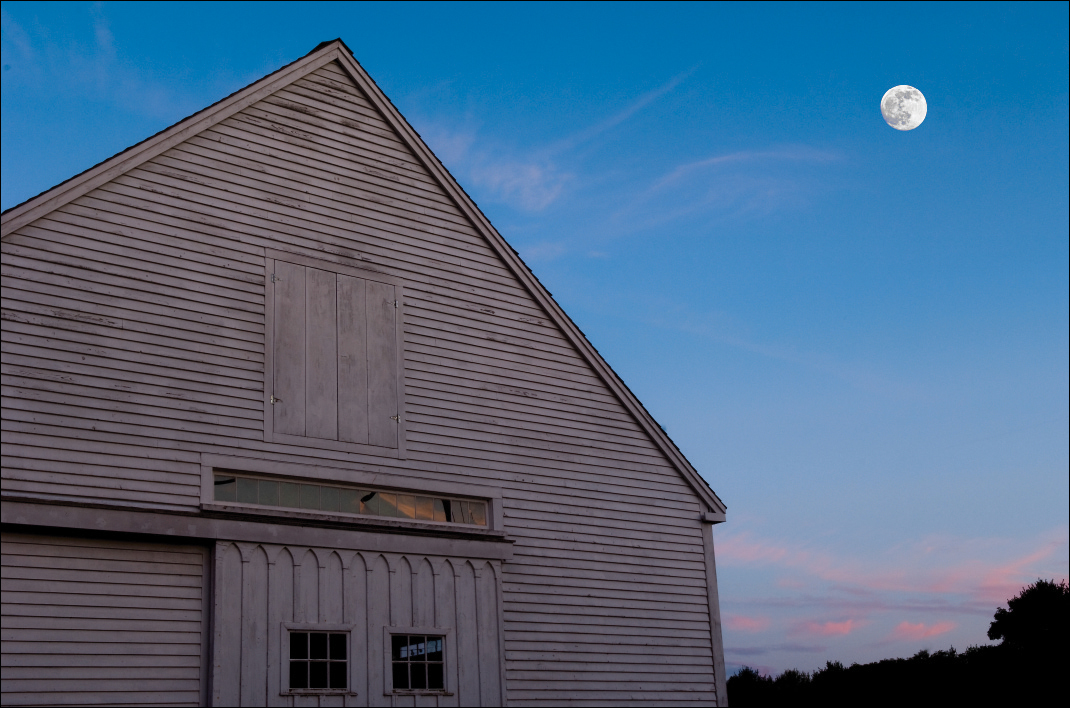
This sounds like it would be easy—a nighttime scene with a crisp detailed moon in the sky in the background, but most people wind up with a totally overexposed bright white circle, rather than the detailed moon shot they were hoping for. That’s because it’s just about impossible to get both the nighttime scene (which takes a long exposure) and a detailed shot of the moon (which takes a very short exposure because it’s actually quite bright) in the same shot. So, what photographers have been doing for years is creating multiple exposures (two images captured in the same frame). Now, there are some digital cameras today that let you create double exposures, but it’s just as easy to take two separate photos—one of the nighttime scene (a barn, in this case), one of the moon—and combine them later in Photoshop. First, start with your nighttime scene. Use a wide-angle lens (maybe an 18mm or 24mm), put your camera on a tripod (an absolute must), set your camera to aperture priority mode, choose f/11 as your f-stop, and your camera will choose the shutter speed for you (which may be as little as 20 or 30 seconds or as long as several minutes, depending on how dark the scene is), then take the nighttime scene shot. Now switch to your longest telephoto (or zoom) lens (ideally 200mm or more). Switch to full manual mode, and set your aperture to f/11 and your shutter speed to 1/250 of a second. Zoom in as tight as you can get on the moon, so there’s nothing but black sky and moon in your shot (this is critical—no clouds, buildings, etc.), then take the shot. Now add the moon to your nighttime scene in Photoshop (visit kelbytraining.com/books/moon to see my step-by-step Photoshop tutorial on how to do this).

This is another one that throws a lot of people (one of my best friends, who didn’t get a single crisp fireworks shot on the Fourth of July, made me include this tip just for him and the thousands of other digital shooters that share his pain). For starters, you’ll need to shoot fireworks with your camera on a tripod, because you’re going to need a slow enough shutter speed to capture the falling light trails, which is what you’re really after. Also, this is where using a cable release really pays off, because you’ll need to see the rocket’s trajectory to know when to push the shutter button—if you’re looking in the viewfinder instead, it will be more of a hit or miss proposition. Next, use a zoom lens (ideally a 200mm or more) so you can get in tight and capture just the fireworks themselves. If you want fireworks and the background (like fireworks over Cinderella’s Castle at Disney World), then use a wider lens. Now, I recommend shooting in full manual mode, because you just set two settings and you’re good to go: (1) set the shutter speed to 4 seconds, and (2) set the aperture to f/11. Fire a test shot and look in the LCD monitor to see if you like the results. If it overexposes, lower the shutter speed to 3 seconds, then check the results again. Tip: If your camera has bulb mode (where the shutter stays open as long as you hold the shutter release button down), this works great—hold the shutter button down when the rocket bursts, then release when the light trails start to fade. (By the way, most Canon and Nikon digital SLRs have bulb mode.) The rest is timing—because now you’ve got the exposure and sharpness covered.
If You Have a Laptop, Take It With You
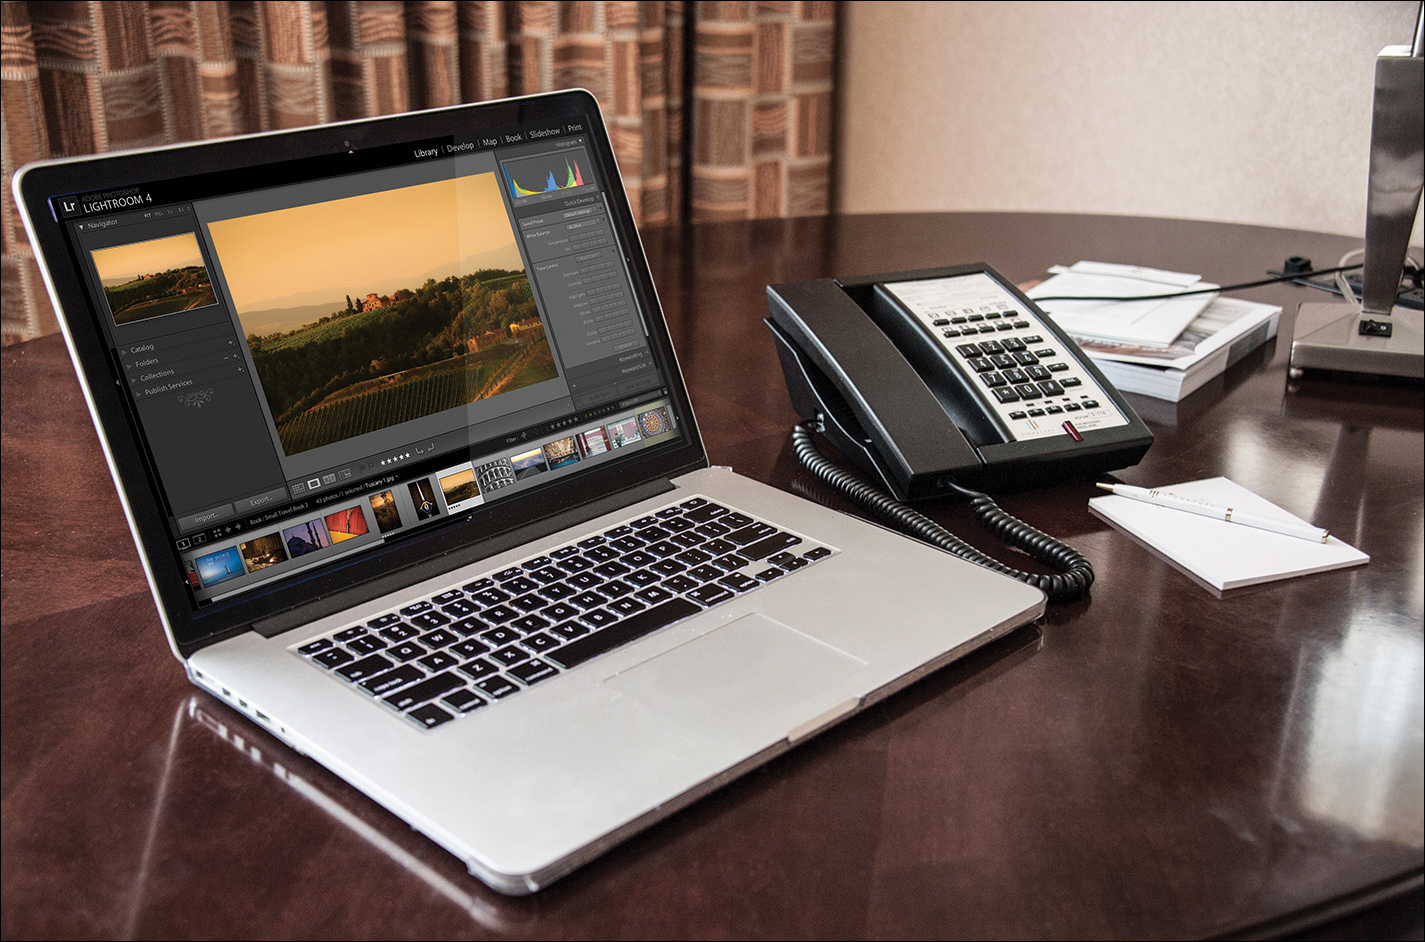
You know what will drive you crazy on vacation? Visiting some amazing location, taking what you know are some really awesome shots, and then having to wait nine days until you get home to start editing and sharing the images. If you take your laptop, you have an editing studio with you wherever you go, and the other bonus is that you have a place to back up each day’s shoots. What I generally do is back up my images onto my laptop after I return to my hotel after a day of shooting, and then I connect an inexpensive hard drive and copy those backups to another drive (now I have two copies of my photos from that day, so now I can erase my memory cards and go back out shooting tomorrow, knowing that I have two copies of my images, in two separate locations). After dinner, I usually open those images from the day and do a little bit of editing, so I can email them to friends or post them on Facebook, Twitter, etc. Lastly, I take one extra step: I upload only my final images (in JPEG format) to Dropbox (or any cloud-based service you like). That way, no matter what happens, my final images are safely stored off-site. One more thing: What if you either don’t have a laptop or don’t feel it’s practical to bring one? In that case, bring a tablet and download Snapseed from Nik Software (now owned by Google). It’s absolutely amazing for editing images, it’s perfect for travel photos, and did I mention it’s free? Well, it is, and it’s awesome! Anyway, there are three morals to this story: (1) If you think it will drive you a little nuts to wait until you return from your trip to edit and/or share your images, bring your laptop. (2) If you can’t go that route, bring a tablet and get Snapseed. (3) Back up your images on-site and, ideally, off-site, as well. You’ll thank me.
If you walk into an office building or high-rise hotel and ask them if it’s okay if you shoot some photographs from their roof, what are the chances they’ll say, “Sure, no problem”? Pretty slim, right? It’s because they really have nothing to gain from letting some stranger up on their roof (it’s all downside for them, right?). Yet, you see shots from rooftops and from rooftop lounges or restaurants quite often, so what’s the trick? The trick is this: when you book your hotel accommodations for your trip, try to find a high-rise hotel with a great view, and now you’re no longer “some stranger.” You’re a hotel guest, and they have plenty to gain from making you happy (after all, that’s their job). Start with the concierge. Tell them you’re a serious photographer (not a commercial photographer—that might close the door for good) and that you’d love to take a shot from their [rooftop bar when it’s closed, roof of the hotel, maybe the balcony of the Presidential Suite if it’s available]. The concierge genuinely wants to help (and they might get a nice tip from you, right?), so they’ll often bend over backward to get you access to some high vista where you can make your shot. If that doesn’t work, introduce yourself to the hotel manager (who also wants to make you happy) as one of his “guests.” If he can’t let you on the roof, ask if there is some other high view in the hotel that might make a great city shot (the concierge may have already tipped you off as to what to ask for), but the bottom line is this: they want to say, “Yes” because you’re a guest. If you’re just a stranger walking in off the street asking for favors, they want to say no, and seem to have little trouble doing so.

When you look at the photo above, taken during the middle of the day at the Paris Opera House while it was very busy, you might be wondering what the trick is to get a shot like this where you have very few tourists in the scene (well, if you look closely, down at the far end of the hall, there are a few tourists, but not enough to “kill” the shot). The trick is actually very easy, but it’s kind of a pain to actually do it. The trick is patience. That’s right—I stood there for 10 or so minutes hoping that there would be a break in the seemingly non-stop parade of tourists walking down the beautiful hall, and worse yet, walking directly in front of me, because immediately to my left was an open door to the balcony overlooking the busy street below (I took a few shots from that same balcony a little later, but the light was harsh and ugly, so they’re pretty much hidden from public view until the end of time). Anyway, I just stood there, back a few feet, waiting for my chance and, sure enough, my patience paid off and suddenly I had about a 20-second opportunity where no one was walking in front of me, and no one was in the middle or front of the hall. So, I quickly fired off a few shots and got the one you see above. I actually use this trick quite a bit (see page 217 where I did this in Disneyland and it worked like a charm).