Chapter One. Pro Tips for Getting Really Sharp Photos
If Your Photos Aren’t Sharp, the Rest Doesn’t Matter
SHUTTER SPEED: 1/200 SEC F-STOP: F/32 ISO: 200 FOCAL LENGTH: 70MM | PHOTOGRAPHER: SCOTT KELBY

Having photos that are sharp and in focus is so vitally important to pro photographers that they actually have coined a term for them. They call them “tack sharp.” When I first heard that term tossed around years ago, I naturally assumed that it was derived from the old phrase “sharp as a tack,” but once I began writing this book and doing some serious research into its history, I was shocked and surprised at what I found. First of all, it’s not based on the “sharp as a tack” phrase at all. Tack sharp is actually an acronym. TACK stands for Technically Accurate Cibachrome Kelvin (which refers to the color temperature of light in photographs), and SHARP stands for Shutter Hyperfocal At Refracted Polarization. Now, these may seem like highly technical terms at first, but once you realize that I totally made them up, it doesn’t seem so complicated, does it? Now, you have to admit, it sounded pretty legitimate at first. I mean, I almost had ya, didn’t I? Come on, you know I had you, and I’ll bet it was that “color temperature of light” thing I put in parenthesis that helped sell the idea that it was real, right? It’s okay to admit you were fooled, just like it’s okay to admit that you’ve taken photos in the past that weren’t tack sharp (just in case you were wondering, the term “tack sharp” is actually formed from the Latin phrase tantus saeta equina which means “there’s horsehair in my tantus”). Anyway, what’s really important at this point is whatever you do, keep your spotted palomino away from anything with a sharp, pointy end used to attach paper to a bulletin board. That’s all I’m saying.
The Real Secret to Getting Sharp Photos
Hey, before we get to “The Real Secret to Getting Sharp Photos,” I need to let you in on a few quick things that will help you big time in getting the most from this book (sorry about duping you with “The Real Secret to Getting Sharp Photos” headline, but don’t worry—that subject and more are coming right up, but first I have to make sure you totally understand how this book works. Then it will all make sense and we can worry about sharp photos). The idea is simple: You and I are out on a photo shoot. While we’re out shooting, you have lots of questions, and I’m going to answer them here in the book just like I would in real life—straight and to the point, without teaching you all the technical aspects and behind-the-scenes technology of digital photography. For example, if we were out shooting and you turned to me and said, “Hey Scott, I want to take a shot where that flower over there is in focus, but the background is out of focus. How do I do that?” I wouldn’t turn to you and give you a speech about smaller and larger apertures, about how exposure equals shutter speed plus aperture, or any of that stuff you can read in any book about digital photography (and I mean any book—it’s in every one). In real life, I’d just turn to you and say, “Put on your zoom lens, set your aperture at f/2.8, focus on the flower, and fire away.” That’s how this book works. Basically, it’s you and me out shooting, and I’m giving you the same tips, the same advice, and the same techniques I’ve learned over the years from some of the top working pros, but I’m giving it to you in plain English, just like I would in person, to a friend.
Again, ignore that headline. It’s just a cheap come-on to get you to keep reading. Anyway, that’s the scoop. Now, here’s another important thing you need to know: To get the kind of quality photos I think you’re looking for, sometimes it takes more than changing an adjustment in the camera or changing the way you shoot. Sometimes, you have to buy the stuff the pros use to shoot like a pro. I don’t mean you need to buy a new digital camera, but instead, some accessories that the pros use in the field every day. I learned a long time ago that in many fields, like sports for example, the equipment doesn’t really make that big a difference. For example, go to Wal-Mart, buy the cheapest set of golf clubs you can, hand them to Tiger Woods, and he’s still Tiger Woods—shooting 12 under par on a bad day. However, I’ve never seen a field where the equipment makes as big a difference as it does in photography. Don’t get me wrong, hand Jay Maisel a point-and-shoot camera and he’ll take point-and-shoot shots that could hang in a gallery, but the problem is we’re not as good as Jay Maisel. So, to level the playing field, sometimes we have to buy accessories (crutches) to make up for the fact that we’re not Jay Maisel. Now, I don’t get a kickback, bonus, or anything from any of the companies whose products I recommend. I’m giving you the same advice I’d give you if we were out shooting (which is the whole theme behind this book). This is not a book to sell you stuff, but before you move forward, understand that to get pro results sometimes you have to use (and that means buy) what the pros use.
Perhaps Even More Important Than That!
Still a fake headline. Don’t let it throw you. Now, although we want pro-quality photos, we don’t all have budgets like the pros, so when possible, I break my suggestions down into three categories:
I’m on a budget. These are denoted with this symbol. It simply means you’re not loose with money (meaning you’re probably married and have kids).
I can swing it. If you see this symbol, it means photography is your passion and you don’t mind if your kids have to work a part-time job once they get to college to buy books. So you’re willing to spend to have some better-than-average equipment.
If you see this symbol, it means you don’t really have a budget (you’re a doctor, lawyer, venture capitalist, U.S. Senator, etc.), so I’ll just tell you which one I would buy if I was one of those rich bas*%$#s. (Kidding. Kind of.)
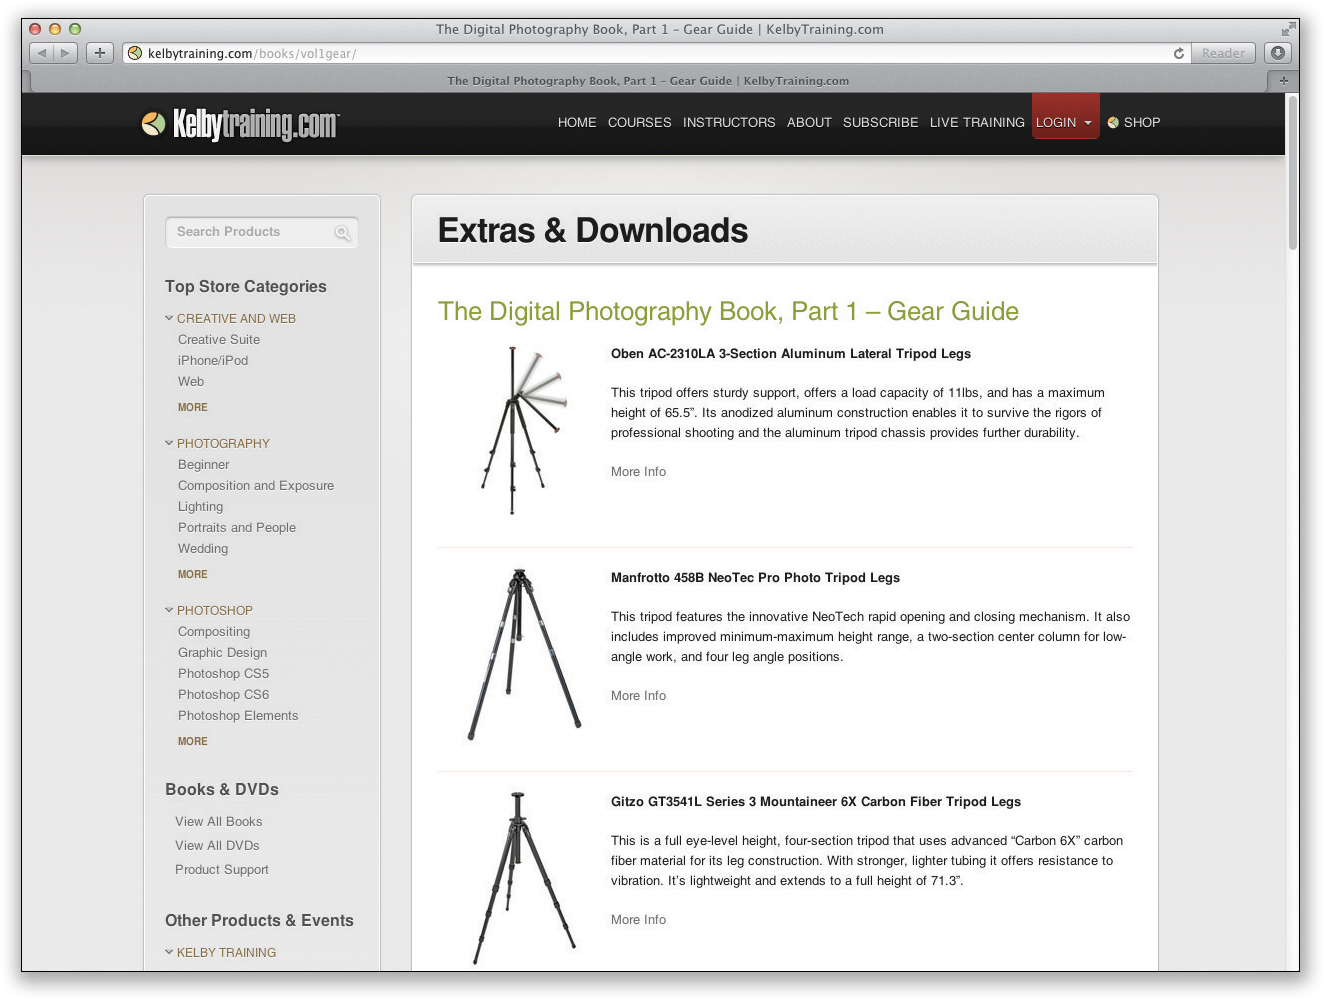
To make things easy, I put up a webpage at kelbytraining.com/books/vol1gear with direct links to these goodies if you’re so inclined. Again, I don’t get a red cent if you use these links or buy this stuff, but I don’t mind because I made such a killing on you buying this book. Again, I kid. Now, where do these links actually go? (See next page.)
If You Skip This, Throw Away Your Camera

Hey, how do you like that grabber of a headline? Sweet! Totally a scam, but sweet nonetheless. Now, those links on the webpage lead to one of two places: (1) to the individual manufacturer who sells the product, if they only sell direct, or (2) to B&H Photo’s website. So, why B&H? Because I trust them. I’ve been buying all my personal camera gear from them for years (so do all my friends, and most of the pros I know) and since you’re now going to be one of my shooting buddies, this is where I would tell you to go without a doubt. There are three things I like about B&H, and why they have become something of a legend among pro photographers: (1) They carry just about every darn thing you can think of, no matter how small or insignificant it may seem. Lose your Nikon brand lens cap? They’ve got ‘em in every size. Lose your neck strap with Canon stitched on it? They’ve got them, too. Lose that tiny little cap that covers the input for your remote shutter release? They’ve got it. (2) When you call them, you talk to a real photographer, and my experience is that they give you the real straight scoop on what to buy. I’ve called up with something in mind, and have had their reps tell me about something better that’s cheaper. That’s rare these days. And finally (3), their prices are very, very competitive (to say the least). If you’re ever in New York City, make it a point to drop by their store. It is absolutely amazing. It’s like Disneyland for photographers. I could spend a day there (and I have). Anyway, they’re good people. Now, does the headline scam thing continue on the next page? You betcha.
If You Do This Wrong, It Will Lock Up
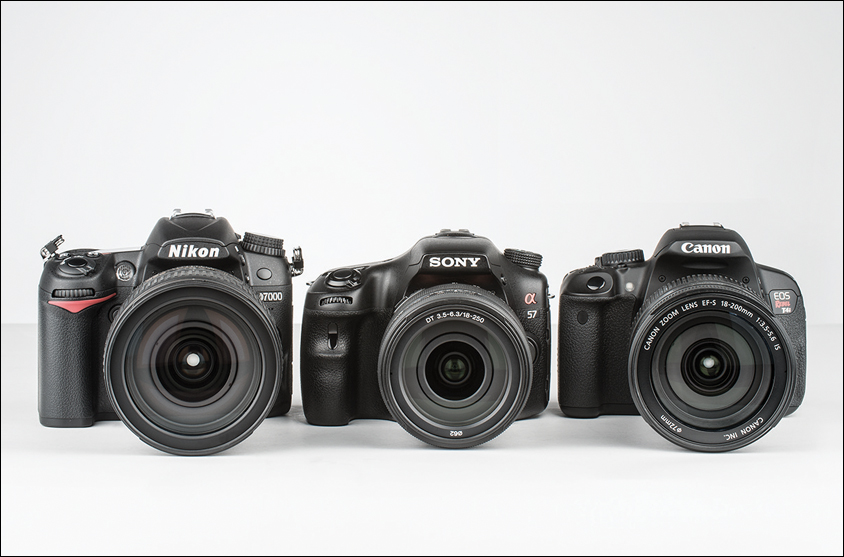
It’s not as good as the last fake headline, but we’re only one more page away from the real chapter content, so I’m backing it off a little. Now, once you turn the page you’ll notice lots of photos of Nikon, Canon, and Sony cameras, and it might make you think that I’m partial to these three brands. It’s not just me. Apparently most of the world is partial to these three brands, so you’ll see lots of shots of them. Now, what if you don’t shoot with a Nikon, Canon, or Sony camera? No sweat—most of the techniques in this book apply to any digital SLR camera, and many of the point-and-shoot digital cameras as well, so if you’re shooting with an Olympus or a Sigma, don’t let it throw you that a Nikon, Canon, or Sony is pictured. This book is about taking dramatically better photos, not about how to set up your Nikon, Canon, or Sony, even though since most people are shooting with one of these, I usually show one of these cameras or menus (but mainly only tell you how to set things up on a Nikon or Canon). So, if I’m talking about white balance, and I’m showing the Canon white balance menu, but you’re not shooting with a Canon, simply breathe deeply and say to yourself, “It’s okay, my [insert your camera name here] also has a white balance setting and it works pretty much like this one.” Remember, it’s about choosing the right white balance, not exactly which buttons to push on your camera, because if we were really out shooting together, we might not have the same brand of camera.
It’s Time to Get Serious
I have good news: Not only are we at the end of this “fake headline” thing, you’ll also be happy to know that from here on out, the rest of the book isn’t laced with the wonderfully inspired (lame) humor you found on these first few pages. Well, the intro page to each chapter has more of this stuff, but it’s only one page and it goes by pretty quickly. My books have always had “enlightened” chapter intros (meaning I wrote them when I was plastered) and the chapter names are usually based on movies, song names, or band names (the actual chapter name appears below the fake chapter name). The other reason I do it is because I need a chance to write something that doesn’t use any of the terms shutter, aperture, or tripod. In a book like this, there’s not much room to interject personality (if you want to call it that), and since the rest of the book is me telling you just what you need to know, there’s little time for my brand of humor. In fact, in life there’s little time for my brand of humor, so I sneak it in there. I have so little. Anyway, as you turn the page, keep this in mind: I’m telling you these tips just like I’d tell a shooting buddy, and that means oftentimes it’s just which button to push, which setting to change, and not a whole lot of reasons why. I figure that once you start getting amazing results from your camera, you’ll go out and buy one of those “tell me all about it” digital camera books. In all seriousness, I truly hope this book ignites your passion for photography by giving you some insight into how the pros get those amazing shots, and showing you how to get results you always hoped you’d get from your digital photography. Now pack up your gear, it’s time to head out for our shoot.
Getting “Tack Sharp” Starts with a Tripod
There’s not just one trick that will give you the sharp photos the pros get—it’s a combination of things that all come together to give you “tack sharp” shots. (Tack sharp is the term pro photographers use to describe the ultimate level of sharpness. Sadly, we aren’t the best at coming up with highly imaginative names for things.) So, while there are a number of things you’ll need to do to get tack-sharp photos, the most important is shooting on a tripod. In fact, if there’s one single thing that really separates the pros from the amateurs, it’s that the pros always shoot on a tripod (even in daylight). Yes, it’s more work, but it’s the key ingredient that amateurs miss. Pros will do the little things that most amateurs aren’t willing to do; that’s part of the reason their photos look like they do. Keeping the camera still and steady is a tripod’s only job, but when it comes to tripods, some do a lot better job than others. That’s why you don’t want to skimp on quality. You’ll hear pros talking about this again and again, because cheap tripods simply don’t do a great job of keeping your camera that steady. That’s why they’re cheap.
Scott’s Gear Finder
![]() Oben AC-2310LA 3-Section Tripod (around $115)
Oben AC-2310LA 3-Section Tripod (around $115)
![]() Manfrotto 458B NeoTec Pro Tripod (around $375)
Manfrotto 458B NeoTec Pro Tripod (around $375)
![]() Gitzo GT3541L Series 3 Mountaineer Tripod (around $745)
Gitzo GT3541L Series 3 Mountaineer Tripod (around $745)
A Ballhead Will Make Your Life Easier
Here’s the thing: when you buy a pro-quality tripod, you get just the tripod. It doesn’t come with a tripod head affixed like the cheap-o tripods do, so you’ll have to buy one separately (by the way, this ballhead thing isn’t necessarily about getting sharp images, but it is about keeping your sanity, so I thought I’d better throw it in). Ballheads are wonderful because with just one knob they let you quickly and easily aim and position your camera accurately at any angle (which you’ll find is a huge advantage). Best of all, good ballheads keep your camera locked down tight to keep your camera from “creeping” (slowly sliding one way or the other) after you’ve set up your shot. Like tripods, a good ballhead isn’t cheap, but if you buy a good one, you’ll fall in love with it.
Scott’s Gear Finder
![]() Manfrotto 498RC4 Midi Ballhead (around $110)
Manfrotto 498RC4 Midi Ballhead (around $110)
![]() Oben BC-2 Ballhead (around $180)
Oben BC-2 Ballhead (around $180)
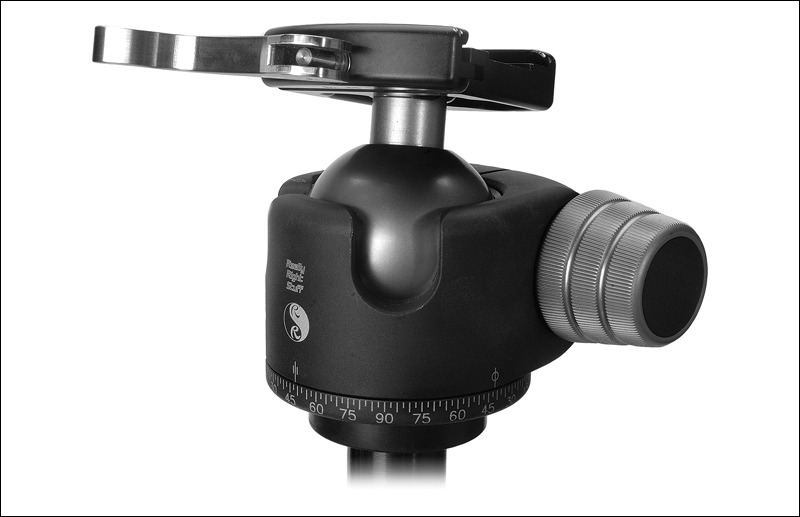
![]() Really Right Stuff BH-40 LR Ballhead ($375)
Really Right Stuff BH-40 LR Ballhead ($375)
Don’t Press the Shutter (Use a Cable Release)
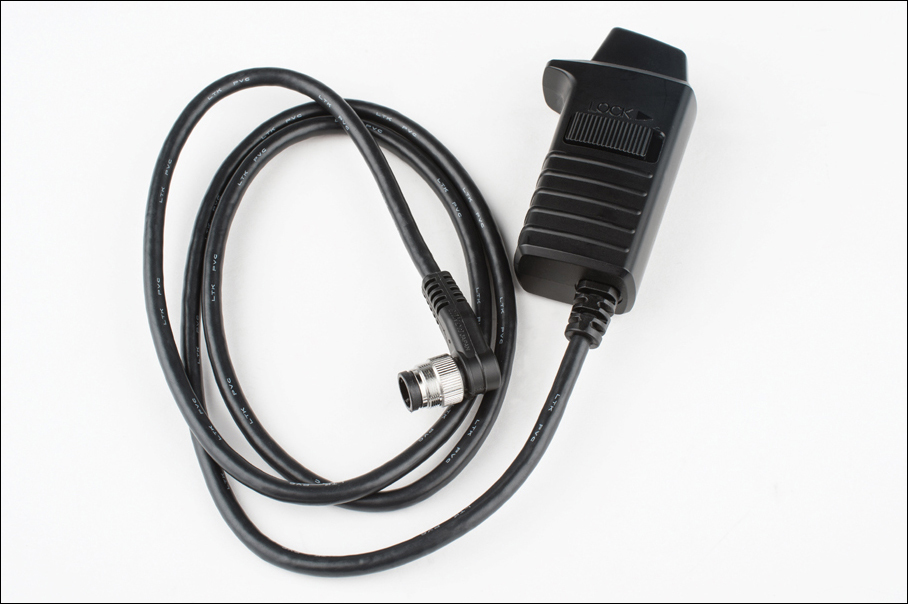
Okay, so now you’re lugging around a tripod, but your photos are looking much sharper. Not tack sharp yet, but much sharper. What will take you to the next level of sharpness? A cable release. This is simply a cable that attaches to your digital camera (well, to most semi-pro or high-end consumer DSLRs anyway) and it has a button on the end of it. That way, when you press this button on the end of the cable, it takes the photo, but without you actually touching the shutter button on the camera itself. So, why is this such a big deal? It’s because, believe it or not, when you press the shutter button on the camera, it makes the camera move just enough to keep your photos from being tack sharp. I know, it sounds like a little thing, but this one is bigger than it sounds. Using it is easier than you might think, and these days most cameras support wireless remotes too, and they’re fairly inexpensive, as well. Now your photos are just that much sharper.
Forgot Your Cable Release? Use a Self Timer
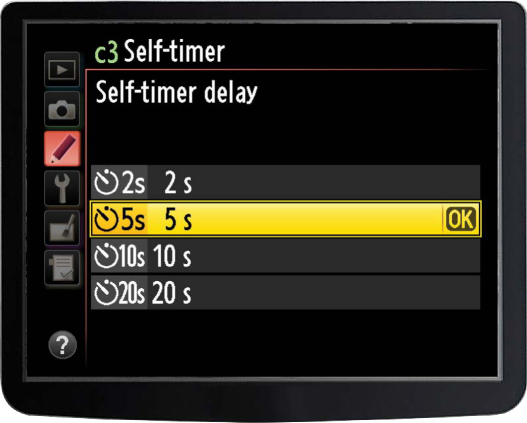
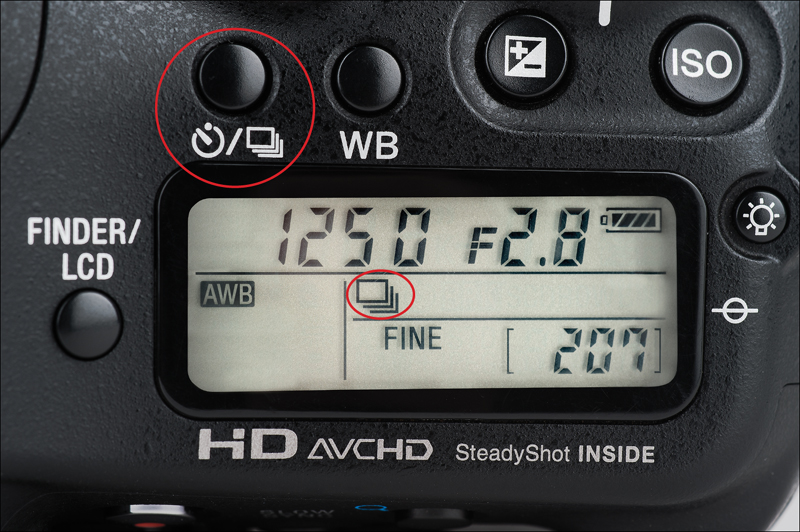
If you don’t want to spring for a cable release (or wireless remote), or if you’re out shooting and forgot yours (which has happened to me on numerous occasions), then the next best thing is to use your digital camera’s built-in self timer. I know, you normally think of using this so you can run and get in the shot real quick, but think about it—what does the self timer do? It takes the shot without you touching the camera, right? Right! So, it pretty much does the same job of keeping your camera from moving—you just have to wait about 10 seconds. If you hate waiting (I sure do), then see if your camera allows you to change the amount of time it waits before it shoots. I’ve lowered mine to just five seconds (see the Nikon menu above). I press the shutter button and then five seconds later, the shot fires (I figure that five seconds is enough time for any movement caused by my pressing the shutter release to subside).
Getting Super Sharp: Mirror Lock-Up
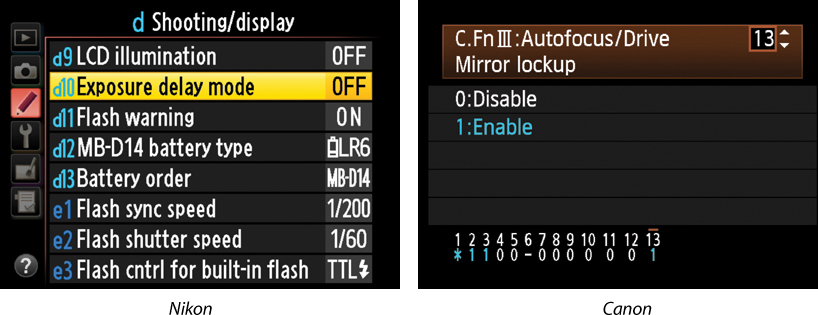
All right, we’re starting to get a bit obsessed with camera shake, but that’s what this chapter is all about—removing any movement so we get nothing but the sharpest, cleanest photo possible. The next feature we’re going to employ is called Exposure Delay Mode on a Nikon or Mirror Lockup on a Canon. What this essentially does is locks your camera’s mirror in the up position, so when you take the shot, the mirror does not move until after the exposure is made—limiting the movement inside your camera during the exposure, and therefore giving you that much sharper a photo. How much does this matter? It’s probably second only to using a solid tripod! So, you’ll need to find out where the mirror lock-up control is for your camera (most of today’s DSLR cameras have this feature because you also use this to clean your sensor). Once you set your camera to mirror lock-up, on a Nikon you now have to press the shutter release button (on your remote or cable release) once, on a Canon you have to press it twice—once to lift the mirror, and then a second time to actually take the shot. Now, this technique sounds a bit nitpicky. Does it make that big a difference? By itself, no. But add this to everything else, and it’s another step toward that tack sharp nirvana.
Turn Off Vibration Reduction (or IS)
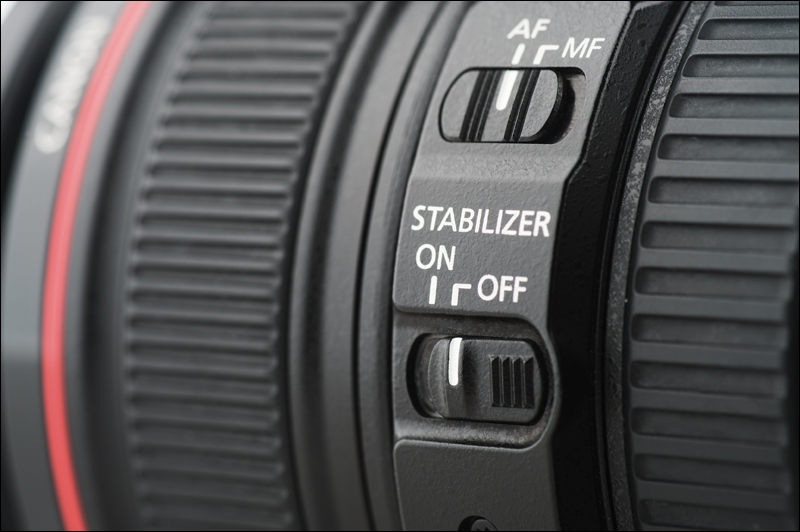
The big rage in digital lenses these days are the Vibration Reduction (VR) lenses from Nikon and the Image Stabilization (IS) lenses from Canon, which help you get sharper images while hand-holding your camera in low-light situations. Basically, they let you hand-hold in more low-light situations by stabilizing the movement of your lens when your shutter is open longer, and honestly, they work wonders for those instances where you can’t work on a tripod (like weddings, some sporting events, when you’re shooting in a city, or just places where they simply won’t let you set up a tripod). If you’re in one of those situations, I highly recommend these VR or IS lenses, but depending on which one you use, there are some rules about when you should turn them off. For example, we’ll start with Nikon. If you are shooting on a tripod with a Nikon VR lens, to get sharper images, turn the VR feature off (you do this right on the lens itself by turning the VR switch to the Off position). The non-technical explanation why is that these VR lenses look for vibration. If they don’t find any, they’ll go looking for it, and that looking for vibration when there is absolutely none can cause (you guessed it) some small vibration. So just follow this simple rule: When you’re hand-holding in anything but bright daylight (where your shutter speeds will already be really fast), turn VR or IS on. When you’re shooting on a tripod, for the sharpest images possible, turn VR or IS off. Now, there are some Nikon VR lenses and some older Canon IS lenses that can be used on a tripod with VR or IS turned on. So, be sure to check the documentation that came with your VR or IS lens to see if yours needs to be turned off.
Shoot at Your Lens’ Sharpest Aperture
Another trick the pros use is, when possible, shoot at your lens’ sharpest aperture. For most lenses, that is about two full stops smaller than wide open (so the f-stop number you use will go higher by two stops). For example, if you had an f/2.8 lens, the sharpest apertures for that lens would be f/5.6 and f/8 (two full stops down from 2.8). Of course, you can’t always choose these apertures, but if you’re in a situation where you can (and we’ll talk about this later in the book), then shooting two stops down from wide open will usually give you the sharpest image your lens can deliver. Now, that being said, this isn’t true for all lenses, and if that’s not the case with your lens, you’ll find your lens’ sweet spot (its sharpest aperture) in short order if you keep an eye out for which aperture your sharpest images seem to come from. You can do that by looking at your photos’ EXIF data (the background information on your shots embedded by your digital camera into the photos themselves) in Photoshop by going under Photoshop’s File menu and choosing File Info. Then, click on Camera Data. It will show the aperture your shot was taken at. If you find most of your sharpest shots are taken with a particular aperture, then you’ve found your sweet spot. However, don’t let this override the most important reason you choose a particular aperture, and that is to give you the depth of field you need for a particular shot. But it’s just nice to know which f-stop to choose when your main concern is sharpness, not controlling depth of field.
Good Glass Makes a Big Difference
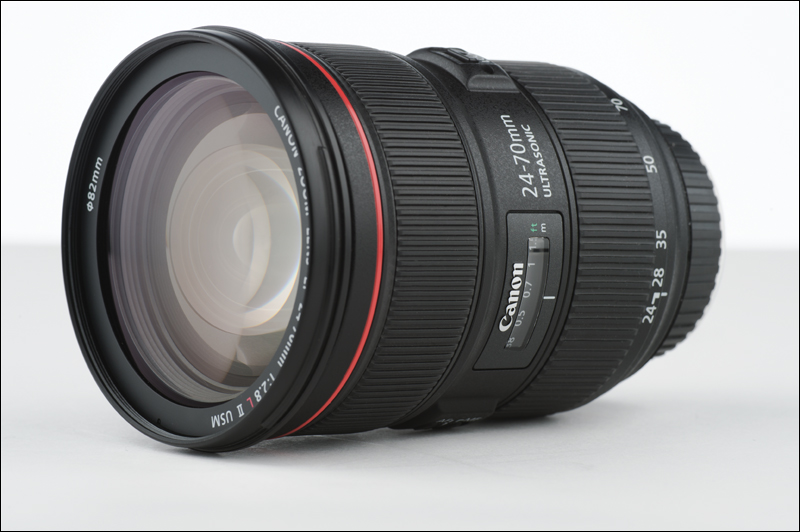
Does buying a really good lens make that big a difference in sharpness? Absolutely! I went shooting with a friend in Zion National Park in Utah. He had just bought a brand new Canon EF 24–70mm f/2.8L II, which is a tack-sharp lens. It’s not cheap, but like anything else in photography (and in life), the really good stuff costs more. His other lens was a fairly inexpensive telephoto zoom he had been using for a few years. Once he saw the difference in sharpness between his new, good quality lens and his cheap lens, he refused to shoot with the telephoto again. He had been shooting with it for years, and in one day, after seeing what a difference a really sharp lens made, he wouldn’t shoot with his old lens again. So, if you’re thinking of buying a zoom lens for $295, sharpness clearly isn’t your biggest priority. A quality lens is an investment, and as long as you take decent care of it, it will give you crystal clear photos that inexpensive lenses just can’t deliver.

Avoid Increasing Your ISO on a Tripod
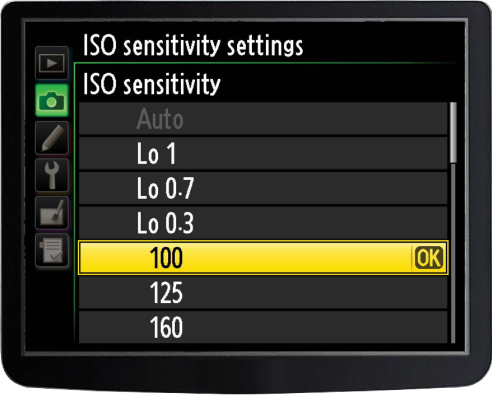
When you’re shooting on a tripod, even in very dim or low light, don’t increase your ISO (your digital equivalent of film speed). Keep your ISO at the lowest ISO setting your camera allows (ISO 200, 100, as shown on the Nikon menu above, or 50, if your camera’s ISO goes that low) for the sharpest, cleanest photos. Raising the ISO adds noise to your photos, and you don’t want that (of course, if you’re hand-holding and have no choice, like when shooting a wedding in the low lighting of a church, then increasing the ISO is a necessity, but when shooting on a tripod, avoid high ISOs like the plague—you’ll have cleaner, sharper images every time).
Zoom In to Check Sharpness
Here’s a sad fact of digital photography—everything looks sharp and in focus when you first look at the tiny LCD screen on the back of your digital camera. When your photo is displayed at that small size, it just about always looks sharp. However, you’ll soon learn (once you open your photo on your computer) that you absolutely can’t trust that tiny little screen—you’ve got to zoom in and check the sharpness. On the back of your camera there’s a zoom button that lets you zoom in close to see if the photo is really in focus. Do this right on the spot, right after you take the shot, so you still have a chance to retake the photo if you zoom in and find out it’s blurry. The pros always check for sharpness this way, because they’ve been burned one too many times.
Sharpening After the Fact in Photoshop
If you’ve followed all the tips in this chapter thus far, and you’ve got some nice crisp photos, you can still make your photos look even that much sharper by adding sharpening in either Adobe Photoshop (the software darkroom tool the pros use) or Adobe Photoshop Elements (the semi-pro version). Now, which photos need to be sharpened using Photoshop? All of them. We sharpen every single photo we shoot using Photoshop’s Unsharp Mask filter. Okay, it sounds like something named “unsharp” would make your photos blurry, but it doesn’t—the name is a holdover from traditional darkroom techniques, so don’t let that throw you. Using it is easy. Just open your photo in Photoshop, then go under Photoshop’s Filter menu, under Sharpen, and choose Unsharp Mask. When the dialog appears, there are three sliders for applying different sharpening parameters, but rather than going through all that technical stuff, I’m going to give you five sets of settings that I’ve found work wonders.
(1) For people: Amount 150%, Radius 1, Threshold 10
(2) For cityscapes, urban photography, or travel: Amount 65%, Radius 3, Threshold 2
(3) For general everyday use: Amount 120%, Radius 1, Threshold 3
(4) For super-sharpening (for sports photos, landscapes, stuff with lots of details): Amount 95%, Radius 1.5, Threshold 1
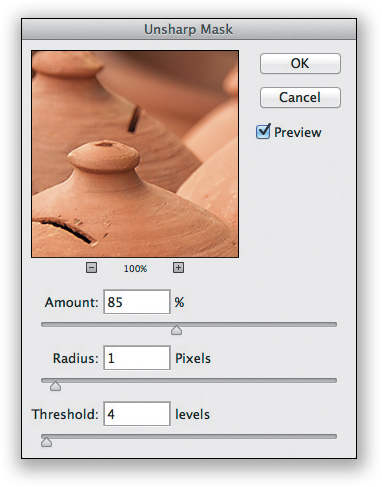
(5) For images I’ve already made smaller and lower resolution, so I can post them on the web: Amount 85%, Radius 1, Threshold 4
Did You Resize That for the Web? Then Resharpen!
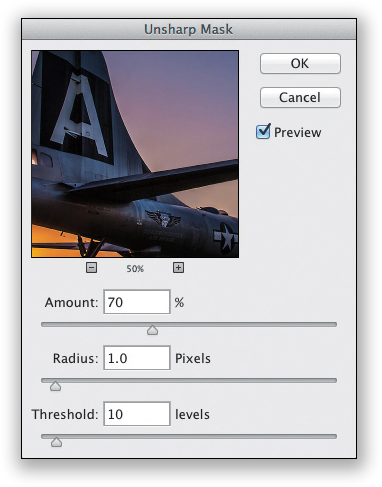
If you take a shot, open it in Photoshop (or Photoshop Elements), and apply the Unsharp Mask filter to it (see the previous page), and then you lower the image size and resolution so you can post it on the web, you need to apply the Unsharp Mask filter again with just a little bit of sharpening. Here’s why: when you lower the image size and resolution, it loses some of its sharpness during that resize, so I always go back and apply a tiny bit of sharpening to bring back what I just lost. I generally use this Unsharp Mask setting as a starting place: Amount: 70%, Radius: 1.0, Threshold: 10, but before I click the OK button, I simply look at the photo to make sure that it doesn’t look oversharpened. If it looks a bit too sharp now, just lower the Amount to 50 and see how that looks. Still too sharp? Drop it down to 40, or even 30 (I’ve never gone below 30, but this is a call only you, as the “sharpener,” can make).
Hand-Held Sharpness Trick
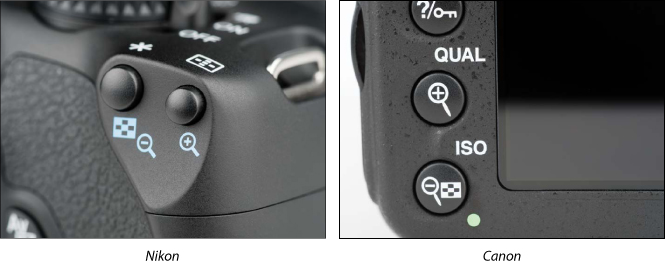
Anytime you’re hand-holding your camera in anything but nice direct sunlight, you’re taking your chances on getting a sharply focused photo because of camera shake, right? Well, the next time you’re hand-holding in less than optimal light, and you’re concerned that you might not get a tack-sharp image, try a trick the pros use in this sticky situation—switch to continuous shooting (burst) mode and hold down the shutter release to take a burst of photos instead of just one or two. Chances are at least one of those dozen or so photos is going to be tack sharp, and if it’s an important shot, it can often save the day. I’ve used this on numerous occasions and it has saved my butt more than once. (Sony’s continuous shooting mode button is pictured above. See Chapter 5 for more on shooting in continuous [burst] mode with both Nikon and Canon cameras.)
Getting Steadier Hand-Held Shots
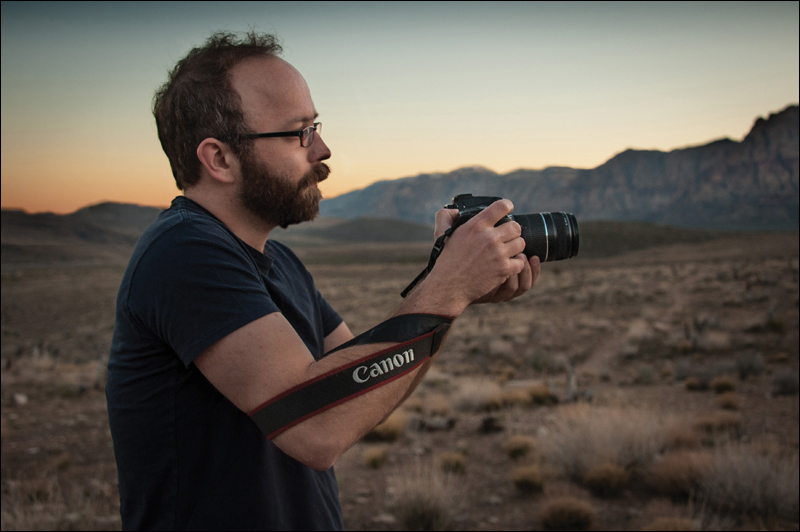
I picked up this trick from photographer Joel Lipovetsky when we were out on a shoot and I saw him hand-holding his camera with his camera strap twisted into what he called “The Death Grip.” It’s designed to give you extra stability and sharper shots while hand-holding your camera by wrapping your camera strap around your arm (just above the elbow), then wrapping it around the outside of your wrist (as shown above) and pulling the strap pretty tight, which makes your camera more stable in your hand. You can see how it wraps in the photo above, but the pose is just for illustrative purposes—you still would hold the camera up to your eye and look through the viewfinder as always. Thanks to Joel for sharing this surprisingly cool tip.