
Hour 17. Animations
What You’ll Learn in This Hour:
• The requirements for animation
• How to prepare a model for animation
• How to apply animations
• How to trigger animations via scripts
In this hour you are going to learn about animations in Unity. You will start by learning exactly what animations are and what is required for them to work. After that, you will look at an actual model and see how to get it ready for animations. From there, you will learn about the anatomy of an animation and apply it to a model. You will wrap the hour up by learning to trigger animations through scripts.
Note: Animation Systems
In Unity there are two systems that can be used for animation. In this hour you are going to look at the legacy animation system. You will be controlling your characters on a very granular level. Don’t worry though, in the next hour you will be looking at the new Mecanim animation system and get to play with the new and powerful animation controller.
Animation Basics
Animations are premade sets of visual motions. In a 2D game, this involves having several sequential images that can be flipped through very quickly. The result is that the object appears to be moving. This effect is similar to an old fashioned flip book. Animation in a 3D world is much different. In 3D games, you use models to represent your game entities. You cannot simply switch between models to give the illusion of motion. Instead, you have to actually move the parts of the model. Doing so requires both a rig and an animation.
The Rig
Animating a model without a rig is impossible (or impossibly difficult). The reason is that without a rig, the computer has no way of knowing which parts of a model are supposed to move, and how they are supposed to move. So what exactly is a rig? Much like a human skeleton (see Figure 17.1), the rig dictates the parts of a model that are rigid, which are often called “bones”. It also dictates which parts can bend. These bendable parts are called “joints”.
Figure 17.1. The skeleton as a rig.
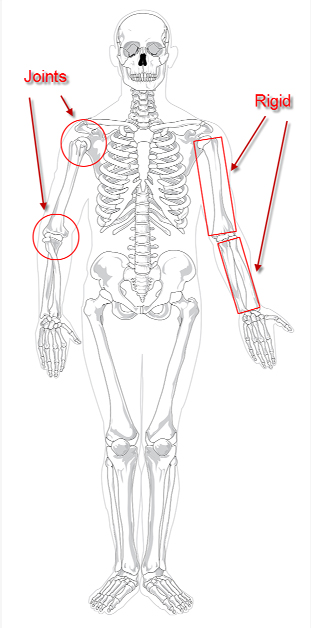
The bones and joints work together to define a physical structure for a model. It is this structure that will be used to actually animate the model.
The Animation
Once a model has a rig, it can be given an animation. On the technical level, an animation is just a series of instructions for the rig (put the right hand in; pull the right hand out; now put the right hand in and shake it all about). These instructions can be played just like a movie. They can even be paused, stepped through, or reversed. Furthermore, with a proper rig, changing the action of a model is as simple as changing the animation. Sometimes these animations can event come with instructions that move the entire model in 3D space. The best part of all is that if you have two completely different models that have the same rigging, then the same animations can be applied to each of them identically. Thus, an orc, a human, a giant, and a werewolf can all perform the exact same dance animation.
Note: 3D Artists Wanted
The truth about animation is that most of the work is done outside of programs like Unity. Generally speaking, the modeling, texturing, rigging, and animations are all created by professionals known as 3D artists in programs like Blender, Maya, 3D Studio Max, or any other 3D creation software. Creating these assets requires a significant amount of skill and practice. As such, their creation will not be covered in this text. Instead, this book will show you how to take already made assets and put them together in Unity to build interactive experiences. Remember that there is more to making a game than simply putting pieces together. You may make a game work, but artists make it look good!
Preparing a Model for Animation
There isn’t much that needs to be done to properly prepare a model for animation. Hopefully the process of rigging the model has already been completed. If it hasn’t, it will need to be done before importing into Unity. In this section, you will begin working with a model that has already been rigged and you will be acquiring animations specifically made for the model. In a real production environment, either you are some other 3D artist will need to develop these items before they can be used in Unity.
In this section, you will be acquiring a model from the Unity Asset Store. This model will come with a lot of different items, and you will be going through each piece to ensure that it is configured properly. To access the Unity Asset Store, click “Window->Asset Store”. You may be asked to log in. If you are, just use the log in that you created in Hour 1. Once the asset store is loaded, locate the search window and search for “Warrior” (see Figure 17.2).
Figure 17.2. The asset store search bar.

Locate the free model “3dsmax Bip Warrior Anim Free” and click “Import” (see Figure 17.3). When the “Import Package” dialog appears, ensure that everything is selected and click “Import”.
Figure 17.3. The required model.

You should now notice a new folder on your project view named “3dsmax Bip Warrior Anim Free”. Take a moment to familiarize yourself with the contents of that folder as you will be using them for the rest of this hour.
Note: Demo
The soldier model comes with a demo scene. This demo can be found in the folder “Scenes” under the folder “3dsmax Bip Warrior Anim Free”. Opening this scene will allow you to test out the model with the various animations applied.
The Model
The model that you will be using can be located in the “Models” folder under the newly created “3dsmax Bip Warrior Anim Free” folder. The model is named “Soldier_f_0”. Locate the model and select it. In the inspector view, you should see three primary tabs: “Model”, “Rig”, and “Animations” (see Figure 17.4).
Figure 17.4. The model inspector view.

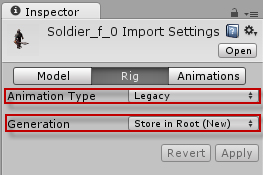
The “Model” tab is responsible for all of the settings that dictate how the model itself is imported into Unity. These items can be safely ignored for the purposes of this hour. The two tabs you are concerned with are the “Rig” and “Animations” tab. Under the “Rig” tab, ensure that the “Animation Type” property is set to “Legacy” and that the “Generation” property is set to “Store in Root (new)”. Figure 17.5 demonstrates the proper settings:
Figure 17.5. The “Rig” settings.
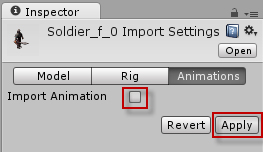
Next, is the “Animations” tab. Often, animations come as a part of the models. This is nice because you don’t have to manage multiple files and can instead keep everything packaged together. The “Animations” tab contains all of the properties and control required to manage built-in animation. For the purposes of this text and for learning, however, these will be disabled. Under the “Animations” tab, uncheck the “Import Animation” check box and then click “Apply”. Your screen should now match Figure 17.6:
Figure 17.6. The “Animations” settings.
Tip: Is the Model Rigged?
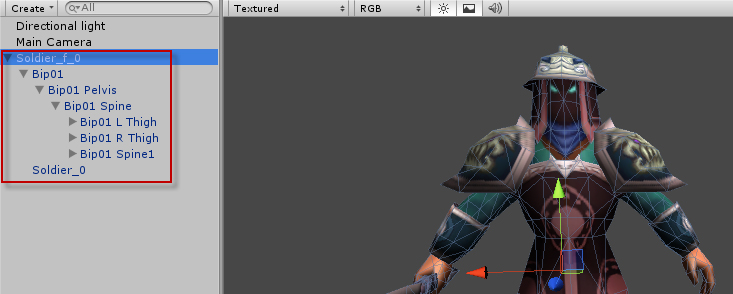
You may be wondering how to know if a model is rigged or not. The easiest way to know is to ask whoever made the model. If that isn’t possible, you can always look at the model in the hierarchy view. Generally, a rigged model will contain several child game objects. These objects will correspond with the various rigging joints. Figure 17.7 illustrates some of the child objects that you can use to determine that the model is rigged.
Figure 17.7. The soldier child objects.
Animation Assets
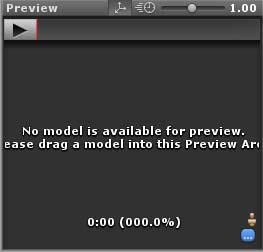
The next thing you will want to do is look through the animation assets and ensure that they are set up the way you want. Locate the “Animations” folder under the “3dsmax Bip Warrior Anim Free” folder. This folder contains four available animations: “death”, “idle0”, “idle1”, and “idle2”. Selecting any of these animation assets will allow you to modify their “Wrap Mode” and preview them. Before previewing an animation, however, you will need to provide a model. Figure 17.8 illustrates what the preview window looks like before a model is provided:
Figure 17.8. The preview window with no available model.
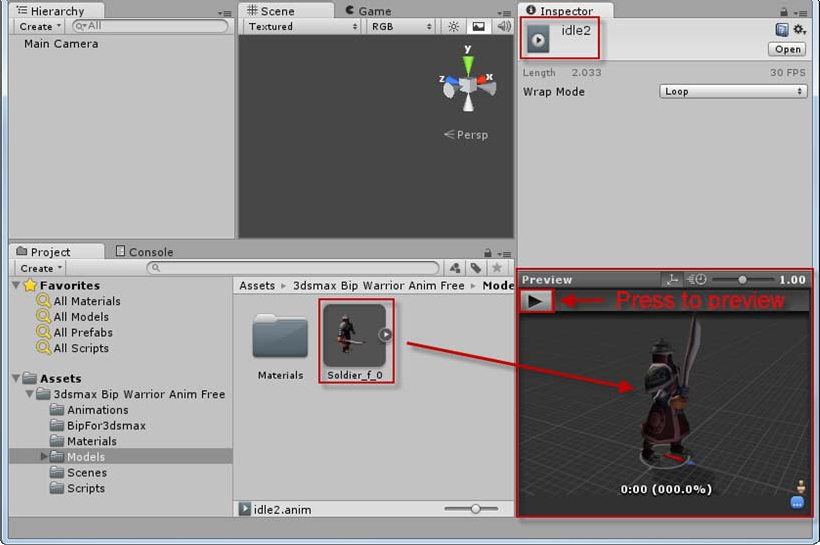
To remedy this, simple click and drag the “Soldier_f_0” model from the “Models” folder into the preview window for the animation (see Figure 17.9).
Figure 17.9. Adding a model to the preview window.
Once that is done, simply click the play button to preview the animation on that model. Take a moment to preview each of the four animations. Don’t worry about the “Wrap Mode” property for now. That will be covered in greater detail later this hour.
Applying Animations
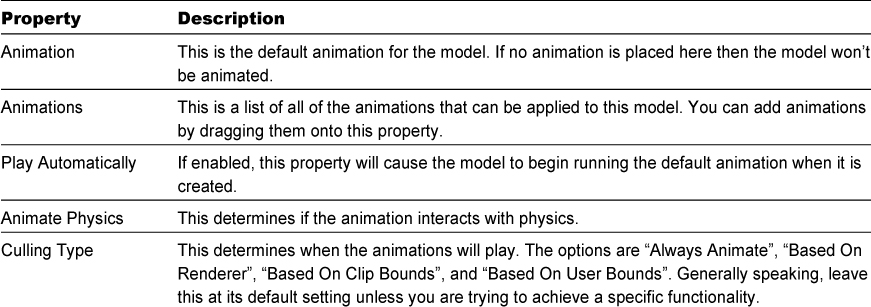
As you saw in the previous section, the soldier model has an “Animation” component attached to it. This component works as a collection of different animations that can be applied to the model at run time. Table 17.1 contains a list of the animation component’s properties and their descriptions:
Table 17.1. Animation Component Properties
Adding Animations
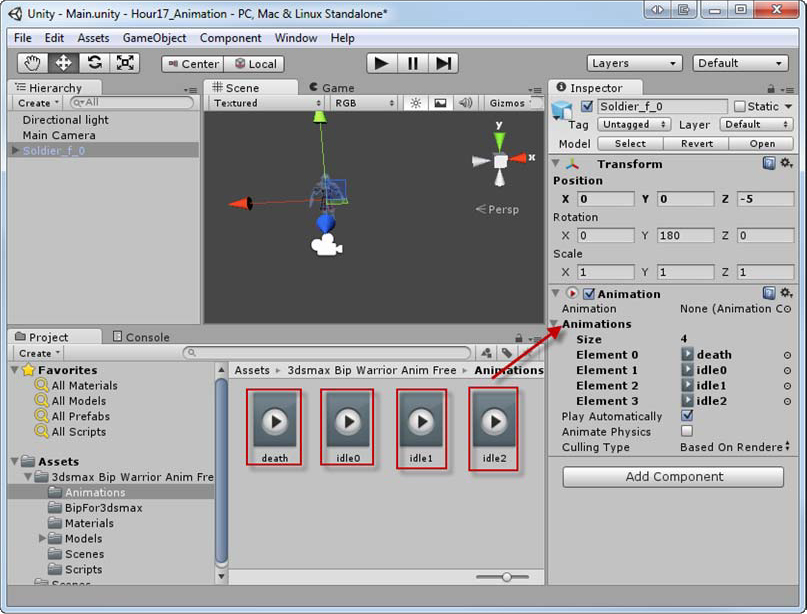
As mentioned above, animations can be applied to a model by dragging them onto the “Animations” property of the “Animation” component (see Figure 17.10).
Figure 17.10. Adding animations to the model.
Doing this simply makes the animations available to the model. It doesn’t actually animate the model, yet. Switching through the various animations is done via scripting and will be covered in the next section. By now you are probably pretty anxious to actually see an animation work. To see an animation run on your model, drag the animation you want onto the “Animation” property of the “Animation” component. This will set the default animation for the model. Ensure that the “Play Automatically” option is also set. Now when you run your scene you will see the model actually move!
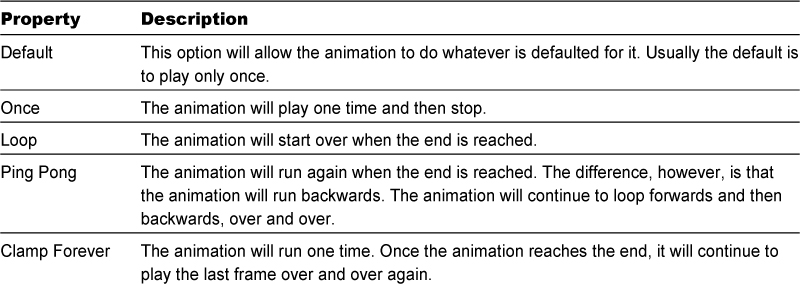
Wrap Modes
Previously you looked at the animation assets in the inspector view. You may have noticed that there was a property called “Wrap Mode” that you skipped over. Essentially, the wrap mode determines what an animation does once it is done running. Table 17.2 contains the five different modes and their descriptions:
Scripting Animations
While it is nice to have a model running a looping idle animation, it can get a bit boring. More than likely, you will need your models to do something other than just loop the same animation. As you saw previously, you can add a bunch of animations to the “Animations” property of an animation component. What you haven’t seen, though, is how to switch between them while the scene is running. While a lot of complex functionality can be achieved through scripting, you are going to focus primarily on just playing animations in this section. More advanced animation scripting will be covered in the next hour.
To play an animation on a model, you will need to use the transform.animation.Play() method. For instance, to play an animation called “walk” you would write:
transform.animation.Play("walk");
Animations can be changed at any time simply by playing another animation. If an animation is set to loop, it will do so automatically.
Summary
This hour you were introduced to animations in Unity. You started by looking at the basics of animations. You learned about animations and rigging. From there you imported a rigged model and animations from the asset store. After that you applied animations to the model and saw them in a running scene. You finished the hour by learning how to change animations via scripting.
Tip: Animations Not Working
After completing this hour you may try to animate some of your own models (or others on the asset store). Just remember that if you apply the animations correctly and the model still doesn’t move, the problem is likely that the model is rigged differently than the animation. This tip is just a reminder that the model and animation have to be rigged the same. Otherwise you are likely to bang your head against the wall in frustration.
Q&A
Q. Can animations be blended together?
A. Yes they can. This will be covered next hour with the new Unity Mecanim system.
Q. Can any animation be applied to any model?
A. Only if they are rigged exactly the same. Otherwise, the animations may behave very strangely or just not work at all.
Q. Can a model be re-rigged in Unity?
A. Yes, and you will see how next hour.
Workshop
Take some time to work through the questions here to ensure you have a firm grasp on the material.
Quiz
1. The “skeleton” of a model is known as what?
2. Which wrap mode plays an animation forwards and then backwards while looping?
3. True or False: The “Animation” property of the “Animation” component contains all of the available animations for a model?
4. True or False: Animations are played using the transform.animation.Play() method.
Answers
1. The “rig” or “rigging”.
2. Ping Pong mode.
3. False. The “Animation” property is the default animation while the “Animations” property is the collection.
4. True.
Exercise
In this exercise you will be creating a script to change animations on the fly using the number keys. The completed solution for this exercise can be found in the book assets for Hour 17 named “Hour17_Exercise”. This exercise uses the scene created in the previous exercise “Adding the Soldier to a Scene”.
1. Open the previously created scene. Ensure that “idle0” is the default animation of the soldier. Ensure that the “Animations” property of the “Animation” component has been filled with the four animations you have been using.
2. Create a new script called “SoldierScript” and attach it to the soldier model currently in the scene. Add the following code to the Start() method of the script:
void Start() {
transform.animation.Play("idle0");
else if(Input.GetKeyDown(KeyCode.Alpha2))
transform.animation.Play("idle1");
else if(Input.GetKeyDown(KeyCode.Alpha3))
transform.animation.Play("idle2");
else if(Input.GetKeyDown(KeyCode.Alpha4))
transform.animation.Play("death");
}
3. Run the scene and notice that the character is looping the “idle0” animation. Press the “2” key and notice that the animation changed. Experiment with the keys 1-4 and see how they change the animation. Note: this does not work with the numpad keys as it is specifically programmed to work with the numbers keys above the letter rows.