
Hour 19. Game 4: Gauntlet Runner
What You’ll Learn in This Hour:
• How to design the game Gauntlet Runner
• How to build the Gauntlet Runner world
• How to build the Gauntlet Runner entities
• How to build the Gauntlet Runner controls
• How to further improve Gauntlet Runner
Let’s make a game! In this Hour we will be making a 3D gauntlet running game appropriately titled Gauntlet Runner. You will start the hour off with the design of the game. From there you will focus on building the world. Once done, you will build the entities and controls. You will wrap the hour up by playing the game and seeing where improvements can be found.
Tip: Completed Project
Be sure to follow along in this hour to build the complete game project. If you get stuck, however, a completed copy of the game can be found in the book assets for Hour 18. Take a look at it if you need help or inspiration!
Design
You have already learned what the design elements are in Hour 7. This time you will get right into them.
The Concept
In this game, you will be playing as a robot running through a gauntlet tunnel. You will be attempting to grab power ups to extend your game time. You will need to avoid obstacles which will slow you down. The game ends when you run out of time.
The Rules
The rules for this game will state how to play, but will also allude to some of the properties of the objects. The rules for Gauntlet Runner are as follows:
• The player can move left or right and jump. They run at a fixed pace and cannot move in any other manner.
• If the player hits an obstacle, they will be slowed by 50% for 1 second.
• If the player grabs a power up their time will be extended by 1.5 seconds.
• The player will be bounded by the sides of the screen.
• The loss condition for the game is running out of time. There is no win condition.
The Requirements
The requirements for this game are very simple. The requirements for Gauntlet Runner are:
• A gauntlet texture.
• A player model.
• A power up and obstacle. These will be created in Unity.
• A game controller. This will be created in Unity.
• A power up particle effect. This will be created in Unity.
• Interactive scripts. These will be written in MonoDevelop.
The World
The world for this game will simply be 3 cubes configured to look like a gauntlet. The entire set up will be fairly basic, as it’s the other components of the game that add challenge and fun.
The Scene
Before setting up the ground with its functionality, you should get your scene set up and ready to go. To prepare the scene, do the following:
1. Create a new project called Gauntlet Runner. Create a new folder called “Scenes” and save your scene as “Main” in that folder.
2. Add a directional light to your scene.
3. Position the main camera at (0, 3, -10.7) with a rotation of (33, 0, 0). Save your scene.
The camera for this game will be in a fixed position hovering over the gameplay. The rest of the world will pass underneath it.
The Ground
The ground in this game will be scrolling in nature; however, unlike the scrolling background used in Captain Blaster, you will not actually be scrolling anything. This will be explained more in the next section, but for now just understand that you will only need to create one ground object to make the scrolling work. The ground itself will consist of 3 basic cubes and a simple texture. To create the ground:
1. Add a cube to the scene. Name it “Ground” and position it at (0, 0, 15.5) with a scale of (10, .5, 50). Add another cube to the scene named “Wall” and position it at (-5.5, .7, 15.5) with a scale of (1, 1, 50). Duplicate the wall piece and position the new wall items at (5.5, .7, 15.5).
2. Create two new folders: “Textures” and “Materials”. In the book assets for Hour 19, locate the “Checker.tga” file and drag it into the “Textures” folder. In the materials folder, create a new material named “GroundMaterial”.
3. Set the texture of “GroundMaterial” to be the “Checker” file that you just imported. Modify the “Main Color” property of the material to give it a slight reddish color. Apply the material to the ground and walls.
That’s it! The ground is fairly basic.
Scrolling the Ground
You have seen before that you can scroll a background by creating two instances of that background and moving them in a “leap frog” manner. In this game, you are going to use a more clever solution. Each material has a set of texture offsets. These can be seen in the inspector when a material is selected. What you want to do it modify those offsets at runtime via a script. If the texture is set to repeat (which it is by default), then the texture will loop around seamlessly. The result, if done correctly, is a seemingly scrolling object without any actual movement. To create this effect:
1. Create a new folder named “Scripts”. Create a new script called “GroundScript”. Attach the script to both the ground and the walls.
2. Add the following code to the script (you will replace the Update() method that is already there):
float speed = .5f;
void Update () {
float offset = Time.time * speed;
renderer.material.mainTextureOffset = new Vector2(0, -offset);
}
public void SlowDown()
{
speed = speed / 2;
}
public void SpeedUp()
{
speed = speed * 2;
}
3. Run the scene and notice your gauntlet “scrolling”. This is an easy and efficient way to create a scrolling 3D object.
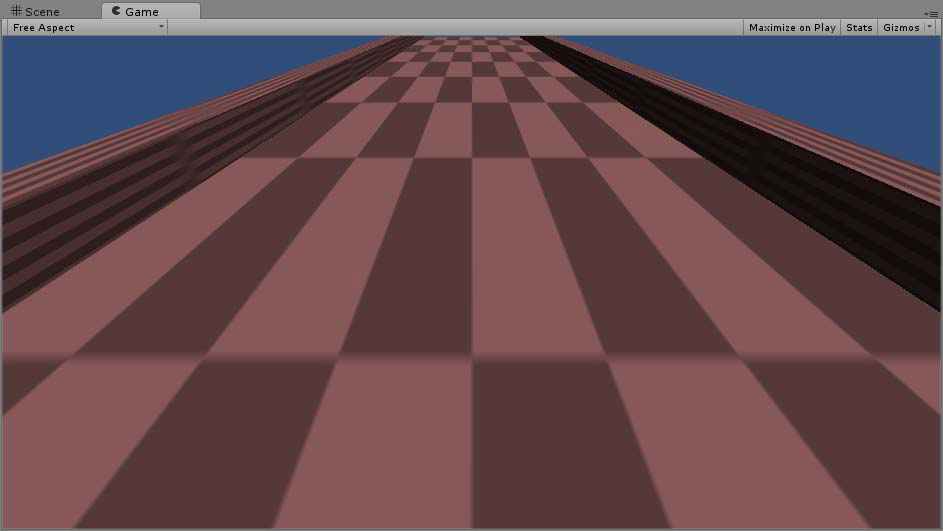
You may have noticed the two additional methods in the script above: “SlowDown” and “SpeedUp”. These aren’t used now, but they will be necessary later when the player hits an obstacle. Figure 19.1 illustrates the running scene set up as described above.
Figure 19.1. The running gauntlet.
The Entities
Now that you have a scrolling world, it is time to set up the entities. There are four primary entities to be aware of: the player, the power ups, the obstacles, and a trigger zone. The trigger zone will be used to clean up any items that make it past the player. You will not need to create a spawn point for this game. Instead, you are going to explore a different way of handling it by letting the game control create the power ups and obstacles.
The Power Ups
The power ups in this game are going to be simple spheres with some effects added to it. You will be creating the sphere, positioning it and then making a prefab out of it. To create the powerup:
1. Add a sphere to the scene. Position the sphere at (0, 1, 42). Add a rigidbody to the sphere and uncheck “Use Gravity”.
2. Create a new material named “PowerupMaterial” and give it a yellow color. Apply the material to the sphere.
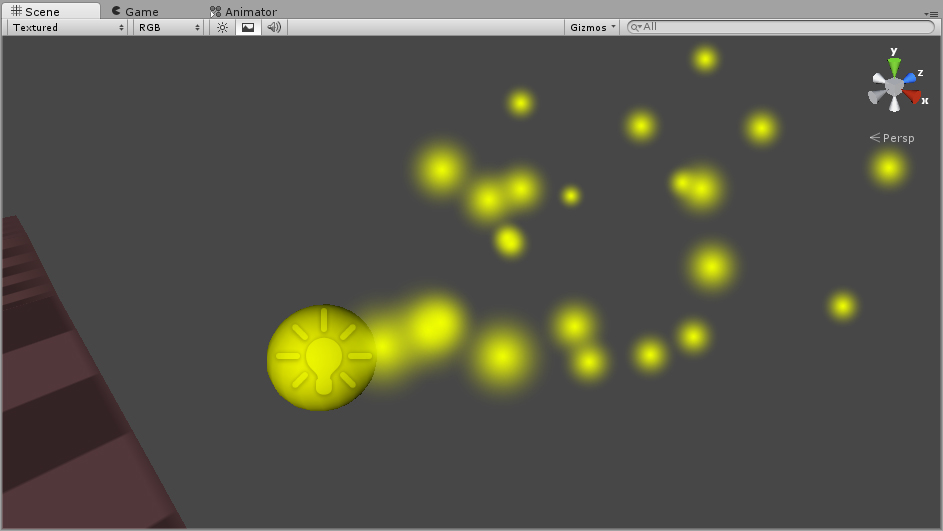
3. Add a point light to the sphere (click “Component->Rendering->Light”). Give the light a yellow color. Add a particle system to the sphere (click “Component->Effects->Particle System”). Give the particles a yellow color and a “Start Lifetime” of 2.5.
4. Create a new folder called “Prefabs”. Create a new prefab in the folder and name it “Powerup”. Click and drag the sphere from the hierarchy view onto the prefab. Delete the sphere from the scene.
Note that by setting the position of the object before putting it into the prefab, you can simply instantiate the prefab and it will appear at that spot. The result is that you will not need a spawn point. Figure 19.2 illustrates the finished power up.
The Obstacles
For this game, the obstacles will be represented by small black cubes. The player will have the option of either avoiding them or jumping over them. To create the obstacles:
1. Add a cube to the scene. Position it at (0, .4, 42) with a scale of (1, .2, 1). Add a rigidbody to the cube and uncheck “Use Gravity”.
2. Create a new material called “ObstacleMaterial”. Make the color of the material black and apply it to the cube.
3. Create a new prefab named “Obstacle”. Drag the cube from the hierarchy onto the prefab and then delete the cube.
The Trigger Zone
Just like in previous games, the trigger zone exists to clean up any game objects that make it past the player. To create the trigger zone:
1. Add a cube to the scene. Rename the cube “TriggerZone” and position it at (0, 1, -20) with a scale of (10, 1, 1).
2. On the “Collider” component of the trigger zone, put a check mark in the “Is Trigger” property.
The Player
The player is where a large portion of the work for this game will go. The player will be using two new animations that you haven’t worked with yet: run and jump. You’ll start by getting the player ready for Mecanim animations:
1. Locate the folder named “Robot Kyle” in the book assets for Hour 19. This is a model provided free to use by Unity, but to save the time from finding it on the asset store, has been provided here. Drag that folder into the project view in Unity to import it.
2. Locate and select the “Robot Kyle.fbx” file in the “Model” folder under the “Robot Kyle” folder. In the inspector, select the “Animations” tab and deselect “Import Animation”. Click “Apply”.
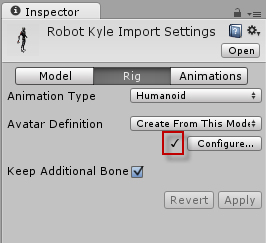
3. Under the “Rig” tab, change the “Animation Type” to “Humanoid”. Click “Apply”.
You should now see a check mark next to the “Configure” button (see Figure 19.3). If you don’t, you will need to click “Configure” and configure the rig. Instructions on doing this can be found in Hour 18: Animators (though it shouldn’t be necessary).
Figure 19.3. The “Rig” settings.
You will now need to get the animations ready to be placed in an animator:
1. Locate the “Animations” folder in the book assets for Hour 19. Drag the folder into the project view in Unity to import it.
2. In the newly imported “Animations” folder, locate the “Jump.fbx” file and select it. In the inspector, click the “Rig” tab and change the “Animation Type” to “Humanoid”. Click “Apply”.
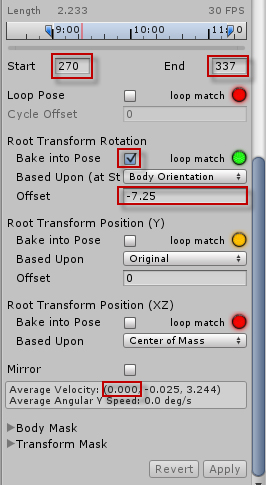
3. Under the “Animations” tab, change the properties of the jump animation to match Figure 19.4. Note that the “Offset” property under the “Root Transform Rotation” property might need to be different from the one in the image. What is important is that the “Average Velocity” has a value of 0 for the x axis. Click “Apply”.
Figure 19.4. Properties for the jump animation.
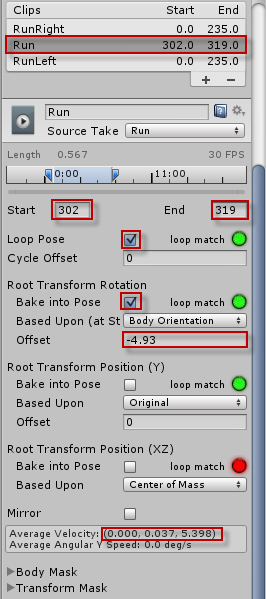
4. Select the “Runs.fbx” file in the “Animations folder. Complete step 2 above again to correct the rig for this model. Under the “Animations” tab notice that there are three clips: “RunRight”, “Run”, and “RunLeft”. Select “Run” and ensure the properties match Figure 19.5 below. Again, the important part is that the x axis value for the “Average Velocity” property is 0. Click “Apply”.
Figure 19.5. The run animation properties.
Now that the animations are prepared, you can begin making the animator. This will be a simple two-state animator without the need for any blending trees. To prepare the animator:
1. Create a new folder called “Animators”. Create a new animator in the folder (right click and select “Create->Animtor Controller”. Name is “PlayerAnimator”.
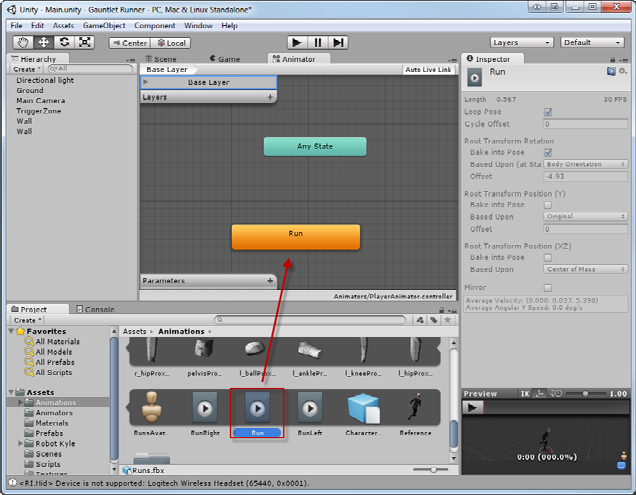
2. Double click the animator to open the animator view. In the “Animations” folder, locate the “Runs.fbx” file by clicking the arrow to the right of it. In the expanded model, locate the “Run” animation clip and drag it onto the animator view (see Figure 19.6). Click the newly created “Run” state and in the inspector put a check mark in the “Foot IK” property.
Figure 19.6. The adding the “Run” animation clip.
3. Locate the “Jump.fbx” file in the “Animations” folder. Expand the file and locate the “Jump” animation clip. Drag the clip onto the animator view. Click the newly created “Jump” state and in the inspector put a check mark in the “Foot IK” property and change the “Speed” property to 1.25.
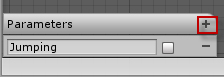
4. Add a new parameter to the animator by clicking the plus sign (+) in the “Parameters” box in the animator view. The parameter should be a “Bool” named “Jumping” (see Figure 19.7).
Figure 19.7. Adding the “Jumping” parameter.
5. Right click the “Run” state in the animator and select “Make Transition”. Click on the “Jump” state to link them together. Right click the “Jump” state and select “Make Transition”. Link it back to the “Run” state.
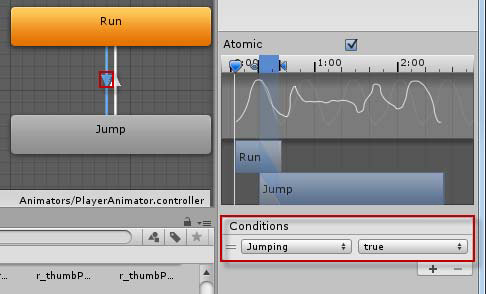
6. Click the white arrow that transitions from “Run” to “Jump”. In the inspector, change the “Conditions” to be when “Jumping” is “True” (see Figure 19.8).
Figure 19.8. The “Run” transition properties.
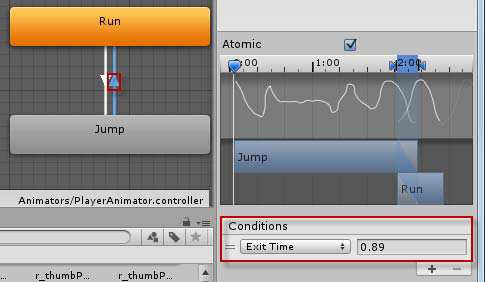
7. Click the white arrow that transitions from “Jump” to “Run”. Ensure that the properties in the inspector match Figure 19.9.
Figure 19.9. The “Jump” transition properties.
Now that the player model is ready for animations, you will need to place it in the scene:
1. Locate the “Robot Kyle.fbx” file and drag it into your scene. Position the robot at (-, .25, -8.5).
2. Add a capsule collider to the model (click “Component->Physics->Capsule Collider”). Set the “Y” value of the collider to .95 and the “Height” of the collider to 1.72.
3. Drag the “PlayerAnimator” onto the “Controller” property of the “Animator” component. Also ensure that the “Apply Root Motion” check box is unchecked.
The player entity should now be set up and ready to go. If you run the scene you should notice the robot running with the gauntlet “moving” underneath it. The effect is that the robot looks like it is running forward.
The Controls
It’s now time to add the controls and interactivity to get this game going. Since the positions for the power ups and obstacles are in the prefabs already, there is no need to create a spawn point. Therefore, most all of the control will be placed on a game control object.
Trigger Zone Script
The first script you will want to make is the one for the trigger zone. Remember that the trigger zone simply destroys any objects that make their way past the player. To create this simply create a new script named “TriggerZoneScript” and attach it to the trigger zone game object. Place the following code in the script:
void OnTriggerEnter(Collider other)
{
Destroy (other.gameObject);
}
The trigger script is very basic and just destroys any object that enters it.
The Game Control Script
This script is where a majority of the work takes place. To start, create an empty game object in the scene and name is “GameControl”. This will simply be a place holder for your scripts. Create a new script named “GameControlScript” and attach it to the game control object you just created. Below is the code for the game control script. There is quite a bit of complexity here, so be sure to read each line carefully to see what it is doing. Add the following code to the script:
public float objectSpeed = -.3f;
float minSpeed = -.15f;
float maxSpeed = -.3f;
public GroundScript ground;
public GroundScript wall1;
public GroundScript wall2;
float timeRemaining = 10;
float timeExtension = 1.5f;
float totalTimeElapsed = 0;
bool isGameOver = false;
void Update () {
if(isGameOver)
return;
totalTimeElapsed += Time.deltaTime;
timeRemaining -= Time.deltaTime;
if(timeRemaining <= 0)
isGameOver = true;
}
public void SlowWorldDown()
{
CancelInvoke("SpeedWorldUp");
objectSpeed = minSpeed;
ground.SlowDown();
wall1.SlowDown();
wall2.SlowDown();
Invoke ("SpeedWorldUp", 1);
}
void SpeedWorldUp()
{
objectSpeed = maxSpeed;
ground.SpeedUp();
wall1.SpeedUp();
wall2.SpeedUp();
}
public void PowerupCollected()
{
timeRemaining += timeExtension;
}
void OnGUI()
{
if(!isGameOver)
{
GUI.Box(new Rect(Screen.width / 2 - 50, Screen.height - 100, 100, 50),
"Time Remaining");
GUI.Label(new Rect(Screen.width / 2 - 10, Screen.height - 80, 20, 40),
((int)timeRemaining).ToString());
}
else
{
GUI.Box(new Rect(Screen.width / 2 - 60, Screen.height / 2 - 100, 120, 50),
"Game Over");
GUI.Label(new Rect(Screen.width / 2 - 55, Screen.height / 2 - 80, 90, 40),
"Total Time: " + (int)totalTimeElapsed);
}
}
Remember that one of the premises of this game is that everything slows down when the player hits an obstacle. Therefore, objects will need to get their speeds from the game control. The first three variables are the current, minimum, and maximum object speeds. You also keep track of the ground and walls so you can slow them down if needed. The remaining variables maintain the game timing and state.
The Update() method keeps track of time. It adds the time since the last frame (Time.deltaTime) to the “totalTimeElapsed” variable. It also checks to see if the game is over, which happens when the time remaining reaches 0. If the game is over, it sets the “isGameOver” flag.
The SlowWorldDown() and SpeedWorldUp() methods work in conjunction. Whenever a player hits an obstacle, the SlowWorldDown() method is called. This method basically slows down all of the objects in the scene. It then calls the Invoke() method. This method basically says: “Call the method written here in X seconds” where the method called is the one named in the quotes and the number of seconds is the second value. You may have noticed the call to CancelInvoke() at the beginning of the SlowWorldDown() method. This basically cancels any SpeedWorldUp() methods waiting to be called because the player hit another obstacle. In the above code, after 1 second, the SpeedWorldUp() method is called. This method speeds everything back up so play can resume like normal.
The PowerupCollected() method is called by the player and adds the extension time to the time remaining.
Finally, the OnGUI method draws the remaining time to the scene while the game is running, and the total time the game lasted once it has ended.
The Player Script
This script has two responsibilities: manage the player movement and collision controls, and manage the animator. Create a new script called “PlayerScript” and attach it to the robot model in the scene. Add the following code to the script:
public GameControlScript control;
Animator anim;
float strafeSpeed = 2;
bool jumping = false;
void Start () {
anim = GetComponent<Animator>();
}
void Update () {
transform.Translate(Input.GetAxis("Horizontal") * Time.deltaTime * strafeSpeed, 0f, 0f);
if(transform.position.x > 3)
transform.position = new Vector3(3, transform.position.y, transform.position.z);
else if(transform.position.x < -3)
transform.position = new Vector3(-3, transform.position.y, transform.position.z);
if (anim.GetCurrentAnimatorStateInfo(0).IsName("Base Layer.Jump"))
{
anim.SetBool("Jumping", false);
jumping = true;
}
else
{
jumping = false;
if(Input.GetButtonDown("Jump"))
anim.SetBool("Jumping", true);
}
}
void OnTriggerEnter(Collider other)
{
if(other.gameObject.name == "Powerup(Clone)")
{
control.PowerupCollected();
}
else if(other.gameObject.name == "Obstacle(Clone)" && jumping == false)
{
control.SlowWorldDown();
}
Destroy(other.gameObject);
}
The first two variables hold the game control and animator references. The second two variables contain the movement related information. The value for the “anim” variable is set in the Start() method.
The Update() method starts by moving the player based on input. It then checks to make sure the player isn’t further than -3 or 3 on the x axis. If the player is, the player is set back to -3 or 3. This keeps the player in the gauntlet. The Update() method then checks to see if the player is currently in the jumping animation. If they are, the local jumping flag is set to true (so the player doesn’t collide with obstacles) and the animator jumping parameter is set to false (so the jump animation doesn’t loop). If the player isn’t currently jumping, the animator sets the appropriate flag and checks to see if the player presses the jump button (space bar by default).
In the OnTriggerEnter() method the script checks to see what the player collided with. If they collided with a power up, the appropriate method is called. In order to collide with an obstacle, the player must also not be jumping. If this is the case, the SlowWorldDown() method is called.
The Powerup and Obstacle Script
The power up and obstacle scripts are completely identical. In fact, they could have been made as a single script. They have been kept separate to make it easy to make differential changes in the future. Create two scripts named “PowerupScript” and “ObstacleScript”. Add the “PowerupScript” to the powerup prefab by selecting the prefab and in the inspector clicking “Add Component->Scripts->Powerup Script”. Do the same for the obstacle prefab and the obstacle script. Add the following to each script:
public GameControlScript control;
void Update () {
transform.Translate(0, 0, control.objectSpeed);
}
This script is very simple. There is a place holder for the game control script. Then, each Update() method call, the object is moved by the control’s current speed. In this way, the control can change the speed of every object in the scene.
The Spawn Script
The spawn script is responsible for creating the objects in this scene. Since position data is in the prefabs, this script will be placed on the game control object. Create a new script called “SpawnScript” and attach it to the “GameControl” object. Add the following code to the script:
GameControlScript control;
public GameObject obstacle;
public GameObject powerup;
float timeElapsed = 0;
float spawnCycle = .5f;
bool spawnPowerup = true;
void Start () {
control = GetComponent<GameControlScript>();
}
void Update () {
timeElapsed += Time.deltaTime;
if(timeElapsed > spawnCycle)
{
GameObject temp;
if(spawnPowerup)
{
temp = (GameObject)Instantiate(powerup);
temp.GetComponent<PowerupScript>().control = control;
Vector3 pos = temp.transform.position;
temp.transform.position = new Vector3(Random.Range(-3, 4), pos.y, pos.z);
}
else
{
temp = (GameObject)Instantiate(obstacle);
temp.GetComponent<ObstacleScript>().control = control;
Vector3 pos = temp.transform.position;
temp.transform.position = new Vector3(Random.Range(-3, 4), pos.y, pos.z);
}
timeElapsed -= spawnCycle;
spawnPowerup = !spawnPowerup;
}
}
The script starts with a reference to the game control script. It also contains a reference to the power up and obstacle game objects. The next variables control the timing and order of the object spawns. The power ups and obstacles will take turns spawning and thus there is a flag to keep track of which one is going.
In the Update() method, the elapsed time is incremented and then checked to see if it is time to spawn a new object. If it is time, the script then checks to see which object it should spawn. It then spawns either a power up or an obstacle. It then passes the reference to the game control script into the new object’s script. This is how the power ups and obstacles know where to find the game control script. The created object is then moved left or right randomly. Finally, the Update() method decreases the elapsed time and flips the power up flag so that the opposite object will be spawned next time.
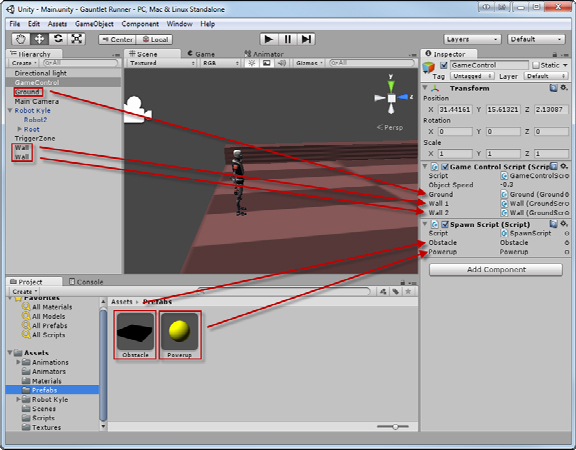
Putting It All Together
This is the last part of the game. You need to link the scripts and objects together. Start by selecting the “GameControl” object in the hierarchy view. Drag the “Ground” and both “Wall” objects to their corresponding properties in the “Game Control Script” component (see Figure 19.10). Drag the “Powerup” and “Obstacle” prefabs onto their corresponding properties in the “Spawn Script” component.
Figure 19.10. Dragging the objects to their properties.
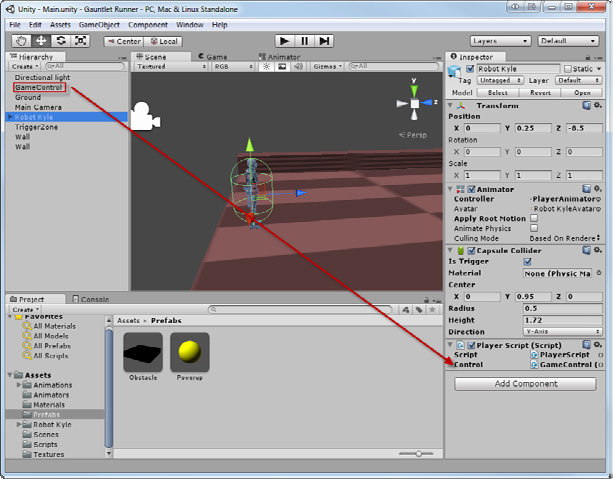
Next, select the “Robot Kyle” model in the hierarchy and drag the “GameControl” object onto the “Control” property of the “Player Script” component (see Figure 19.11).
Figure 19.11. Adding the game control to the player script.
That’s it! The game is now complete and playable.
Room for Improvement
As always, a game is not fully complete until it is tested and adjusted. Now it is time for you to play through the game and see what you like and what you don’t like. Remember to keep track of the features that you think really enhance the gameplay experience. Also keep track of the items you feel detract from the experience. Be sure to make notes on any ideas you have for future iterations of the game. Try to have friends play the game as well and record their feedback about the game. All of these things will help you make the game unique and more enjoyable!
Summary
This hour you made the game Gauntlet Runner. You started by laying out the design elements of the game. From there, you built the gauntlet and got it to scroll using a texture trick. You then built the various entities for your game. After that, you built the various controls and scripts. Last but not least, you play tested the game and recorded some feedback.
Q&A
Q. The movement of the objects and the ground aren’t exactly lined up. Is that normal?
A. In this case, yes. A fine level of testing and tweaking is required to get these to sync up perfectly. This is one element you can focus on refining.
Q. The jumping animation looks a little off. Is that normal?
A. Again, this is normal in this circumstance. The animations used in this hour were provided by Unity for their Mecanim demo. As such, they are being used in a manner they weren’t exactly designed for (they were meant to control the movement of the player). So it looks a little off. Sometimes game development is a manner of doing what you can with the tools you are provided.
Workshop
Take some time to work through the questions here to ensure you have a firm grasp on the material.
Quiz
1. How does the player lose the game?
2. How does the scrolling background work?
3. What two states did you create in the animator?
4. How does the game control the speed of all of the objects in the scene?
Answers
1. The game is lost when time runs out.
2. The gauntlet stays stationary. Instead of moving, the texture is scrolled along the object. The result is that the ground appears to move.
3. Run and Jump.
4. Every object in the scene has a reference to the game control script. The script itself has the speed the objects should travel. Every time an object updates, it gets the speed from the control script to see how fast it should go.
Exercise
It is time for you to attempt to implement some of the changes you noted when playtesting this game. You should make an attempt to make the game unique to you. Hopefully, you were able to identify some weaknesses of the game or some strengths that you would like to improve. Here are some things you can consider changing:
• Try adding new and / or different power ups and obstacles
• Try to refine the object speed to better align with the scrolling ground.
• Try to increase or decrease the difficulty by changing how often power ups and obstacles spawn. Also change how much time is added by power ups or how long the world is slowed. You could even try to adjust how much the world is slowed or give different objects different slowed speeds.
• Give the power ups and / or obstacles a new look. Player around with textures and particle effects to make them look awesome!