
Hour 7. Game 1: Amazing Racer
What You’ll Learn in This Hour:
• How to design a basic game
• How to apply your knowledge of terrain to build a game specific world
• How to add objects to a game to provide interactivity
• How to playtest and tweak a finished game
This hour you will be taking what you have learned so far and using it to build your very first Unity game. You will start by covering the basic design elements of the game. From there, you will build the world that the game will take place in. Once done, you will add some interactivity objects to make the game playable. You will finish by playing the game and making any necessary tweaks to improve the experience.
Tip: Completed Project
Be sure to follow along in this hour to build the complete game project. If you get stuck, however, a completed copy of the game can be found in the book assets for Hour 7. Take a look at it if you need help or inspiration!
Design
The design portion of game development is where you plan ahead of time all of the major features and components of a game. You can think if it as laying down the blueprint so that the actual construction process is much smoother. Normally, when making a game a lot of time is spent working through the design. Since the game you will be making in this hour is fairly basic, the design phase will go faster. You will need to focus on three areas of planning to make this game: the concept, the rules, and the requirements.
The Concept
The idea behind this game is very simple. You will start at one end of an area and run quickly to the other side. There will be hills, trees, and obstacles in your path. Your goal will be to see how fast you can make it to the finish zone. An image of the game This game concept was chosen for your first game as it highlights all of the sections you have worked on so far. Also, since you have not learned scripting in Unity yet, you aren’t able to add very elaborate interactions. Future games will be more complex.
The Rules
Every game must have a set of rules. The rules serve two purposes. First, they tell you how the player will actually play the game. Second, since software is a process of permission, the rules dictate the actions available to the players to overcome challenges. The rules for Amazing Racer are as follows:
• There is no win or loss condition, only a completed condition. The game is completed when the player enters the “finish zone”.
• The player will always “spawn” in the same spot. The finish zone will always be in the same spot.
• There will be water hazards present. Whenever the player falls into a water hazard, they will be moved back to the spawn point.
• The objective of the game is to try to get the fastest time possible. This is an implicit rule and is not specifically built into the game. Instead, cues will be built into the game to hint to the player this goal. The idea is that the player will intuit the desire for a faster time based off of the signals given to them.
Something to always remember when making a game is that software is a “process of permission”. What this means is that unless you specifically allow something, it will be unavailable to the player. For instance, if the player wants to climb a tree, but you have not created any way for the player to climb a tree, that action will not be possible. If you do not give the player the ability to jump, then they can’t jump. Everything that you want the player to be able to do must be explicitly built in. Remember that you cannot assume any action and must plan for everything!
Note: Terminology
Some new terms are used in this hour and will be explained here:
• Spawn – Spawning is the process by which a player or entity enters a game.
• Spawning Point – A spawning point is the place where a player or entity spawns. There can be one or many of these. They can be stationary of moving around.
• Condition – A condition is a form of trigger. A win condition is the event that will cause the player to win the game (such as accumulating enough points). A lost condition is the event that will cause the player to lose the game (such as losing all of your hit points).
• Game Controller – The game controller dictates the rules and flow of a game. It is responsible for knowing when the game is won or lost (or just over). Any object can be designated as the game controller as long as it is always in the scene. Often, an empty object or the main camera will be designated as the game controller.
The Requirements
Another important step in the design process is determining which assets will be required for the game. Generally speaking, a game development team is made up of several individuals. Some will be designing, while others program or make art. Every member of the team needs something to do to be productive during every step of the development process. If everyone waiting until something was needed to begin working, there would be a lot of starting and stopping. Instead, you determine your assets ahead of time so that things can be created before they are needed. Below is a list of all of the requirements for Amazing Racer:
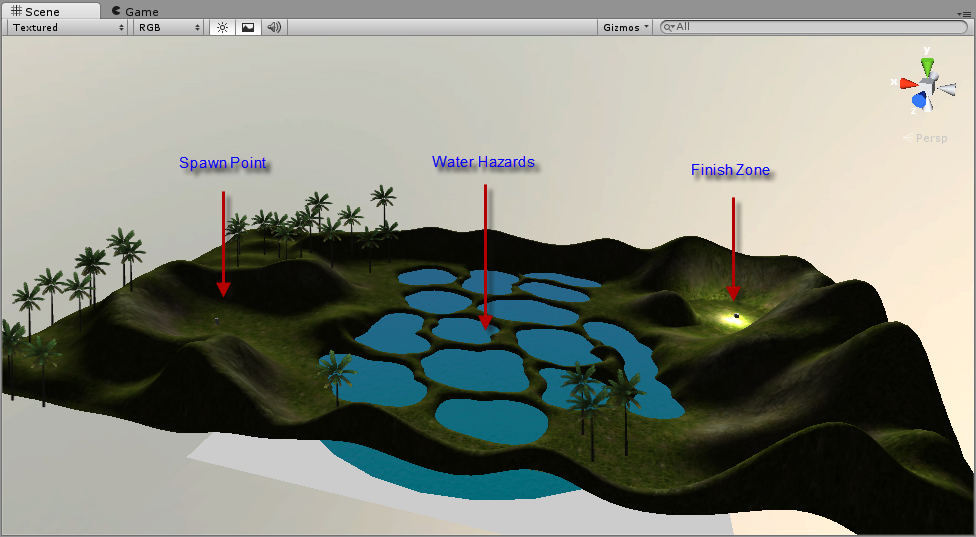
• A piece of rectangular terrain. The terrain needs to be big enough to present a challenging race. The terrain should have obstacles built in as well as a designated spawn and finish point (see Figure 7.1).
Figure 7.1. The general terrain layout for the game Amazing Racer.
• Textures and environment effects for the terrain. These are provided in the Unity standard assets.
• A spawn point object, a finish zone object, and a water hazard object. These will be generated in Unity.
• A character controller. This is provided by the Unity standard assets.
• A Graphic User interface (called a GUI). This will be provided for you in the book assets.
• A game controller. This will be created in Unity.
Creating the Game World
Now that you have the basic idea of the game on paper, it is time to start building it. There are many places to begin building a game. For this project, you will begin with the world. Since this is a linear racing game, the world will be longer than it is wide (or wider than it is long, depending on how you look at it). Many if the Unity standard assets will be used to rapidly create the game.
Sculpting the World
There are many ways you can create this terrain. Everyone will probably have a different vision for it in their head. To streamline the process, a heightmap has been provided for you. This is to ensure that everyone will have the same experiences during this hour. To sculpt the terrain:
1. Create a new project in a folder named “Amazing Racer”. Add a terrain to the project.
2. Set the resolution of the terrain to 200 wide by 100 long and 100 tall (click “Terrain->Set Resolution”).
3. Locate the file “terrain.raw” in the book assets for Hour 7. Import the “terrain.raw” file as a heightmap for the terrain (click “Terrain->Import Heightmap – Raw”).
4. Create a “Scenes” folder under assets and save the current scene as “Main”.
The terrain should now be sculpted to match the world in the book. Feel free to make minor tweaks and changes to your liking.
Caution: Building Your Own Terrain
This hour you will be building a game based off of a heightmap given to you. The heightmap has been prepared for you so that you can quickly get through the process of game development. You may, however, chose to build your own custom world to make this game truly unique and yours. Be warned that if you do that some of the coordinates and rotations provided for you will not match up. If you want to build your own world, you will need to pay attention to intended placement of objects and position them in your world accordingly.
Adding the Environment
At this point you can begin texturing and adding the environment effects to your terrain. You will need to import the following packages (click “Assets->Import Package”):
• Skyboxes.
• Water.
You now have a bit of freedom to decorate the world however you would like. The following steps are guidelines. Feel free to do things in a manner that looks good to you.
• Add a directional light to the scene. Rotate the directional light to suit your preference.
• Texture the terrain. The sample project uses the following textures: “Grass (Hill)” for flat parts, “Cliff (Layered Rock)” for the steep parts, and “Grass&Rock” for the areas in between.
• Add a skybox to the scene (click “Edit->Render Settings”). The sample project uses the “Sunny1 Skybox” for its skybox.
• Add trees to your terrain. Trees should be placed sparsely and mostly on flat surfaces.
• Add some basic water to your scene (drag the “Daylight Simple Water” from the “AssetsStandard AssetsWater (Basic)” folder in the project view). Place the water at (88, 29, 49) and scale it (50, 1, 50).
The terrain should now be prepared and ready to go. Be sure to spend a good amount of time on texturing to make sure you have a good blend and a realistic look. There are some additional things not present in the sample project but that you may want to add. These things are:
• Fog.
• Grass around the water hazards. This may obscure them a bit and add to the difficulty.
• Light flares for the directional light to simulate the sun. You will need to rotate the directional light to match the sun image of the skybox if one is present.
The Character Controller
At this stage of development you will want to add a character controller to your terrain.
1. Import the standard character controllers by clicking “Assets->Import Package->Character Controller”.
2. Drag a “First Person Controller” asset from the “AssetsCharacter Controllers” folder into your scene.
3. Position the first person controller (it will be named “player” and be blue) at (160, 32, 64). Rotate the controller 260 on the y axis so that it faces the correct direction.
Once the character controller is in your scene and positioned, play the scene. Be sure to move around and look for any areas that need fixed or smoothed. Pay attention to the borders. Look for any areas where you are able to escape the world. Those places will need to be raised so that the player cannot fall off of the map. This is the stage where you will generally fix any basic problems with your terrain.
Tip: Falling Off of the World
Generally, game levels will have walls or some other obstacle in place to prevent the player from exiting the developed area. If the game employs gravity, then the player may fall off of the side of the world. You will always want to create some way of preventing the player from going somewhere they shouldn’t. This game project uses a tall berm to keep the players in the play area. The heightmap provided to you in the book’s assets for Hour 7 intentionally has a few places where the player can climb out. See if you can find and correct them!
Gamification
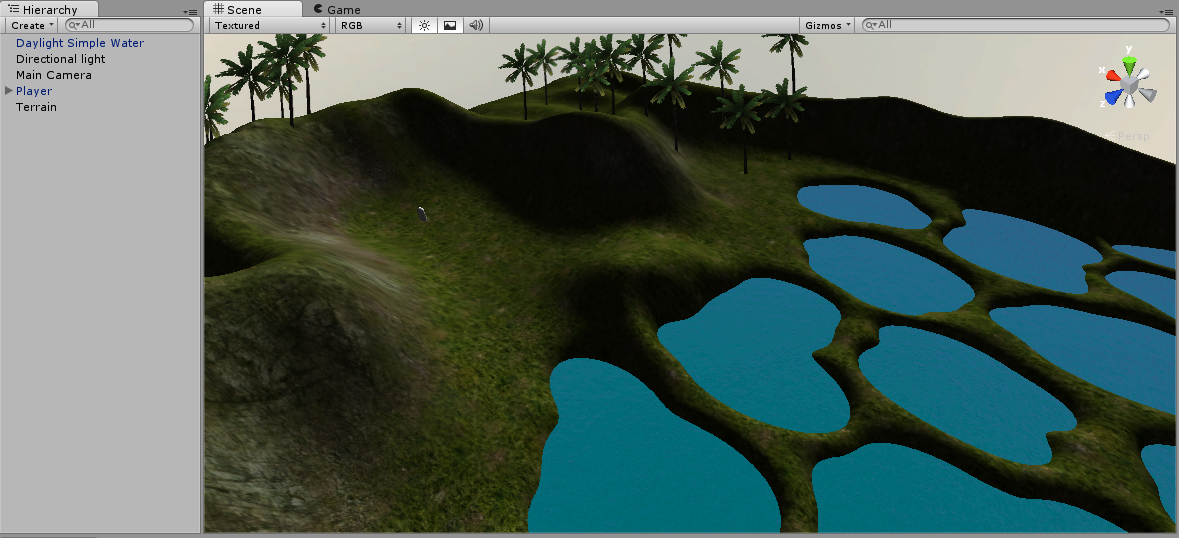
You now have a world in which your game can take place. You can run around and experience the world to an extent. The piece that is missing is the game itself. Right now, what you have is considered a toy. It is something that can be played with. What you want is a game, which is a toy that has rules and a goal. The process of turning something into a game is called “gamification”, and that’s what this section is all about. If you followed the above steps, your game project should now look something like Figure 7.2 below. The next couple of steps will be to add game control objects for interaction, apply game scripts to those objects, and connect them to each other.
Figure 7.2. The current state of the Amazing Racer game.
Scripts are pieces of code that define behaviors for game objects. You have not yet learned about scripting in Unity. In order to make an interactive game, however, scripts are a must. With this in mind, the scripts needed to make this game have been provided for you. An effort has been made to make the scripts as minimal as possible so you can understand most of this project. Feel free to open the scripts in a text editor and read what they are doing. Scripts will be covered in greater detail in Hours 8 and 9.
Adding Game Control Objects
As defined in your requirements section above, you will need four specific game control objects. The first object will be a spawning point. This will be a simple game object that exists solely to tell the game where to spawn the player. To create the spawning point:
1. Add an empty game object to the scene (click “GameObject->Create Empty”) and position it at (160, 32, 64).
2. Rename the empty object to “SpawnPoint” in the hierarchy view.
Next you will want to create the water hazard “detector”. This will be a simple plane that will sit just below the water. The plane will have a trigger collider (will be covered in more detail later in this book) which will detect when a player has fallen in the water. To create the detector:
1. Add a plane to the scene (click “GameObject->Create Other->Plane”) and position it at (86, 27, 51). Scale the plan (10, 1, 10).
2. Rename the plane to “WaterHazardDetector” in the hierarchy view.
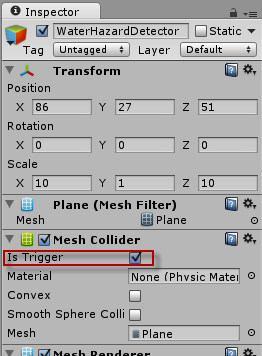
3. Check the “IsTrigger” checkbox on the “Mesh Collider” component in the inspector view (see Figure 7.3).
Figure 7.3. The inspector view of the “WaterHazardDetector” object.
Next you will want to add the finish zone to your game. This zone will be a simple object with a point light on it so that the player knows where to go. The object will have a capsule collider attached to it so it will know when a player can entered the zone. To add the finish zone object:
1. Add an empty game object to the scene and position it at (26, 32, 24).
2. Rename the object to “Finish” in the hierarchy view.
3. Add a light component to the finish object (with the object selected click “Component->Rendering->Light”). Change the type to “Point” if it isn’t already and set the range to 35 and intensity to 3.
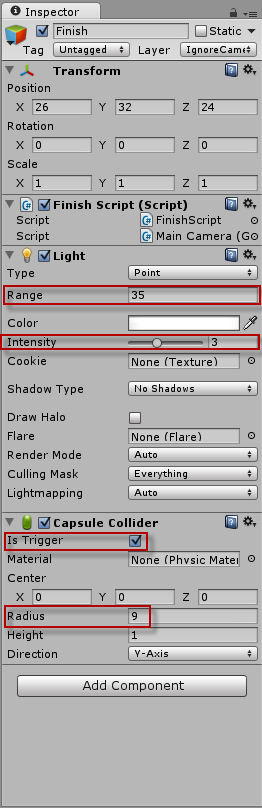
4. Add a capsule collider to the finish object by selecting the object and clicking “Component->Physics->Capsule Collider”. Change the Radius property to 9 and check the “IsTrigger” checkbox in the inspector view (see Figure 7.4).
Figure 7.4. The inspector view of the “Finish” object.
The final object you will need to create is the game control object. This object doesn’t technically need to exist. You could instead just apply its properties to some other persistent object in the game world such as the main camera. You will generally create its own object to prevent any accidental deletion though. During this phase of development, the game control object is very basic. It will be used more later. To create the game control object:
1. Add an empty game object to the scene.
2. Rename the game object to “GameControl” in the hierarchy view.
Adding Scripts
As mentioned above, scripts specify behaviors for your game objects. In this section you will be applying scripts to your game objects. At this point, it is not important for you to understand what these scripts do. The first thing you need to do is add the scripts to your project:
1. Create a “Scripts” folder under “Assets” in the project view.
2. Locate the “Scripts” folder in the book assets for Hour 7.
3. Click and drag the scripts from the book asset’s “Scripts” folder into the “Scripts” folder in Unity. There should be three scripts: “FinishScript”, “GameControlScript”, and “RespawnScript”.
Once the scripts are in your project, applying them is easy. To apply a script, simply drag it from the project view onto whatever object you want to apply it to (see Figure 7.5). Apply the following scripts:
• Apply the “FinishScript” to the “Finish” game object.
• Apply the “GameControlScript” to the “GameControl” object.
• Apply the “RespawnScript” to the “WaterHazardDetector”.
Figure 7.5. Applying scripts by dragging them onto game objects.
Connecting the Scripts Together
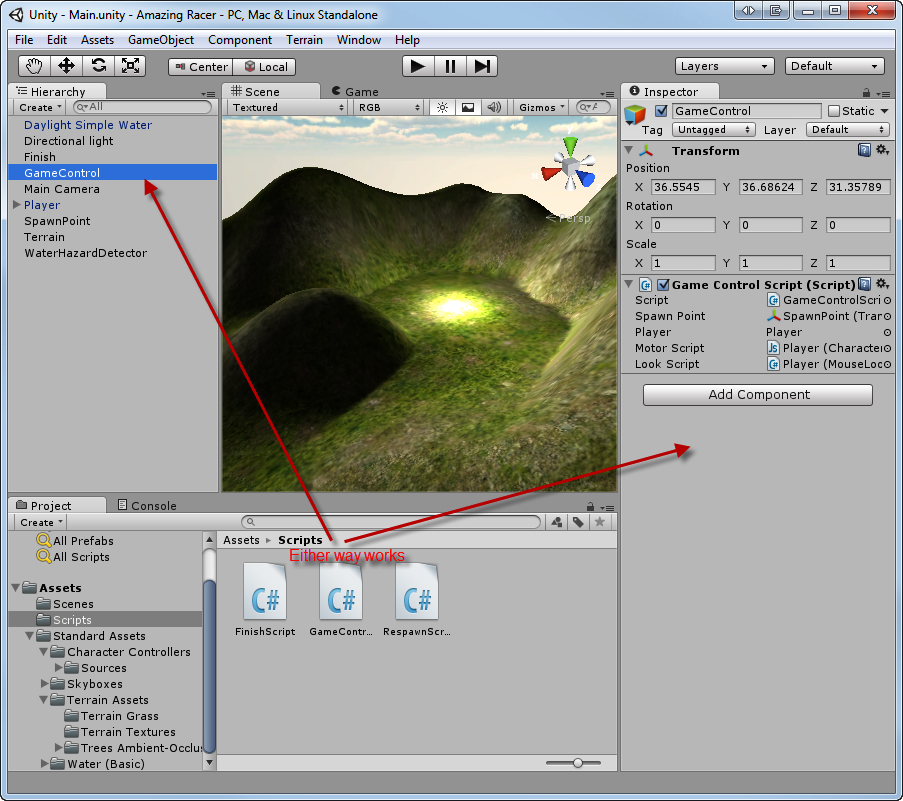
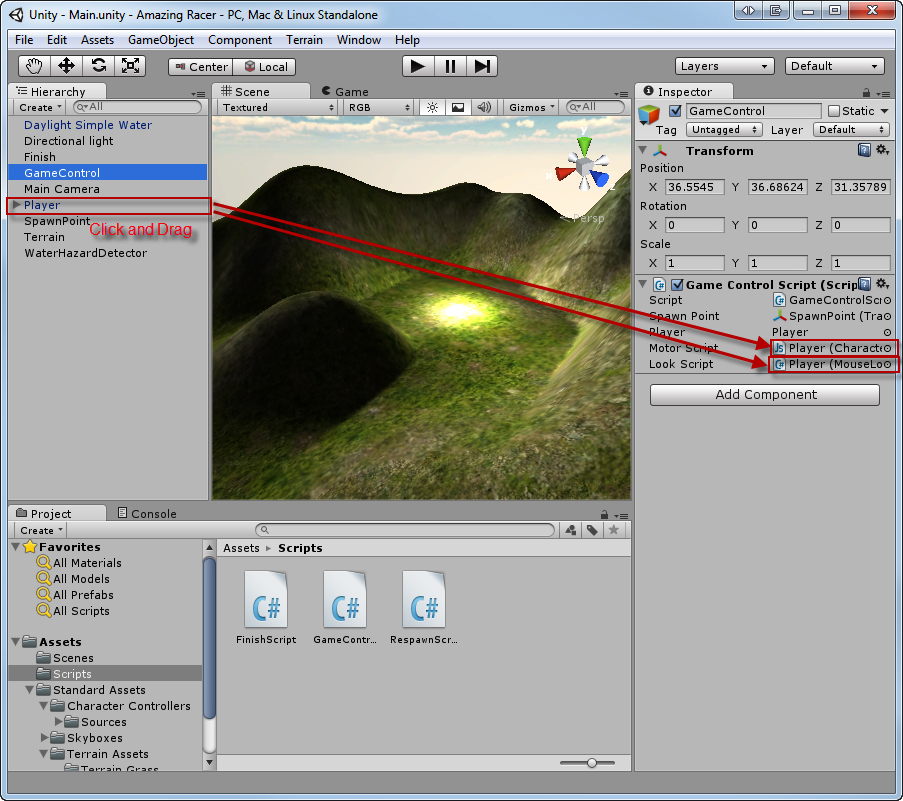
If you read through the scripts then you noticed they all have placeholders for other objects. These placeholders allow one script to talk to another script. You will see that for every placeholder that existed in the scripts, there is a property in the component for that script in the inspector view. Just like with scripts, you apply the objects to the placeholders by clicking and dragging (see Figure 7.6).
Figure 7.6. Moving game objects onto placeholders.
You will start connecting objects with the “WaterHazardDetector” first. Select the “WaterHazardDetector” in the hierarchy view and notice how it has the “Respawn Script” component. This is the result of applying the respawn script in the previous section. You will also notice that the respawn component has a “Respawn Point” property. This property is a place holder for the “SpawnPoint” game object you made previously. With the “WaterHazardDetector” object selected, click and drag the “SpawnPoint” object from the hierarchy view onto the “Respawn Point” property of the “Respawn Script” component. Now, whenever the player falls into the water hazard, they will get moved back to the spawn point at the beginning of the level.
The next object to set up is the “Finish” game object. With the “Finish” game object selected, click and drag the “GameControl” object from the hierarchy view onto the “Game Control Script” property of the “Finish Script” component in the inspector view. Now, whenever the player enters the finish zone, the game control will be notified.
The last object you will need to set up is the “GameControl”. To set this control up correctly you will need to:
• Click and drag the “SpawnPoint” object onto the “Spawn Point” property of the “Game Control Script” component of the “GameControl”.
• Click and drag the “Player” object (this is the character controller) onto the “Player” property, the “Motor Script” property, and the “Look Script” property of the “Game Control Script” of the “GameControl”.
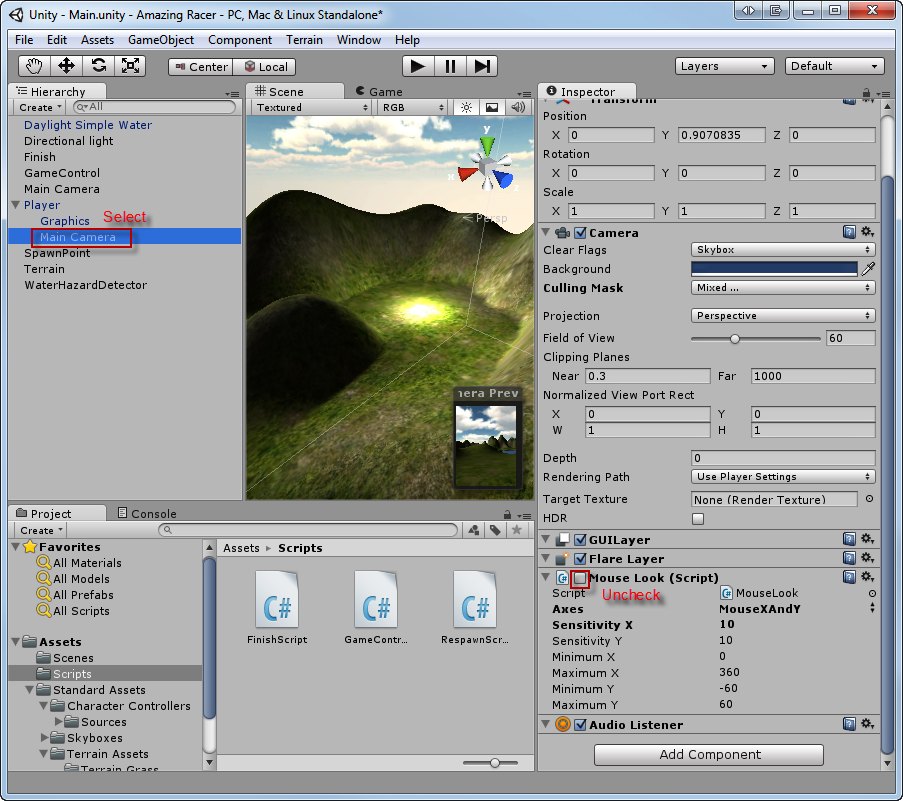
• You will need to disable the mouse look script of the camera on the “Player” character controller. To do this you will need to expand the “Player” object in the hierarchy view (click the arrow to the left of “Player” to expand) and then select the “Main Camera” that is nested under “Player”. Locate the “Mouse Look (Script)” component in the inspector view and uncheck it (see Figure 7.7).
Figure 7.7. Unchecking the “Mouse Look” on the player’s camera.
That’s all there is to connecting the game objects. Your game is now completely playable! Some of this may not make sense right now, but the more you study it and work with it, the more intuitive it becomes.
Playtesting
Your game is now done, but it is not time to rest just yet. Now you have to begin the process of playtesting. Playtesting is where you play a game with the intention of finding errors or things that just aren’t as fun as you thought they would be. A lot of times it can be very beneficial to have other people playtest your games so that they can tell you what makes sense to them and what they found enjoyable.
If you followed all of the steps above, then there shouldn’t be any errors (commonly called bugs) for you to find. The process of determining what parts are fun, however, is completely at the discretion of the person making the game. Therefore, this part will be left up to you. Play the game and see what you don’t like. Take notes of the things that aren’t enjoyable to you. Don’t just focus on the negative though. Also find the things that you like. Your ability to change these things may be limited at the moment, so write them down. Plan on how you would change the game for the better if given the opportunity.
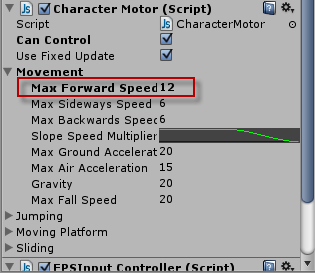
One simple thing you can tweak right now to make the game more enjoyable is the player’s speed. If you have played the game a couple of times, you notice the character moves too slow and that can make the game feel very long and drawn out. To make the character fast, you will need to modify the “Character Motor (Script)” component on the “Player Object”. Expand the “Movement” property in the inspector view and change the “Max Forward Speed” (see Figure 7.8). The sample project has this set at 12. Try that and see how you like it. Try faster or slower speeds and pick one you enjoy.
Figure 7.8. Changing the player’s speed.
Summary
This hour you made your first game in Unity. You started by designed the various aspects of the games concept, rules, and requirements. From there, you built the game world and added environment effects. Then, you added the game objects required for interactivity. You applied scripts to those game objects and connected them together. Finally, you playtested your game and noted the things you liked and didn’t like.
Q&A
Q. This seems over my head. Am I doing something wrong?
A. Not at all! This process can feel very alien to someone who is not used to it. Keep reading and studying the materials and it will all begin to come together. The best thing you can do is pay attention to how the objects connect to each other through the scripts.
Q. You didn’t cover how to build and deploy the game. Why not?
A. Building and deployment is its own hour later one. There are many things to consider when building a game and at this point you should just focus on the concepts required to develop it.
Q. Why couldn’t we make a game without scripts?
A. As mentioned above, scripts define the behavior of objects. It is very difficult to have a coherent game without some form of interactive behavior. The only reason you are building a game in Hour 7 before learning scripting in Hours 8 and 9 is that you should reinforce the topics you have already learned before moving on to something different.
Workshop
Take some time to work through the questions here to ensure you have a firm grasp on the material.
Quiz
1. What are a game’s requirements?
2. What is the win condition of this game?
3. How many textures are recommended for a natural blended look in this terrain?
4. Which object is responsible for controlling the flow of the game?
5. Why do we playtest a game?
Answers
1. The requirements are the list of assets that will need to be created in order to make the game.
2. Trick question! There is no explicit win condition for this game. It is assumed that the player wins when they get a better time than previous attempts. This is not built into the game in any way however.
3. Three: grass, grass and rock, and rock.
4. The game controller. In this game it was called “GameControl”.
5. To discover bugs and determine what parts of the game work the way we want them to.
Exercise
The best part about making games is that you can get to make them the way you want. Following a guide can be a good learning experience, but you don’t get the satisfaction of making a custom game. In this exercise, you will have an opportunity to modify the game a little to make something more unique. Exactly how you want to change the game is up to you. Some suggestions are listed below:
• Try to add multiple finish zones. See if you can place them in a way that offers the players more choice.
• Modify the terrain to have more or different hazards. As long as the hazards are built like the water hazard (including the script) then they will work just fine.
• Try having multiple spawn locations. Make it so some of the hazards move you to a second or third spawn point.
• Modify the sky and textures to create an alien world. Make the world experience unique.