10. Exploring the World with Your iPad
In this chapter, you learn to take advantage of some of the best iPad apps for planning and managing your travel needs.
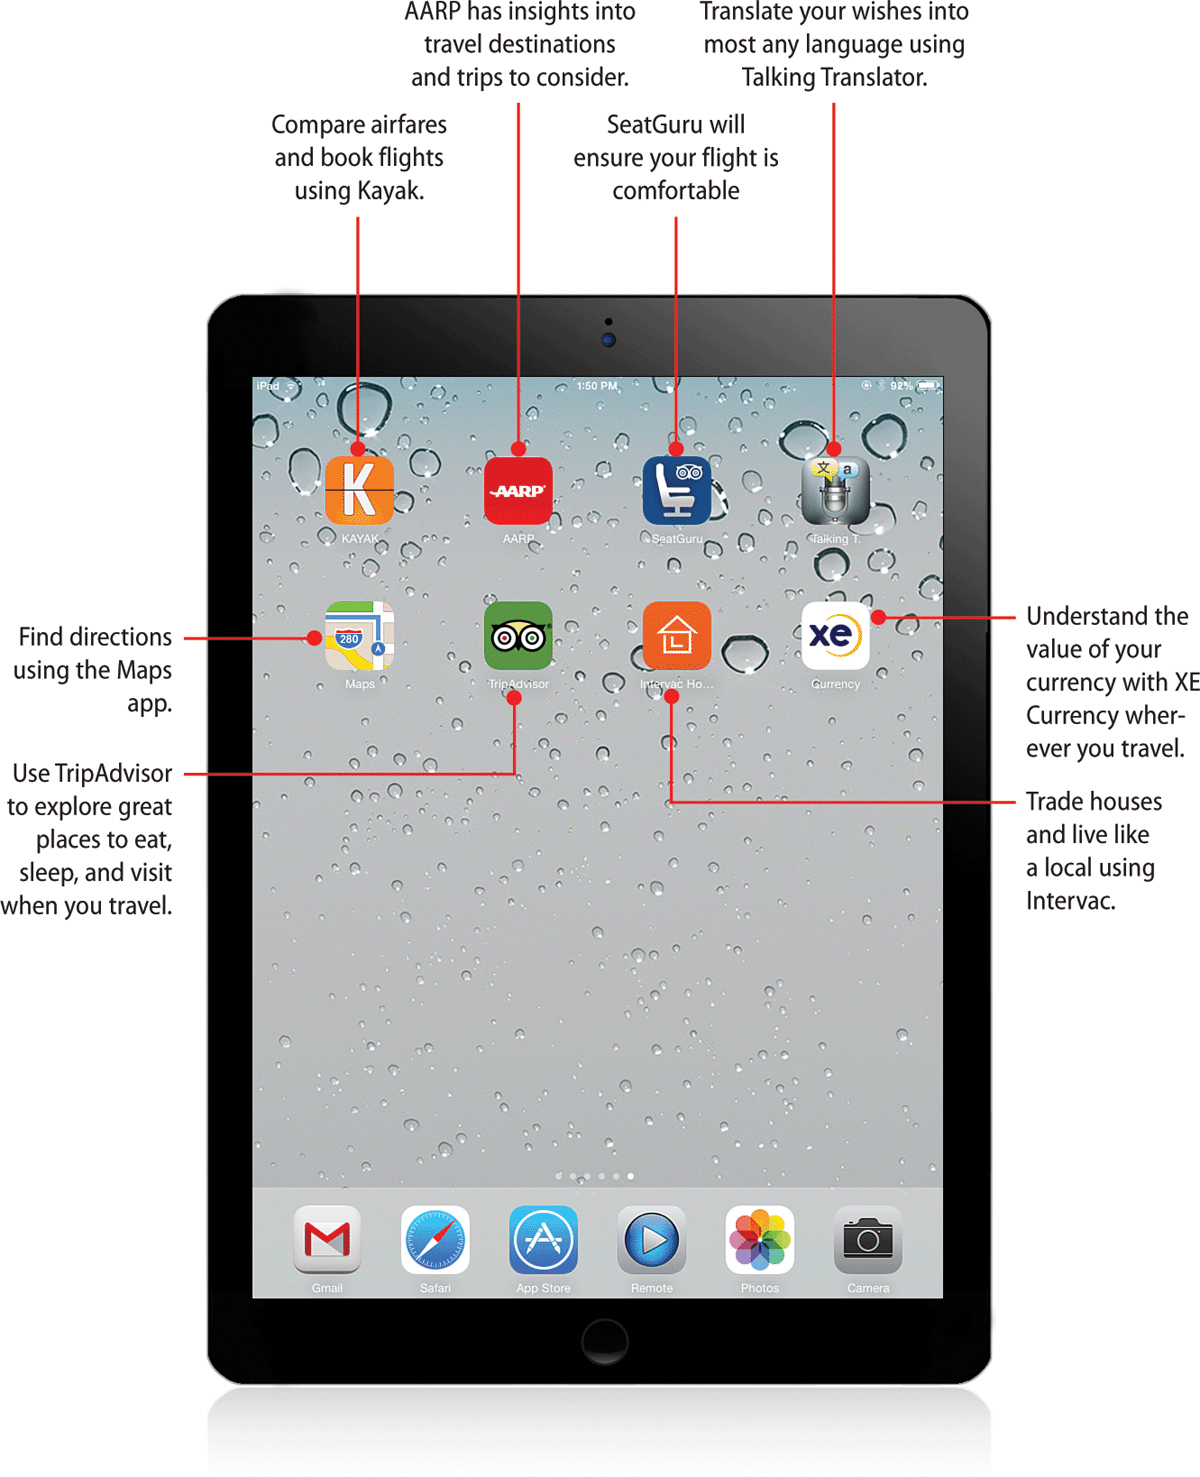
→ Use Kayak to create and manage your next trip.
→ Find interesting locations to visit using the AARP app.
→ Use SeatGuru to make your in flight time as comfortable as possible.
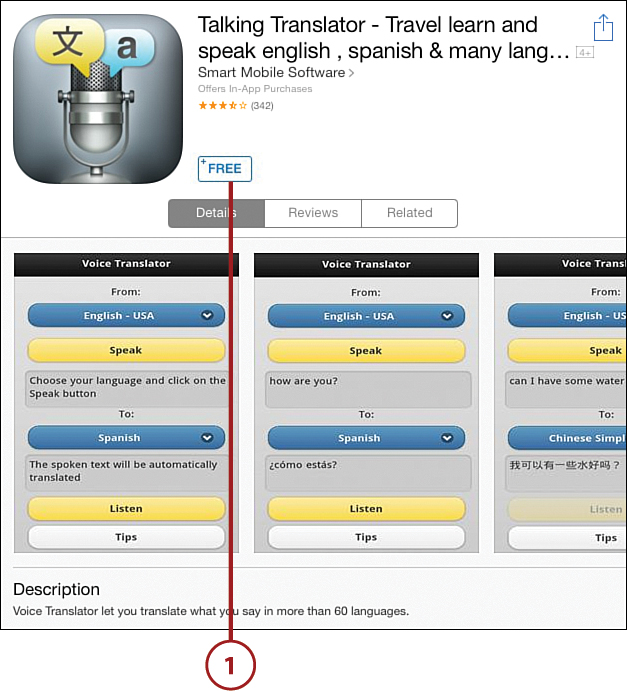
→ Let Talking Translator help you communicate while traveling abroad.
→ Find your way using the Maps app.
→ Take advantage of other’s travel experiences using TripAdvisor.
→ Travel the world living like a local using the Intervac Home Exchange app.
→ Find like-minded seniors to exchange homes with.
→ Use XE Currency to keep track of what you spend in a foreign country.
The iPad makes traveling easier and more enjoyable. Not only can you book your flight from your easy chair, you can plan your itinerary, scope out amazing restaurants and markets, and find key things to do and sights not to be missed so that you take full advantage of your destination. And the great news is that most of the best iPad apps for travel are free!
Arranging Travel Using the Kayak App
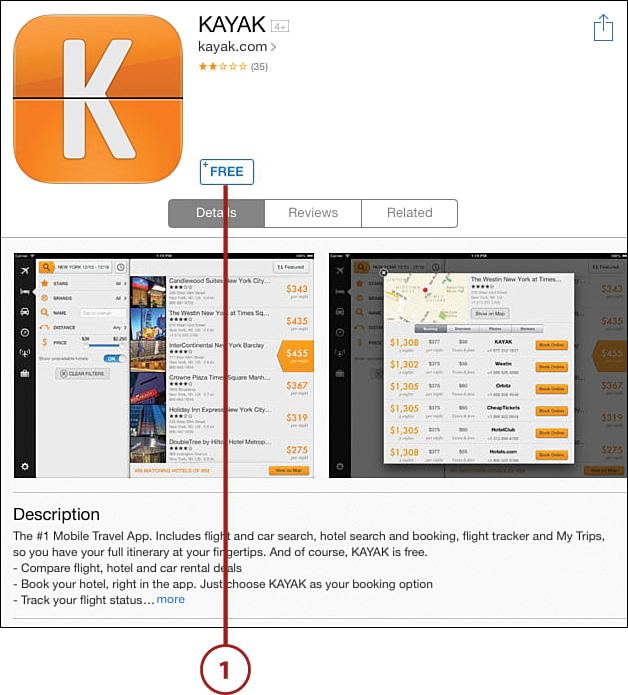
Kayak has the ideal app to help you find the best way to travel to your next destination. Through Kayak’s app, you can book flights and hotels, reserve cars, and maintain your travel details all in one place. Kayak searches the travel options of many airlines and then refers you directly to the airline to make the purchase. A notable exception is Southwest, which doesn’t participate in any of these apps. If you want to fly Southwest, you need to use its website to search for flights.
![]() Search the App Store for Kayak. Tap Free and then tap Install to download it. Open Kayak by tapping its icon on your screen.
Search the App Store for Kayak. Tap Free and then tap Install to download it. Open Kayak by tapping its icon on your screen.
The Real Deal
One of the great things about being in the senior demographic is the ability to travel “when the spirit moves,” rather than at specified times. The opportunity to fly at nonpeak times becomes a reality that can greatly enhance your ability to take advantage of travel deals that others might miss.
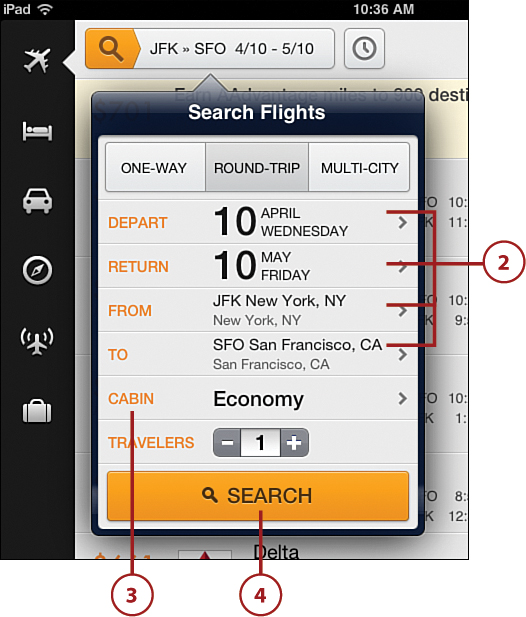
![]() The example in this task shows searching for a round-trip flight from New York’s JFK airport to San Francisco, departing April 10 and returning May 10. There are several easy ways to modify your search. You can choose different dates, locations, and cabin options.
The example in this task shows searching for a round-trip flight from New York’s JFK airport to San Francisco, departing April 10 and returning May 10. There are several easy ways to modify your search. You can choose different dates, locations, and cabin options.
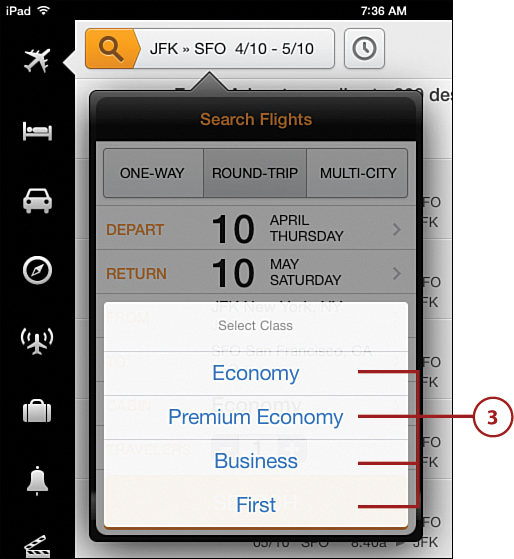
![]() One option is to choose seating other than economy. Your choices range from economy to first class; tap CABIN line to access other seating options.
One option is to choose seating other than economy. Your choices range from economy to first class; tap CABIN line to access other seating options.
![]() After you make all your choices, tap Search to find your outbound flight.
After you make all your choices, tap Search to find your outbound flight.
Apps Change Frequently
The images you see here are how these apps appeared at the time this book was written. App developers do occasionally update their apps by changing the way it looks, moving buttons around, or adding new features. You might find that an app looks slightly different from what you see here, but unless the developer has given it a total overhaul, it should function basically the same way it did when these steps were written. So don’t let that stop you from trying it out!
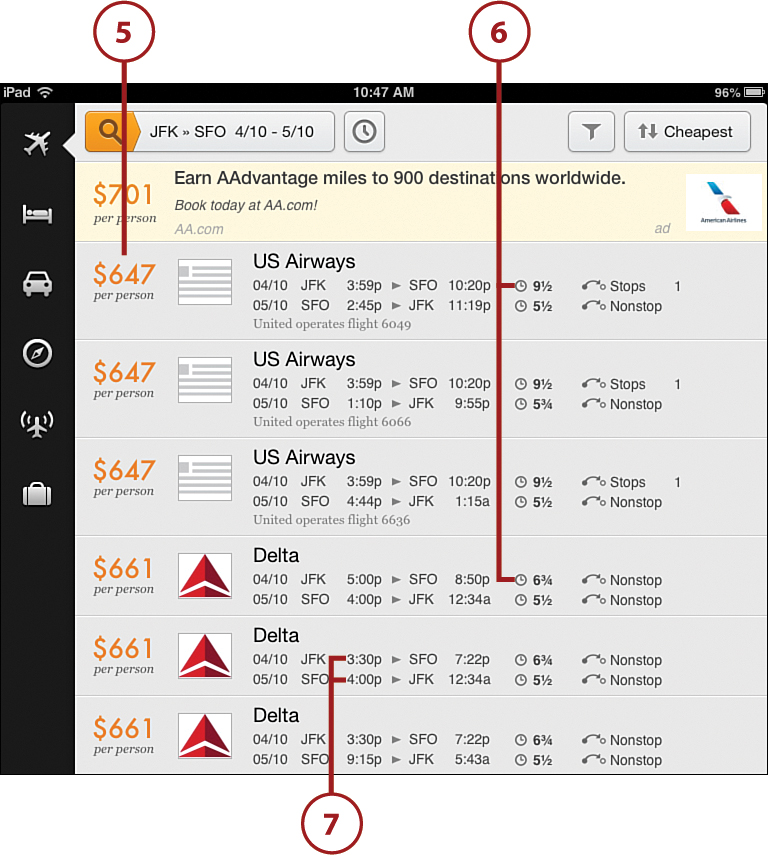
![]() This search yields round-trip flights starting at $647 (US Airways).
This search yields round-trip flights starting at $647 (US Airways).
![]() The time for the least expensive option to San Francisco is 9 1/2 hours. However, looking at the other results it appears that Delta has a flight with a duration of 6 3/4 hours, at a cost of $661. The $14 additional cost per ticket is well worth the shorter flight.
The time for the least expensive option to San Francisco is 9 1/2 hours. However, looking at the other results it appears that Delta has a flight with a duration of 6 3/4 hours, at a cost of $661. The $14 additional cost per ticket is well worth the shorter flight.
![]() In this example, the second Delta flight, departing JFK at 3:30 p.m. on April 10, was chosen along with the return flight departing San Francisco at 4:00 p.m. on May 10. You can see that each flight is nonstop and travels across the country in the shortest time.
In this example, the second Delta flight, departing JFK at 3:30 p.m. on April 10, was chosen along with the return flight departing San Francisco at 4:00 p.m. on May 10. You can see that each flight is nonstop and travels across the country in the shortest time.
![]() The next screen contains a summary of your flight choice. The summary has two options for next steps: You can either tap the upper-right corner to email the information to yourself or fellow travelers, or tap the arrow after Delta to go to the airline website to buy the tickets.
The next screen contains a summary of your flight choice. The summary has two options for next steps: You can either tap the upper-right corner to email the information to yourself or fellow travelers, or tap the arrow after Delta to go to the airline website to buy the tickets.

![]() For this example, tap the arrow after Delta to buy the tickets. At this point, you leave the Kayak app and go directly to Delta’s website. When at the Delta website, you can proceed to buy your tickets, choose seat assignments, complete passenger information, as well as add on other optional items such as baggage fees and other extras.
For this example, tap the arrow after Delta to buy the tickets. At this point, you leave the Kayak app and go directly to Delta’s website. When at the Delta website, you can proceed to buy your tickets, choose seat assignments, complete passenger information, as well as add on other optional items such as baggage fees and other extras.
You can use this same process to search for hotels and car rentals to add to your itinerary, or you can book only hotels and a car rental if you don’t need flights. Kayak also has a My Trips option that enables you to save your travel itinerary in one place. Time to pick a destination, book your flight, and start exploring!
Using the AARP App
AARP has built an awesome app that provides many interesting insights for seniors. The travel section of the app is useful. It zeroes into several stunning travel ideas, and annotates them individually so that with a tap of your iPad, you can be planning your next trip.
![]() Search the App Store for the AARP app. Tap the Free button, and then tap Install to download it. Tap Open to open it. If you are not already a registered user, you must register at the AARP website (www.aarp.org) to access this app.
Search the App Store for the AARP app. Tap the Free button, and then tap Install to download it. Tap Open to open it. If you are not already a registered user, you must register at the AARP website (www.aarp.org) to access this app.
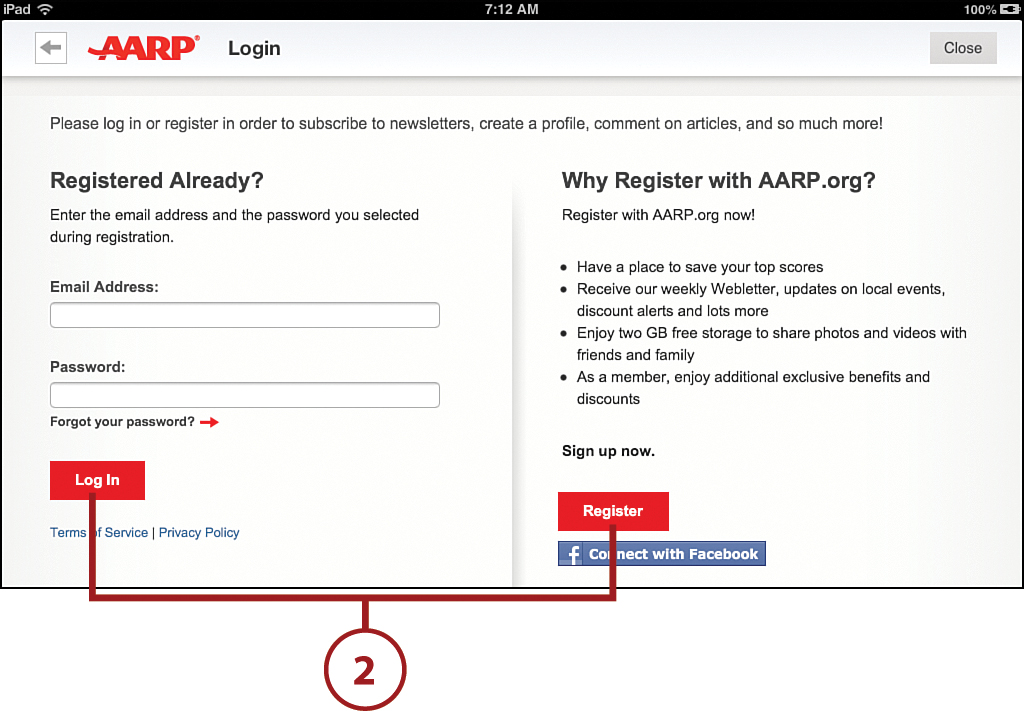
![]() After you register with AARP, you can use the same password and username to access the AARP app. Tap the icon for the AARP app on your iPad, and then sign in with your AARP username and password, or if you choose, tap register to be transferred to the AARP website to register.
After you register with AARP, you can use the same password and username to access the AARP app. Tap the icon for the AARP app on your iPad, and then sign in with your AARP username and password, or if you choose, tap register to be transferred to the AARP website to register.
Only One Sign In Required
After you open the AARP app and sign in using your AARP username and password the first time, opening the app in the future takes you directly to the home page.
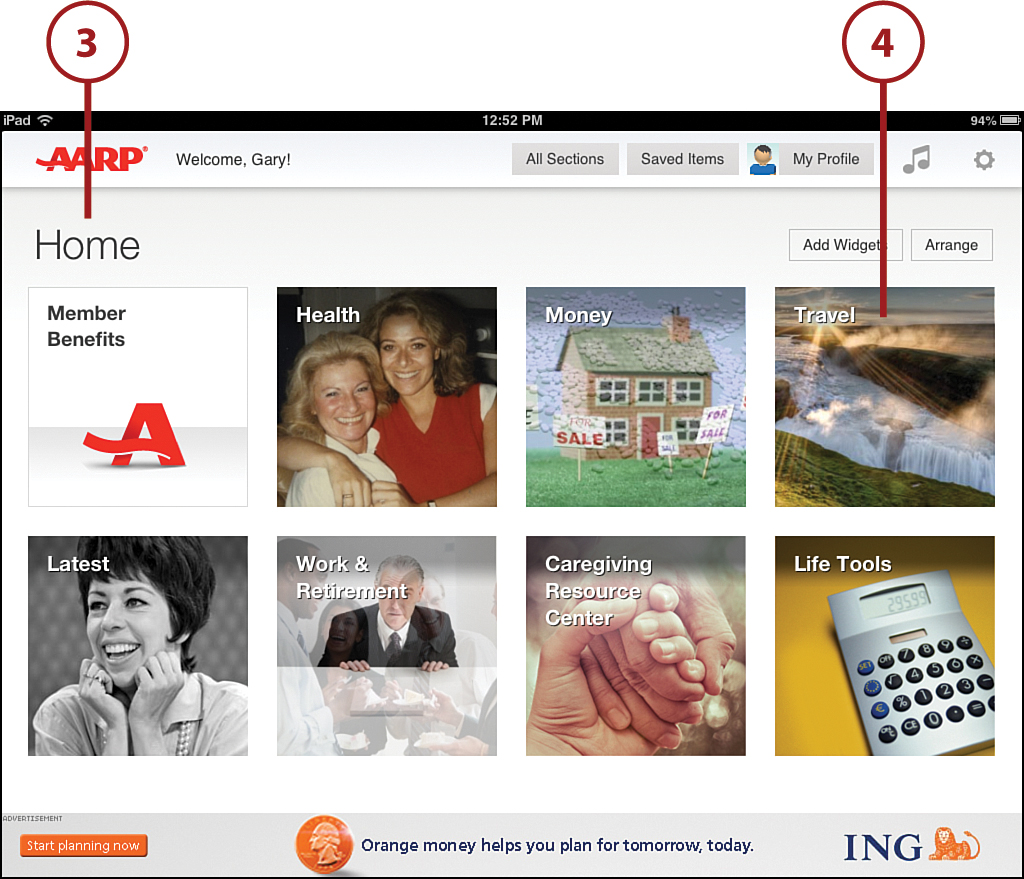
![]() The AARP home page contains several interesting options to explore. Health, money, latest, work and retirement, care-giving resources center, life tools, and, of course, travel. Each of these segments is well thought out and contains a number of helpful articles to anyone 55 and over.
The AARP home page contains several interesting options to explore. Health, money, latest, work and retirement, care-giving resources center, life tools, and, of course, travel. Each of these segments is well thought out and contains a number of helpful articles to anyone 55 and over.
![]() For this task, explore the Travel section of the app. Tap the AARP travel icon.
For this task, explore the Travel section of the app. Tap the AARP travel icon.
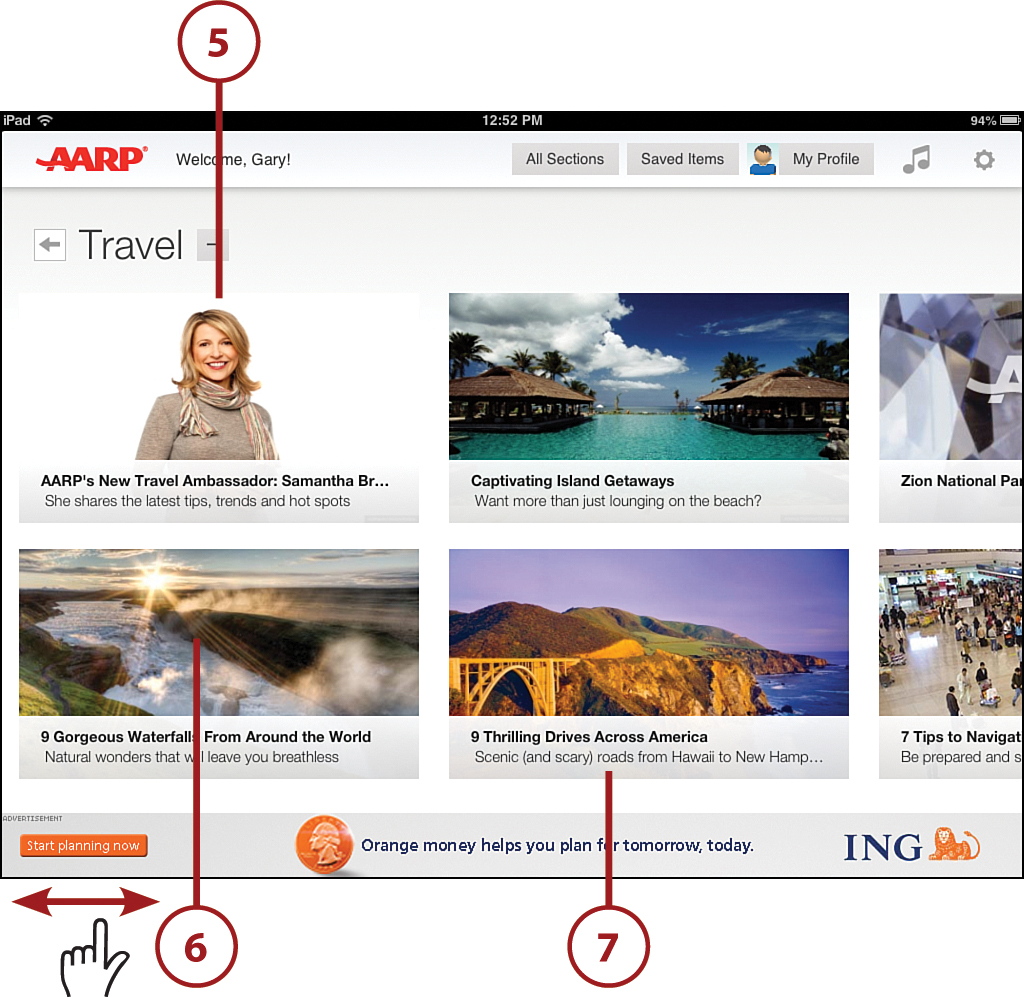
![]() In the Travel section of this app, you meet the AARP Travel Ambassador, Samantha Brown. Ms. Brown is a well-known travel show host and an excellent choice to represent AARP Travel.
In the Travel section of this app, you meet the AARP Travel Ambassador, Samantha Brown. Ms. Brown is a well-known travel show host and an excellent choice to represent AARP Travel.
![]() You can find several additional pages of options by swiping your finger across your IPad from right to left to move on to the next page. AARP has chosen some enticing travel titles including Captivating Island Getaways, 9 Thrilling Drives Across America, New Air Travel Rules, 5 Must See Rome Sights, and more. There are a total of 70 different articles available at this time.
You can find several additional pages of options by swiping your finger across your IPad from right to left to move on to the next page. AARP has chosen some enticing travel titles including Captivating Island Getaways, 9 Thrilling Drives Across America, New Air Travel Rules, 5 Must See Rome Sights, and more. There are a total of 70 different articles available at this time.
![]() For this task, tap 9 Thrilling Drives Across America.
For this task, tap 9 Thrilling Drives Across America.
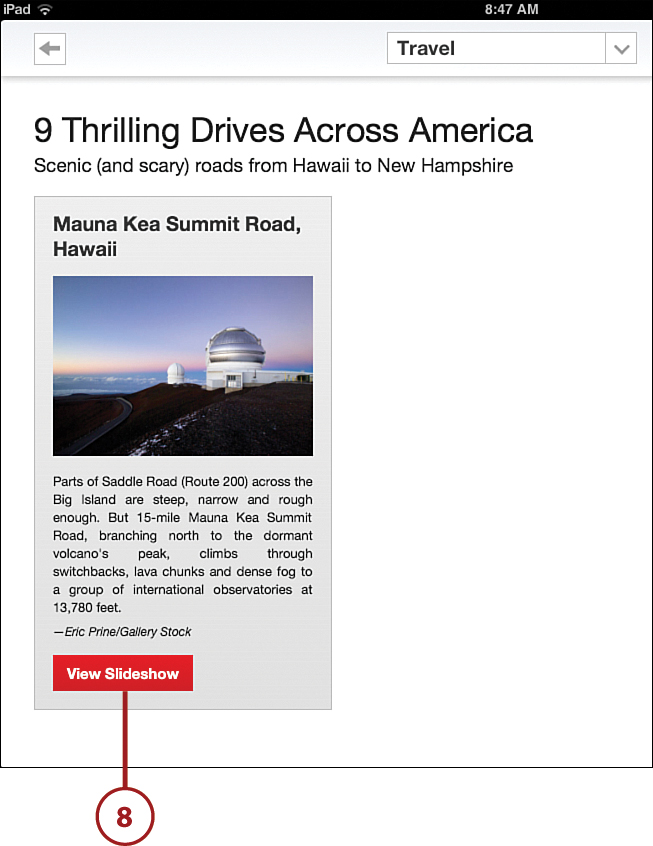
![]() Tap the View Slideshow button to access the article.
Tap the View Slideshow button to access the article.
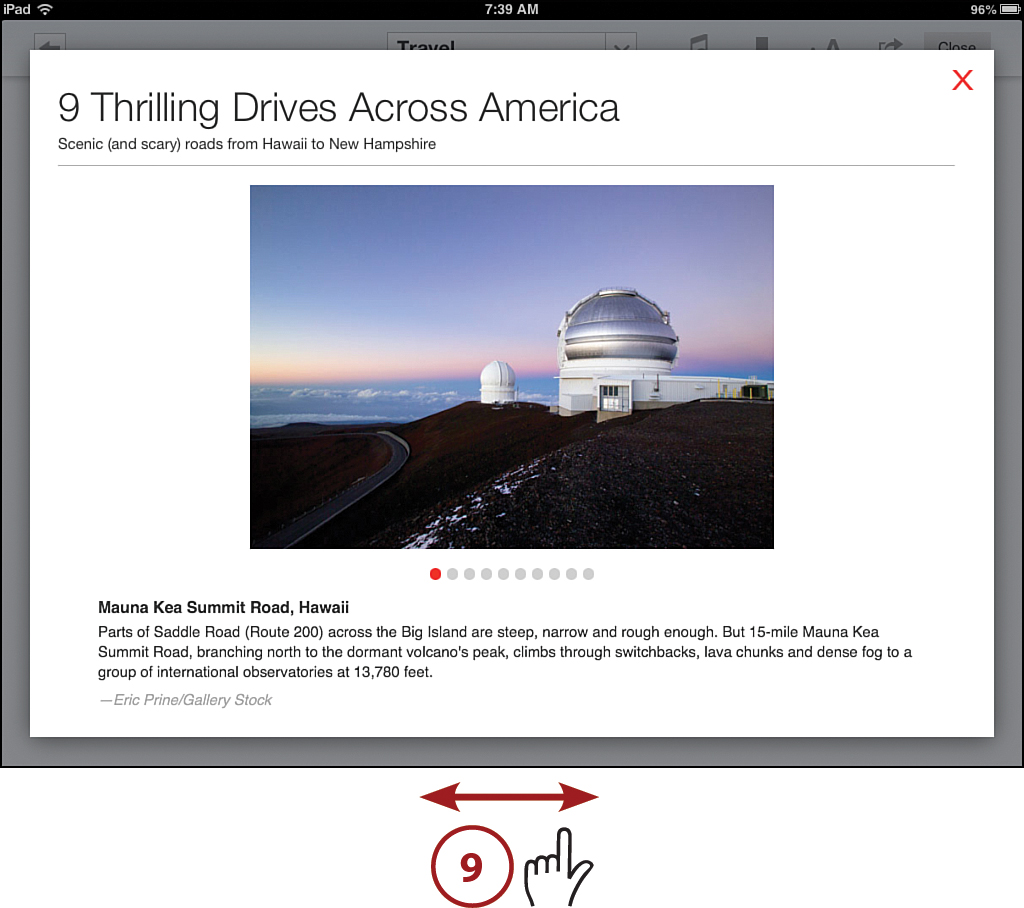
![]() The slideshow begins with Mauna Kea Summit Road in Hawaii. Swipe right to left to move along to the Dalton Highway in Alaska, Highway 1 in California, and on to many other breathtaking drives across the United States. This is an enticing app that can certainly stimulate your wanderlust.
The slideshow begins with Mauna Kea Summit Road in Hawaii. Swipe right to left to move along to the Dalton Highway in Alaska, Highway 1 in California, and on to many other breathtaking drives across the United States. This is an enticing app that can certainly stimulate your wanderlust.
Check Out the Website
The AARP website (www.aarp.org) also provides a more extensive look at the prolific offerings this organization provides to the senior community, so take a look at that via your iPad’s Safari web browser. For help finding and viewing web pages, see Chapter 7, “Surfing the Web.”
AARP’s Travel options change continually, so check often to see new and interesting articles.
Finding Your Way Using the iPad Maps App
The Maps app comes installed as part of the iOS operating system for your iPad (similar to Email and other built-in apps). There are many uses for this app, but it is particularly helpful when you travel. You can find your present location, get directions, check traffic, view the map from a satellite perspective, and search the area for various services, such as coffee shops, restaurants, gas stations, and more.
![]() Tap the Maps icon on your iPad.
Tap the Maps icon on your iPad.
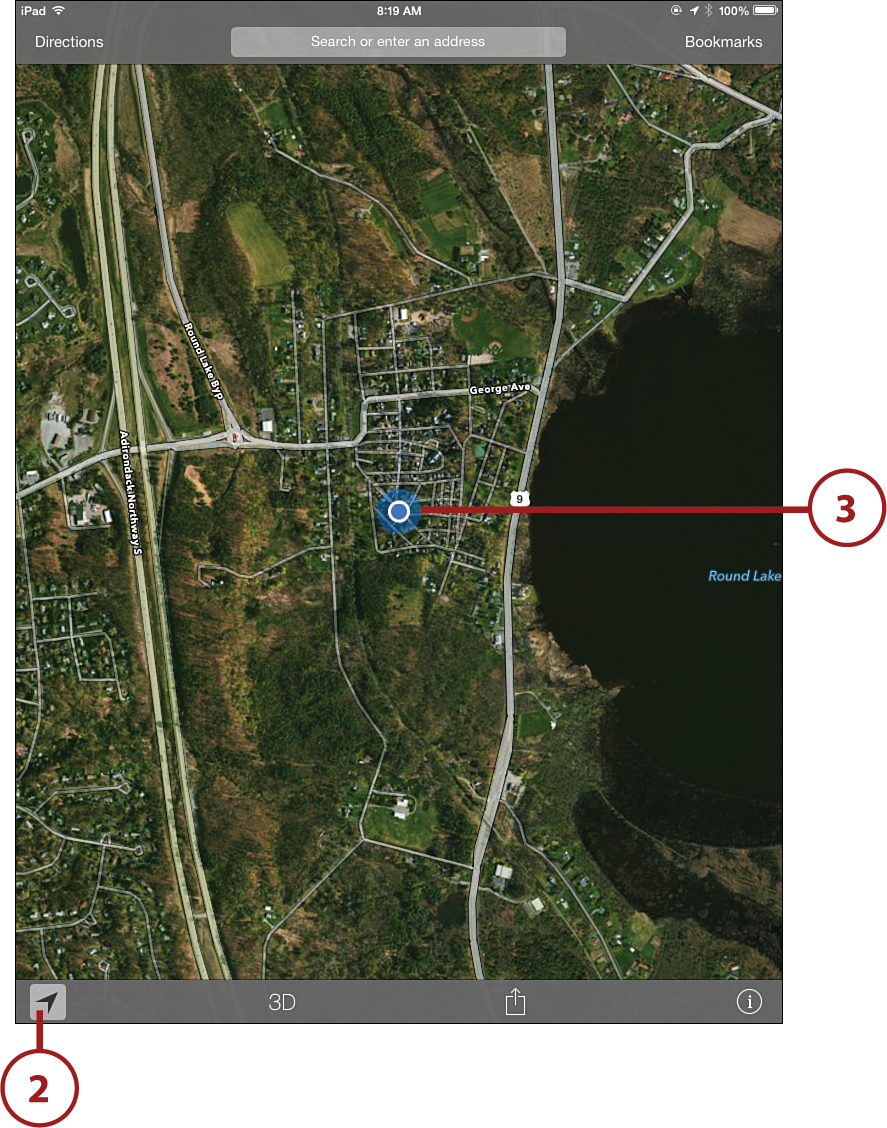
![]() Tap the arrow at the bottom left of the page to see your present location.
Tap the arrow at the bottom left of the page to see your present location.
Location Settings
Location services for Maps must be enabled for the Maps app to find your location automatically. Tap the Settings app on your home screen, and then tap Privacy on the left side. Tap Location Service at the top of the right side of the screen, and then slide the Location Services switch to ON. If you have allowed the Maps app to have access to your location, you should see it in the list below Location Services. Make sure its switch is set to ON. If it is not in the list, after you tap the location arrow in the lower-left corner of the Maps app, it asks to allow the app to have access to Location Services. Tap OK.
![]() Your location is indicated by a blue dot on the map.
Your location is indicated by a blue dot on the map.
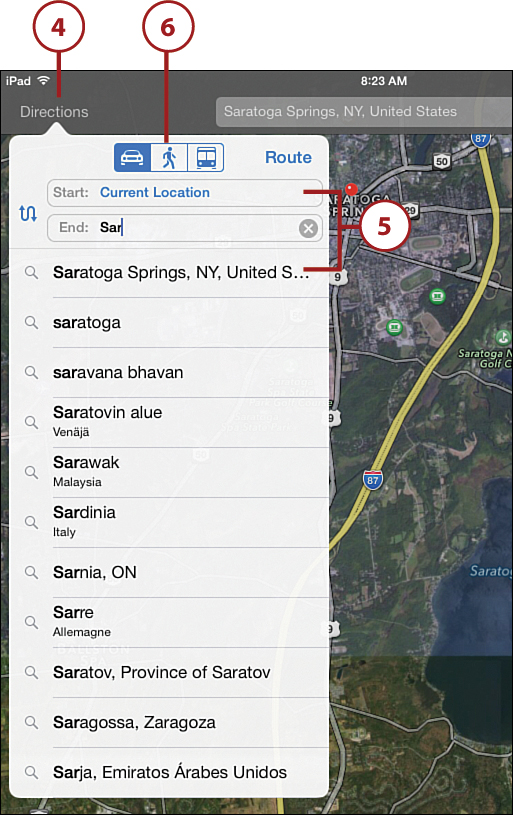
![]() To find directions, tap Directions in the upper-left corner.
To find directions, tap Directions in the upper-left corner.
![]() If you allow Maps access to your location, Current Location is filled in the Start Field for you. If your current location is not your starting location for the directions you need, type in the address you are traveling from in the Start field. Type the address of your destination in the End field. In this example, the directions are for traveling from the current location to Saratoga Springs, NY. Maps fills in possibilities as you type. I tapped Saratoga Springs as my destination.
If you allow Maps access to your location, Current Location is filled in the Start Field for you. If your current location is not your starting location for the directions you need, type in the address you are traveling from in the Start field. Type the address of your destination in the End field. In this example, the directions are for traveling from the current location to Saratoga Springs, NY. Maps fills in possibilities as you type. I tapped Saratoga Springs as my destination.
![]() Maps gives you the option to choose directions for car, walking, or bus.
Maps gives you the option to choose directions for car, walking, or bus.
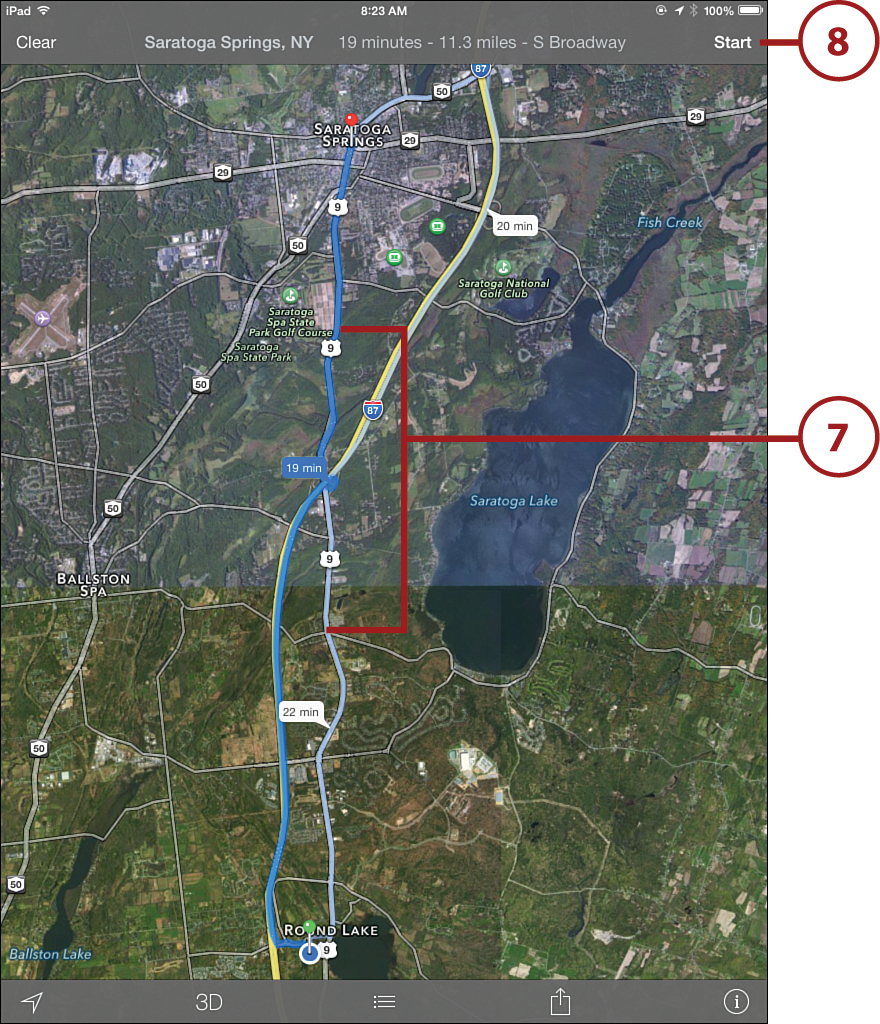
![]() This example chooses to get the best route by car. After you determine how you want to travel and where you are going, and have plugged that information into the start/end boxes, the Maps app automatically shows your potential routes.
This example chooses to get the best route by car. After you determine how you want to travel and where you are going, and have plugged that information into the start/end boxes, the Maps app automatically shows your potential routes.
![]() Tap the Start button and Maps starts step-by-step directions. Tap End to stop the turn-by-turn directions.
Tap the Start button and Maps starts step-by-step directions. Tap End to stop the turn-by-turn directions.
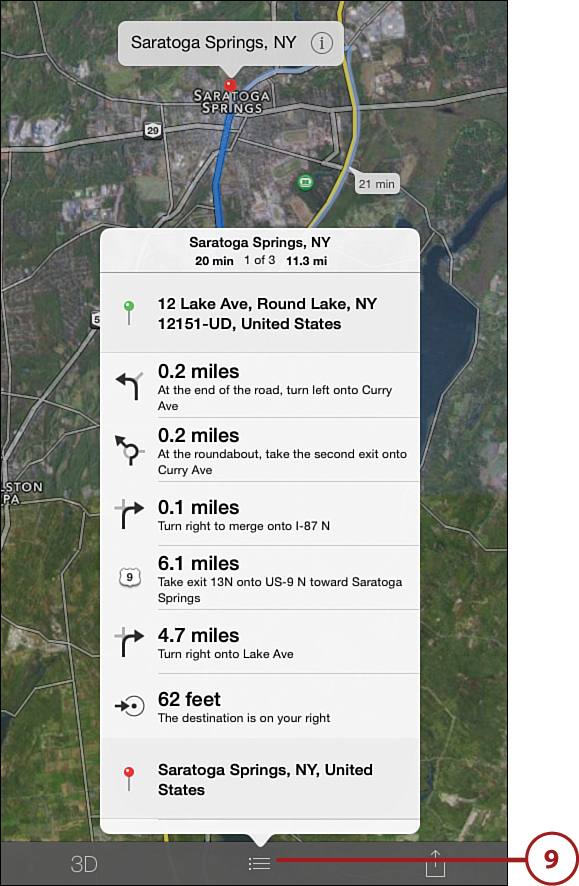
![]() Tap the List icon at the bottom center to get a summary of your directions.
Tap the List icon at the bottom center to get a summary of your directions.
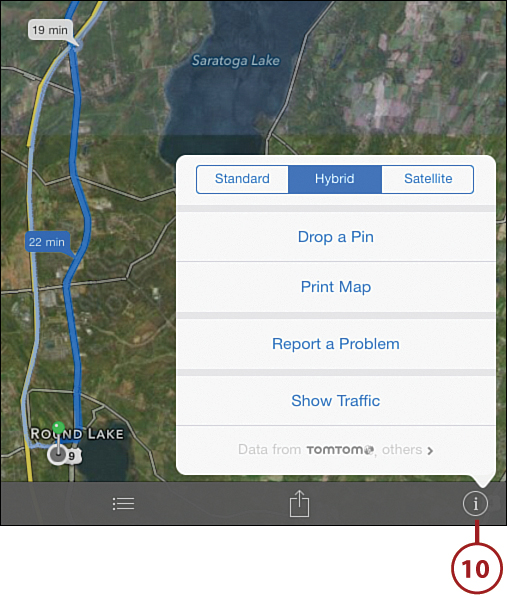
![]() Tap the i at the bottom right to Drop a Pin (which marks a new location point for you), Print Map, Report a Problem, or Show Traffic.
Tap the i at the bottom right to Drop a Pin (which marks a new location point for you), Print Map, Report a Problem, or Show Traffic.
If you have a cellular-enabled iPad, it can also give you turn-by-turn directions. If you travel to an area that you are unfamiliar with, the iPad provides you the perfect way to familiarize yourself with the area from your hotel or apartment.
SeatGuru by TripAdvisor
Have you ever boarded an airplane, made your way to you seat and settled in, only to find you have chosen the only row on the plane that doesn’t tilt back? After you download SeatGuru from the App Store, those days will be over. The idea is to do your research upfront and get to know the aircraft you will be flying on before you buy you tickets and choose a seat. Using SeatGuru you can choose the best possible seat to make your trip as comfortable as possible. Your days of selecting the worst seat on the plane are over!
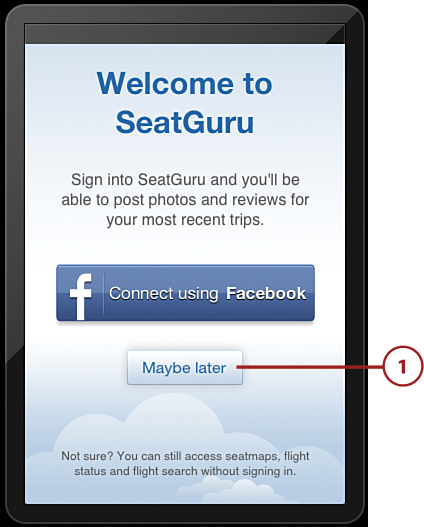
![]() Search for SeatGuru by TripAdvisor, an iPhone app, in the App Store. Tap Free and then tap Install to download it. Open it by tapping its icon on your home screen. Tap on the Maybe Later link if you see no need to connect using Facebook; otherwise, tap Connect using Facebook for SeatGuru to log you in using your Facebook account and enable you to directly post photos and reviews to your Facebook page.
Search for SeatGuru by TripAdvisor, an iPhone app, in the App Store. Tap Free and then tap Install to download it. Open it by tapping its icon on your home screen. Tap on the Maybe Later link if you see no need to connect using Facebook; otherwise, tap Connect using Facebook for SeatGuru to log you in using your Facebook account and enable you to directly post photos and reviews to your Facebook page.
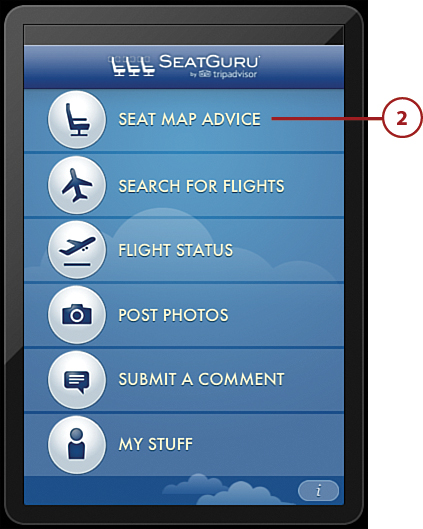
![]() Tap the Seat Map Advice option.
Tap the Seat Map Advice option.
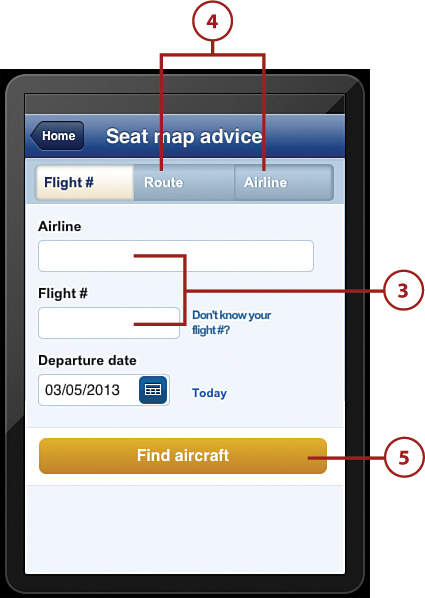
![]() If you know your flight number or airline, plug those in to find the type of aircraft you will be flying aboard.
If you know your flight number or airline, plug those in to find the type of aircraft you will be flying aboard.
![]() If you are unaware of the flight number, you can tap the route or airline and search for the flight you are choosing.
If you are unaware of the flight number, you can tap the route or airline and search for the flight you are choosing.
![]() After your flight info is entered, tap Find aircraft and an illustration of your plane’s seat map opens.
After your flight info is entered, tap Find aircraft and an illustration of your plane’s seat map opens.
![]() This illustration indicates the great seats (green), lousy seats (red), seats with some drawbacks (yellow) and standard seats (white) available on your flight.
This illustration indicates the great seats (green), lousy seats (red), seats with some drawbacks (yellow) and standard seats (white) available on your flight.
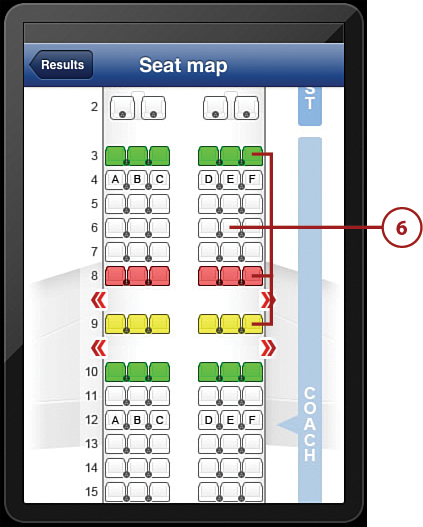
![]() Tap a specific seat number to see a description of the pros and cons of that seat.
Tap a specific seat number to see a description of the pros and cons of that seat.
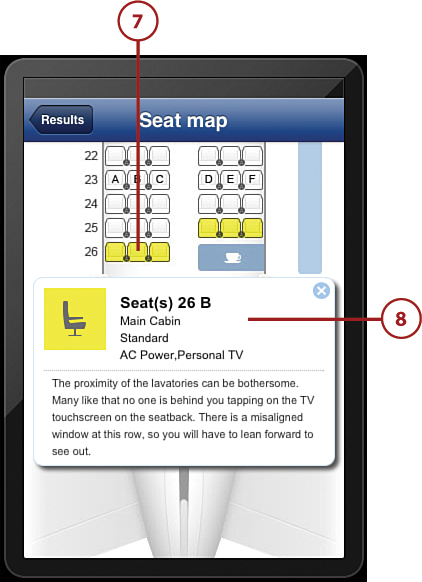
![]() In this example, tap seat 26B and the characteristics of this seat are shown. This is great information particularly if you plan a long flight where comfort might be a priority.
In this example, tap seat 26B and the characteristics of this seat are shown. This is great information particularly if you plan a long flight where comfort might be a priority.
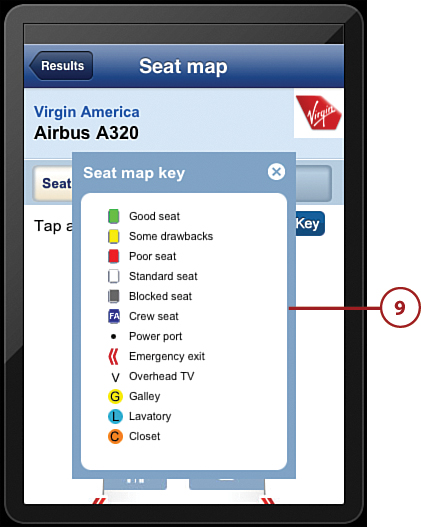
![]() The seat map key offers other types of information on seating that can be found using SeatGuru.
The seat map key offers other types of information on seating that can be found using SeatGuru.
Communicating in a Foreign Country Is Easy When You Use Talking Translator
Talking Translator is an amazing App that enables you to speak into a microphone in your native tongue and instantly have the phrase translated into another language. You are allowed five free translations per day, after that you need to purchase further translations. This is a remarkable app that can greatly enhance your ability to communicate in a foreign country.
To try out this app, do the following:
![]() In the App Store, search for Talking Translator. Tap Free, and then tap Install to download it. After it is installed, tap the Talking Translator icon on your iPad’s home screen to open it.
In the App Store, search for Talking Translator. Tap Free, and then tap Install to download it. After it is installed, tap the Talking Translator icon on your iPad’s home screen to open it.
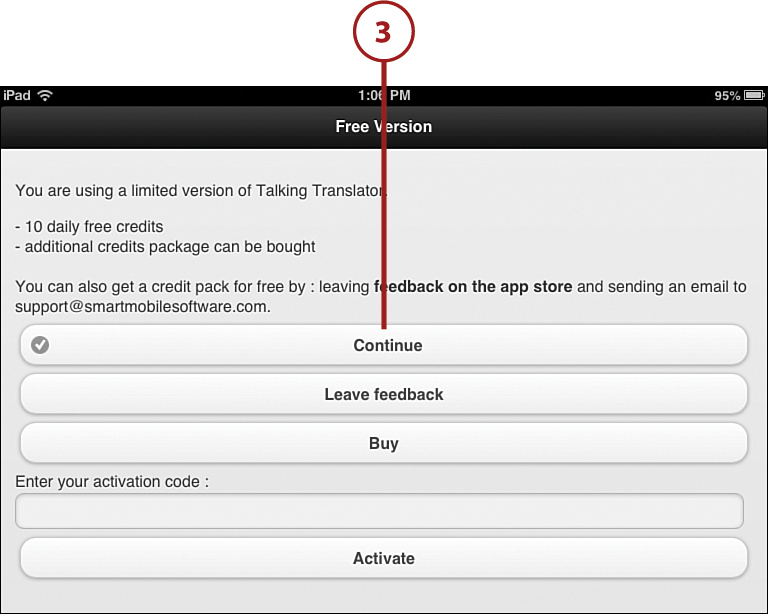
![]() The opening page gives you a few options to review, including Continue, Leave Feedback, Buy, or Activate.
The opening page gives you a few options to review, including Continue, Leave Feedback, Buy, or Activate.
![]() For this task, tap Continue, which takes you to the free translations.
For this task, tap Continue, which takes you to the free translations.
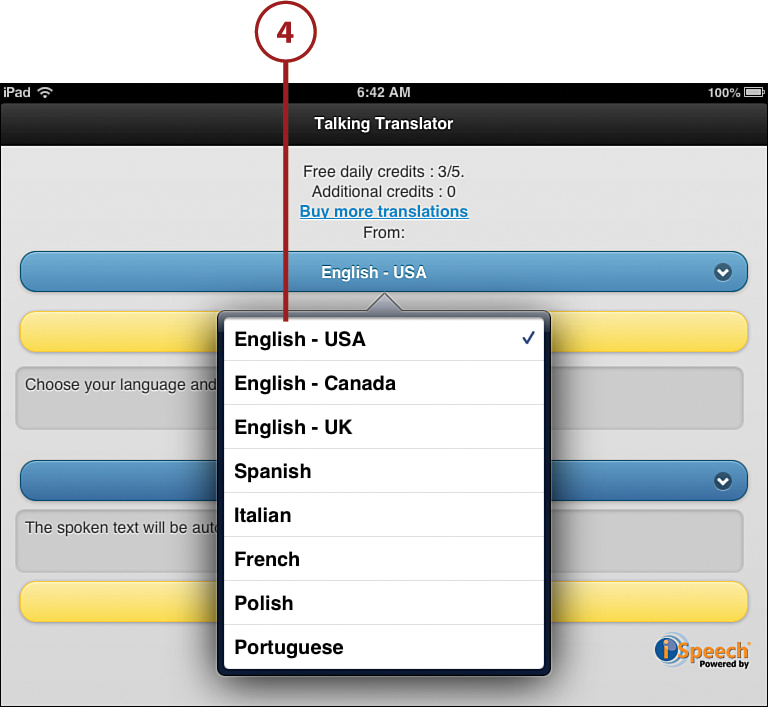
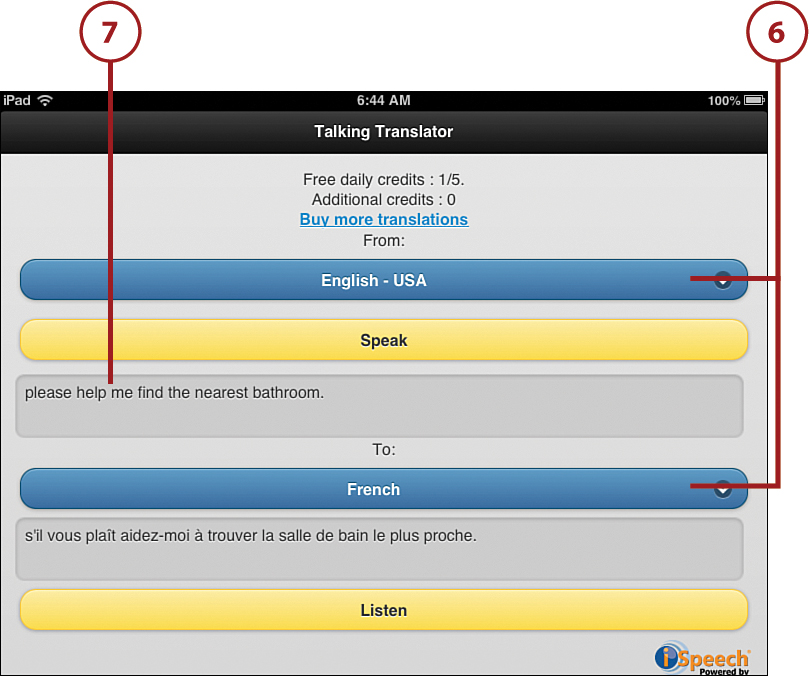
![]() The next page requires you to choose your native tongue. For this task, chose English USA. As you can see, there are many languages to choose from.
The next page requires you to choose your native tongue. For this task, chose English USA. As you can see, there are many languages to choose from.
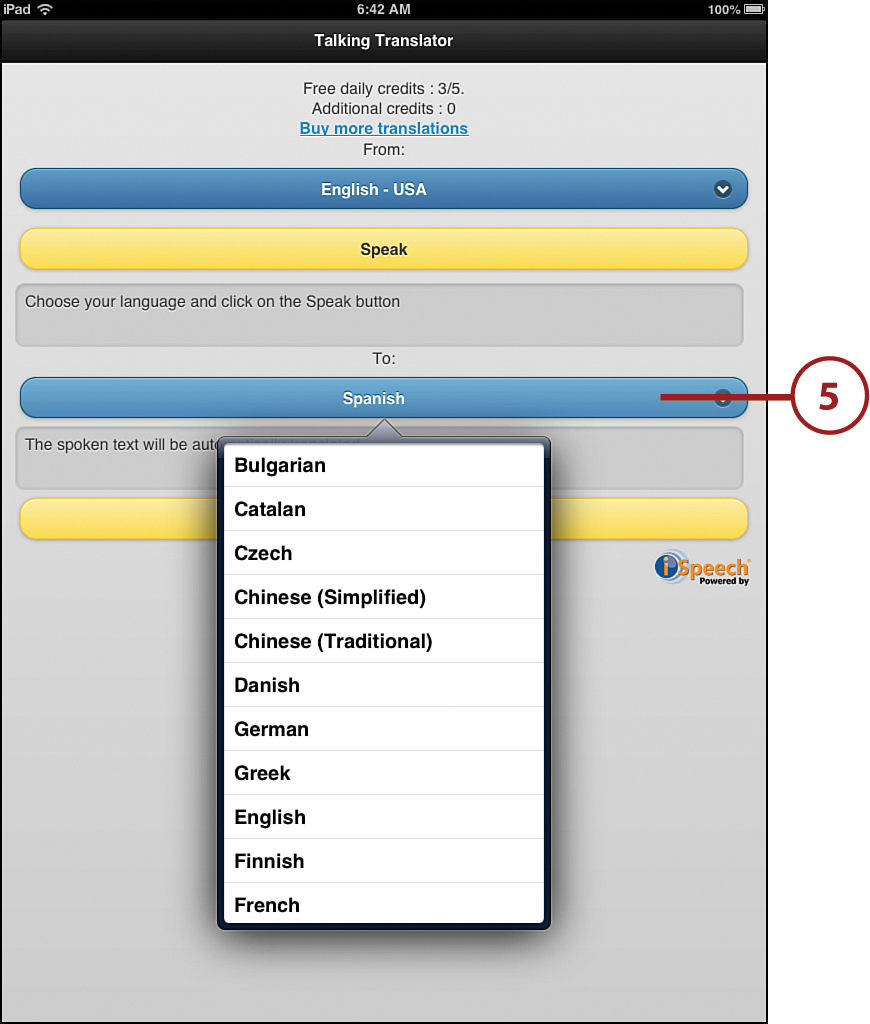
![]() Next, choose the language into which you want your phrase translated.
Next, choose the language into which you want your phrase translated.
Apps Change Frequently
The images you see here are how these apps appeared at the time this book was written. App developers do occasionally update their apps by changing the way it looks, moving buttons around, or adding new features. You might find that an app looks slightly different from what you see here, but unless the developer has given it a total overhaul, it should function basically the same way it did when these steps were written. So don’t let that stop you from trying it out!
![]() For this task, choose to have English USA translated into French.
For this task, choose to have English USA translated into French.
![]() Tap Speak and choose a phrase you commonly need to translate when abroad, “Please help me find the nearest bathroom.”
Tap Speak and choose a phrase you commonly need to translate when abroad, “Please help me find the nearest bathroom.”
![]() To do this, tap the red dot at the bottom of the app. As soon as the dot begins to flash, speak into the microphone. The app writes what it heard you say. It is important to make sure that the app has captured your exact question.
To do this, tap the red dot at the bottom of the app. As soon as the dot begins to flash, speak into the microphone. The app writes what it heard you say. It is important to make sure that the app has captured your exact question.

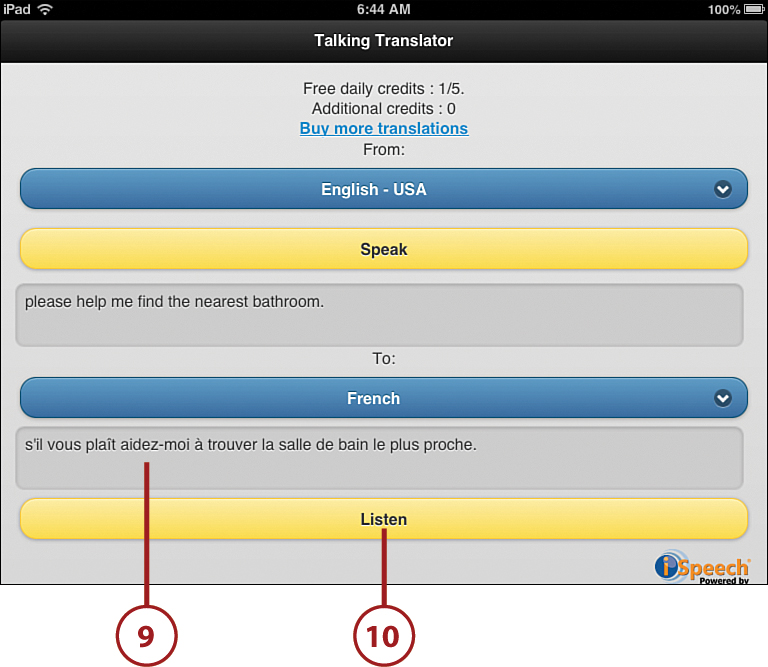
![]() Talking Translator shows your phrase written in French.
Talking Translator shows your phrase written in French.
![]() Tap listen to hear your phrase.
Tap listen to hear your phrase.
Getting Travel Advice from Others Using TripAdvisor
Whether you travel a few miles or thousands of miles from home, TripAdvisor serves to enhance that experience. With just a few taps, you have access to restaurants, hotels, things to do, and the thoughts of many people who have preceded you at your chosen destination. With TripAdvisor, you also have the ability to save your favorites.
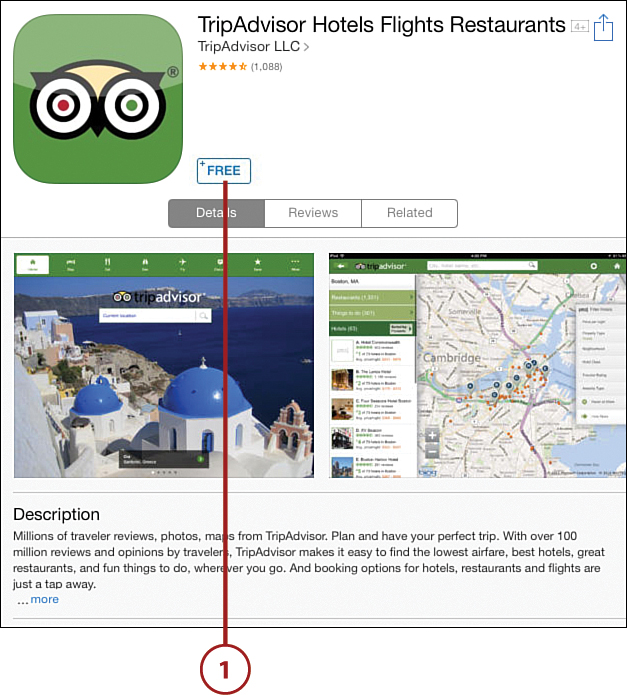
![]() To start, search the App Store TripAdvisor Hotels Flights Restaurants. Tap Free and then tap Install to download and install the app. Tap the icon for the app on your Home screen to open it.
To start, search the App Store TripAdvisor Hotels Flights Restaurants. Tap Free and then tap Install to download and install the app. Tap the icon for the app on your Home screen to open it.
Opening Apps
There are two ways to open an app. After you download and install an app from the App Store, the button you tapped that said Free, and then changed to Install App changes to read Open after the app is installed. You can tap the Open button right there in the app store to open the app, or you can press the Home button on your iPad and then you will see the new icon on your Home screen for the app you just downloaded. Tap the icon to open the app. If the app already exists on your iPad, such as the built in apps like Maps or iTunes, you simply tap that apps icon. You never need to download or install the apps that are part of the iPad’s operating system.
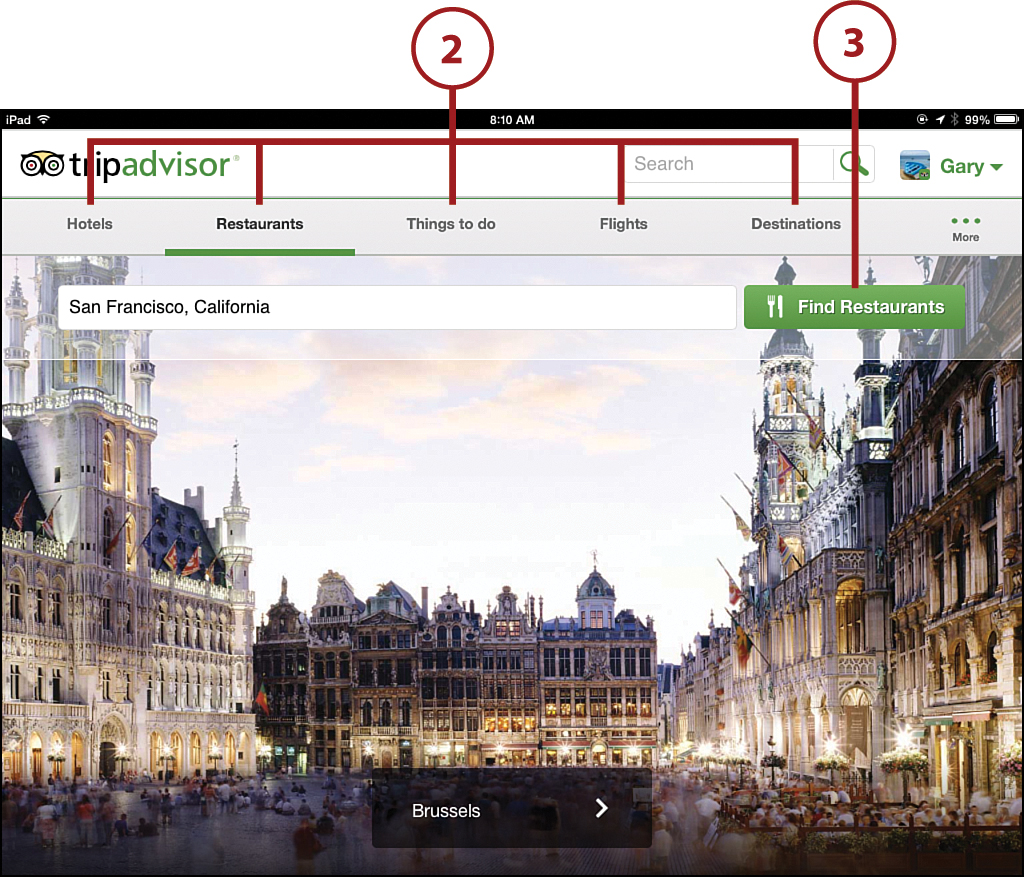
![]() You can see the options you can explore through TripAdvisor along the top of the screen (hotels, restaurants, things to do, flights, forums, and so on).
You can see the options you can explore through TripAdvisor along the top of the screen (hotels, restaurants, things to do, flights, forums, and so on).
![]() For this task, choose Find Restaurants to explore in the San Francisco area.
For this task, choose Find Restaurants to explore in the San Francisco area.
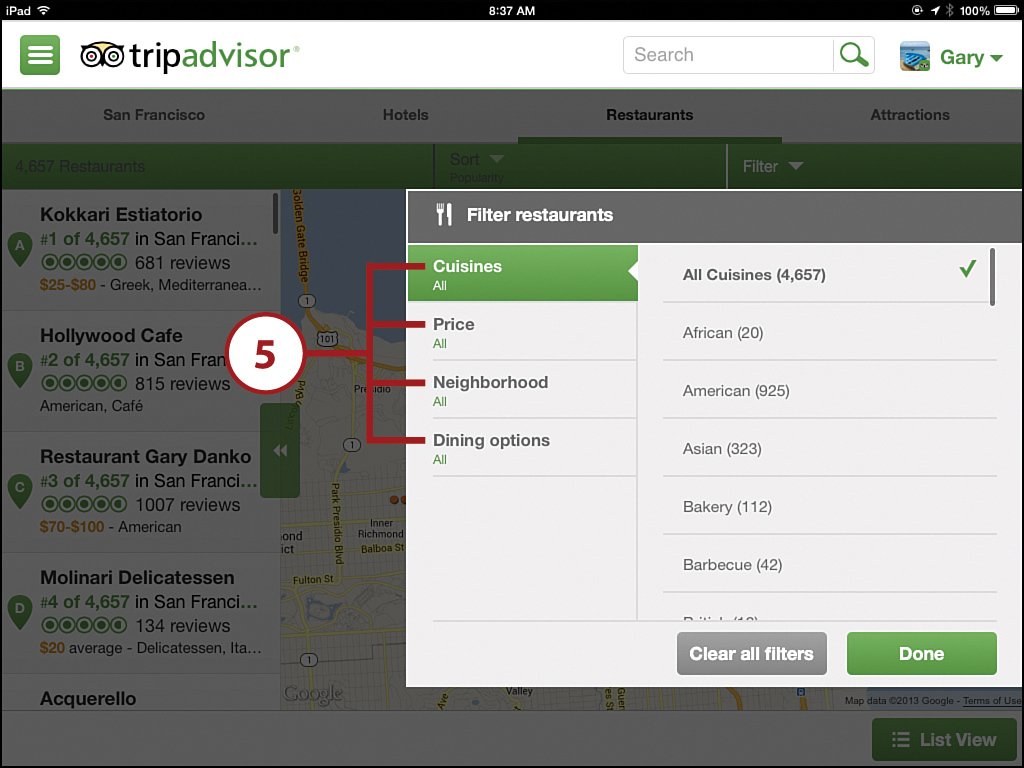
![]() The restaurant page now enables you the opportunity to refine your search by cuisine, price range, and locations within the city by tapping the Filter button.
The restaurant page now enables you the opportunity to refine your search by cuisine, price range, and locations within the city by tapping the Filter button.
![]() In this example, we chose all cuisines, all prices, all neighborhoods, and all dining options.
In this example, we chose all cuisines, all prices, all neighborhoods, and all dining options.
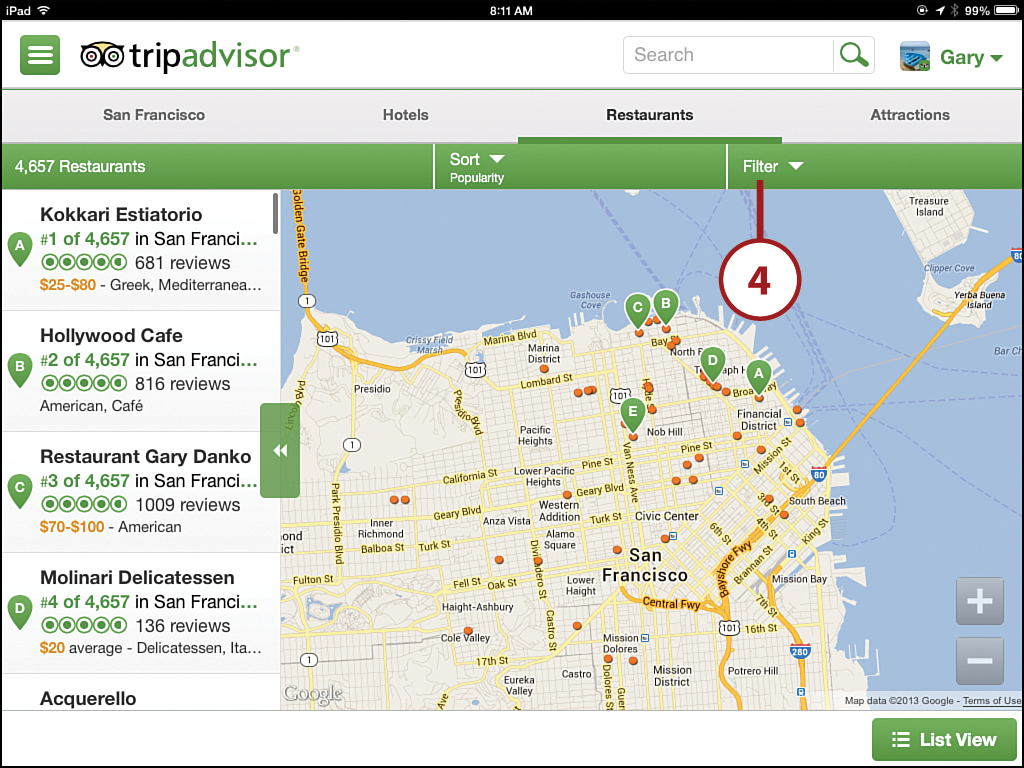
![]() At the time of this search, there were 4657 restaurants listed in San Francisco. The top-rated restaurant, Kokkari Estiatorio, had 681 reviews and a rating of almost a perfect 5. In addition, you can move around the map, zooming to your present location and finding the best restaurants or services near you or where you plan to go.
At the time of this search, there were 4657 restaurants listed in San Francisco. The top-rated restaurant, Kokkari Estiatorio, had 681 reviews and a rating of almost a perfect 5. In addition, you can move around the map, zooming to your present location and finding the best restaurants or services near you or where you plan to go.
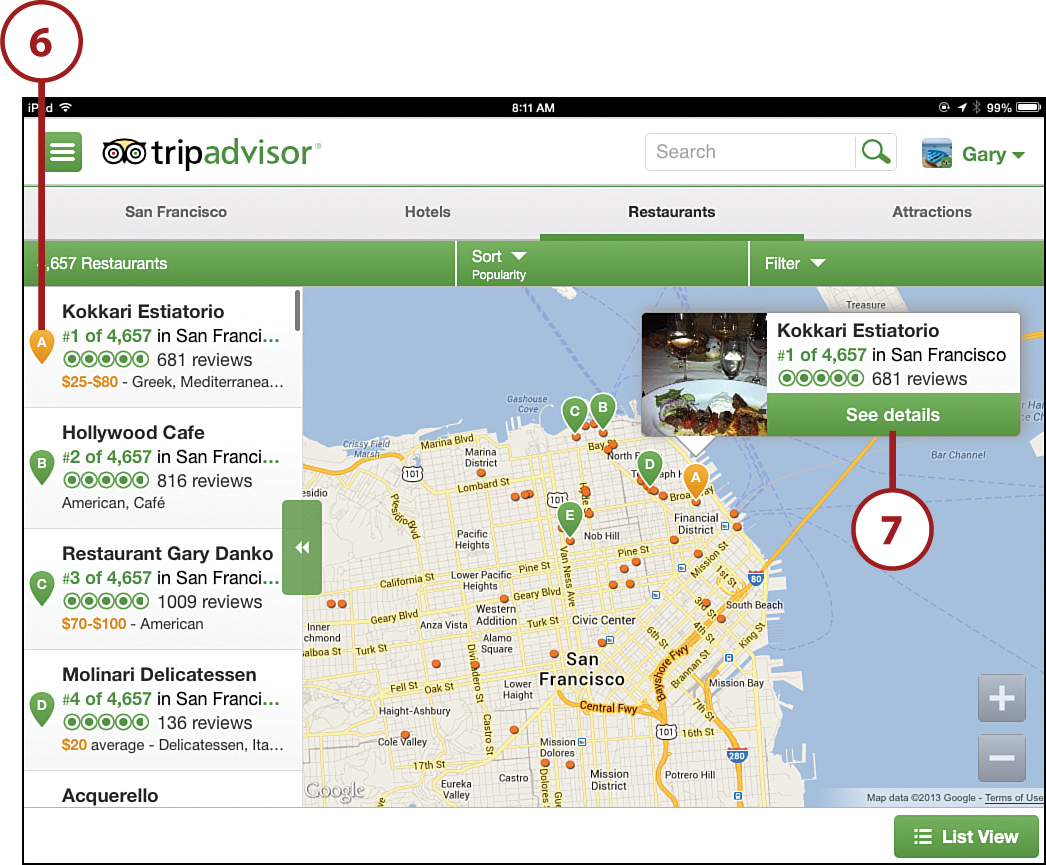
![]() Tap on the Kokkari Estiatorio insert to see further details.
Tap on the Kokkari Estiatorio insert to see further details.
Location Settings
To change your location settings, open the Settings App from your iPad’s home screen, and then tap Privacy on the left side. Along the right side, be sure that TripAdvisor is set to ON. This ensures that should you choose Current Location, your iPad can find you.
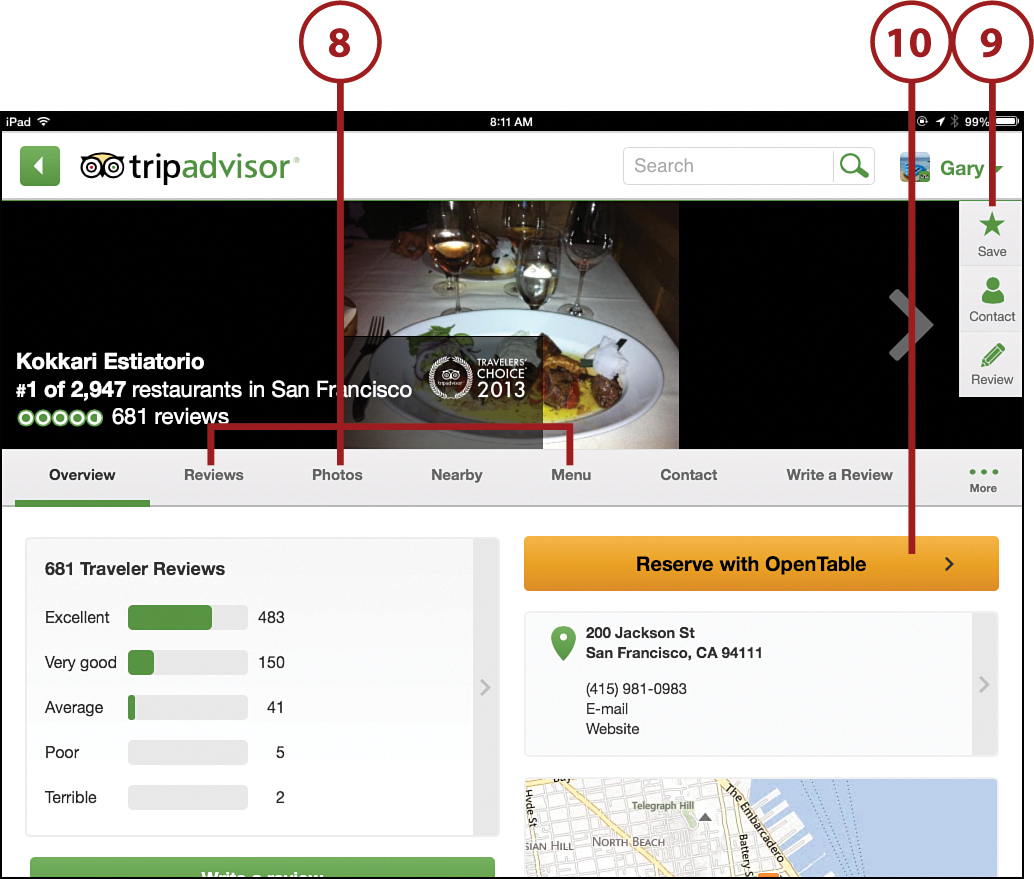
![]() If you find the information interesting, you can tap reviews, photos, or menu to see what others are saying or get even more information.
If you find the information interesting, you can tap reviews, photos, or menu to see what others are saying or get even more information.
![]() After you find a restaurant or hotel that you want to check out, tap the Save button to add it to your favorites. To do this it will be necessary to sign in to TripAdvisor.
After you find a restaurant or hotel that you want to check out, tap the Save button to add it to your favorites. To do this it will be necessary to sign in to TripAdvisor.
![]() Finally, tap Reserve with OpenTable to make a reservation.
Finally, tap Reserve with OpenTable to make a reservation.
Exchanging Homes Is a Great Way to See the World
Exchanging homes with like-minded folks around the world is quite possibly the best way to experience a foreign country. Home exchangers can live like a local, shop in local markets, cook as if a local, get to know neighbors and friends of the homeowner, and in many cases, become lifelong friends with the people they exchange with. Although the Senior Home Exchange is a website, not an app, I have included it in this book because it is a great way to initiate travel with like-minded seniors.
Using Intervac Home Exchange
Intervac is the oldest home exchange site, and one that is popular. Although you can search the site to get an idea of what options might be available, to actually initiate an exchange you must join and list your own home as an option for exchange. There is a fee for joining. The amount depends on the type of membership you choose. The following task provides a look at this cool and inexpensive way to see the world.
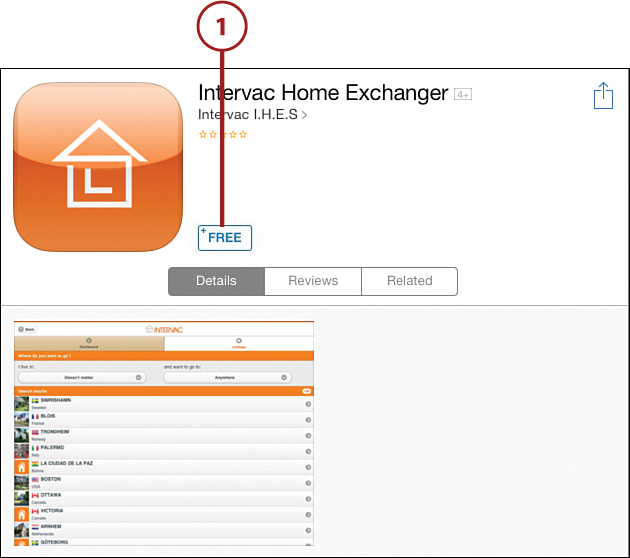
![]() Search the App Store for Intervac. Tap Free and then tap Install to download and install the app. After it has loaded, locate the Intervac app icon on your iPad, and tap it to start the app.
Search the App Store for Intervac. Tap Free and then tap Install to download and install the app. After it has loaded, locate the Intervac app icon on your iPad, and tap it to start the app.
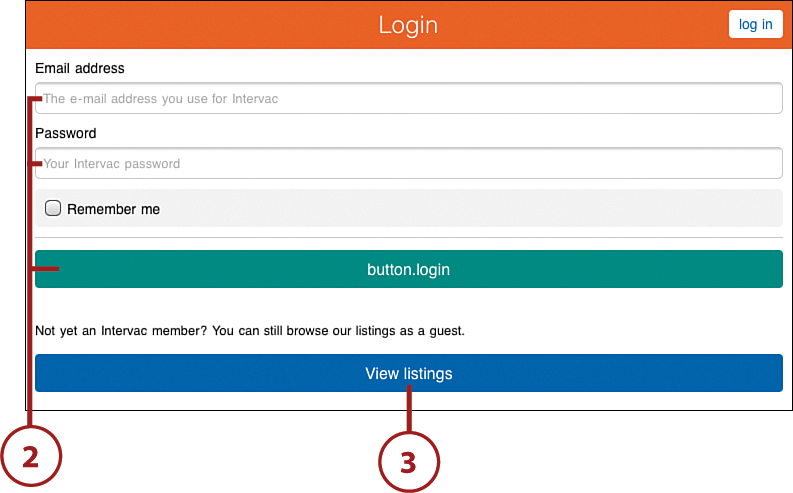
![]() The email address, button. login, is for existing members to access their accounts.
The email address, button. login, is for existing members to access their accounts.
![]() Tap the View listings button to access the visitors view of the exchange options available. A variety of different options appear.
Tap the View listings button to access the visitors view of the exchange options available. A variety of different options appear.
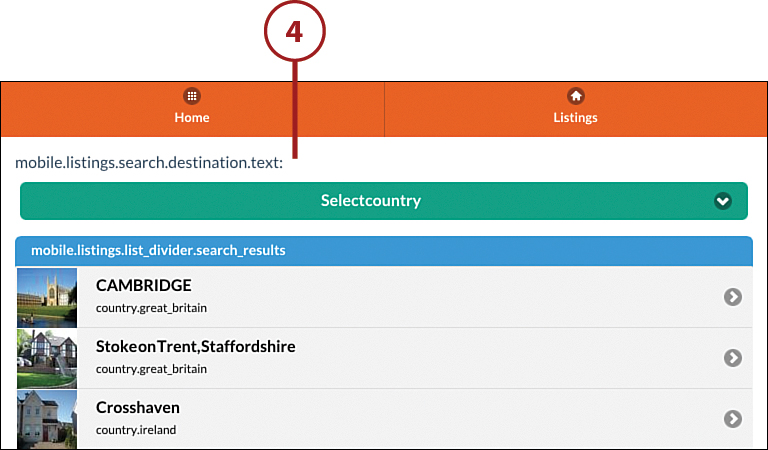
![]() Tap the green Selectcountry bar near the top of the screen to restrict your search to the country you are interested in visiting.
Tap the green Selectcountry bar near the top of the screen to restrict your search to the country you are interested in visiting.
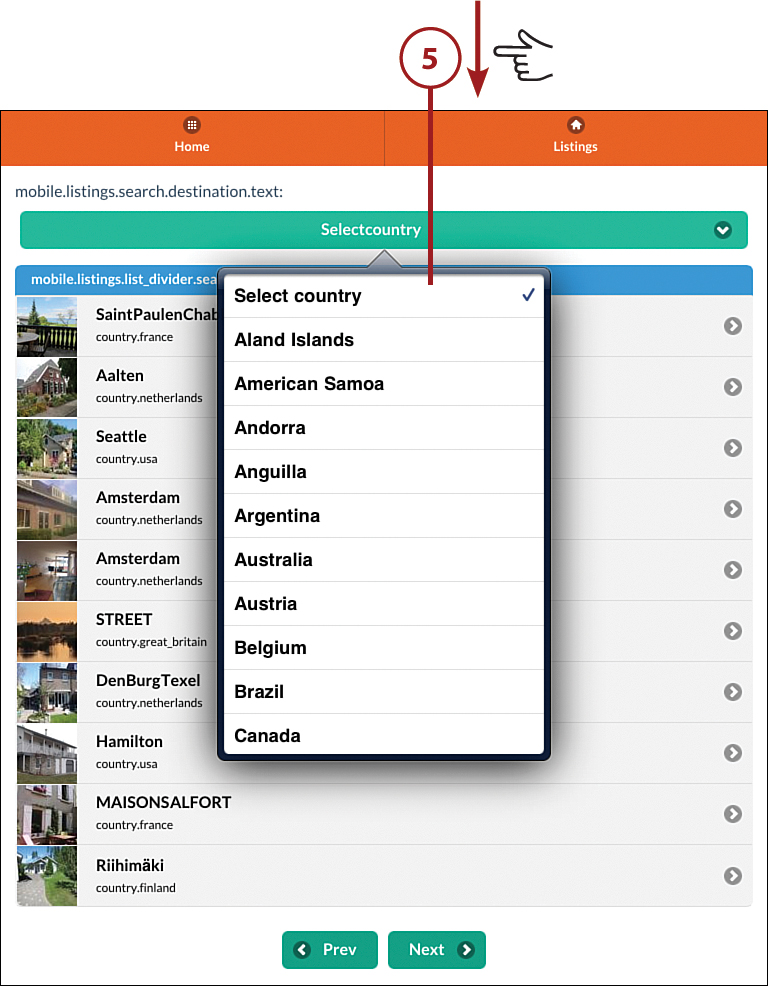
![]() Scroll down the list of countries to make your choice of listings to view by country, and then tap Next. For this task, I chose France.
Scroll down the list of countries to make your choice of listings to view by country, and then tap Next. For this task, I chose France.
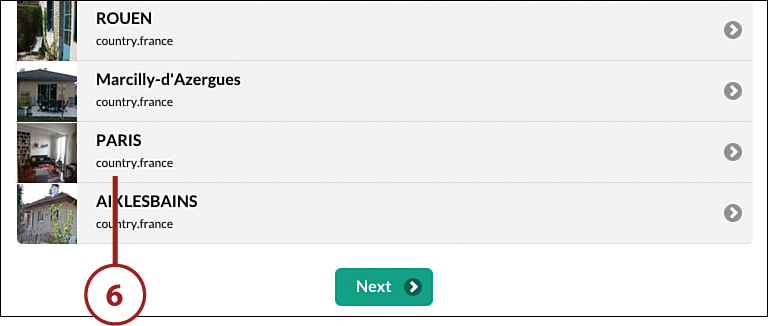
![]() The France options are listed randomly; I chose to tap the first Paris listing.
The France options are listed randomly; I chose to tap the first Paris listing.
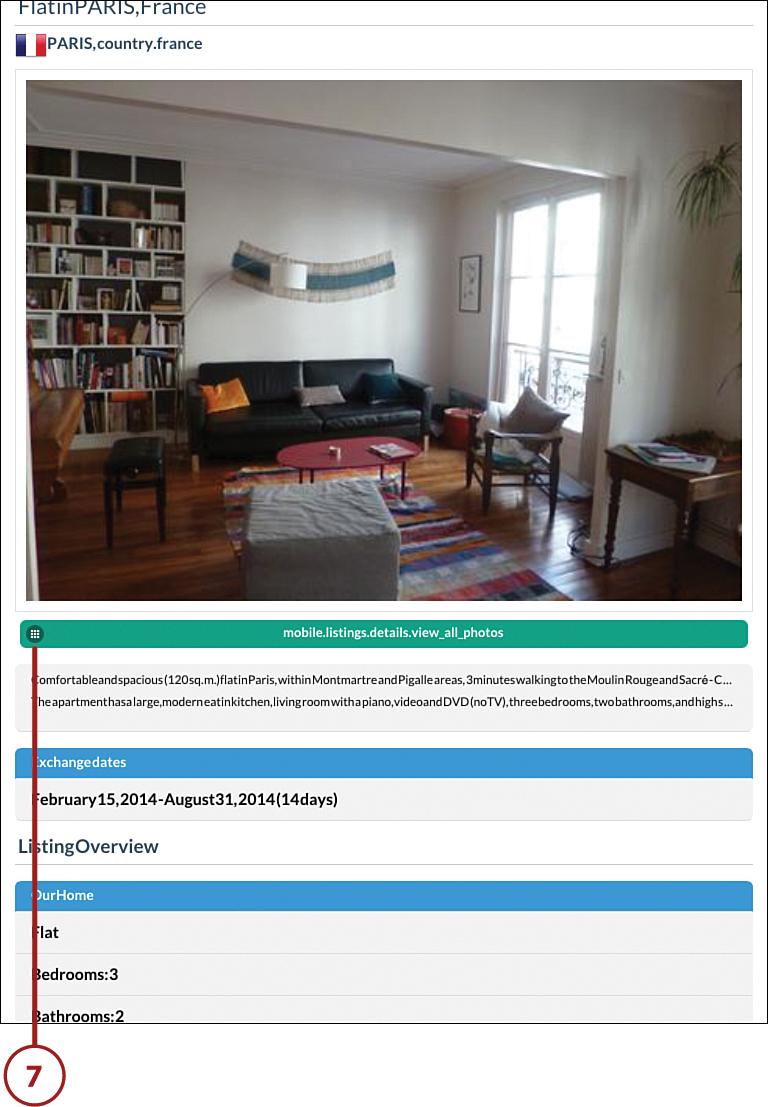
![]() The first photo of this apartment in Paris appears. Details about the listing are seen at the bottom of the page. Tap the green View All Photos button to see all the photos for this apartment.
The first photo of this apartment in Paris appears. Details about the listing are seen at the bottom of the page. Tap the green View All Photos button to see all the photos for this apartment.
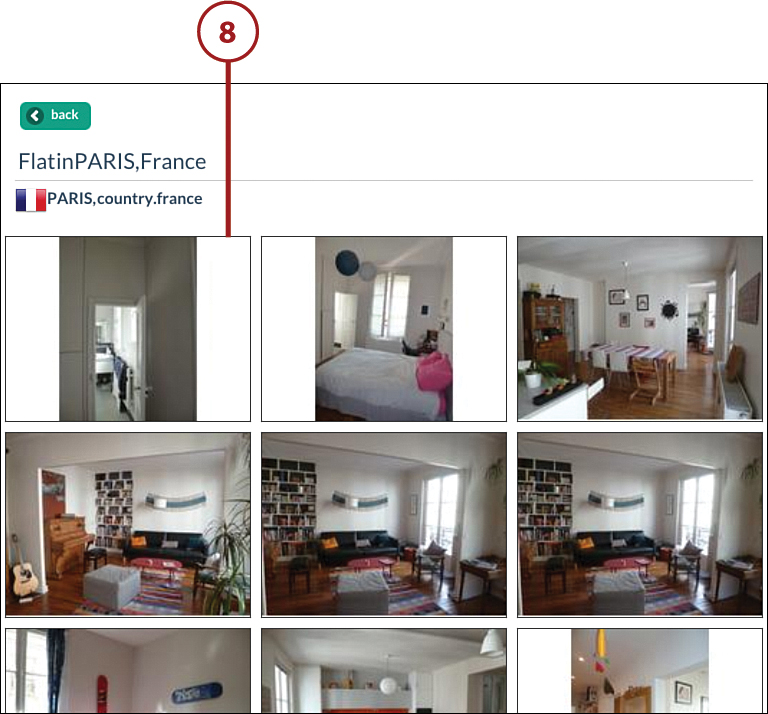
![]() The next page includes many photos that the apartment owner has chosen to show. This is a great opportunity to get a feel for this location as a potential exchange.
The next page includes many photos that the apartment owner has chosen to show. This is a great opportunity to get a feel for this location as a potential exchange.
As a visitor using this, you can get a general feel for the home exchange options available through Intervac. A visit to the website gives you the options to refine your search by date and those who are interested in visiting. I would suggest taking a look at the website prior to signing up—there is a fee involved to be a member.
What About Our Stuff???
Our take on this is it quite similar to a nuclear stand-off. Yes, they are living in your house and using your “stuff” but equally, you are living in their house and using their “stuff.” My wife and I have personally participated in many exchanges and never had a problem. As an added bonus, we now have friends throughout the world.
Using Senior Home Exchange Website
The Senior Home Exchange website is designed for 50+ year olds who are interested in exchanging homes. This website caters to those who are adventurous and interested in vacationing by exchanging homes with other seniors.
![]() Type www.seniorshomeexchange.com/ into your Safari web browser, or search for Senior Home Exchange.
Type www.seniorshomeexchange.com/ into your Safari web browser, or search for Senior Home Exchange.
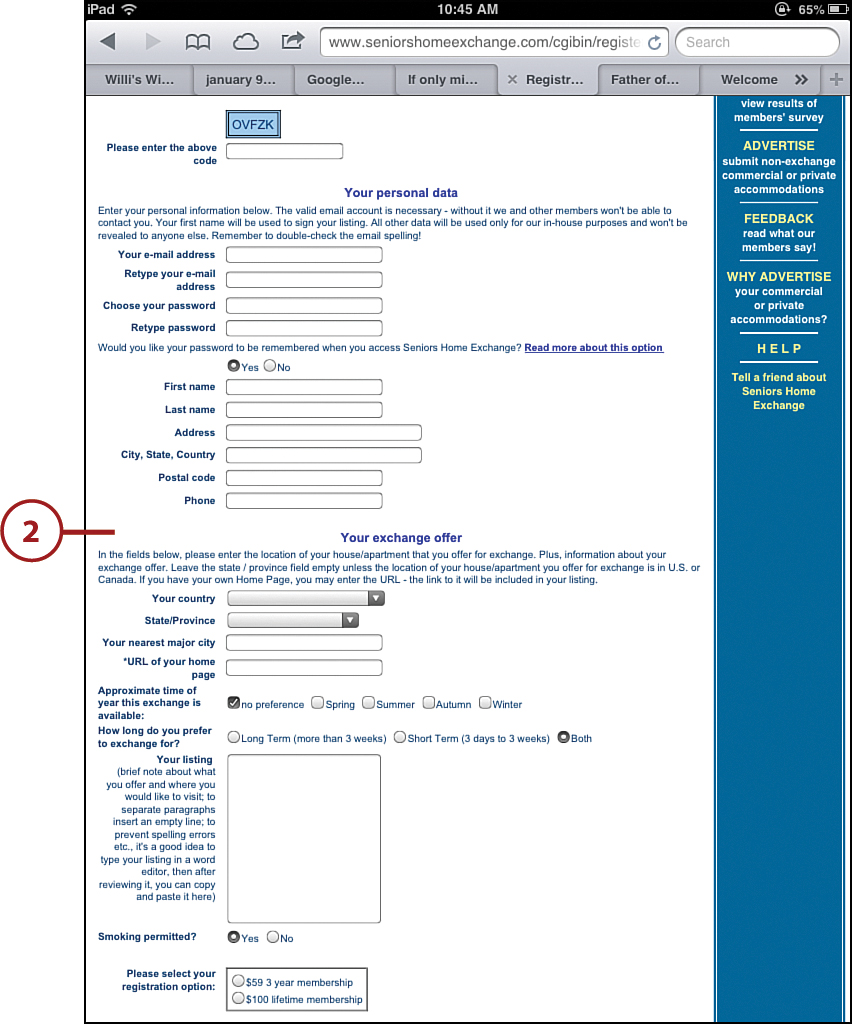
![]() To have full access to this website you can pay $59 for a 3-year membership or $100 for a lifetime membership. In addition, you will list the characteristics of the home you want to exchange. This photo illustrates the kind of information needed to join the group.
To have full access to this website you can pay $59 for a 3-year membership or $100 for a lifetime membership. In addition, you will list the characteristics of the home you want to exchange. This photo illustrates the kind of information needed to join the group.
![]() The option chosen for this example was to access the Visitors directory to see just what might be available to meet your needs.
The option chosen for this example was to access the Visitors directory to see just what might be available to meet your needs.
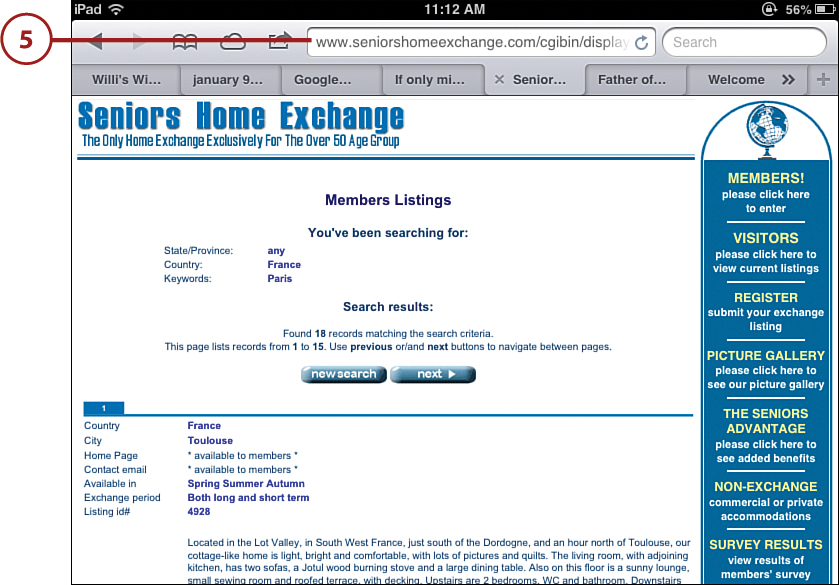
![]() France is chosen as the country to visit. To narrow the search further, select a city such as Paris. Tap Display
France is chosen as the country to visit. To narrow the search further, select a city such as Paris. Tap Display

![]() As you can see from the example, 18 records matching the search came up.
As you can see from the example, 18 records matching the search came up.
![]() In this example, scroll down to find a particularly interesting example—a penthouse apartment in central Paris.
In this example, scroll down to find a particularly interesting example—a penthouse apartment in central Paris.
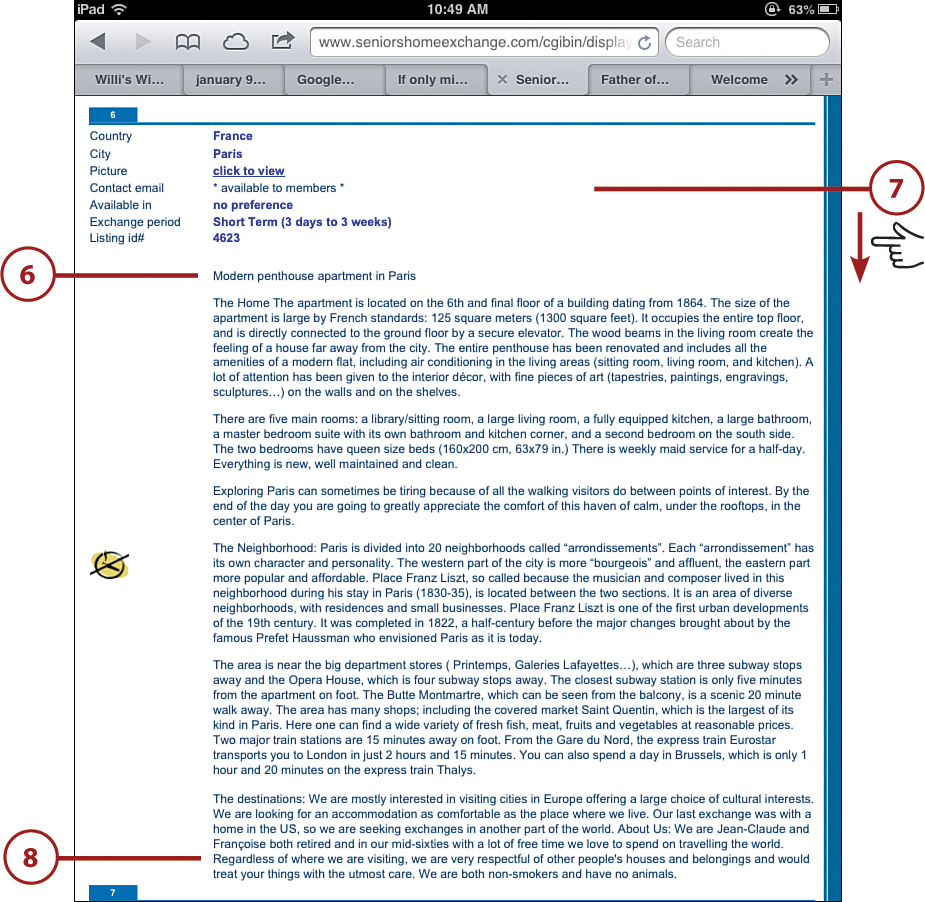
![]() There is an eloquent description of the apartment and surrounding area. The description also provides valuable insight into the owners and gives a real sense of who they are as people and individuals that will be staying in your own home.
There is an eloquent description of the apartment and surrounding area. The description also provides valuable insight into the owners and gives a real sense of who they are as people and individuals that will be staying in your own home.
![]() At the end of the description they state, “Regardless of where we are visiting, we are very respectful of other people’s houses and belongings and would treat your things with the utmost care.” This statement is generally indicative of the kind of people that are interested in exchanging homes. Exchanging homes with others enables you to not only explore the world on a budget, but expand your group of friends worldwide—great fun!
At the end of the description they state, “Regardless of where we are visiting, we are very respectful of other people’s houses and belongings and would treat your things with the utmost care.” This statement is generally indicative of the kind of people that are interested in exchanging homes. Exchanging homes with others enables you to not only explore the world on a budget, but expand your group of friends worldwide—great fun!
Understanding Foreign Currency Exchange Using XE Currency Converter
When traveling abroad, it is essential to keep track of your spending and to be familiar with the currency in whatever country you are traveling. Understanding the relationship between your own currency, and the currency where you are traveling, ensures that you will not make costly errors when making purchases internationally. The App XE Currency Converter is a very helpful tool when you are in a land with an unfamiliar currency.
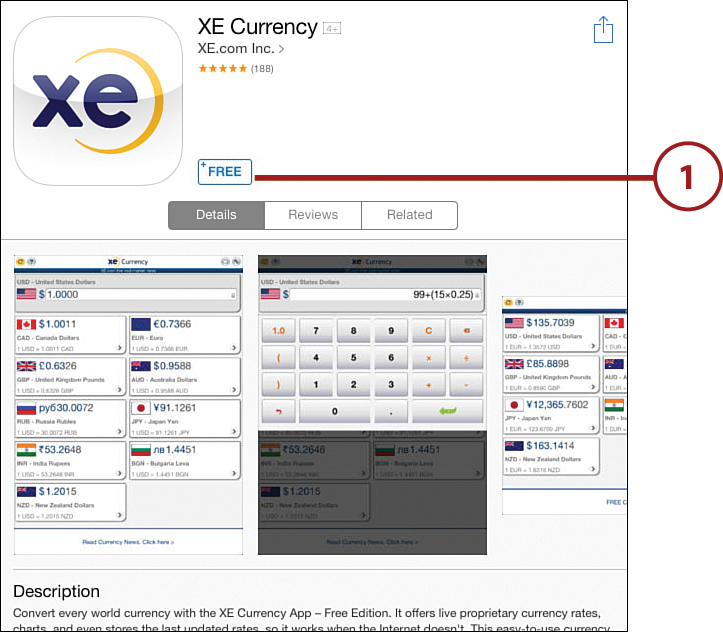
![]() Search the App Store for XE Currency. Tap Free and then tap Install to download and install the app. Tap the XE Currency icon on your home screen to open it.
Search the App Store for XE Currency. Tap Free and then tap Install to download and install the app. Tap the XE Currency icon on your home screen to open it.
![]() A Getting Started option enables you to become familiar with the app. It provides pop-up notes that describe the different parts of the app. You can find Getting Started by tapping on the ? at the top.
A Getting Started option enables you to become familiar with the app. It provides pop-up notes that describe the different parts of the app. You can find Getting Started by tapping on the ? at the top.
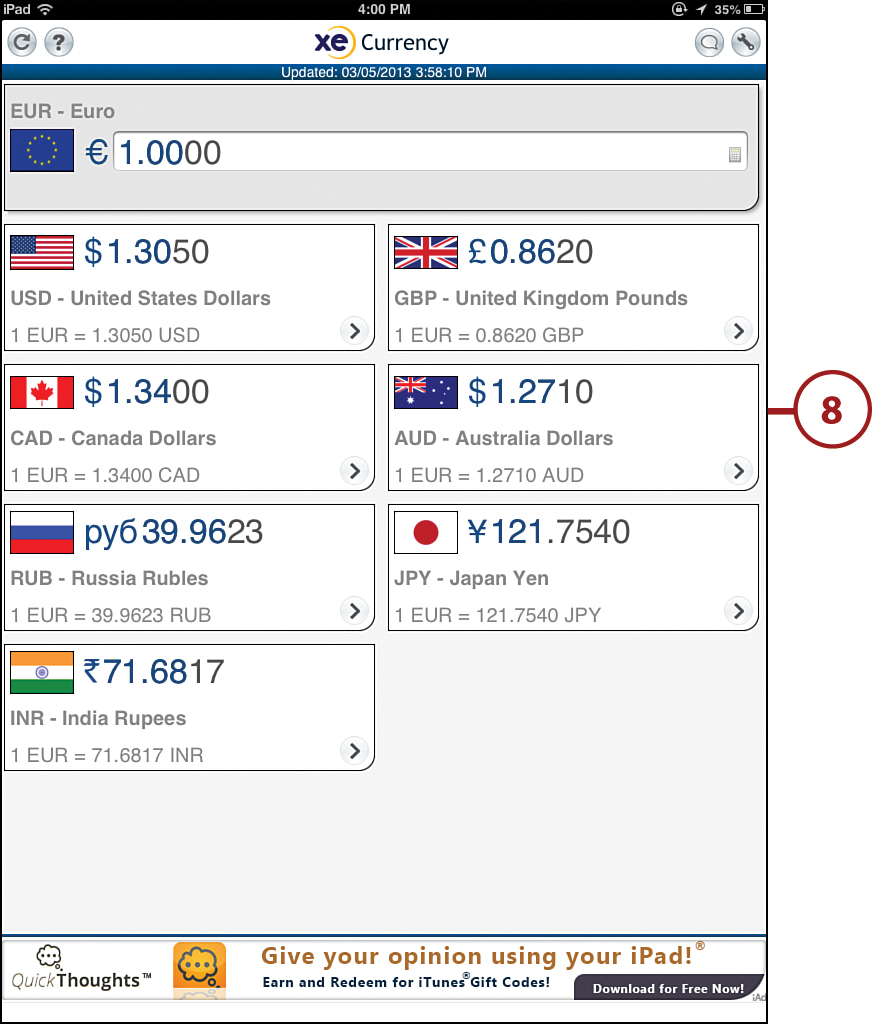
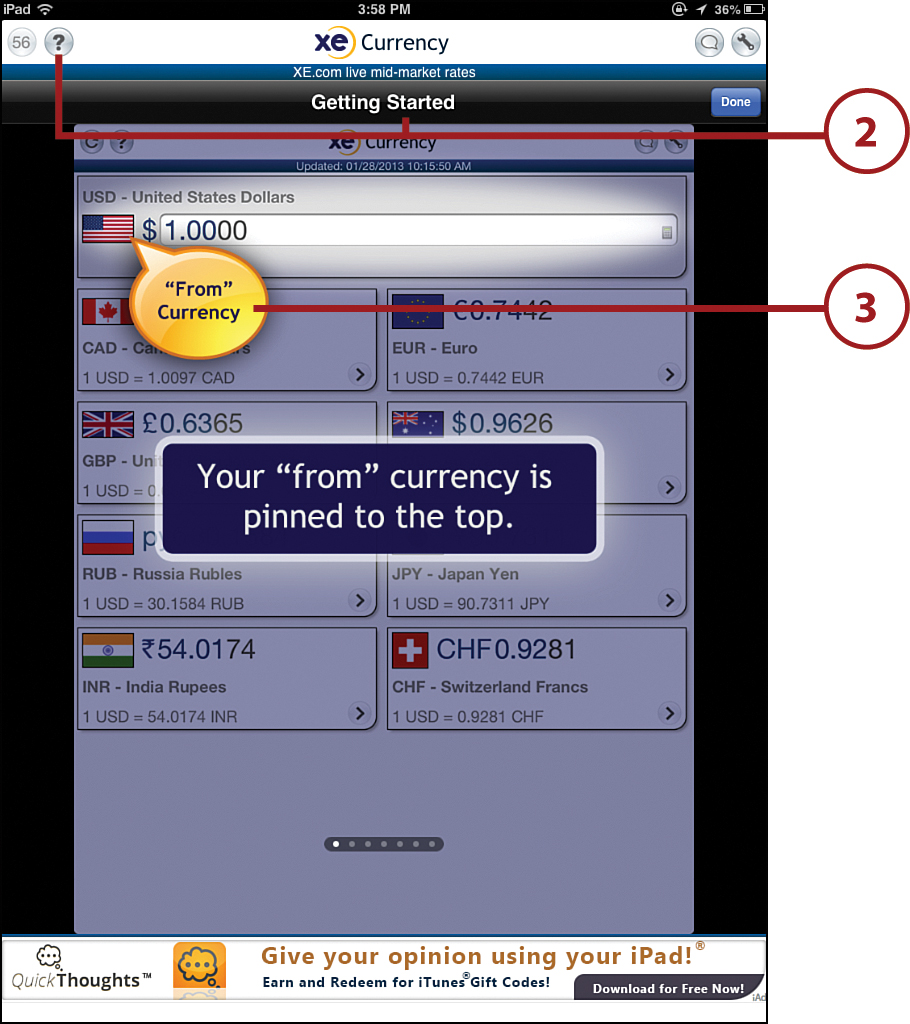
![]() Choose your “from” currency. This will be the currency you are familiar with. This example uses U.S. dollars.
Choose your “from” currency. This will be the currency you are familiar with. This example uses U.S. dollars.
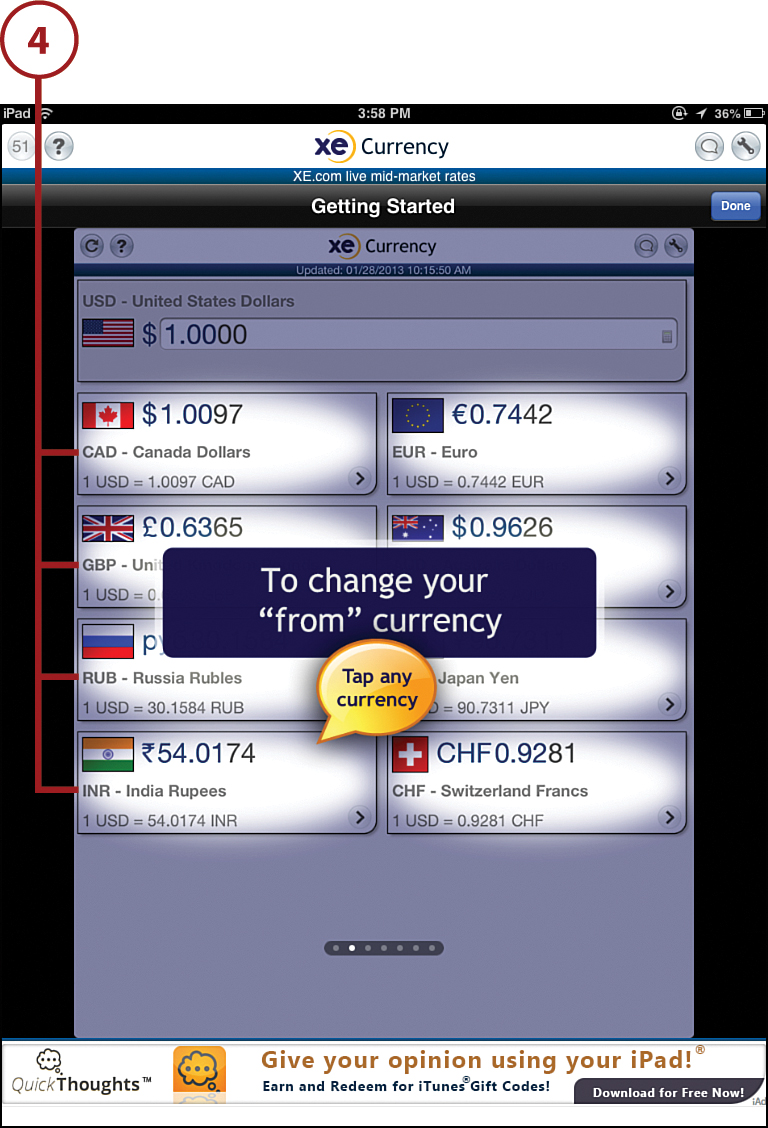
![]() Tap any other currency to change your “from” currency.
Tap any other currency to change your “from” currency.
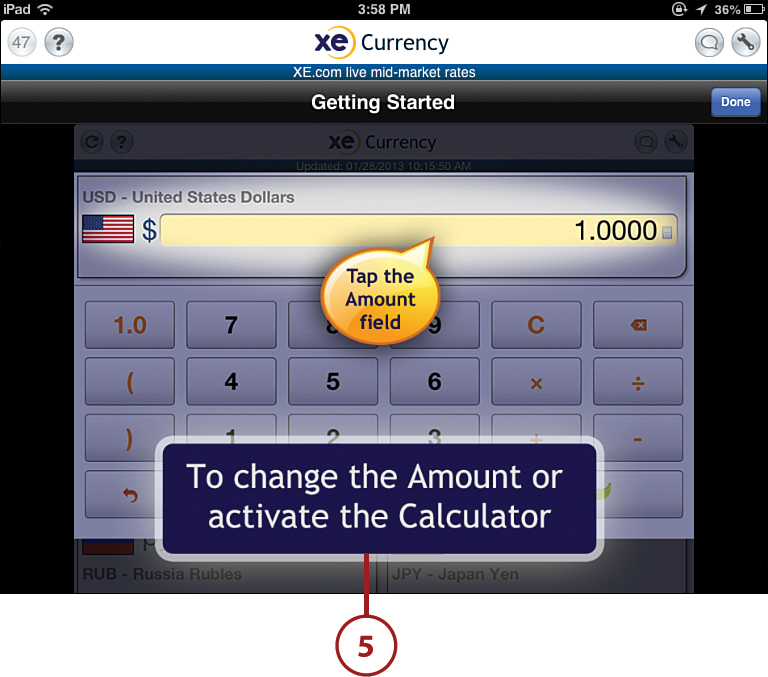
![]() You can now change the amount or activate the calculator to see the relationship between your currency and what you are considering spending in the new currency.
You can now change the amount or activate the calculator to see the relationship between your currency and what you are considering spending in the new currency.
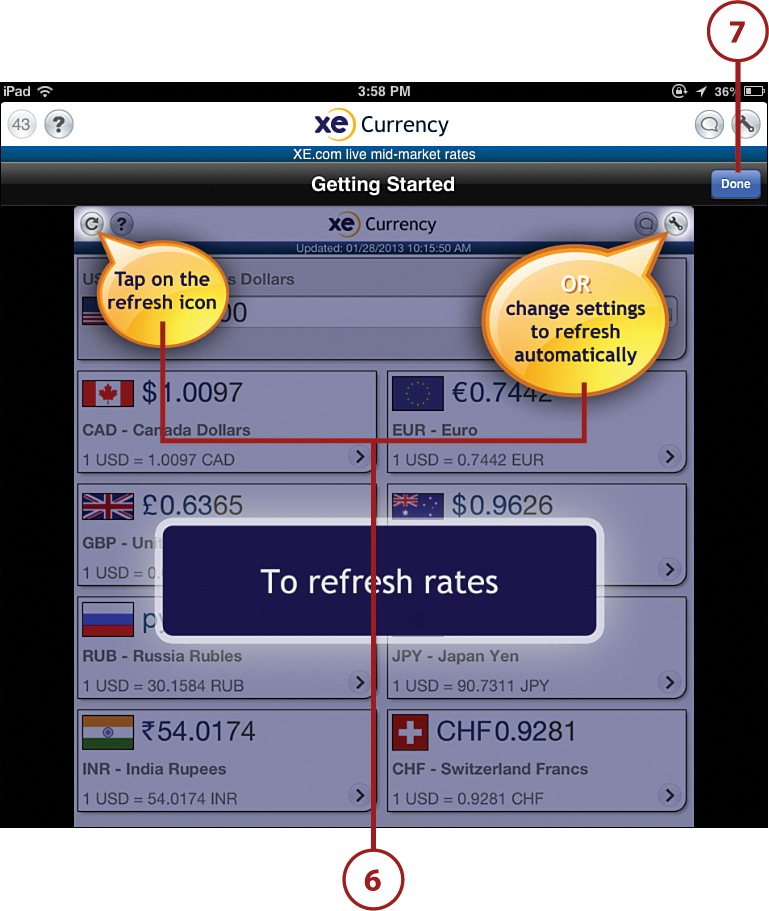
![]() Currency rates change continually. XE Currency provides the opportunity to refresh the rates by tapping the Refresh icon or change the settings to have the rates refresh automatically at intervals you choose.
Currency rates change continually. XE Currency provides the opportunity to refresh the rates by tapping the Refresh icon or change the settings to have the rates refresh automatically at intervals you choose.
![]() Tap Done.
Tap Done.
![]() After you enter an amount and activated the calculator, the conversion rates you’re looking for display on the screen.
After you enter an amount and activated the calculator, the conversion rates you’re looking for display on the screen.
There are several other options to add currencies and further refine your use of XE Currency, but the primary objective when traveling is to know the value of the currency you are working with in relation to your home currency.