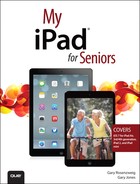
3. Networking and Syncing
In this chapter, you find out how to connect your iPad to your local Wi-Fi network. You also see how to sync your iPad with your Mac or Windows computer and with Apple’s iCloud service.
→ Setting Up Your Wi-Fi Network Connection
→ Setting Up Your 3G/4G Connection
→ Keeping Your iPad Up-To-Date
Your iPad connects you to the world. You can surf the Web, view all sorts of information, communicate with friends, and share photos. But first, you must connect your iPad to the Internet. You can do that using a Wi-Fi connection. Some iPads also have the capability to connect to a mobile network.
Setting Up Your Wi-Fi Network Connection
One of the first things you need to do with your iPad is to establish an Internet connection.
Chances are that you did this when you started your iPad for the first time. It should have prompted you to choose from a list of nearby Wi-Fi networks. But you need to do this again if you first used your iPad away from home or need to switch to use another Wi-Fi network.
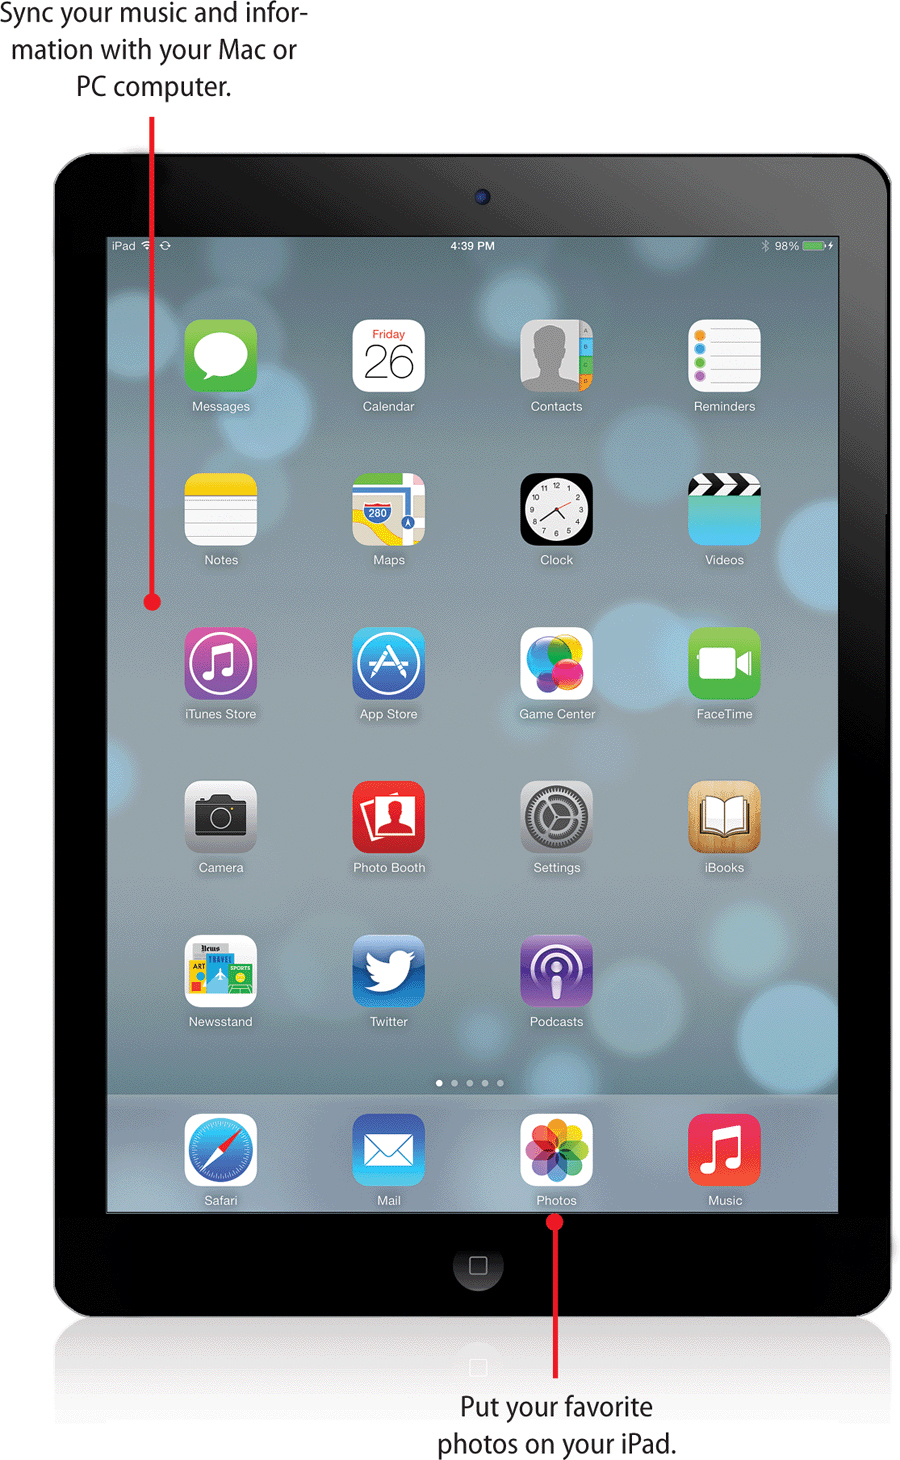
To connect your iPad to a wireless network, follow these steps.
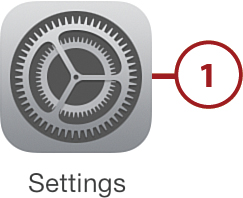
![]() Tap the Settings icon on the Home screen.
Tap the Settings icon on the Home screen.

![]() Choose Wi-Fi from the list of settings on the left.
Choose Wi-Fi from the list of settings on the left.
![]() Make sure that Wi-Fi is turned on.
Make sure that Wi-Fi is turned on.
![]() Tap the item that represents your network. (If you tap on the blue-circled i button next to each network, you can further customize your network settings.)
Tap the item that represents your network. (If you tap on the blue-circled i button next to each network, you can further customize your network settings.)
I Don’t Have a Wireless Network
If you don’t have a Wi-Fi network but do have high-speed Internet through a telephone or cable provider, you have several options. The first is to call your provider and ask for a new network modem that enables wireless connections. Some providers might upgrade your box for free or a small cost.
Another option is to keep your current box and add a wireless base station of your own, such as the Apple Airport Extreme base station.
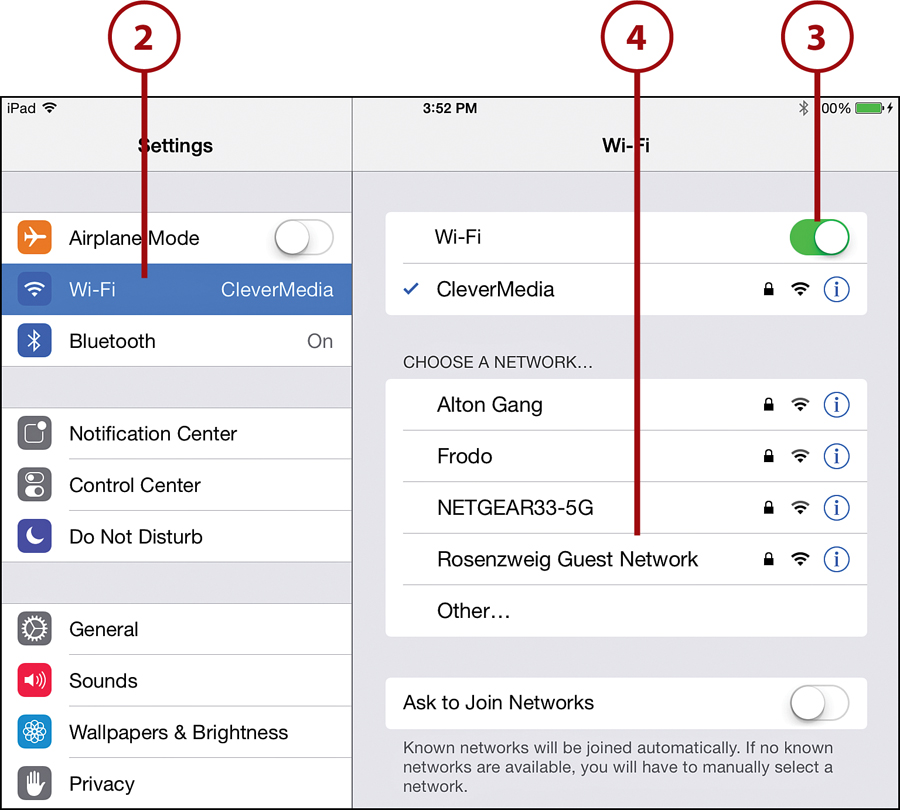
![]() If the network is protected by a password, you will be asked to enter the password. Once you enter the password, your iPad will remember it. So if you switch between two locations, like work and home, you will be asked to enter the password for each the first time you use that connection. From that point on, your iPad will automatically log on to each connection as you move around.
If the network is protected by a password, you will be asked to enter the password. Once you enter the password, your iPad will remember it. So if you switch between two locations, like work and home, you will be asked to enter the password for each the first time you use that connection. From that point on, your iPad will automatically log on to each connection as you move around.
Setting Up Your 3G/4G Connection
If you have an iPad with 3G/4G capabilities, you can set it up to use AT&T, Verizon, or any other compatible network. You can purchase a monthly data plan or purchase service in shorter increments.
![]() Tap the Settings icon on the Home screen.
Tap the Settings icon on the Home screen.
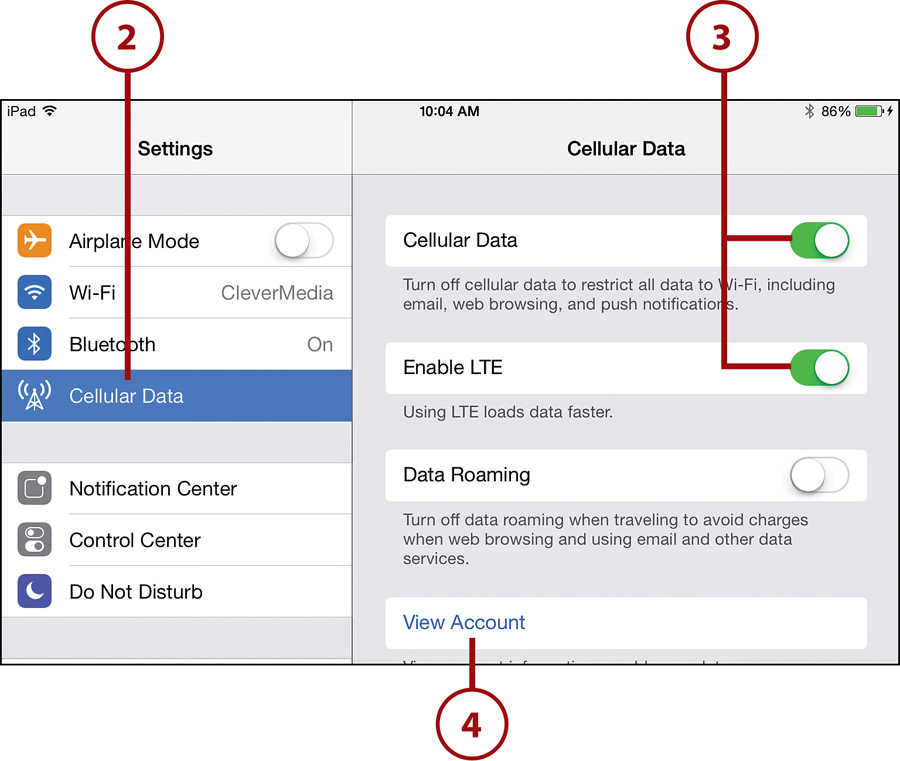
![]() Tap Cellular Data on the left.
Tap Cellular Data on the left.
![]() Turn on Cellular Data. In addition, if you have a 3rd generation iPad, turn on Enable LTE for the faster 4G connection.
Turn on Cellular Data. In addition, if you have a 3rd generation iPad, turn on Enable LTE for the faster 4G connection.
![]() Tap View Account.
Tap View Account.
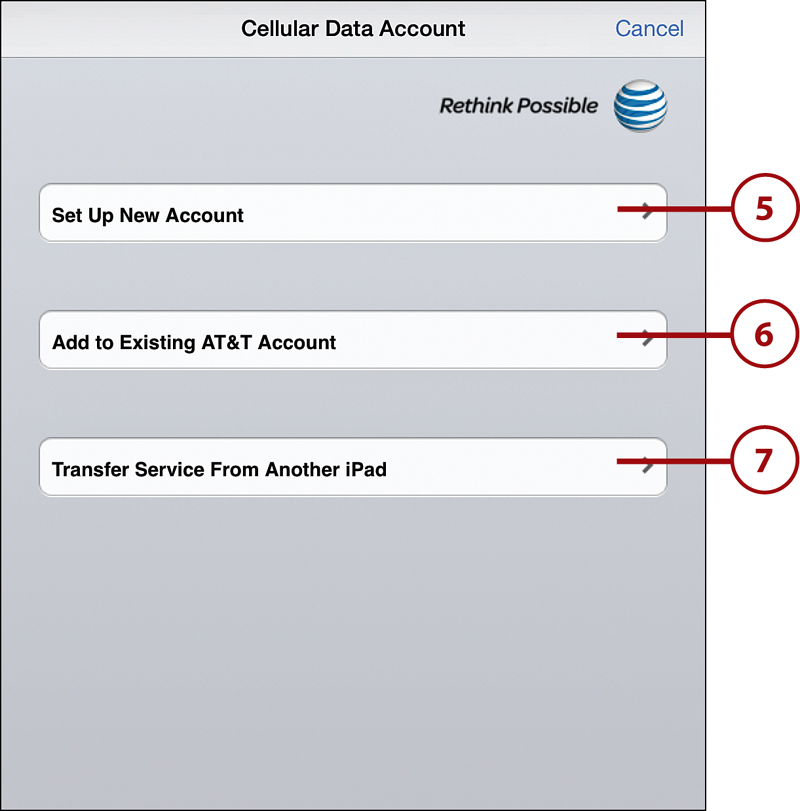
![]() You have three options to set up an account with AT&T. Other carriers may offer different options. The first one is to set up a completely new account. If you choose this, skip to step 8.
You have three options to set up an account with AT&T. Other carriers may offer different options. The first one is to set up a completely new account. If you choose this, skip to step 8.
![]() Another option is to add your iPad’s data plan as an additional service to your existing AT&T plan. Use this if you are already an AT&T customer. You will be prompted for your mobile phone number, zip code, passcode, and social security number to complete the setup.
Another option is to add your iPad’s data plan as an additional service to your existing AT&T plan. Use this if you are already an AT&T customer. You will be prompted for your mobile phone number, zip code, passcode, and social security number to complete the setup.
![]() This option is for those who already have an iPad data plan but want to transfer it from an old iPad to a new one.
This option is for those who already have an iPad data plan but want to transfer it from an old iPad to a new one.
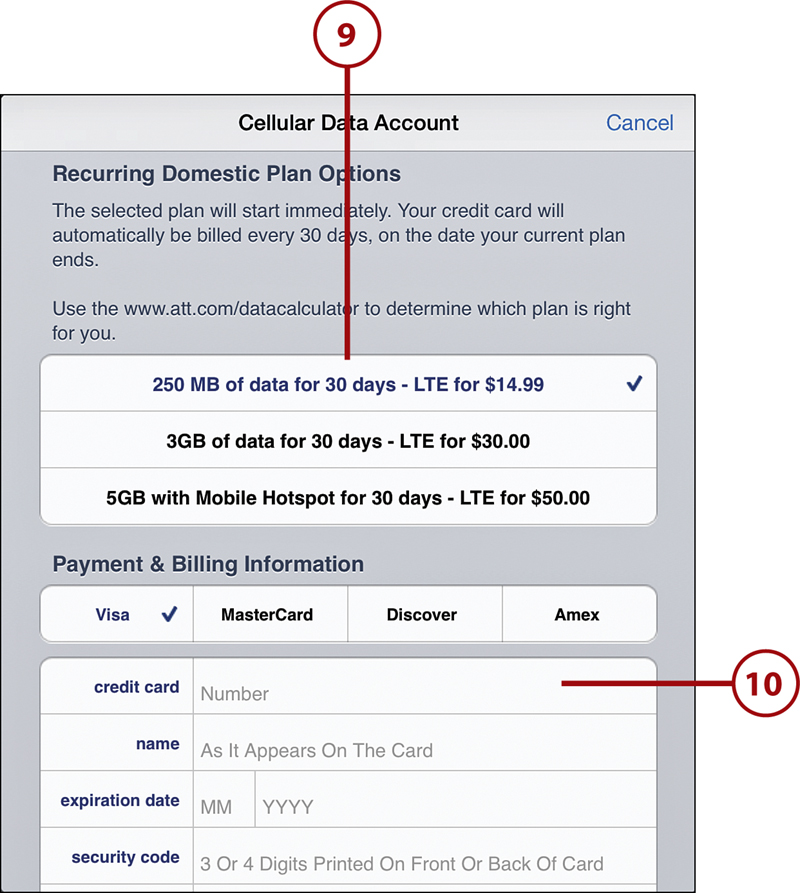
![]() To set up a new account, you are prompted for some basic information. You need to enter all your basic information and specify an email address for your account and a password.
To set up a new account, you are prompted for some basic information. You need to enter all your basic information and specify an email address for your account and a password.

![]() Choose a data plan that best fits your needs
Choose a data plan that best fits your needs
![]() Enter your credit card information. When you are done, you have to approve the service agreement and confirm your purchase. Still, it beats going to the mall and dealing with a salesperson at a mobile phone store, right?
Enter your credit card information. When you are done, you have to approve the service agreement and confirm your purchase. Still, it beats going to the mall and dealing with a salesperson at a mobile phone store, right?
It may take a few more minutes for your 4G service to activate. After establishing 4G service, you can return to this section of the Settings app to view your usage and modify your plan. Then you can see your pay details and status.
After you establish a 3G/4G plan, your iPad should still connect to your Wi-Fi networks when it is in range and use 3G/4G when it cannot find a Wi-Fi network. You can also return to Settings and turn on or off Cellular Data to specifically prevent your iPad from using the 3G/4G network. This is handy when you are completely out of mobile data range but have local Wi-Fi; for instance, you might be on an airplane flight. Of course, for take-off and landing, you will most likely be asked to use the Airplane Mode available in the Settings as well. That mode comes in handy when you want to quickly take your iPad “off the grid” and have it connected to absolutely nothing.
Looking at the top-left corner of your iPad’s screen, you can tell which sort of connection you are currently using. You will see the Wi-Fi symbol, a fan of four curves, when you are connected to Wi-Fi. If you have a 3G/4G plan you will see the name of your network next to it, such as “AT&T,” plus a series of bars that show your connection strength. But you are only using that connection if the characters “3G,” “4G,” or sometimes “LTE” are shown.
Syncing with iCloud
When you think of your contacts, calendar events, and email messages, you may be tempted to think of that information as being “on your iPad” or “on your computer.” But today this information is usually in both places, and more. This is referred to as “the cloud”—when the actual location of the information isn’t important as long as it is where you need it, when you need it.
As an iPad user, you have access to several different cloud services, most notably Apple’s system called iCloud. It is a free service that offers email, contacts, calendar, and other types of data stored on Apple’s servers and automatically synced to your iPad and the other Apple devices you may own.
Or, you could choose to use other cloud services, such as Gmail or Yahoo!, for mail and calendar events. There’s no reason to pick just one—you can use both iCloud and Gmail on your iPad, for instance.
When you use cloud services, you get automatic syncing as long as you have a connection to the Internet. For example, add a contact to your iPad and your iPhone will automatically update to show that new contact. Let’s look at how to set up an iCloud account, or link to one you’ve already created.
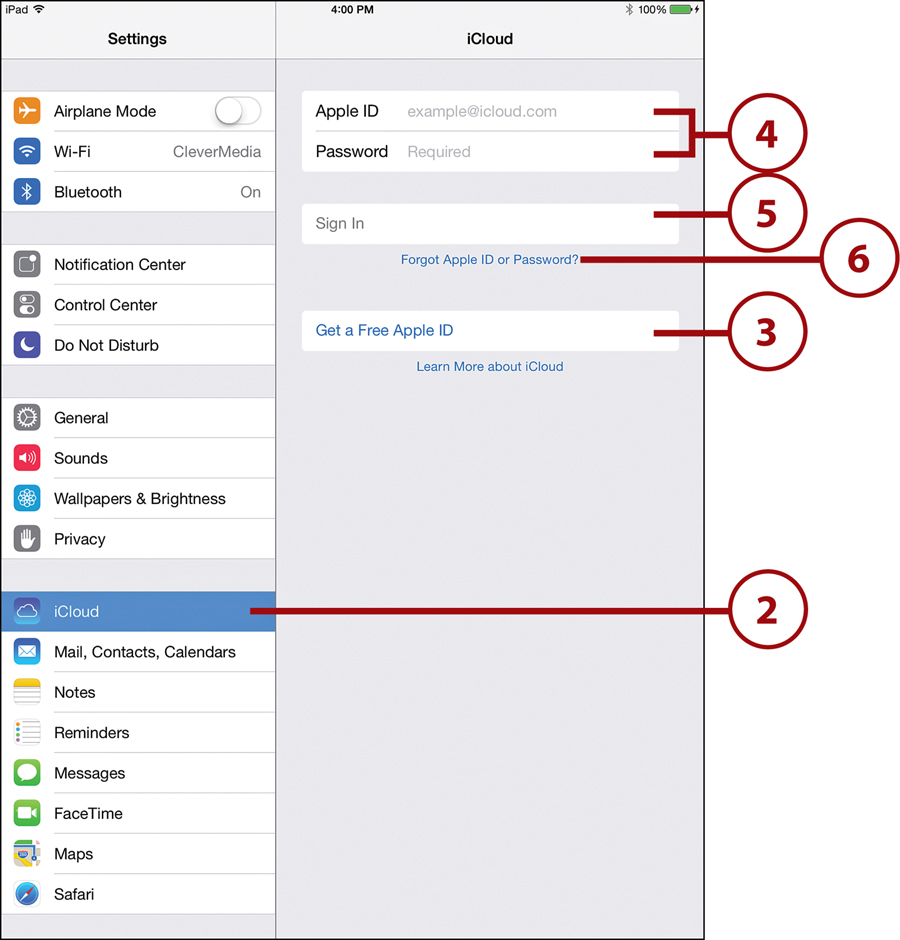
![]() Go to the Settings app.
Go to the Settings app.

![]() Select iCloud settings.
Select iCloud settings.
![]() If you have never set up an account with Apple before, then tap Get a Free Apple ID to set one up. Any account you have with Apple, such as an iTunes account, would be an Apple ID, and you should use that instead of starting a new account.
If you have never set up an account with Apple before, then tap Get a Free Apple ID to set one up. Any account you have with Apple, such as an iTunes account, would be an Apple ID, and you should use that instead of starting a new account.
![]() If you already have an Apple ID, even if you have never used iCloud before, then enter your ID and password. Apple IDs can be any email address, not just an @iCloud.com email address.
If you already have an Apple ID, even if you have never used iCloud before, then enter your ID and password. Apple IDs can be any email address, not just an @iCloud.com email address.
![]() Tap Sign In to access your account. If your account has only been used for things like iTunes in the past, then you will be prompted to set up the new iCloud part of your account.
Tap Sign In to access your account. If your account has only been used for things like iTunes in the past, then you will be prompted to set up the new iCloud part of your account.
![]() If you think you have used an email address to log on to iTunes or some other Apple service before, but you can’t remember the password, then tap Forgot Apple ID or Password to reset your password.
If you think you have used an email address to log on to iTunes or some other Apple service before, but you can’t remember the password, then tap Forgot Apple ID or Password to reset your password.
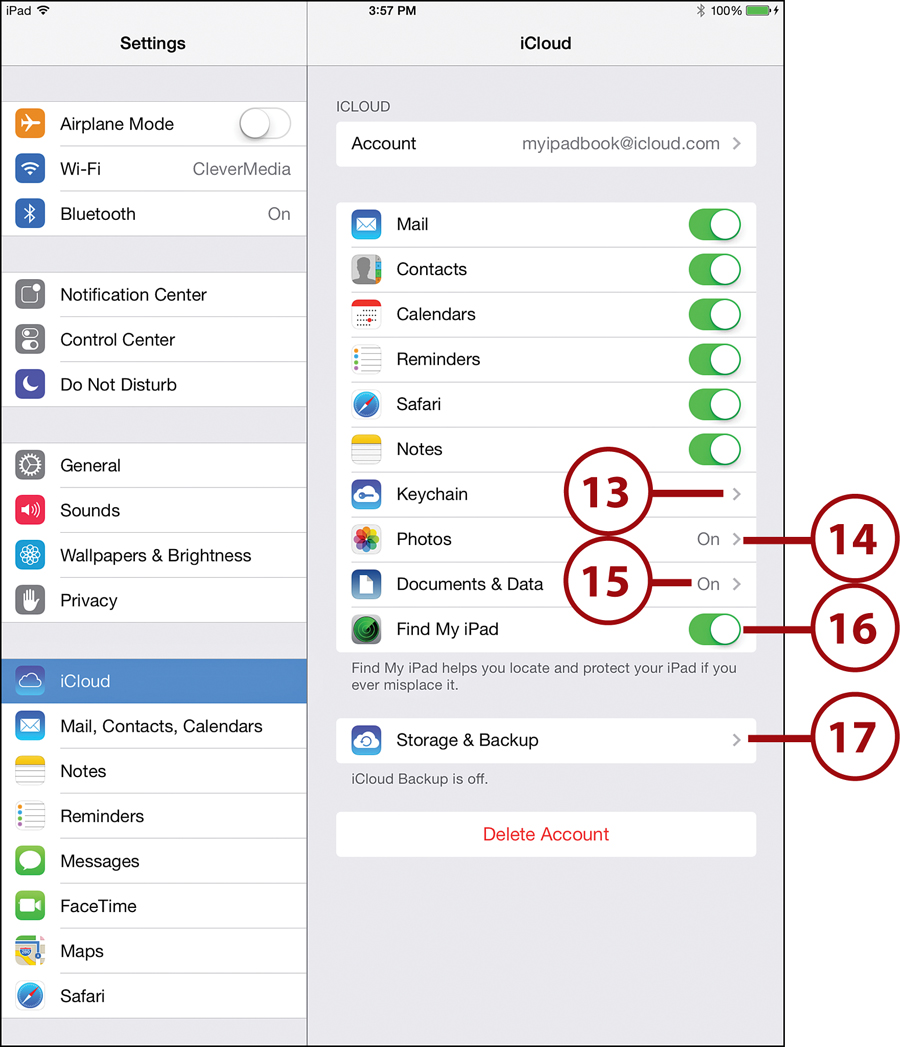
![]() You can use your iCloud email on your iPad. This would typically be an @icloud.com (or old @me.com or @mac.com) email address. These addresses are part of the free iCloud service. If you happen to be using a non-Apple email address as an Apple ID, note that this setting has nothing to do with that email account.
You can use your iCloud email on your iPad. This would typically be an @icloud.com (or old @me.com or @mac.com) email address. These addresses are part of the free iCloud service. If you happen to be using a non-Apple email address as an Apple ID, note that this setting has nothing to do with that email account.
![]() If Contacts is on, iCloud stores all your contacts so they automatically sync with the iCloud servers and then to your other Apple devices.
If Contacts is on, iCloud stores all your contacts so they automatically sync with the iCloud servers and then to your other Apple devices.
![]() Likewise, iCloud can store your calendar events when the Calendars switch is on.
Likewise, iCloud can store your calendar events when the Calendars switch is on.
![]() Turn on Reminders to have the Reminders app use iCloud to store reminders and automatically sync them with your other devices.
Turn on Reminders to have the Reminders app use iCloud to store reminders and automatically sync them with your other devices.
![]() Safari can sync over iCloud as well. Things like your bookmarks, tabs, and reading list would sync across devices when the Safari switch is on.
Safari can sync over iCloud as well. Things like your bookmarks, tabs, and reading list would sync across devices when the Safari switch is on.
![]() Turn the Notes switch on so that Notes can also sync over iCloud.
Turn the Notes switch on so that Notes can also sync over iCloud.
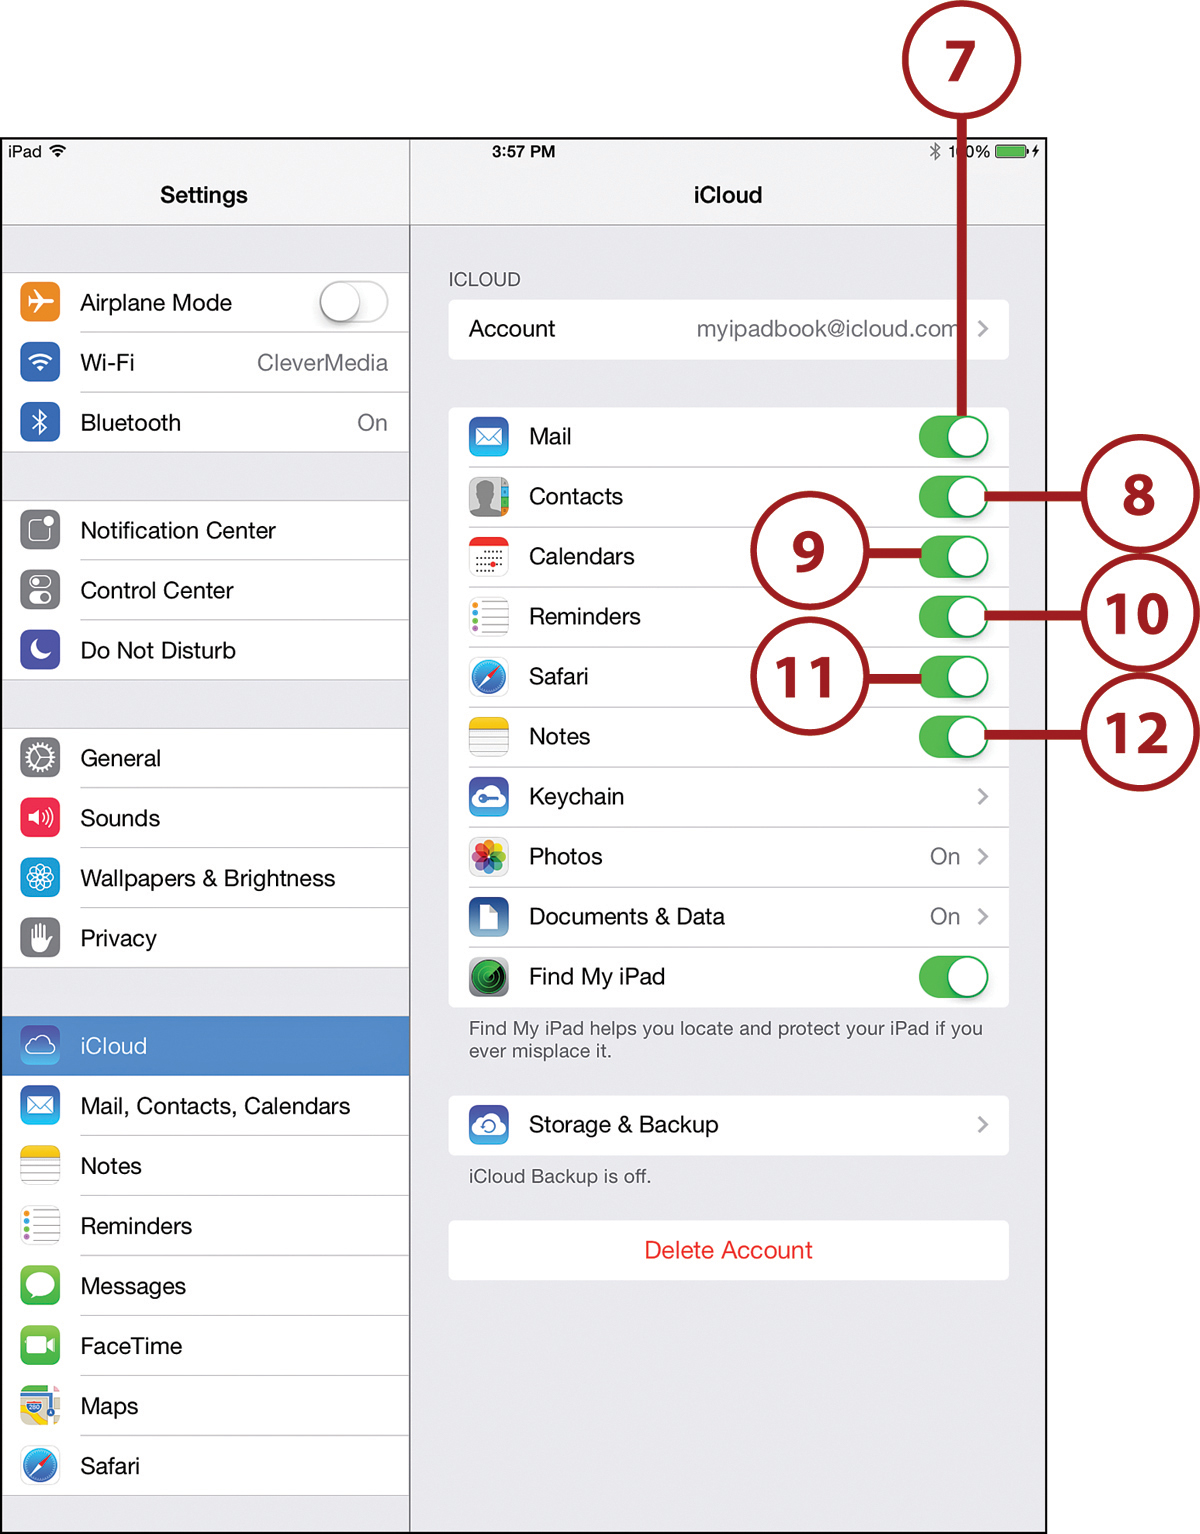
![]() iOS 7 allows you to store some passwords while using Safari so you don’t need to enter them each time. Syncing these over iCloud means that you can also access these passwords on other Apple devices. Tap Keychain to configure this setting. We’ll look at Keychain further in Chapter 7.
iOS 7 allows you to store some passwords while using Safari so you don’t need to enter them each time. Syncing these over iCloud means that you can also access these passwords on other Apple devices. Tap Keychain to configure this setting. We’ll look at Keychain further in Chapter 7.
![]() The Photos option enables you to configure Photo Stream for storage and sharing. We’ll look at Photo Stream further in Chapter 9.
The Photos option enables you to configure Photo Stream for storage and sharing. We’ll look at Photo Stream further in Chapter 9.
![]() Some other Apps, like Pages, Numbers, and Keynote, can store documents using iCloud. This way you can access the same document using the same app on your other devices. The files are transferred to iCloud and then to each device without you needing to take any action. Tap Documents & Data to make sure switches for these apps are turned on, if you use them.
Some other Apps, like Pages, Numbers, and Keynote, can store documents using iCloud. This way you can access the same document using the same app on your other devices. The files are transferred to iCloud and then to each device without you needing to take any action. Tap Documents & Data to make sure switches for these apps are turned on, if you use them.
![]() Find My iPad is an option that lets you locate your iPad on a map using another Apple device or the iCloud.com website. Be aware that if your Location Services are not on, this feature will not work.
Find My iPad is an option that lets you locate your iPad on a map using another Apple device or the iCloud.com website. Be aware that if your Location Services are not on, this feature will not work.
![]() If you don’t have a desktop computer to use to back up your iPad, you can enable iCloud backups by tapping Storage & Backup. Most of your critical information, such as contacts and events, are stored in iCloud anyway if you have them enabled. However, a full backup makes it easier for you to recover from a lost or broken iPad.
If you don’t have a desktop computer to use to back up your iPad, you can enable iCloud backups by tapping Storage & Backup. Most of your critical information, such as contacts and events, are stored in iCloud anyway if you have them enabled. However, a full backup makes it easier for you to recover from a lost or broken iPad.
Syncing with iTunes
With iOS 7 and iCloud, the iPad can be a truly stand-alone device, no desktop computer needed. If you use a computer, however, you may still want to sync your iPad with it. There are several advantages to doing so:
• Each day you sync your iPad, iTunes stores a backup of its content. You can restore all your data from these backups if you lose your iPad.
• Syncing with a computer is a good way to get a large number of photos from your collection on your iPad.
• Syncing is how you get your music stored in iTunes onto your iPad. If you have a large collection of music, you can opt to copy only a selection of it to your iPad at any one time. You can also do this with iCloud if you use an optional pay service from Apple called iTunes Match.
• It can be easier to arrange your app icons on the Home screen pages using iTunes, rather than doing it on your iPad.
You might get a message on your computer the first time you connect your iPad and open iTunes, asking if it is okay to sync your iPad to this computer. The message won’t reappear.
After connecting the first time, iTunes should automatically open when you connect your iPad. While connected, you can always resync to apply changes by clicking the Sync button in iTunes.
You can also check Sync over Wi-Fi connection in your iPad’s options in iTunes. This allows you to sync when your iPad isn’t connected by the cable. It only needs to be on the same network as your Mac or PC that is running iTunes.
Syncing Options
After your device is in sync, you can change some general options for your iPad from the Summary screen in iTunes. Most of the options are self-explanatory, such as Open iTunes When this iPad Is Connected.
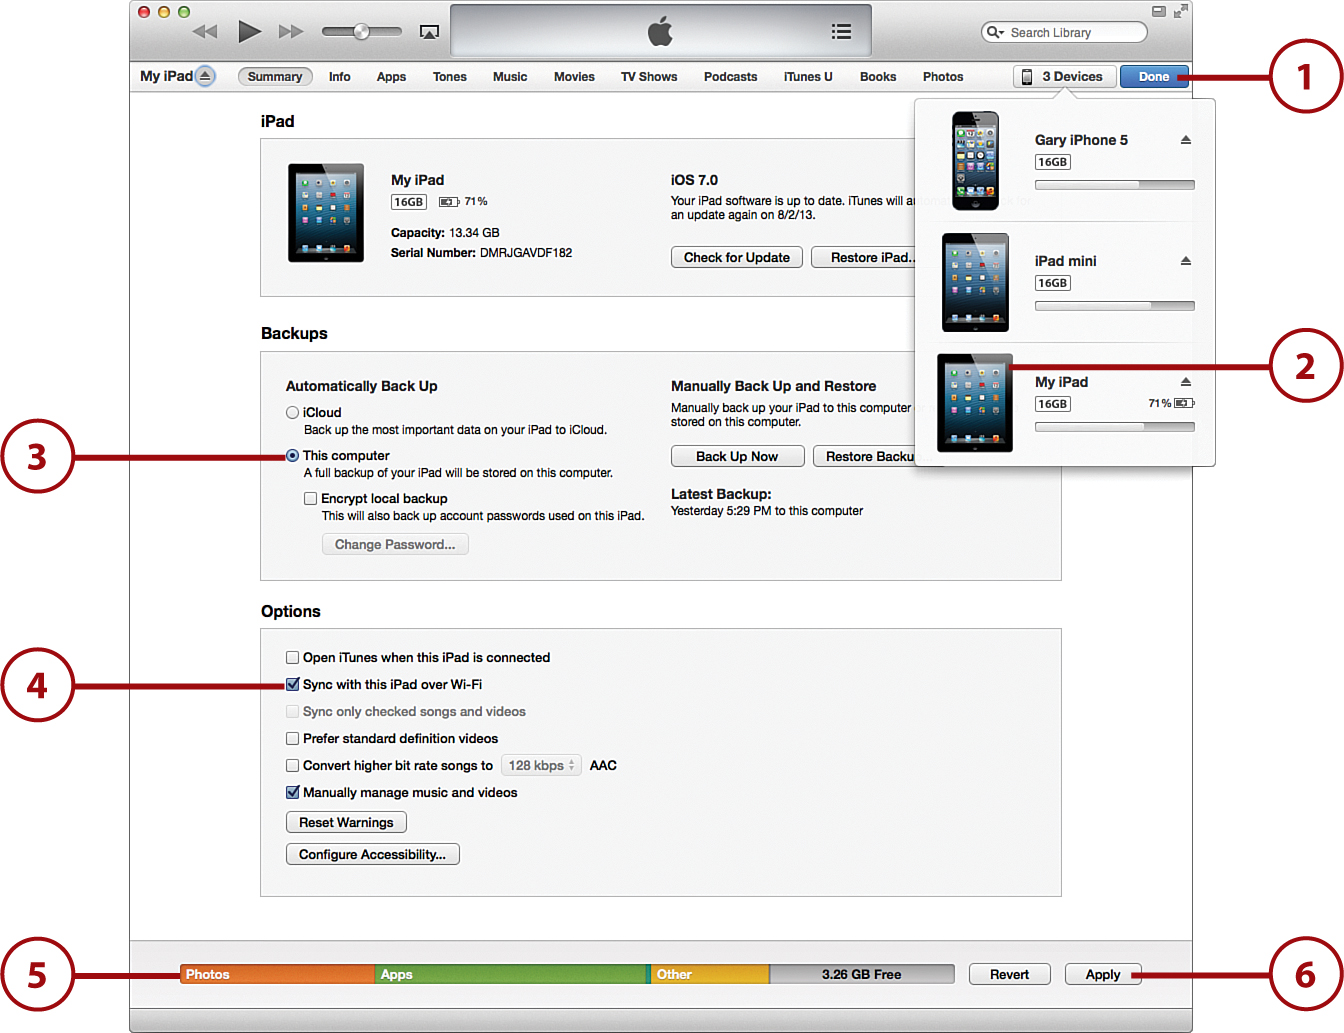
![]() Using iTunes 11, look for the devices button at the top right. If you have only the iPad connected, it should show the name of the iPad there, and you can click it and skip step 2. If you have enabled the left sidebar in the View menu of iTunes, then your iPad will appear in that sidebar instead.
Using iTunes 11, look for the devices button at the top right. If you have only the iPad connected, it should show the name of the iPad there, and you can click it and skip step 2. If you have enabled the left sidebar in the View menu of iTunes, then your iPad will appear in that sidebar instead.
![]() A list of devices appears. Click on your iPad.
A list of devices appears. Click on your iPad.
![]() You can configure your backups. iCloud backups are convenient for those without regular access to a computer, but it uses Internet bandwidth and can be a problem if you have a slow connection. Backing up to your computer is the best option if you regularly sync to your computer anyway.
You can configure your backups. iCloud backups are convenient for those without regular access to a computer, but it uses Internet bandwidth and can be a problem if you have a slow connection. Backing up to your computer is the best option if you regularly sync to your computer anyway.
![]() You can set your iPad to connect via Wi-Fi. From then on, you only need to be on the same network as your computer to sync with iTunes.
You can set your iPad to connect via Wi-Fi. From then on, you only need to be on the same network as your computer to sync with iTunes.
![]() A handy graph of your iPad’s storage is shown.
A handy graph of your iPad’s storage is shown.
![]() Any changes you make on this screen or any other iTunes sync screen will require that you click Apply to re-sync with the new settings.
Any changes you make on this screen or any other iTunes sync screen will require that you click Apply to re-sync with the new settings.
One option that dramatically changes how your iPad syncs is Manually Manage Music and Videos, which turns off automatic syncing of music and videos and enables you to simply drag and drop songs and movies from your iTunes library onto the iPad icon on the left. (You might need to scroll down the Summary page to locate this checkbox if your screen size is too small to show the entire page at once.)
As we look at some of the syncing options for the iPad, the Mac version of iTunes is used as an example. The Windows version of iTunes is similar but not exactly the same.
Syncing Music
The easy way to sync music is to select Entire Music Library In iTunes on your computer. If you have more music than can fit on your iPad, though, you must make some choices. Syncing Movies, TV Shows, Podcasts, Tones (ringtones for messaging and FaceTime), iTunes U, and Books all work in a similar way to syncing music, so you can apply what you learn in these steps to those items as well.
![]() Select your iPad at the top of the iTunes window. If you have more than one iOS device, you may have to select your iPad from a short list.
Select your iPad at the top of the iTunes window. If you have more than one iOS device, you may have to select your iPad from a short list.
![]() Click the Music button of your iPad’s settings in iTunes.
Click the Music button of your iPad’s settings in iTunes.
![]() Select Sync Music, if it isn’t already turned on.
Select Sync Music, if it isn’t already turned on.
![]() Click the Selected Playlists, Artists, Albums, and Genres button.
Click the Selected Playlists, Artists, Albums, and Genres button.
![]() Check off any playlists in the Playlists section that you want to include.
Check off any playlists in the Playlists section that you want to include.
![]() Check off any artists for which you want to include every song by that artist.
Check off any artists for which you want to include every song by that artist.
![]() Check off any genres to include in their entirety.
Check off any genres to include in their entirety.
![]() Check off any albums you want to include.
Check off any albums you want to include.
![]() Use the search box to quickly find specific artists.
Use the search box to quickly find specific artists.
![]() Click the Apply button if you want to apply the changes now.
Click the Apply button if you want to apply the changes now.
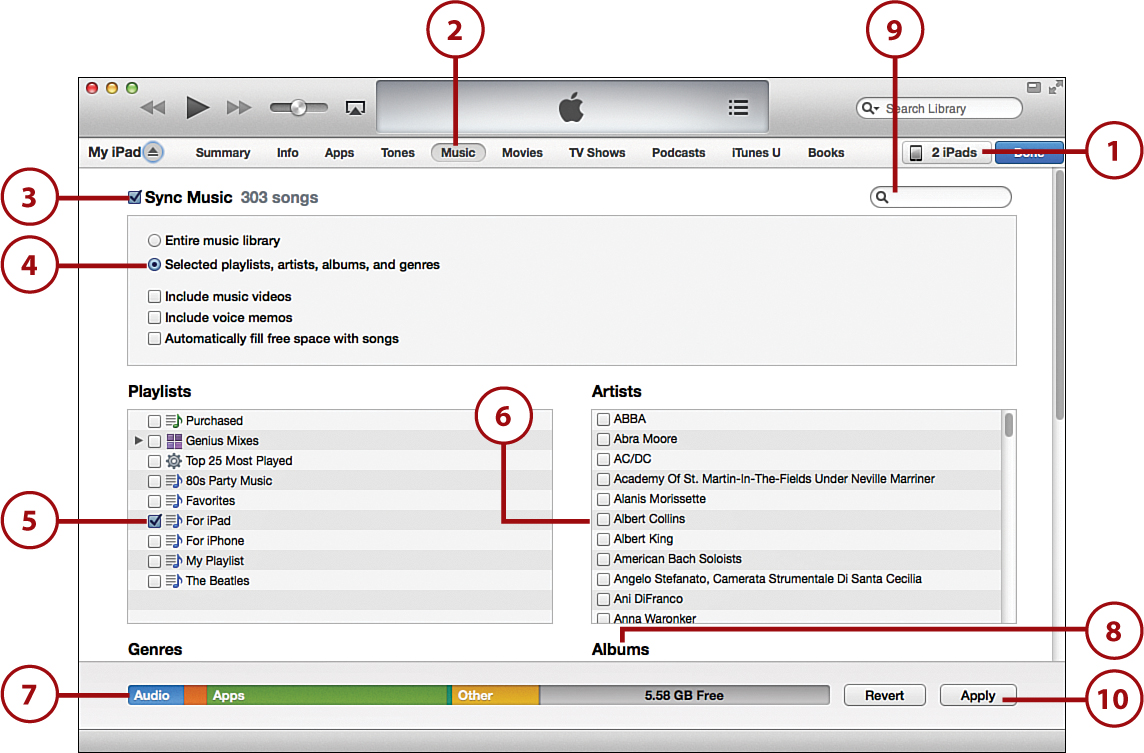
Note that songs are never duplicated on your iPad. For instance, if the same song appears in two playlists and is also by an artist that you have selected to sync, the song only has one copy on your iPad. But it appears in both playlists and under that artist, album, and alphabetical list of all songs.
The Kitchen Sync
In addition to Music, you can also sync your Tones, Movies, TV Shows, Podcasts, iTunes U, and Books in a similar way. Each type of media has its own way of syncing, but they are all similar to music. For instance, Tones lets you sync all tones or selected tones, and then you select them individually. There are no playlists for Tones. Movies, TV Shows, and Podcasts can be included in playlists, so syncing options there let you sync by playlist if you like. Explore each page of your syncing settings to see which options you have.
Syncing Photos
The process for syncing photos from your computer to your iPad is very similar to how you move music, videos, and other data to your iPad. So let’s use photos as an example. The steps here are very similar if you want to sync something else, like movies, to your iPad. You would just choose the Movies tab in iTunes instead of the Photos tab.
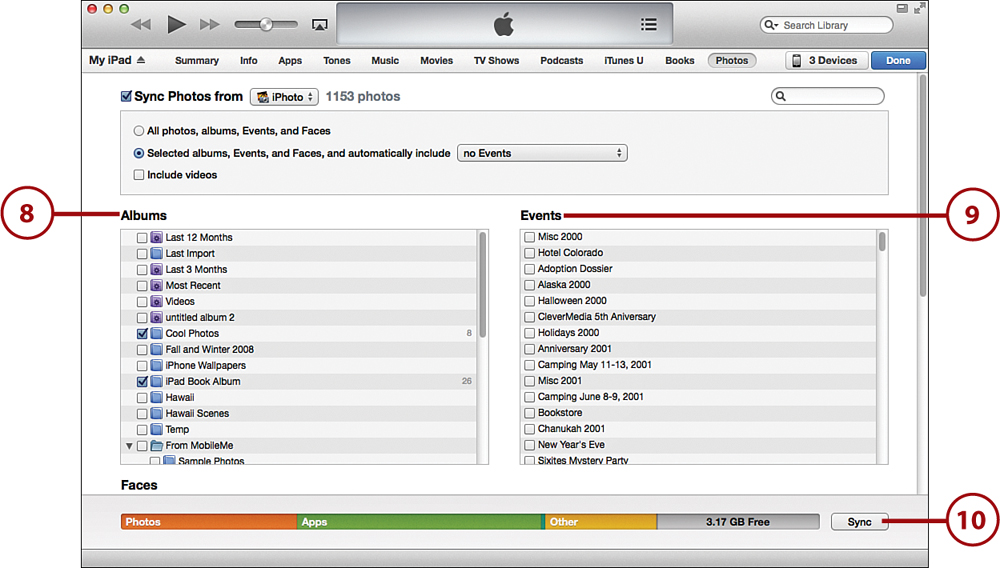
![]() Select your iPad.
Select your iPad.
![]() Choose the Photos tab at the top.
Choose the Photos tab at the top.
![]() Click the checkbox to indicate that you want to sync photos.
Click the checkbox to indicate that you want to sync photos.
![]() You can choose from any applications that are compatible with iTunes and store photos. For instance, on Mac you can choose iPhoto and also Aperture if you use it. You can also simply select a folder to use as the location for your photos. The rest of the steps here assume you are using iPhoto.
You can choose from any applications that are compatible with iTunes and store photos. For instance, on Mac you can choose iPhoto and also Aperture if you use it. You can also simply select a folder to use as the location for your photos. The rest of the steps here assume you are using iPhoto.
![]() Click All photos, albums, Events, and Faces to sync all your photos. Only do this if you have a fairly small collection.
Click All photos, albums, Events, and Faces to sync all your photos. Only do this if you have a fairly small collection.
![]() Choose Selected albums, Events, and Faces, and automatically include button to select which albums and events to sync.
Choose Selected albums, Events, and Faces, and automatically include button to select which albums and events to sync.
![]() You can also have a number of recent events, or photos taken over a recent period of time, automatically sync. For instance, you can have it sync all events from the past 6 months.
You can also have a number of recent events, or photos taken over a recent period of time, automatically sync. For instance, you can have it sync all events from the past 6 months.
![]() Choose which albums you want to sync. Albums are collections of photos, like music playlists, that allow you to compile your favorite or related photos into a group.
Choose which albums you want to sync. Albums are collections of photos, like music playlists, that allow you to compile your favorite or related photos into a group.
![]() You can also select individual iPhoto events.
You can also select individual iPhoto events.
![]() When you are satisfied with your selections, click Sync to begin the transfer.
When you are satisfied with your selections, click Sync to begin the transfer.
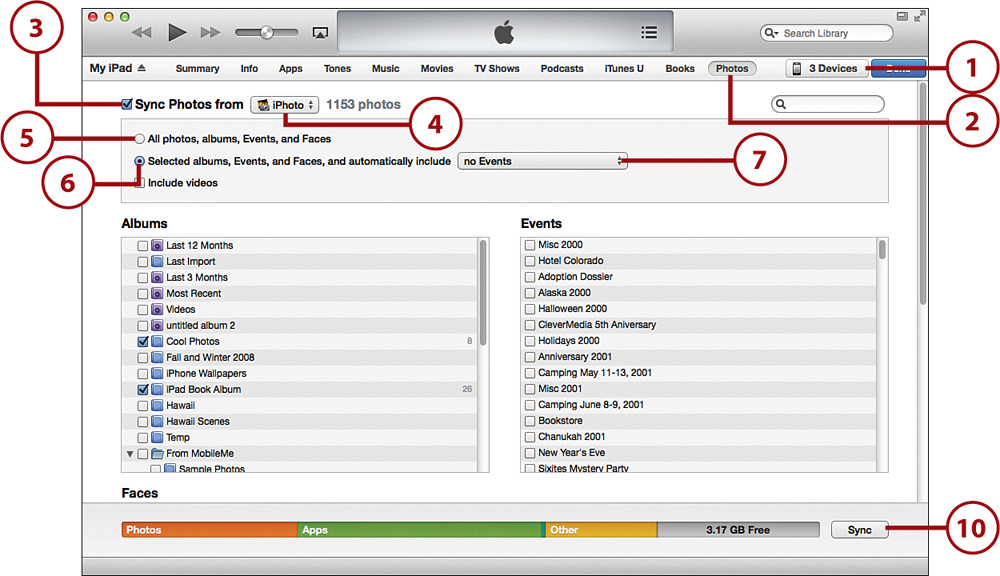
No Duplicates
Like with music, you get only one copy of each photo, no matter how many times the photo appears in albums, events, and faces. The photos appear in all the right places but take up only one spot in memory on your iPad.
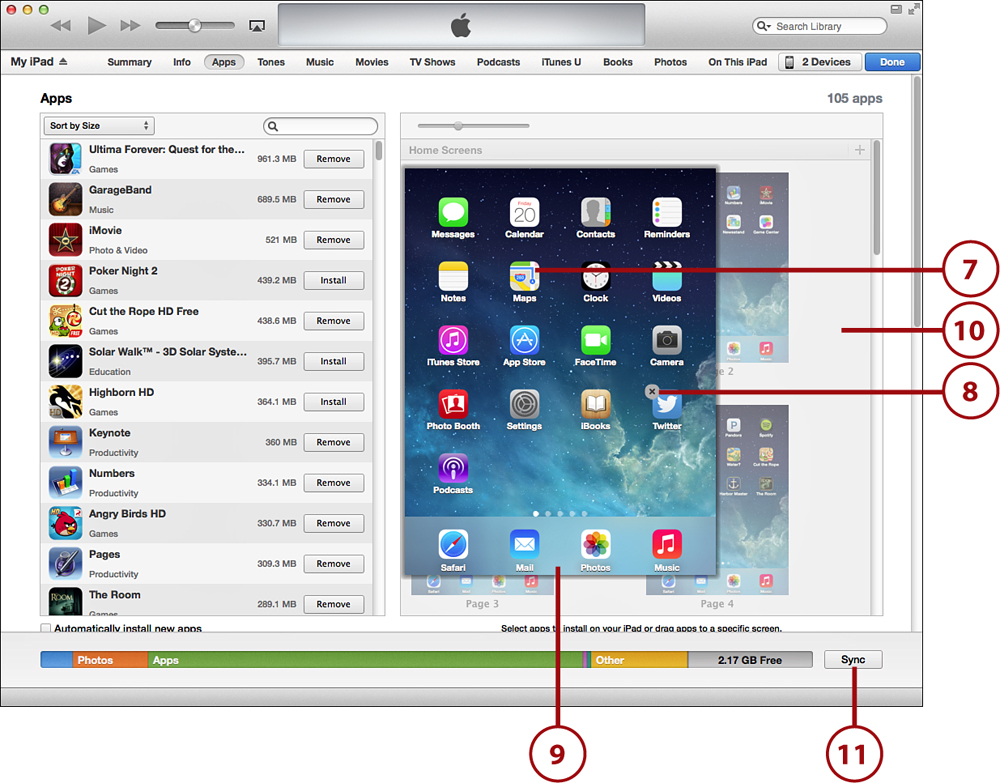
Syncing Apps
iTunes keeps your apps on your computer and your iPad in sync and helps you organize them.
Note that you cannot run apps on your computer, just store them. You can store all of the apps you have downloaded and purchased on your computer and only have a subset of those set to sync on to your iPad.
![]() Click the Apps button of your iPad’s settings in iTunes.
Click the Apps button of your iPad’s settings in iTunes.
![]() Use the Remove or Install buttons next to each app to remove or install the app, depending on its current state and what you want to do. Install appears next to apps that are currently not on the iPad, and you can click it to install it the next time you sync.
Use the Remove or Install buttons next to each app to remove or install the app, depending on its current state and what you want to do. Install appears next to apps that are currently not on the iPad, and you can click it to install it the next time you sync.
![]() Use this slider to adjust the size of the screens so you can see more screens at a time, or make them larger to see the icons more clearly.
Use this slider to adjust the size of the screens so you can see more screens at a time, or make them larger to see the icons more clearly.
![]() Click here to add a new screen.
Click here to add a new screen.
![]() You can swap entire pages by dragging them around in this area.
You can swap entire pages by dragging them around in this area.
![]() Double-click a screen to enlarge it.
Double-click a screen to enlarge it.
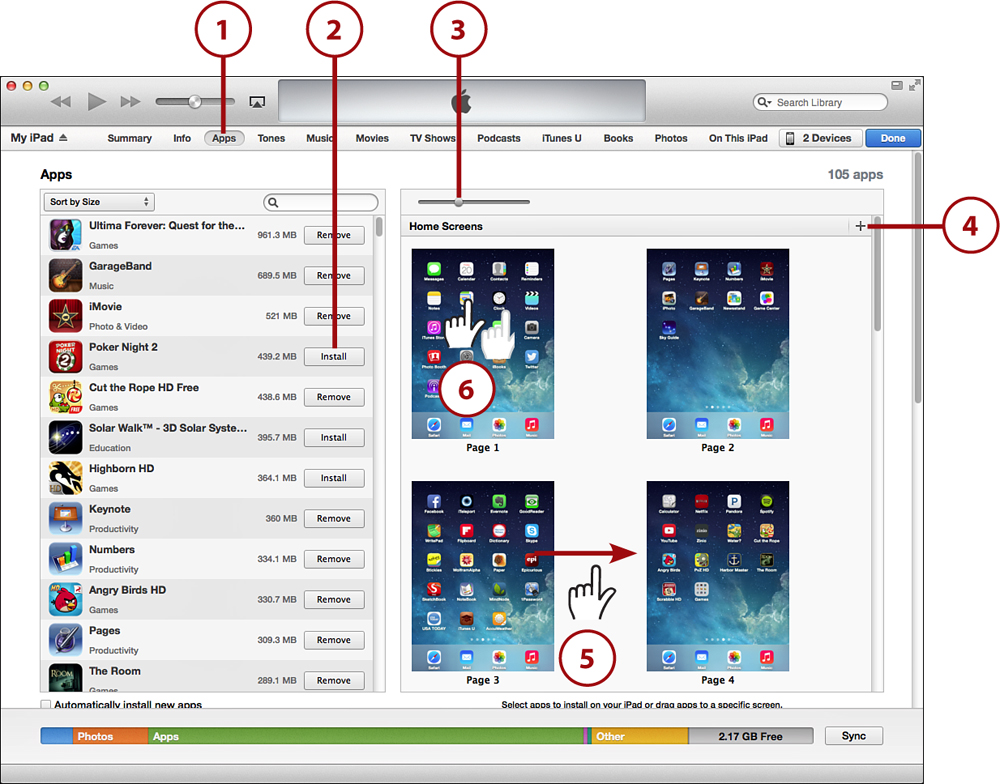
![]() Now you can grab icons on this screen and move them around to change their positions. You can also drag them out of this screen. Then the screen will shrink back and allow you to move the icon onto another screen.
Now you can grab icons on this screen and move them around to change their positions. You can also drag them out of this screen. Then the screen will shrink back and allow you to move the icon onto another screen.
![]() Move the cursor over an app and an X appears. You can use this to remove the app from your iPad.
Move the cursor over an app and an X appears. You can use this to remove the app from your iPad.
![]() You can also drag apps in and out of the iPad’s dock area at the bottom.
You can also drag apps in and out of the iPad’s dock area at the bottom.
![]() To shrink a screen back to normal size, click an area outside of the screens.
To shrink a screen back to normal size, click an area outside of the screens.
![]() Click the Sync button if you want to apply the changes now.
Click the Sync button if you want to apply the changes now.
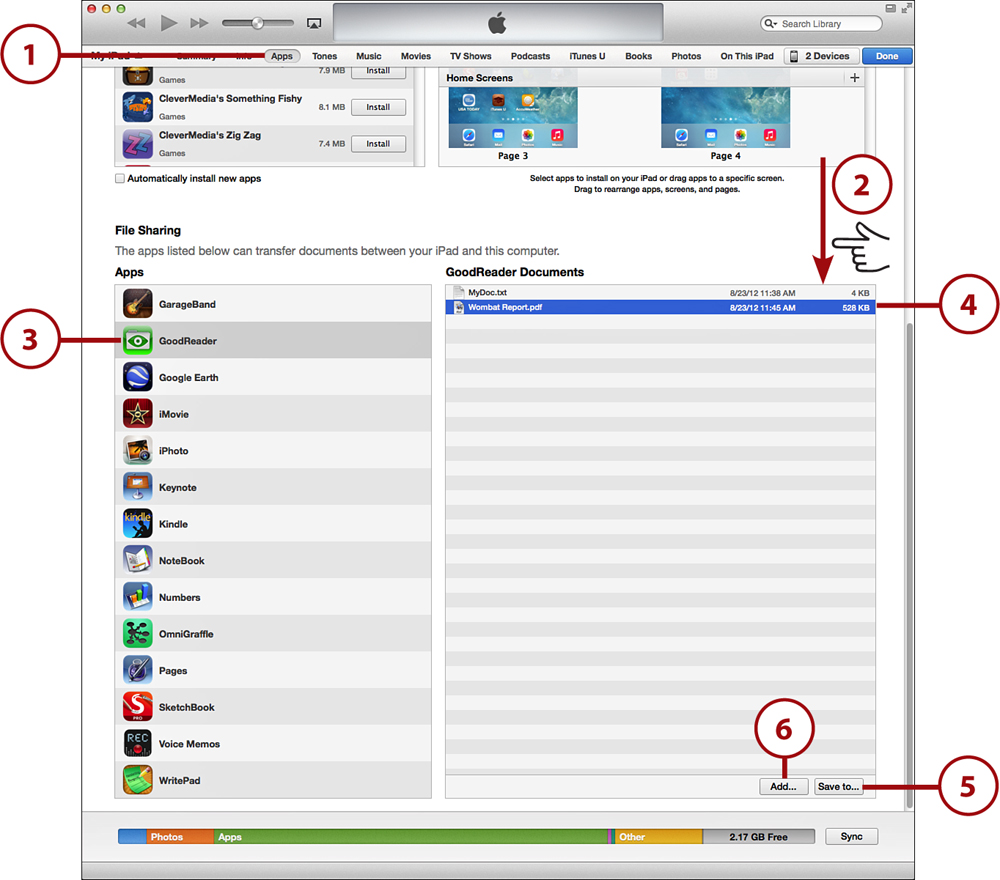
Syncing Documents
Apps sometimes have documents. For example, Pages is a word processor, so it would naturally have word-processing documents. Documents are stored on your iPad, but you might want to access them on your Mac or PC as well.
![]() Click the Apps button of your iPad’s settings in iTunes.
Click the Apps button of your iPad’s settings in iTunes.
![]() Scroll down to the bottom of the Apps page.
Scroll down to the bottom of the Apps page.
![]() In the File Sharing section, choose an app.
In the File Sharing section, choose an app.
![]() Select a document from the right.
Select a document from the right.
![]() Click the Save To button to save the document as a file on your computer.
Click the Save To button to save the document as a file on your computer.
![]() Click the Add button to import a file from your computer to your iPad. Each app has its own document space on your iPad. So if you have two PDF readers, and you want the PDF document available to both, you need to add it to each app’s documents.
Click the Add button to import a file from your computer to your iPad. Each app has its own document space on your iPad. So if you have two PDF readers, and you want the PDF document available to both, you need to add it to each app’s documents.
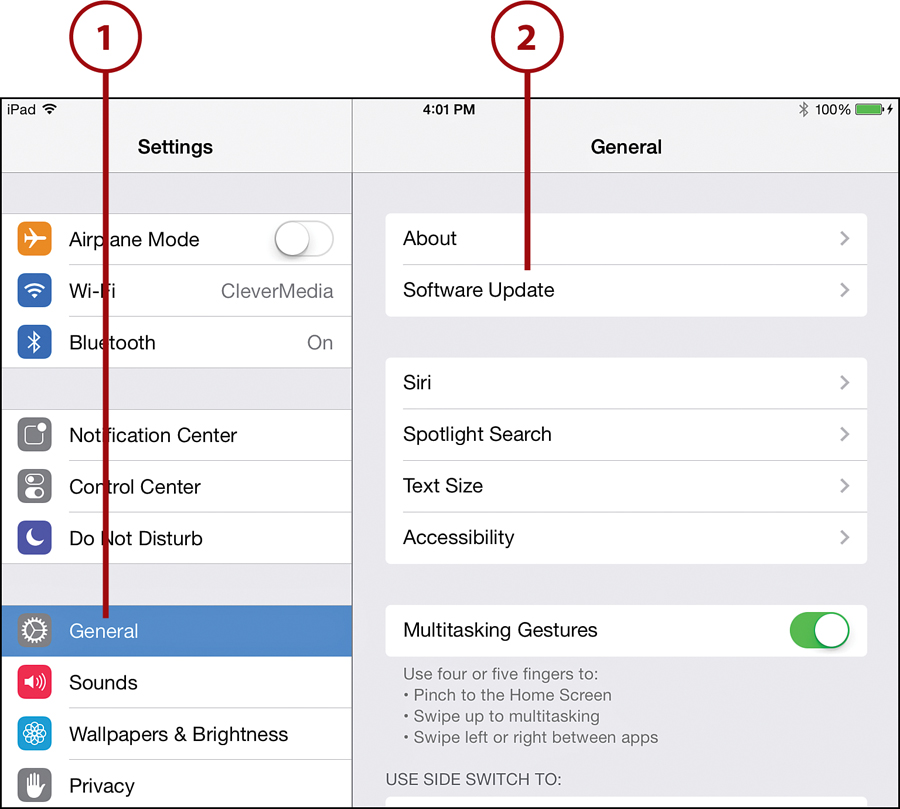
Keeping Your iPad Up-to-Date
Apple periodically comes out with updates to iOS. And Apple and other developers come out with updates to apps all the time. Usually all these updates are free and contain useful and important new features. So, there is no reason not to keep your iPad up-to-date. In fact, updates sometimes include important security patches, so you should pay careful attention when an update is available.
To check for iOS and software updates, follow these steps:
![]() Tap the Settings icon on the Home screen and then tap General.
Tap the Settings icon on the Home screen and then tap General.
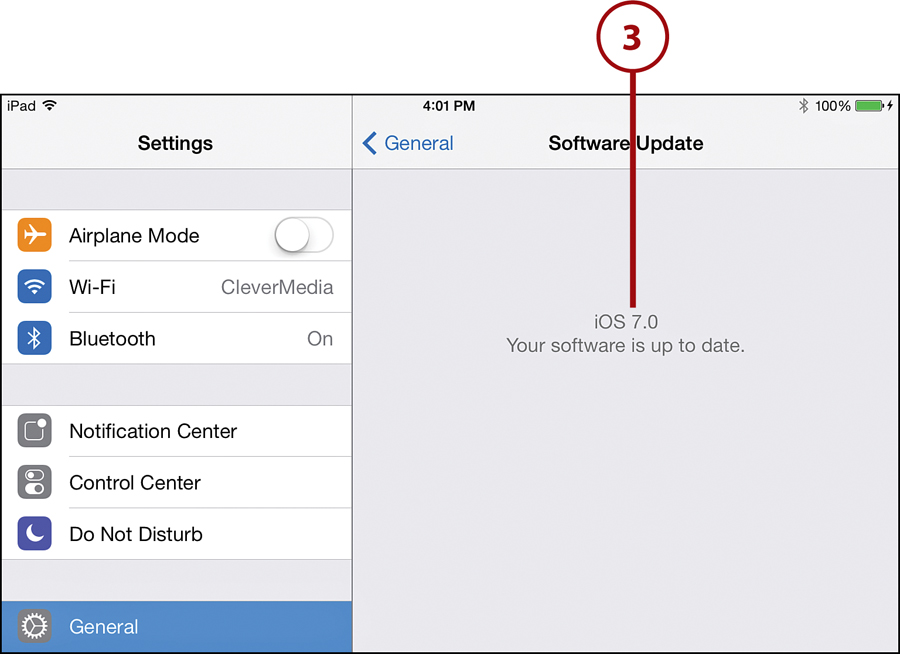
![]() Tap Software Update.
Tap Software Update.
![]() If you have the latest version of iOS, you will see a message like this one. Otherwise, follow the instructions provided to update your iPad.
If you have the latest version of iOS, you will see a message like this one. Otherwise, follow the instructions provided to update your iPad.
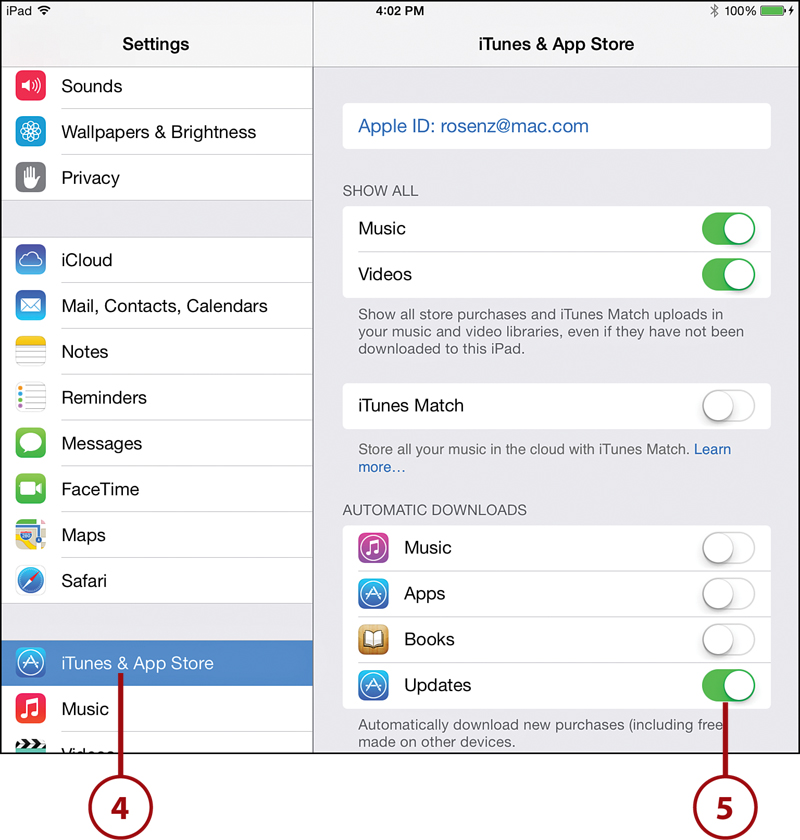
![]() Updating your apps is also important. iOS 7 can do this for you automatically. Make sure you have automatic updates enabled by going to the Settings app and choosing iTunes & App Stores on the left.
Updating your apps is also important. iOS 7 can do this for you automatically. Make sure you have automatic updates enabled by going to the Settings app and choosing iTunes & App Stores on the left.
![]() Under Automatic Downloads, you should have Updates turned on. This means iOS 7 will download app updates in the background. It will actually attempt to do this at times when you are not using your iPad and have a Wi-Fi connection.
Under Automatic Downloads, you should have Updates turned on. This means iOS 7 will download app updates in the background. It will actually attempt to do this at times when you are not using your iPad and have a Wi-Fi connection.
![]() On the Home screen, find and tap the App Store app. You may also notice a number in a red circle attached to the icon. This tells you how many apps you have that have updates available.
On the Home screen, find and tap the App Store app. You may also notice a number in a red circle attached to the icon. This tells you how many apps you have that have updates available.
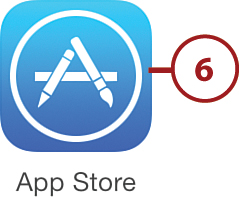
![]() Tap the Updates button. This takes you to a screen with a list of all recent app updates.
Tap the Updates button. This takes you to a screen with a list of all recent app updates.
![]() Here you can see a list of all apps that have been updated recently. It also shows a list of changes to these apps.
Here you can see a list of all apps that have been updated recently. It also shows a list of changes to these apps.

If you often find yourself in a situation where you are worried about Wi-Fi bandwidth, you may want to turn off automatic updates. For instance, if you pay for a limited Internet connection at home, but have a fast, unlimited connection at work, you can turn off automatic updates and use the Updates section of the App Store app to manually update your apps only while at work.
Sharing with AirDrop
A new way to get files from your iPad to another iOS device is using AirDrop. This technique uses Wi-Fi, but instead of going through a Wi-Fi network, it goes directly from iOS device to iOS device. So the devices don’t need to be on the same network—they don’t need to be on any Wi-Fi network at all.
AirDrop requires the latest Wi-Fi hardware in your iPad, so it only works with the 4th generation iPad or newer, or an iPad mini. Using AirDrop is pretty simple.
To use AirDrop, follow these steps:
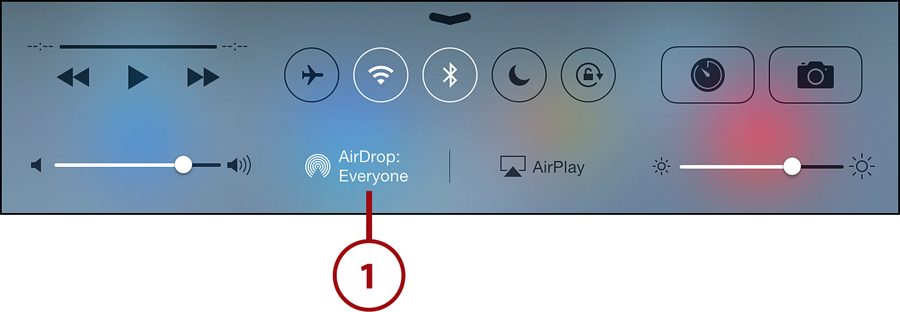
![]() To use AirDrop, make sure you have turned it on. Do this by accessing Control Center. See “Using Control Center” in Chapter 1. Make sure that it is set to “Everyone.”
To use AirDrop, make sure you have turned it on. Do this by accessing Control Center. See “Using Control Center” in Chapter 1. Make sure that it is set to “Everyone.”
![]() Let’s use the Notes app as an example. You can use any app that can share items, such as the Photos app, Contacts app, and so on. While editing a note, tap the Share button.
Let’s use the Notes app as an example. You can use any app that can share items, such as the Photos app, Contacts app, and so on. While editing a note, tap the Share button.
![]() In addition to sharing options such as Message and Mail, you’ll see a list of other AirDrop-compatible devices that are within range. You will see whatever image the user has chosen as a user icon, plus their name. If you do not see your other device, it could be asleep, or have AirDrop disabled, or possibly is not a model that has AirDrop available.
In addition to sharing options such as Message and Mail, you’ll see a list of other AirDrop-compatible devices that are within range. You will see whatever image the user has chosen as a user icon, plus their name. If you do not see your other device, it could be asleep, or have AirDrop disabled, or possibly is not a model that has AirDrop available.
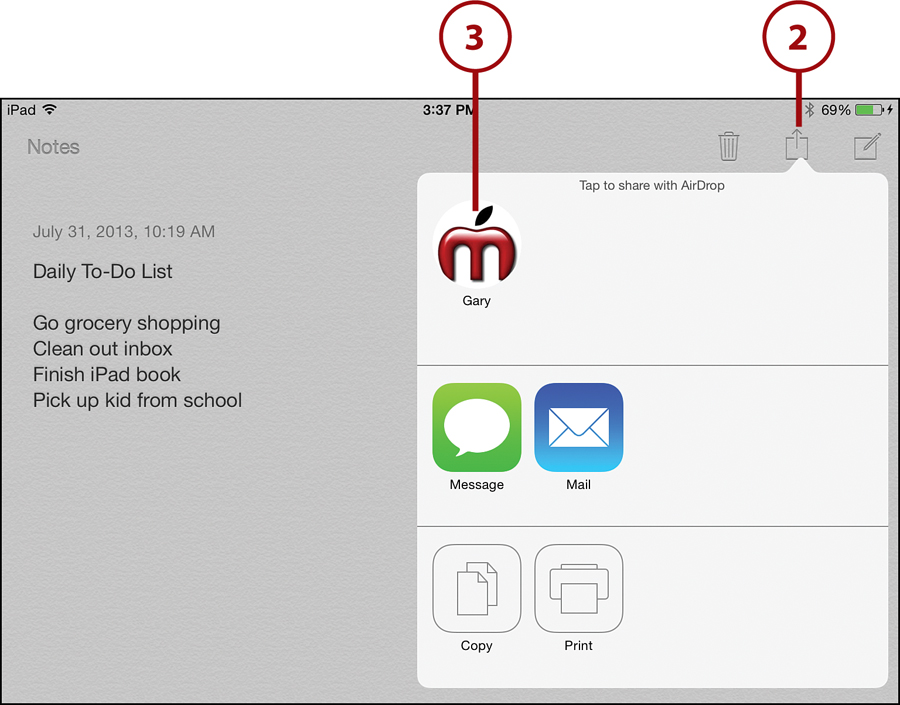
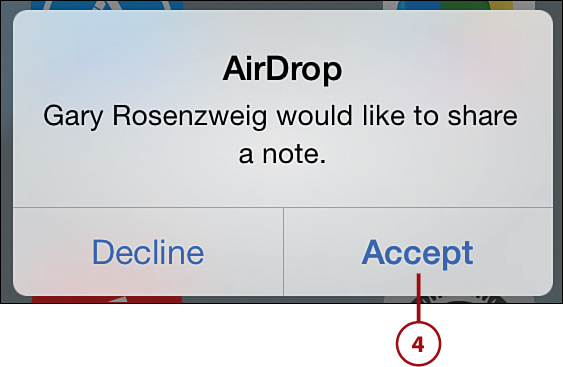
![]() After you tap the icon, you see a “Waiting” message below it. In the meantime, the recipient will get an alert asking them to accept the transfer.
After you tap the icon, you see a “Waiting” message below it. In the meantime, the recipient will get an alert asking them to accept the transfer.
For You, Friend
The real power of AirDrop is sending between friends. For instance, if you are standing with your iPad next to a friend with an iPhone 5, you can send her a picture without both of you needing to share a common Wi-Fi network or exchanging email addresses. You just Share, select her for the AirDrop, and she accepts.