9. Taking and Editing Photos
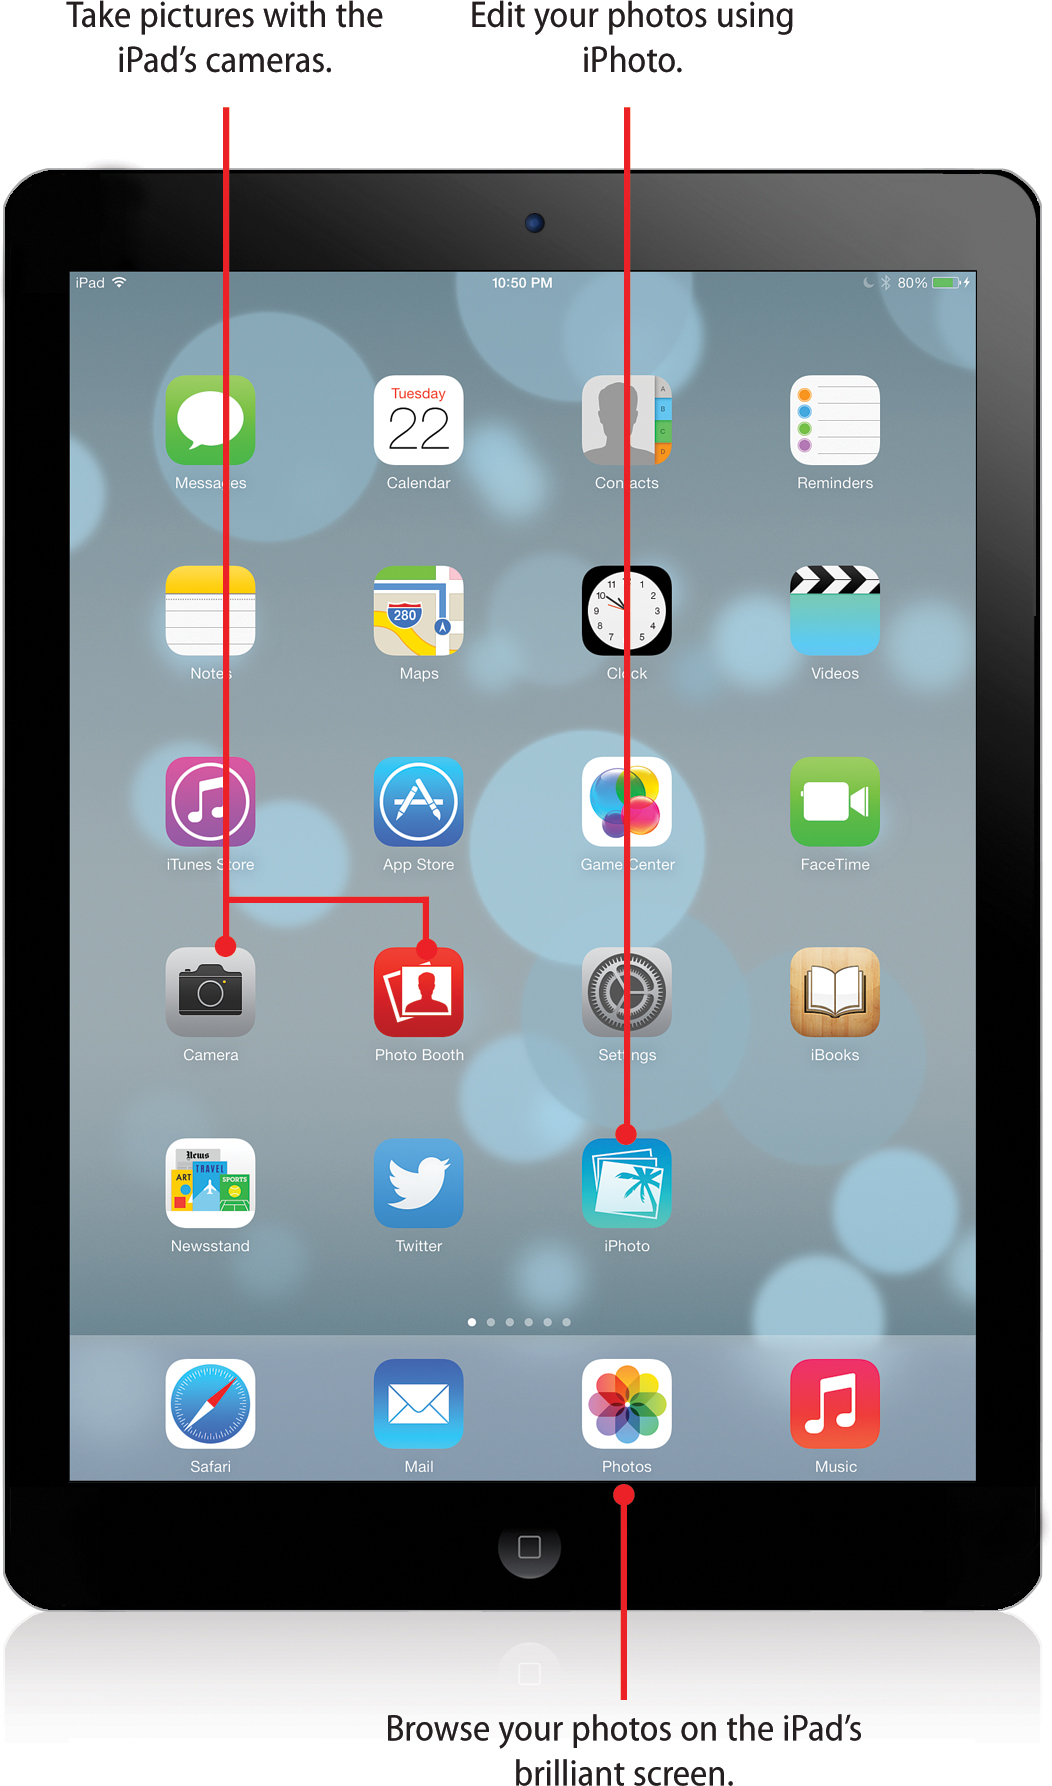
In this chapter, we use the Camera app to take photos, the Photos app to view your pictures and create slideshows, and the iPhoto app to edit photos and create journals.
→ Using Brushed Effects with Photos in iPhoto
→ Applying Special Effects to Photos in iPhoto
→ Creating Online Journals with iPhoto
In addition to replacing books, the iPad replaces photo albums. You can literally carry thousands of photos with you on your iPad. Plus, your iPad’s screen is a beautiful way to display these photos.
To access photos on your iPad, you first must sync them from your computer. Then you can use the Photos app to browse and view your photos.
With the iPad’s cameras, you can also take photos with your iPad. You can view those in the Photos app as well.
Taking and Editing Photos
The 2nd and 3rd generation iPads include two cameras that you can use to take photos. The primary app for doing this is the Camera app.
![]() Tap the Camera app icon on the home screen. This brings up the Camera app, and you should immediately see the image from the camera.
Tap the Camera app icon on the home screen. This brings up the Camera app, and you should immediately see the image from the camera.
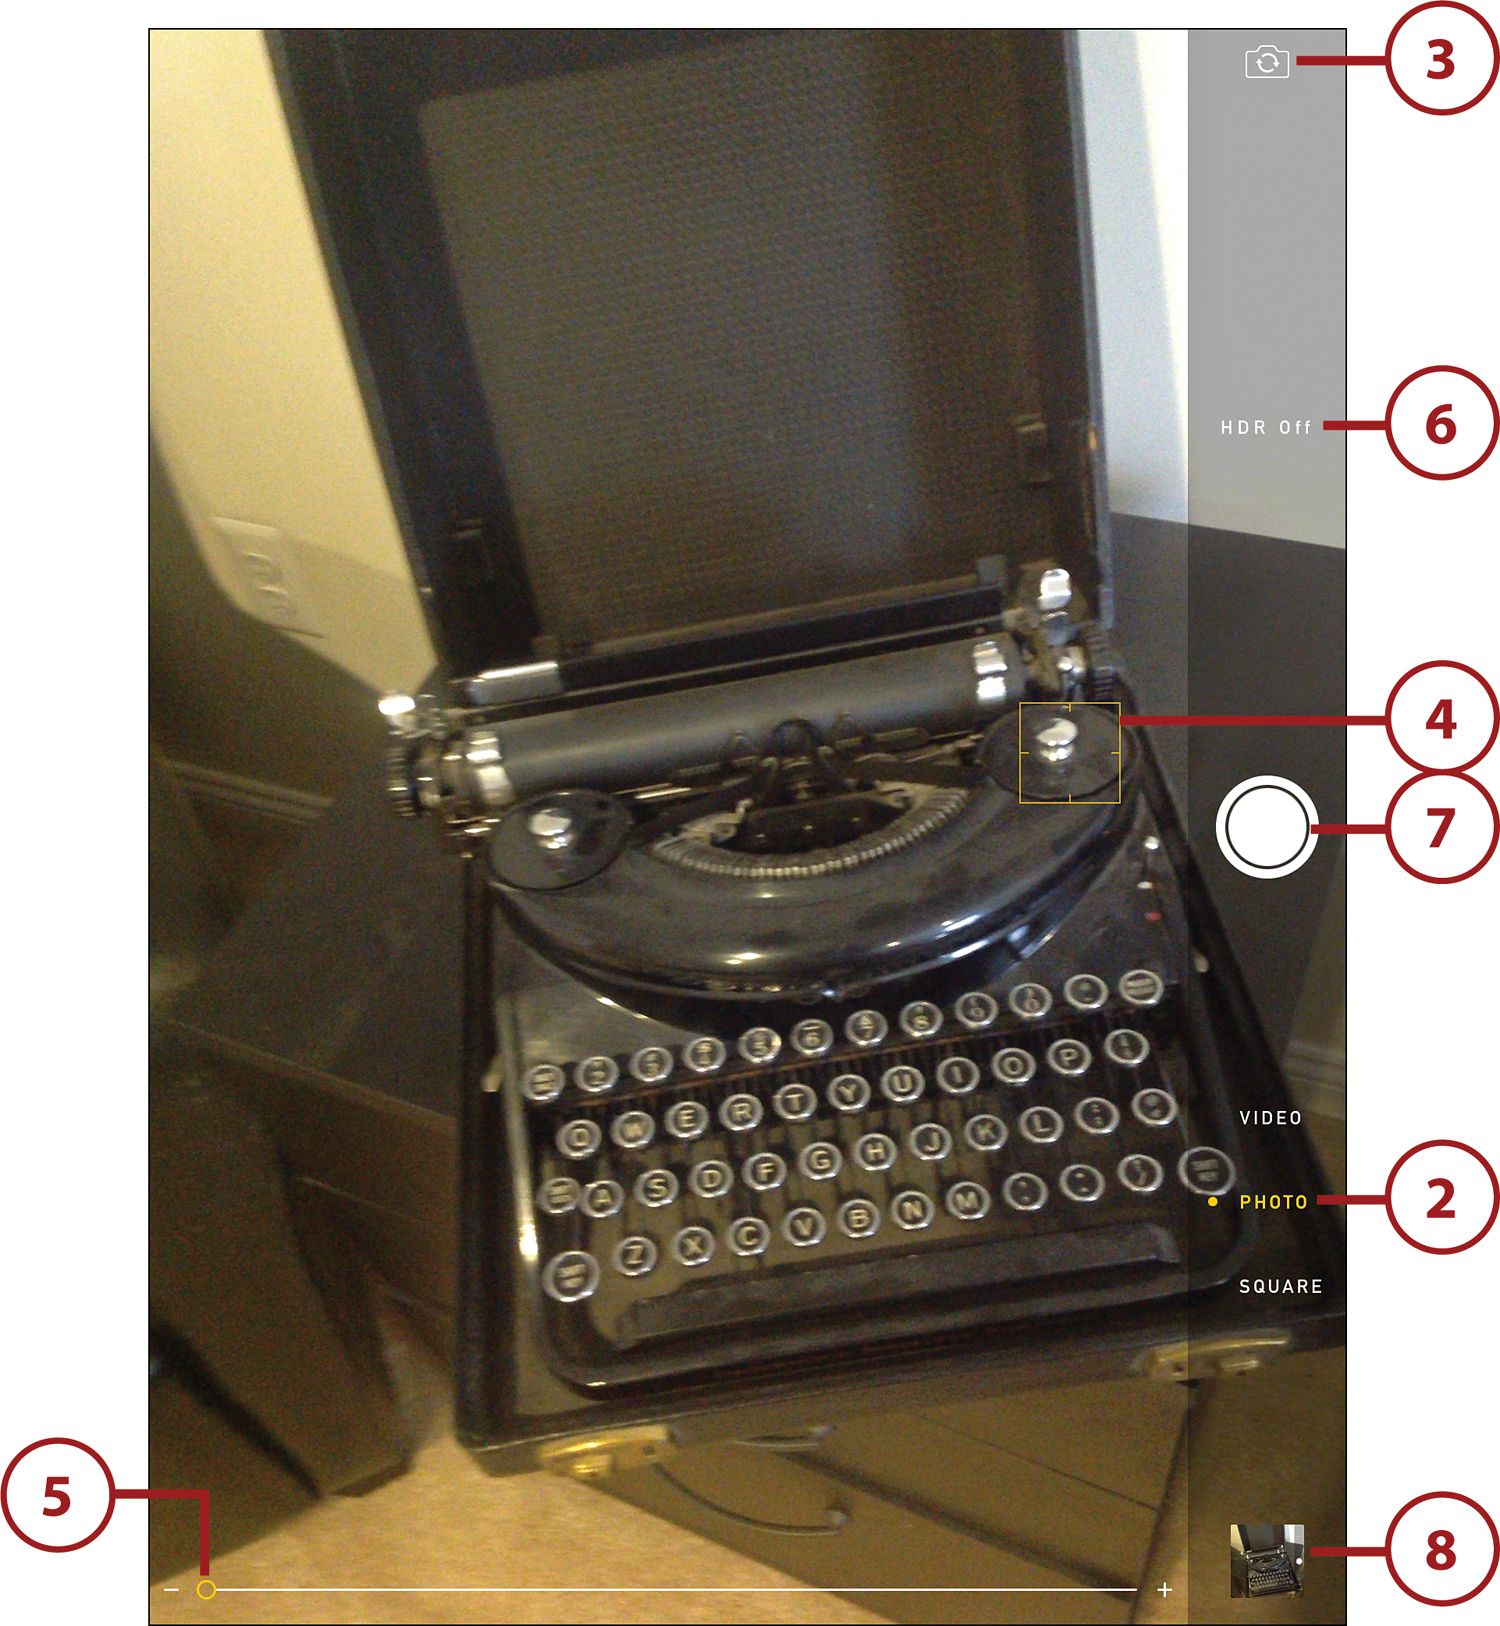
![]() The camera app has three modes: Video, Photo, and Square. The first one is for movie filming mode, and the others take rectangular and square photographs. To switch between modes, tap and drag up and down where you see Video, Photo, and Square. The three words will move vertically while the yellow dot remains in the same place. The option with the yellow dot is the mode you are currently using.
The camera app has three modes: Video, Photo, and Square. The first one is for movie filming mode, and the others take rectangular and square photographs. To switch between modes, tap and drag up and down where you see Video, Photo, and Square. The three words will move vertically while the yellow dot remains in the same place. The option with the yellow dot is the mode you are currently using.
![]() Tap the button at the top right switch between front and rear cameras.
Tap the button at the top right switch between front and rear cameras.
![]() Tap anywhere on the image to specify that you want to use that portion of the image to determine the exposure for the photo.
Tap anywhere on the image to specify that you want to use that portion of the image to determine the exposure for the photo.
![]() After you have tapped on the image, and if you are using the rear-facing camera, you can zoom in. To do that, use your fingers to pinch apart. After you do so, you will see a zoom slider at the bottom of the screen. Drag it to the right to increase the zoom.
After you have tapped on the image, and if you are using the rear-facing camera, you can zoom in. To do that, use your fingers to pinch apart. After you do so, you will see a zoom slider at the bottom of the screen. Drag it to the right to increase the zoom.
![]() Tap the HDR button to turn on High Dynamic Range Imaging.
Tap the HDR button to turn on High Dynamic Range Imaging.
High Dynamic What?
High Dynamic Range Imaging is a process where two pictures are taken in quick succession, each using a different exposure. Then the two images are combined. For instance, if you are taking a picture of a person with a bright sky behind them, one picture will do better with the person, and the other with the sky. Combining the two images gives you a picture that shows them both better than a single shot would.
When you use HDR, be sure to hold your iPad steady so each shot captures the same image. They will be taken a fraction of a second apart. So, HDR does not work well with moving objects or a moving camera.
![]() Tap the large camera button at the right side of the screen to take the picture.
Tap the large camera button at the right side of the screen to take the picture.
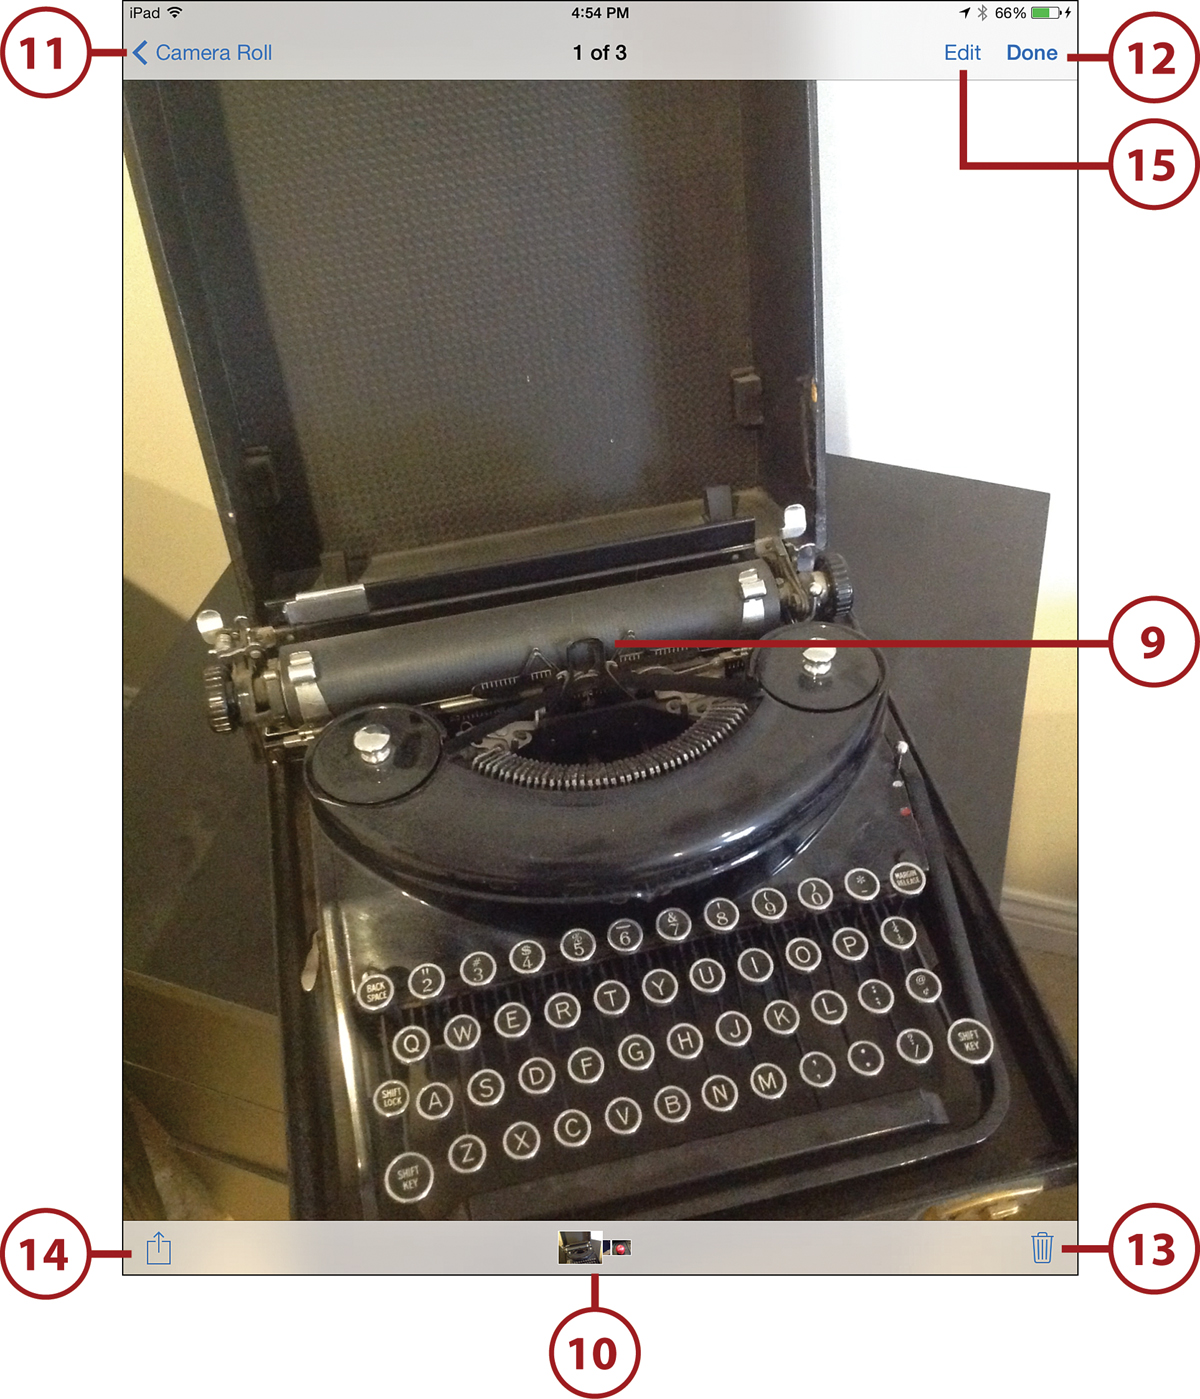
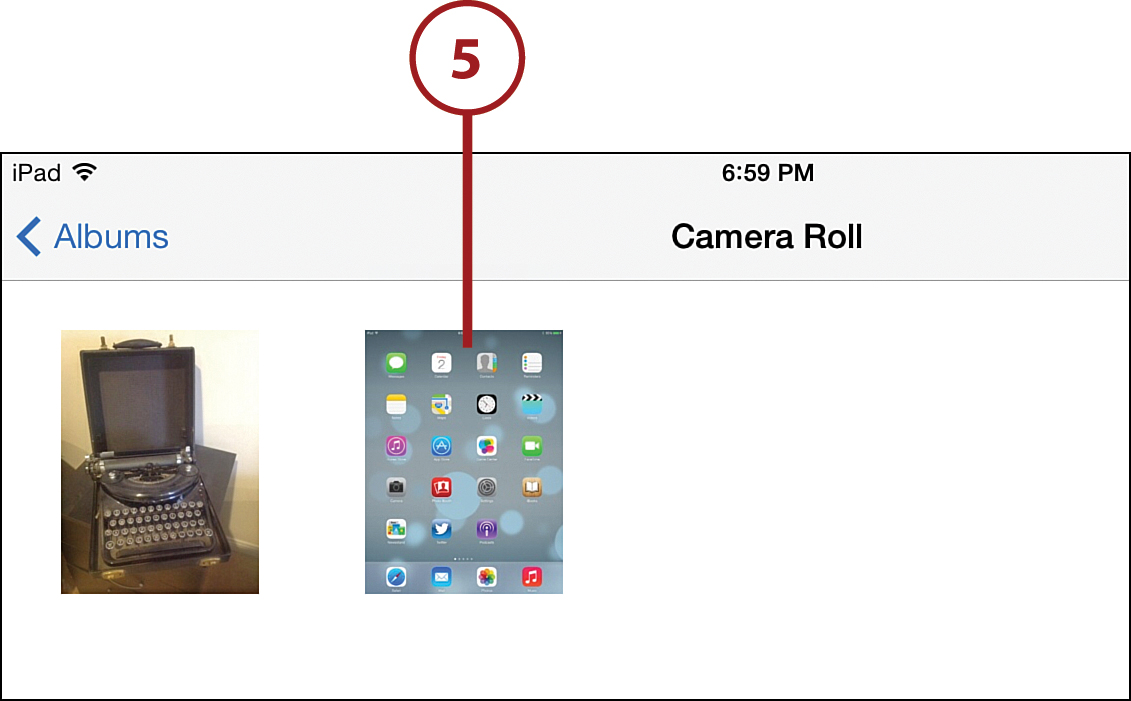
![]() Tap the button at the lower right to go to the Camera Roll and see the pictures you have taken.
Tap the button at the lower right to go to the Camera Roll and see the pictures you have taken.
![]() If you don’t see buttons at the top and bottom of the photo, tap the middle of the image from the Camera Roll to bring up controls on the top and bottom of the screen.
If you don’t see buttons at the top and bottom of the photo, tap the middle of the image from the Camera Roll to bring up controls on the top and bottom of the screen.
![]() Use the thumbnails at the bottom to flip through images you have taken that are in your Camera Roll. Or just swipe left and right through the thumbnails to flip through your photos.
Use the thumbnails at the bottom to flip through images you have taken that are in your Camera Roll. Or just swipe left and right through the thumbnails to flip through your photos.
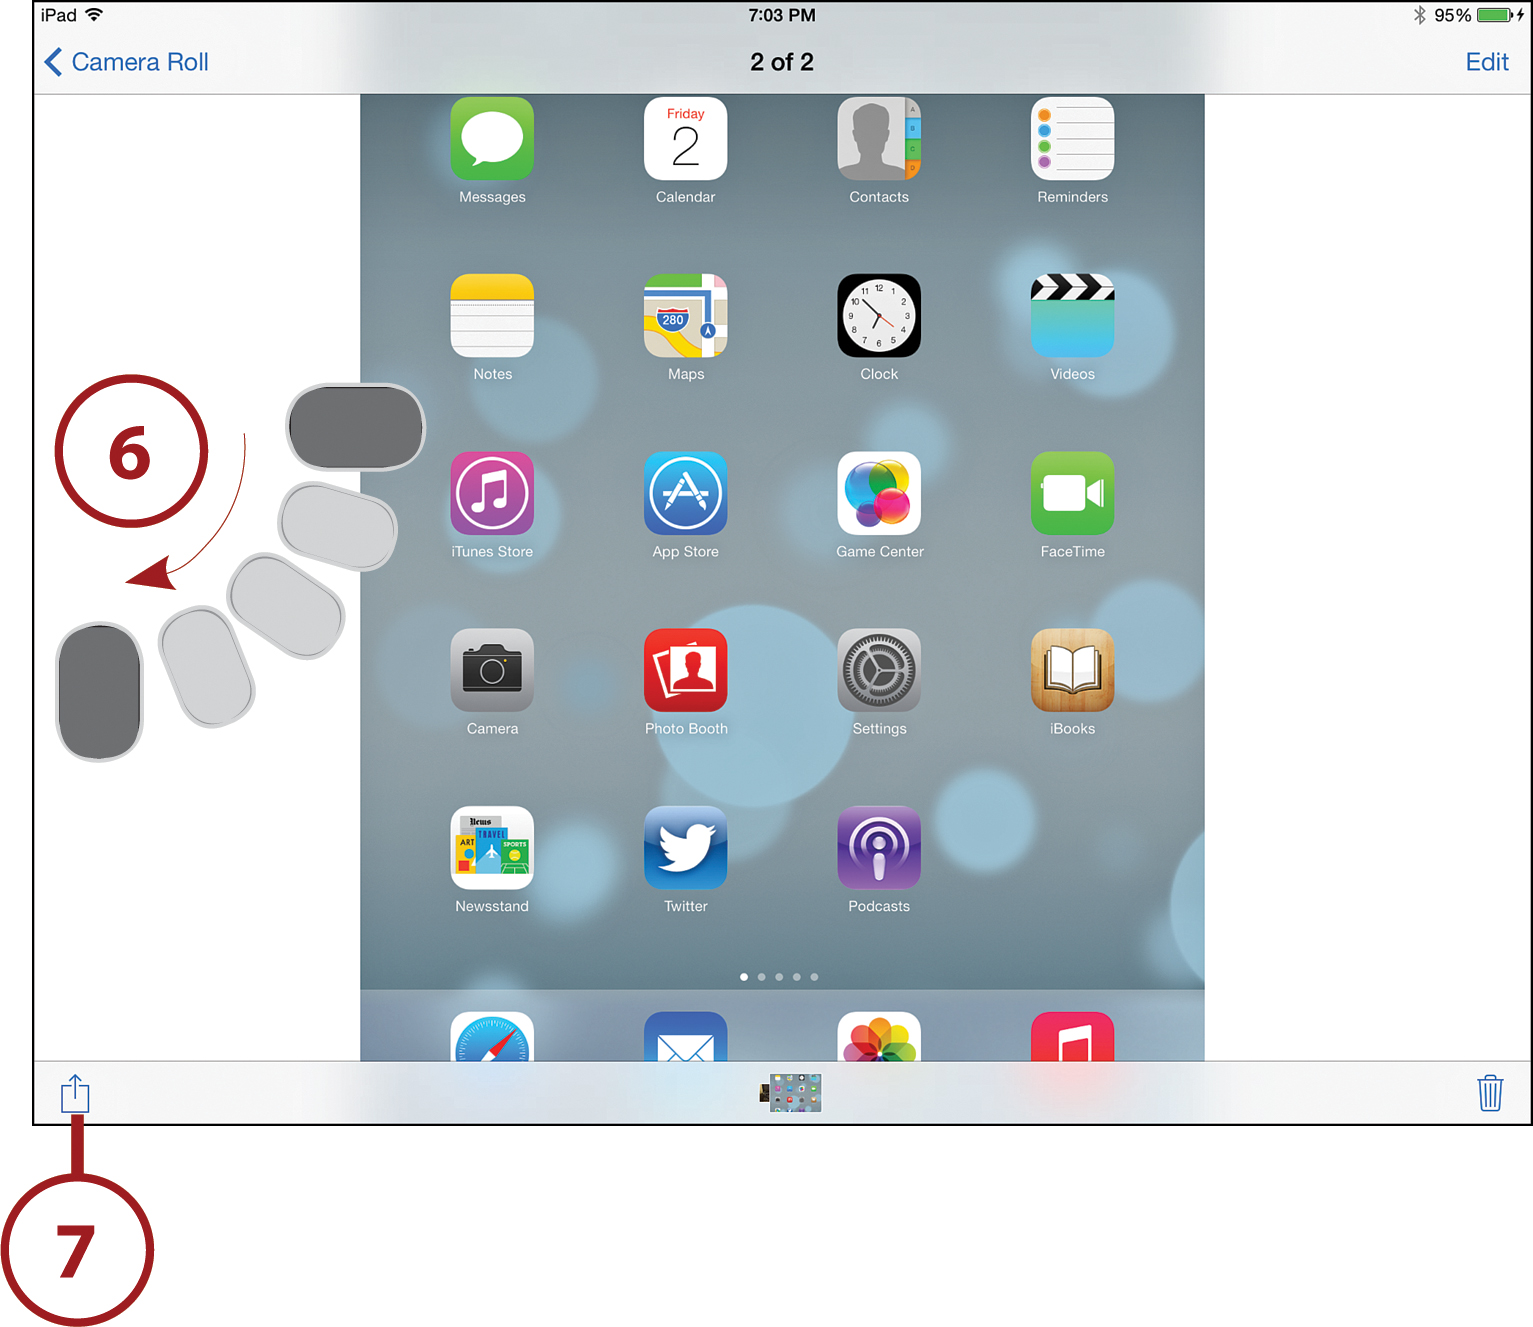
![]() Tap Camera Roll to exit viewing this one image and jump to an icon view of all of your Camera Roll photos.
Tap Camera Roll to exit viewing this one image and jump to an icon view of all of your Camera Roll photos.
![]() Tap Done to exit this screen and return to take more pictures.
Tap Done to exit this screen and return to take more pictures.
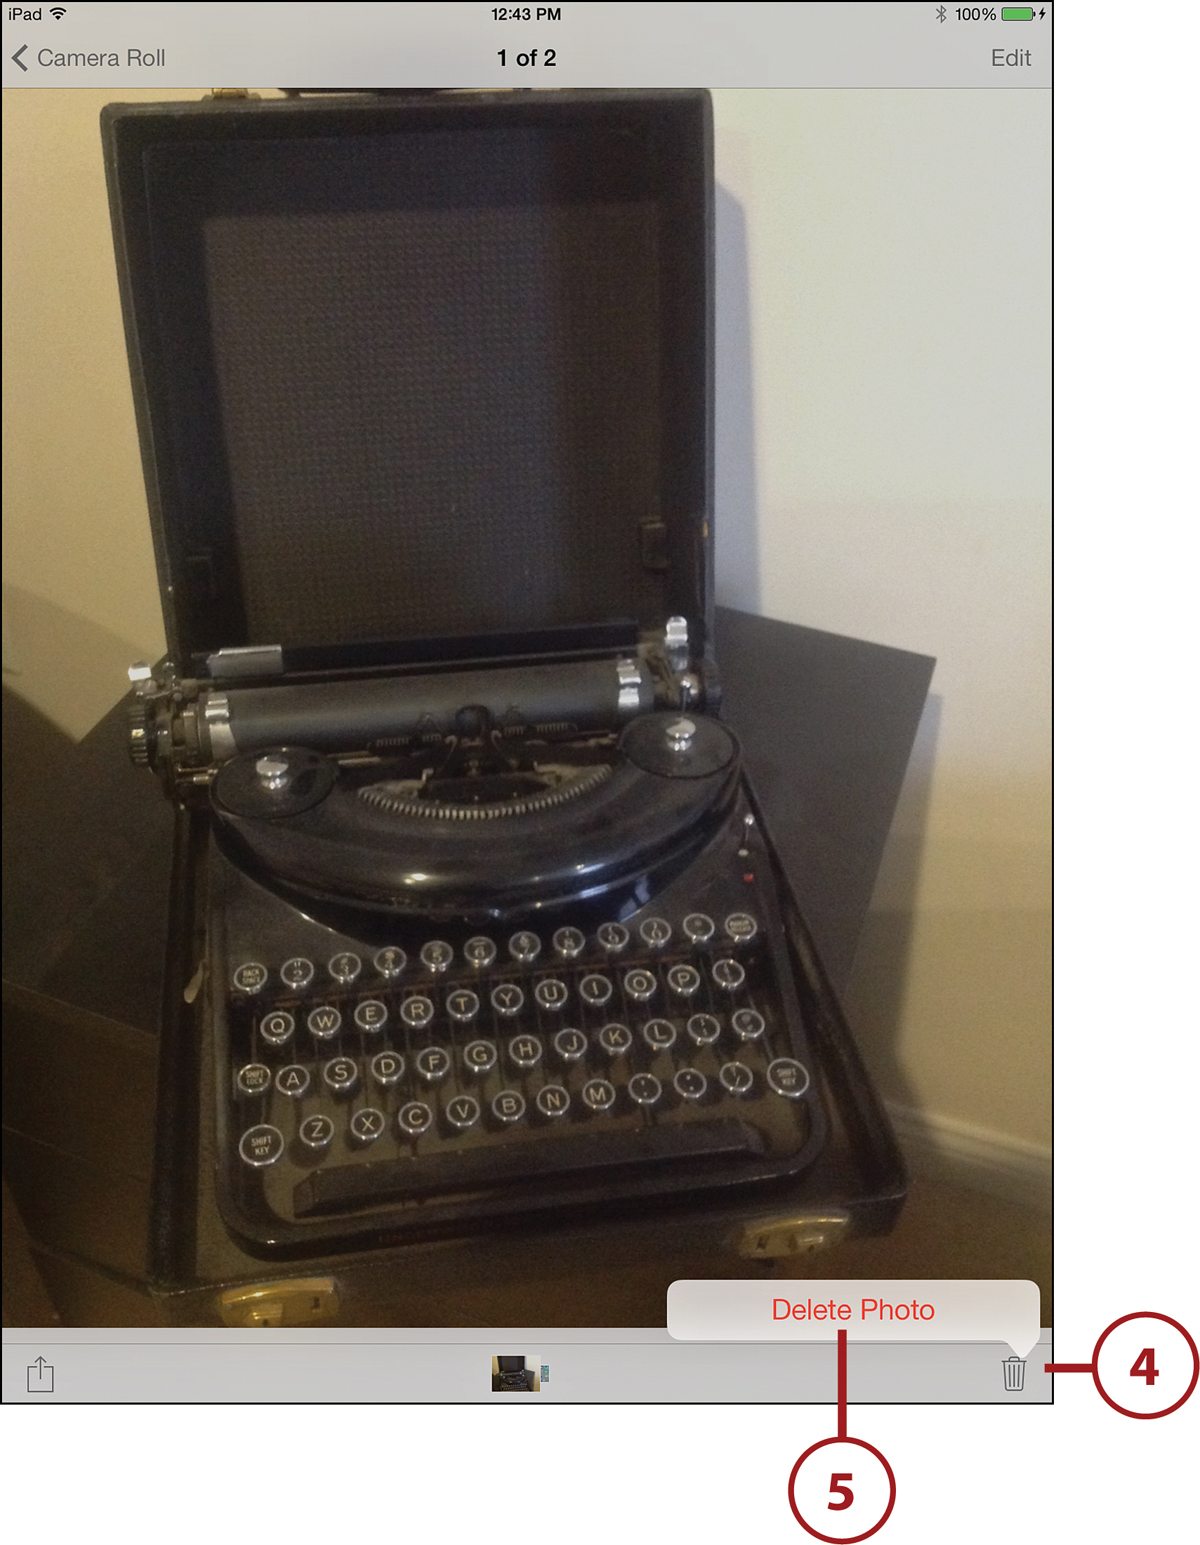
![]() Tap the Trash icon to delete the photo.
Tap the Trash icon to delete the photo.
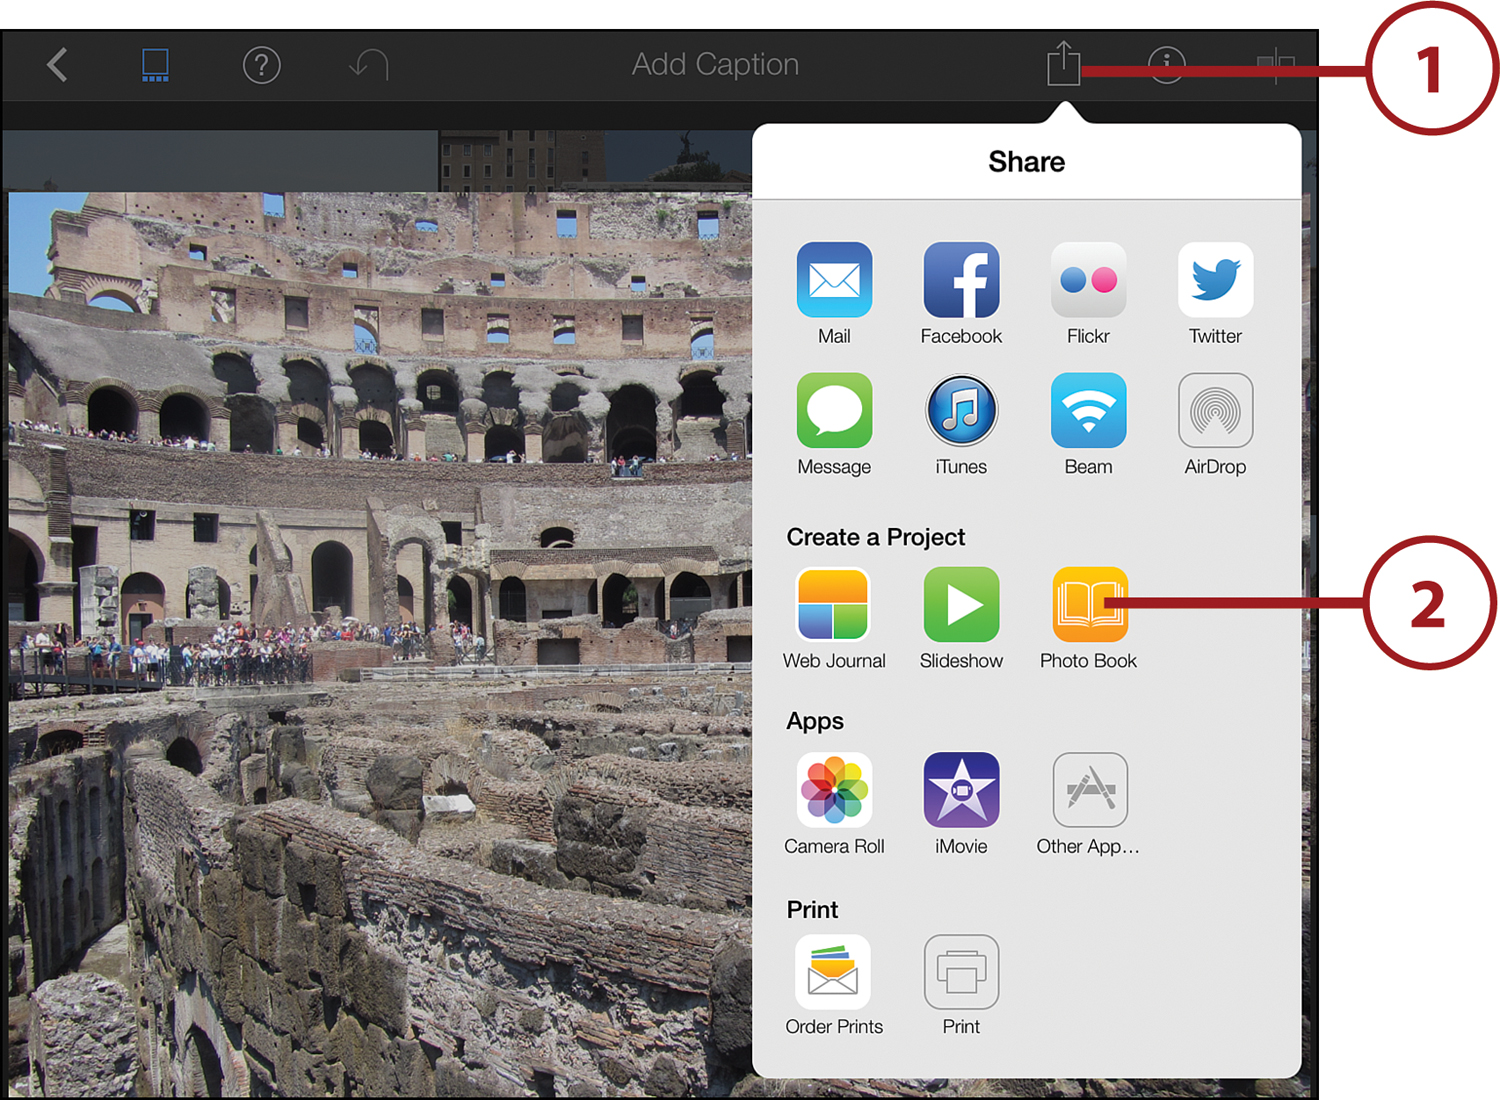
![]() Tap the Share icon to send the photo to someone else via message, email, AirDrop and a variety of other methods depending on which apps you have installed. This is also where you can copy the image so you can paste it into an email or another app.
Tap the Share icon to send the photo to someone else via message, email, AirDrop and a variety of other methods depending on which apps you have installed. This is also where you can copy the image so you can paste it into an email or another app.
![]() Tap Edit to adjust the photo.
Tap Edit to adjust the photo.
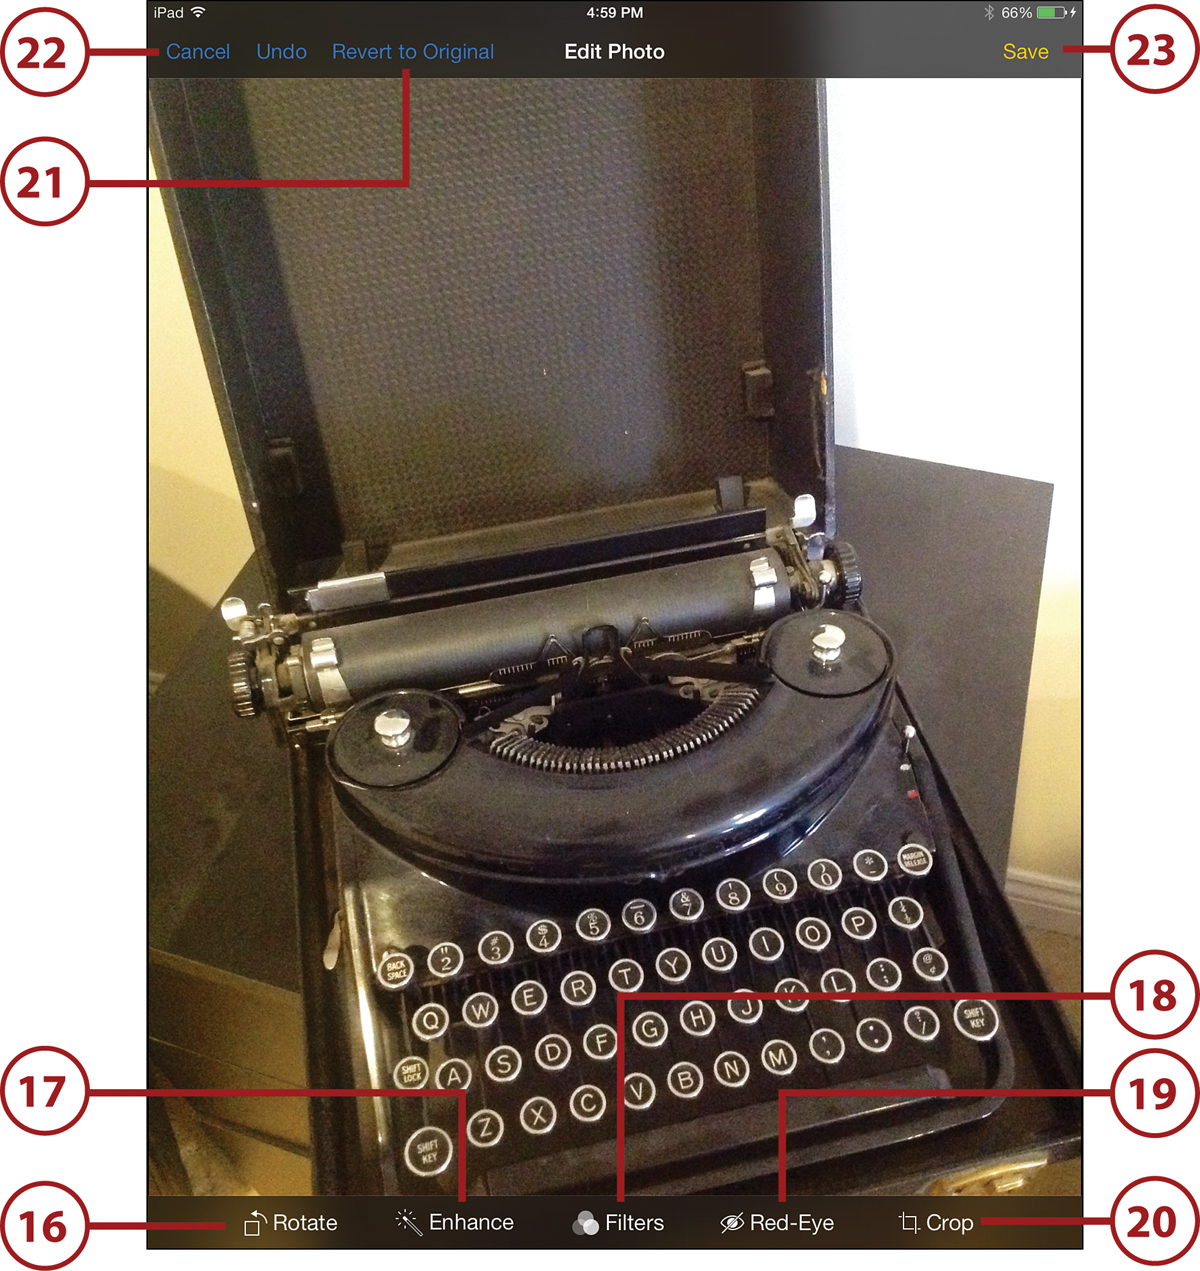
![]() Tap Rotate to rotate the image 90 degrees counterclockwise.
Tap Rotate to rotate the image 90 degrees counterclockwise.
![]() Tap Enhance to have the app examine the brightness and contrast in the photo and try to bring out the best image.
Tap Enhance to have the app examine the brightness and contrast in the photo and try to bring out the best image.
![]() Tap Filters to access a choice of several filters to apply to the photo, such as Mono, Noir, Fade, Chrome, Transfer, and Instant.
Tap Filters to access a choice of several filters to apply to the photo, such as Mono, Noir, Fade, Chrome, Transfer, and Instant.
![]() Tap Red-Eye, and then tap red eyes in the photo and they are automatically corrected.
Tap Red-Eye, and then tap red eyes in the photo and they are automatically corrected.
![]() Tap Crop to crop the image and get rid of unwanted things at the edges or to focus on a specific object in the photo.
Tap Crop to crop the image and get rid of unwanted things at the edges or to focus on a specific object in the photo.
![]() You can tap Revert to Original at any time to throw away all the edits you might have made with the options in steps 16 to 20. You can try different adjustments without permanently committing to them. You can also tap Undo to throw away only the very last adjustment you made.
You can tap Revert to Original at any time to throw away all the edits you might have made with the options in steps 16 to 20. You can try different adjustments without permanently committing to them. You can also tap Undo to throw away only the very last adjustment you made.
![]() You can also tap the Cancel button to throw away changes and return to the previous screen.
You can also tap the Cancel button to throw away changes and return to the previous screen.
![]() If you want to make the changes stay with the photo, you can tap the Save button.
If you want to make the changes stay with the photo, you can tap the Save button.
Using Photo Booth
In addition to the basic picture-taking functionality of the Camera app, you can also use the included Photo Booth app to take more creative shots using one of eight special filters.
![]() Launch the Photo Booth app.
Launch the Photo Booth app.
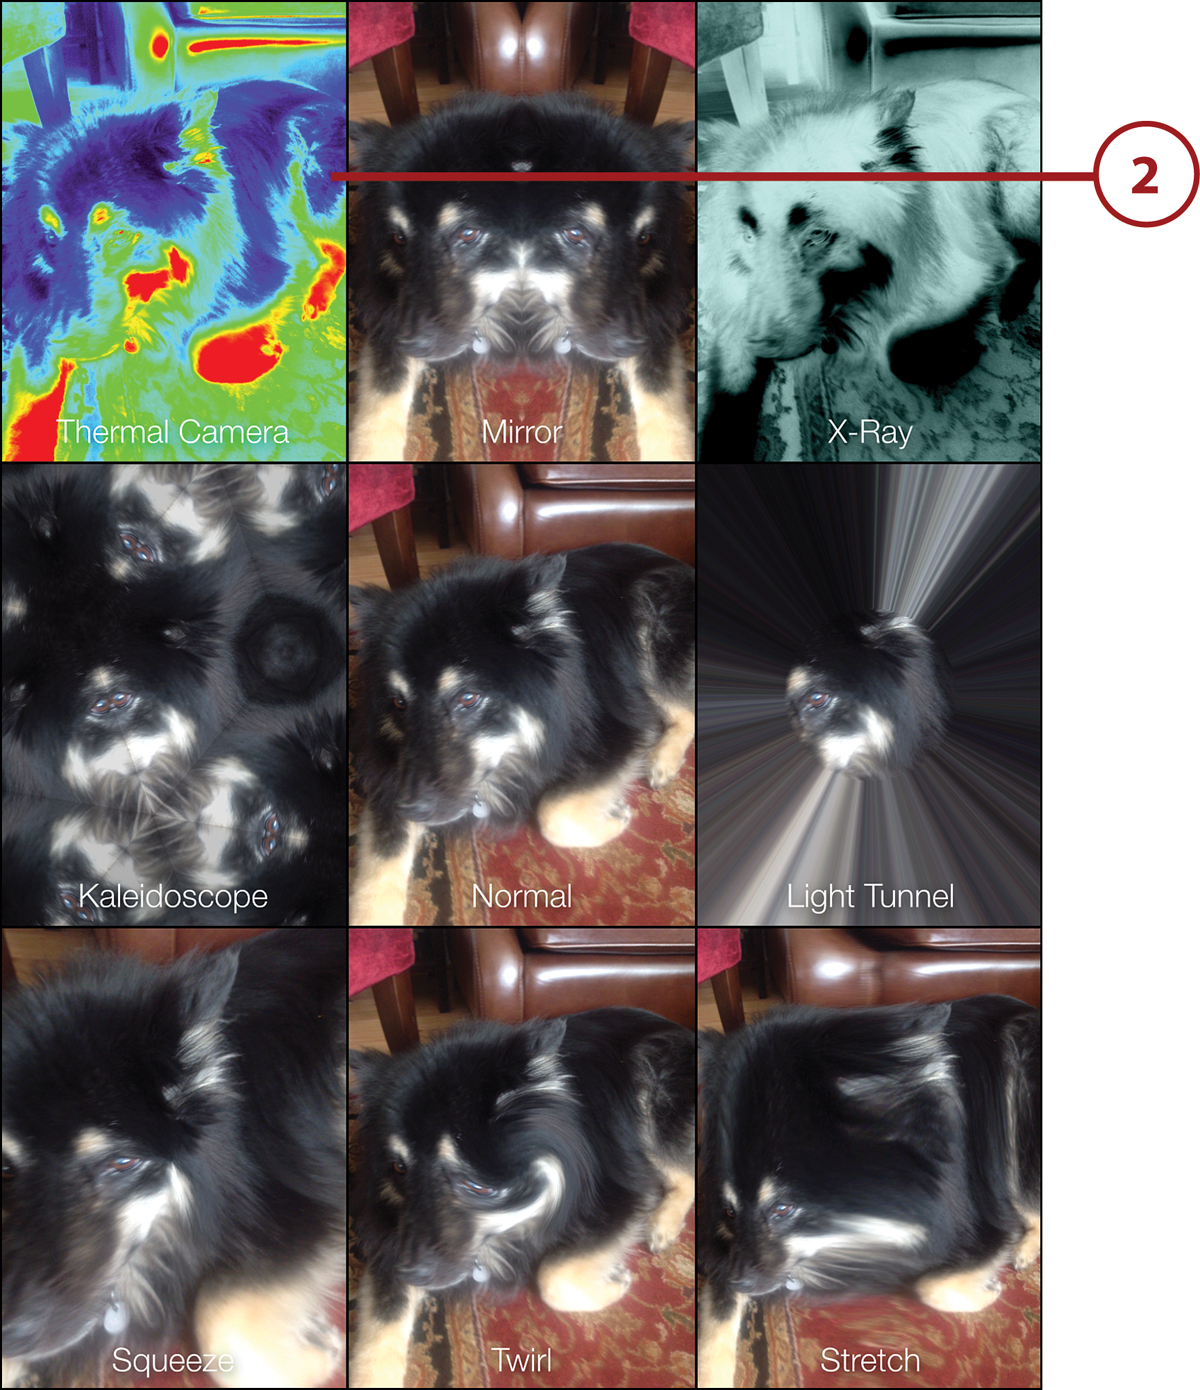
![]() You’ll start by seeing all the filters you can choose from. Tap one of the filters to select it.
You’ll start by seeing all the filters you can choose from. Tap one of the filters to select it.
![]() Now you’ll see just that one filter. In addition, you have some buttons. Tap on the button at the bottom right to switch between the front and rear cameras.
Now you’ll see just that one filter. In addition, you have some buttons. Tap on the button at the bottom right to switch between the front and rear cameras.
![]() Tap the button at the bottom left to return to the 9-filter preview.
Tap the button at the bottom left to return to the 9-filter preview.
![]() Tap the camera button at the bottom to take a picture.
Tap the camera button at the bottom to take a picture.
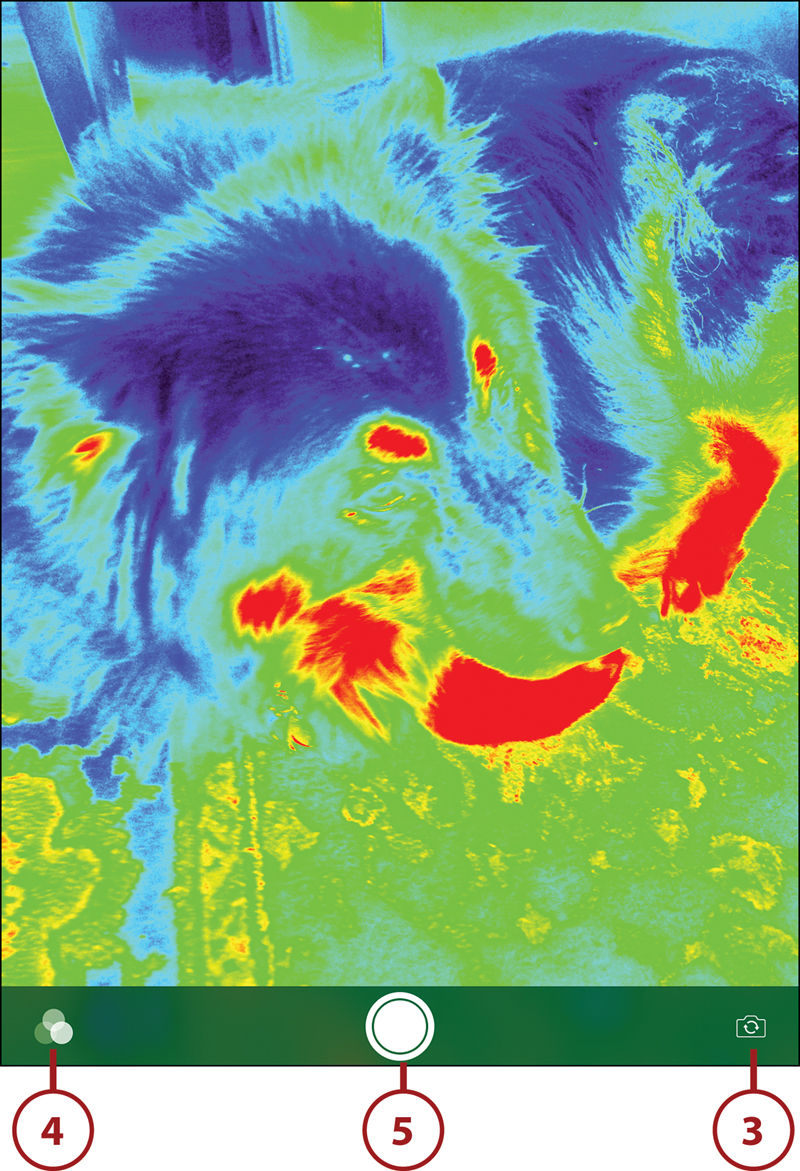
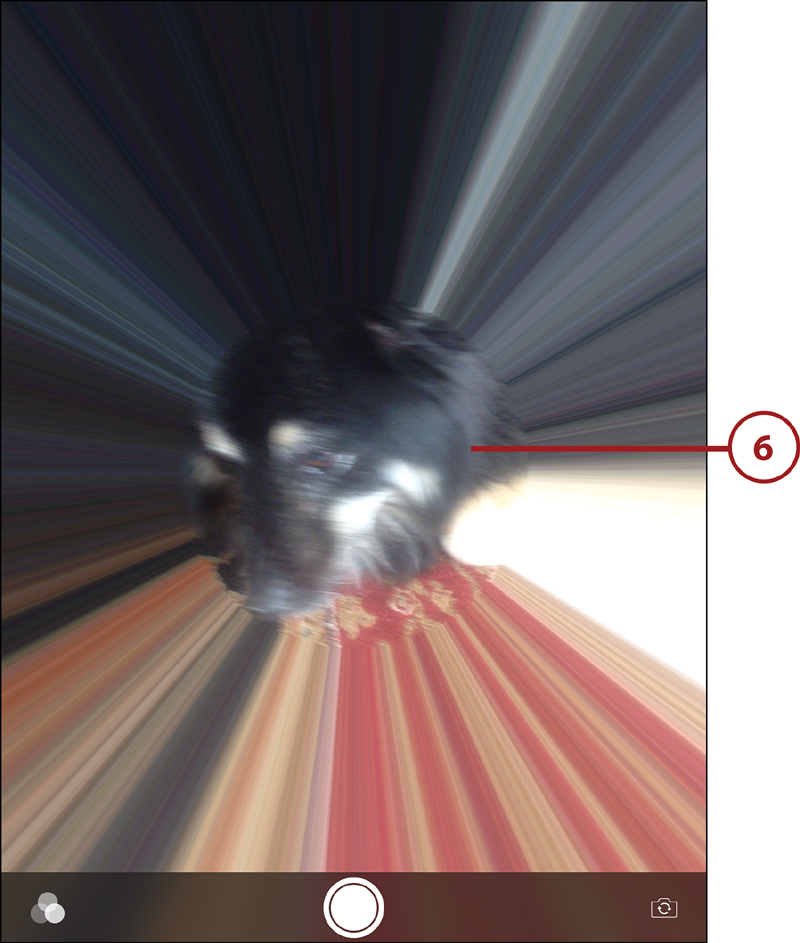
![]() Some filters also allow you to tap the live video image to adjust the filter. For instance, the Light Tunnel filter enables you to set the position of the center of the tunnel.
Some filters also allow you to tap the live video image to adjust the filter. For instance, the Light Tunnel filter enables you to set the position of the center of the tunnel.
![]() All you do with Photo Booth is take photos. Then they are sent right to your Camera Roll. See the next section to learn how to browse your photos in the Camera Roll.
All you do with Photo Booth is take photos. Then they are sent right to your Camera Roll. See the next section to learn how to browse your photos in the Camera Roll.
A Kind of Flash
When you take a picture with the camera on the front of the iPad, you get a kind of flash effect from the screen. It simply turns all white for a second. This helps in low light situations.
Browsing Your Photos
After you have synced to your Mac or PC, you should have some photos on your iPad, provided you have set some to sync in either iPhoto or iTunes. Then you can browse them with the Photos app.
![]() Tap on the Photos app icon to launch it.
Tap on the Photos app icon to launch it.
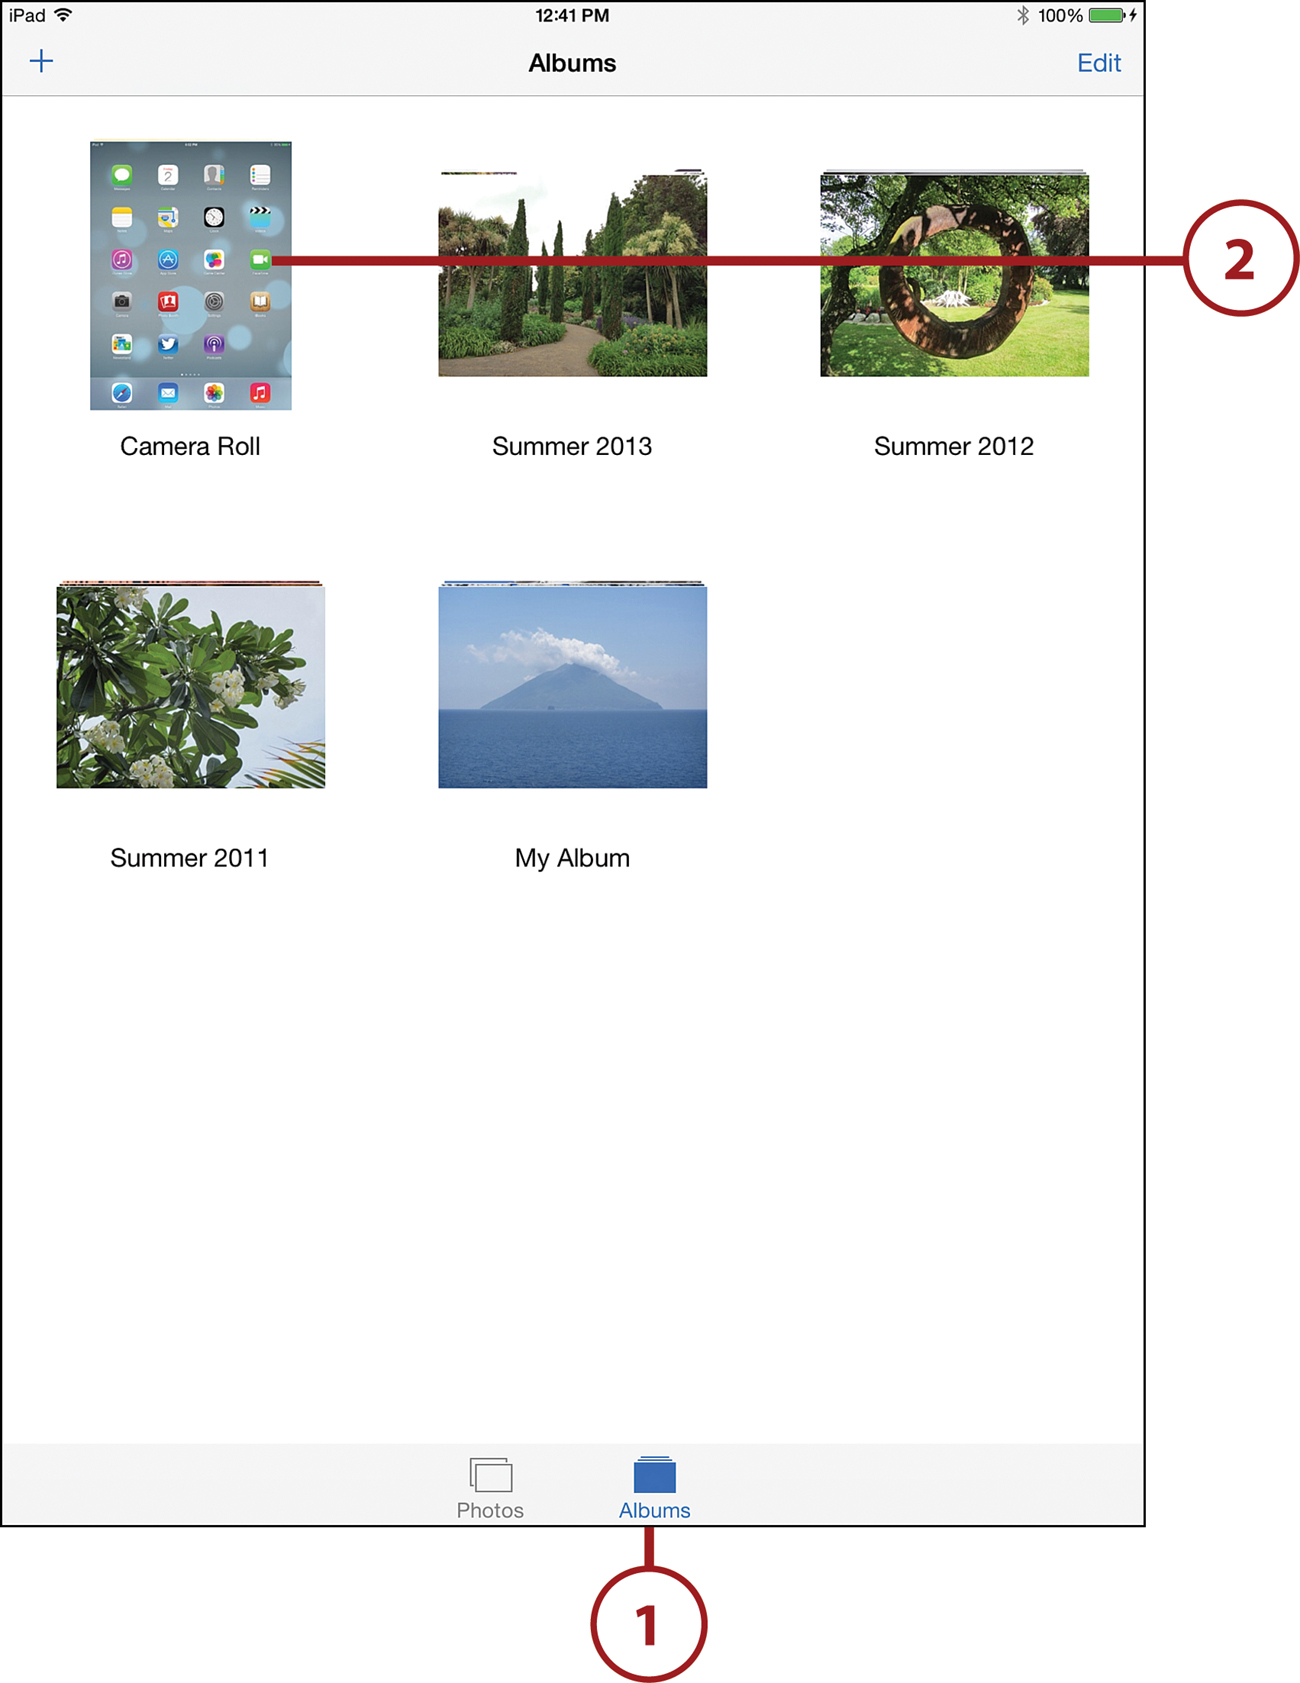
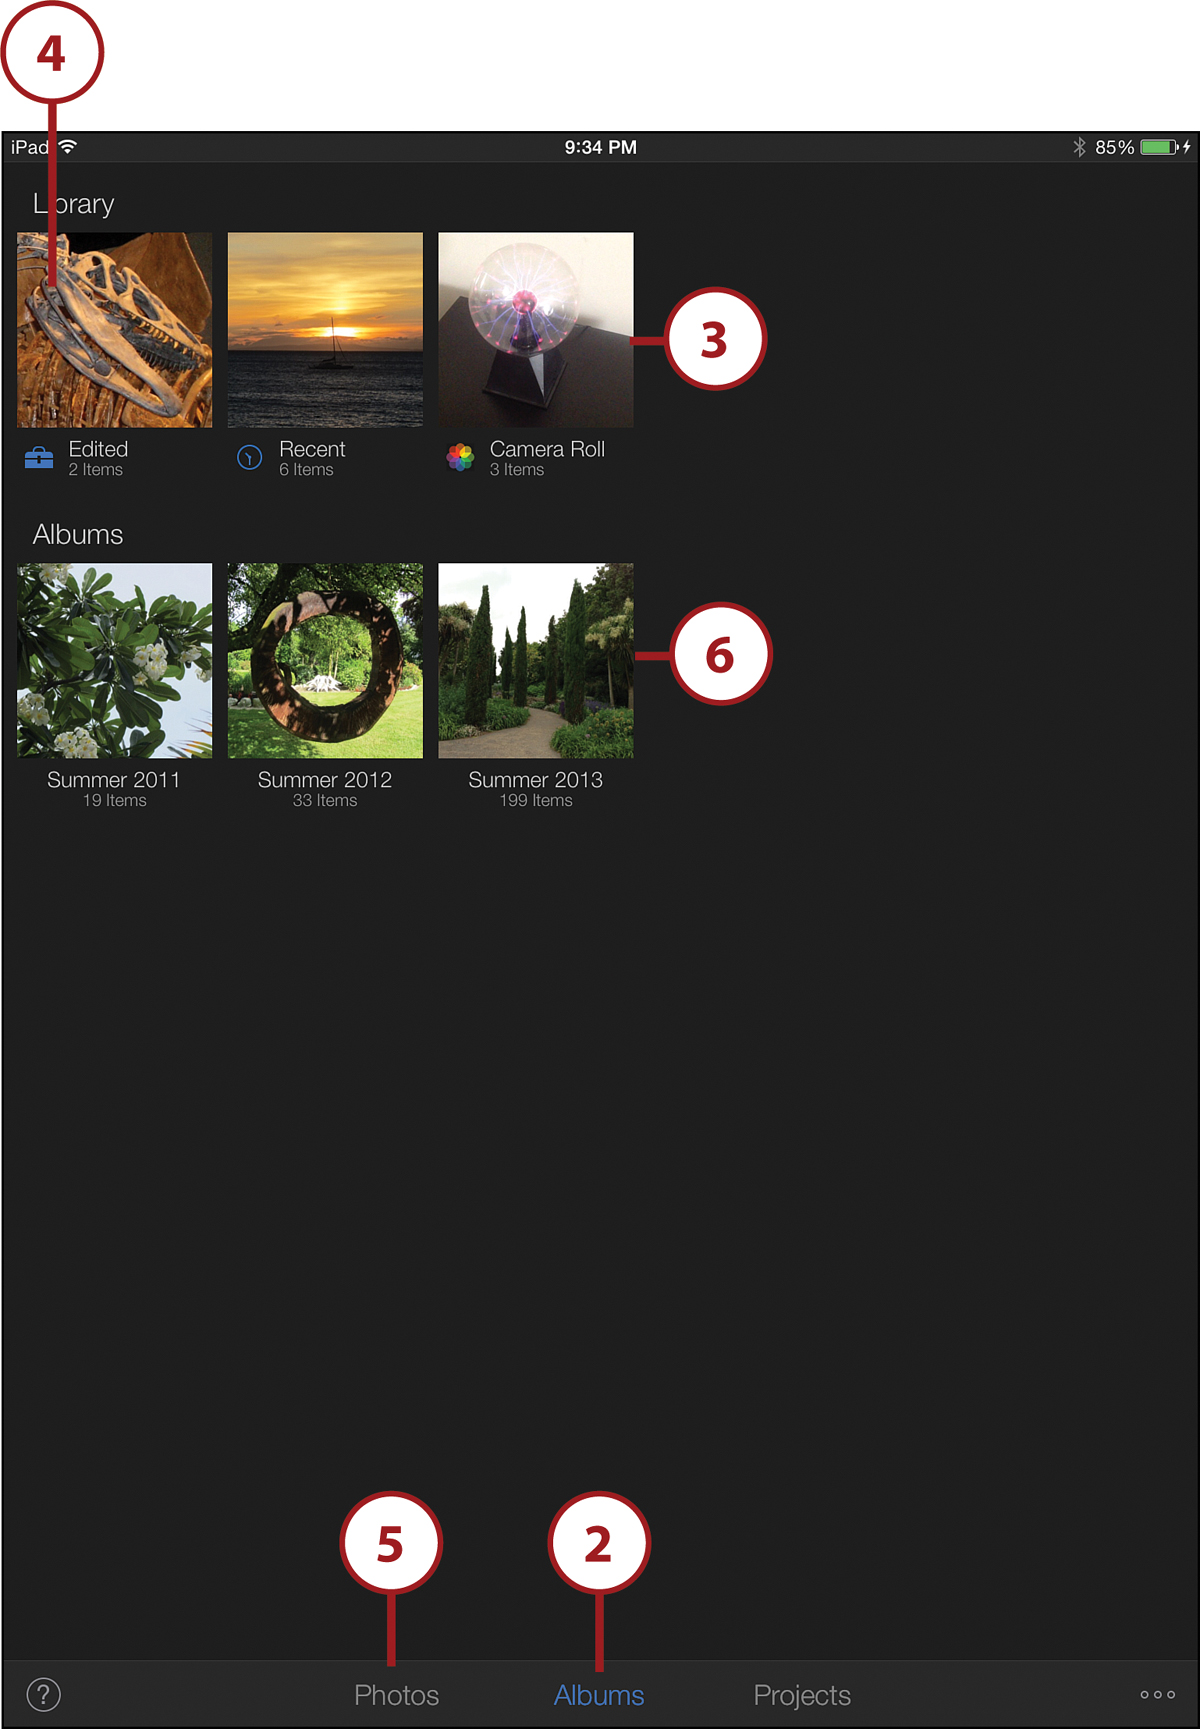
![]() Tap to view your photos by photo collections or albums. For this example, we’ll use albums. These are both just different ways of sorting the photos on your iPad.
Tap to view your photos by photo collections or albums. For this example, we’ll use albums. These are both just different ways of sorting the photos on your iPad.
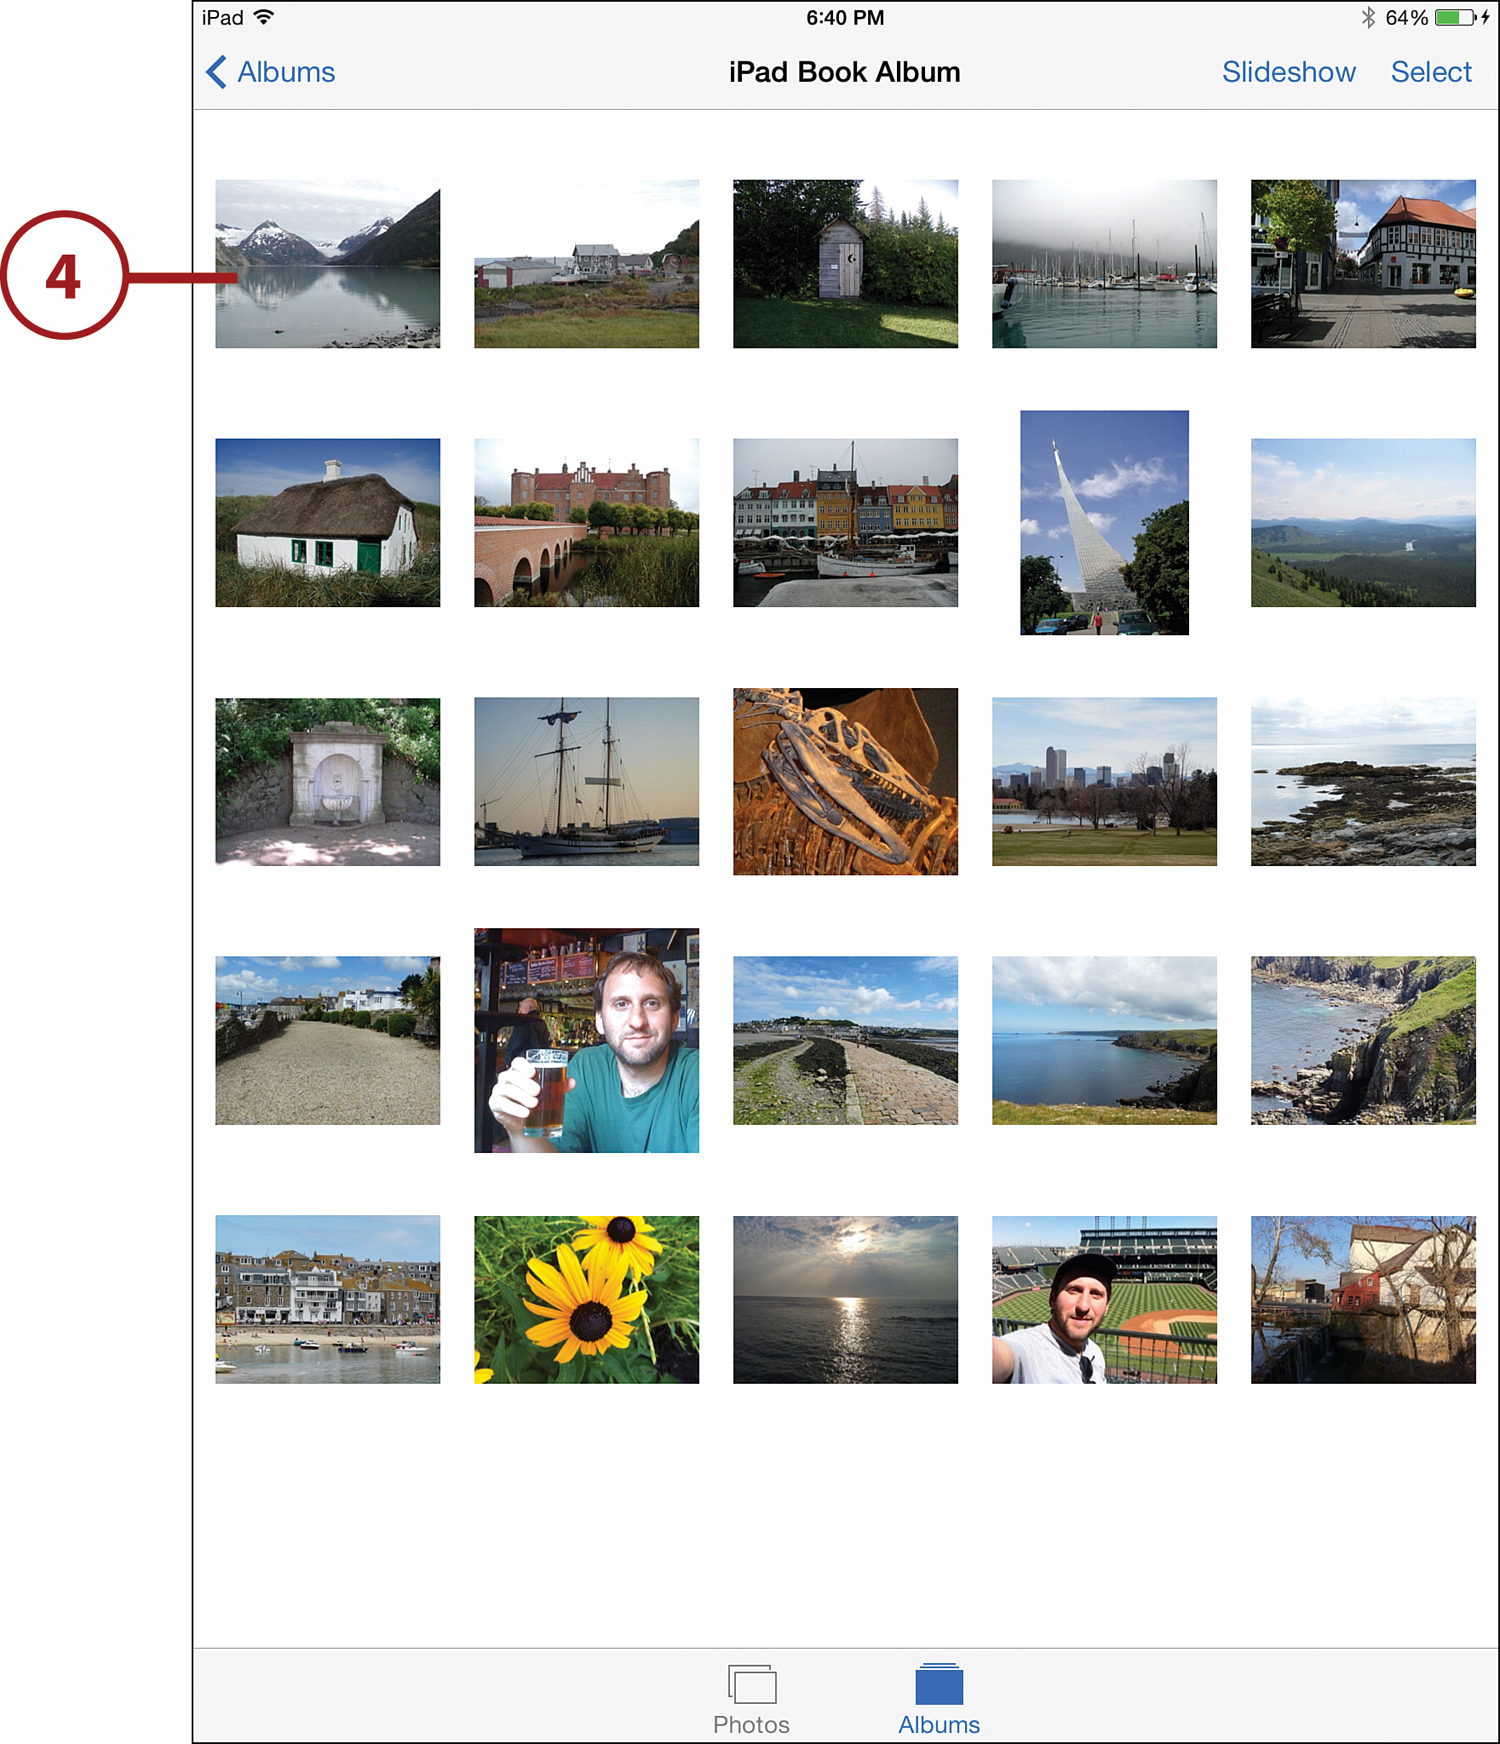
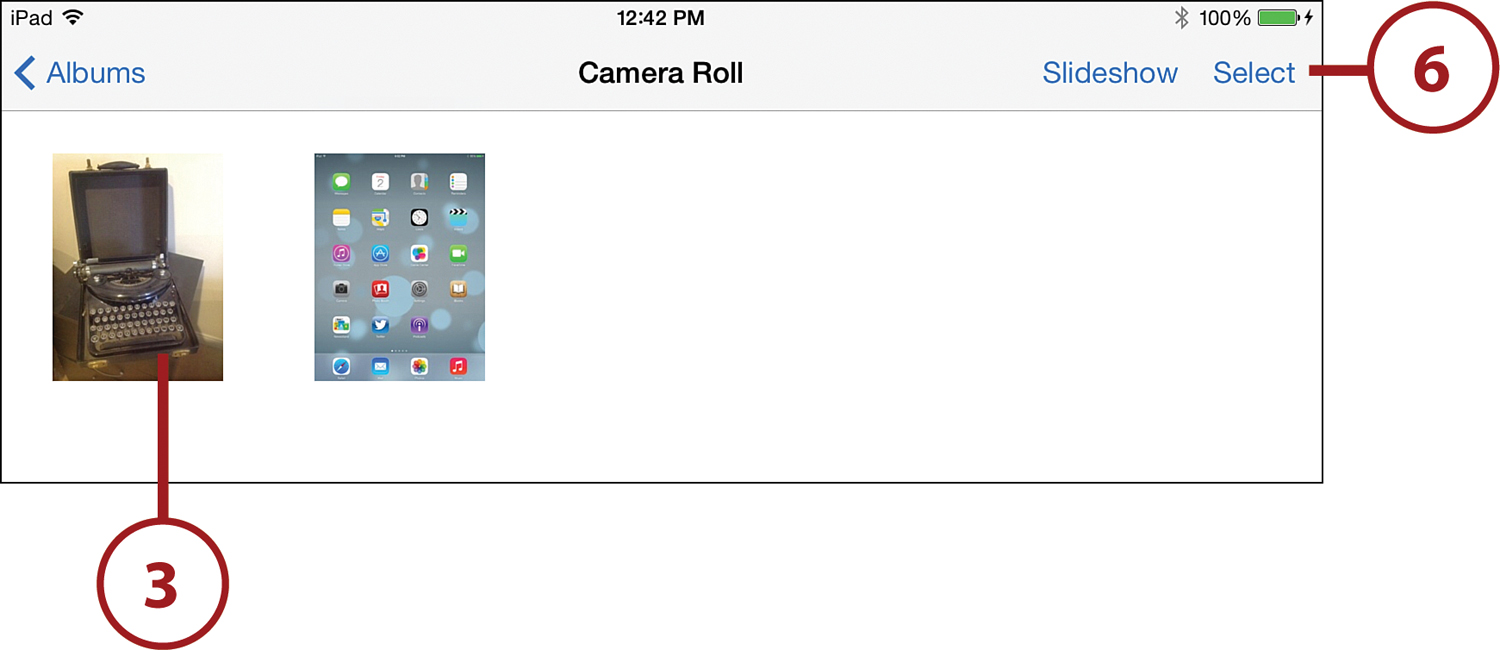
![]() Tap an album to view the photos in it.
Tap an album to view the photos in it.

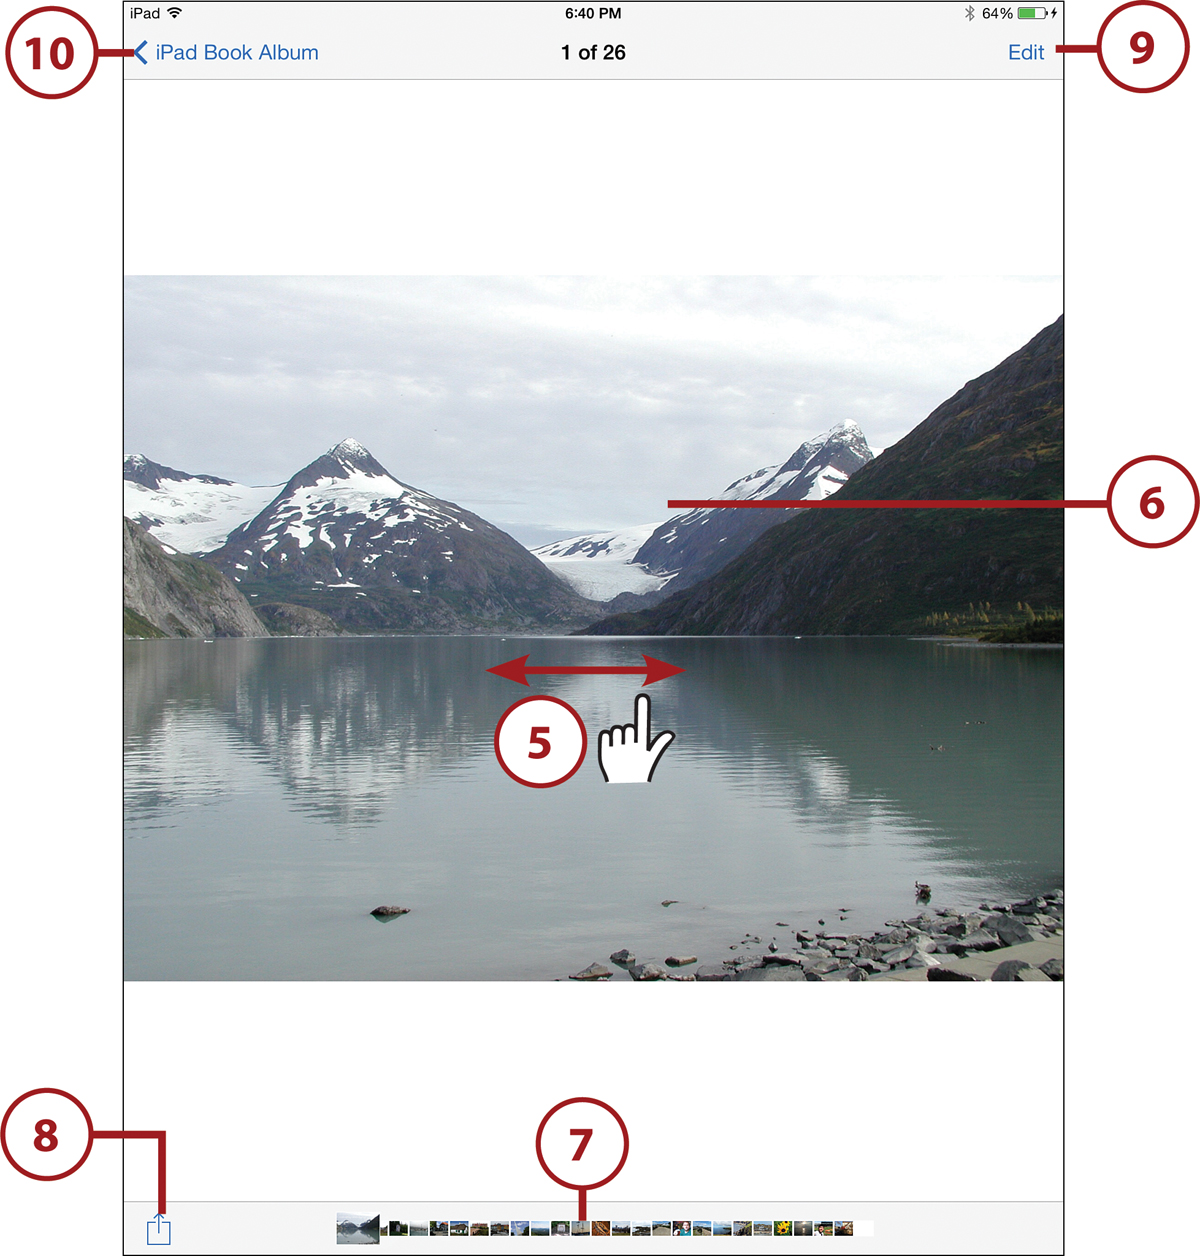
![]() Tap a photo to view it. For most photos, you might want to rotate the iPad to its horizontal orientation for wide-screen viewing.
Tap a photo to view it. For most photos, you might want to rotate the iPad to its horizontal orientation for wide-screen viewing.
![]() To move to the next or previous photo, drag left or right.
To move to the next or previous photo, drag left or right.
![]() To bring up controls at the top and bottom of a photo, if they are not already present, tap in the center of the screen.
To bring up controls at the top and bottom of a photo, if they are not already present, tap in the center of the screen.
![]() You can tap and run your finger over the small thumbnails at the bottom of the screen to move through that album’s photos.
You can tap and run your finger over the small thumbnails at the bottom of the screen to move through that album’s photos.
![]() Tap the Share button to copy the photo, or send it to a friend or another app.
Tap the Share button to copy the photo, or send it to a friend or another app.
![]() Tap Edit to adjust the photo, the same way you did in the task “Taking and Editing Photos” earlier in this chapter, steps 16 to 23.
Tap Edit to adjust the photo, the same way you did in the task “Taking and Editing Photos” earlier in this chapter, steps 16 to 23.
![]() Tap the name of the album at the top of the screen to return to the list of photos.
Tap the name of the album at the top of the screen to return to the list of photos.
Sharing Photos
There are many ways you can share photos from the Photos app.
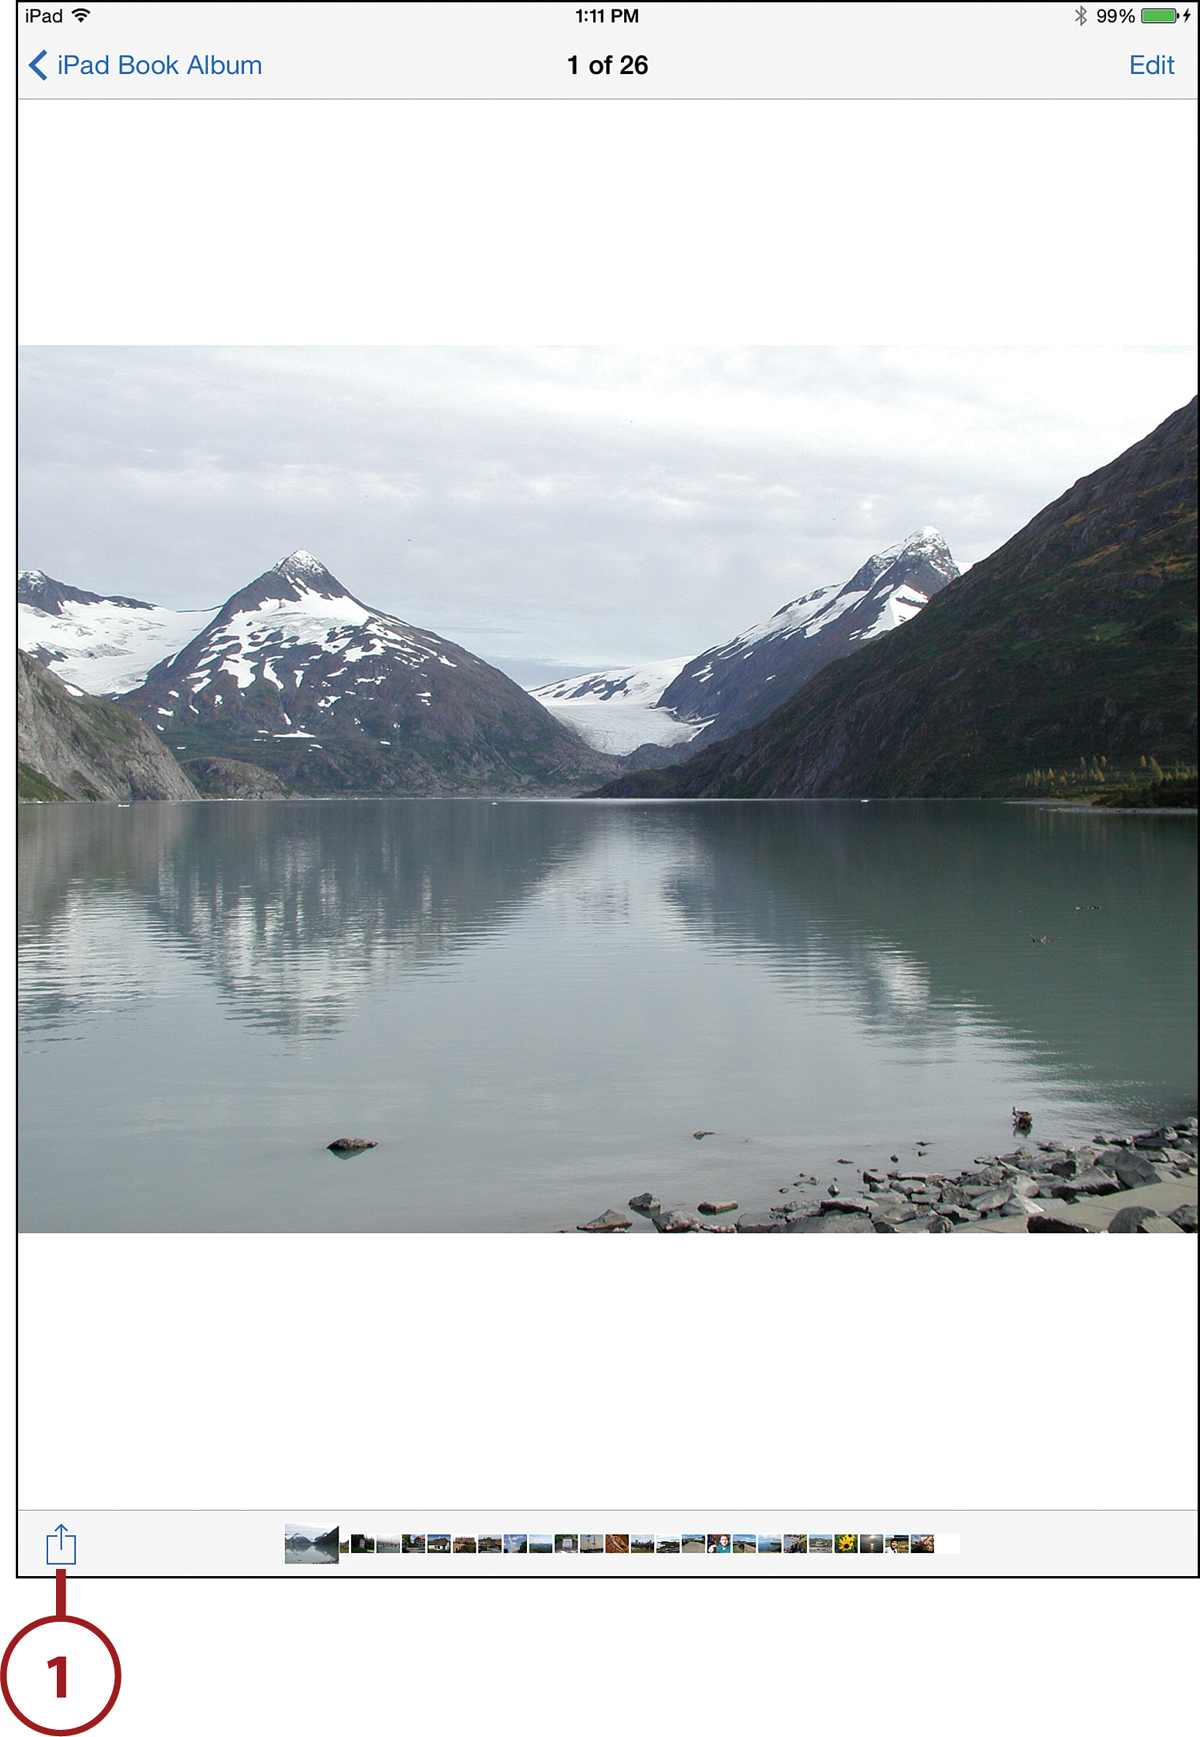
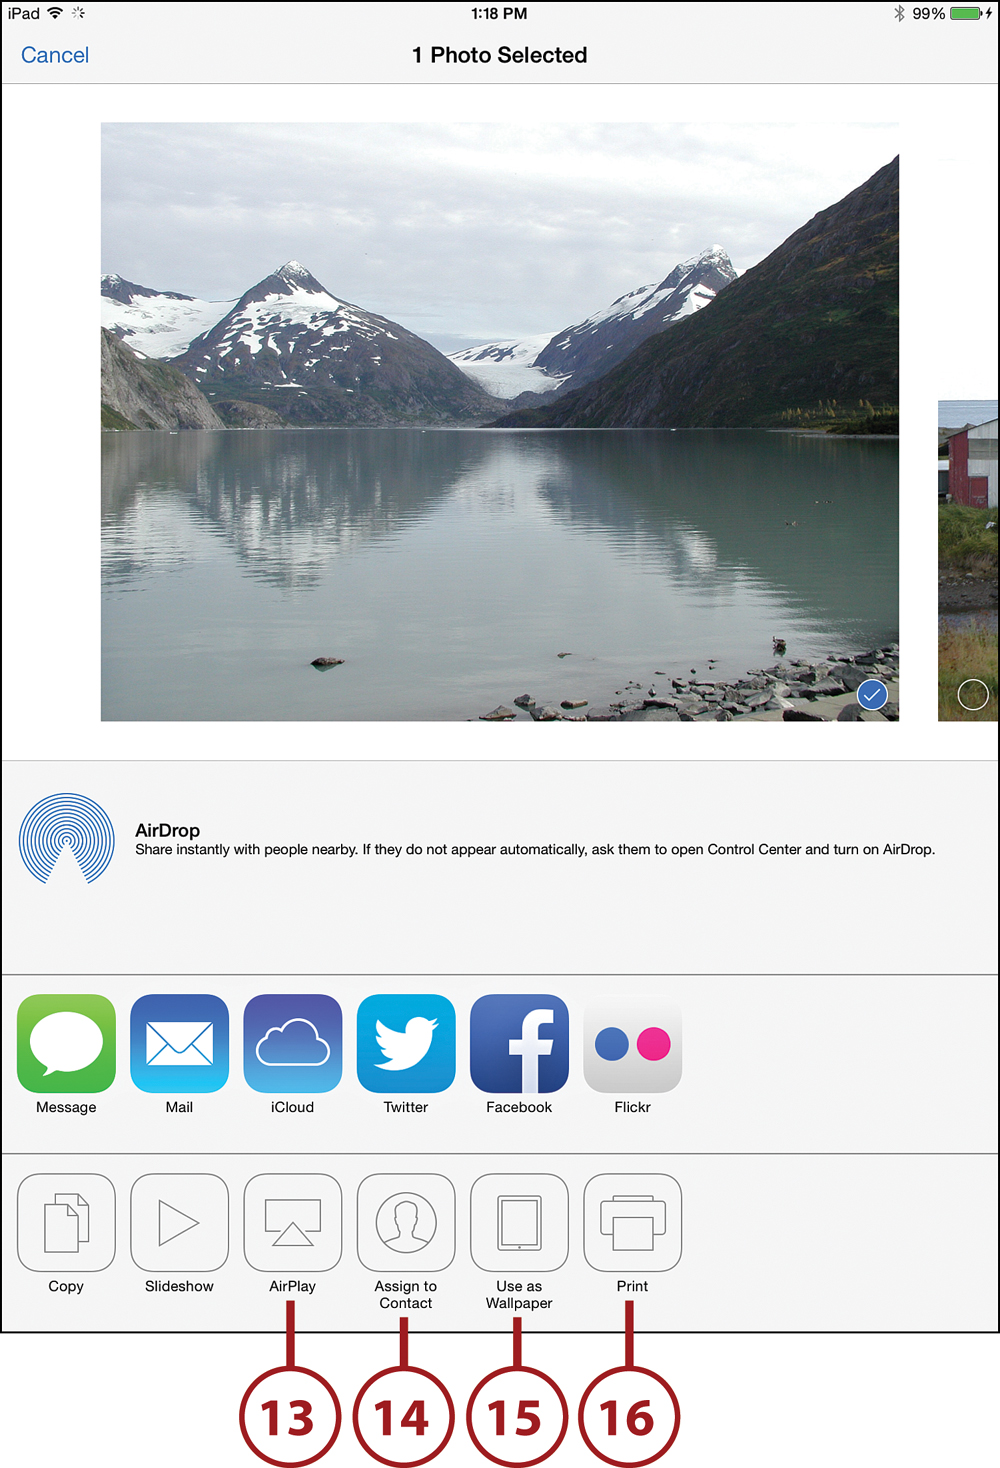
![]() While viewing a single image in the Photos app, or in the Camera app right after taking a new photo, tap the Share button in the lower-left corner.
While viewing a single image in the Photos app, or in the Camera app right after taking a new photo, tap the Share button in the lower-left corner.
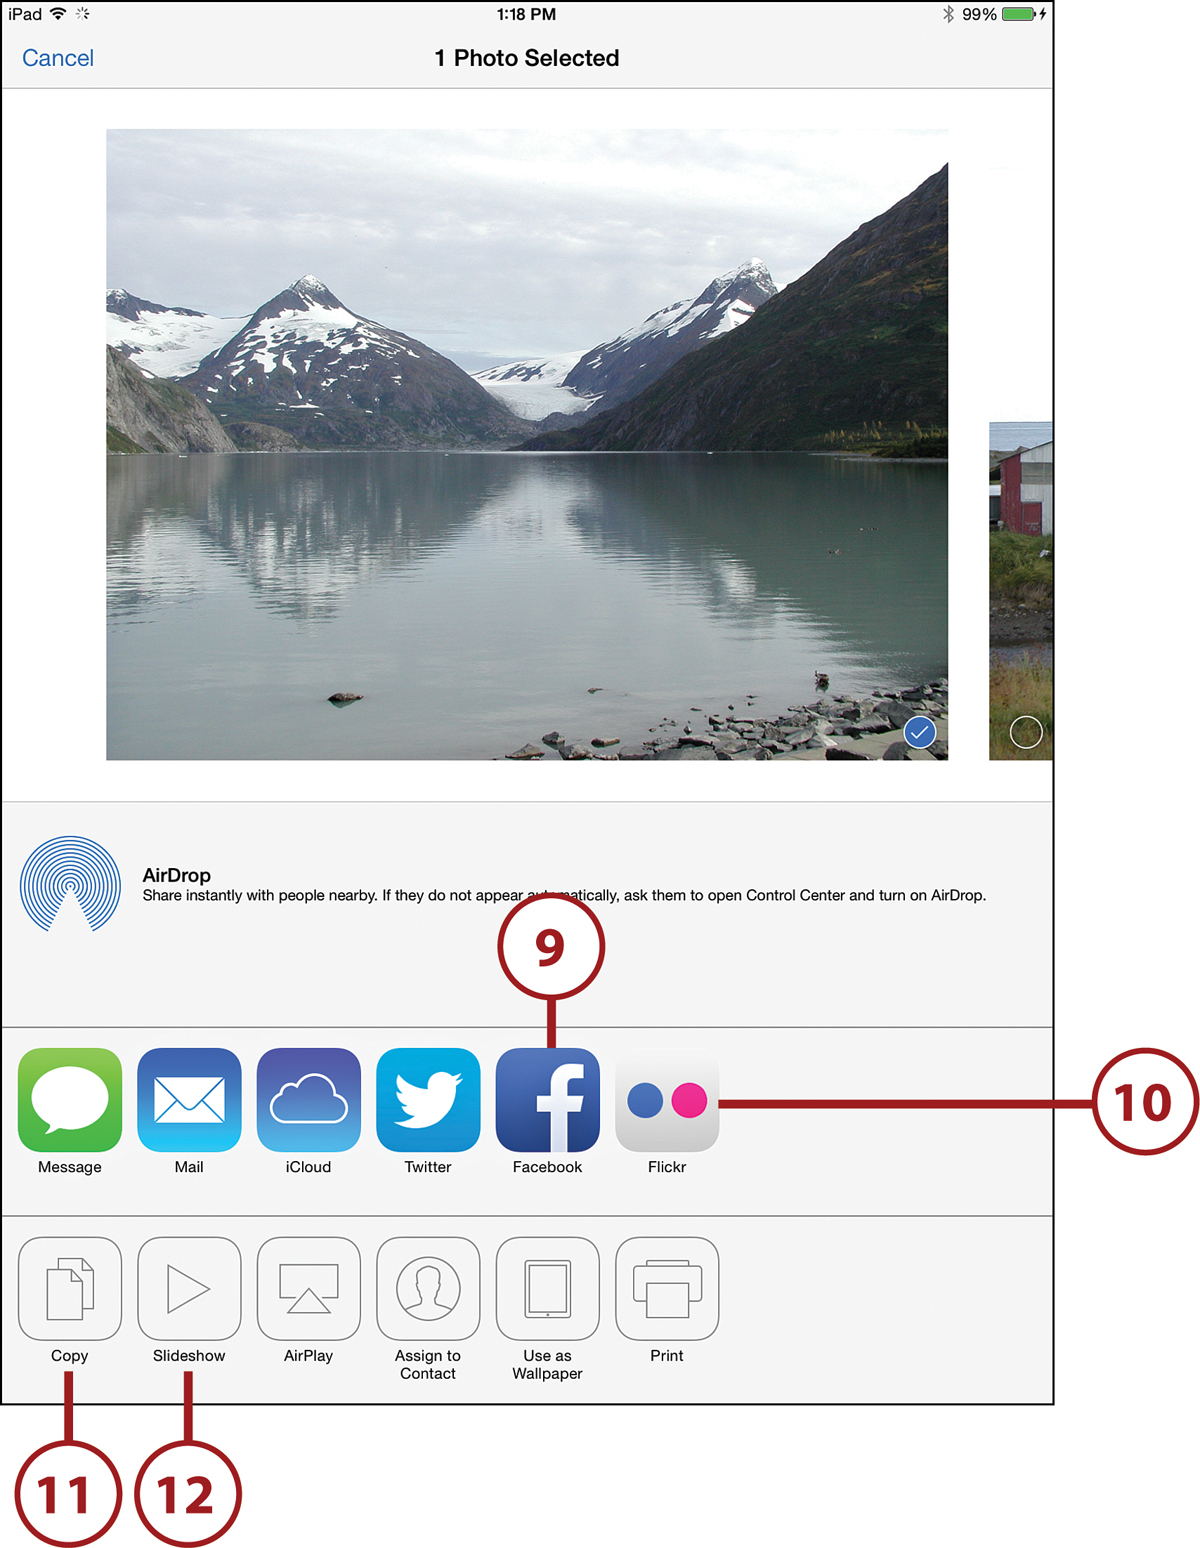
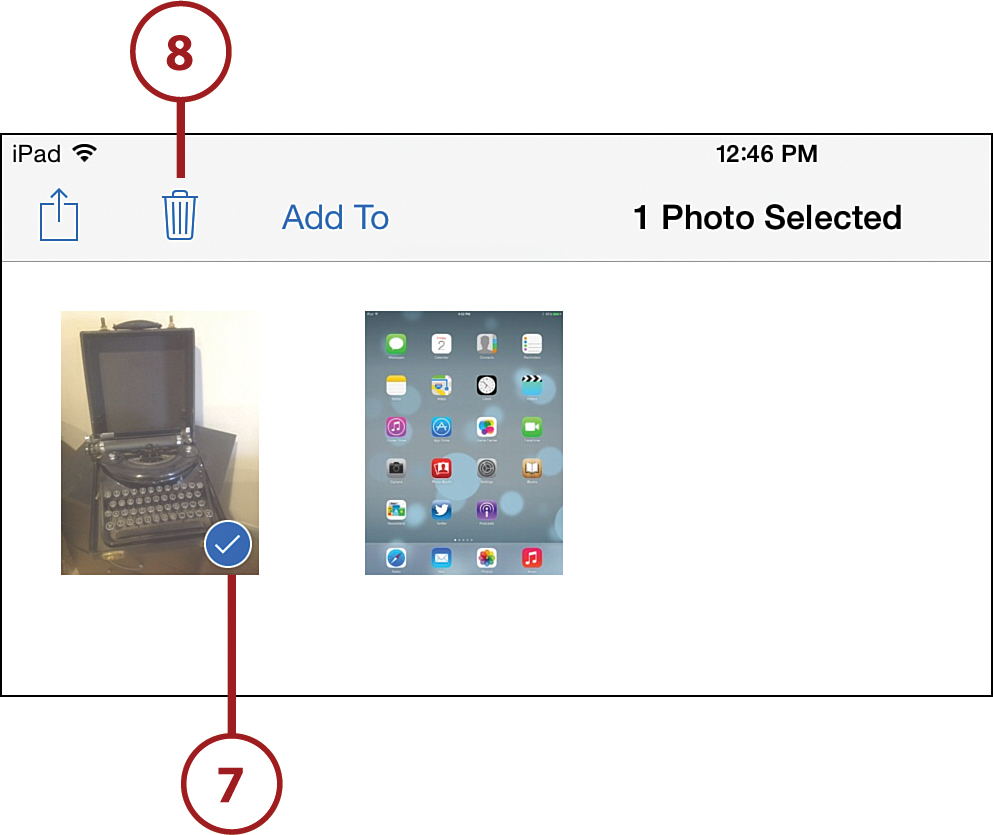
![]() The image is selected, but you can also select other images in the album by swiping to the left and right and tapping the checkmark circle at the bottom of each image. This way you can share a set of photos instead of just one.
The image is selected, but you can also select other images in the album by swiping to the left and right and tapping the checkmark circle at the bottom of each image. This way you can share a set of photos instead of just one.
![]() If any other iOS devices using AirDrop are nearby, you will see them in this area and can tap their icon to send the photo via AirDrop.
If any other iOS devices using AirDrop are nearby, you will see them in this area and can tap their icon to send the photo via AirDrop.
![]() Tap the Message button to send a text message that includes the selected image(s) using iMessage to another person. See “Setting Up Messaging” in Chapter 8.
Tap the Message button to send a text message that includes the selected image(s) using iMessage to another person. See “Setting Up Messaging” in Chapter 8.
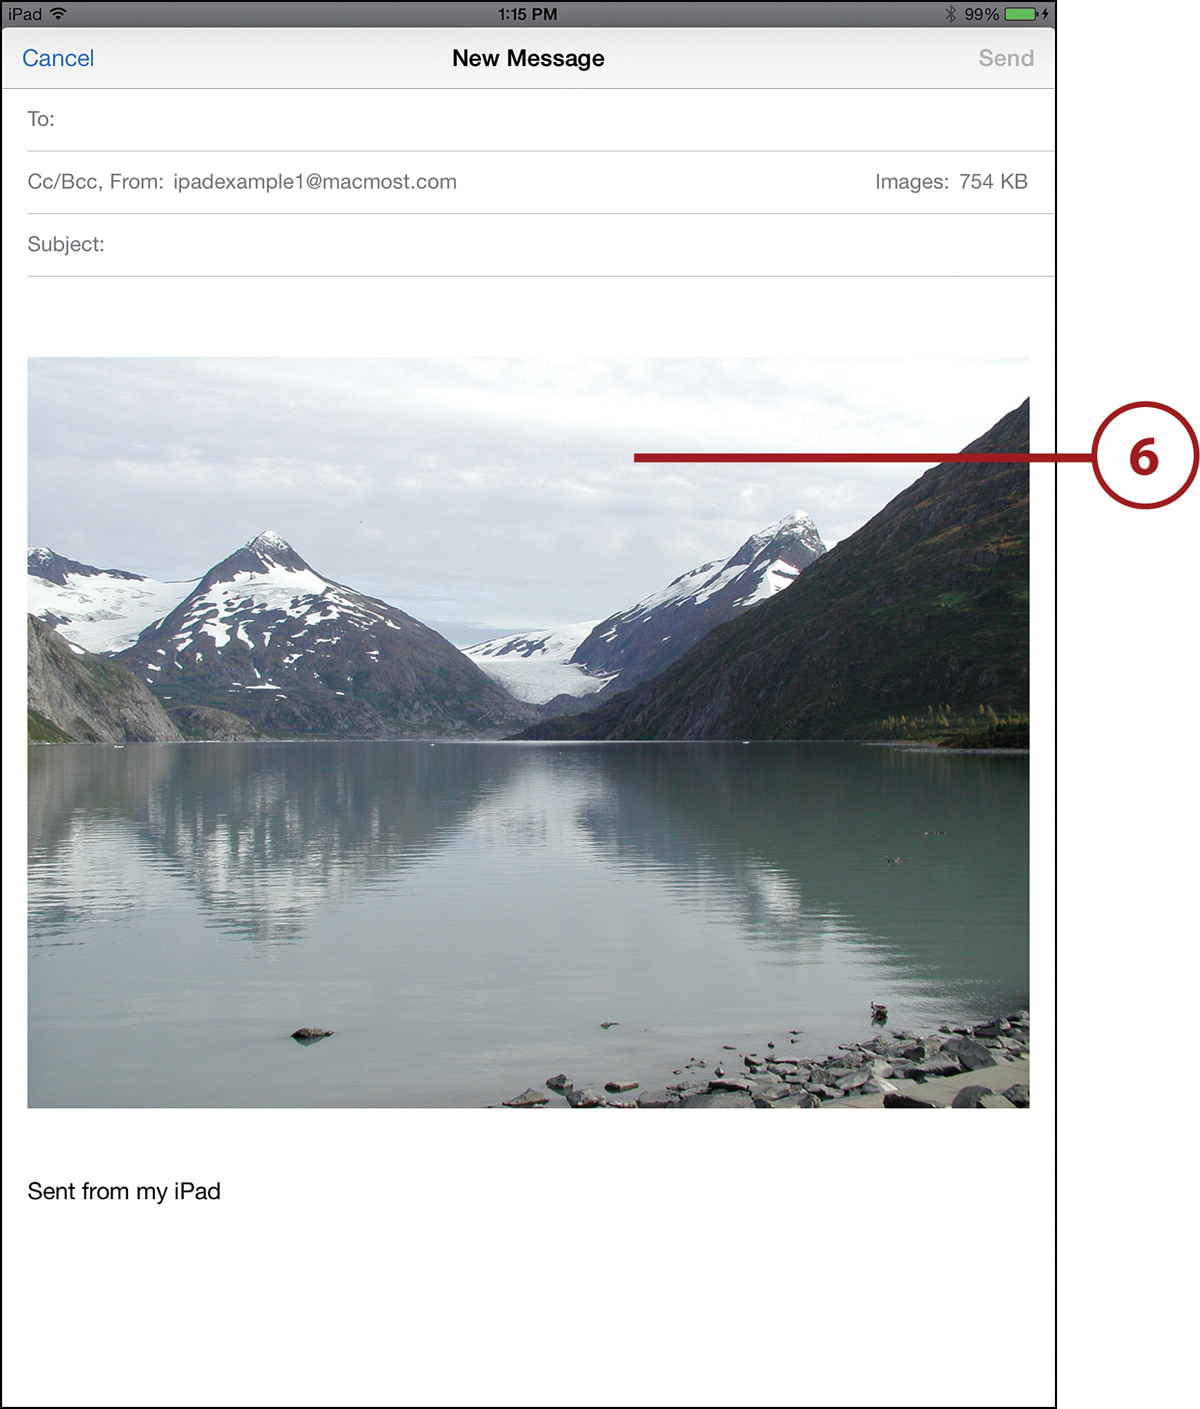
![]() Tap Mail to send the current photo in an email message.
Tap Mail to send the current photo in an email message.
![]() After you tap Mail, a message composition screen appears and starts a new message. The photo is attached to the message.
After you tap Mail, a message composition screen appears and starts a new message. The photo is attached to the message.
It’s Not the Original Image
If you sync a photo from your computer to your iPad, and then email it to people, they actually receive a reduced image, not the original. iPad albums contain reduced images to save space. If you want to send the original, email it from your computer.
![]() If you are using iCloud’s Photo Stream feature, you can send the photo to Photo Stream—even if it is not a photo you have taken with the iPad’s camera, such as a photo taken with your iPhone. We’ll look at using Photo Stream in the next section.
If you are using iCloud’s Photo Stream feature, you can send the photo to Photo Stream—even if it is not a photo you have taken with the iPad’s camera, such as a photo taken with your iPhone. We’ll look at using Photo Stream in the next section.
![]() You can also send (tweet) the photo using your Twitter account. Tap the Twitter button and a small Twitter composition dialog appears, which allows you to add a message to go along with the photo.
You can also send (tweet) the photo using your Twitter account. Tap the Twitter button and a small Twitter composition dialog appears, which allows you to add a message to go along with the photo.

![]() Likewise, tap the Facebook button to post the photo, along with a message, to your Facebook wall.
Likewise, tap the Facebook button to post the photo, along with a message, to your Facebook wall.
![]() If you use Flickr, tap the Flickr button to post the image to your Flickr account. Go to the Flickr section of the Settings app to configure your Flickr account first.
If you use Flickr, tap the Flickr button to post the image to your Flickr account. Go to the Flickr section of the Settings app to configure your Flickr account first.
![]() Tap Copy to copy the photo to your clipboard. Putting the photo on the clipboard enables you to paste it into documents or email messages in other apps.
Tap Copy to copy the photo to your clipboard. Putting the photo on the clipboard enables you to paste it into documents or email messages in other apps.
![]() Tap Slideshow to start a slideshow with the selected pictures. It can display on the iPad’s screen, or you can select to view it on an AirPlay device like an Apple TV on the same network.
Tap Slideshow to start a slideshow with the selected pictures. It can display on the iPad’s screen, or you can select to view it on an AirPlay device like an Apple TV on the same network.
![]() You can also show a single photo on a TV using an Apple TV. This only appears if you are using AirPlay on your network.
You can also show a single photo on a TV using an Apple TV. This only appears if you are using AirPlay on your network.
![]() Tap Assign to Contact to display a list of all your contacts so that you can add the photo to the contact’s thumbnail image.
Tap Assign to Contact to display a list of all your contacts so that you can add the photo to the contact’s thumbnail image.
![]() Tap Use as Wallpaper to assign the image to either the Lock Screen background or the Home Screen background, or both.
Tap Use as Wallpaper to assign the image to either the Lock Screen background or the Home Screen background, or both.
![]() Tap Print to send the photo to your networked printer.
Tap Print to send the photo to your networked printer.
You can share your photos in many ways, and it is likely that more will be added in the future. What you can use depends on what you have set up on your iPad. For instance, if you have Messaging and Twitter set up, you can use the Message and Tweet buttons to share using those services.
Using Photo Stream
Photo Stream is a feature of iCloud that can do two things: First, it can automatically upload new photos you take on your iPad to iCloud. Then these photos will sync to your other iOS devices and your Mac using iPhoto. This can essentially replace syncing your iPad to your computer to transfer your photos.
A second feature of Photo Stream is the ability to create online photo galleries that your friends and family can view. This also happens wirelessly using iCloud.
Setting Up Photo Stream
To use these Photo Stream features, you first need to enable Photo Stream in the Settings app.
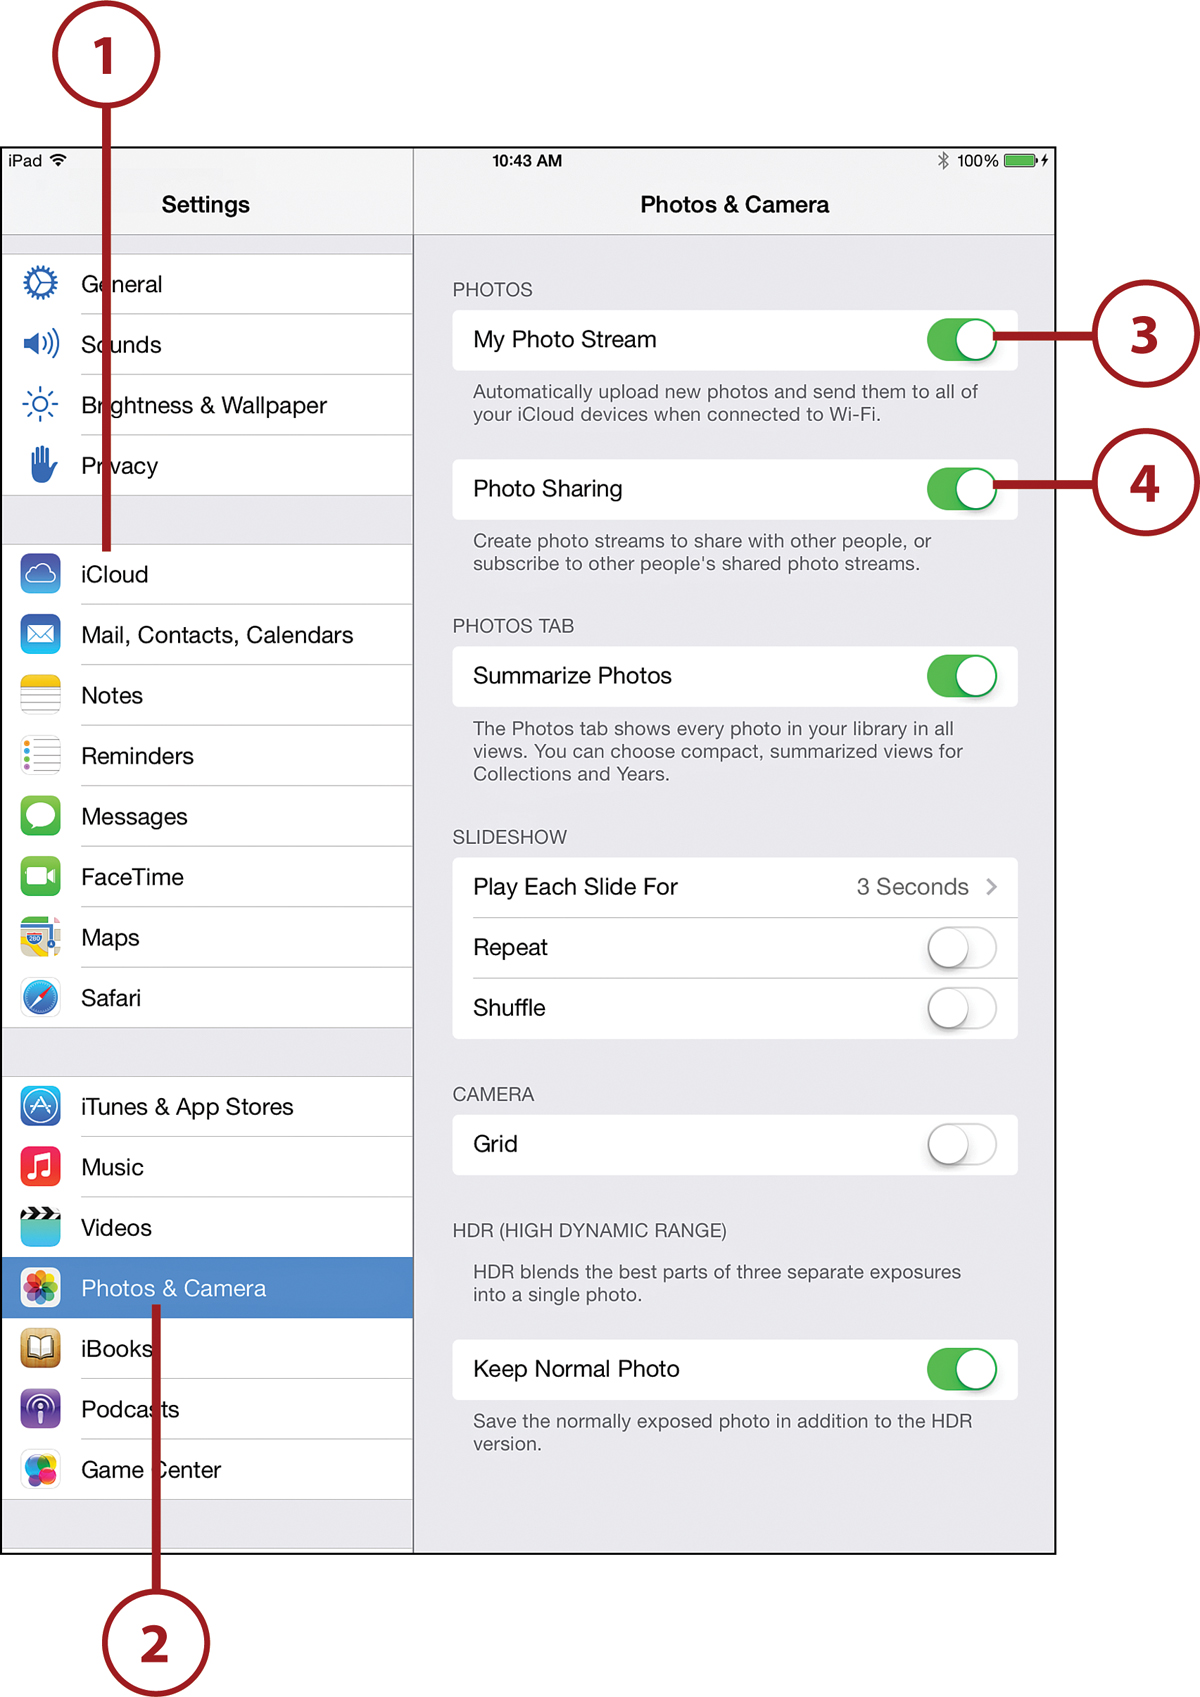
![]() In the Settings app, first go to the iCloud settings and make sure you are signed in to your iCloud account. See “Syncing with iCloud” in Chapter 3.
In the Settings app, first go to the iCloud settings and make sure you are signed in to your iCloud account. See “Syncing with iCloud” in Chapter 3.
![]() Once again in the Settings app, tap Photos & Camera.
Once again in the Settings app, tap Photos & Camera.
![]() Turn on My Photo Stream, which automatically saves the photos you take to iCloud.
Turn on My Photo Stream, which automatically saves the photos you take to iCloud.
![]() Turn on Photo Sharing, which enables you to create online photo galleries.
Turn on Photo Sharing, which enables you to create online photo galleries.
After you have Photo Stream enabled, each photo you take with your iPad will be placed in an album titled for the current month. These albums will also appear, with their photos, on your other iOS devices and in iPhoto on a Mac, if you have one. Of course, your iPad must be connected to the Internet for this to happen.
Photo Stream in iPhoto
If you are a Mac user, you can set up Photo Stream in iPhoto on your Mac as well. Go to iPhoto, Preferences, Photo Stream and turn it on. Turn on My Photo Stream and Automatic Import. You will see Photo Stream show up in the left sidebar. When you take a picture on your iPad, it will upload to Photo Stream as long as you have an Internet connection. Then it will appear in the Photo Stream section of iPhoto on your Mac a minute later.
Sharing Photos with Photo Stream
After you have turned on Photo Sharing in Settings, you can create shared streams that others can view in a web browser.
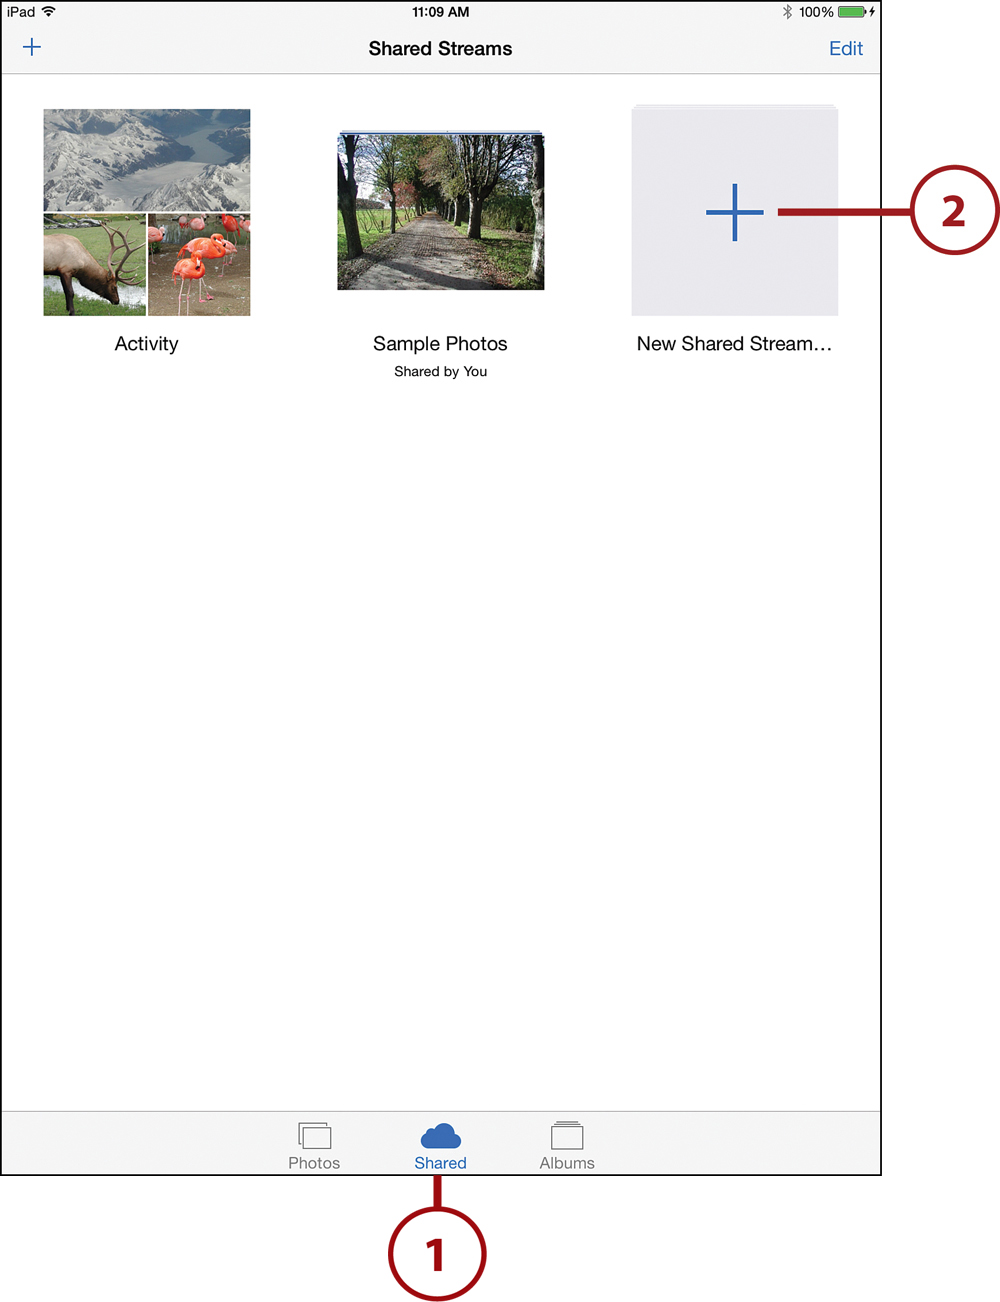
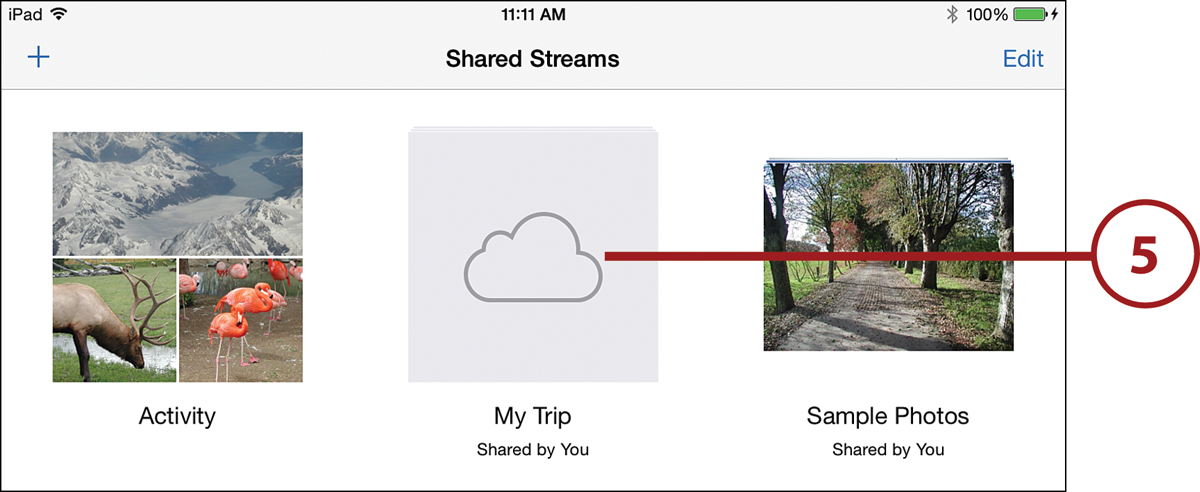
![]() In the Photos app, tap Shared at the bottom.
In the Photos app, tap Shared at the bottom.
![]() Tap New Shared Stream.
Tap New Shared Stream.
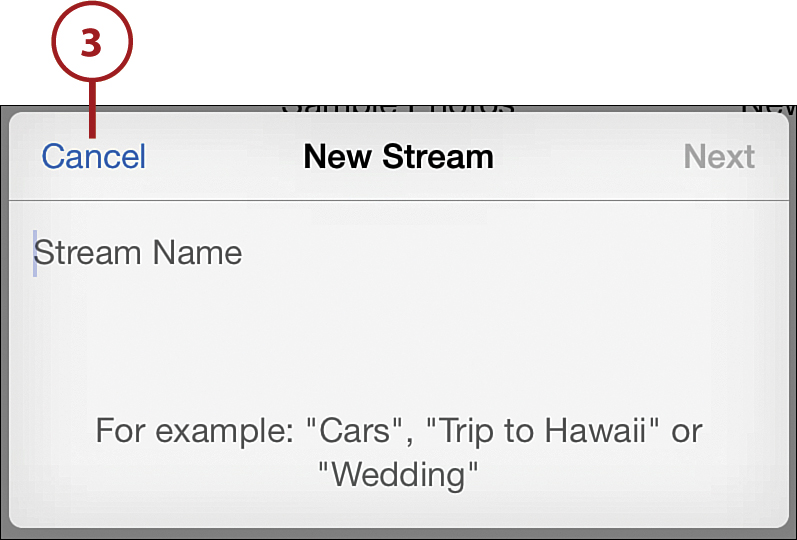
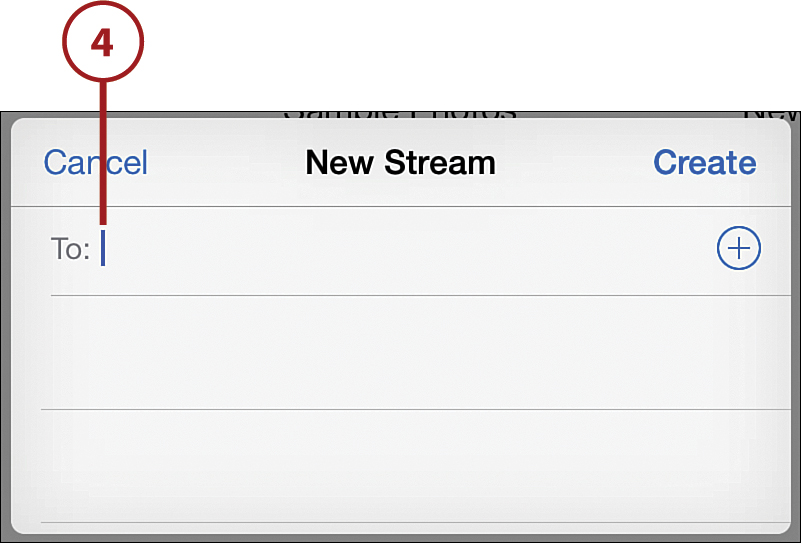
![]() Enter a name for the stream and tap Next.
Enter a name for the stream and tap Next.
![]() Enter contact names or email addresses of people who will be able to see the photo stream. You will be able to modify this later to add more. Tap Create when you are done.
Enter contact names or email addresses of people who will be able to see the photo stream. You will be able to modify this later to add more. Tap Create when you are done.
![]() You now see your list of shared photo streams again. Tap the new one to enter it.
You now see your list of shared photo streams again. Tap the new one to enter it.
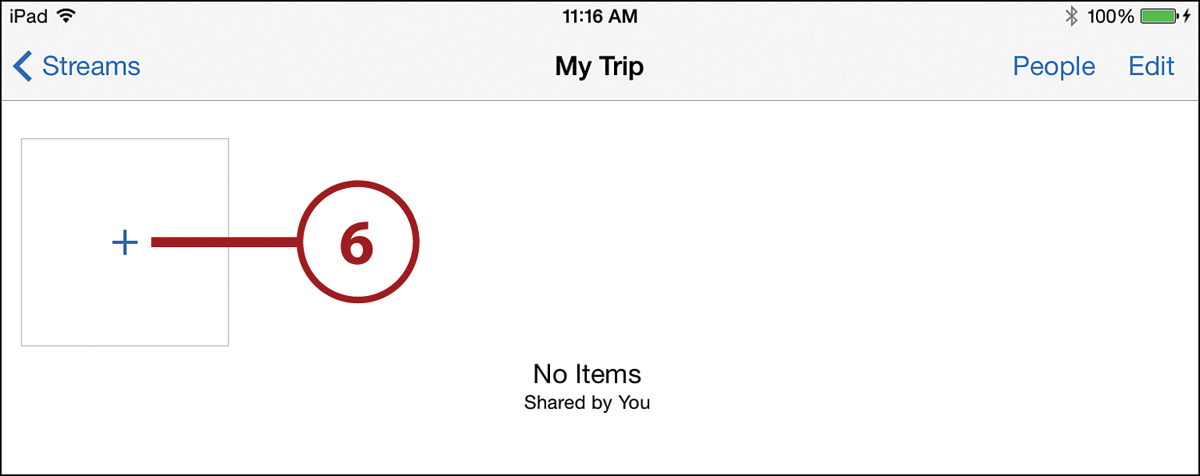
![]() There are no photos here yet, so tap the + button to add one.
There are no photos here yet, so tap the + button to add one.
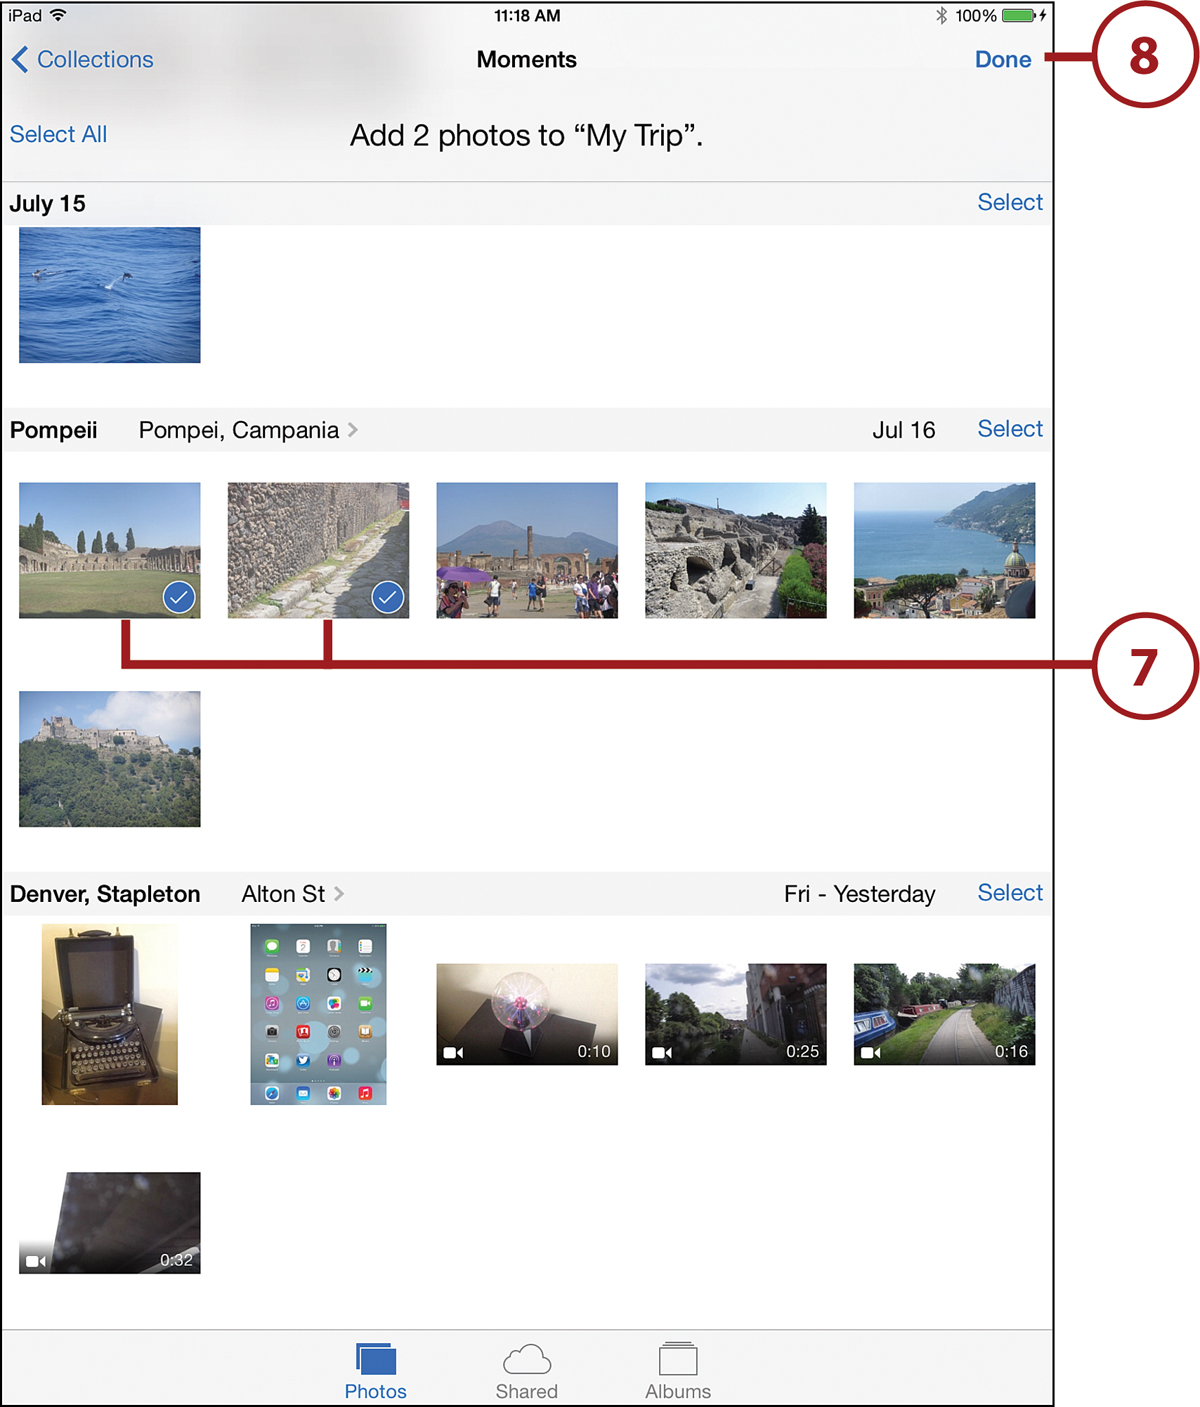
![]() Select photos you want to add.
Select photos you want to add.
![]() Tap Done.
Tap Done.
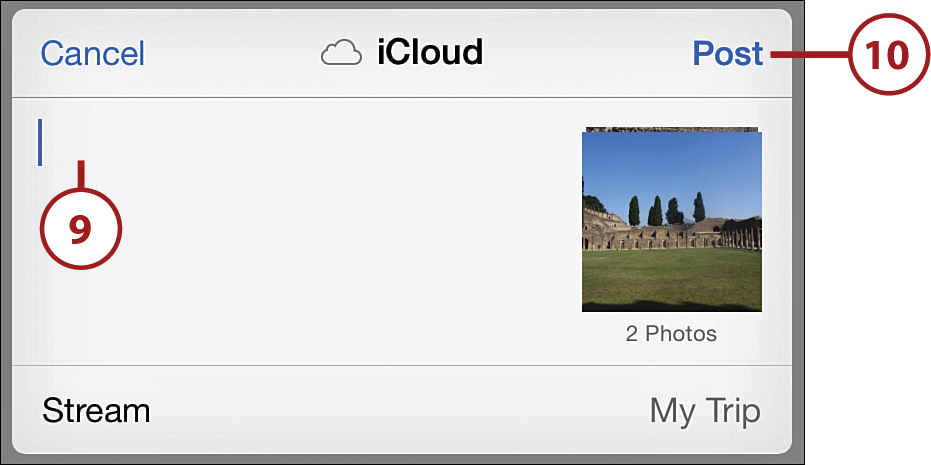
![]() Enter a message to accompany the posting of these new photos. The message will become the description for the photos when viewed.
Enter a message to accompany the posting of these new photos. The message will become the description for the photos when viewed.
![]() Tap Post.
Tap Post.
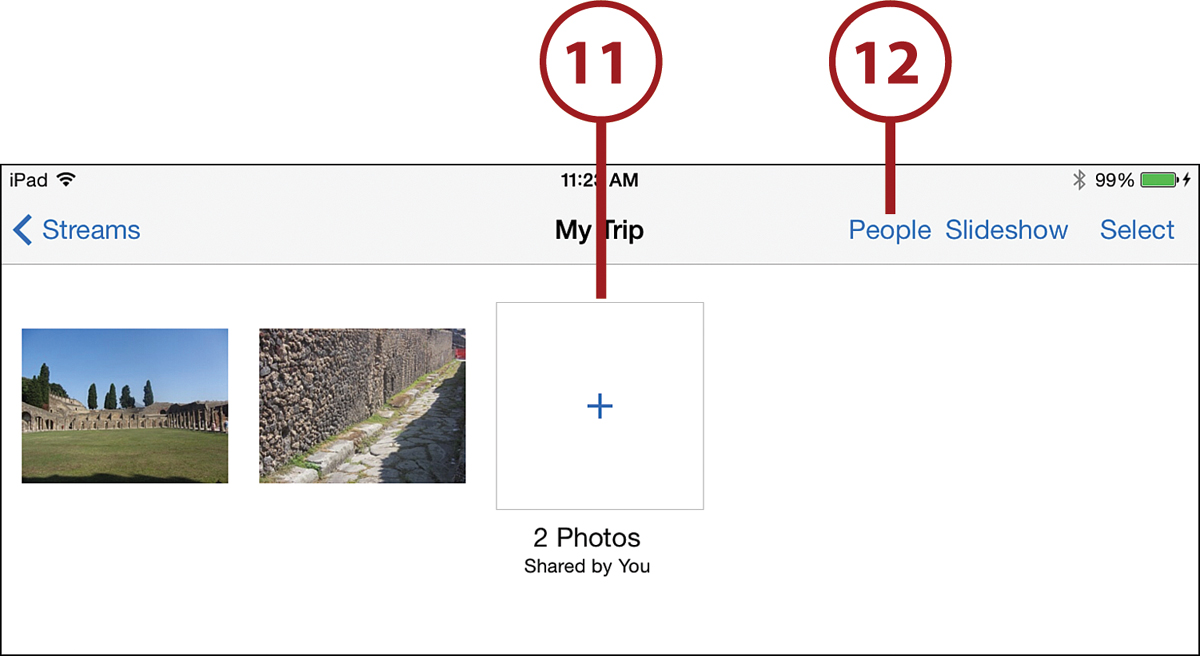
![]() You are returned to the stream and can see the photos have been added.
You are returned to the stream and can see the photos have been added.
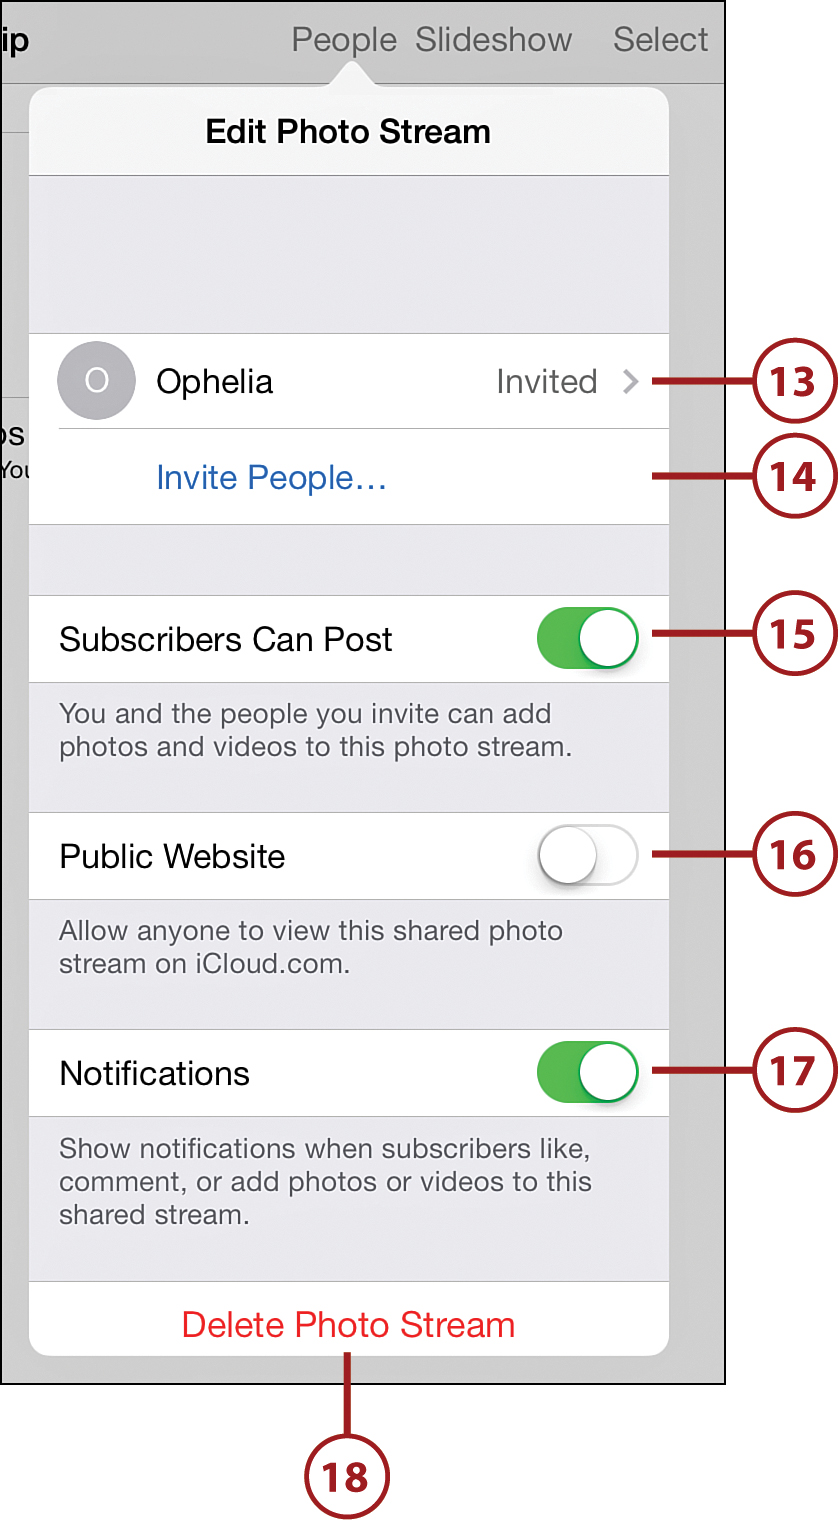
![]() Tap People for more shared photo stream settings.
Tap People for more shared photo stream settings.
![]() You can always remove people from the shared list by tapping the name and then choosing Remove Subscriber from the options presented.
You can always remove people from the shared list by tapping the name and then choosing Remove Subscriber from the options presented.
![]() You can invite new people.
You can invite new people.
![]() If Subscribers Can Post is turned on, the people on your list can upload photos from their iOS devices and iPhoto to this stream.
If Subscribers Can Post is turned on, the people on your list can upload photos from their iOS devices and iPhoto to this stream.
![]() You can also enable Public Website to make the whole photo stream public. You will get a public URL that you can share with people or post to your blog or social media networks. Anyone can view the photos using that link.
You can also enable Public Website to make the whole photo stream public. You will get a public URL that you can share with people or post to your blog or social media networks. Anyone can view the photos using that link.
![]() Shared photo streams allow likes and comments to photos. Leave Notifications on if you want to get a notification on your iPad when someone interacts with your stream.
Shared photo streams allow likes and comments to photos. Leave Notifications on if you want to get a notification on your iPad when someone interacts with your stream.
![]() Delete Photo Stream is the option that enables you to delete the entire stream. This is handy if your photo stream was only meant to be a temporary way for family and friends to see what was going on during a trip or event.
Delete Photo Stream is the option that enables you to delete the entire stream. This is handy if your photo stream was only meant to be a temporary way for family and friends to see what was going on during a trip or event.
So what happens when you take a new picture but Photo Stream can’t connect to the Internet at that moment? Or, you choose to share a photo and there is no connection?
Like a typical cloud service, you can perform all the steps, and your iPad will simply complete the upload next time it has a connection.
Viewing Photo Collections
When you use the Photos app, you can view your photos in several ways. One way if by collections. Collections are groups created by the Photos app from the information stored in your photos, such as time and location of the photo. You don’t create collections; you just leave that up to iOS. In the next section, we look at viewing based on albums, which are groups you define.
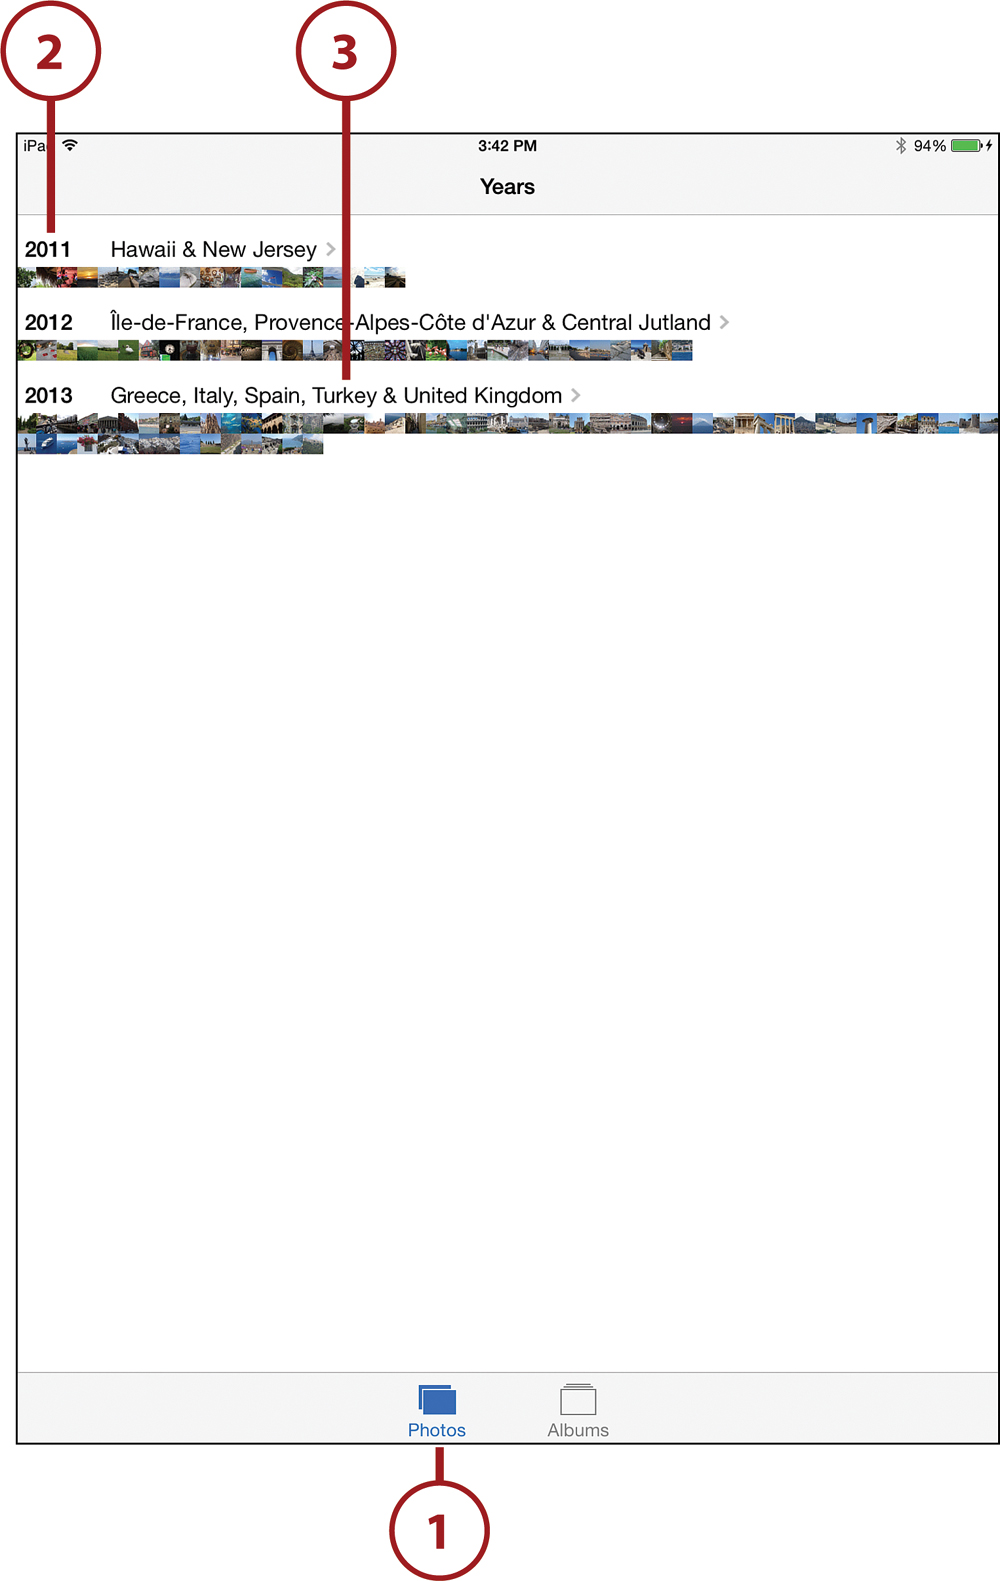
![]() The top level of the collections hierarchy is Years. Go to the Photos app and tap Photos at the bottom. If you do not see Years as the title at the top, use the button at the top left to move up the hierarchy to Years.
The top level of the collections hierarchy is Years. Go to the Photos app and tap Photos at the bottom. If you do not see Years as the title at the top, use the button at the top left to move up the hierarchy to Years.
![]() Your photos are then divided up into years. Every year that has enough photos will show, and years that have only a few photos will be grouped with other years. For instance, you may see 2008-2010 as a group.
Your photos are then divided up into years. Every year that has enough photos will show, and years that have only a few photos will be grouped with other years. For instance, you may see 2008-2010 as a group.
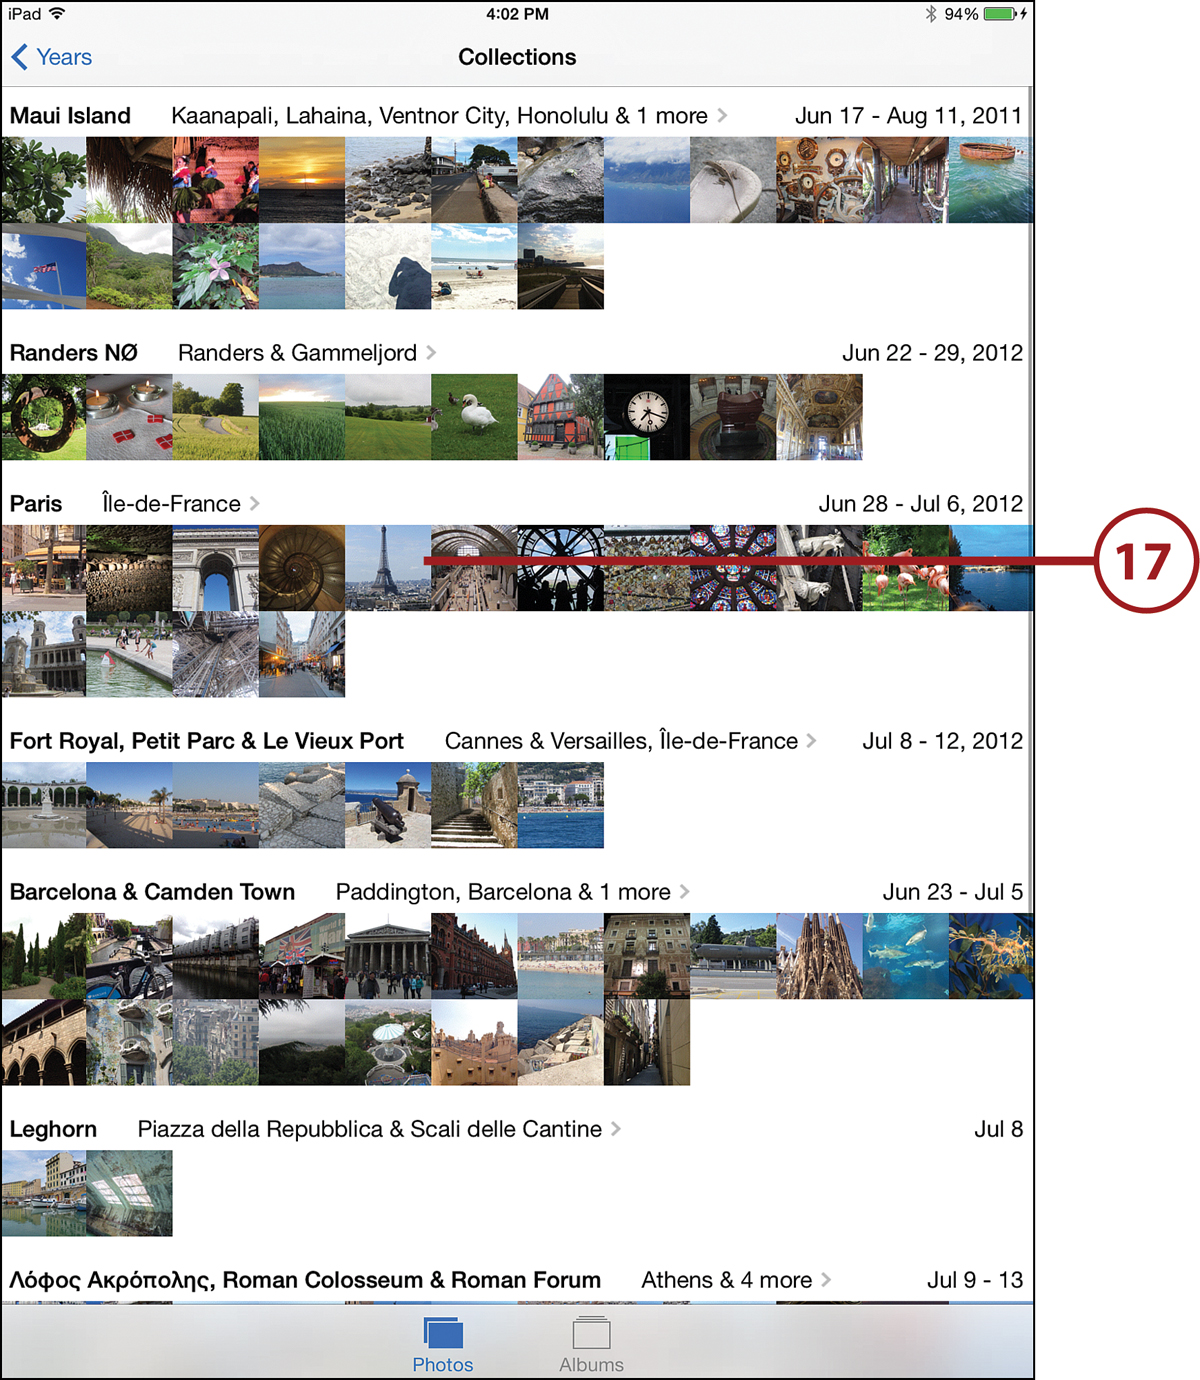
![]() Each year shows a list of locations. Tap this list, not the photo thumbnails, to jump to the map view.
Each year shows a list of locations. Tap this list, not the photo thumbnails, to jump to the map view.
![]() A map appears with groups of photos over various locations. If you only use a camera that does not have GPS capability, then you may not see any. The scale of the map will change depending on where your photos for that year were located. Tap Years to return to the previous screen without working with the map.
A map appears with groups of photos over various locations. If you only use a camera that does not have GPS capability, then you may not see any. The scale of the map will change depending on where your photos for that year were located. Tap Years to return to the previous screen without working with the map.
![]() Tap a collection of photos over a location to go to that set of phot
Tap a collection of photos over a location to go to that set of phot

![]() Now you are viewing the photos in that collection. You can tap the year button at the top to jump back up to the map.
Now you are viewing the photos in that collection. You can tap the year button at the top to jump back up to the map.
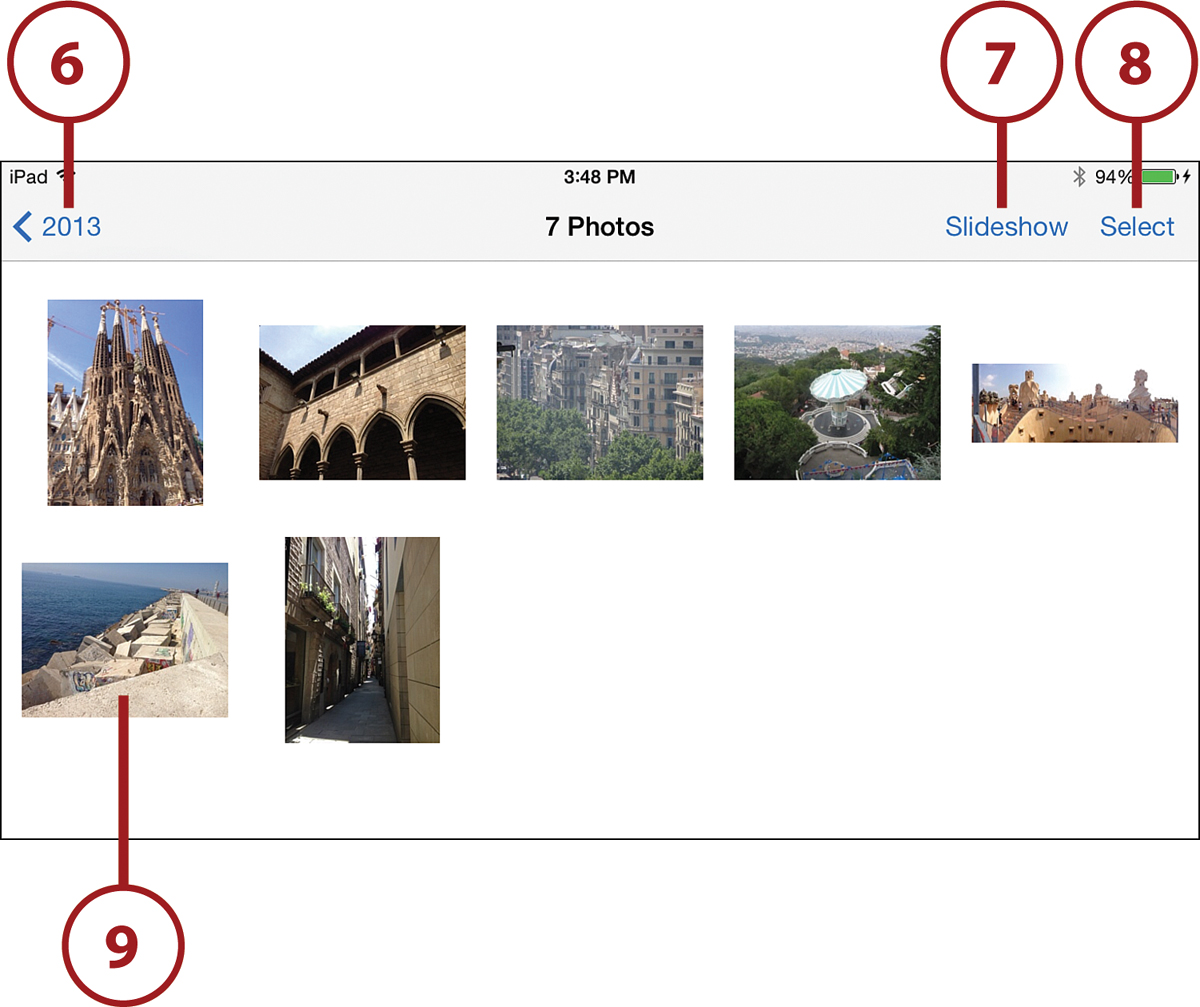
![]() Tap Slideshow to start an automatic slideshow with all the photos.
Tap Slideshow to start an automatic slideshow with all the photos.
![]() Tap Select to be able to select multiple photos from this collection for sharing.
Tap Select to be able to select multiple photos from this collection for sharing.
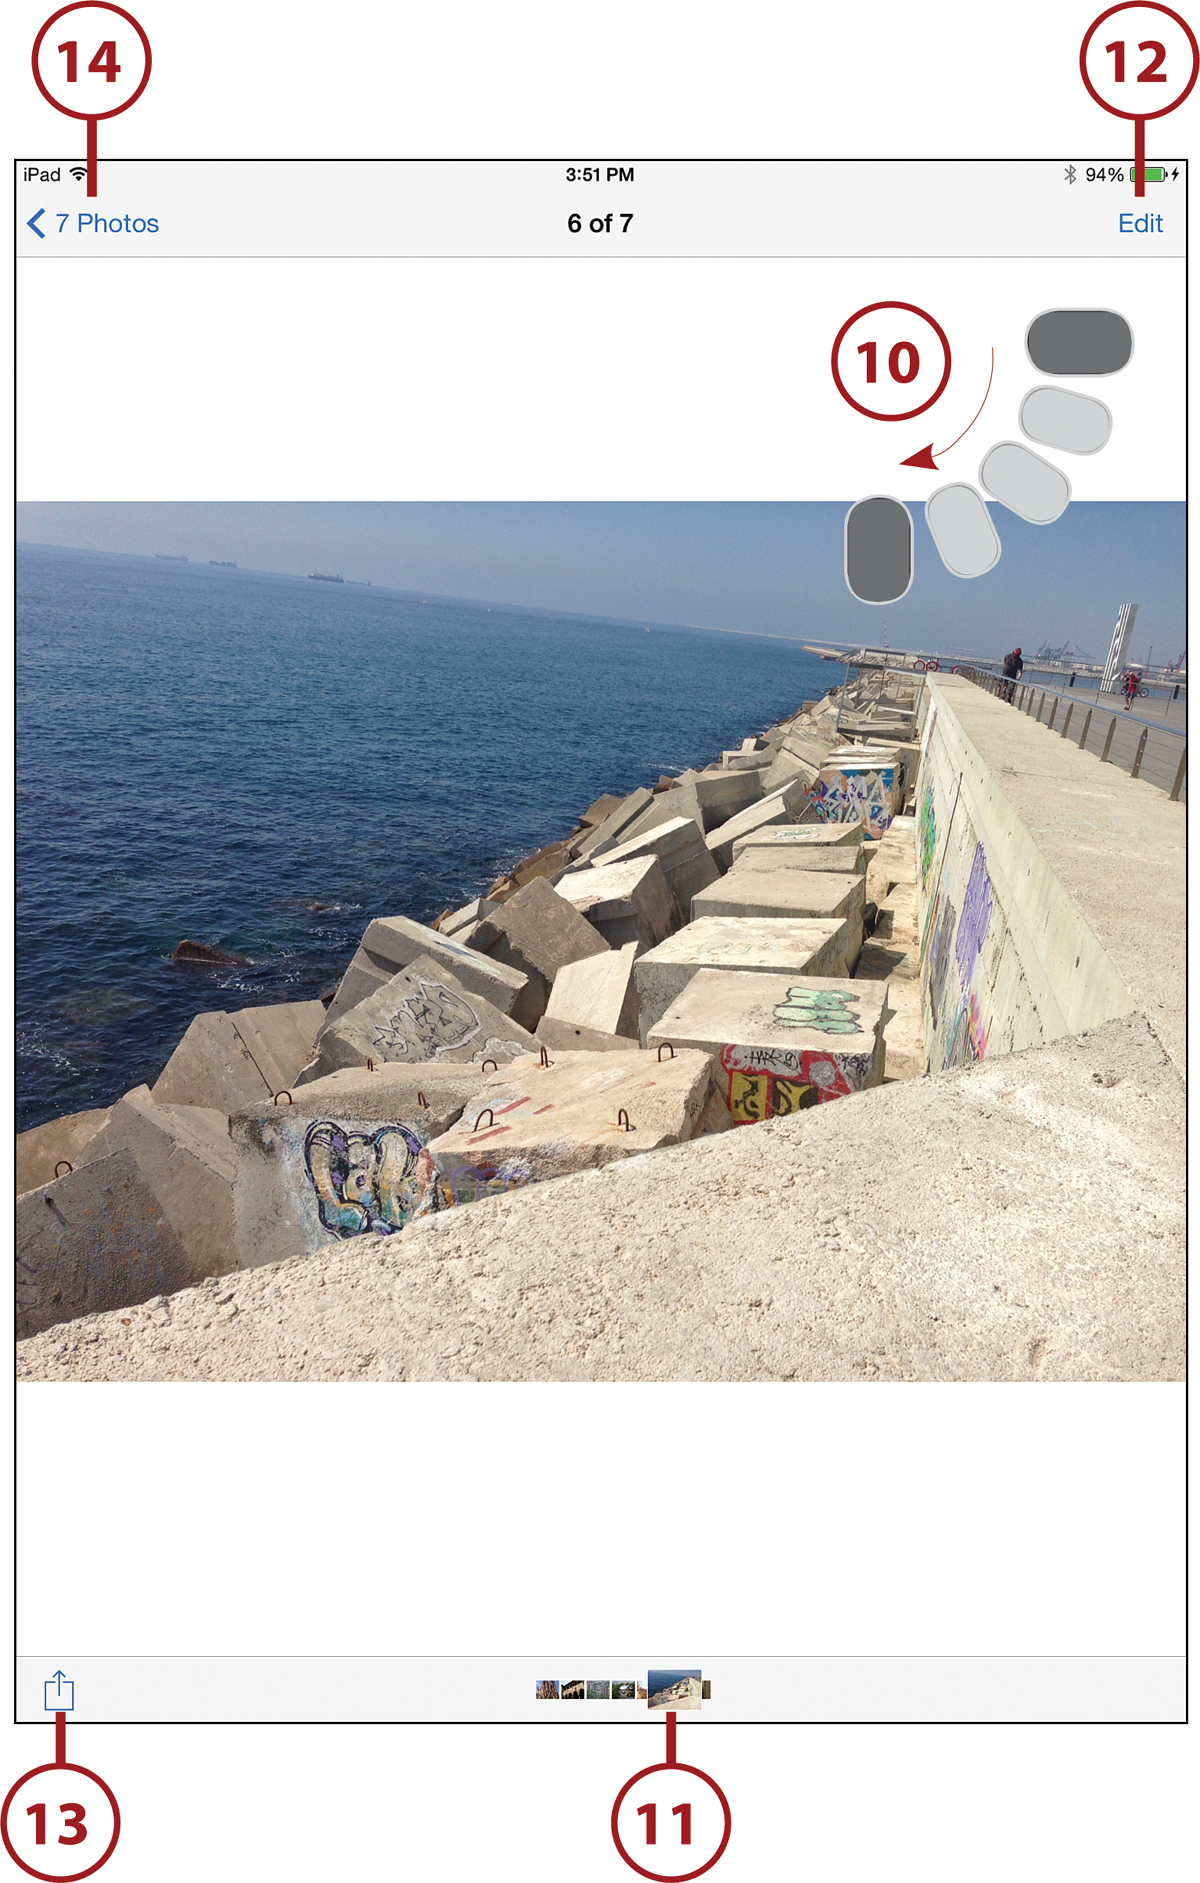
![]() Tap a photo to view it full screen.
Tap a photo to view it full screen.
![]() When viewing photos, you may want to turn your iPad to horizontal orientation—most pictures are wider than they are taller.
When viewing photos, you may want to turn your iPad to horizontal orientation—most pictures are wider than they are taller.
![]() Use the thumbnails at the bottom to select another photo from the collection, or simply swipe left or right from the center of the screen to move between photos.
Use the thumbnails at the bottom to select another photo from the collection, or simply swipe left or right from the center of the screen to move between photos.
![]() Tap Edit to edit the photo from here. See the task “Taking and Editing Photos” earlier in this chapter, steps 15 to 23.
Tap Edit to edit the photo from here. See the task “Taking and Editing Photos” earlier in this chapter, steps 15 to 23.
![]() You can share the photo, using the same controls from the “Sharing Photos” task earlier in this chapter.
You can share the photo, using the same controls from the “Sharing Photos” task earlier in this chapter.
![]() To return to the collection, tap the button at the top left. Tap in that area twice more to return all the way back to the list of photos by Years that we started with in step 1.
To return to the collection, tap the button at the top left. Tap in that area twice more to return all the way back to the list of photos by Years that we started with in step 1.
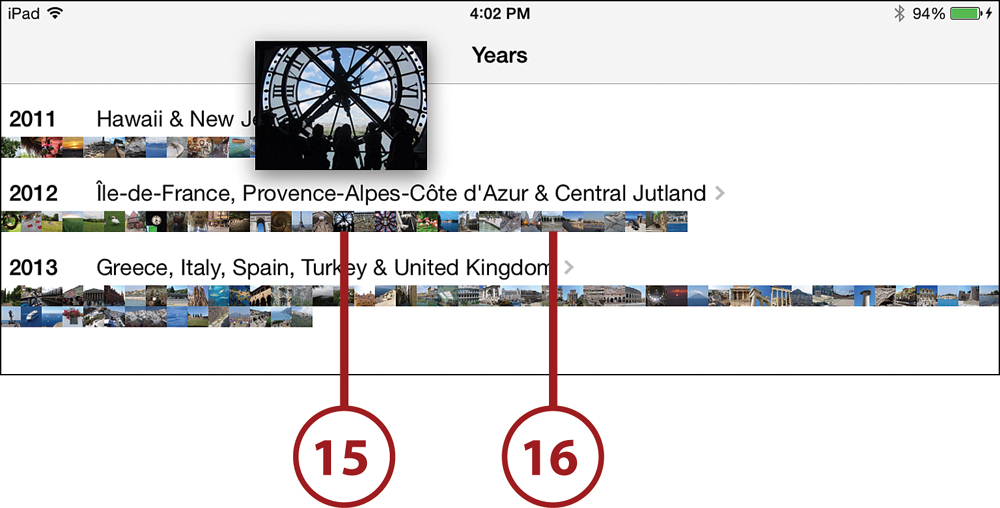
![]() On the Years screen, tap and hold over any tiny thumbnail to see a larger version of it appear above your finger. Then you can move your finger around the screen to view larger versions of other thumbnails.
On the Years screen, tap and hold over any tiny thumbnail to see a larger version of it appear above your finger. Then you can move your finger around the screen to view larger versions of other thumbnails.
![]() Tapping any thumbnail, as opposed to tapping the list of place names, takes you to a different screen.
Tapping any thumbnail, as opposed to tapping the list of place names, takes you to a different screen.
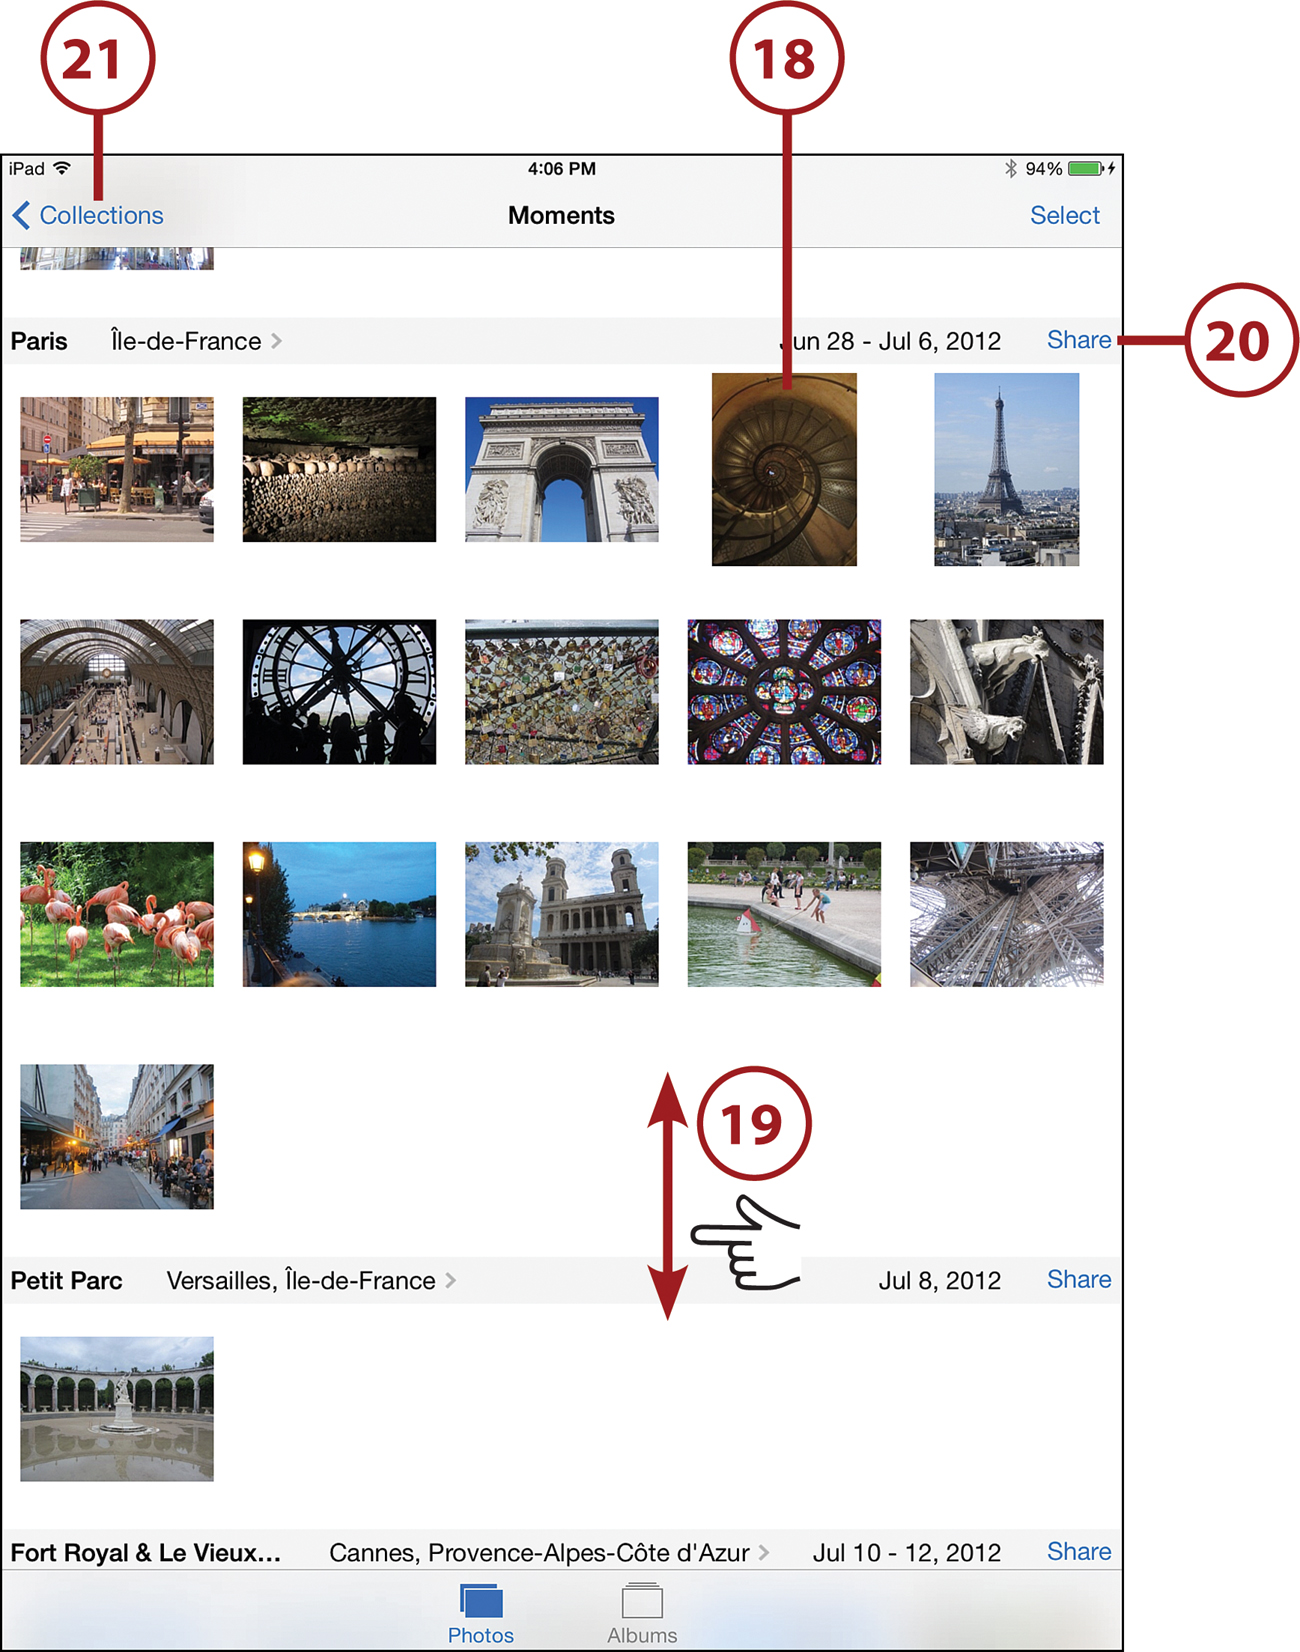
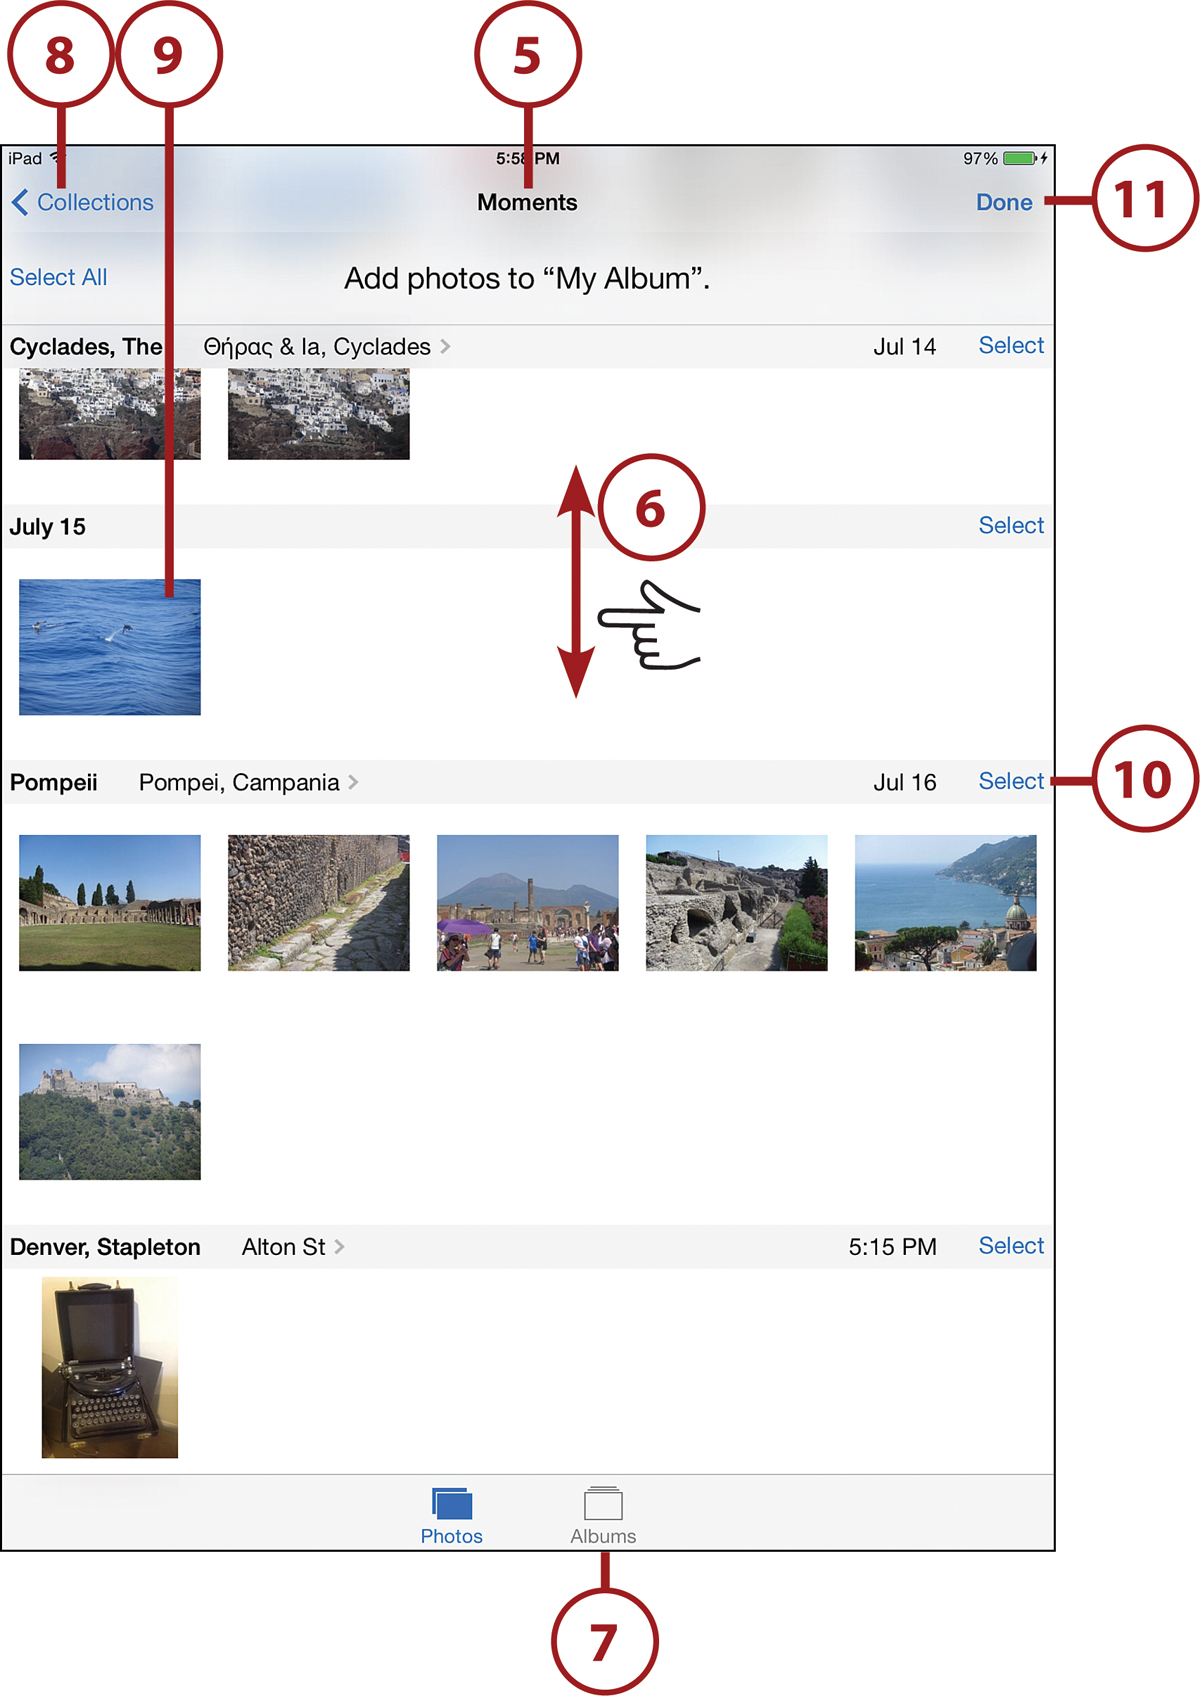
![]() This screen shows collections of photos in smaller selections of time, called “Moments.” Tap any thumbnail to jump into a collection.
This screen shows collections of photos in smaller selections of time, called “Moments.” Tap any thumbnail to jump into a collection.
![]() You can tap any photo to view it full screen, just like in step 9.
You can tap any photo to view it full screen, just like in step 9.
![]() You can drag up and down to look at other Moments. You can also do this on the Collections screen.
You can drag up and down to look at other Moments. You can also do this on the Collections screen.
![]() If you want to quickly share the entire set of photos that comprise one Moment, tap the Share button.
If you want to quickly share the entire set of photos that comprise one Moment, tap the Share button.
![]() You can return to the previous screen by tapping Collections in the upper left corner.
You can return to the previous screen by tapping Collections in the upper left corner.
Collections Are Not for Organizing
When given a collection, such as a collection of photos, our instinct is to organize it. That’s what albums are for. Collections can be frustrating for some, as you do not have many options to organize the photos. They are simply grouped based on the data in the photos, which was added when the photo was taken.
If the time or location of a photo is wrong, there is no way to change it in the Photos app. There are some third-party apps in the app store that can do this, and you can also do this in iPhoto on your Mac.
Viewing Albums
Using the Photos button at the bottom of the Photos app is a great way to find the photos you want to view. But, if you would rather organize your photos yourself, you can do so by creating albums.
Albums can be made in iPhoto or Aperture on your Mac, Photoshop Albums or Photoshop Elements on Windows, or by using file system folders on Mac and windows. When you sync to your iPad, you’ll see these albums using the steps that follow.
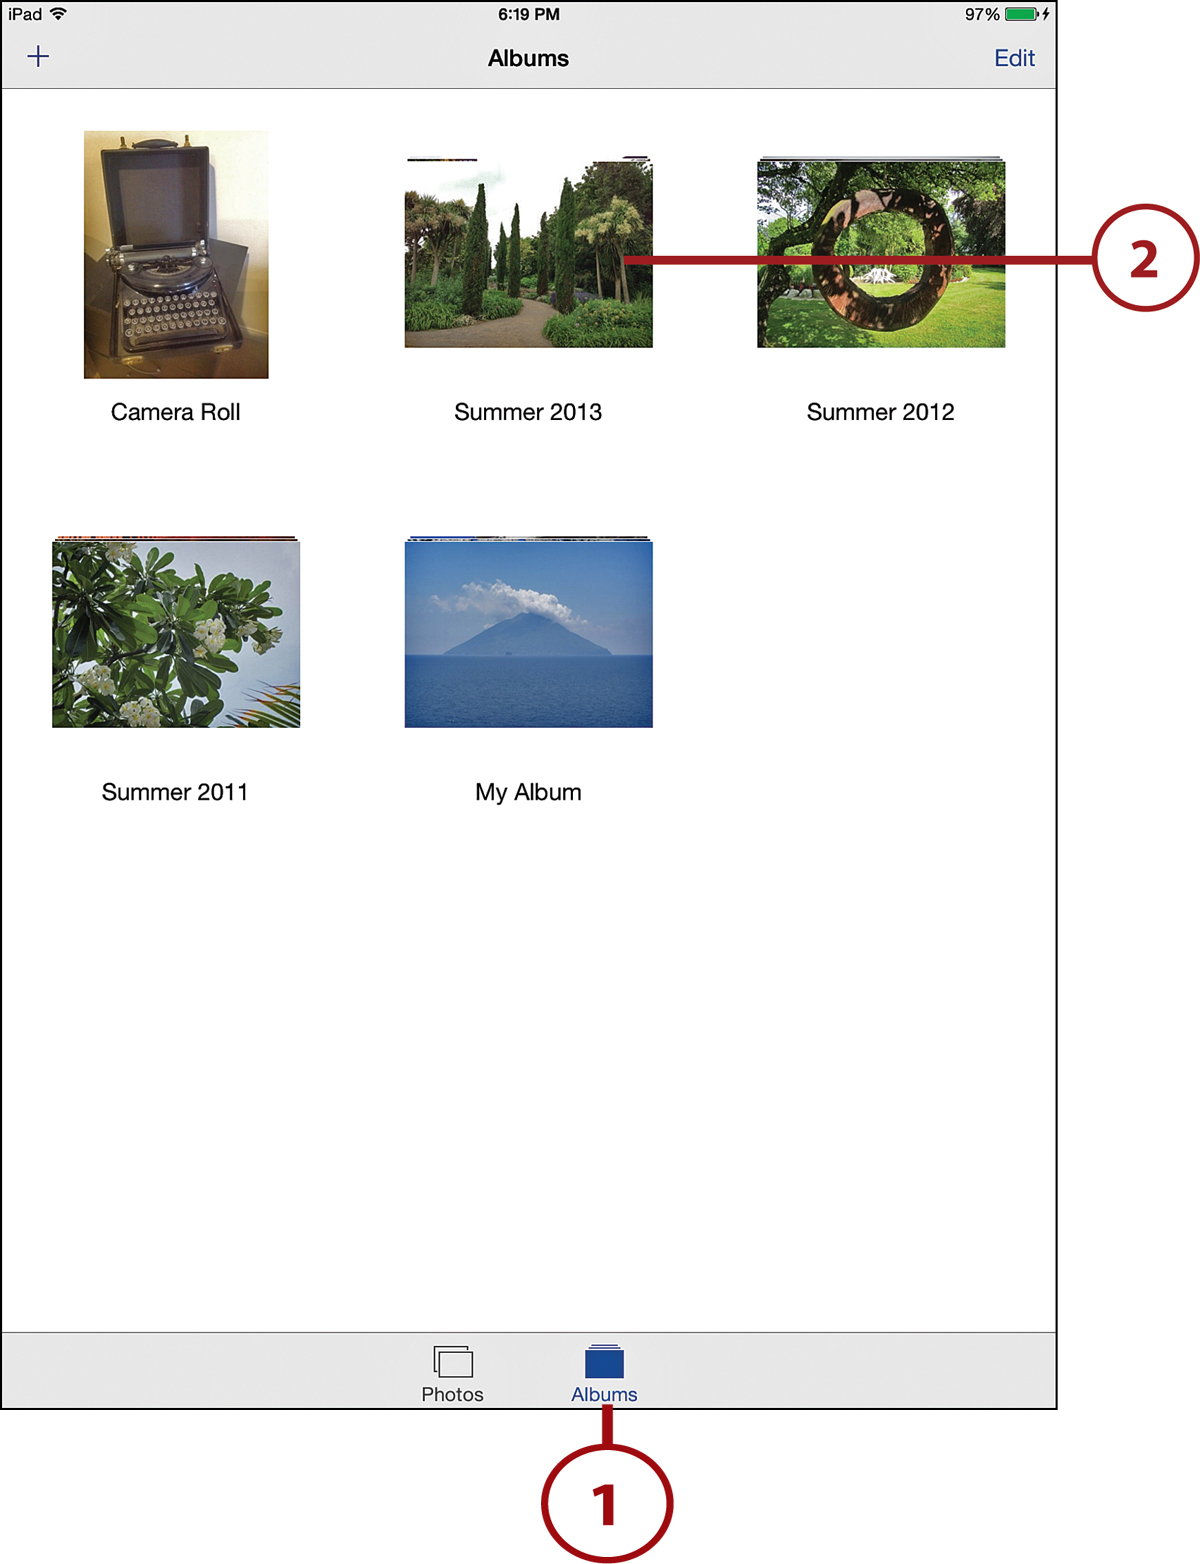
![]() In the Photos app, tap the Albums button.
In the Photos app, tap the Albums button.
![]() Tap on an album to expand it to see all the photos.
Tap on an album to expand it to see all the photos.
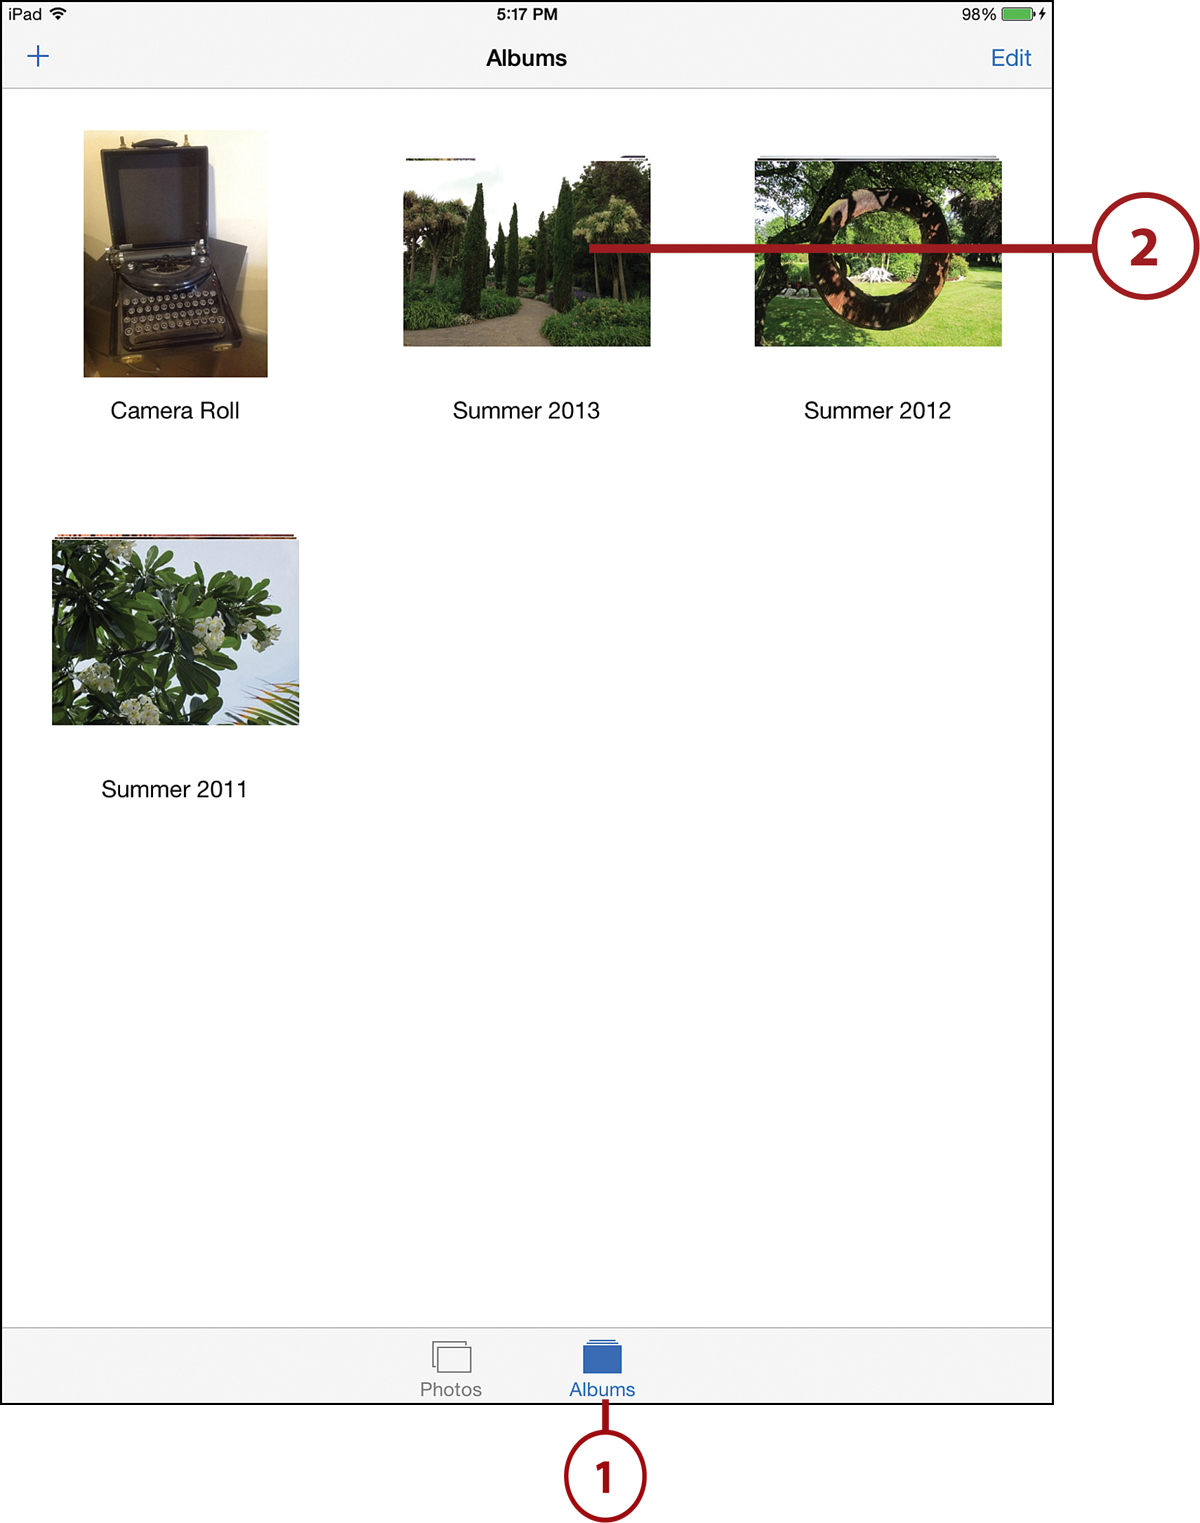
![]() Tap any photo to view it.
Tap any photo to view it.
![]() Tap the album name to return from viewing the photo, and then tap the Albums button on the next screen to return to the list of albums.
Tap the album name to return from viewing the photo, and then tap the Albums button on the next screen to return to the list of albums.

Getting Back to the Album
After you finish digging down into an album, you can go back to the list of albums by tapping the Albums button, or a similarly named button, at the top left. But you can also pinch in all photos to group them in the middle of the screen and then release to move back to the albums list.
iPhoto and Aperture on the Mac have the ability to find faces in your photos. If you use this feature and you sync your photos to your iPad, you will also have an option to view groups of photos that correspond to those faces. You can even select faces to sync to your iPad in iTunes on your Mac.
Creating Albums
Syncing with iTunes isn’t the only way to organize your photos into albums. You can create new albums right on your iPad. The process involves naming a new album and then selecting the photos to appear in the album.
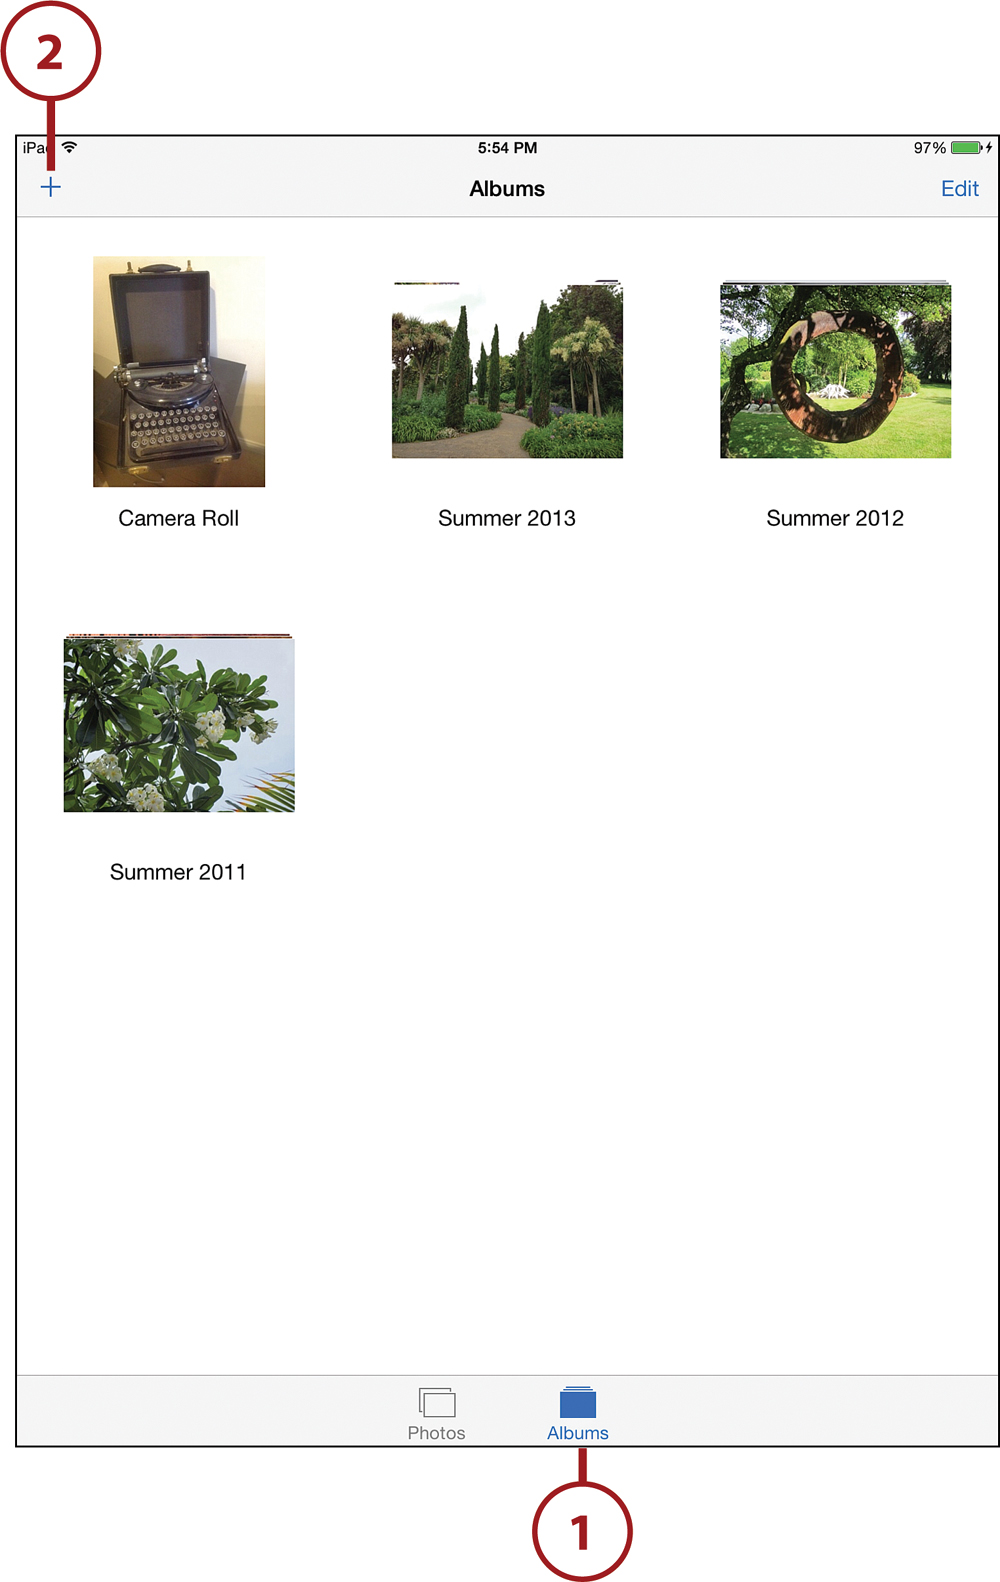
![]() In the Photos app, tap Albums at the bottom to view your albums.
In the Photos app, tap Albums at the bottom to view your albums.
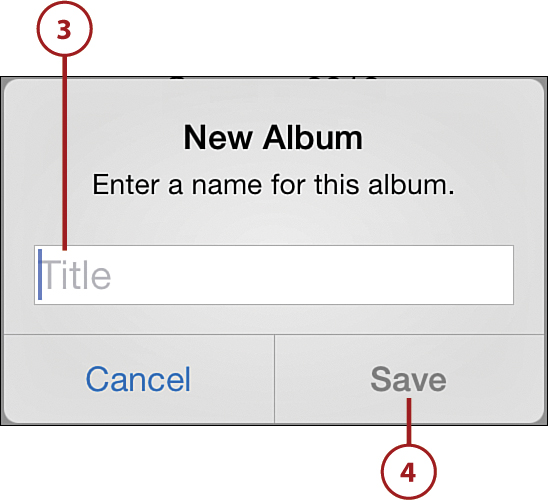
![]() Tap the + button to create a new album.
Tap the + button to create a new album.
![]() Tap Save.
Tap Save.
![]() Now you can start adding some photos to this empty album. You will see all your photos appear in the Moments view, just as they did in step 17 of the task “Viewing Photo Collections,” earlier in this chapter.
Now you can start adding some photos to this empty album. You will see all your photos appear in the Moments view, just as they did in step 17 of the task “Viewing Photo Collections,” earlier in this chapter.
![]() Tap and drag vertically to flip through your photos to locate the ones you want to include in this new album.
Tap and drag vertically to flip through your photos to locate the ones you want to include in this new album.
![]() If you prefer Albums view, you can tap Albums to switch to that view.
If you prefer Albums view, you can tap Albums to switch to that view.
![]() You can also tap Collections to move up to Collections view.
You can also tap Collections to move up to Collections view.
![]() Tap a single photo to add it to the album. Tap again to undo the selection.
Tap a single photo to add it to the album. Tap again to undo the selection.
![]() You can also select an entire collection.
You can also select an entire collection.
![]() When you have added all the photos you want to the album, tap Done. You can always add more by viewing that album, tapping the Select button at the top, and then tapping the Add button at the top.
When you have added all the photos you want to the album, tap Done. You can always add more by viewing that album, tapping the Select button at the top, and then tapping the Add button at the top.
Creating a Slideshow
Another way to look at your photos is as a slideshow with music and transitions. You can quickly and easily create a slideshow with any group of photos in the Photos app that shows a Slideshow button at the top—for example, an album synced to, or that you created on, your iPad.
![]() In the Photos app, tap Albums.
In the Photos app, tap Albums.
![]() Tap an album to select it.
Tap an album to select it.
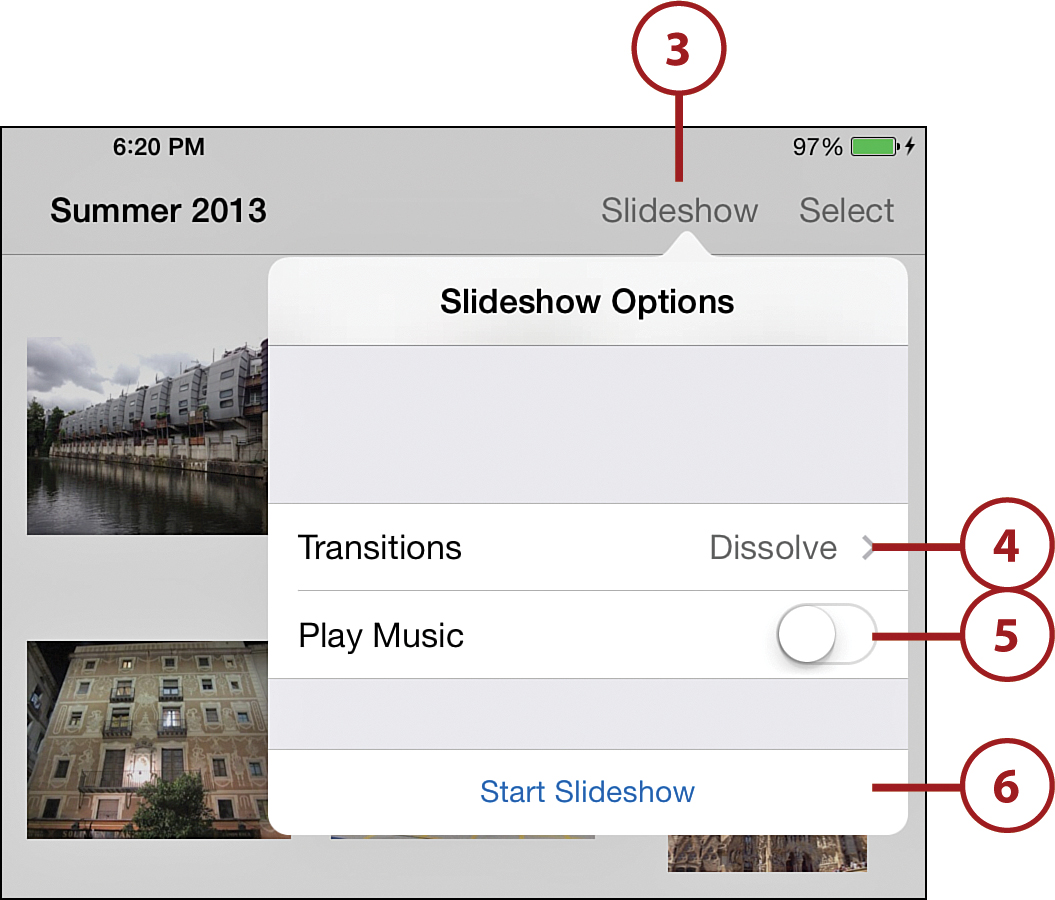
![]() Tap the Slideshow button at the top of the album.
Tap the Slideshow button at the top of the album.
![]() Tap Transition to select a transition that you want to appear between images. There are several to choose from.
Tap Transition to select a transition that you want to appear between images. There are several to choose from.
![]() Slide the Play Music button on or off. If you toggle it on, you will be able to select a song from your iTunes collection.
Slide the Play Music button on or off. If you toggle it on, you will be able to select a song from your iTunes collection.
![]() Tap Start Slideshow.
Tap Start Slideshow.
Stopping a Slideshow
Tap on the screen anywhere to stop a slideshow.
Capturing the Screen
You can capture the entire iPad screen and send it to your Photos app. This feature is useful if you want to save what you see to an image for later.
![]() Make sure the screen shows what you want to capture. Try the Home screen, as an example.
Make sure the screen shows what you want to capture. Try the Home screen, as an example.
![]() Press and hold the Wake/Sleep button and Home button at the same time. The screen flashes and you hear a camera shutter sound, unless you have the volume turned down.
Press and hold the Wake/Sleep button and Home button at the same time. The screen flashes and you hear a camera shutter sound, unless you have the volume turned down.
![]() Go to the Photos app.
Go to the Photos app.
![]() Tap on the Camera Roll album. The last image in this album should be your new screen capture. Tap it to open it.
Tap on the Camera Roll album. The last image in this album should be your new screen capture. Tap it to open it.
![]() Tap the last image in your Camera Roll, which should be the screenshot you just took.
Tap the last image in your Camera Roll, which should be the screenshot you just took.
![]() The example is a vertical capture of the Home screen, so it might be confusing to look at. Turn your iPad horizontally.
The example is a vertical capture of the Home screen, so it might be confusing to look at. Turn your iPad horizontally.
![]() Tap the Share icon to email the photo or copy it to use in another application. Or you can leave the photo in your Camera Roll album for future use.
Tap the Share icon to email the photo or copy it to use in another application. Or you can leave the photo in your Camera Roll album for future use.
Deleting Photos
You can only delete photos from the Camera Roll album (sometimes referred to as the “Saved Photos” album) and your Photo Stream.
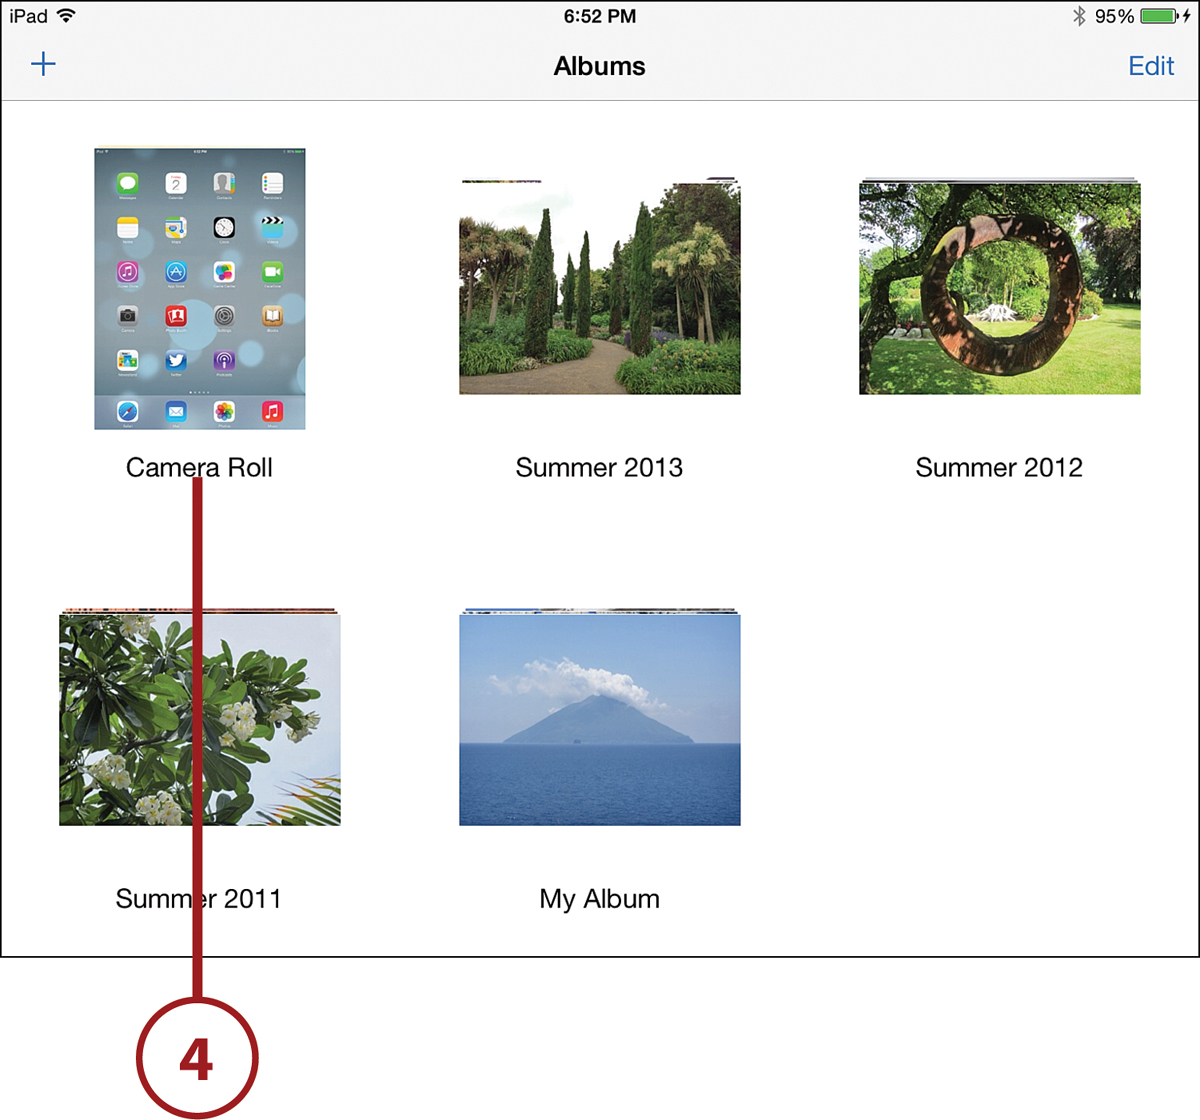
![]() In the Photos app, tap Albums.
In the Photos app, tap Albums.
![]() Tap on Camera Roll.
Tap on Camera Roll.
![]() Tap a photo to view it.
Tap a photo to view it.
![]() Tap Delete Photo.
Tap Delete Photo.
![]() Alternatively, you can go back to step 3 and then tap the Select button.
Alternatively, you can go back to step 3 and then tap the Select button.
![]() Tap multiple photos to select them.
Tap multiple photos to select them.
![]() Tap the trashcan button, and then tap the Delete Selected Photos button that appears.
Tap the trashcan button, and then tap the Delete Selected Photos button that appears.
So How Can I Delete Other Photos?
The Camera Roll album is special; it contains photos created on your iPad. The rest of the albums are just copies of photos synced from your computer. You can’t delete them from your iPad any more than you can delete music synced to your iPad.
To delete these photos, go back to iPhoto on your computer, and remove them from any albums that you have set to sync to your iPad. Also, go into iTunes on your computer, and make sure the photo syncing options there—such as to sync Last 12 Months—won’t copy that photo.
If you think of your photos like you think of your music, understanding which photos are synced and why makes more sense.
Adjusting Photos in iPhoto
Although the Photos app gives you the ability to make basic adjustments to your pictures, the iPhoto app goes much further. iPhoto does not come preloaded with the iOS—you need to add it from the App Store. Then, you can use the iPhoto app to apply a variety of filters, adjustments, and special effects to your photos.
![]() After you download iPhoto, tap its icon to run it.
After you download iPhoto, tap its icon to run it.

![]() First, you need to select a photo to edit. Tap Albums to view your photos grouped into the same albums as in the Photos app.
First, you need to select a photo to edit. Tap Albums to view your photos grouped into the same albums as in the Photos app.
![]() You can view the photos you have taken with your iPad’s camera in the Camera Roll. You can also see photos you have created in other apps here.
You can view the photos you have taken with your iPad’s camera in the Camera Roll. You can also see photos you have created in other apps here.
![]() If you have already edited a photo, you will see the Edited album. This contains all altered photos. You can go here to continue to work on them.
If you have already edited a photo, you will see the Edited album. This contains all altered photos. You can go here to continue to work on them.
![]() Tap Photos to see one long list of all the photos on your iPad.
Tap Photos to see one long list of all the photos on your iPad.
![]() Tap an album to dig into that album’s photos.
Tap an album to dig into that album’s photos.
![]() You will see one of the photos from the album in the center of the screen. This is the photo you are currently editing.
You will see one of the photos from the album in the center of the screen. This is the photo you are currently editing.
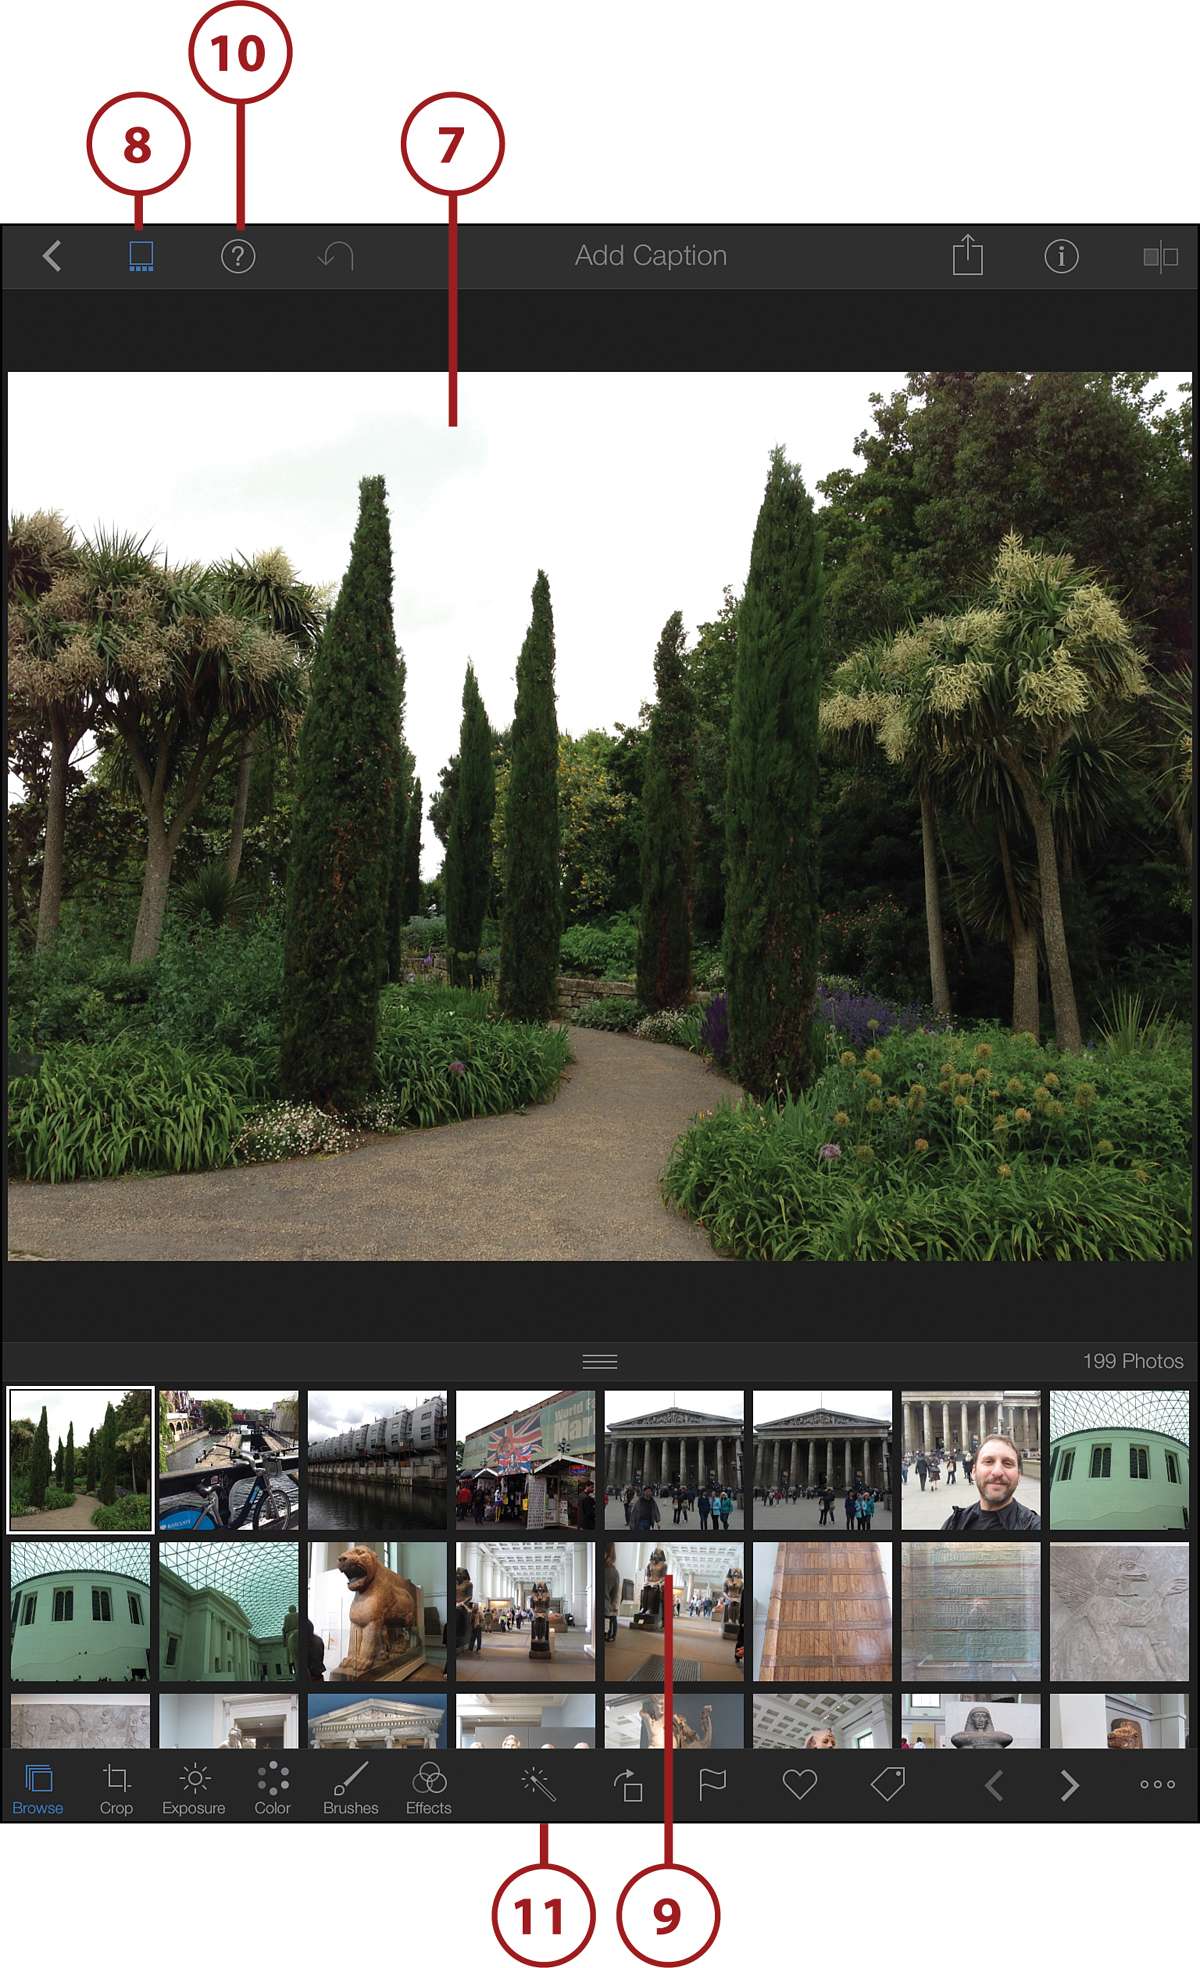
![]() Tap the Thumbnail Grid button to see the rest of the photos in the album at the bottom so that you can switch between them.
Tap the Thumbnail Grid button to see the rest of the photos in the album at the bottom so that you can switch between them.
![]() Tap any photo to switch to it. Alternatively, you can swipe left or right to move between photos.
Tap any photo to switch to it. Alternatively, you can swipe left or right to move between photos.
![]() Tap the Help button to bring up labels for all of buttons and controls in iPhoto.
Tap the Help button to bring up labels for all of buttons and controls in iPhoto.
![]() Try the Auto-enhance button if you want to let your iPad figure out how to adjust the brightness, contrast, and other alterations that should improve the look of the picture.
Try the Auto-enhance button if you want to let your iPad figure out how to adjust the brightness, contrast, and other alterations that should improve the look of the picture.
![]() Tap the Exposure button to reveal the brightness and contrast controls.
Tap the Exposure button to reveal the brightness and contrast controls.
![]() Drag the brightness control left or right to adjust the general brightness of the photo.
Drag the brightness control left or right to adjust the general brightness of the photo.
![]() Drag the contrast controls left or right to adjust the contrast.
Drag the contrast controls left or right to adjust the contrast.
![]() Drag the shadows control to adjust the exposure for the dark areas of the photo.
Drag the shadows control to adjust the exposure for the dark areas of the photo.
![]() Drag the highlights control to adjust the exposure for the light areas of the photo.
Drag the highlights control to adjust the exposure for the light areas of the photo.

![]() Tap the Color adjustments button.
Tap the Color adjustments button.
![]() Drag the Saturation control left and right to saturate or desaturate the image. The first enhances the color in your photo, and the second removes color, bringing it closer to black and white.
Drag the Saturation control left and right to saturate or desaturate the image. The first enhances the color in your photo, and the second removes color, bringing it closer to black and white.
![]() Adjust the blue tones in the picture.
Adjust the blue tones in the picture.
![]() Adjust the green tones in the picture.
Adjust the green tones in the picture.
![]() Adjust the skin tones in the picture.
Adjust the skin tones in the picture.
![]() Tap to bring up manual controls for white balance and to adjust the image for specific lighting conditions. These include sun, cloudy, flash, shade, incandescent, fluorescent, or underwater.
Tap to bring up manual controls for white balance and to adjust the image for specific lighting conditions. These include sun, cloudy, flash, shade, incandescent, fluorescent, or underwater.

Cropping, Straightening, and Rotating
In addition to color effects and adjustments, you can also crop and rotate your pictures. The Crop & Straighten button is at the bottom-left corner and enables you to trim the edges down and straighten the image. To rotate an image 90 degrees, tap the Browse icon at the bottom-left. Using two finger, tap and spin the image in the direction you want it to rotate.
Using Brushed Effects on Photos in iPhoto
There are also adjustments that you can make on parts of a photo rather than the entire image.
![]() Select a brush to use.
Select a brush to use.
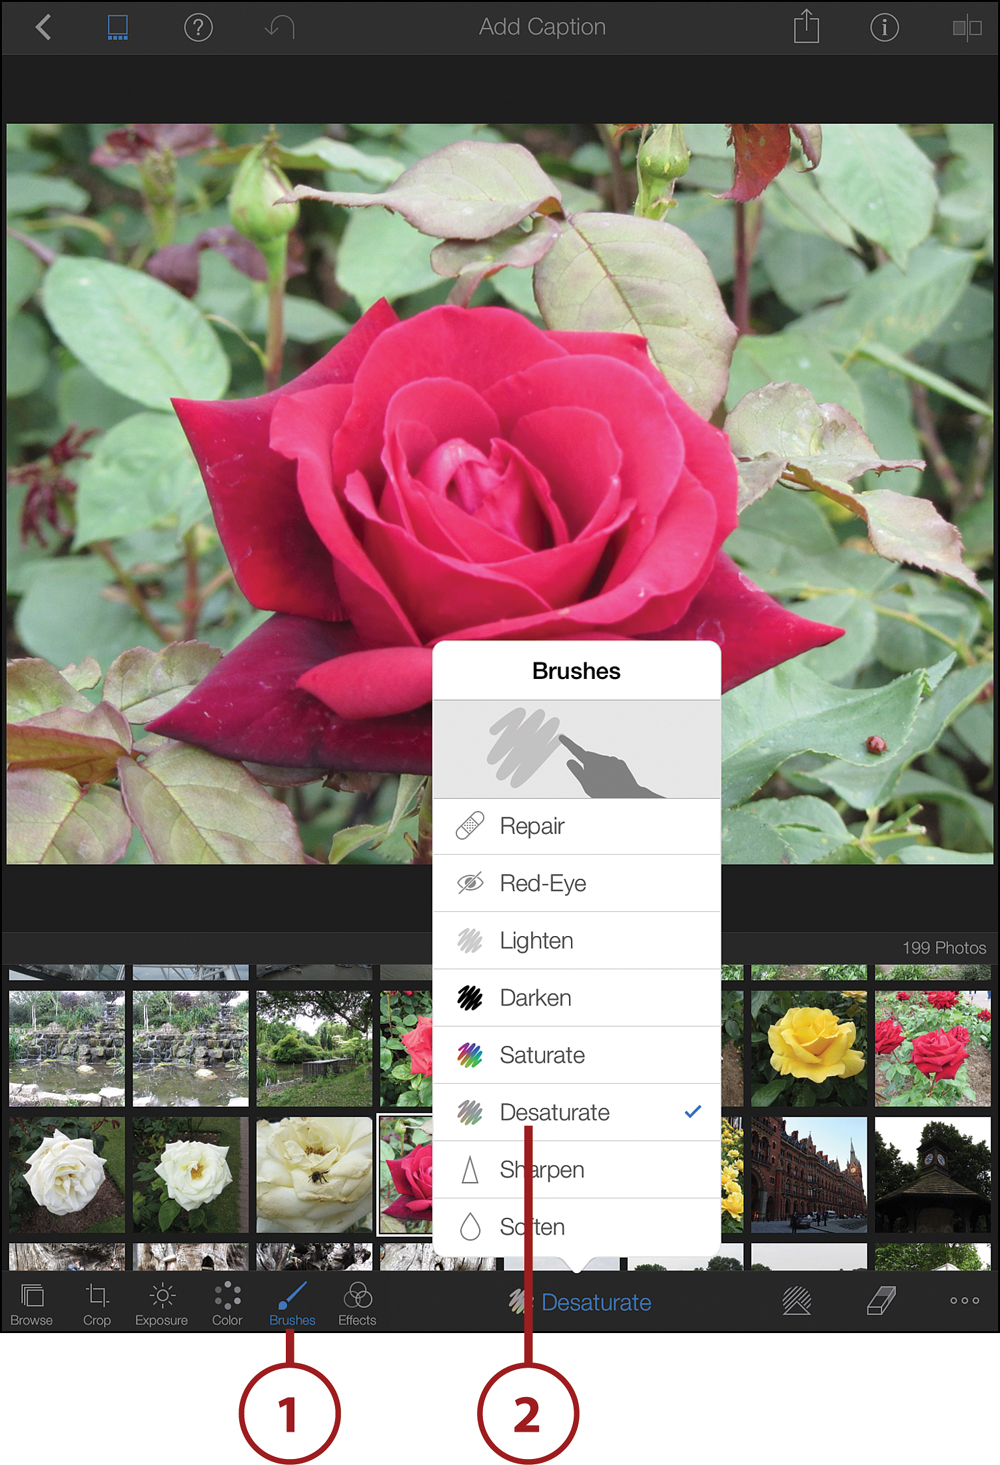
![]() Use your finger to manually brush the area you want the effect applied to. For instance, you can desaturate everything in this photo except the flower.
Use your finger to manually brush the area you want the effect applied to. For instance, you can desaturate everything in this photo except the flower.
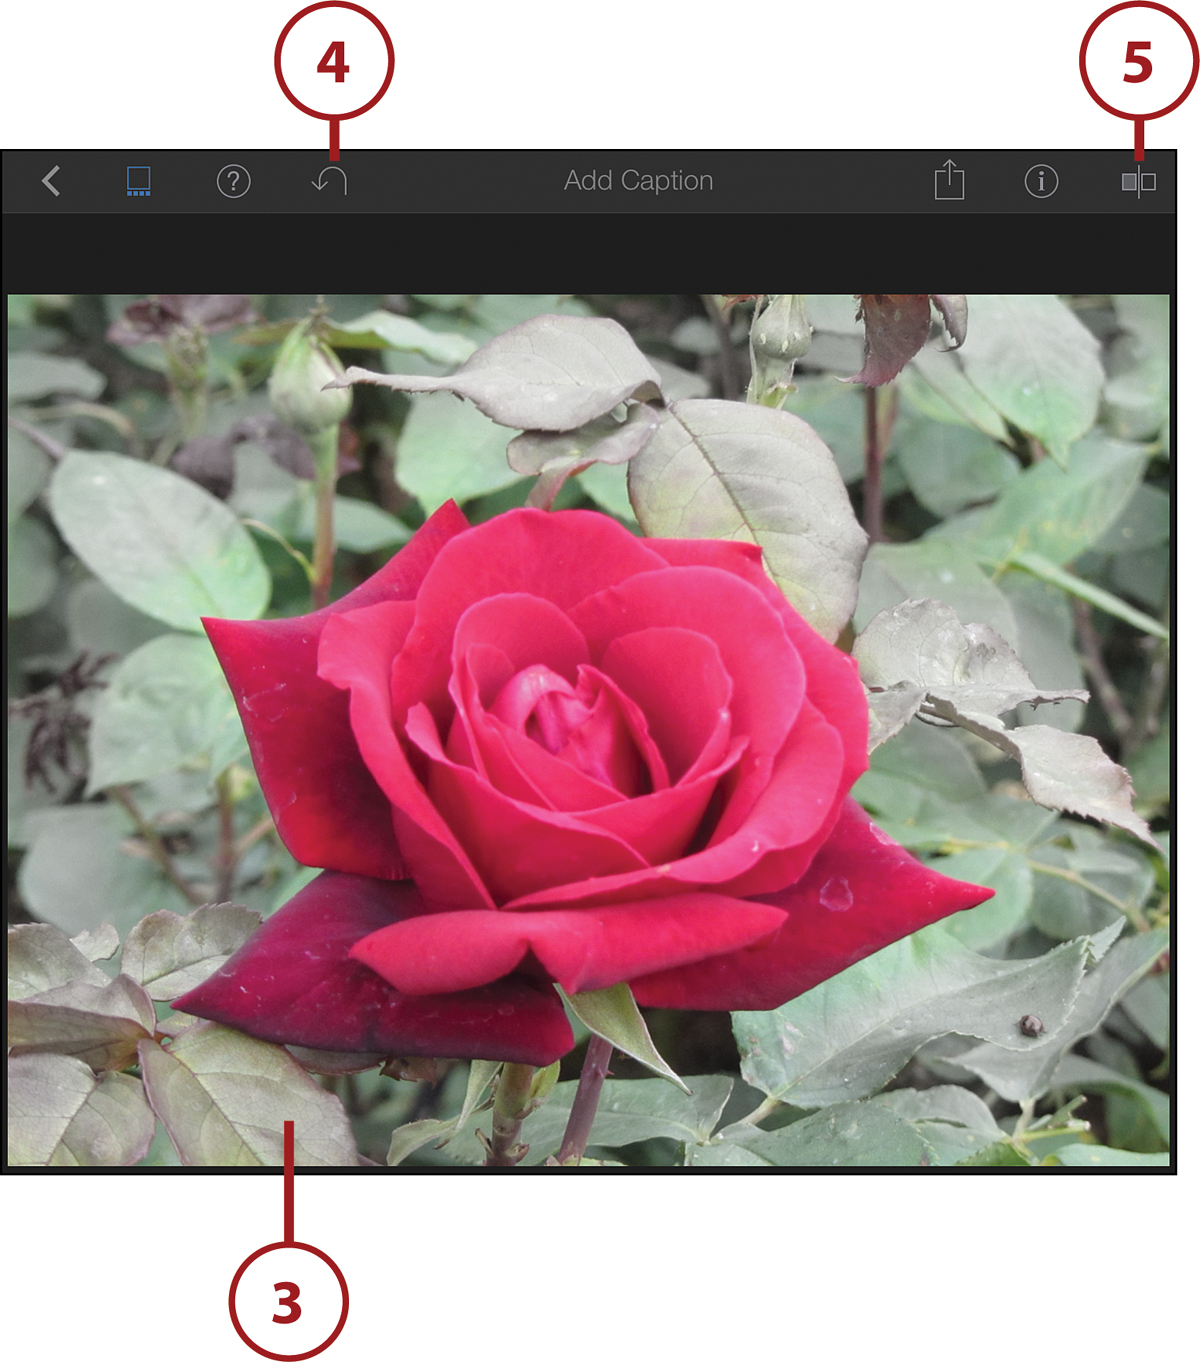
![]() Tap the undo button to revert to how the image was before you tried the brush. Using the undo button, you can try a variety of brushes and other effects knowing that you can undo the change easily.
Tap the undo button to revert to how the image was before you tried the brush. Using the undo button, you can try a variety of brushes and other effects knowing that you can undo the change easily.
![]() Tap the Show Original button if you want to quickly compare your changes to the original photo without undoing the changes.
Tap the Show Original button if you want to quickly compare your changes to the original photo without undoing the changes.
Applying Special Effects to Photos in iPhoto
You can also apply a variety of filters to your entire photo.
![]() Tap the Effects button.
Tap the Effects button.
![]() Select one of the effects sets.
Select one of the effects sets.
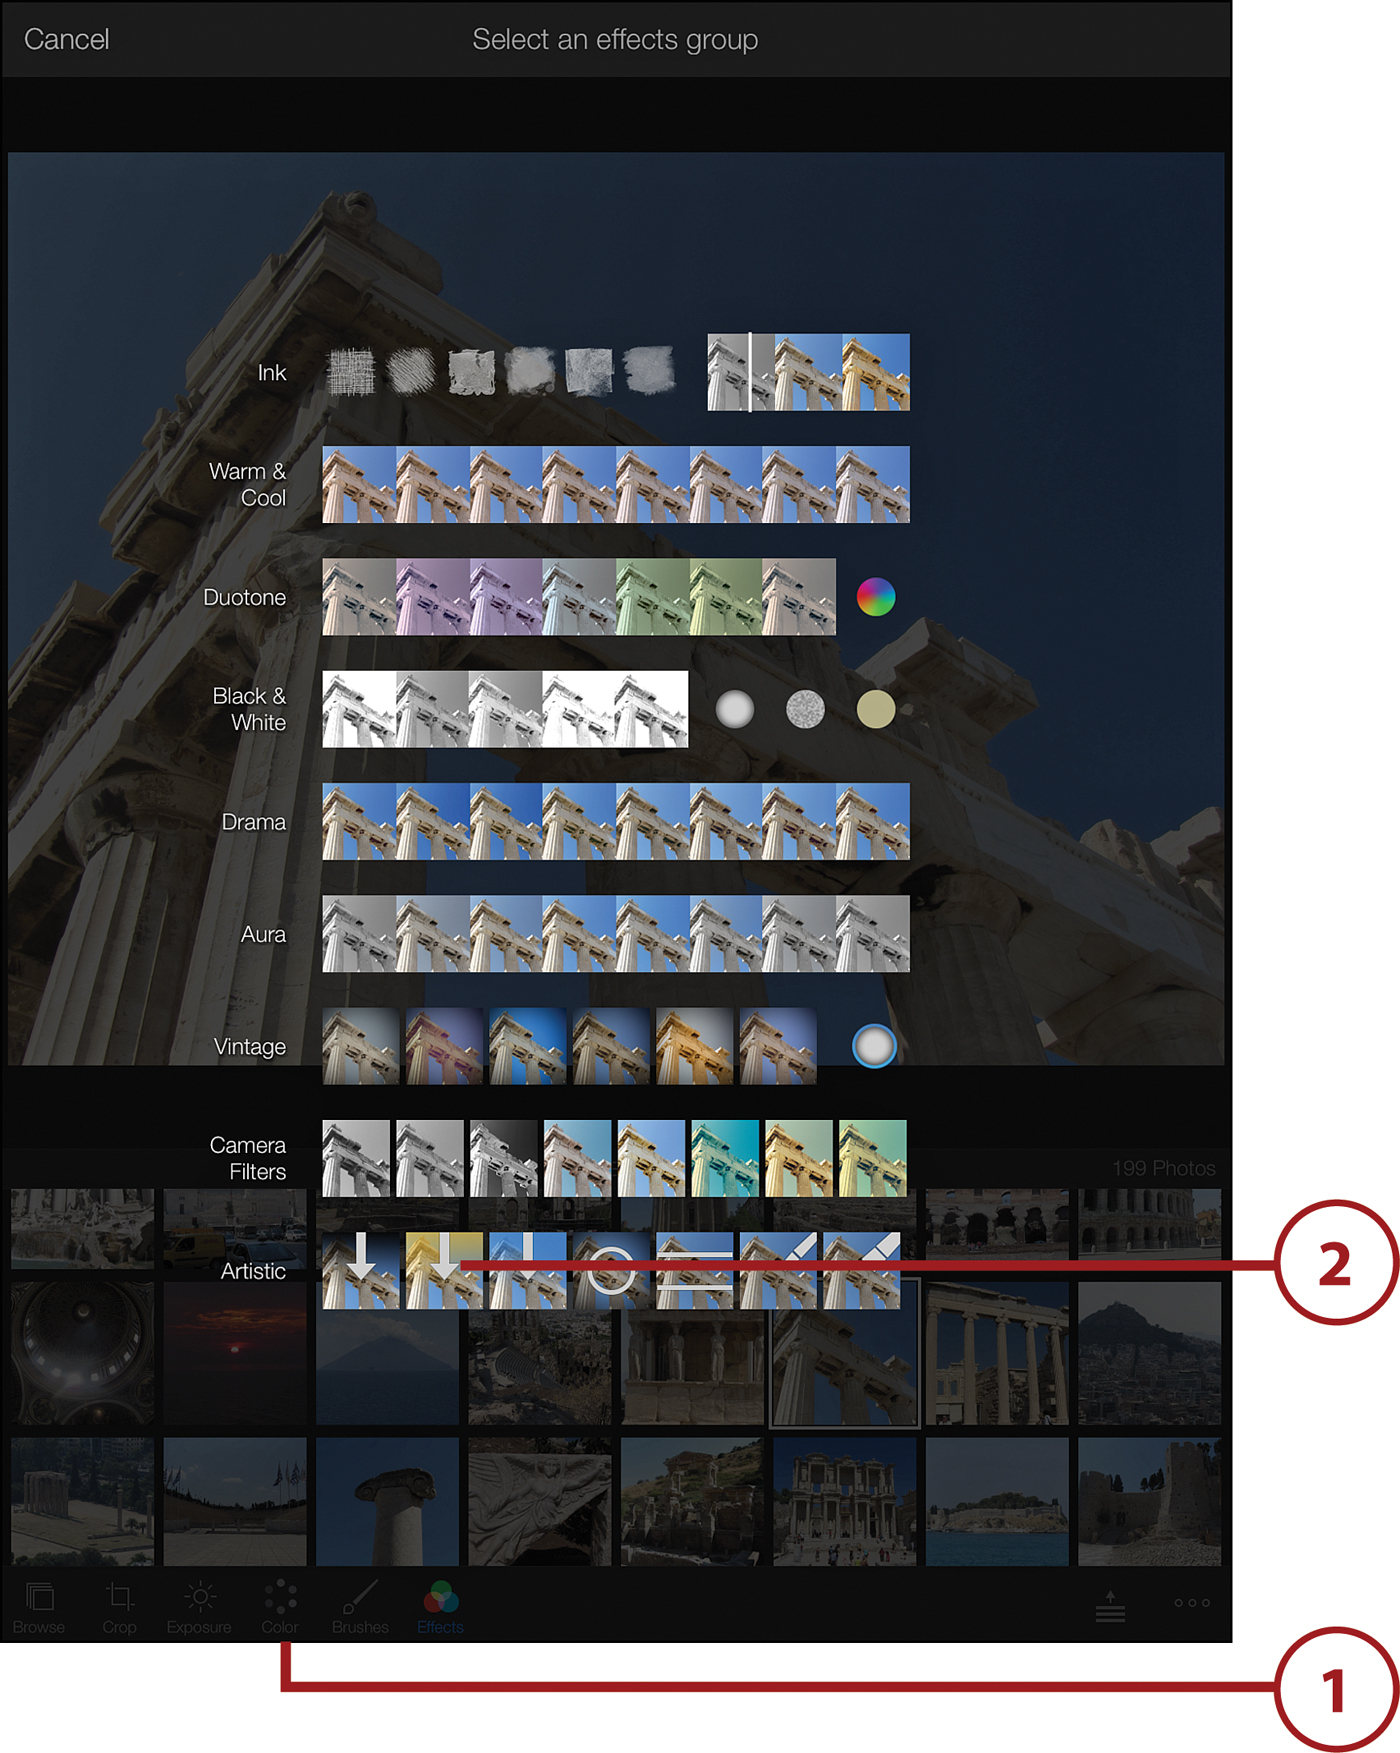
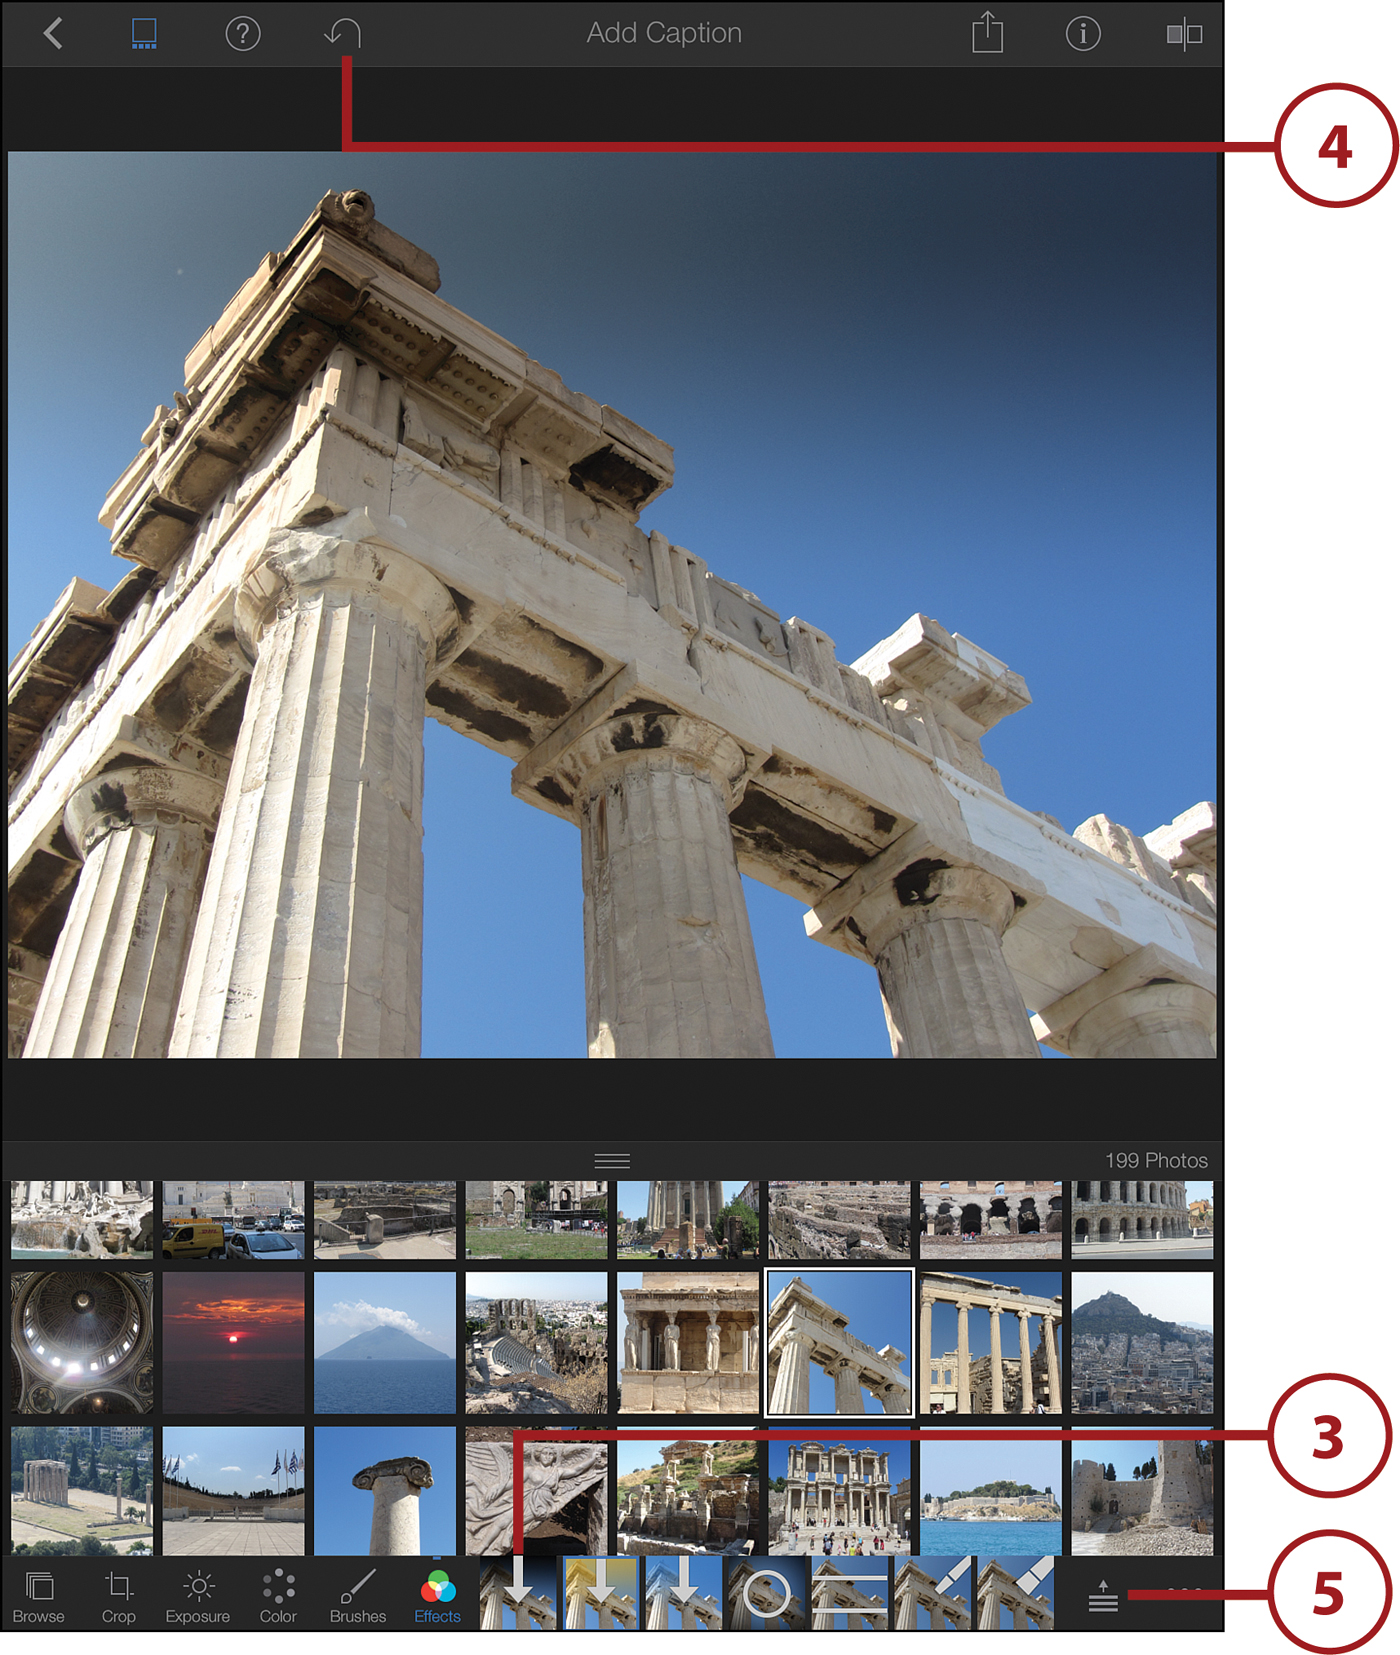
![]() All of the effects in the category you chose appear at the bottom of the screen. Tap one and try it with the current image.
All of the effects in the category you chose appear at the bottom of the screen. Tap one and try it with the current image.
![]() Use undo to revert back to the original image before trying another one.
Use undo to revert back to the original image before trying another one.
![]() Tap the Show All Effects button to choose from a different category of effects.
Tap the Show All Effects button to choose from a different category of effects.
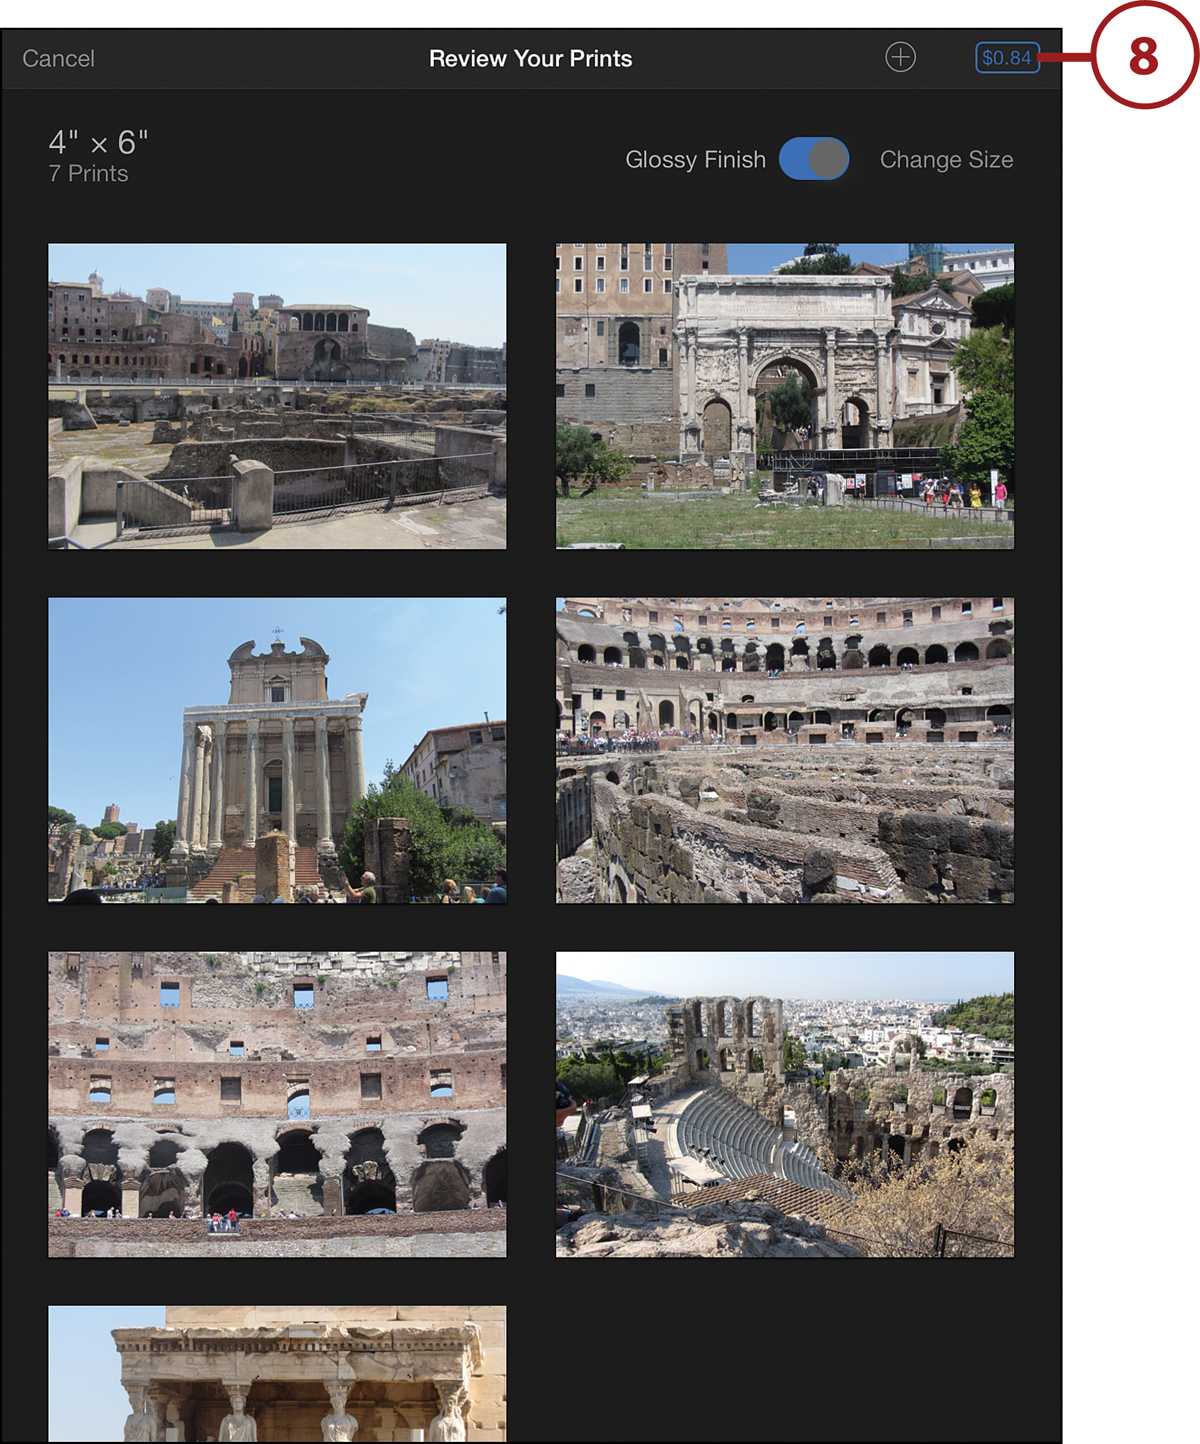
Ordering Prints with iPhoto
If you want printed copies of some of your photos, you can order some from right within iPhoto on your iPad. You pay for the service with your iTunes account, just like buying music or apps.
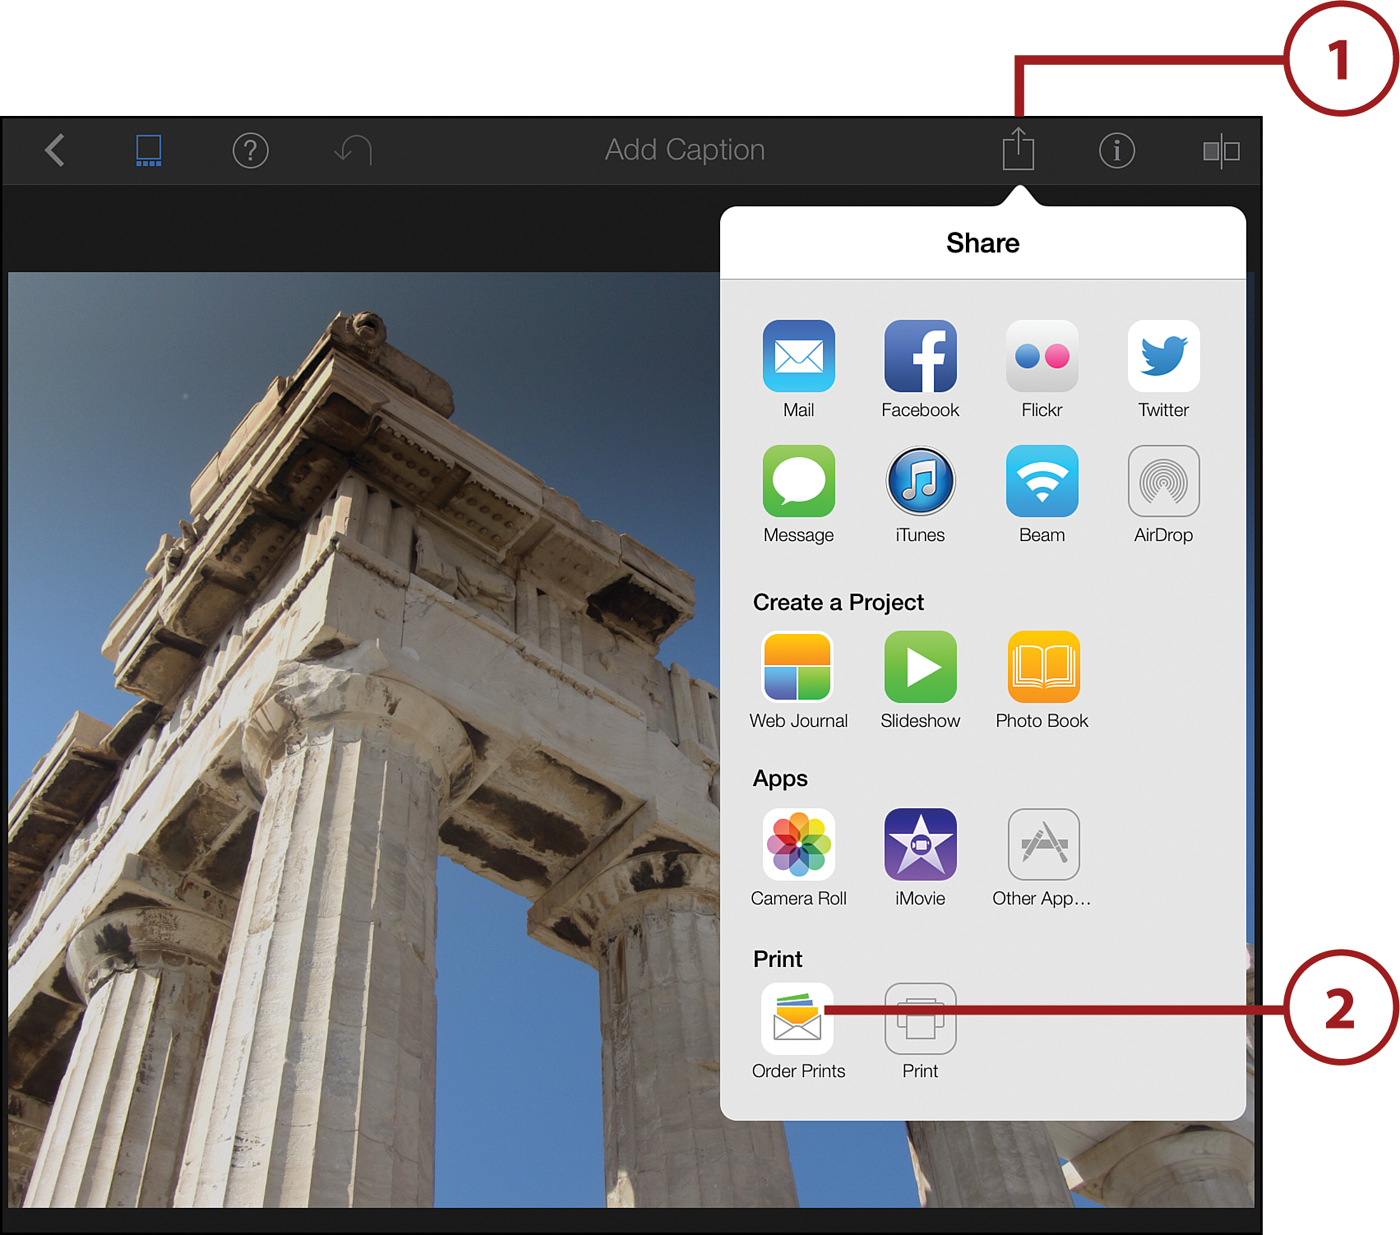
![]() While viewing photos in an album, tap the Share button.
While viewing photos in an album, tap the Share button.
![]() Tap Order Prints.
Tap Order Prints.
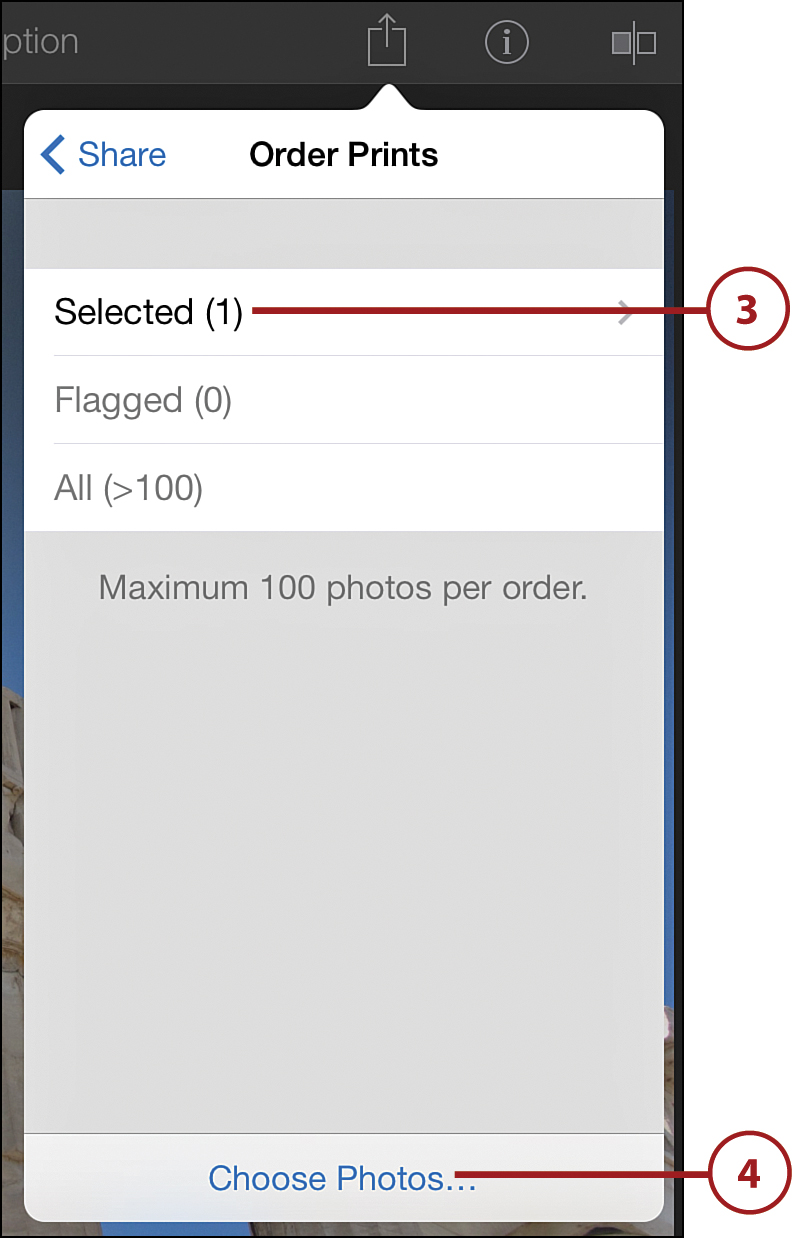
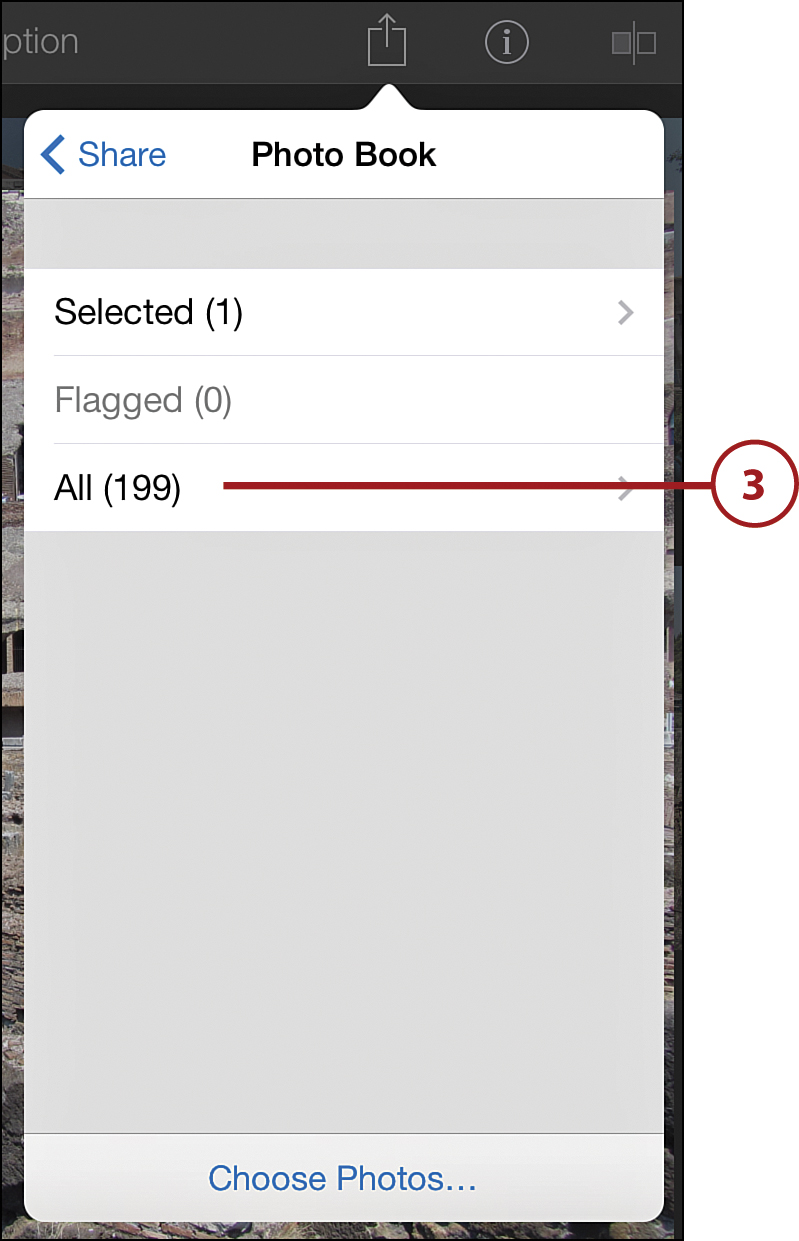
![]() If you had previously selected several photos, you can simply use the Selected button to jump to step 7. If the album you are viewing is 100 photos or less, you can tap the All button to order copies of every photo in the album.
If you had previously selected several photos, you can simply use the Selected button to jump to step 7. If the album you are viewing is 100 photos or less, you can tap the All button to order copies of every photo in the album.
![]() To select photos to order at this stage, simply tap Choose Photos.
To select photos to order at this stage, simply tap Choose Photos.
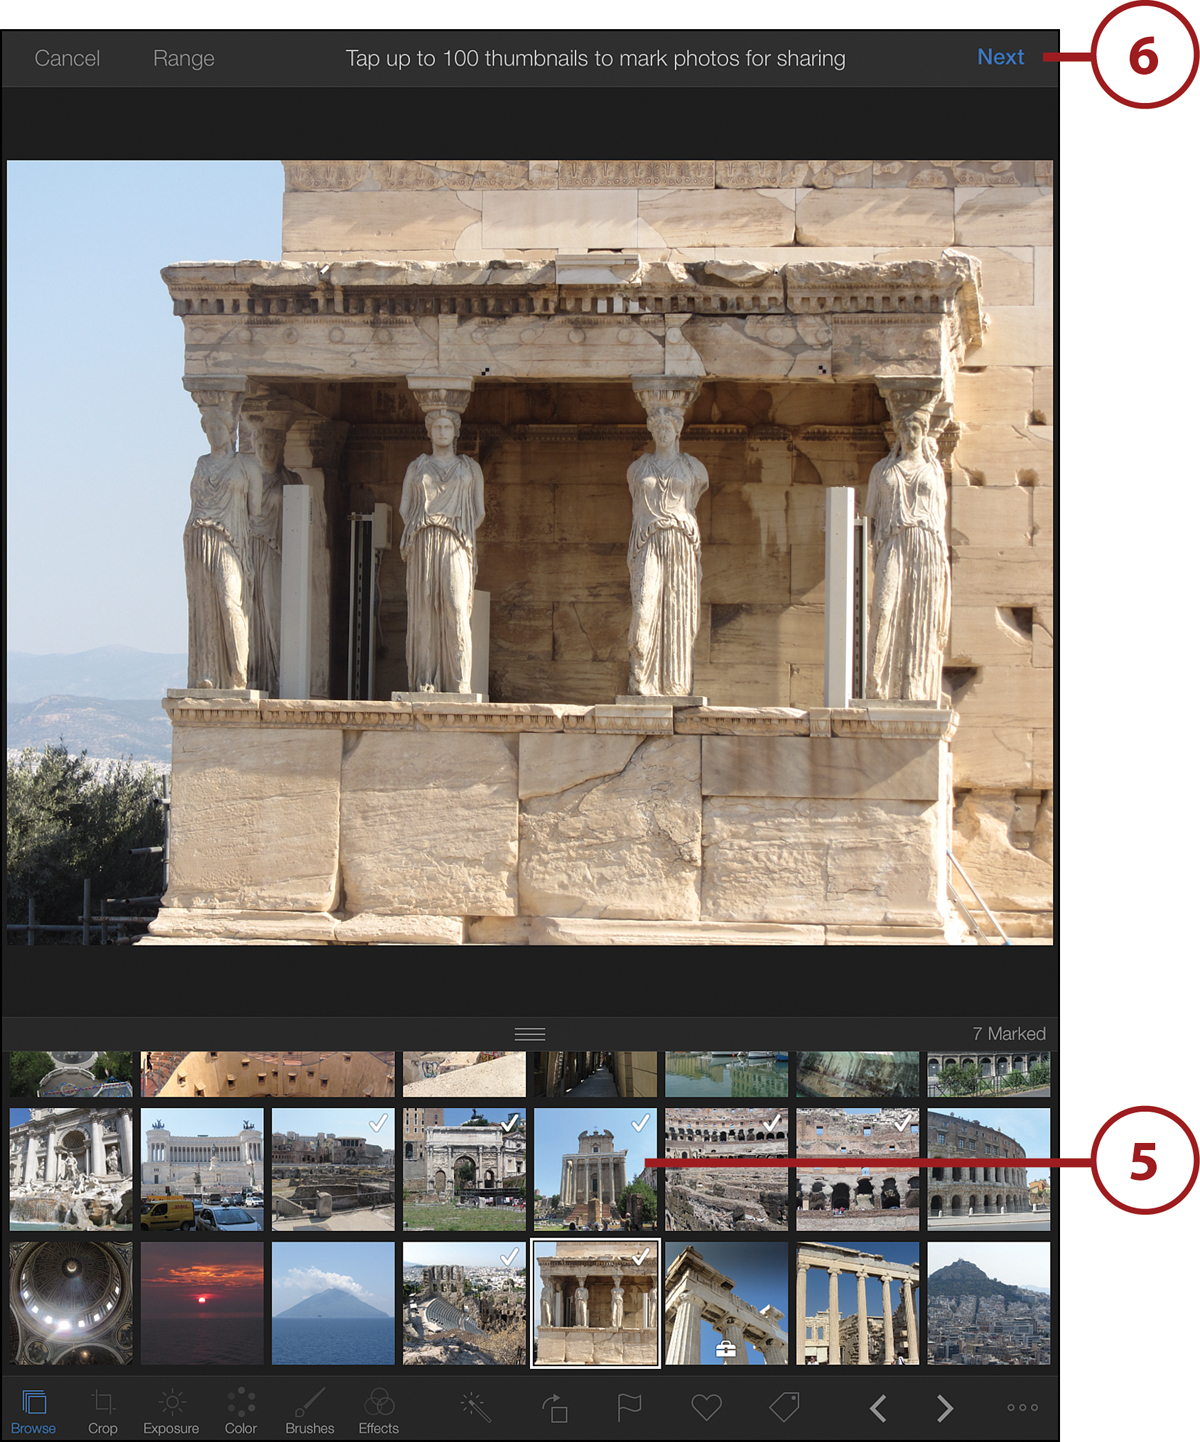
![]() Tap on photos to select them. You see a checkmark on each photo you select.
Tap on photos to select them. You see a checkmark on each photo you select.
![]() Tap Next.
Tap Next.
![]() Choose a photo sizing option. Each sizing option has further options to choose from.
Choose a photo sizing option. Each sizing option has further options to choose from.
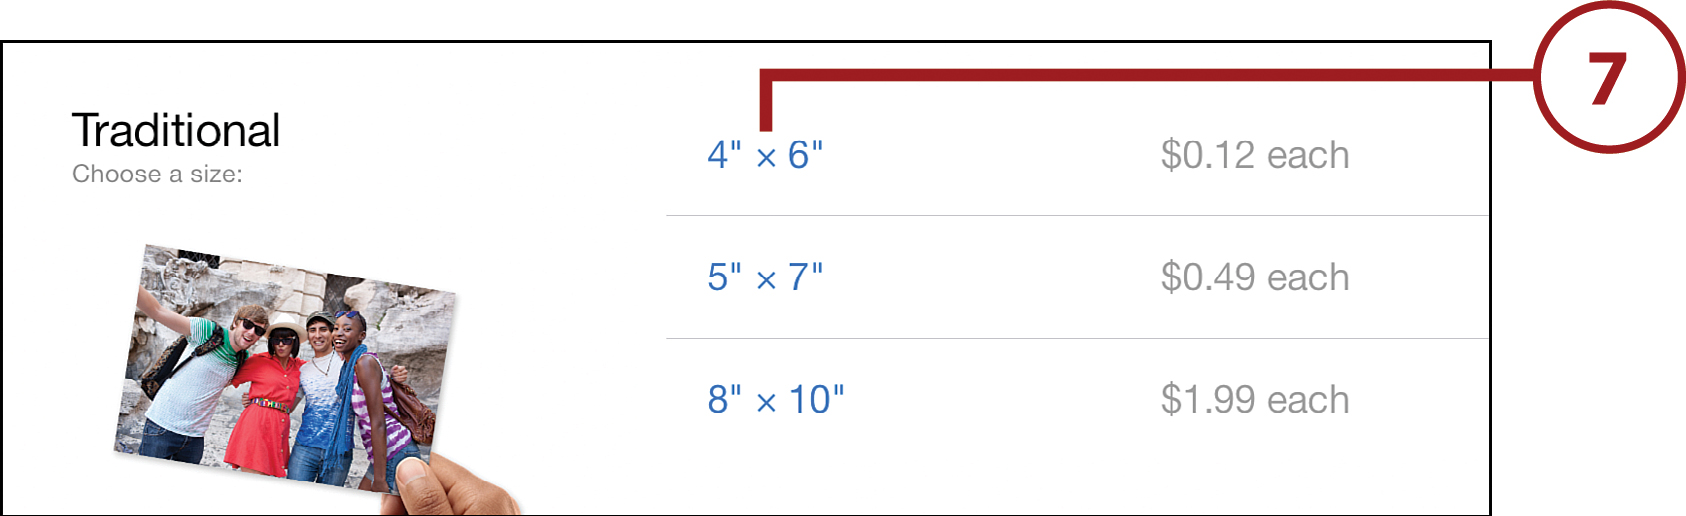
![]() Review your photos and then tap the price to order them. You will be prompted for an address and then you will finish on a final confirmation screen before the order is complete.
Review your photos and then tap the price to order them. You will be prompted for an address and then you will finish on a final confirmation screen before the order is complete.
Making Photo Books with iPhoto
An alternative to individual prints is to create a book with your photos. If your plan is to put the photos into an album anyway, this saves you the time and gives you some interesting and creative options.
![]() While viewing photos in an album, tap the Share button.
While viewing photos in an album, tap the Share button.
![]() Tap Photo Book.
Tap Photo Book.
![]() You can select photos just as you did in the previous task. Or, just tap All to use all the photos in the album.
You can select photos just as you did in the previous task. Or, just tap All to use all the photos in the album.
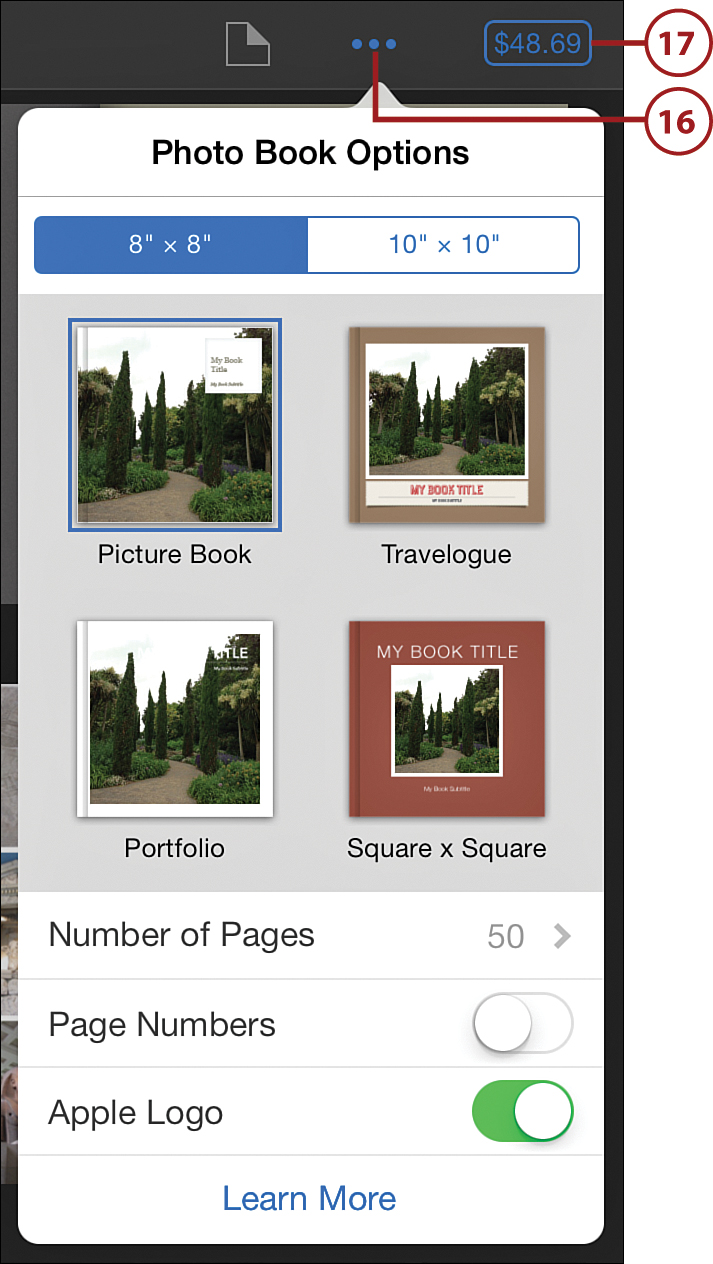
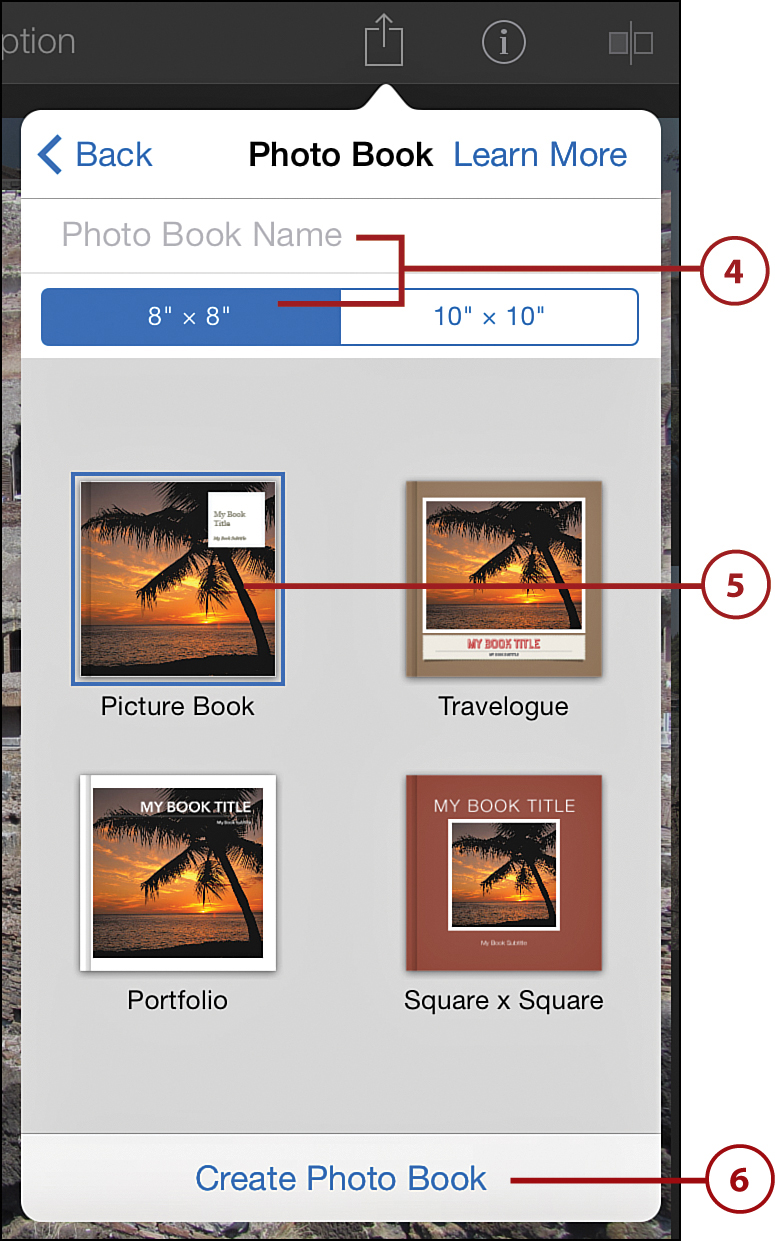
![]() Tap in the name field to type a name for your book and choose a size.
Tap in the name field to type a name for your book and choose a size.
![]() Select a basic book theme.
Select a basic book theme.
![]() Tap Create Photo Book.
Tap Create Photo Book.
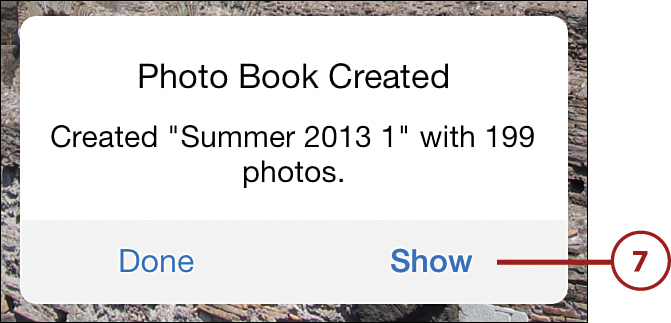
![]() iPhoto automatically creates and populates a book with your selected photos. When it is done, tap Show to view the book.
iPhoto automatically creates and populates a book with your selected photos. When it is done, tap Show to view the book.
![]() You can scroll through the pages of the book, or double-tap a page to view it closer.
You can scroll through the pages of the book, or double-tap a page to view it closer.
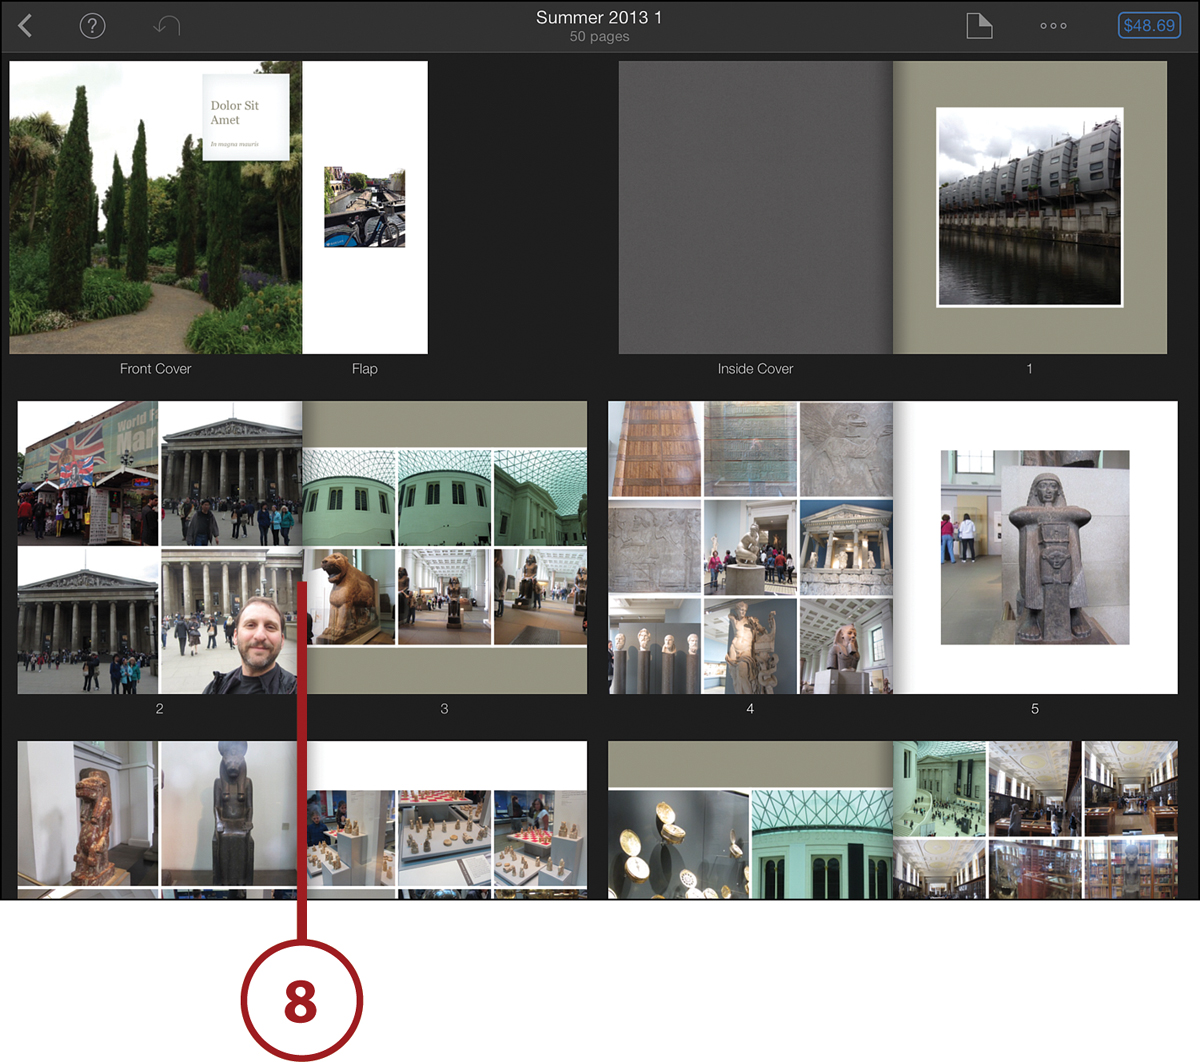
![]() Tap any photo for options to edit it, replace it, or remove it.
Tap any photo for options to edit it, replace it, or remove it.
![]() You can also drag a photo from the unused photos list at the bottom and replace any photo on the pages. You can also drag a photo to another photo on the pages to swap them.
You can also drag a photo from the unused photos list at the bottom and replace any photo on the pages. You can also drag a photo to another photo on the pages to swap them.

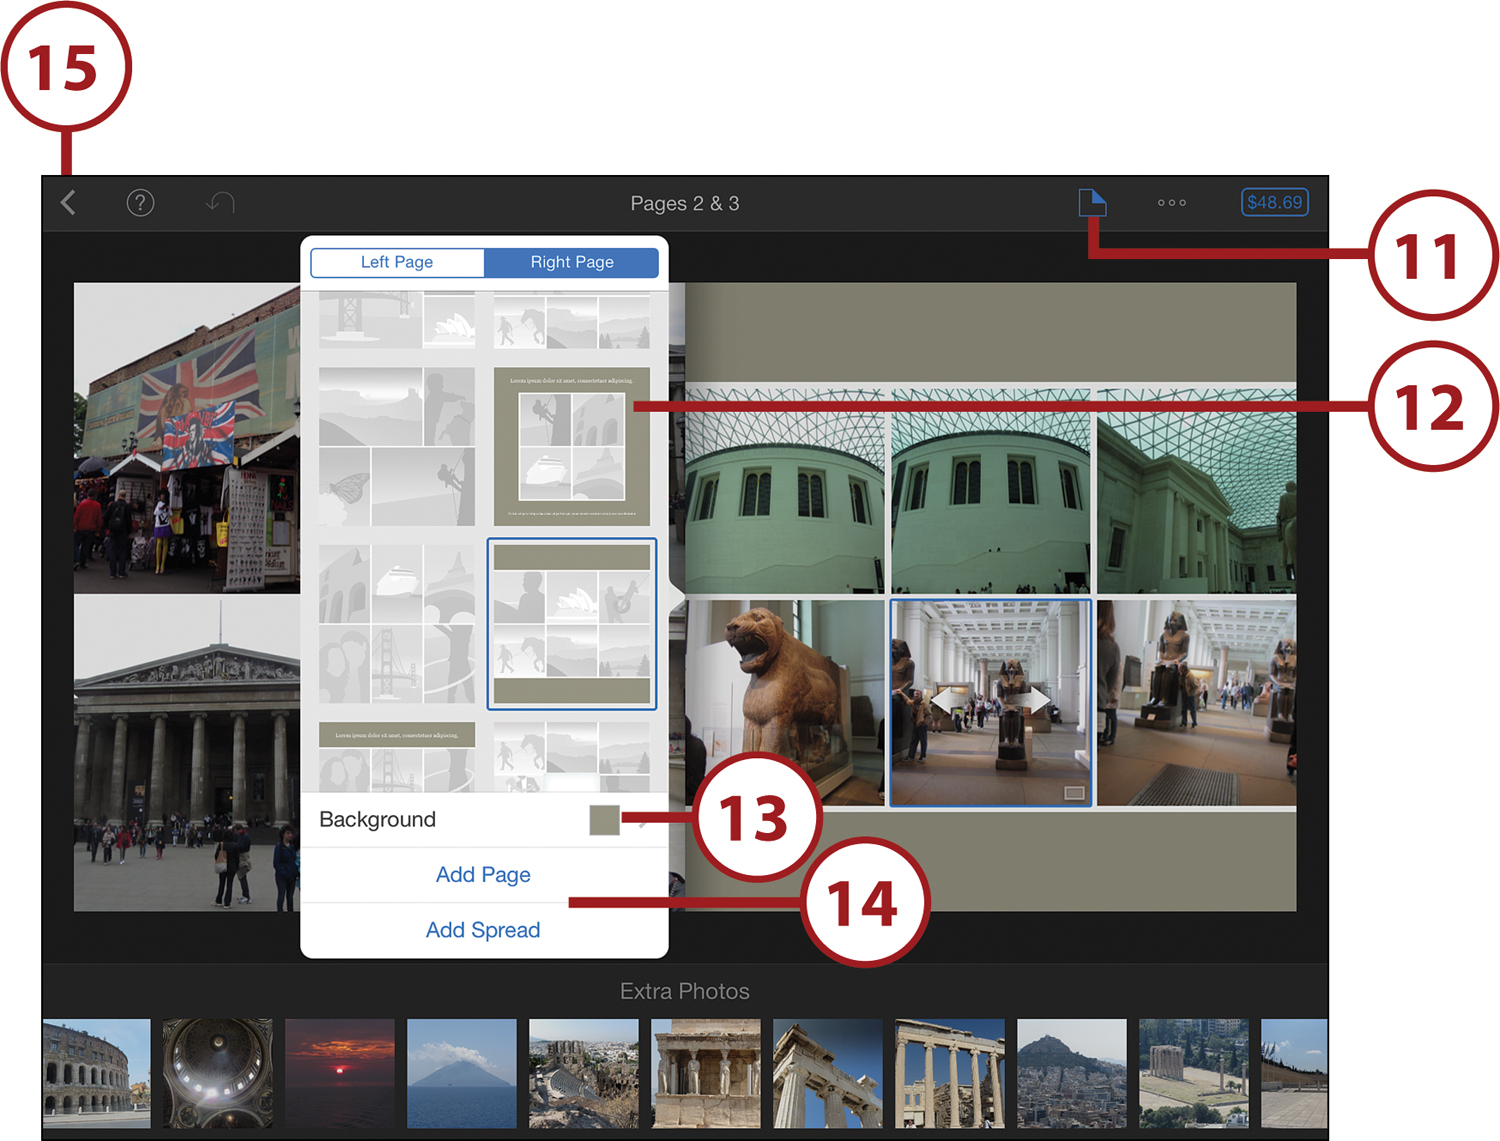
![]() Tap the Page button at the top.
Tap the Page button at the top.
![]() You can now change the layout style of the left or right page.
You can now change the layout style of the left or right page.
![]() You can also change the background pattern.
You can also change the background pattern.
![]() If you like, you can insert a new page or spread of two pages.
If you like, you can insert a new page or spread of two pages.
![]() Tap the back button to view the whole book again.
Tap the back button to view the whole book again.
![]() Tap the options button to review the book’s options and make changes.
Tap the options button to review the book’s options and make changes.
![]() The price of the book will vary depending on the number of pages you have. Tap the price to begin the process of ordering the book, just like ordering prints from the previous task.
The price of the book will vary depending on the number of pages you have. Tap the price to begin the process of ordering the book, just like ordering prints from the previous task.