Hour 18. Scripting with PHP
In 1995, a programmer named Rasmus Lerdorf created a set of scripts to help him manage some basic tasks within his own personal website, specifically around the use of HTML form data. He called this bundle of scripts “Personal Home Page/Forms Interpreter” or PHP/FI. Over the next few years, and with the help of some more developers—Zeev Suraski and Andi Gutmans—PHP/FI turned into the processing module we know today as PHP (which is now a recursive acronym that stands for “PHP: Hypertext Preprocessor”). From its humble beginnings as a server-side scripting language used for common tasks such as form handling and database interactions, PHP has grown in popularity such that more than 250 million websites use PHP in some way today.
Often working in conjunction with a web server, the PHP processing module interprets scripts when requested by the user and produces output that is returned to the user. For example, if a user requests a web page and that web page is actually a PHP script instead of pure HTML, the PHP processing module will process that script and produce output that in turn is sent back to the user as HTML and rendered in the browser.
The simplicity of the language itself makes it a popular language to learn, and especially a first scripting language to learn, but simple doesn’t mean it isn’t powerful and feature-rich. In this lesson, you’ll get a whirlwind tour of the basics of the PHP language and its use.
The highlights of this hour include
![]() Understanding the basic structure of PHP scripts
Understanding the basic structure of PHP scripts
![]() Learning about the variables, data types, and logical control structures used in PHP
Learning about the variables, data types, and logical control structures used in PHP
![]() Using PHP’s many built-in functions
Using PHP’s many built-in functions
![]() Creating functions of your own to perform tasks
Creating functions of your own to perform tasks
![]() Creating and using objects in PHP
Creating and using objects in PHP
![]() Discovering common uses for PHP scripts
Discovering common uses for PHP scripts
What You Need for PHP Programming
Like HTML documents, PHP files are made up of plain text. You can create them with any text editor, and most popular HTML editors and programming IDEs (integrated development environments) provide support for PHP. When working with the PHP samples in this hour, you can use the same text editor you have been using to create sample code from other lessons in this book.
Beyond a simple text editor used to create PHP source files, you will need access to a web server and the PHP processing module which will interpret your source files and produce output from them. Well over 90% of all web-hosting plans offer PHP support, so it is very likely that if you have a web-hosting account you have access to a web server and the PHP processing module.
If you do not have access to a web-hosting account, and if you simply want to practice on your own in a way that no one else can access your scripts, you might consider installing the Apache web server and PHP processing module on your own personal computer. While these technologies are available for Windows, Mac, and Linux, and you can download these technologies at http://httpd.apache.org and www.php.net, respectively, a third-party installation package might prove more efficient:
![]() XAMPP—Installation of Apache, MySQL, and PHP on Windows, Mac, or Linux. See www.apachefriends.org/ for more information.
XAMPP—Installation of Apache, MySQL, and PHP on Windows, Mac, or Linux. See www.apachefriends.org/ for more information.
![]() WAMP—Installation of Apache, MySQL, and PHP on Windows. See www.wampserver.com/ for more information.
WAMP—Installation of Apache, MySQL, and PHP on Windows. See www.wampserver.com/ for more information.
![]() MAMP—Installation of Apache, MySQL, and PHP on Mac. See www.mamp.info/ for more information.
MAMP—Installation of Apache, MySQL, and PHP on Mac. See www.mamp.info/ for more information.
While these third-party installation packages install everything you need (and some things you didn’t even know you needed, like the MySQL database server), one potential drawback to using third-party installation packages is that the version of the core technologies that are bundled together will always be a few revision versions behind. This happens because of the work that goes into creating and testing the bundle itself, to ensure that no conflicts exist between the latest versions of the technologies; it also has to go through a quality-assurance process. The upside of this process, however, is that when you install these technologies using a bundled installer, the upgrade process requires nothing more than running the new installer—it takes care of removing and updating all the files for you.
From this point forward in the hour, if you want to follow along with the source code, then you will need access to a PHP-enabled web server either through your hosting provider or through the installation of the core technologies. If you are unsure if your web-hosting provider is PHP-enabled, or if you want to test the packaged installation, you can create a small test script like the one shown in Listing 18.1.
LISTING 18.1 A simple PHP script
<?php
echo "<h1>Hello World!</h1>";
?>
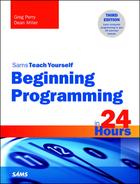
Type in the example in Listing 18.1 and save the file to the document root of your web server, using a name something like helloworld.php.
If you are not working directly on the machine that will be serving your PHP script, you need to use a File Transfer Protocol (FTP) or Secure Copy (SCP) client to upload your saved document to the server. When the document is in place on the server, you should be able to access it using your browser. If all has gone well, you should see the script’s output. Figure 18.1 shows the output from the helloworld.php script.
If you do not see a similar output, and instead see a replica of the code that you typed into the text file, then your web-hosting solution is not PHP-enabled.
Basic Structures in PHP Scripts
When writing PHP, you need to inform the PHP-processing module that you want it to execute your commands. If you don’t do this, the code you write will be mistaken for HTML and will be output directly into the browser. You can designate your code as PHP with special tags that mark the beginning and end of PHP code blocks. The most common—and standard—tag pair is <?php and ?>, which is what you will see used throughout this hour.
The echo and print() Statements
Simply put, you can use the echo statement to output data. In most cases, anything output by echo ends up viewable in the browser. Alternatively, you could have used the print() statement in place of the echo statement. Using echo or print() is a matter of taste; when you look at other people’s scripts, you might see either used, which is why both are included here.
Referring back to the code you have seen so far, note the only line of code in Listing 18.1 ended with a semicolon. The semicolon informs the PHP engine that you have completed a statement, and is probably the most important bit of PHP syntax you could learn at this stage.
A statement represents an instruction to the PHP engine. Broadly, it is to PHP what a sentence is to written or spoken English. A sentence should usually end with a period; a statement should usually end with a semicolon. Exceptions to this rule include statements that enclose other statements and statements that end a block of code. In most cases, however, failure to end a statement with a semicolon will confuse the PHP engine and result in an error.
Combining HTML and PHP
The script in Listing 18.1 is pure PHP. You can incorporate this into an HTML document by simply adding HTML around the PHP start and end tags, as shown in Listing 18.2.
LISTING 18.2 A PHP script incorporated into HTML
<!DOCTYPE html>
<html>
<head>
<title>A PHP script including HTML</title>
</head>
<body>
<h1><?php echo "Hello World!"; ?></h1>
</body>
</html>
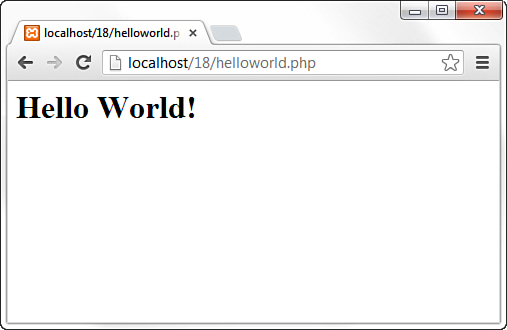
As you can see, incorporating PHP code into a predominantly HTML document is simply a matter of typing in that code. The PHP engine ignores everything outside the PHP open and close tags. If you were to save the contents of Listing 18.2 as helloworldagain.php, place it in your document root, and then view it with a browser, it would appear exactly as did Figure 18.1. If you were to view the document source, as shown in Figure 18.2, the listing would look just like a normal HTML document, because that’s all the output actually is—the PHP processor has simply placed some text within an <h1> element before it got to your web browser.
You can include as many blocks of PHP code as you need in a single document, interspersing them with HTML as required. Although you can have multiple blocks of code in a single document, they combine to form a single script. Any variables defined in the first block will usually be available to subsequent blocks.
Adding Comments to PHP Code
A comment is text in a script that is ignored by the PHP engine. Comments can make code more readable or annotate a script. Single-line comments begin with two forward slashes (//)—the preferred style—or a single hash or pound sign (#). The PHP engine ignores all text between these marks and either the end of the line or the PHP close tag:
// this is a comment
# this is another comment
Multiline comments begin with a forward slash followed by an asterisk (/*) and end with an asterisk followed by a forward slash (*/):
/*
this is a comment
none of this will
be parsed by the
PHP engine
*/
Flow Control Functions
It is common for scripts to evaluate conditions and change their behavior accordingly. These decisions are what make your PHP pages dynamic—that is, able to change output according to circumstances. Like most programming languages, PHP enables you to control the logical flow with statements such as the if statement, among others that you’ll learn about in a moment.
The if statement evaluates an expression found between parentheses. If this expression results in a true value, the statement is executed. Otherwise, the statement is skipped entirely. This functionality enables scripts to make decisions based on any number of factors:
if (expression) {
// code to execute if the expression evaluates to true
}
When working with an if statement, you might want to define an alternative block of code that should be executed if the expression you are testing evaluates to false. You can do this by adding else to the if statement followed by a further block of code:
if (expression) {
// code to execute if the expression evaluates to true
} else {
// code to execute in all other cases
}
Using an else clause in conjunction with an if statement allows scripts to make decisions about code execution. However, your options are limited to an either-or branch: either the code block following the if statement or the code block following the else statement.
You can use an if...elseif...else clause to test multiple expressions (the if...else portion) before offering a default block of code (the elseif portion):
if (expression) {
// code to execute if the expression evaluates to true
} elseif (another expression) {
// code to execute if the previous expression failed
// and this one evaluates to true
} else {
// code to execute in all other cases
}
If the initial if expression does not evaluate to true, the first block of code is ignored. The elseif clause presents another expression for evaluation. If it evaluates to true, its corresponding block of code is executed. Otherwise, the block of code associated with the else clause is executed. You can include as many elseif clauses as you want; and if you don’t need a default action, you can omit the else clause.
The switch statement is an alternative way of changing flow, based on the evaluation of an expression. Using the if statement in conjunction with elseif, you can evaluate multiple expressions, as you’ve just seen. However, a switch statement evaluates only one expression in a list of expressions, selecting the correct one based on a specific bit of matching code. Whereas the result of an expression evaluated as part of an if statement is interpreted as either true or false, the expression portion of a switch statement is subsequently tested against any number of values, in hopes of finding a match:
switch (expression) {
case result1:
// execute this if expression results in result1
break;
case result2:
// execute this if expression results in result2
break;
default:
// execute this if no break statement
// has been encountered hitherto
}
The expression used in a switch statement is often just a variable. Within the switch statement, you find a number of case statements. Each of these cases tests a value against the value of the switch expression. If the case value is equivalent to the expression value, the code within the case statement is executed. The break statement ends the execution of the switch statement altogether.
If the break statement is omitted, the next case statement is executed, regardless of whether a previous match has been found. If the optional default statement is reached without a previous matching value having been found, its code is executed.
Caution
It is important to include a break statement at the end of any code that will be executed as part of a case statement. Without a break statement, the program flow continues to the next case statement and ultimately to the default statement. In most cases, this results in unexpected behavior, likely incorrect!
Finally, the ?: or ternary operator is similar to the if statement, except that it returns a value derived from one of two expressions separated by a colon. This construct provides you with three parts of the whole, hence, the name ternary. The expression used to generate the returned value depends on the result of a test expression:
(expression) ? returned_if_expression_is_true : returned_if_expression_is_false;
If the test expression evaluates to true, the result of the second expression is returned; otherwise, the value of the third expression is returned.
Looping
So far, you’ve looked at decisions that a script can make about what code to execute. Scripts can also decide how many times to execute a block of code. Loop statements are specifically designed to enable you to perform repetitive tasks because they continue to operate until a specified condition is achieved or until you explicitly choose to exit the loop.
The while statement looks similar in structure to a basic if statement, but has the ability to loop:
while (expression) {
// do something
}
Unlike an if statement, a while statement executes for as long as the expression evaluates to true, over and over again if need be. Each execution of a code block within a loop is called an iteration. Within the block, you usually change something that affects the while statement’s expression; otherwise, your loop continues indefinitely. For example, you might use a variable to count the number of iterations and act accordingly. Listing 18.3 creates a while loop that calculates and prints multiples of 2 up to 24.
LISTING 18.3 A while statement
<?php
$counter = 1;
while ($counter <= 12) {
echo $counter." times 2 is ".($counter * 2)."<br />";
$counter++;
}
?>
This example initializes the variable $counter in line 2 with a value of 1. The while statement in line 3 tests the $counter variable so that as long as the value of $counter is less than or equal to 12, the loop continues to run. Within the while statement’s code block, the value of $counter is multiplied by 2, and the result is printed to the browser. In line 5, the value of $counter is incremented by 1. This step is extremely important because if you did not increment the value of the $counter variable, the while expression would never resolve to false and the loop would never end.
If you put these lines of code into a text file called while.php and place this file in your web server document root, then access the script through your web browser, it produces the following output:
1 times 2 is 2
2 times 2 is 4
3 times 2 is 6
4 times 2 is 8
5 times 2 is 10
6 times 2 is 12
7 times 2 is 14
8 times 2 is 16
9 times 2 is 18
10 times 2 is 20
11 times 2 is 22
12 times 2 is 24
A do...while statement looks a little like a while statement turned on its head. The essential difference between the two is that the code block is executed before the truth test and not after it:
do {
// code to be executed
} while (expression);
This type of statement is useful when you want the code block to be executed at least once, even if the while expression evaluates to false.
The while statement is useful, but a for statement is often a more efficient method of achieving the same effect. In Listing 18.3, you saw how a variable was initialized outside the while statement and then tested within its expression and incremented within the code block. With a for statement, you can achieve this same series of events, but in a single line of code:
for (initialization expression; test expression; modification expression) {
// code to be executed
}
This structure allows for more compact code and makes it less likely that you might forget to increment a counter variable, thereby creating an infinite loop.
Note
Infinite loops are, as the name suggests, loops that run without bounds. If your loop is running infinitely, your script is running for an infinite amount of time. This behavior is very stressful on your web server and renders the web page unusable.
The expressions within the parentheses of the for statement are separated by semicolons. Usually, the first expression initializes a counter variable, the second expression is the test condition for the loop, and the third expression increments the counter. Listing 18.4 shows a for statement that re-creates the example in Listing 18.3, which multiplies 12 numbers by 2.
LISTING 18.4 Using the for statement
<?php
for ($counter=1; $counter<=12; $counter++) {
echo $counter." times 2 is ".($counter * 2)."<br />";
}
?>
The results of Listings 18.3 and 18.4 are the same, but the for statement makes the code in Listing 18.4 more compact. Because the $counter variable is initialized and incremented at the beginning of the statement, the logic of the loop is clear at a glance.
Tip
Loops can contain other loop statements, thus creating nested loops, as long as the logic is valid and the loops are tidy.
The Building Blocks of PHP: Variables, Data Types, and Operators
Having learned of the basic structures you will encounter in PHP scripts, this section introduces you to more of the building blocks you’ll use in those scripts. Many of these basic concepts are similar to other programming languages you might already have encountered, or will encounter, later in this book.
Variable Naming and Scope
In PHP, a variable consists of a name of your choosing, preceded by a dollar sign ($). Variable names can include letters, numbers, and the underscore character (_), but they cannot include spaces. Names must begin with a letter or an underscore. The following list shows some legal variables:
$a;
$a_longish_variable_name;
$2453;
$sleepyZZZZ;
A semicolon (;)—also known as the instruction terminator—is used to end a PHP statement. The semicolons in the previous fragment of code are not part of the variable names, but are used to end the statement that declares the variable as “alive and kicking,” if you will. To declare a variable, you need only include it in your script. When you declare a variable, you usually assign a value to it in the same statement, as shown here:
$num1 = 8;
$num2 = 23;
The preceding lines declare two variables and use the assignment operator (=) to assign values to them. After you assign values to your variables, you can treat them exactly as if they were the values themselves. In other words
echo $num1;
is equivalent to
echo 8;
as long as $num1 is assigned a value of 8.
In addition to the rules for naming variables, there are rules regarding the availability of variables. In general, the assigned value of a variable is present only within the function or script where it resides. For example, if you have scriptA.php that holds a variable called $name with a value of joe, and you want to create scriptB.php that also uses a $name variable, you can assign to that second $name variable a value of jane without affecting the variable in scriptA.php. The value of the $name variable is local to each script, and the assigned values are independent of each other.
However, you can also define the $name variable as global within a script or function. If the $name variable is defined as a global variable in both scriptA.php and scriptB.php, and these scripts are connected to each other (that is, one script calls the other or includes the other), there will be just one value for the now-shared $name variable.
In addition to global variables of your own creation, PHP has several predefined variables called superglobals. These variables are always present, and their values are available to all your scripts. Each of the following superglobals is actually an array of other variables:
![]()
$_GET contains any variables provided to a script through the GET method.
![]()
$_POST contains any variables provided to a script through the POST method.
![]()
$_COOKIE contains any variables provided to a script through a cookie.
![]()
$_FILES contains any variables provided to a script through file uploads.
![]()
$_SERVER contains information such as headers, file paths, and script locations.
![]()
$_ENV contains any variables provided to a script as part of the server environment.
![]()
$_REQUEST contains any variables provided to a script via GET, POST, or COOKIE input mechanisms.
![]()
$_SESSION contains any variables that are currently registered in a session.
Using superglobals is crucial in creating secure applications because they reduce the likelihood of user-injected input to your scripts. By coding your scripts to accept only what you want, in the manner defined by you (from a form using the POST method, or from a session, for example), you can eliminate some of the problems created by loosely written scripts.
Data Types
Different types of data take up different amounts of memory and may be treated differently when they are manipulated by a script. Some programming languages therefore demand that the programmer declare in advance which type of data a variable will contain. By contrast, PHP is loosely typed, meaning that it automatically determines the data type at the time data is assigned to each variable.
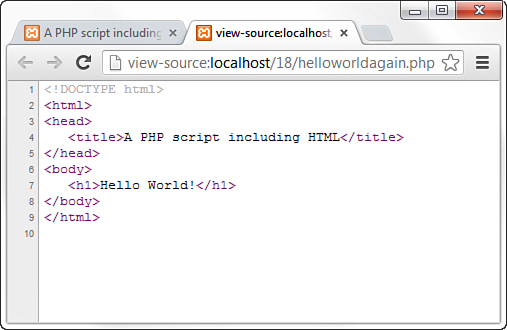
Table 18.1 shows the eight standard data types available in PHP.
PHP provides the function settype(), which is used to change the type of a variable. To use settype(), you place the variable to change and the type to change it to between the parentheses and separate the elements with a comma, like so:
settype($variabletochange, 'new type'),
PHP also allows you to change the type of an existing variable by casting; this produces a copy, leaving the original variable untouched. To change type through casting, you indicate the name of a data type, in parentheses, in front of the variable you are copying:
$newvar = (integer) $originalvar
Operators and Expressions
With what you have learned so far, you can assign data to variables, and you can even investigate and change the data type of a variable. A programming language isn’t very useful, though, unless you can manipulate the data you have stored. Operators are symbols used to manipulate data stored in variables, to make it possible to use one or more values to produce a new value, or to check the validity of data to determine the next step in a condition, and so forth.
The following sections describe the operators commonly used in PHP programming.
The Assignment Operator
You have seen the assignment operator in use each time a variable was declared in an example; the assignment operator consists of the single character: =. The assignment operator takes the value of the right-side operand and assigns it to the left-side operand:
$name = "John";
The variable $name now contains the string "John".
Arithmetic Operators
The arithmetic operators do exactly what you would expect—they perform arithmetic operations. Table 18.2 lists these operators along with examples of their usage and results.
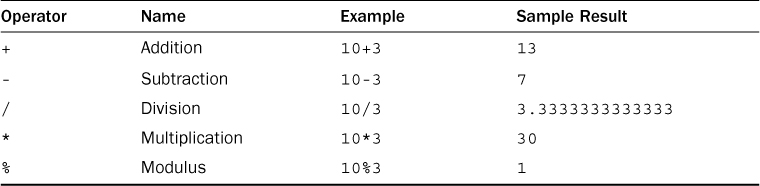
The addition operator adds the right-side operand to the left-side operand. The subtraction operator subtracts the right-side operand from the left-side operand. The division operator divides the left-side operand by the right-side operand. The multiplication operator multiplies the left-side operand by the right-side operand. The modulus operator returns the remainder of the left-side operand divided by the right-side operand.
The Concatenation Operator
The concatenation operator is represented by a single period (.). Treating both operands as strings, this operator appends the right-side operand to the left-side operand. So
"hello"." world"
returns
"hello world"
Note that the resulting space between the words occurs because there is a leading space in the second operand (" world" rather than "world"). The concatenation operator literally smashes together two strings without adding any padding. So, if you try to concatenate two strings without leading or trailing spaces, such as
"hello"."world"
you will get this as your result:
"helloworld"
Regardless of the data types of the operands used with the concatenation operator, they are treated as strings, and the result is always of the string type.
Combined Assignment Operators
Although there is only one true assignment operator, PHP provides a number of combination operators that transform the left-side operand and return a result while also modifying the original value of the variable. As a rule, operators use operands but do not change their original values, but combined assignment operators break this rule.
A combined assignment operator consists of a standard operator symbol followed by an equal sign. Combination assignment operators save you the trouble of using two operators in two different steps within your script. For example, if you have a variable with a value of 4, and you want to increase this value to 4 more, you might see this:
$x = 4;
$x = $x + 4; // $x now equals 8
However, you can also use a combination assignment operator (+=) to add and return the new value, as shown here:
$x = 4;
$x += 4; // $x now equals 8
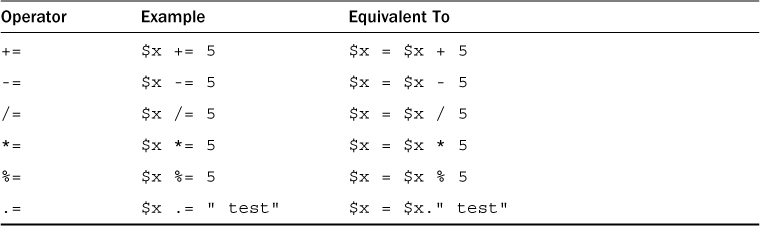
Each arithmetic operator, as well as the concatenation operator, also has a corresponding combination assignment operator. Table 18.3 lists these new operators and shows an example of their usage.
Automatically Incrementing and Decrementing an Integer Variable
When coding in PHP, you will often find it necessary to increment or decrement a variable that is an integer type. You usually need to do this when you are counting the iterations of a loop. You have already learned two ways of doing this—either by incrementing the value of $x using the addition operator
$x = $x + 1; // $x is incremented by 1
or by using a combined assignment operator
$x += 1; // $x is incremented by 1
In both cases, the new value is assigned to $x. Because expressions of this kind are common, PHP provides some special operators that allow you to add or subtract the integer constant 1 from an integer variable, assigning the result to the variable itself. These are known as the post-increment and post-decrement operators. The post-increment operator consists of two plus symbols appended to a variable name:
$x++; // $x is incremented by 1
This expression increments the value represented by the variable $x by 1. Using two minus symbols in the same way decrements the variable:
$x--; // $x is decremented by 1
If you use the post-increment or post-decrement operators in conjunction with a conditional operator, the operand is modified only after the first operation has finished:
$x = 3;
$y = $x++ + 3;
In this instance, $y first becomes 6 (the result of 3 + 3), and then $x is incremented.
In some circumstances, you might want to increment or decrement a variable in a test expression before the test is carried out. PHP provides the pre-increment and pre-decrement operators for this purpose. These operators behave in the same way as the post-increment and post-decrement operators, but they are written with the plus or minus symbols preceding the variable:
++$x; // $x is incremented by 1
--$x; // $x is decremented by 1
If these operators are used as part of a test expression, incrementing occurs before the test is carried out. For example, in the next fragment, $x is incremented before it is tested against 4:
$x = 3;
++$x < 4; // false
The test expression returns false because 4 is not smaller than 4.
Comparison Operators
Comparison operators perform comparative tests using their operands and return the Boolean value true if the test is successful or false if the test fails. This type of expression is useful when using control structures in your scripts, such as if and while statements.
Table 18.4 lists the comparison operators.

These operators are most commonly used with integers or doubles, although the equivalence operator is also used to compare strings. Be very sure to understand the difference between the == and = operators. The == operator tests equivalence, whereas the = operator assigns value. Also, remember that === tests equivalence with regard to both value and type.
Creating Complex Test Expressions with the Logical Operators
Logical operators test combinations of Boolean values. For example, the or operator, which is indicated by two pipe characters (||) or simply the word or, returns the Boolean value true if either the left or the right operand is true:
true || false
This expression returns true.
The and operator, which is indicated by two ampersand characters (&&) or simply the word and, returns the Boolean value true only if both the left and right operands are true:
true && false
This expression returns the Boolean value false. It’s unlikely that you will use a logical operator to test Boolean constants because it makes more sense to test two or more expressions that resolve to a Boolean. For example
($x > 2) && ($x < 15)
returns the Boolean value true if $x contains a value that is greater than 2 and smaller than 15. Parentheses are used when comparing expressions to make the code easier to read and to indicate the precedence of expression evaluation. Table 18.5 lists the logical operators.
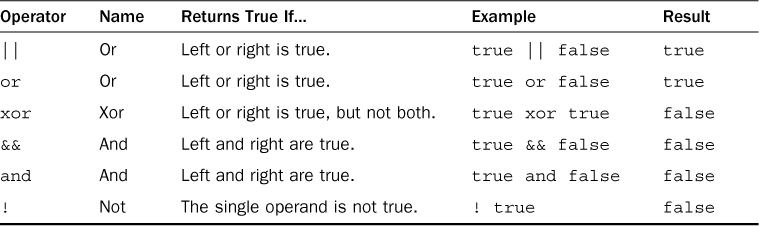
You might wonder why are there two versions of both the or and the and operators, and that’s a good question. The answer lies in operator precedence, which we examine next.
Operator Precedence
When you use an operator within an expression, the PHP engine usually reads your expression from left to right. For complex expressions that use more than one operator, though, the PHP engine could be led astray without some guidance. First, consider a simple case:
4 + 5
There’s no room for confusion here; PHP simply adds 4 to 5. But what about the following fragment, with two operators:
4 + 5 * 2
This presents a problem. Should PHP find the sum of 4 and 5, and then multiply it by 2, providing the result 18? Or does it mean 4 plus the result of 5 multiplied by 2, resolving to 14? If you were simply to read from left to right, the former would be true. However, PHP attaches different precedence to different operators, and because the multiplication operator has higher precedence than the addition operator, the second solution to the problem is the correct one: 4 plus the result of 5 multiplied by 2.
However, you can override operator precedence by putting parentheses around your expressions. In the following fragment, the addition expression is evaluated before the multiplication expression:
(4 + 5) * 2
Whatever the precedence of the operators in a complex expression, it is a good idea to use parentheses to make your code clearer and to save you from bugs such as applying sales tax to the wrong subtotal in a shopping cart situation. The following is a list of the operators covered in this section, in precedence order (those with the highest precedence listed first):
/, *, %
+, -
<, <=, =>, >
==, ===, !=
&&
||
=, +=, -=, /=, *=, %=, .=
and
xor
or
As you can see, or has a lower precedence than ||, and and has a lower precedence than &&, so you can use the lower-precedence logical operators to change the way a complex test expression is read.
The order of precedence is the only reason that both && and and are available in PHP. The same is true of || and or. In most circumstances, the use of parentheses makes for clearer code and fewer bugs than code that takes advantage of the difference in precedence of these operators.
Constants
Variables offer a flexible way of storing data because you can change their values and the type of data they store at any time during the execution of your scripts. However, if you want to work with a value that must remain unchanged throughout your script’s execution, you can define and use a constant. You must use PHP’s built-in define() function to create a constant, which subsequently cannot be changed unless you specifically define() it again. To use the define() function, place the name of the constant and the value you want to give it within parentheses and separated by a comma:
define("YOUR_CONSTANT_NAME", 42);
The value you want to set can be a number, a string, or a Boolean. By convention, the name of the constant should be in capital letters. Constants are accessed with the constant name only; no dollar symbol is required.
PHP automatically provides some built-in constants for you. For example, the constant __FILE__ returns the name of the file that the PHP engine is currently reading. The constant __LINE__ returns the current line number of the file. These are but two examples of what are called “magic constants,” because they are not statically predefined and instead change depending on the context in which they are used. For a complete list, see www.php.net/manual/en/language.constants.predefined.php.
Using and Creating Functions in PHP
A function is a self-contained block of code that can be called by your scripts. When called, the function’s code is executed and performs a particular task. You can pass values to a function, which then uses the values appropriately—storing them, transforming them, displaying them, whatever the function is told to do. When finished, a function can also pass a value back to the original code that called it into action.
Functions come in two flavors: those built in to the language and those you define yourself.
Using Built-in Functions
PHP has hundreds of built-in functions, ranging from simple string manipulation to mathematical operations to database interactions, and many, many things in between. To get a feel for the functions that PHP includes, browse the list in the online function reference at www.php.net/manual/en/funcref.php.
Using built-in functions in your scripts is often as simple as typing the function name and passing an argument to it. For example, take a look at the following snippet:
strtoupper("Hello Web!");
This example calls the built-in strtoupper() function, passing it the string "Hello Web!". The function then goes about its business of changing the contents of the string to uppercase letters.
A function call consists of the function name (strtoupper in this case) followed by parentheses. If you want to pass information to the function, you place it between these parentheses. A piece of information passed to a function in this way is called an argument. Some functions require that more than one argument be passed to them, separated by commas:
some_function($an_argument, $another_argument);
strtoupper() is typical for a PHP function in that it returns a value. Most functions return some information back after they’ve completed their task; they usually at least tell whether their mission was successful. strtoupper() returns a string value, so its usage requires the presence of a variable to accept the new string, such as the following:
$new_string = strtoupper("Hello Web!");
You may now use $new_string in your code, such as to print it to the screen:
echo $new_string;
This code results in the following text on the screen:
HELLO WEB!
You can call user-defined functions in exactly the same way that we have been calling built-in functions.
Defining a Function
You can define your own functions using the function statement:
function some_function($argument1, $argument2)
{
//function code here
}
The name of the function follows the function statement and precedes a set of parentheses. If your function requires arguments, you must place comma-separated variable names within the parentheses. These variables are filled by the values passed to your function. Even if your function doesn’t require arguments, you must nevertheless supply the parentheses.
Note
The naming rules for functions are similar to the naming rules for variables earlier in this hour. Names cannot include spaces, and they must begin with a letter or an underscore. As with variables, your function names should be meaningful and consistent in style. The capitalization of function names is one such stylistic touch you can add to your code; using mixed case in names, such as MyFunction() or handleSomeDifficultTask(), makes your code much easier to read. You may hear this naming convention referred to as CamelCase or lower CamelCase, depending on whether the first character is capitalized.
Listing 18.5 declares and calls a function of your own making.
LISTING 18.5 Declaring and calling a function
<?php
function bighello()
{
echo "<h1>HELLO!</h1>";
}
bighello();
?>
The script in Listing 18.5 simply outputs the string "HELLO!" wrapped in an HTML <h1> element.
Listing 18.5 declares a function, bighello(), that requires no arguments. Because of this, the parentheses are left empty. Although bighello() is a working function, it is not terribly useful. Listing 18.6 creates a function that requires an argument and actually does something with it.
LISTING 18.6 Declaring a function that requires an argument
<?php
function printBR($txt)
{
echo $txt."<br/>";
}
printBR("This is a line.");
printBR("This is a new line.");
printBR("This is yet another line.");
?>
Note
Unlike variable names, function names are not case sensitive. In Listing 18.6, the printBR() function could have been called as printbr(), PRINTBR(), or any combination thereof, with success.
The output of this script is three lines of text with HTML linebreaks after each line, which would not automatically be there otherwise.
Returning Values from User-Defined Functions
The previous example output an amended string to the browser through the use of the printBR() function. Sometimes, however, you will want a function to provide a value that you can work with yourself. If your function has transformed a string that you have provided, you might want to get the amended string back so that you can pass it to other functions. A function can return a value using the return statement in conjunction with a value. The return statement stops the execution of the function and sends the value back to the calling code.
Listing 18.7 creates a function that returns the sum of two numbers.
LISTING 18.7 A function that returns a value
<?php
function addNums($firstnum, $secondnum)
{
$result = $firstnum + $secondnum;
return $result;
}
echo addNums(3,5);
//will print "8"
?>
The return statement can return a value or nothing at all. How you arrive at a value passed by return can vary. The value can be hard-coded:
return 4;
It can be the result of an expression:
return $a/$b;
It can be the value returned by yet another function call:
return another_function($an_argument);
Variable Scope in Functions
A variable declared within a function remains local to that function. In other words, it is not available outside the function or within other functions. In larger projects, this can save you from accidentally overwriting the contents of a variable when you declare two variables with the same name in separate functions.
From within one function, you cannot (by default) access a variable defined in another function or elsewhere in the script. Within a function, if you attempt to use a variable with the same name, you will only set or access a local variable. Let’s put this to the test in Listing 18.8.
LISTING 18.8 Variables defined outside functions are inaccessible from within a function by default.
<?php
$life = 42;
function meaningOfLife()
{
echo "The meaning of life is ".$life;
}
meaningOfLife();
?>
If you run this script, the output will be:
The meaning of life is
As you might expect, the meaningOfLife() function does not have access to the $life variable in line 2; $life is empty when the function attempts to print it. On the whole, this is a good thing because it saves you from potential clashes between identically named variables, and a function can always demand an argument if it needs information about the outside world.
Occasionally, you might want to access an important variable from within a function without passing it in as an argument. This is where the global statement comes into play. Listing 18.9 uses global to restore order to the universe.
LISTING 18.9 Accessing global variables with the global statement
<?php
$life=42;
function meaningOfLife()
{
global $life;
echo "The meaning of life is ".$life;
}
meaningOfLife();
?>
If you run this script now, the output will be:
The meaning of life is 42
When you place the global statement in front of the $life variable when it is declared in the meaningOfLife() function (line 5), it refers to the $life variable declared outside the function (line 2).
You need to use the global statement within every function that needs to access a particular named global variable. Be careful, though: If you manipulate the contents of the variable within the function, the value of the variable changes for the script as a whole.
You can declare more than one variable at a time with the global statement by simply separating each of the variables you want to access with commas:
global $var1, $var2, $var3;
Caution
Usually, an argument is a copy of whatever value is passed by the calling code; changing it in a function has no effect beyond the function block. Changing a global variable within a function, however, changes the original and not a copy. Use the global statement carefully.
Working with Objects in PHP
Programmers use objects to store and organize data. Object-oriented programming (OOP) is a type of programming in which the structure of the program (or application) is designed around these objects and their relationships and interactions. OOP structures are found in many programming languages, and are also evident in PHP. In fact, many PHP programmers—especially those coming from a highly OOP background—choose to develop PHP applications in an object-oriented way.
However, in PHP, it is not required that you write your scripts in an object-oriented manner. Many PHP scripts are procedural and functional rather than object-oriented. That is to say, the emphasis is on stepping through the use of variables, data and control structures, and subroutines and functions in the course of creating a program. Regardless of which method you choose for writing your PHP scripts, it’s important to understand a little bit about objects in PHP.
Creating an Object
Although it’s easy to visualize a scalar variable, such as $color, with a value of red, some people have a difficult time visualizing objects. For now, try to think of an object as a little box with inputs and outputs on either side of it. The input mechanisms are methods, and methods have properties. Throughout this section, we look at how classes, methods, and properties work together to produce various outputs.
An object exists in a structure called a class. In each class, you define a set of characteristics. For example, suppose you have created an automobile class. In the automobile class, you might have color, make, and model characteristics. Each automobile object uses all the characteristics, but each object initializes the characteristics to different values, such as silver, Mazda, and Protege5, or red, Porsche, and Boxster.
The whole purpose of using objects is to create reusable code. Because classes are so tightly structured but self-contained and independent of one another, you can reuse them from one application to another. For example, suppose that you write a text-formatting class for one project and decide you can use that class in another project. Because a class is just a set of characteristics, you can pick up the code and use it in the second project, reaching into it with methods specific to the second application but using the inner workings of the existing code to achieve new results.
Creating an object is simple; you just declare it to be in existence:
class myClass {
//code will go here
}
Now that you have a class, you can create a new instance of an object:
$object1 = new myClass();
In Listing 18.10, you have proof that your object exists, even though there’s nothing in it—it’s just been named.
LISTING 18.10 Proof that your object exists
<?php
class myClass {
//code will go here
}
$object1 = new myClass();
echo "$object1 is an ".gettype($object1).".<br/>";
if (is_object($object1)) {
echo "Really! I swear $object1 is an object!";
}
?>
The output of this script is:
$object1 is an object.
Really! I swear $object1 is an object!
This is not a particularly useful class because it does absolutely nothing, but it is valid and shows you how the class template works in lines 2 to 5. Lines 8 to 10 use the is_object() function to test whether something is an object; in this case, the something is $object1. Because the test of is_object() evaluates to true, the string within the if statement is printed to the screen.
Properties of Objects
The variables declared inside an object are called properties. It is standard practice to declare your variables at the top of the class. These properties can be values, arrays, or even other objects. The following snippet uses simple scalar variables inside the class, prefaced with the public keyword:
class myCar {
public $color = "silver";
public $make = "Mazda";
public $model = "Protege5";
}
Note
If you use the keyword public, protected, or private before the variable name, you can indicate if the class member (the variable) can be accessed everywhere (public), within the class itself or a parent class or an inherited class (protected), or only by the class itself (private).
Now when you create a myCar object, it will always have those three properties. Listing 18.11 shows you how to access properties after they have been declared and values have been assigned to them.
LISTING 18.11 Showing object properties
<?php
class myCar {
public $color = "silver";
public $make = "Mazda";
public $model = "Protege5";
}
$car = new myCar();
echo "I drive a: ".$car -> color." ".$car -> make." ".$car -> model;
?>
The output of this script is:
I drive a: silver Mazda Protege5
Object Methods
Methods add functionality to your objects. No longer will your objects just sit there, holding on to their properties for dear life—they’ll actually do something! Listing 18.12 shows just that.
LISTING 18.12 A class with a method
<?php
class myClass {
function sayHello() {
echo "HELLO!";
}
}
$object1 = new myClass();
$object1 -> sayHello();
?>
Running this code will produce the following:
HELLO!
A method looks and acts like a normal function but is defined within the framework of a class. The -> operator is used to call the object method in the context of your script. Had there been any variables stored in the object, the method would have been capable of accessing them for its own purposes, as illustrated in Listing 18.13.
LISTING 18.13 Accessing class properties within a method
<?php
class myClass {
public$name = "John";
function sayHello() {
echo "HELLO! My name is ".$this->name;
}
}
$object1 = new myClass();
$object1 -> sayHello();
?>
Running this code will produce the following:
HELLO! My name is John
The special variable $this is used to refer to the currently instantiated object as you see on line 5. Anytime an object refers to itself, you must use the $this variable. Using the $this variable in conjunction with the -> operator enables you to access any property or method in a class, within the class itself.
Common Uses of PHP
Because PHP is relatively simple to work with and has a low barrier to entry—since the vast majority of web-hosting providers offer PHP support—you can imagine that web application developers use PHP in many different ways. That’s one reason that PHP contains hundreds of built-in functions grouped together into many different categories (see www.php.net/manual/en/funcref.php): When it comes to working with strings, dates, files, images, databases, and everything in between, there aren’t a lot of basic functions that are unique, so the language just includes a lot of these functions right out of the box.
What you do with these functions may be unique, but as a general purpose scripting language, PHP tries to cover all the bases so you can just get down to the business of scripting with built-in functions rather than reinventing the wheel. This feature of PHP is also one reason it has detractors—some people think the language contains too much built-in functionality and is too forgiving (for example, PHP allows developers to “get away with” too many imperfections in the code, where scripts in other languages would simply error and fail). While this and other points about the overall value of the language are debatable, that PHP is widely used cannot be debated. Following are some of the ways in which PHP is used by developers every day:
![]() Processing form data—As mentioned earlier in this lesson, PHP includes superglobal variables that hold all the values sent in an HTML form. Using either the
Processing form data—As mentioned earlier in this lesson, PHP includes superglobal variables that hold all the values sent in an HTML form. Using either the $_POST or $_GET superglobal, you have at your fingertips all the information you need from a user to then manipulate it as necessary. That manipulation can come through text processing (see www.php.net/manual/en/book.strings.php), performing mathematical functions (see www.php.net/manual/en/book.math.php), or just sending an email (see www.php.net/manual/en/book.mail.php), among many, many other functions.
![]() Setting and reading cookies and user sessions—The primary way to track a user through your application is to set and maintain cookies that store pieces of data in the browser and are accessed and used by the application. PHP has built-in functions for handling both cookies (see www.php.net/manual/en/features.cookies.php) and user sessions (see www.php.net/manual/en/book.session.php).
Setting and reading cookies and user sessions—The primary way to track a user through your application is to set and maintain cookies that store pieces of data in the browser and are accessed and used by the application. PHP has built-in functions for handling both cookies (see www.php.net/manual/en/features.cookies.php) and user sessions (see www.php.net/manual/en/book.session.php).
![]() Interacting with databases—It would be difficult for you to come up with a database product that PHP cannot access. Whether through an abstraction layer or through vendor specific database functions, you can use PHP to put or retrieve data from your database and your application’s custom database schema (see www.php.net/manual/en/refs.database.php).
Interacting with databases—It would be difficult for you to come up with a database product that PHP cannot access. Whether through an abstraction layer or through vendor specific database functions, you can use PHP to put or retrieve data from your database and your application’s custom database schema (see www.php.net/manual/en/refs.database.php).
If you look at these three points, you might think “that’s all?” But think for a moment about how web applications are put together. Typically, you perform one of four operations when interacting with a web application and its underlying data: creating, reading, updating, and deleting (commonly referred to as CRUD operations). When creating, updating, and deleting data, you typically interact with a database through some sort of form action, which may or may not include custom string input. When reading information, you are also interacting with a database to retrieve that information, and thus the strings likely have some sort of manipulation happening between their raw state in the database and what you see on your screen.
PHP is a powerful general purpose scripting language that contains multitudes of useful functions. Some may argue that the most complicated aspect of using PHP is not the tactical application of the language itself, but instead it is in deciding which of the many approaches and functions are best suited to solving any given problem.
Summary
This brief lesson has not made you an expert in PHP—like anything, that takes thousands of hours of practice. But what you should now have is a solid understanding of the fundamentals of the PHP language and how it could be used to solve basic programming problems, especially in web application development.
Continue to practice with the variables, data types, logical structures, and built-in functions that PHP offers you, and create functions of your own that provide unique solutions. To learn a lot more about the PHP language and how to develop PHP-based applications using the MySQL database, take a look at Sams Teach Yourself PHP, MySQL, and Apache All-in-One, 5th edition.
Q&A
Q. What editors should I avoid when creating PHP code?
A. Any plaintext editor will do. Do not use word processors that format text for printing (Microsoft Word, for example). Even if you save files created using this type of editor in plain-text format, hidden characters are likely to creep into your code.
Q. Should I learn the operator precedence table, or memorize any of the intricate details of the PHP language?
A. There is no reason you shouldn’t memorize the operator precedence table, but I would save the effort for more useful tasks. By using parentheses in your expressions, you can make your code easy to read while defining your own order of precedence. As for memorizing any of the details of the PHP language, I would recommend knowing the basics about variables, data types, operators, and logical structures, and over time you will begin to remember the syntax of the functions you use frequently. As with all new languages (programming or otherwise), repetition and practice will make the knowledge stick, but you always have the PHP Manual online at www.php.net should you need to refer to it.
Workshop
The quiz questions and exercises are provided for your further understanding.
Quiz
1. What are the standard opening and closing tags used in PHP scripts?
2. Which of the following statements contains an operator?
4;
is_int(44);
5/12;
3. Which of the following variable names are not valid and why?
$a_value_submitted_by_a_user
$666666xyz
$xyz666666
$_____counter_____
$the first
$file-name
4. True or false: If a function doesn’t require an argument, you can omit the parentheses in the function call.
5. What is output of the following PHP code?
<?php
$number = 50;
function tenTimes() {
global $number;
$number = $number * 10;
}
tenTimes();
echo $number;
?>
6. Create a while statement that increments through and prints every odd number between 1 and 49 with an HTML line break after each.
7. Convert the answer from question 5 into a for statement that does the same.
8. When creating a function of your own design, what is the limit to the number of arguments you can pass?
9. How can you ensure that a variable is accessible by multiple functions?
10. Which PHP superglobal variable would you use to extract form values sent via the POST method?
Answers
1. <?php and ?>
2. The statement 5/12; contains a division operator.
3. The variable name $666666xyz is not valid because it does not begin with a letter or an underscore character. The variable name $the first is not valid because it contains a space. $file-name is also invalid because it contains a nonalphanumeric character (-).
4. False. You must always include the parentheses in your function calls, whether or not you are passing arguments to the function.
5. 500
6.
$num = 1;
while ($num <= 49) {
echo $num."<br />";
$num += 2;
}
7.
for ($num = 1; $num <= 49; $num += 2) {
echo $num."<br />";
}
8. There is no limit to the number of arguments you can pass, but you might want to limit the number to a handful, for your own sanity and ease of maintenance.
9. Declare it as a global variable.
10. $_POST