
Chapter 15. Perl Connects with MySQL

By the time you finish this chapter, you should be able to read and write the following Perl code:
use DBI;
$dbh = DBI->connect('dbi:mysql:sample_db','root','letmein') or die
"Connection Error: $DBI->errstr
";
$sql = "select * from teams";
$sth = $dbh->prepare($sql);
$sth->execute or die "SQL Error: $sth->errstr
";
while (@row = $sth->fetchrow_array) {
print "@row
";
}
$sth->finish;
$dbh->disconnect;
15.1 Introduction
The user has filled out a form and submitted it with a list of items he wants to purchase. Information for that user is stored in a database in a table called customers. You want to open the database and add the new order directly from your Perl program. And you may want to retrieve all the previous orders and product information for that customer and format the data for a Web page, or use it in an email message, or send it to a spreadsheet, all from your Perl program. This is all possible with Perl and the Perl DBI module, an object-oriented database interface that allows you to connect to any relational database and use Perl methods to perform all the necessary operations for opening and closing the database, as well as send SQL queries to create tables, update and delete them, retrieve and modify records, manage transactions, and display results.
This chapter focuses on using Perl with the MySQL relational database management system, a very popular open-source, fully functional, relational database.1 You will learn how to issue commands at the MySQL client and then use the DBI module to issue the same commands from a Perl script. Finally, if you are interested in having your Perl DBI script talk to a Web server, you can refer to Appendix E, “Dancing with Perl,” where we will tie all of this together by creating a dynamic Web page using both the DBI module with CGI and the new and popular module called Dancer, a fun and easy Web application framework written in Perl.
1. Although still open source, MySQL was acquired by Oracle in 2010.
The subject of databases is huge. This chapter is not an attempt to teach you how to correctly design the structure of a database or the best practices for organizing the data. That would take another book or more, so if you are a complete novice, and have never been exposed to databases and how they work, you might find Databases Demystified by Andy Oppel an excellent tutorial for getting started.2 This chapter will cover the basic concepts and terminology you will need in order to work with the Perl DBI and MySQL.
2. Oppel, Andrew J., Databases Demystified, McGraw-Hill/Osbourne, Emeryville, CA, 2004.
15.2 What Is a Relational Database?
Until now, we have been storing data in ordinary text files with Perl by creating user-defined filehandles. But text files are limited when you need to efficiently store and manage large amounts of data; for example, to maintain a business such as a hospital, research lab, bank, college, or Web site. A relational database system follows certain standards and has a number of features for storing large collections of data. The data is managed so that retrieving, updating, inserting, and deleting the data is relatively easy and takes the least amount of time. The database management system must store the data so that it maintains its integrity; the data must stay accurate and be protected from being accessed by unauthorized users.
Introduced in the 1970s, the relational model made data manipulation easier and faster for the end users and easier to maintain by the administrator. At the core of this model is the concept of a relation, visually represented as a table in which all data is stored. The data is represented by different types, such as a string, number, date, and so on. Each table is made up of records consisting of horizontal rows and vertical columns or fields, like a two-dimensional array. Tables in the database relate to each other; for example, if you have a database called school, it might consist of tables called student, teacher, course, and so forth. The student takes a course from a teacher who teaches one or many courses. The data can be retrieved and manipulated for just the student, teacher, or course, but also joined together based on some common key field. The Structured Query Language (SQL) is used to “talk to” relational databases, making it easy to retrieve, insert, update, and delete data from the tables in the database.
Due to the popularity of relational databases, known as relational database management systems (RDBMS), a number of relational databases are used today, among them Oracle, Sybase, PostgreSQL Informix, SQL server, and MySQL.
15.2.1 Client/Server Databases
Relational databases use a client/server model. Today, MySQL is one of the most popular client/server database systems in the open-source community.
Figure 15.1 shows the model for a client/server architecture. The user goes to the command line and starts the MySQL client to issue MySQL commands. The client makes a request to the MySQL server, which in turn sends a query to the database. The database sends the results of the query back to the server, and the results are displayed in the client’s window.
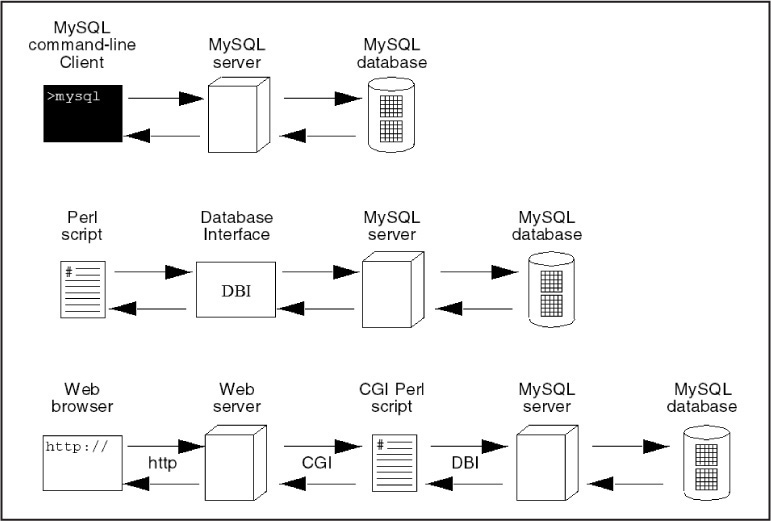
In the second scenario, rather than using the command-line client, a Perl script makes a connection to the database server through a database interface that acts as an interpreter. If a Perl script contains an instruction to connect to a database, in this case MySQL, then once the connection is made and a database selected, the Perl program has access to the database through the MySQL server. The MySQL server receives requests, called queries, from the Perl program and sends back information collected from the database.
In the third example in the figure, the user requests a page from the browser (the client); an HTTP connection is made to the Web server (Apache, ISS, Nginx, Lighttpd), where the request is received and handled. If the action is to start up a Perl program, the Web server may use the Common Gateway Interface (CGI) to start up the Perl interpreter, and Perl starts processing the information that was sent from the HTTP server to format and send it back to the Web server; or if a request to the database server is made, then the steps to connect, query, and get results from the database are carried out.
Figure 15.1 shows the client/server relationship between the MySQL client and the MySQL server, and the client/server relationship between the Web browser, Web server, Perl program, and the MySQL database server. By the end of this chapter, you will be able to get information sent from a Web browser (client) to a Web server, and from the Web server to a Perl CGI program, which can connect to a database server to retrieve and store information from a MySQL database.
15.2.2 Components of a Relational Database
What makes up a database? The main components of a relational database management system are as follows:
• Database server
• Database
• Tables
• Fields
• Records
• Primary key
• Schema
We will discuss each of these concepts in the next sections of this chapter. Figure 15.2 illustrates their relationship to each other.
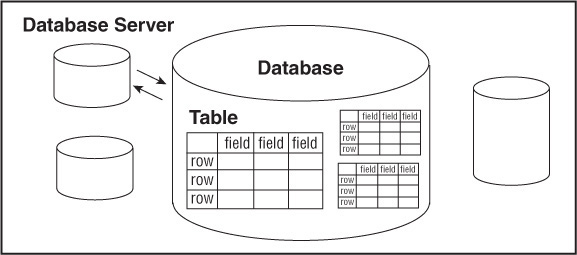
The Database Server
The database server is the actual server process running the databases. It controls the storage of the data, grants access to users, updates and deletes records, and communicates with other servers. The database server is normally on a dedicated host computer, serving and managing multiple clients over a network, but can also be used as a stand-alone server on the local machine to serve a single client; for example, you may be the single client using MySQL on your local machine, often referred to as localhost, without any network connection at all. This is probably the best way to learn how to use MySQL.
If you are using MySQL, the server process is the mysql service on Windows or the mysqld process on Linux/UNIX operating systems. The database server typically follows the client/server model, where the front end is the client (a user sitting at his workstation making database requests and waiting for results), while the back end is the database server that grants access to users, stores and manipulates the data, performs backups, and even talks to other servers. The requests to the database server can also be made from a program that acts on behalf of a user making requests from a Web page or a program.
In this chapter, you will learn how to make requests from the MySQL command line first, and then to connect to the database server from a Perl program using Perl built-in functions to make requests to the MySQL database server, and finally how to make a request from a Web form and send the request to a Perl program and then onto MySQL.
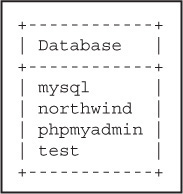
The Database
A database is a collection of related data elements, usually corresponding to a specific application. A company may have one database for all its HR needs, perhaps another for its sales staff, and a third for e-commerce applications, and so on. Figure 15.3 lists the databases installed on a particular version of MySQL. The databases are listed as mysql, northwind, phpmyadmin, and test.
Tables
Each database consists of two-dimensional tables identified by unique names. In fact, a relational database stores all of its data in tables, and nothing more. All operations are performed on the table, which can then produce other tables.
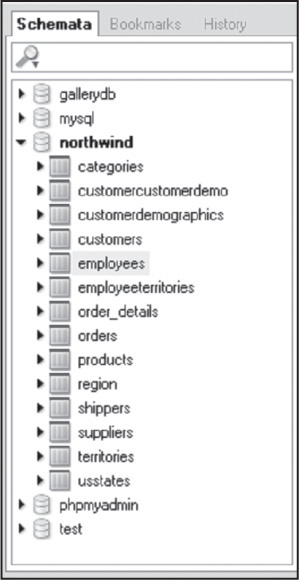
One of the first decisions you will make when designing a database is what tables it will contain. A typical database for an organization might consist of tables for customers, orders, and products. All these tables are related to one another in some way. For example, customers have orders and orders have items. Although each table exists on its own, collectively the tables comprise a database. Figure 15.4 lists the tables in a database called northwind,3 a fictional database provided by Microsoft to serve as a model for learning how to manipulate a database. (This database should be on the CD provided with this book.)
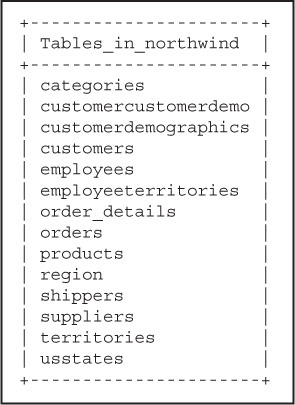
3. The Northwind Traders sample database typically comes as a free sample with Microsoft Access. It is also available at http://www.geeksengine.com/article/export-access-to-mysql.html.
Records and Fields
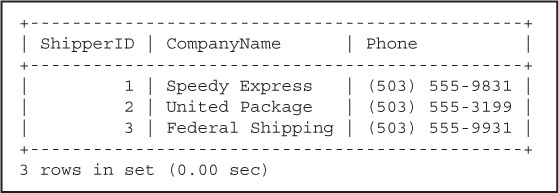
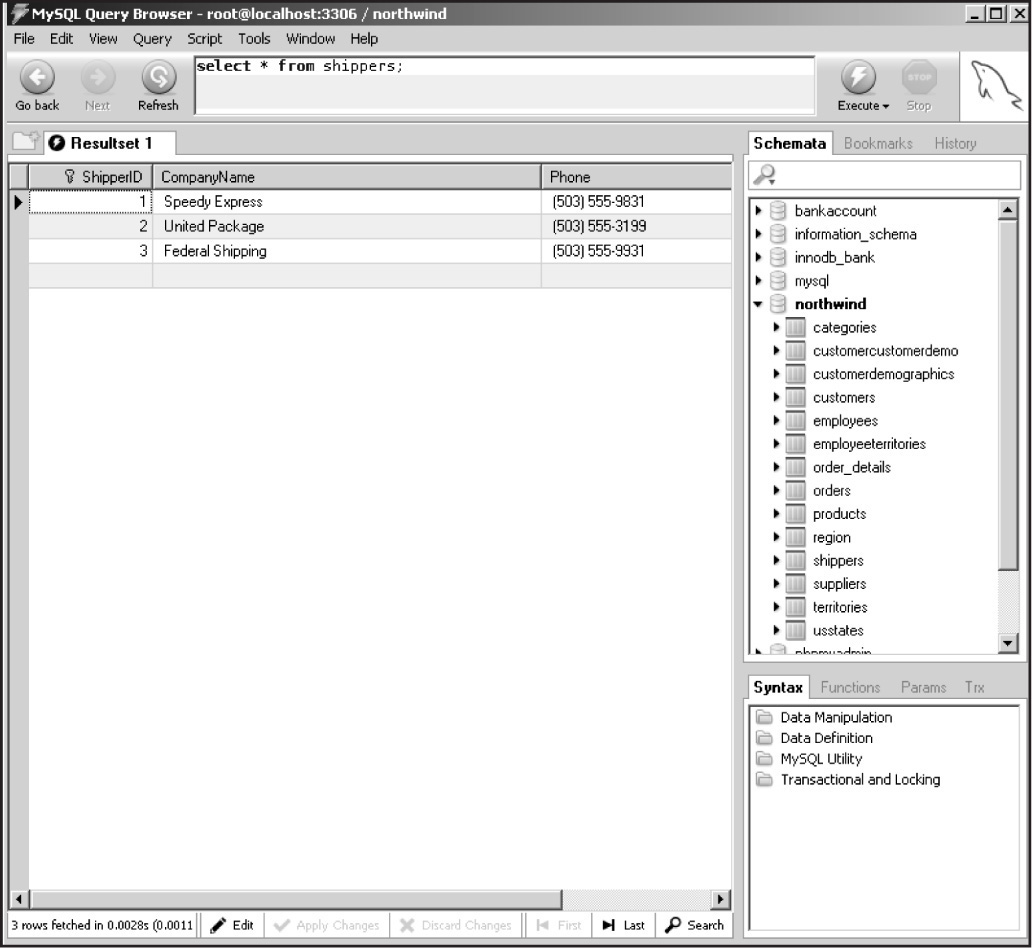
A table has a name and consists of a set of rows and columns. It resembles a spreadsheet where each row, also called a record, consists of vertical columns, also called fields. All rows from the same table have the same set of columns. The shippers table from the northwind database has three columns and three rows (see Figure 15.5).
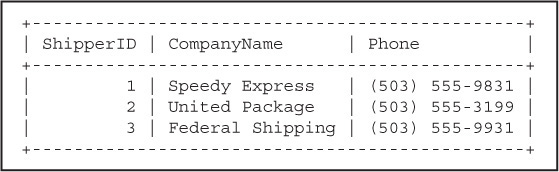
Figure 15.5 The rows (records) and columns (fields) from the shippers table in the northwind database.
There are two basic operations you can perform on a relational table. You can retrieve a subset of its columns and you can retrieve a subset of its rows. Figure 15.6 and Figure 15.7 are samples of the two operations.
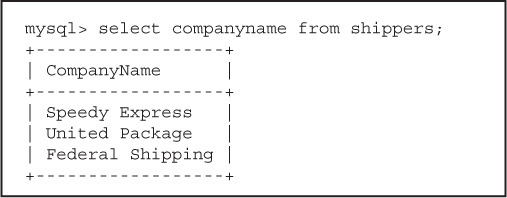
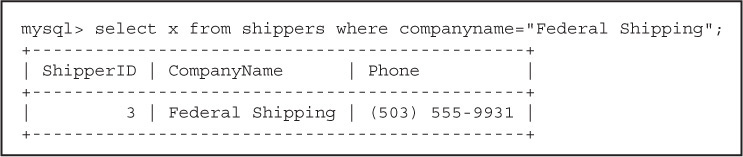
Remember that a relational database manipulates only tables, and the results of all operations are also tables, called result sets. The tables are sets, which are themselves sets of rows and columns. The database itself is a set of tables.
You can also perform a number of other operations between two tables, treating them as sets. For example, you can join information from two tables, make Cartesian products of the tables, get the intersection between two tables, add one table to another, and so on. Later, you’ll see how to perform operations on tables using the SQL language.
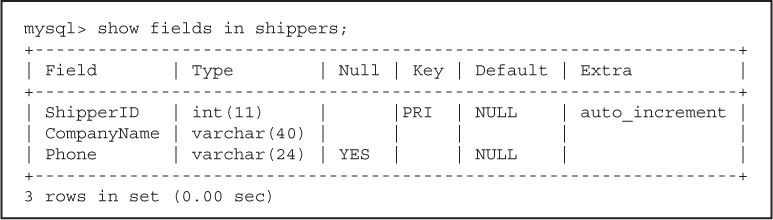
Columns/Fields
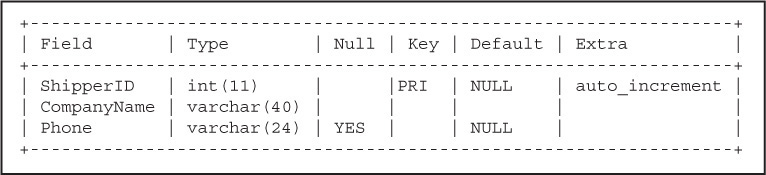
Columns are an integral part of a database table. Columns are also known as fields, or attributes. Fields describe the data. Each field has a name. For example, the shippers table has fields named ShipperID, CompanyName, and Phone. The field also describes the type of data it contains. A data type can be a number, a character, a date, a time stamp, and so on. In Figure 15.8, the ShipperID is the name of a field, the data type is an integer, and the shipper’s ID will not exceed 11 numbers. There are many data types and sometimes they are specific to a particular database system; for example, MySQL may have different data types available than Oracle. We will learn more about the MySQL data types in the next chapter.
Rows/Records
A record is a row in the table. It could be a product in the product table, an employee record in the employee table, and so on. Each table in a database contains zero or more records. Figure 15.9 shows us that there are three records in the shippers table.
Primary Key and Indexes
A primary key is a unique identifier for each record. For example, every employee in the United States has a Social Security number, every driver has a driver’s license, and every car has a license plate. These identifiers are unique. In the database world, the unique identifier is called a primary key. Although it is a good idea to have a primary key, not every table has one. The primary key is determined when the table is created and is more in keeping with a discussion on database design. In Figure 15.10, the ShipperID is the primary key for the shippers table in the northwind database. It is a unique ID that consists of a number that will automatically be incremented every time a new company (record) is added to the list of shippers.

When searching for a particular record in a table, MySQL must load all the records before it can execute the query. In addition to a primary key, one or more indexes are often used to enhance performance for finding rows in tables that are frequently accessed. Indexes are like the indexes in the back of a book that help you find a specific topic more quickly than searching through the entire book page by page. An index, like the index of a book, is a reference to a particular record in a table.
The Database Schema
Designing a very small database isn’t difficult, but designing a database for a large Web-based application can be daunting. Database design is both an art and a science and requires an understanding of how the relational model is implemented, a topic beyond the scope of this book. When discussing the design of the database, you will encounter the term database schema, which refers to the structure of the database. It describes the design of the database similar to a template, or blueprint; it describes all the tables and how the data will be organized, but does not contain the actual data. Figure 15.11 describes the schema for the tables in the northwind database.
15.2.3 Talking to the Database with SQL
When Perl output is sent to the browser, the browser understands markup languages, such as HTML or XHTML, and these language tags are embedded in Perl’s print statements. This output could be displayed as forms, images, stylized text, colors, tables, and so on. Likewise, in order to communicate with the MySQL server, your Perl scripts must speak a language the database will understand. That language is called SQL. SQL stands for Structured Query Language, the language of choice for most modern multiuser relational databases. It provides the syntax and language constructs needed to talk to relational databases in a standardized, cross-platform, structured way. Just as the English language has a variety of dialects (for example, British, American, Australian), there are many different versions of the SQL language. The version of SQL used by MySQL follows the ANSI (American National Standards Institute) standard, meaning that it must support the major keywords (such as SELECT, UPDATE, DELETE, INSERT, WHERE, and so on) as defined in the standard. As you can see by the names of these keywords, SQL is the language that makes it possible to manipulate the data in a database.
If you are not familiar with SQL, refer to Appendix B, “SQL Language Tutorial,” for a complete guide on how to use the SQL language. There are also a number of very well-written tutorials available on the Internet (see http://www.w3schools.com/sql/default.asp, http://sqlcourse.com/select.html, or http://www.1keydata.com/sql/sql.html).
English-like Grammar
When you create a SQL statement, it makes a request, or “queries” the database, in the form of a statement, similar to the structure of an English imperative sentence, such as “Select your partner,” “Show your stuff,” or “Describe that bully.” The first word in a SQL statement is an English verb, an action word called a command, such as show, use, select, drop, and so on. The commands are followed by a list of noun-like words, such as show databases, use datatabase, or create databases. The statement may contain prepositions, such as in or from; for example, show tables in database or select phones from customer_table. The language also lets you add conditional clauses to refine your query, such as select companyname from suppliers where supplierid > 20;.
When listing multiple items in a query, like English, the items are separated by commas; for example, in the following SQL statement, each field in the list being selected is comma-separated:
select companyname, phone, address from suppliers;
If the queries get very long and involved, you might want to type them into your favorite editor, because once you have executed a query, the only way to get it back is to use the arrow keys in the MySQL console. By saving the query in an editor, you can cut and paste it back into the MySQL browser or command line without retyping it. But most important, make sure your query makes sense and will not cause havoc on an important database. MySQL provides a test database for practice.
Semicolons Terminate SQL Statements
The semicolon is the standard way to terminate each query statement. Some database systems don’t require the semicolon, but MySQL does (exceptions are the USE and QUIT commands), and if you forget it, you will see a secondary prompt, and execution will go on hold until you add the semicolon.
Naming Conventions
A database and its tables are easier to read when good naming conventions are used. For example, it makes good sense to make table names plural and field/column names singular. Why? Because a table called Shippers normally holds more than one shipper, but the name of the field used to describe each shipper is a single value, such as his company_name, phone, and so on.
Compound names, such as company_name, are usually separated by the underscore, with the first letter of each word capitalized, as in Company_Name.
Spaces and dashes are not allowed in any name in the database.
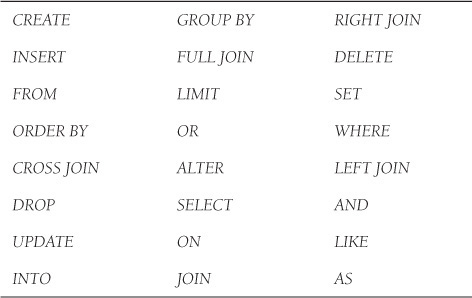
Reserved Words
All languages have a list of reserved words that have special meaning to the language. Most of these words will be used in this chapter. The SQL reserved words are listed in Table 15.1. (See MySQL documentation for a complete list of all reserved words.)
Case Sensitivity
Database and table names are case sensitive if you are using UNIX, but not if you are using Windows. A convention is to always use lowercase names for databases and their tables.
SQL commands are not case sensitive. For example, the following SQL statements are equally valid:
show databases;
SHOW DATABASES;
Although SQL commands are not case sensitive, by convention, SQL keywords are capitalized for clarity, whereas only the first letter of the field, table, and database names is capitalized.
SELECT * FROM Persons WHERE FirstName='John'
When performing pattern matching with the LIKE and NOT LIKE commands, the pattern being searched for is case sensitive when using MySQL.
The Result Set
A result set is just another table created to hold the results from a SQL query. Most database software systems even allow you to perform operations on the result set with functions, such as Move-To-First-Record, Get-Record-Content, Move-To-Next-Record, and so forth. In the example shown in Figure 15.12, the result set is the table created by asking MySQL to show all the fields in the table called shippers.
15.3 Getting Started with MySQL
MySQL is an open-source,4 full-featured relational database management system and has been ported to most platforms, including Linux, Windows, OS/X, HP-UX, AIX, and more. MySQL is portable, fast, reliable, scalable, and easy to use. It is the world’s second most widely used relational database management system, said to be installed in more than 10 million computers all over the world, including Antarctica!
4. MySQL is free use for those who are 100 percent GPL. See http://www.mysql.com/company/legal/licensing/opensource-license.html for details.
There are two versions, one in which you buy a commercial license and one that is free (“free” meaning you can use MySQL in any application as long as you don’t copy, modify, or distribute the MySQL software). MySQL supports a number of APIs (application programming interfaces), including Perl, PHP, TCL, Python, C/C++, Java, and others.
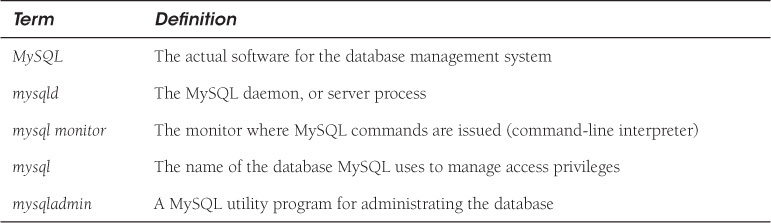
When working with MySQL, a number of like-name terms are used. Table 15.2 is provided to help clarify the use of these terms.
15.3.1 Installing MySQL
Here, we assume you have installed a database server and it is running. Downloading and installing MySQL is usually a straightforward process. You can get MySQL from the mysql.com Web site or use integrated applications, such as XAMPP or WAMP.
XAMPP (for Windows, Linux, Mac OS, and Solaris) is a free, easy-to-install Apache distribution containing MySQL, PHP, and Perl. All you have to do is download, extract, and start it up. For details, go to http://www.apachefriends.org/en/xampp.html.
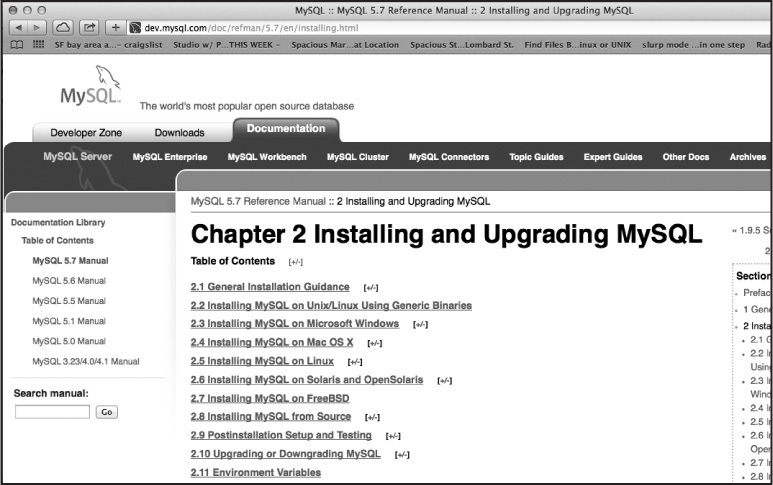
For complete installation instructions, go to http://dev.mysql.com (see Figure 15.13).
15.3.2 Connecting to MySQL
The MySQL database system uses the client/server model described in Section 15.2.1, “Client/Server Databases.” You are the client connecting to the database from the command line, a graphical user interface, or from a program. Before connecting to the database from a Perl program, we will first use the the MySQL command-line client.
The MySQL command-line client comes with the MySQL installation and is universally available. It is a mysql program located in the bin folder of your MySQL installation. To run this command-line application, you must start the command-line prompt.
• On Windows, go to the Start menu, choose the Run... option, and then type cmd in the run window.
• On Mac OS X, go to the Applications folder in your Finder and then navigate to Utilities. You will find the Terminal application there. You should navigate to the location where you installed MySQL and find the bin folder.
• With UNIX, type commands at the shell prompt in a terminal window.
The MySQL client executable is normally located in the bin folder.
To connect to a database using this client, you will enter information similar to the following line:
mysql --user=root --password=my_password --host=localhost
Regardless of the type of client you choose, you may be required to specify the user name and the host machine to which you are connecting. Most configurations expect you to have a password, although if just working by yourself, it is not required. You have the option to specify the default database as well.
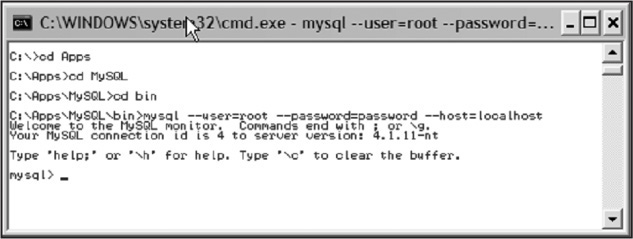
Once you are successfully connected, you will get the mysql> prompt instead of your standard DOS/UNIX prompt (see Figure 15.14). This means you are now sending commands to the MySQL database server and not to your local computer’s operating system.
Editing Keys at the MySQL Console
MySQL supports input-line editing. The up-arrow and down-arrow keys enable you to move up and down through previous input lines, and the left-arrow and right-arrow keys let you move back and forth within a line. The Backspace and Delete keys are used to erase characters from the line and type in new characters at the cursor position. To submit an edited line, press Enter. For UNIX users, MySQL also supports tab completion, allowing you to enter part of a keyword or identifier and complete it using the Tab key.
Setting a Password
When you download MySQL, on some installations, you may be asked to enter a password for user root. Even if you are not forced to create a password, it is a good idea to set one to protect the security of your database. To set a password, go to the MySQL console and type the following MySQL command. Replace 'MyNewPassword' with your password.
SET PASSWORD FOR 'root'@'localhost' = PASSWORD('MyNewPassword'),
After setting the password, you can stop the MySQL server and then restart it in normal mode again. If you run the server as a service, start it from the Windows Services window. If you start the server manually, use whatever command you normally use. You should be able to connect using the new password.
The following example shows how to set the password at the mysql prompt.
15.3.3 Graphical User Tools
The MySQL Query Browser
The MySQL Query Browser is a graphical user interface (GUI) client available from mysql.com used to connect to the MySQL database server. Once you download it and follow the simple installation wizard, you can start the application from the Start menu under Windows.
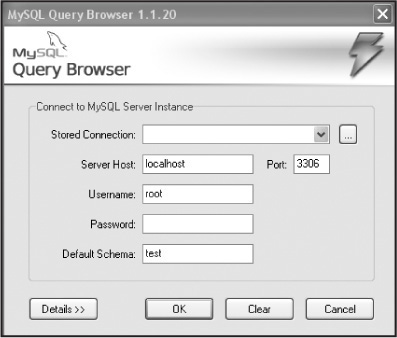
The MySQL Query Browser then displays a connection dialog box (see Figure 15.15). You must specify the MySQL server where you want to connect, the credentials needed for authorization on that server, which machine that server runs on (and which port it listens to), and the default database (called the schema) you will be using. There are also a number of additional options you can specify if necessary.
You must choose a default database in order to issue queries. Although it is possible to choose a default database after connecting to the server, setting the default from the connection dialog can save time on subsequent connections.
The information to enter is very similar to the command-line client: user name, password, and the server host where the database server is running. You can optionally enter the database name and port number (3306 is the default for MySQL) and save the connection information as a bookmark under the Stored Connection section.
By using the familiar tree-like navigation structure on the right-hand side of the application window, you can also navigate the various databases in the MySQL Query Browser (see Figure 15.16).
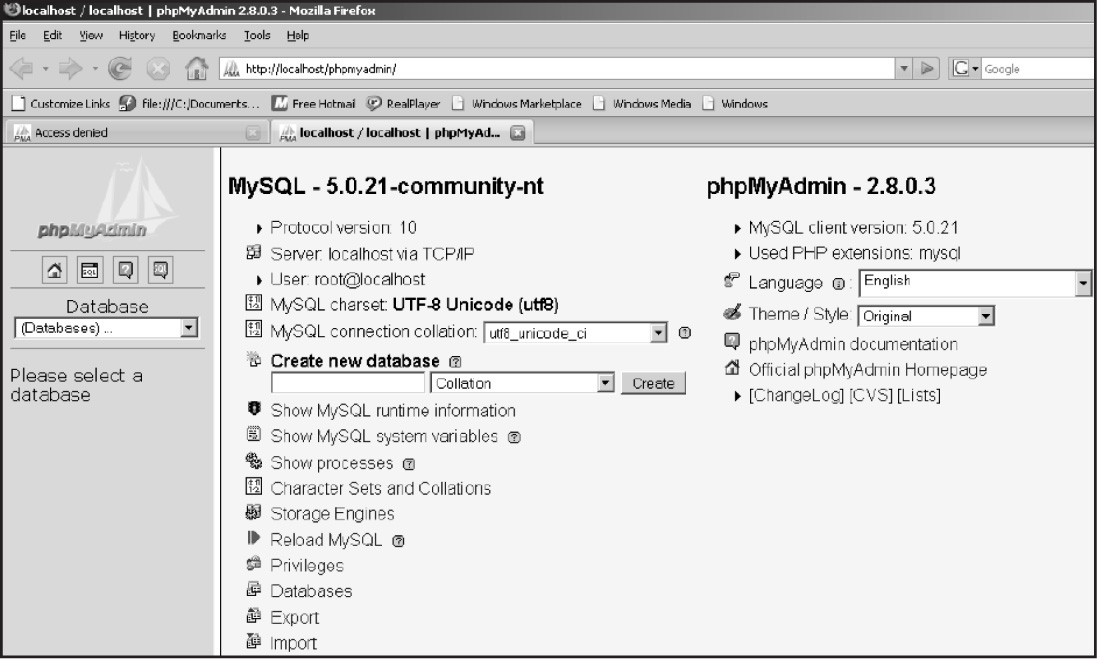
The phpMyAdmin Tool
The phpMyAdmin tool (see Figure 15.17) is written in PHP to handle the administration of MySQL over the Web. It is used to create and drop databases, manipulate tables and fields, execute SQL statements, manage keys on fields, manage privileges, and export data into various formats. You can download it from http://www.phpmyadmin.net/home_page/index.php.
The MySQL Privilege System
With a driver’s license, “authentication” is verifying that it is really you who owns the license by checking your picture and expiration date, and “authorization” is validating what type of vehicle you are authorized to drive, such as a car, a large truck, or a school bus.
Similarly, the primary purpose of the MySQL privilege system is to authenticate that the user and password are valid to connect to the specified host, as demonstrated in the previous examples in both the command line and graphical client. The second purpose of the privilege system is to specify what the user, once connected to the database, is authorized to do. For example, some users may only be authorized to select and view the data from a specific table. When MySQL is installed, the MySQL database is created with tables called grant tables that define the initial user accounts and privileges. The first account is that of a user named root, also called the superuser. The superuser can do anything, meaning anyone logging on to the database as root is granted all privileges. Initially, the root account has no password, making it easy for anyone to log on as the superuser. The other types of accounts created are anonymous-user accounts, also without a password. For both the root and anonymous accounts, Windows gets one each and UNIX gets two. Either way, to avoid security problems, the first thing you should do, once the MySQL server starts, is to set a password on the root account and the anonymous accounts.
For administration purposes, you should have root access rights to your server. The mysqladmin utility is useful for creating passwords and performing other MySQL administrative tasks. In the next example it is used to set the password for the user root.
15.3.4 Finding the Databases
The database server keeps a list of available databases, which can be displayed as a table by issuing the show command at the mysql prompt, as shown in the following example. Typically, when you install MySQL, it comes with two databases: test and mysql.test, which is an empty database used for practicing and testing various features. You normally don’t need to have any special permissions to be able work in the test database. The mysql database is a special database where the MySQL server stores various access permissions. For now, you should not worry about this database unless you need to administer privileges. See the GRANT command in the MySQL manual.
Creating and Dropping a Database
Creating a database is simple. Designing it is another story and depends on your requirements and the model you will use to organize your data. Even with the smallest database, you will have to create a table. The next section will discuss how to create and drop both databases and tables. Assuming you have been granted permission to create a database, you can do it at the mysql command line or with the mysqladmin tool as shown in the following example.
15.3.5 Getting Started with Basic Commands
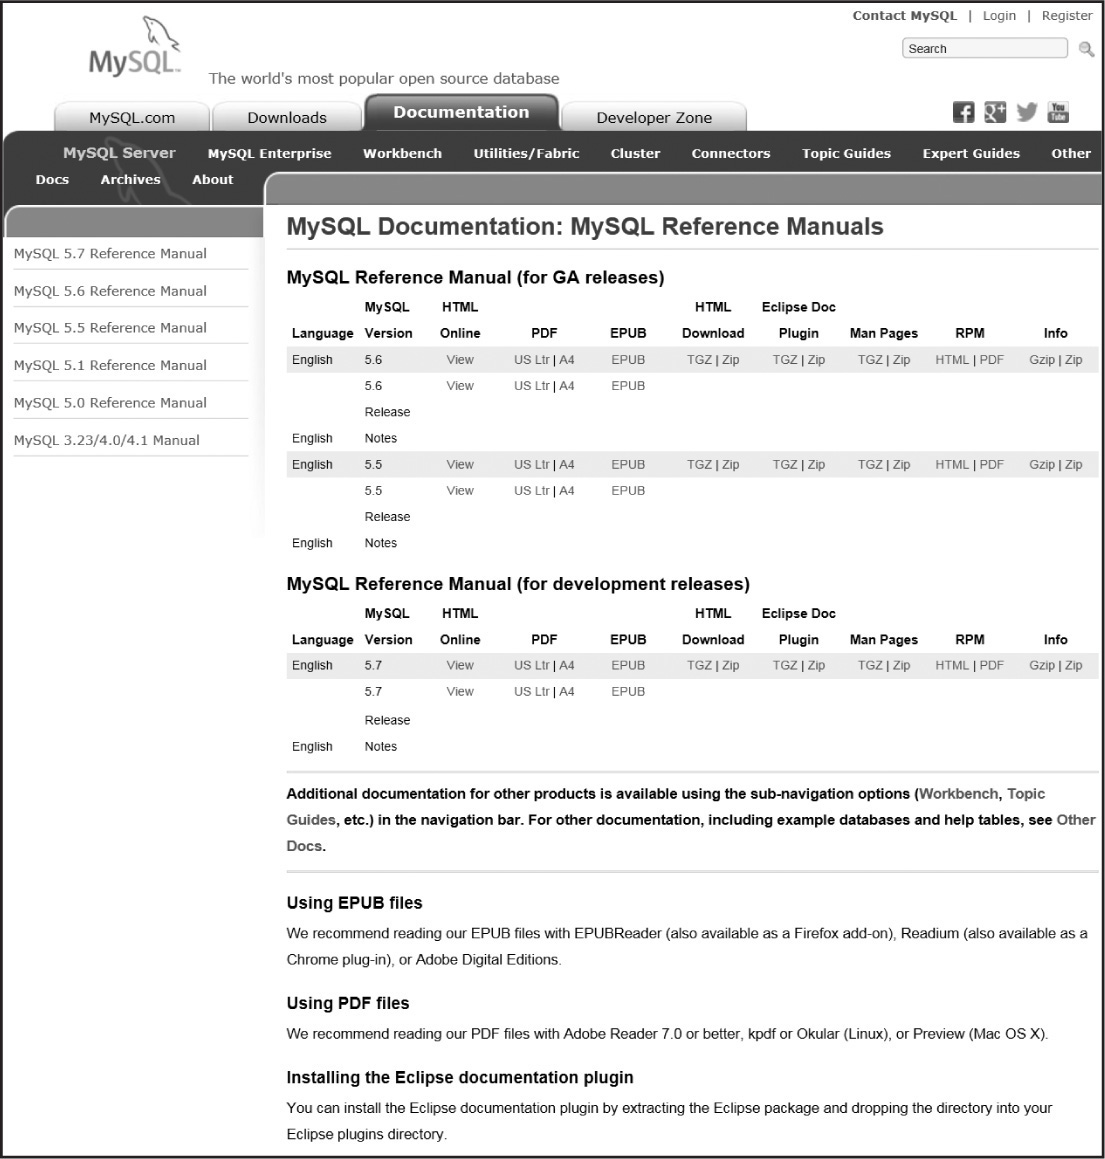
The examples in this next section illustrate how to issue SQL commands from the MySQL client. These examples do not attempt to cover all the possible SQL statements supported by MySQL but are here to illustrate the basic syntax for creating and dropping databases and tables and how to insert, delete, edit, alter, and select data from the database tables. For a complete description of all that you can do with MySQL, visit the MySQL Documentation page at http://dev.mysql.com/doc (see Figure 15.18).
Creating a Database with MySQL
Now we are ready to create a database. This database is called sample_db. The CREATE DATABASE command creates the database, and the SHOW DATABASES statement demonstrates that it is now listed with the other databases. (You can also use the mysqladmin command to create and drop databases.)
Selecting a Database with MySQL
After creating the database, we need to open it so we can use it. This is done with the USE statement. We now have a database to work in.
Creating a Table in the Database
Once the database is created, it is time to create some tables. In a real situation, the relational database will be designed with rules that put logic in the structure of the tables, a process called normalization and a topic beyond the scope of this book. In our sample database, we will create one table and put some data in it, just to show you how it is done. The data types define the structure of each field in the table. The CREATE TABLE statement defines each field, its name, and its data type.
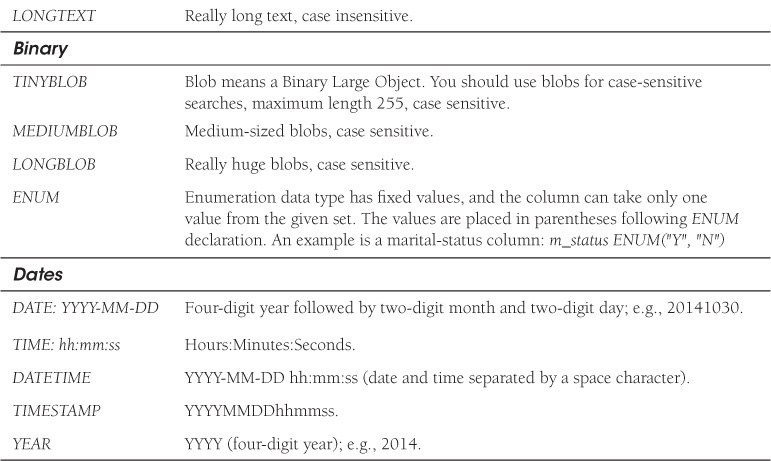
Data Types
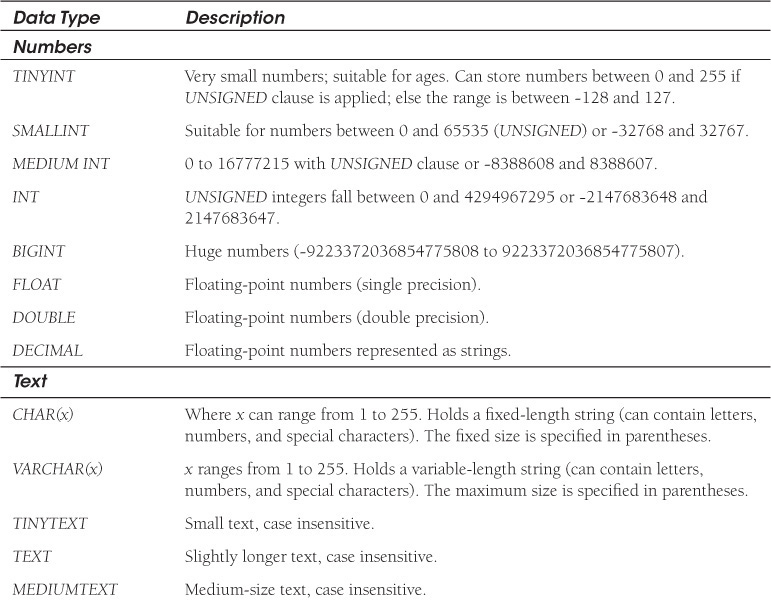
First, we will have to decide what kind of data will be stored in the table: text, numbers, dates, photos, money, and so on, and what to name the fields (columns) under which the data is stored. MySQL has specific data types to describe all the types of data that can be stored in the database. Most of the MySQL data types are listed in Table 15.3.
Adding Another Table with a Primary Key
In the next example, we will create another table and add a primary key. A primary key is used to uniquely identify the records in the database. A user’s login name, UID, account number, or license plate are examples of unique IDs. A primary key is a unique index where all key columns must be defined as NOT NULL. If they are not explicitly declared as NOT NULL, MySQL declares them so implicitly (and silently). A table can have only one primary key.
Inserting Data into Tables
The SQL INSERT statement adds new records to a table. When you insert data, make sure you provide a value for each field name in the order the data is stored; otherwise, MySQL will send an error message. In the following example, data can be inserted with the SET clause where fields are assigned values, or the values can be specified with the VALUES list or by simply listing the values for each field in order. See the MySQL documentation for a complete list of ways to add new records to a table.
Selecting Data from Tables—The SELECT Command
One of the most commonly used SQL commands is SELECT, mandatory when performing a query. The SELECT command is used to retrieve data from a table based on some criteria. It specifies a comma-separated list of fields to be retrieved, and the FROM clause specifies the table(s) to be accessed. The results are stored in a result table known as the result set, just a little table itself. The * symbol can be used to represent all of the fields.
Selecting by Columns
In the following examples, data is retrieved for specific columns, each column (field) separated by a comma.
Selecting All Columns
The * is a wildcard that is used to represent all of the columns in a table.
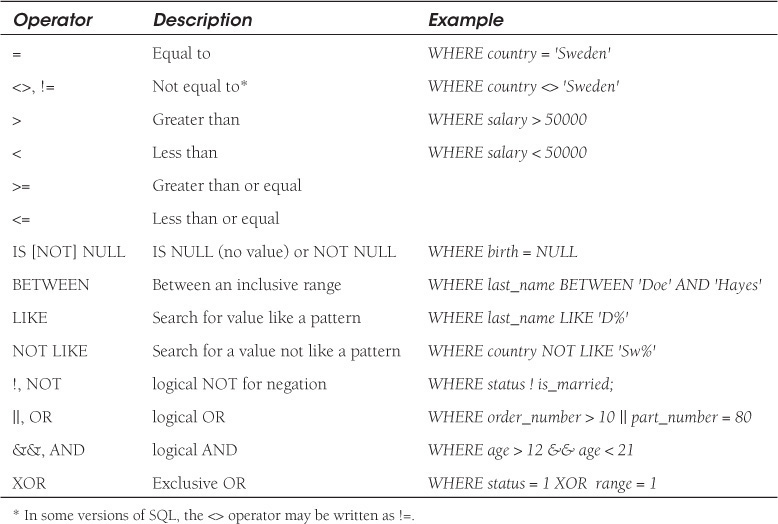
The WHERE Clause
The WHERE clause is optional and specifies which data values or rows will be selected based on some condition, called a selection criterion. SQL provides a set of operators to qualify the condition being set (see Table 15.4).
Sorting Tables
You can display the output of a query in a particular order by using the ORDER BY clause. Rows can be sorted either in ascending (the default) or descending (DESC) order where the values being sorted are either strings or numbers. You can limit the output of any query with the LIMIT clause.
Joining Tables
When a database is designed properly, the tables relate to one another based on some criteria; for example, in our database, every team has a name and every coach has a name and a team name. A join allows two or more tables to be combined and return a result set based on the relationships they share. There are different types of join statements (inner joins, cross joins, left joins, and others), but they all follow the basic syntax of a SELECT statement with the addition of a JOIN clause.
Deleting Rows
The DELETE command allows you to remove rows from a table. The only real difference between DELETE and SELECT is that the DELETE removes records based on some criteria, whereas the SELECT retrieves those records and DELETE does not take field names.
Updating Data in a Table
The UPDATE command is used to edit a table; that is, to modify or change the values in a table. This statement uses the SET clause to change the existing value to something else, as shown in the following example. In order for the UPDATE to work, we must put the Bath Warships record back into the database as it was removed in the previous example.
Altering a Table
The ALTER TABLE command allows you to alter the structure of an existing table by adding and dropping columns. The ALTER statement has many possible clauses, such as CHANGE, MODIFY, RENAME, DROP, and others. Don’t confuse ALTER with UPDATE. Altering a table changes the structure of how the table was described after it was created. You can use it to add primary keys or indexes, change the definition of a column or where it is positioned in the table, and more. Some of these alterations are demonstrated in the following examples.
Adding a Column
Example 15.17 shows how to use ADD with the ALTER TABLE command to add a column to a table.
Dropping a Column
Example 15.18 shows how to use DROP with the ALTER TABLE command to remove a column from a table.
Adding a Primary Key
In Example 15.19, the teams table is altered by making the name field a primary key. This means that all new teams must have unique names.
Dropping a Table
To drop a table is relatively simple. Just use the DROP command and the name of the table.
Dropping a Database
To drop a database, use the DROP DATABASE command.
15.4 What Is the Perl DBI?
The DBI is a layer of “glue” between an application and one or more database driver modules.
—Tim Bunce, author of DBI
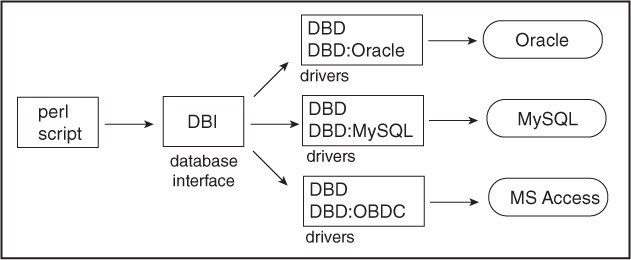
DBI stands for the Database Independent Interface. DBI is an object-oriented module that allows your Perl application to talk to many different types of databases using the same method calls, variables, and conventions. It locates the database driver module (DBD) for a particular database system and dynamically loads the appropriate DBD module. The database driver contains the libraries necessary to talk to a specific database. For example, to connect to a MySQL database, you need to install the DBD-MySQL driver, and in order to talk to an Oracle database, you need the DBD-Oracle driver.
DBI acts as the interface between your Perl script and the database driver modules; meaning, it translates Perl output to code that can be understood by a specific driver whether that driver is Oracle, Sybase, MySQL, or others (see Figure 15.19). You set up the SQL query string and send it via a DBI method to the appropriate database driver, and you get back results that can be managed in your Perl program in the same way no matter what database you are using. For an excellent tutorial by Tim Bunce, the DBI author, see http://www.slideshare.net/Tim.Bunce/dbi-advanced-tutorial-2007.
15.4.1 Installing the DBD Driver
Without the DBD-MySQL with PPM
The DBI module has been included in the standard Perl library for most recent versions of Perl, but the DBD-MySQL driver can be retrieved from CPAN for UNIX, Mac, and Linux. (Strawberry for Windows includes the driver.) Instructions for getting the mysql driver for the Mac can be found at http://bixsolutions.net/forum/thread-8.html.
A simple way to install DBI or any of the DBD drivers is to use PPM, a package-management utility from ActiveState that simplifies finding, installing, upgrading, and removing Perl modules. To get a complete tutorial on PPM, go to http://docs.activestate.com/activeperl/5.10/faq/ActivePerl-faq2.html.
In order to use PPM, first make sure your computer has an Internet connection. You must also have access to a PPM repository, either on a local hard drive, a network, or have access to a mounted ActiveState ActiveDVD. Keep in mind that if your Internet connection is via firewall or proxy, you might need to set the http_proxy environment variable.
Access to the Solaris PPM repository requires an ActivePerl Business Edition license.
To launch PPM you can type the following at the command line:
ppm
When the Perl Package Manager is initially displayed, it will synchronize the ActiveState repository package list from its database. You can view all the currently installed packages or all the packages in the repository and use the search box to find a module you are looking for. If found, it will be highlighted (see Figure 15.20).

The small icons in the toolbar at the top of the PPM window indicate what you can do once you have selected a package from the repository. Normally, you select the package, mark it for install, and then click on the green arrow at the right-hand side of the toolbox.
Using PPM with Linux
If you are using Linux, you can download Perl 5.18.2 from ActiveState as an rpm (RedHat Package Manager) file or as a tarfile. The instructions for downloading ActivePerl are found at http://www.activestate.com/activeperl. Then run the install.sh shell script found in the perl directory. After you run the install script, set your PATH to the perl directory. Then you can use the PPM program to install modules from CPAN just as you would with Windows. This is by far easier than using CPAN with all its questions and issues.
You need to be connected to the Internet to install the required packages. To see the installed packages, type the following:
pm -i Active-State.....rpm
sh install.sh
Installing the DBD::mysql Driver from CPAN
The primary tool used to maintain a local Perl distribution is the CPAN module, used to access the Comprehensive Perl Archive Network, aka CPAN. In Appendix D, “Perlbrew, CPAN, and cpanm,” you will find detailed instructions on how to use cpan and cpanm for installing modules.
To install the DBD-mysql driver, at the command-line prompt, type the following:
$ cpan DBD::mysql
Or check to see whether it’s already there by typing this:
$ perldoc -l DBD::mysql
15.4.2 The DBI Class Methods
The DBI module is object oriented and comes with a number of methods and variables. The documentation for this module is listed next. The database objects are called handles. Database handles connect to a specific database, and statement handles are used to send SQL statements to the database. Notice that names such as $dbi, $sth, $rc, and so forth, are use to describe statement handles, return codes, rows of data, and so on. (These names are conventions only in the documentation; for example, $dbh represents a database handle, and $sth a statement handle.)
$ perldoc DBI
Notation and Conventions
The following conventions are used in this document:
$dbh Database handle object
$sth Statement handle object
$drh Driver handle object (rarely seen or used in applications)
$h Any of the handle types above ($dbh, $sth, or $drh)
$rc General Return Code (boolean: true=ok, false=error)
$rv General Return Value (typically an integer)
@ary List of values returned from the database, typically a row of
data
$rows Number of rows processed (if available, else -1)
$fh A filehandle
undef NULL values are represented by undefined values in Perl
\%attr Reference to a hash of attribute values passed to methods
Note that Perl will automatically destroy database and statement
handle objects if all references to them are deleted.
NAME
DBI - Database independent interface for Perl
SYNOPSIS
use DBI;
@driver_names = DBI->available_drivers;
@data_sources = DBI->data_sources($driver_name, \%attr);
$dbh = DBI->connect($data_source, $username, $auth, \%attr);
$rv = $dbh->do($statement);
$rv = $dbh->do($statement, \%attr);
$rv = $dbh->do($statement, \%attr, @bind_values);
$ary_ref = $dbh->selectall_arrayref($statement);
$hash_ref = $dbh->selectall_hashref($statement, $key_field);
$ary_ref = $dbh->selectcol_arrayref($statement);
$ary_ref = $dbh->selectcol_arrayref($statement, \%attr);
@row_ary = $dbh->selectrow_array($statement);
$ary_ref = $dbh->selectrow_arrayref($statement);
$hash_ref = $dbh->selectrow_hashref($statement);
$sth = $dbh->prepare($statement);
$sth = $dbh->prepare_cached($statement);
$rc = $sth->bind_param($p_num, $bind_value);
$rc = $sth->bind_param($p_num, $bind_value, $bind_type);
$rc = $sth->bind_param($p_num, $bind_value, \%attr);
$rv = $sth->execute;
$rv = $sth->execute(@bind_values);
$rv = $sth->execute_array(\%attr, ...);
$rc = $sth->bind_col($col_num, $col_variable);
$rc = $sth->bind_columns(@list_of_refs_to_vars_to_bind);
@row_ary = $sth->fetchrow_array;
$ary_ref = $sth->fetchrow_arrayref;
$hash_ref = $sth->fetchrow_hashref;
$ary_ref = $sth->fetchall_arrayref;
$ary_ref = $sth->fetchall_arrayref( $slice, $max_rows );
$hash_ref = $sth->fetchall_hashref( $key_field );
$rv = $sth->rows;
$rc = $dbh->begin_work;
$rc = $dbh->commit;
$rc = $dbh->rollback;
$quoted_string = $dbh->quote($string);
$rc = $h->err;
$str = $h->errstr;
$rv = $h->state;
$rc = $dbh->disconnect;
*The synopsis above only lists the major methods and parameters.*
15.4.3 How to Use DBI
Once you load the DBI module into your program with the use DBI statement, there are only five steps involved: connect to a database, prepare a query, execute the query, get the results, and disconnect.
To connect to MySQL, use the connect() method. This method specifies the type of database (MySQL, Oracle, Sybase, CSV files, Informix, and so on), the database name, host name, user, and password with some additional, optional arguments to specify error and transaction handling, and more. It returns a database handle ($dbh is used in the manual page, but you can call it any valid scalar name).
Once connected to the MySQL database, you have a database handle (reference to the database object). Now you can send a query by preparing and executing a SQL statement. This can be done by calling the prepare() and execute() methods or by using the do() method. The prepare() and execute() methods are used for SELECT statements, whereas the do() method is normally used for SQL statements that don’t return a result set, such as the INSERT, UPDATE, or DELETE statements. What is returned from these methods depends on what the query returns. For example, successful SELECT queries return a result set (represented as $sth in the DBI manual page); successful INSERT/UPDATE/DELETE queries with do() return the number of rows affected; and unsuccessful queries return an error or undef. Most data is returned to the Perl script as strings, and null values are returned as undef.
Once the query has been sent to the database and a result set returned (reference to the result object), you can extract the data with special methods, such as fetchrow_array() and fetchrow_hashref(). These methods retrieve each record as a Perl array or a Perl hashref, respectively.
Finally, when you are done, the finish() method releases the result object returned from the prepare() method, and the disconnect() method ends the session by disconnecting from the database.
Now we will go through each of these five steps in detail.
15.4.4 Connecting to and Disconnecting from the Database
Once loaded, the DBI module is responsible for loading the appropriate driver for a given database. Then you will work with the database by using the methods provided by the module listed in the output shown from perldoc DBI. The first method we will use is the connect() method to get a connection to the database, and the last method, disconnect(), to break the connection.
The following example shows how to check for available database drivers for DBI.
The connect() Method
The connect() method establishes a connection to the specified database and returns an object called a database handle. You can make multiple connections to the same database or even to different databases in a program by using multiple connect statements. The connect() method takes several arguments:
"dbi:$driver:$database,$port,$username,$password"
1. The first argument is the DSN string (Data Source Name), the logical name for the database. Any attributes that define the data source are assigned to the DSN for retrieval by the driver. The DSN contains the name of the DBI module, dbi, followed by a colon and the database driver (MySQL, Sybase, Oracle), another colon and the name of the actual database for which the connection will be made, and/or the hostname (default is localhost), port, and so on, and is terminated with a semicolon.
2. The next argument to connect is the name of the user.
3. The next argument is the password of the user (optional).
4. And finally, there is a reference to a hash (set of optional attributes for error handling, autocommiting, and so on).
The disconnect() Method
As you may remember from Chapter 10, “Getting a Handle on Files,” after we opened a file with a user-defined filehandle, we closed it with the built-in close function when finished. Unless lexically scoped, (three-part argument to open) if we forgot to close the file, it would be left up to the operating system to do so when the Perl script exited. The same thing is true with closing a database. After you are finished using the database, it is always a good idea to close the connection with the disconnect method. Of course, because the database handle is an object, Perl will automatically remove the reference to it once the program exits or the object goes out of scope. You would use the disconnect method, like so:
$dbh->disconnect();
15.4.5 Preparing a Statement Handle and Fetching Results
The SQL select statement is probably the statement used most when querying a database. When preparing a select statement for the database, the query is sent as a string argument to the DBI prepare method. The query is just as you would type it in the MySQL console but minus the semicolon. The database handle calls the prepare method. The database determines how it will execute the query (creates a “plan”), and DBI returns a statement handle containing the details on how the query will be executed. The statement handle (represented as $sth) encapsulates individual SQL statements to be executed within the database and calls the execute method.
This execute method tells the database to perform the SQL statement (execute its “plan”) and to return the results back to the program. An undef is returned if an error occurs. A successful execute always returns true regardless of the number of rows affected, even if zero rows were affected. The number of statement handles that can be created and executed is basically unlimited.
Even though you have executed the plan, you can’t see the results unless you use another DBI method to retrieve it, such as dump_results(), fetchrow_array(), or fetch().
Select, Execute, and Dump the Results
The DBI dump_results method gets all the rows from the statement handle object and prints the results in one simple statement. In the following example, we will connect to the database, prepare the query, execute the query, and print the results.
Select, Execute, and Fetch a Row As an Array
When the fetchrow_array() method is called, the database will return the first row of results as an array, where each field is an element in the array. Each successive call to the fetchrow_array() method yields the next row of results, until there are no more results and the call yields a value of undef.
In the following example, we will connect to the database, prepare the query, execute the query, and fetch the data with the fetchrow_array() method. As in this example, we can use a while or for loop to fetch all the rows. (An important point to remember is that when the fields are fetched, they are assigned in the order they were listed in the SQL query.)
Select, Execute, and Fetch a Row As a Hash
The fetchrow_hashref() method fetches a row from the database table as a hash reference where the keys are the names of the columns and the values are the data stored in that column. The following example is exactly like the previous one, except fetchrow_arrayref() is replaced with fetchrow_hashref().
15.4.6 Getting Error Messages
It is important to know what went wrong when working with DBI. Did the connection fail? Did you prepare the SQL statement correctly? DBI defines several ways to handle errors. You can use automatic error handling with the PrintError and RaiseError attributes for a specific handle, or you can use diagnostic methods and special DBI variables.
Automatic Error Handling
The DBI module provides automatic error handling when you connect to the database. You can either get warnings every time a DBI method fails, or have the program send a message and abort. The two attributes most often used with the connect method are PrintError and RaiseError.
The PrintError Attribute
By default, the connect() method sets PrintError to on (set to 1) and automatically generates a warning message if any of the DBI methods fail.
The RaiseError Attribute
The RaiseError attribute can be used to force errors to raise exceptions. It is turned off by default. When set to on, any DBI method that results in an error will cause DBI to die with an error, $DBI::errstr. If you turn RaiseError on, then you would normally turn PrintError off. If PrintError is also on, then the PrintError is done first. Typically, RaiseError is used in conjunction with an eval block so that you can catch the exception that’s been thrown. If there is a die, a compile, or runtime error in the eval block, the special variable $@ is set to the error message and set to null if there is not an error. If $@ has been set, then you can handle the error without exiting DBI.
Manual Error Handling
If you want to manually check for errors when a particular method fails, you can use either the error diagnostic methods or the error diagnostic variables provided by the DBI module. This gives you control over each method you call to trap the errors if they occur.
Error Diagnostic Methods
First we will look at two error diagnostic methods, err() and errstr(). These methods can be invoked against any valid handle, driver, database, or statement. The err() method will return the error code associated with the problem that occurred. The error code is a number that differs depending on the database system being used. The errstr() method corresponds to the error code number but is a string that contains information as to why the last DBI method call failed. Before another method call, the error messages for a handle are reset, so they should be checked right after a specific handle has produced an error. The diagnostic methods are used as discussed next.
$rv = $h->err();
$str = $h->errstr();
Error Diagnostic Variables
The DBI variables $DBI::err and $DBI::errstr, are class variables and behave similarly to the method described previously, except they have a shorter life span and always refer to the last handle that was used. The $DBI::err contains the error number associated with last method that was called, and $DBI:errstr contains a string describing the error message associated with the error number in $DBI::err. You should generally test the return status of connect and print $DBI::errstr if the connect() method failed.
Binding Columns and Fetching Values
Binding columns is the most efficient way to fetch data. Binding allows you to associate a Perl variable with a field (column) value in the database. When values are fetched, the variables are automatically updated with the retrieved value, making fetching data fast. DBI provides the bind_columns method to bind each column to a scalar reference. When the fetch method is called, the values from the database are assigned to scalars of the same name rather than to arrays or hashes as seen in the previous examples.
Every time the fetch method is called, the scalars will be updated with values from the current row.
(See bind_col in the DBI documentation for another way to bind columns.)
15.4.7 The ? Placeholder and Parameter Binding
Placeholders, represented by a ?, are used to optimize how queries are handled. Placeholders provide a template for a query and represent values that will be assigned to fields at a later time. They are used primarily with SELECT, INSERT, UPDATE, and DELETE statements. Values need to be “bound” to each placeholder before the statement can be executed. There are two ways to bind parameters: in the execute statement or with the bind_params method.
When a query is prepared by DBI, the database has to plan how it can best handle the query. The statement handle is used to store the prepared plan for the query, called the execution plan. Normally, once a query has been executed, the plan is discarded. When placeholders are used, instead of discarding the execution plan, the database accepts the placeholder in a template and makes a plan around it—making the template usable for future queries.
The ? represents values, such as name = ?, where name is a field name in the database table and its value will be supplied a value later on. (Remember, the ? represents a value, not a field name; for example, ? = "John" is wrong!)
Binding Parameters in the execute Statement
The execute method can take arguments representing the values of the placeholders, and those values are replaced in the prepared plan each time the method is called. DBI has to figure out the data type of the value. (Not all databases and DBI drivers support placeholders. See http://dev.mysql.com/doc/refman/5.7/en/sql-syntax-prepared-statements.html.)
In the following example, we will use a placeholder to be filled in later as an argument to the execute method.
Using Multiple Placeholders
It is also possible to use multiple placeholders to be filled in later in the execute method, as shown in the following example.
Using Placeholders to Insert Multiple Records
We can also use placeholders to represent entire rows (records) to be later inserted into a database, as shown in the following example.
Binding Parameters and the bind_param() Method
Another convenient and efficient way to use placeholders is with the bind_param() method. The placeholder tells the database that the value represented by the ? will be filled in later. The bound parameter is the value that will be filled in to replace the ? and eliminates sending arguments to the execute() method. Make sure that bind_param is called before the execute statement to ensure that the missing value has been filled in.
The bind_param() method takes up to three arguments. The first argument represents the position of the parameter in the placeholder; so if the position is 1, then that would be represented by the first ? (placeholder) to be filled in with a value, and if the position is 2, that would be represented by the second ?, and so on. The second argument to bind_param() is the actual value that will replace the ?. Last is an optional parameter that hints as to the data type of the replacement value, typically a number or string. The data type for a placeholder cannot be changed after the first bind_param() method call. However, it can be left unspecified, in which case it defaults to the previous value.
Two ways to handle the data type are either as an anonymous hash or as a DBI constant, like so:
$sth->bind_param(1, $value, { TYPE => SQL_INTEGER }); # Hash
$sth->bind_param(1, $value, SQL_INTEGER); # DBI Constant
15.4.8 Handling Quotes
When strings are sent to a database, they are enclosed in quotes. Strings themselves may also contain quotes, as in the string "Mrs. O'Donnell", and these quotes must be properly escaped when sent to a database. To make things more complicated, different database systems have different rules for handling quotes. The DBI module handles quoting issues with its quote method. This method is used with a database handle to convert a string according to rules defined for a specific database and returns the string correctly escaped.
15.4.9 Cached Queries
A cache is a temporary storage area where data frequently used can be copied and accessed more quickly. Most database servers utilize a cache to improve the performance of recently seen queries. A SQL statement can be cached rather than destroyed after it is executed. If another query identical to the cached statement is executed, the cached query can be reused. The DBI prepare_cached method is used to cache a query. It is just like the prepare method, except that it looks to see if the same SQL statement has been previously executed, and if so, gives you the cached statement handle rather than a brand new one. (If you are managing multiple connections, see Apache::DBI::Cache.)
15.5 Statements That Don’t Return Anything
15.5.1 The do() Method
The do() method is used to prepare and execute nonselect, nonrepeating statements in one step. Statements such as the UPDATE, INSERT, or DELETE are examples of SQL statements that would use the do method. These statements change the database but don’t return data. Unlike the prepare method, do doesn’t return a statement handle but instead returns a count of the number of rows that were affected or undef if the query failed. (A return value of -1 means the number of rows is not known, not applicable, or not available.)
$rows_affected = $dbh->do("UPDATE your_table SET foo = foo + 1");
The only drawback is performance if you are repeating an operation a number of times with placeholders, as we did in Example 15.35, because then, for each query, the steps of prepare and execute must also be repeated over and over again.
Adding Entries
To add entries to a table in the database, the SQL INSERT statement is used in the DBI do method. The do method will return the number of new entries or undef if it fails.
Deleting Entries
In the following example, a record is deleted if some condition is true. Since the delete method doesn’t return a result set, it is called with the DBI do method.
Updating Entries
To update or edit a database entry, we use the SQL UPDATE statement with the DBI do() method.
15.6 Transactions
In the simple example of the teams table, if the data is inserted for two teams, and the number of wins and losses for the two teams is accidentally swapped, an update would require both teams be modified, not just one. Suppose you are updating more than one table and the update statements in one table succeed and those in the other fail. A classic example is that you take money out of a savings account in one table and put it in a checking account in another table. The deposit succeeds but the withdrawal fails. The tables are then in an inconsistent state. A transaction is a set of SQL statements that succeed or fail all as a unit. For example, INSERT, UPDATE, and DELETE statements may be executed as a group. If one fails, then none of the statements is executed.
By default, the MySQL client runs with autocommit mode enabled. DBI also runs with autocommit mode on by default. This means that as soon as you execute any statement that modifies the data in a table, as long as no errors are returned, MySQL immediately commits the statement to the database, and any changes to the affected tables are made permanent.
To use transactions with MySQL, autocommit mode must be disabled. We can do that in a Perl script when connecting to the database by setting the hash value of AutoCommit => 0 as shown in the following example.
In the examples shown so far, when we connected to a database, the hash options available to the connect() method for error handling were used, PrintError and RaiseError. To use transactions, we need to turn off the AutoCommit attribute, turn RaiseErrors on, and optionally leave PrintError on or off (on being the default).
RaiseError tells DBI to die with the $DBI::errstr message if there are errors, and PrintError (by default turned on) tells DBI to send a warning with the $DBI::errstr message and the program will continue to execute.
15.6.1 Commit and Rollback
Commit means in a transaction that a set of statements will be executed and sent to the database as a group. If all of the statements are successful, the group is committed and the database is modified. If, however, there is an error in any one of the statements in the group, a rollback command is issued, which returns all the tables back to their previous state.
Transactions are often handled in Perl by using an eval block to trap errors, then using the commit() or rollback() methods to finish the transaction.
In the following example, a group of records will be inserted into a table. If an error occurs in the process of adding these entries, the entire process will be rolled back. The error could be because an entry already exists, for example.
15.6.2 Perl DBI, the Web, and the Dancer Framework
Back in the old days, starting in 1993, CGI (Common Gateway Interface) was used to create dynamic Web pages. Writing these pages required configuring the HTTP server (normally Apache), dealing with HTTP headers, requests/responses, as well as environment variables, producing HTML code, understanding HTTP error messages, and more. In the previous edition of this book, a great deal of time was spent explaining how to write these scripts which not only required a considerable understanding of Perl, but also of HTML and HTTP.
When CGI.pm was added to the standard Perl library, it provided a solution to simplify writing CGI scripts and handling HTTP requests/responses by adding features for creating forms, file uploads, cookies, and other utilities. However, CGI.pm is not simple; it’s big and clunky, and to be effective requires a fairly advanced understanding of how the CGI protocol works, not to mention knowing Perl and HTML in depth. The problem was that more often the designer didn’t know Perl and the programmer didn’t know how to design.
The CGI template system was added to separate the design from the code, make error handling easier, and thus speed up the development process. In fact, although CGI.pm has been a standard since 1997, the Perl 5 porters have been discussing a proposal to remove it from the core distribution as of Perl 5.20. (See http://www.modernperlbooks.com/mt/2013/05/ejecting-cgipm-from-the-perl-core.html.)
Like it or not, CGI.pm, is still a viable way to create Web pages, still part of the Perl core, and according to the Perl 5.20 documentation, “It has the benefit of having developed and refined over 10 years with input from dozens of contributors and being deployed on thousands of Web sites. CGI.pm has been included in the Perl distribution since Perl 5.4, and has become a de-facto standard.” To speed up the older slower CGI programs, mod_perl and FastCGI provided much better solutions, but moving these from one system to another presented problems.
Enter PSGI and Plack. Like CGI, PSGI (Perl Webserver Gateway Interface) is a specification, an interface between Perl Web servers and Web applications or frameworks, and most modern servers and frameworks already support it. Plack is a Perl module (perldoc plack) and a toolkit for running Web applications and frameworks such as Catalyst and Dancer that are compatible with the PSGI specification (inspired by Python’s WSGI and Ruby’s Rack). Together, they make developing and deploying Perl Web applications easier, faster, and portable.
Several Perl Web frameworks provide PSGI support including Catalyst, Mason, Dancer, and Mojolicious. This text uses the Dancer framework, which is a simple, yet robust Web application framework for Perl. It is free and open source, written in Perl, and every Dancer application is also a valid Plack applicaton. (See http://www.perldancer.org.)
Note to reader: to install and see examples on how to use Dancer, go to Appendix E, “Dancing with Perl.”
The following example demonstrates how to use Dancer and DBI to display Perl output on a browser formatted with HTML. It replaces the CGI example from Perl by Example, Fourth Edition.
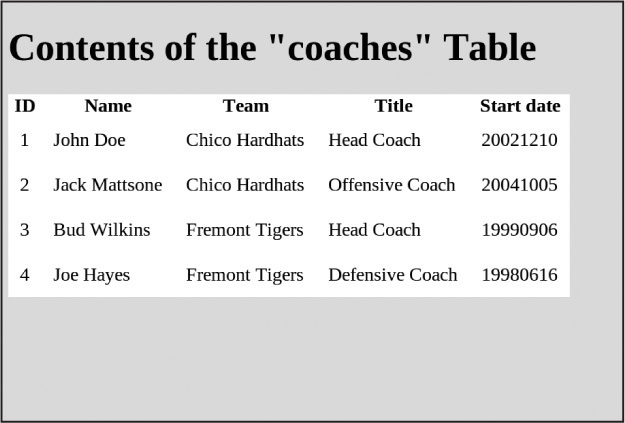
Figure 15.21 The output from Example 15.41.
15.7 What’s Left?
This chapter was provided to introduce you to the MySQL relational database and how to issue SQL statements at the mysql client. After you learned the basic queries at the command line, the Perl DBI module was introduced so that you could perform the same mysql functions from your Perl scripts. We discussed the most commonly used DBI methods and how to use them for connecting to a database, selecting and retrieving data, updating and removing records, and so on. Finally, if you are interested in creating a dynamic Web page to interact with a user request from a fill-out form and respond with data retrieved from a database, see Appendix E, “Dancing with Perl,” where you will learn how to install and use Dancer, a free, open-source Web application framework written in Perl.
Although we have covered the DBI essentials, there is more to be learned. To find detailed documenation of DBI, including methods, variables, constants, functions, and more, the best resource is found at the CPAN repository.
2. What is MySQL?
3. Where can you get MySQL?
4. What is the MySQL client?
5. How do you set a password for MySQL?
6. What is the test database for?
7. What is the mysql database for?
8. What is SQL?
9. What is DBI and how can you get it?
10. What is DBI-MySQL?
11. What is a database handle?
12. What is a statement handle?
13. How does Perl query a database, and where does the result set end up?
14. When you prepare a query for Perl’s prepare method, is it the same as when you make the query in the MySQL client?
15. How do you retrieve the result set from a Perl program?
16. What is a cached query?
17. What is the purpose of placeholders?
18. How do you know if your database connection was successful?
19. How do you close the database from a Perl script?
20. Who is Tim Bunce?
21. Where can you get a good tutorial on Perl DBI?
15.9 What’s Next?
The next chapter discusses how Perl scripts can interface with the operating systems by issuing system calls, and Perl functions to work with directories, permissions, ownerships, hard and soft links, rename files, get file statistics, and more. You will learn how to use these functions on both UNIX- and Windows-based systems.
1. Load the northwind database from a script. The northwind database is a good sample database used with Microsoft’s Access Database but tailored to work with MySQL as well. You will be provided with the northwind.sql script for this exercise (on CD), a file containing SQL statements to create and populate the northwind database. The file must be located on the client host where you are running mysql.
2. To run the script, go to your MySQL console window and type
source c:document orthwind.sql
(Notice that there are no quotes around the name of the file and that absolute or relative pathnames can be used.)
Ways to source the SQL script:
mysql> SOURCE C:path
orthwind.sql;
mysql> SOURCE ..path
orthwind.sql;
shell> mysql db_name < input_file
As the script executes, the results will be displayed on your screen, most of them SQL insert statements. If an error occurs, the process will be aborted, and nothing done.
Part 2—Practice SQL Commands
1. After running the northwind.sql script, start by typing use northwind.
2. Type the following SQL commands and explain what they do.
a. SHOW DATABASES;
b. SHOW TABLES FROM NORTHWIND;
c. SHOW FIELDS FROM SHIPPERS;
d. DESCRIBE SHIPPERS;
3. Use the SQL tutorial, if you need it, to do the following:
a. Select all rows from the Shippers table and display the fields.
b. Select all rows from the Employees table and display only the FirstName and LastName fields.
c. Select the CompanyName and Phone from the Customers table only if the Country is Italy.
d. Print in sorted order the ContactName and Country from the Customers table. Sort by Country.
e. Select the ContactName, CompanyName, and Country from the Customers table where the Country begins with either Po or Sw.
f. Find the total number of products in the Products table.
g. Print only the first 10 products from the Products table.
h. Select countries from the Customers table in alphabetic order with no duplicates.
i. Find all the products between $10 and $20.
j. Insert a new product.
k. Update the products table by adding $5.25 to the unit price of Sir Rodney’s Marmalade.
l. Select products below 10 units in stock.
m. Delete the oldest order in the database.
n. Use a SQL function to print the current date and time.
Part 3—Perl/MySQL Lab
Consult the MySQL documentation (mysql.com) to get the correct datatypes and functions to help you with this lab. The documentation is excellent.
1. Create a SQL script called school.sql that will do the following:
a. DROP DATABASE IF EXISTS SCHOOL;
b. CREATE SCHOOL;
c. Create a table called student. It will consist of the following fields:
FirstName
LastName
CellPhone
Major
GPA
StartDate
StudentID (primary key)
2. Use school and insert three rows of data into the student table.
3. At the MySQL prompt, execute the school.sql script. Use the SQL describe statement to see the structure of the school database.
4. Select all the rows in the student table. If the table has all the columns and data expected, then you are ready to go on to the next part of this lab.
5. In a Perl script, use the DBI module to do the following:
a. Connect to MySQL and open the school database.
b. Prepare a cached query to select all the rows in the student table, sorted by last names, and display all the columns with headings.
6. Create another Perl script so that the user can select the following options from a menu:
1) Update a record
2) Delete a record
3) Insert a new record
4) Display the table
5) Exit
For each of the options in the menu, create a subroutine that will perform the selected task, using MySQL functions. Can you create a CGI program to handle all of this?
a. Create a loop so that the menu will be redisplayed until the user selects number 5.
b. Rewrite the program by turning off AutoCommit and turning on RaiseErrors. Commit all changes to the database when the user chooses exit.
Part 4—Back to Checking.pm
1. Now you can redesign your original Checking.pm module to use the MySQL database, rather than the text file you originally created, to keep track of the balance.
a. Create the database and the register table at the mysql prompt. This register should contain fields that match the text file called register you created in the first exercise.
b. In the Perl module, Checking.pm, open the connection to the database. To get the balance, you will select it from the register table.
c. When you call your exit() function, insert the last transaction into the database with the new information, using the SQL INSERT command.
d. Create a Perl function that, when called, displays the contents of the register.