Chapter 3. Get Smart
Panos, HDR & Smart Objects
Okay, I named this chapter after the Smart Objects feature in Photoshop (which you can jump to directly from Lightroom), even though it’s probably not the coolest thing in this chapter. I chose “Get Smart” because it’s hard to find a movie or song title with either the acronym HDR or the word “pano” in it. Now, of course “pano” is short for “panorama” or “panoramic,” both of which are derived from the popular Latin phrase, panem et circenses, which roughly translated means “I left my panini at the circus.” Of course, the meaning behind the acronym HDR itself is one of the most misquoted of all, as I constantly see it referred to incorrectly as High Dynamic Range photography, when in fact its roots can be traced back to the Latin phase Hominem Dictu Regnum, which is a phrase used in ancient photographic literature representing the belief that any photo with large white glows around the edges, overly vibrant Harry Potter-like colors, and solid black clouds should be taken to the banks of a nearby river and beaten with a rock until it can no longer be determined to be of photographic origin. So, basically, you can see why I went with “Get Smart.” However, this created quite a conundrum because now I had to decide whether it would be the one from the classic TV show Get Smart or the movie version of Get Smart (which was based on the TV show), even though my readers would never know which I had chosen when I wrote this (by the way, the word “conundrum,” surprisingly, does not have a Latin origin. It’s actually a phrase that was used in 15th century England to describe “a convict who can no longer play the drums.” I don’t know about you, but I find this stuff fascinatum!). Anyway, I hope that your not knowing which version of Get Smart I used doesn’t In necessariis unitas, in dubiis libertas, in omnibus caritas, which roughly means “If it’s necessary to fly United Airlines to Dubai, don’t leave your seat while the snack cart is in the aisle.”
Keeping Your RAW Image Editable Using Smart Objects
You’re able to go back and re-edit your RAW image once you’re in Photoshop by taking it over to Photoshop as a smart object. Once you do that, you can re-edit it using Photoshop’s Camera Raw. (By the way, Camera Raw is built into Lightroom, Adobe just calls it something different: the Develop module. It’s the same sliders, in the same order, and they do the same thing.)
STEP ONE:
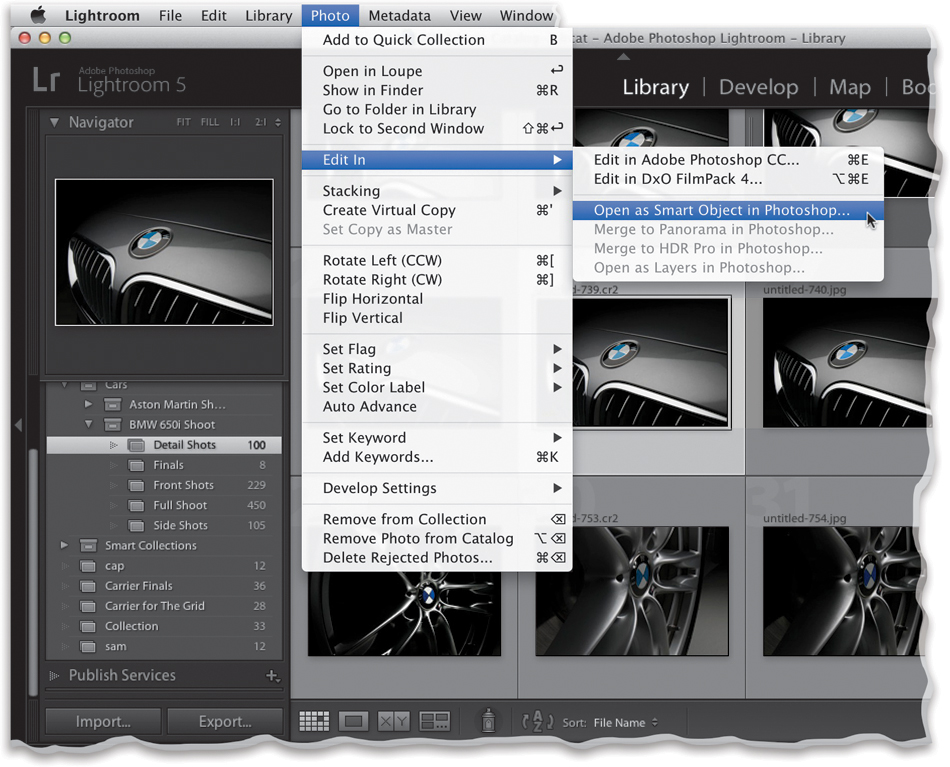
To take your image over to Photoshop as a re-editable RAW image, go under the Photo menu, under Edit In, and choose Open as Smart Object in Photoshop (as shown here). It appears in Photoshop like always, but you can tell it’s a smart object by looking in the Layers panel—in the bottom-right corner of the layer thumbnail, you should see a little page icon, as you can see in the next step. We’re going to use this re-editing ability to pull a cool little trick: we’re going to combine the old Fill Light slider from Lightroom 3 with the Shadows slider that replaced it back in Lightroom 4 (and, of course, it’s in Lightroom 5, as well).
STEP TWO:
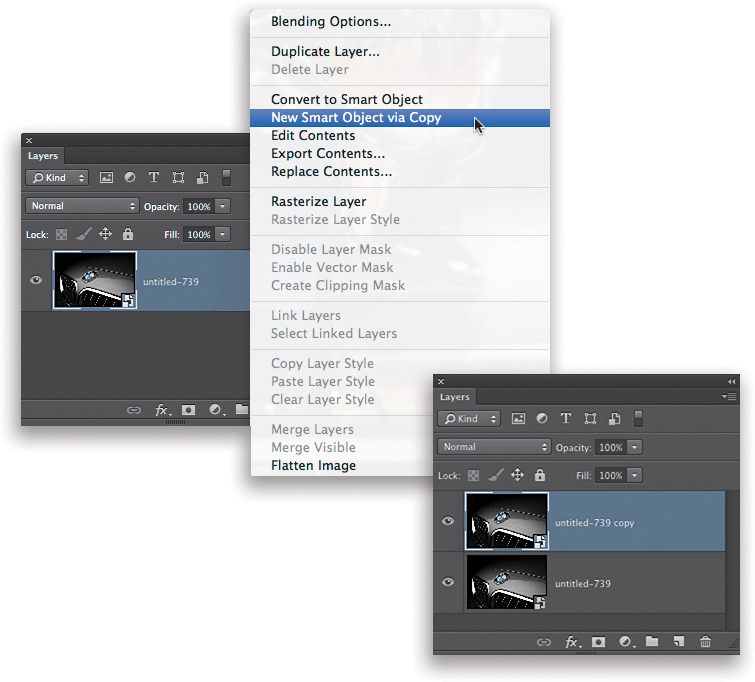
To pull off this trick, we’re going to need two smart object layers (in other words, we need two completely separate versions of the RAW image). But, we can’t just duplicate the layer by dragging it onto the Create a New Layer icon (like we normally would), because when you do this, the two smart object layers would be linked to each other—if you re-edit one of the layers, the other layer automatically updates, too. So, we need to break that link when we duplicate the layer. Here’s how: In the Layers panel, Right-click just above the layer’s name and, from the pop-up menu that appears, choose New Smart Object via Copy (as shown here). This duplicates your RAW image layer, but it breaks the tie to it, so you can edit this copied layer independently from the original.
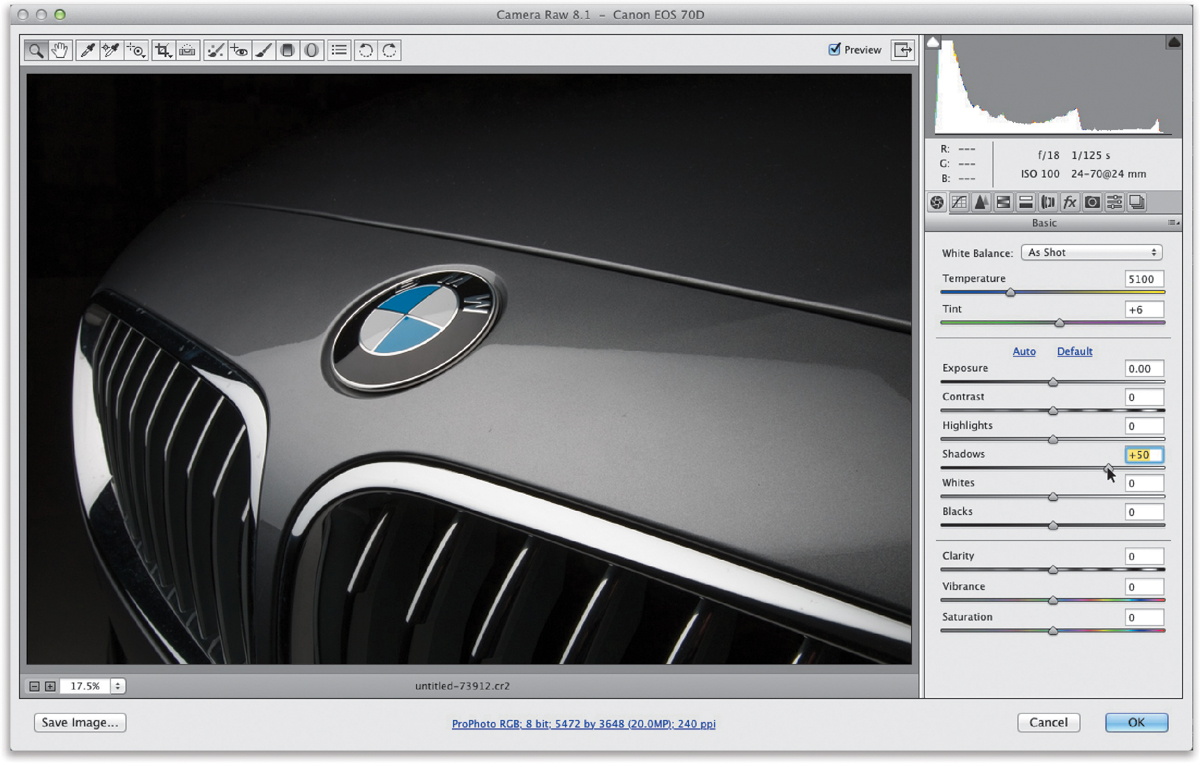
Now, double-click on the layer thumbnail for the original smart object layer and it opens in Camera Raw (as seen here). When it opens, you’ll see the same sliders in the same order that they are in Lightroom’s Develop module. In fact, the only real difference is that, in Lightroom, the background color is dark gray; here in Camera Raw, it’s light gray. Now, the entire image is kind of dark in the shadow areas, so let’s open things up a bit by dragging the Shadows slider to the right to +50 (as shown here). It’s subtle, but it certainly helped. Click OK to save this change.
STEP FOUR:
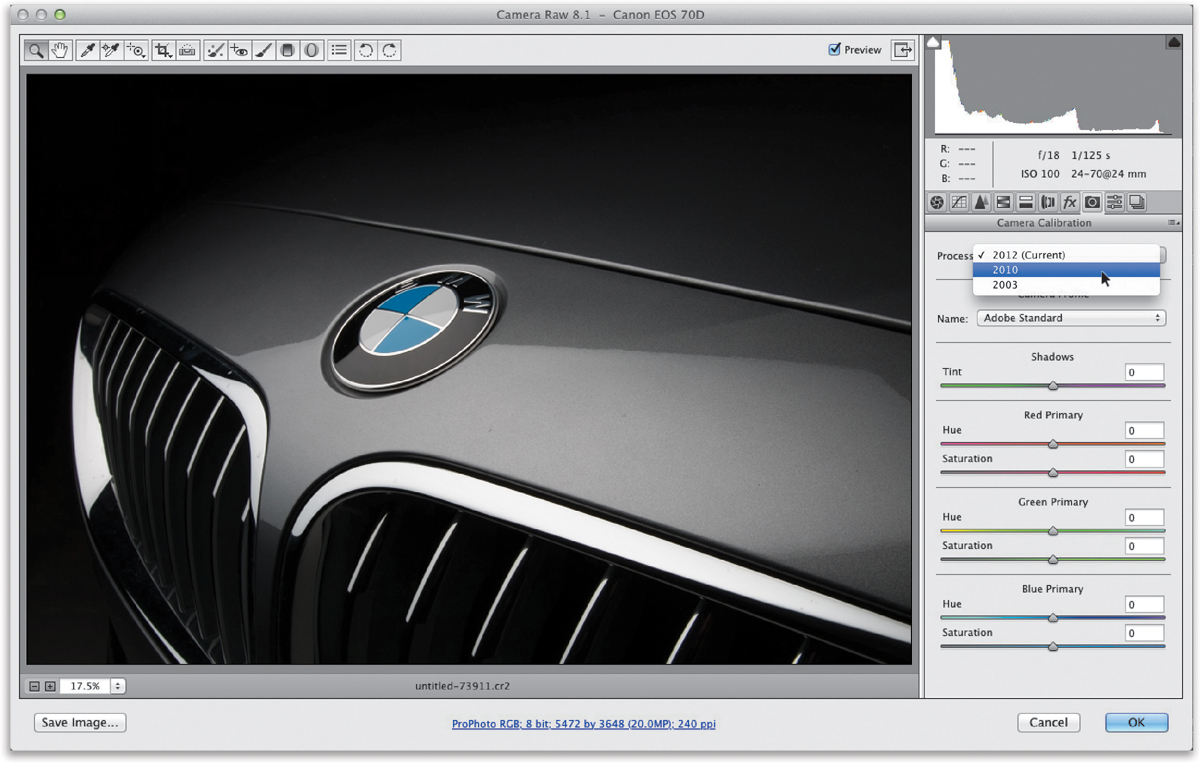
Next, double-click on the top smart object layer, and then click on the Camera Calibration icon (the third from the right) near the top right of the Camera Raw window. At the top of this panel, you’ll see the Process pop-up menu is set to 2012 (Current). That means you’re using the current, most up-to-date processing version for your RAW image (and that’s a good thing). The previous version was the 2010 process version (used in CS5)—that’s the version that had the Fill Light slider. That slider was replaced in Photoshop CS6 (and Lightroom 4) with the Shadows slider, which is much more subtle in its effect, and overall looks more natural. But, if you do need to really open up those shadows, the old Fill Light slider would definitely do the trick (albeit, not as realistically as the new Shadows slider, but when you need lots of shadow-opening juice, nothing rocks a shadow like Fill Light). To make this slider re-appear in Camera Raw, from that Process pop-up menu, choose 2010 (as shown here).
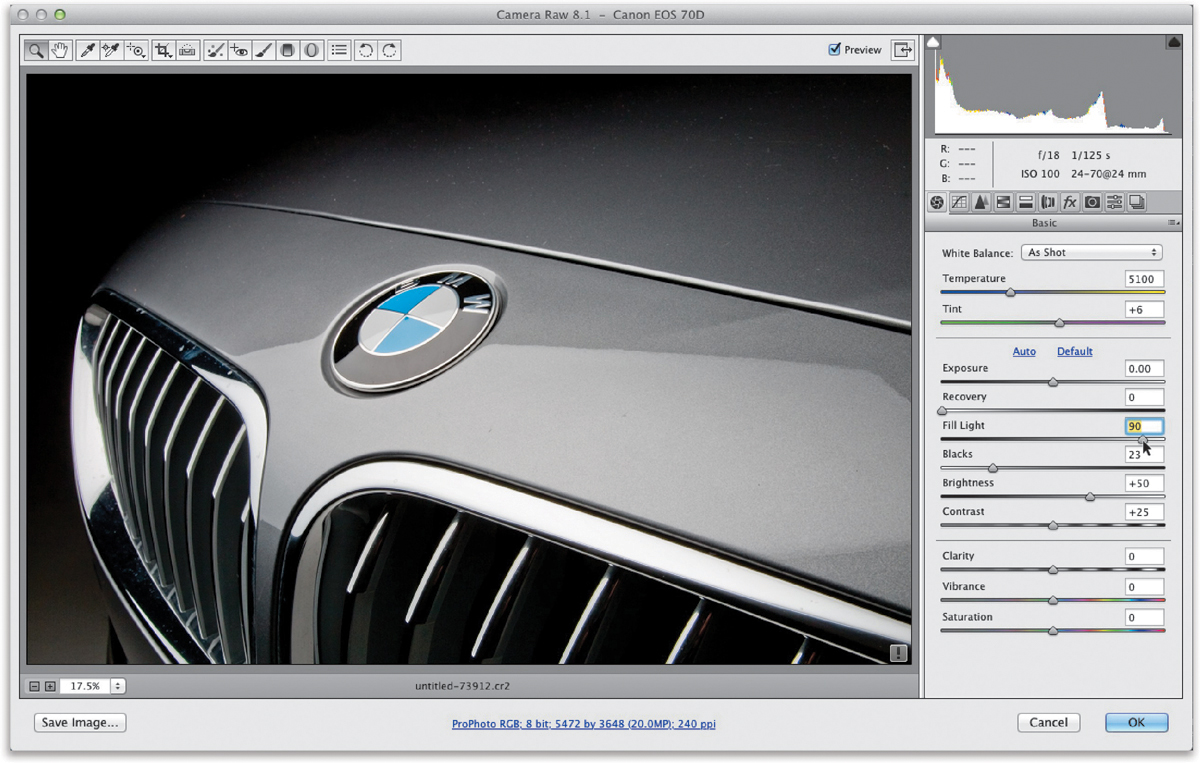
Go back to the Basic panel (the first icon), and you’ll see that the Fill Light slider now appears and the Shadows slider is gone. We’re trying to open up those solid black areas at the bottom of the car’s front grill, so drag that Fill Light slider way over to the right (as shown here), and it really opens up that area. Although this really did open up the shadows here, it also washed out the photo as well, so drag the Blacks slider a little to the right until the contrast comes back in the shadow areas, and click OK. It’s way too bright overall in the shadows now (after all, we only wanted the bottom of the grill brighter), but we can fix that in the next step.
STEP SIX:
We only want the area at the bottom of the grill to have this opened-up shadows look, so Option-click (PC: Alt-click) on the Add Layer Mask icon at the bottom of the Layers panel (shown circled here in red) to hide this brightened smart object layer behind a black layer mask. Now your image looks like it did before we moved that Fill Light slider, but that’s because that top layer is hidden behind that black mask. Our job is to reveal just part of that layer—the area at the bottom of the grill—and we’re going to do that using the Brush tool to paint in that part of the grill. So, get the Brush tool (B) from the Toolbox and make sure your Foreground color is set to white. Now, paint over the bottom part of the grill (as shown here) and, as you do, it paints in the brighter version of the grill (you’re now seeing the Fill Light layer showing through only where you paint).

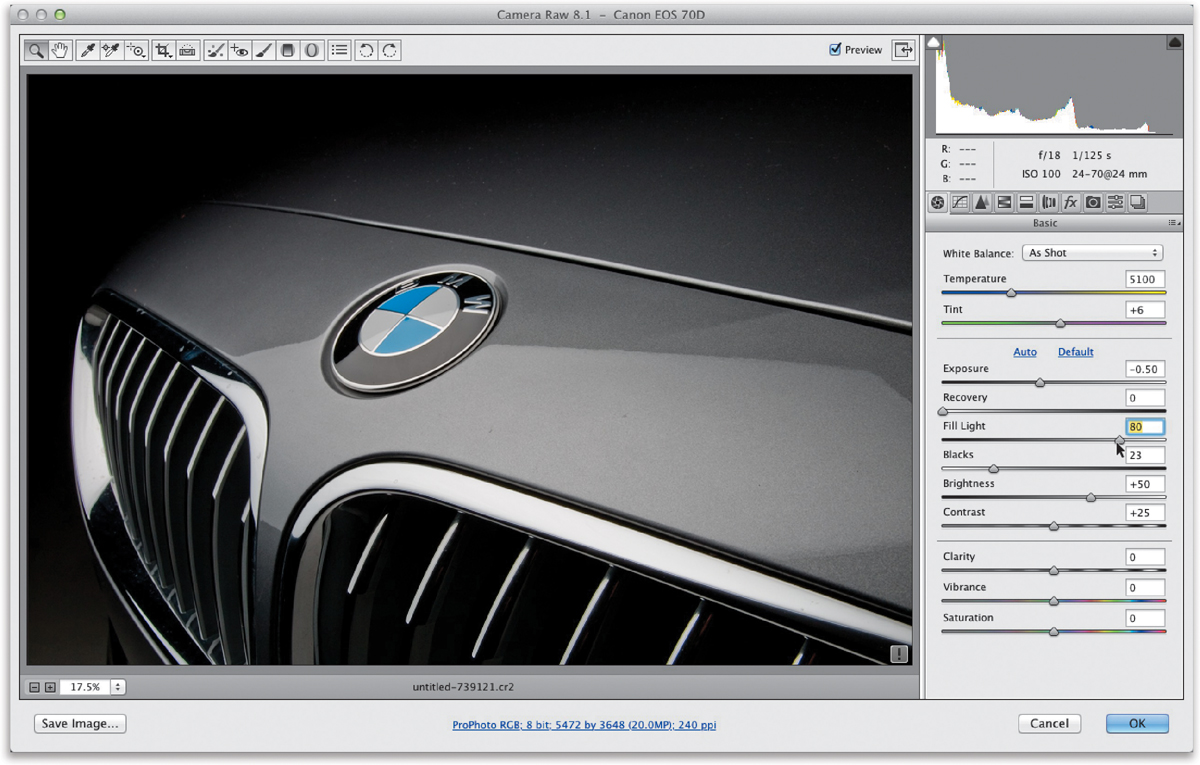
The beauty is that if you want to return to Camera Raw and tweak that Fill Light effect now, all you have to do is double-click on the thumbnail for that top layer, and it will re-open the RAW image in Camera Raw with your last settings intact. So, let’s go ahead and lower the Fill Light amount down to 80 (as shown here) and lower the Exposure to –0.50. Click OK and Camera Raw updates your smart object layer automatically (you might see a progress bar appear onscreen for just a moment or two that says “Preparing Smart Object.” That’s it updating the layer).
STEP EIGHT:
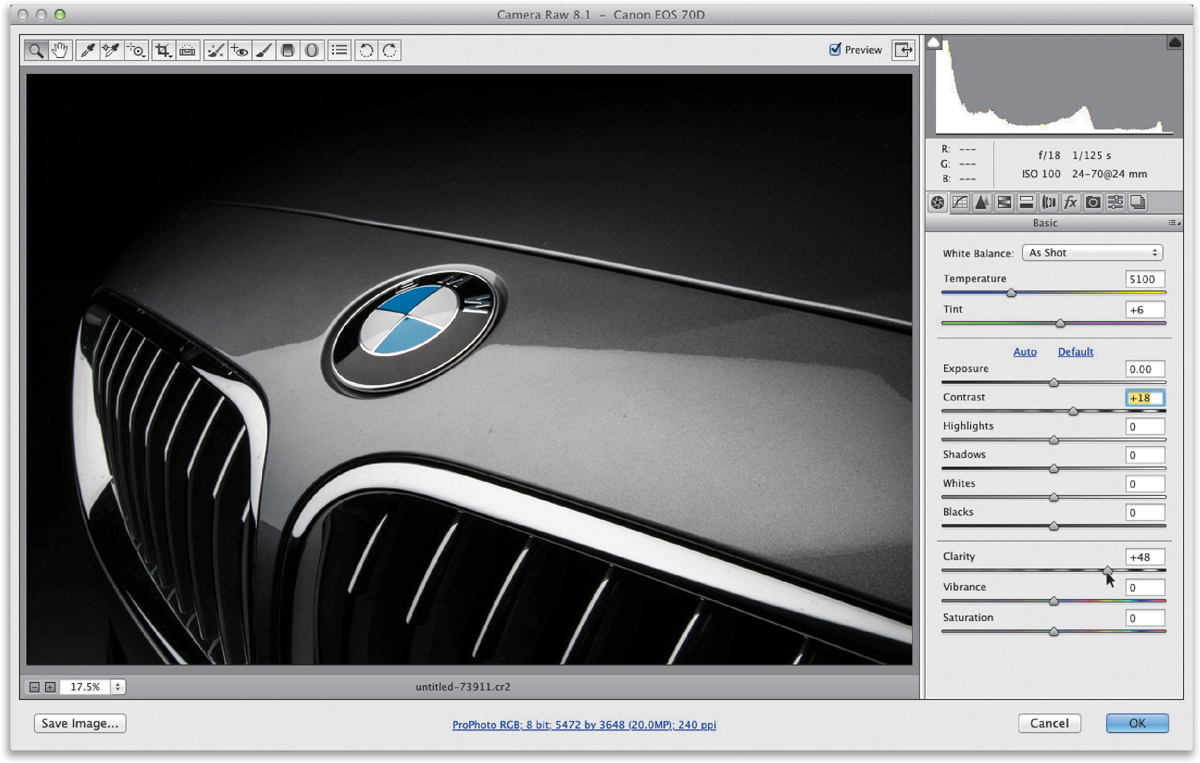
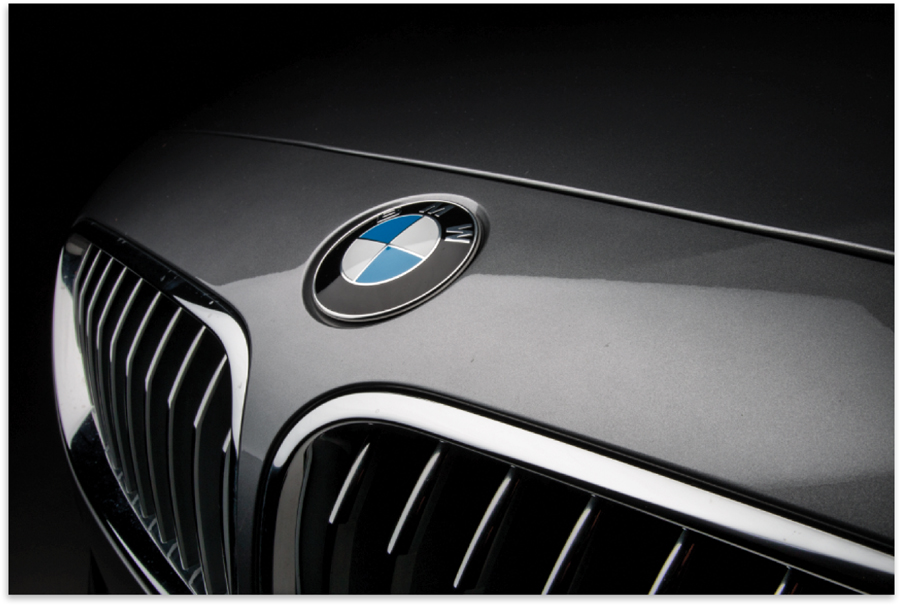
Now, let’s tweak the bottom layer. In the Layers panel, click on the bottom layer, then double-click directly on its thumbnail and the original image we brought over from Lightroom opens in Camera Raw, and you’ll see the standard sliders just like you do in Lightroom. This time, let’s increase the Contrast a bit (I dragged it over to +18), then drag the Clarity slider over to +48 to increase the midtone contrast (I add Clarity when I want to enhance the texture in an image), and then drag the Shadows slider back to 0. Click OK and it applies your changes to give you the final image you see below. I hope this helped you see how keeping your RAW image re-editable might be really handy in some cases (like when you shoot a landscape where the ground is properly exposed, but since the foreground is right, the sky is way too bright. You can use this smart object trick to duplicate the original RAW image, darken the sky by lowering the Exposure amount, and then use the layer mask trick you just learned to paint the darker sky into the shot on the bottom layer that has the properly exposed foreground).
Stitching Panoramas Using Photoshop
Lightroom doesn’t have a panorama feature built-in (well, at this point anyway—hopefully one day), so we start in Lightroom, select the images we took to make our pano, then we jump over to Photoshop to seamlessly stitch all those photos into one single image.
STEP ONE:
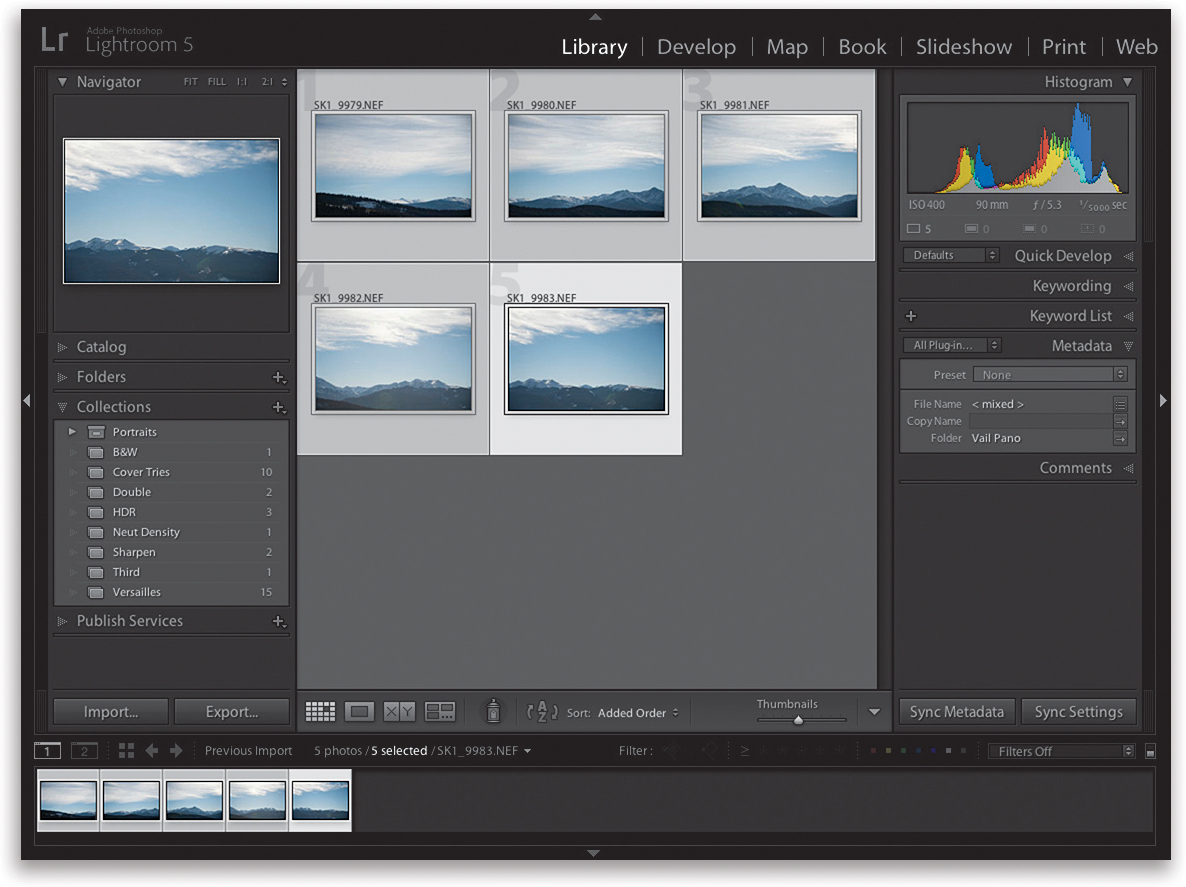
In Lightroom’s Grid view, Command-click (PC: Ctrl-click) on the photos you want to stitch together. Here, I’ve selected a series of five photos (images I shot in Vail, Colorado). When I shot them, I made sure each photo overlapped the next one by around 20%, because that’s about how much overlap Photoshop needs between images to stitch them into a single panoramic image. At this point, the images are still 16-bit RAW files, but once we take them over to Photoshop and combine them, they won’t be RAW files anymore (they’ll be combined into one PSD, TIFF, or JPEG, depending on how you have your External Editing preferences set), so that’s why it’s better to tweak the images now, in Lightroom, while they’re still individual RAW photos.
STEP TWO:
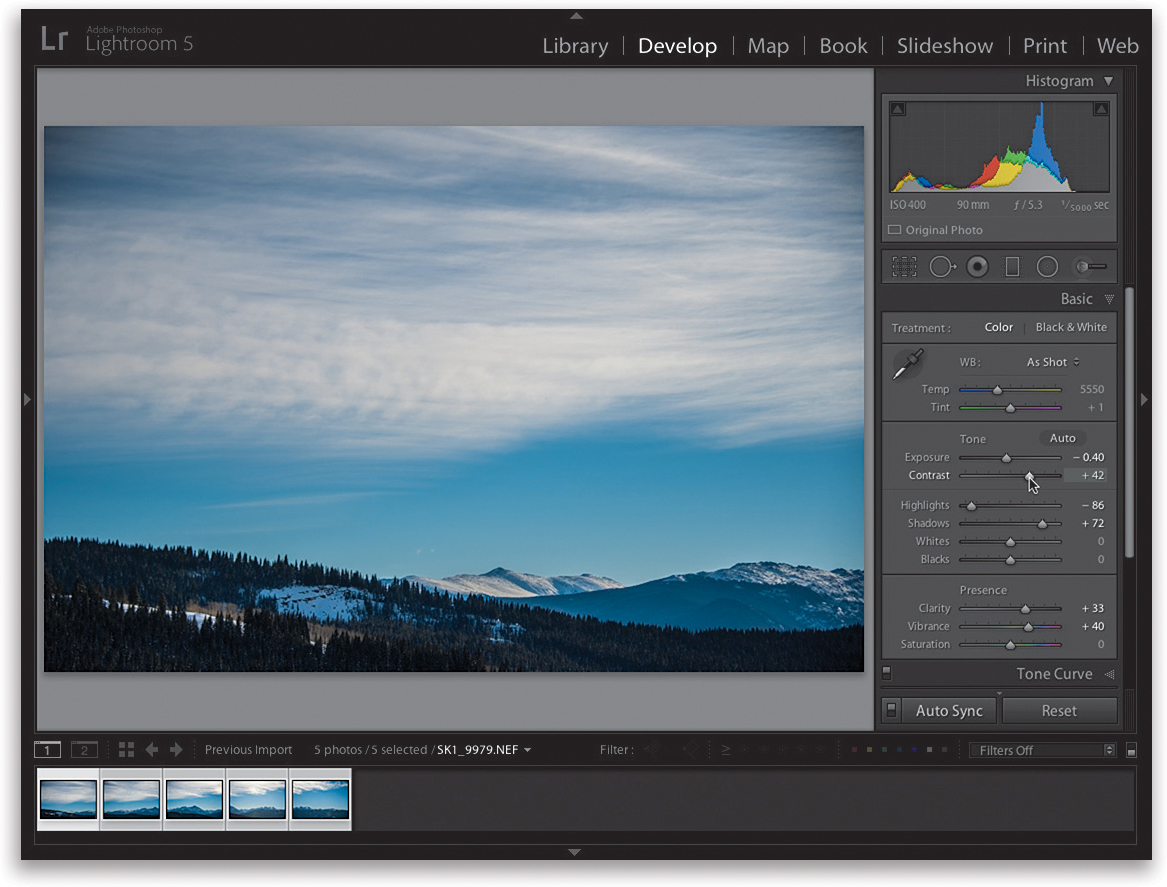
So, select all five images and go to the Develop module. Click on the little switch to the left of the Sync button (at the bottom of the right side Panels area) to turn on Auto Sync, so when we edit one photo, those changes are applied to all the rest. Now, let’s increase the Contrast, lower the Exposure just a little (to make the sky a little darker), increase the Shadows amount (so we can see detail in the mountains), increase the Clarity (to enhance the texture in the trees and sky), and lastly, increase the Vibrance (to make the image more colorful; especially the sky).
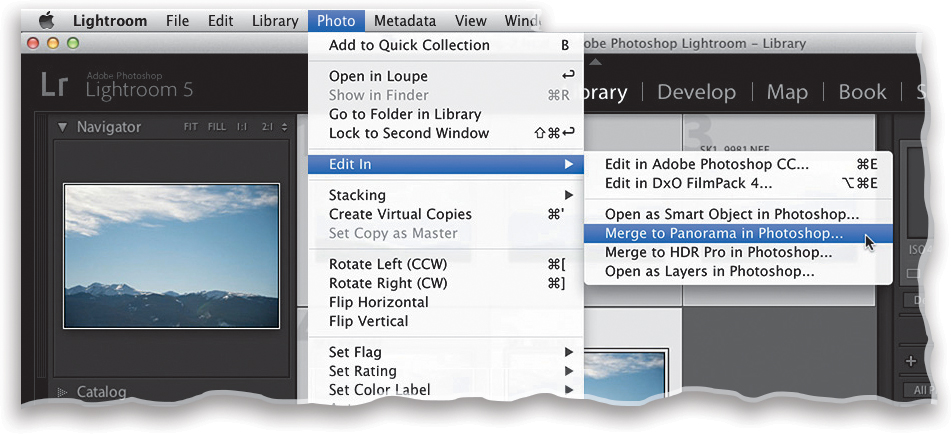
Once the photos look good, go back to the Library module and, while all five are still selected, go under the Photo menu, under Edit In, and choose Merge to Panorama in Photoshop (as shown here).
STEP FOUR:
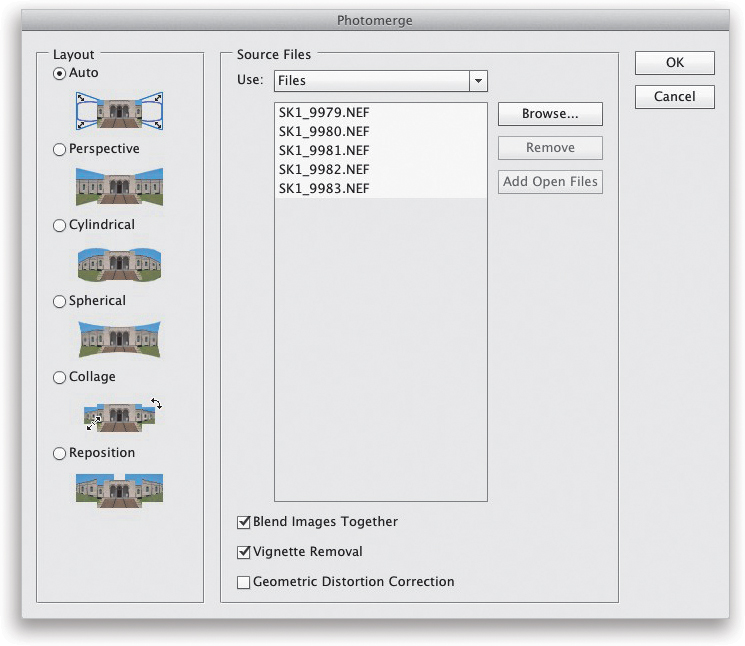
In a few moments, you’ll see Photoshop’s Photomerge dialog (shown here), and in the center of the dialog, you’ll see the names of the five images you selected in Lightroom. In the Layout section on the left side, leave it set to Auto, so Photomerge will automatically try to align and blend the images together for you. Also, these five photos have some edge vignetting (darkening in the corners), so turn on the Vignette Removal checkbox at the bottom of the dialog. It’ll take a little longer to stitch your pano together, but your vignettes will already be removed, so overall it’s a time and trouble saver. Click the OK button in the upper-right corner of the dialog to begin the stitching process.
STEP FIVE:
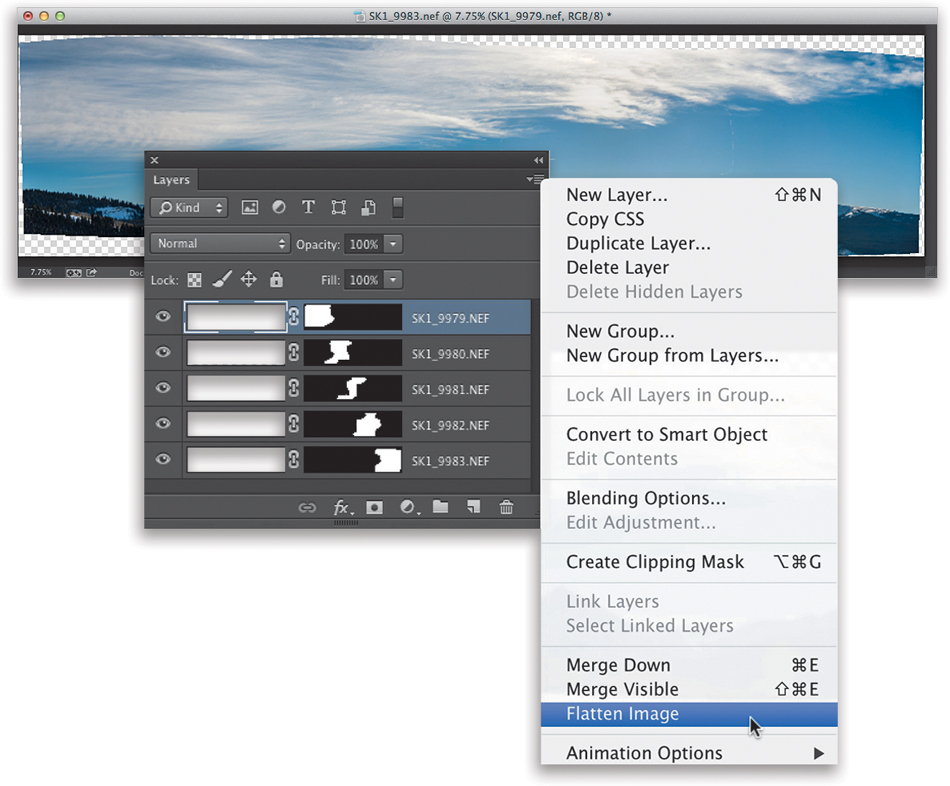
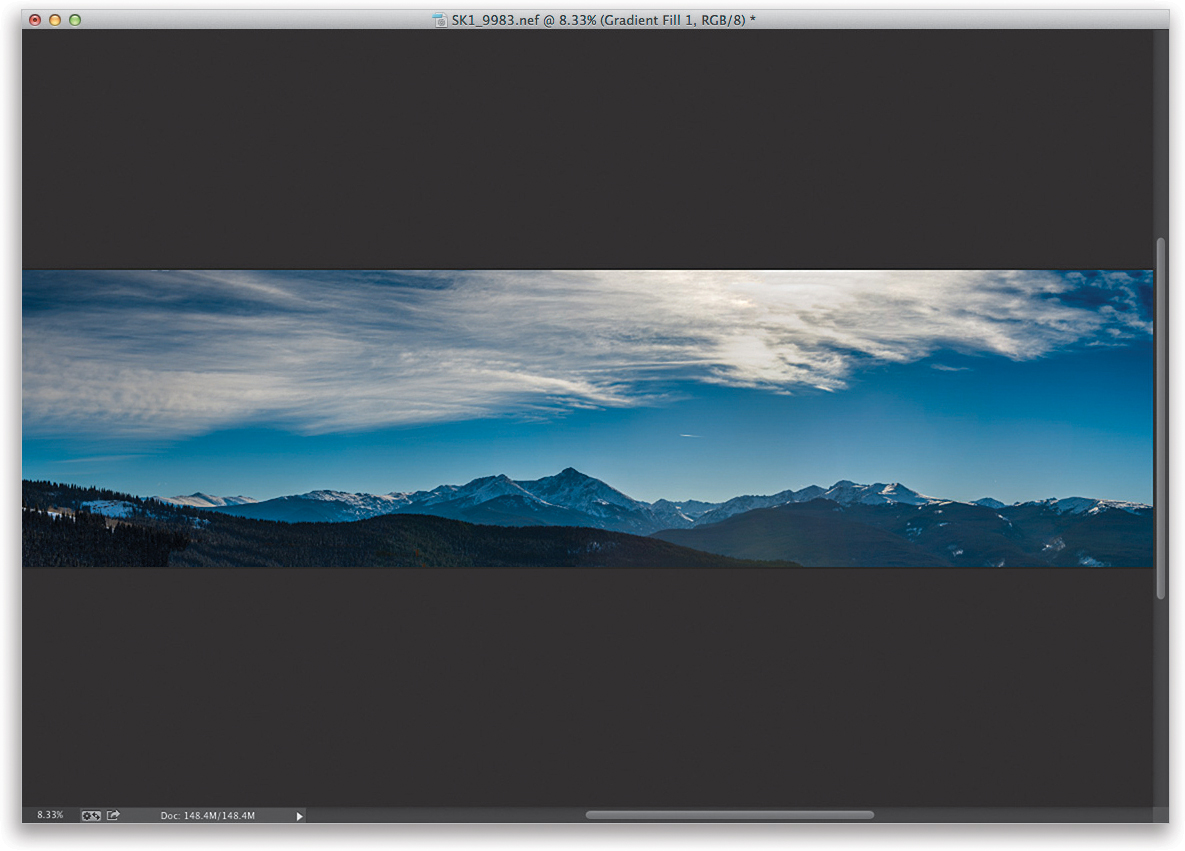
When Photoshop is done aligning and blending your photos, a new document will appear with your five images combined into a single panoramic image (as seen here). Parts of each photo wind up in this document as a separate layer (as you’ll see in your Layers panel), so if you wanted to tweak the masks created by Photomerge, you could (but I don’t). Let’s go ahead and flatten the image by choosing Flatten Image from the Layers panel’s flyout menu (the icon near the top-right corner of the panel). Now that we’ve flattened the image, let’s crop it down to size a bit to get rid some of the white gaps that Photoshop left after stitching the image together (this pretty much always happens).
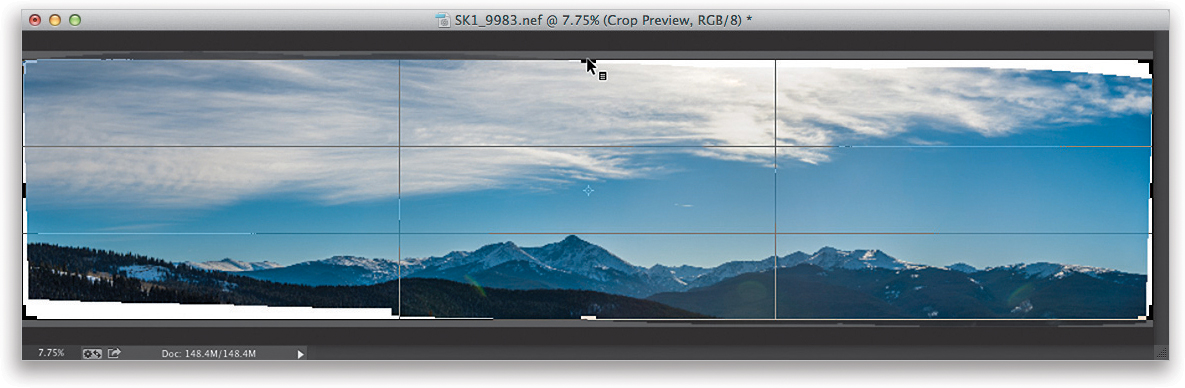
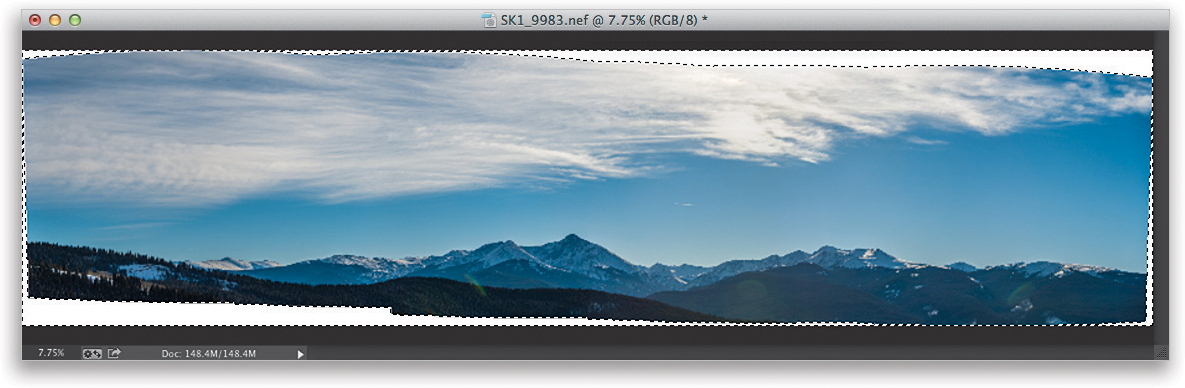
Press C to get the Crop tool and drag the top, bottom, left, and right center points inward a bit so most of those white gaps are gone (you don’t have to crop them all away—we can have Photoshop fix some small gap areas for us). Once your cropping is in place (as seen here), press the Return (PC: Enter) key to apply the cropping to your pano.
STEP SEVEN:
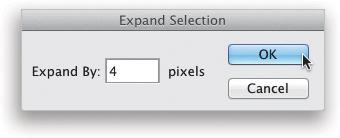
To fill in the small white gaps that remain along the top, bottom, left, and right sides, we use Content-Aware Fill, which tries to fill in the gaps intelligently (and actually does that pretty well most of the time). Start by getting the Magic Wand tool (Shift-W) from the Toolbox and click it once in one of the white gap areas. Since there are multiple areas with white gaps, just press-and-hold the Shift key and click on those areas, and it adds them to your current selection. Once your selection is in place, we do a trick to make Content-Aware Fill work better: we expand it out by a few pixels. So, go under the Select menu, under Modify, and choose Expand. When the dialog appears, enter 4 pixels and click OK.
STEP EIGHT:
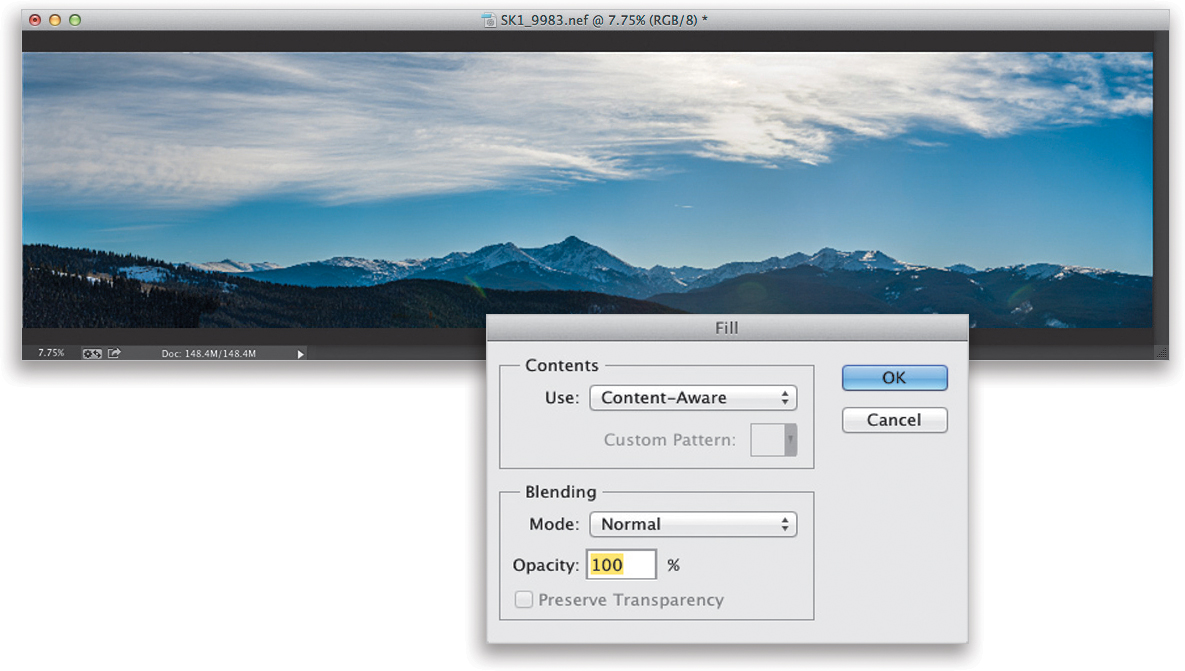
Once you’ve expanded your selection by four pixels, go under the Edit menu and choose Fill. When the dialog appears, choose Content-Aware from the Use pop-up menu (as seen here) and click OK. Press Command-D (PC: Ctrl-D) to Deselect. As you can see, it does a pretty amazing job.
STEP NINE:
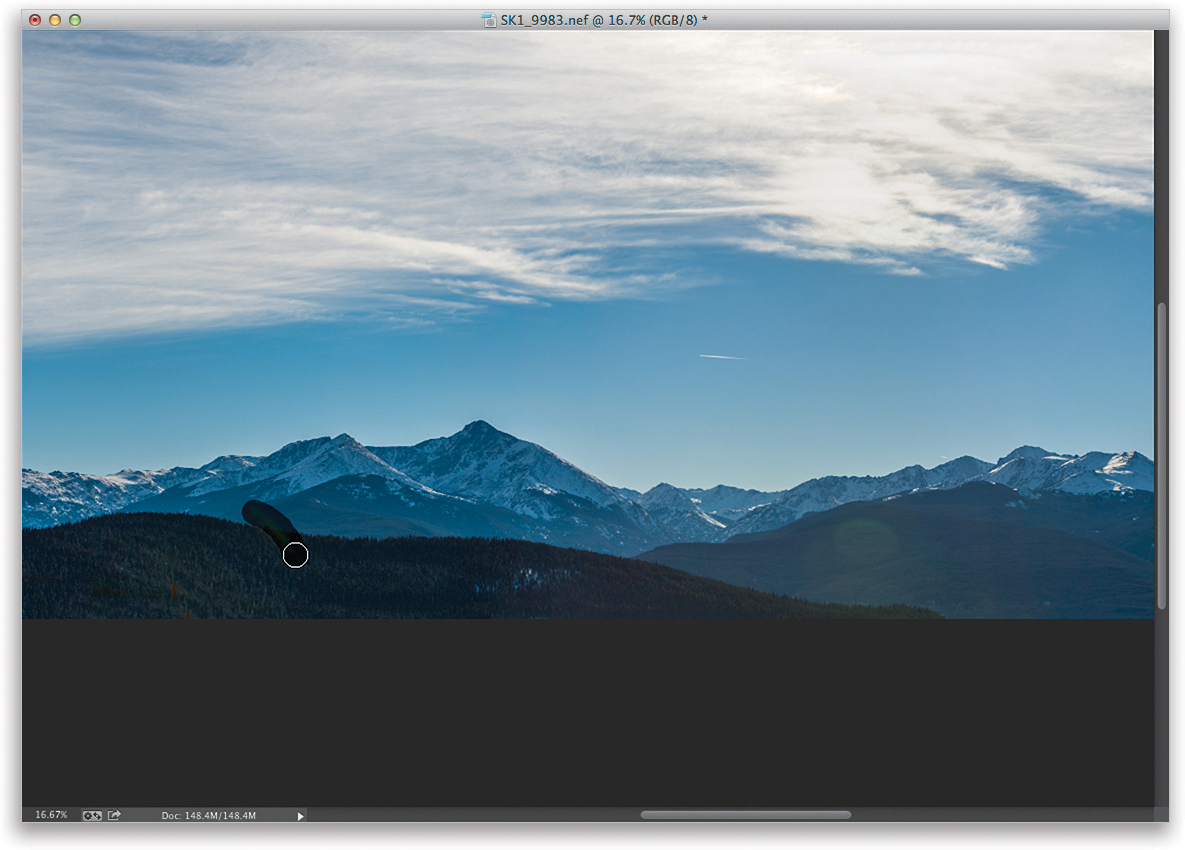
Now that all the white gaps are filled in, go ahead and take a good look at the image. Here, you’ll see three or four small areas where we have some lens flare (greenish spots or strokes on the image). Although we could wait to get rid of these later in Lightroom, honestly it’s easier here in Photoshop. So, get the Healing Brush tool (press Shift-J until you have it) from the Toolbox and paint over the areas where you see lens flare to remove them (as shown here, where we’re removing a streak of green lens flare on the left side of the image).
STEP 10:
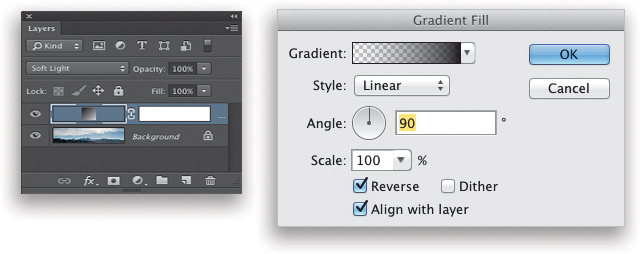
Next, let’s add a neutral density gradient effect (darkening the sky and then graduating down to transparent). First, press D to set your Foreground and Background colors to their defaults of black and white, respectively. At the bottom of the Layers panel, click on the Create New Adjustment Layer icon and choose Gradient. When the Gradient Fill dialog appears, it does the opposite of what we want—it darkens the ground instead of the sky. So, turn on the Reverse checkbox to fix that and click OK. Now, go to the Layers panel and change the layer’s blend mode from Normal to Soft Light, and the effect blends in with the sky on the layer below it (as seen here). Go ahead and flatten the image and when you’re done, to take your pano back to Lightroom, you do just two things: (1) save the file, and (2) close it. So, press Command-S (PC: Ctrl-S) to save it, then close the image window. When you go back to Lightroom, you’ll see the pano appear in the Grid view, right after the images you used to create it.
Creating HDR Images in Photoshop
HDR (High Dynamic Range) images (a series of shots of the same subject taken at different exposures to capture the full tonal range) have become really popular, and you can take the images you shot for HDR straight from Lightroom over to Photoshop’s Merge to HDR Pro feature. You start by shooting bracketed on your camera. Here, I set up my camera to shoot three bracketed shots with two stops between each shot—one with the standard exposure, one two stops darker, and one two stops brighter (for three shots total).
STEP ONE:
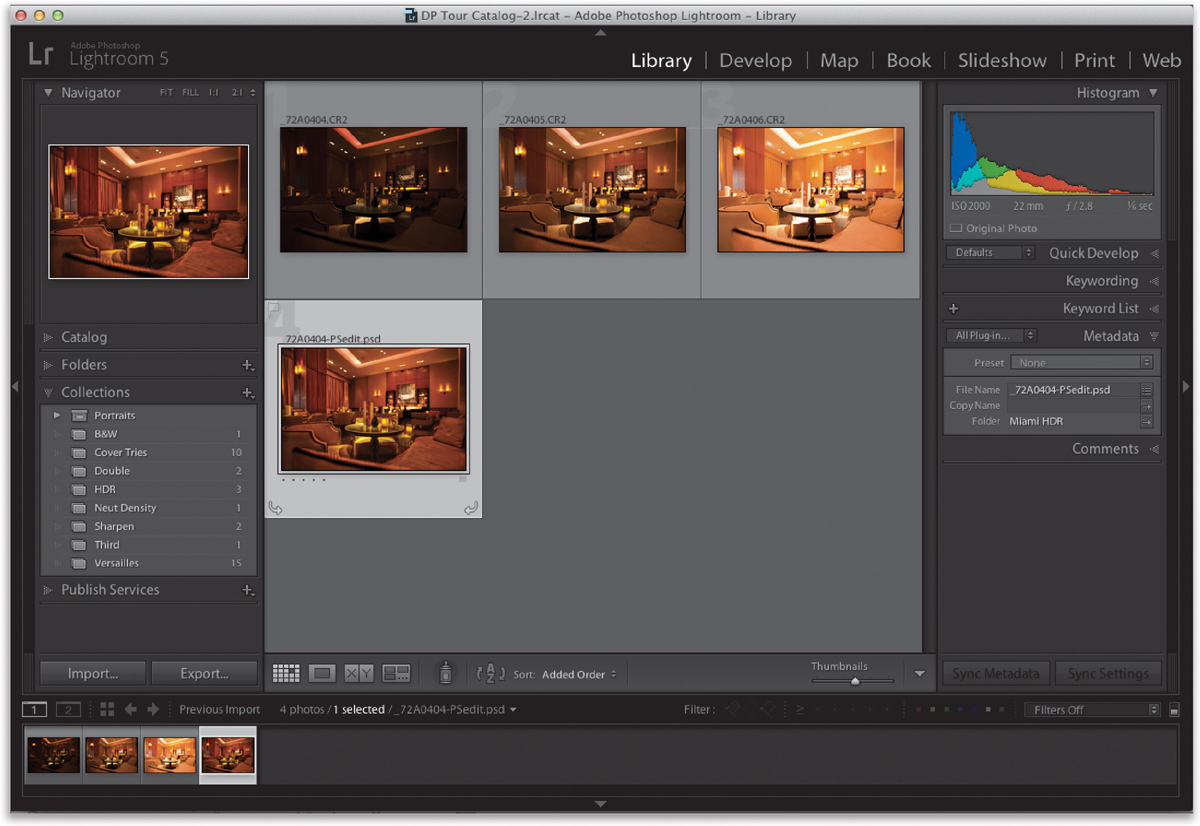
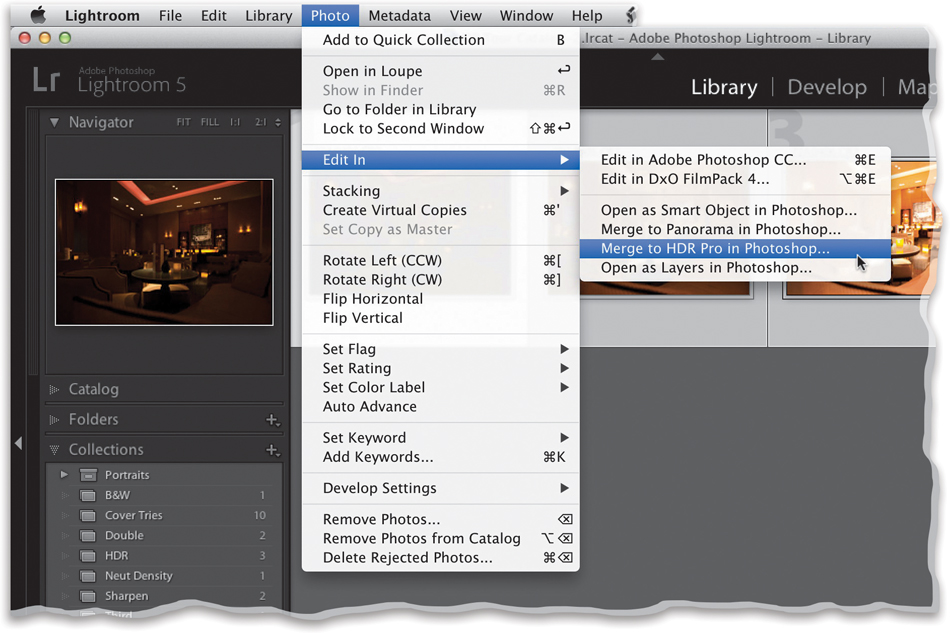
In Lightroom, select your bracketed shots. Here, I’ve taken three bracketed shots (with a two-stop difference between each) and selected all three in the Library module by Command-clicking (PC: Ctrl-clicking) on each one. Once you’ve selected them, go under the Photo menu, under Edit In, and choose Merge to HDR Pro in Photoshop (as shown here).
STEP TWO:
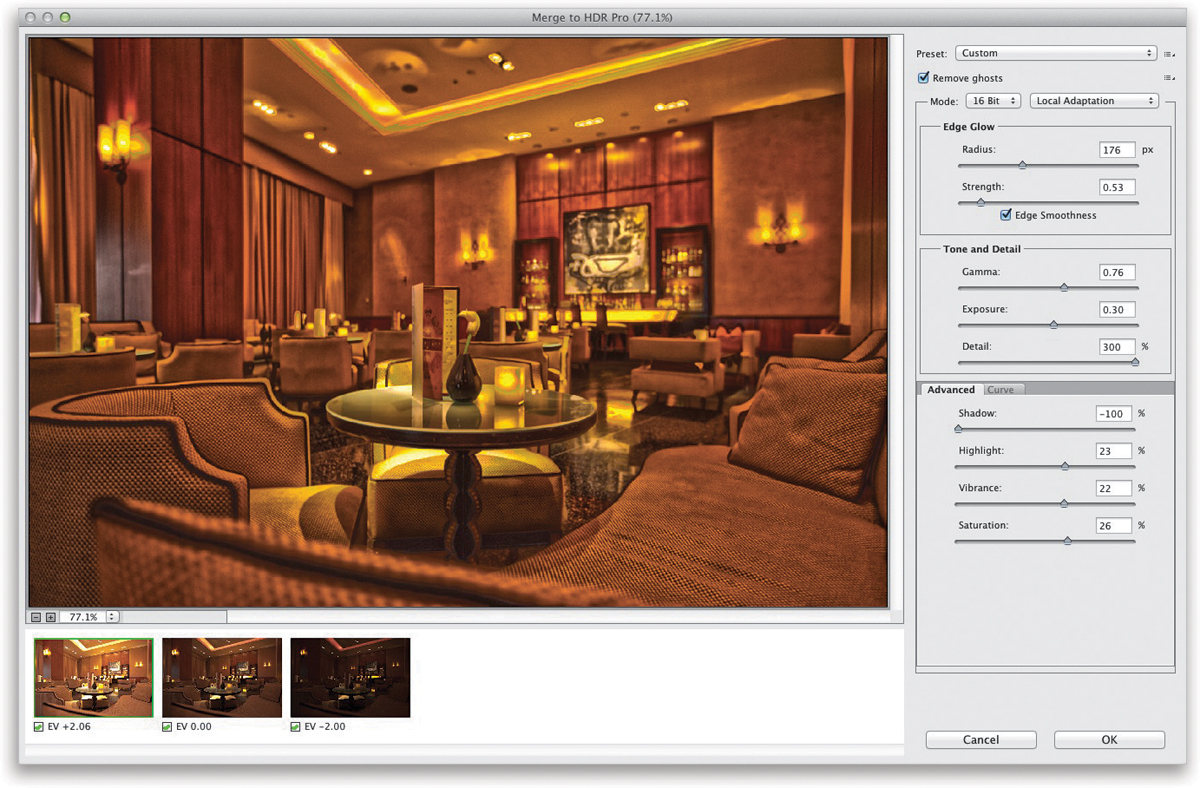
This launches Photoshop, and brings up the Merge to HDR Pro dialog (shown here), and it compiles your three images (or five images, or seven images—it just depends on how many bracketed shots you took) into one flat-looking image (as seen here), but that’s just reflecting the default settings. There’s a Preset menu in the top-right corner of the dialog with a group of presets that are...well...most are just about unusable. Adobe must have gotten tired of hearing me whine about them because when they launched CS5 they asked if they could include one of my own presets. Of course, I was happy to give them one, and it has been in HDR Pro ever since. It’s called “Scott5.”
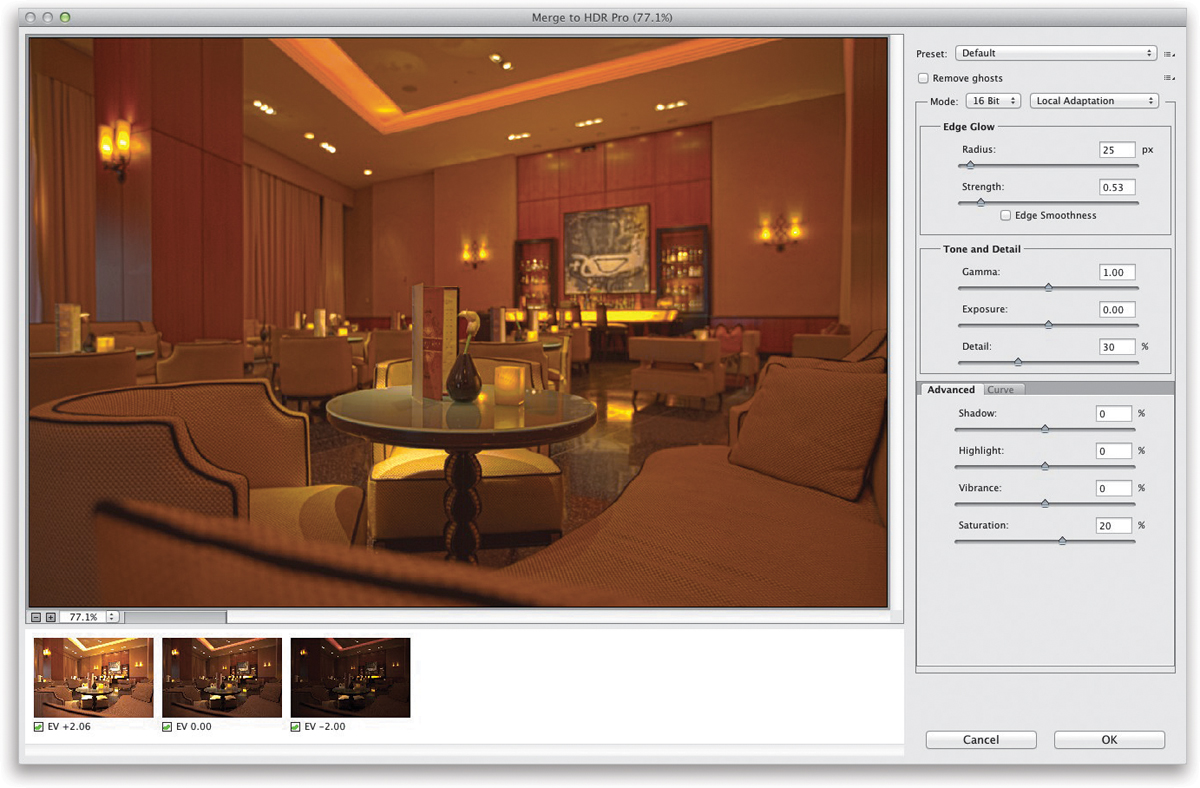
Go ahead and choose Scott5 as it gives you that HDR-tonemapped look (I know, it looks bad right now, but it’ll get better in just a moment). Back in Photoshop CS6, Adobe added an important new feature called Edge Smoothness, which makes your HDR effect less harsh, but the Scott 5 preset was created before Photoshop had this feature, so you have to add it. So, right after you choose Scott 5, turn on the Edge Smoothness checkbox. This softens the effect enough that you’ll need to crank up the Strength a bit, so drag the Strength slider a little bit to the right to add more tonemapping (I increased it to 0.53). One more tweak: the Highlight slider on the Advanced tab controls the brightest whites (in this case, the lights in the room), so to brighten them up, drag it over to 23%.
STEP FOUR:
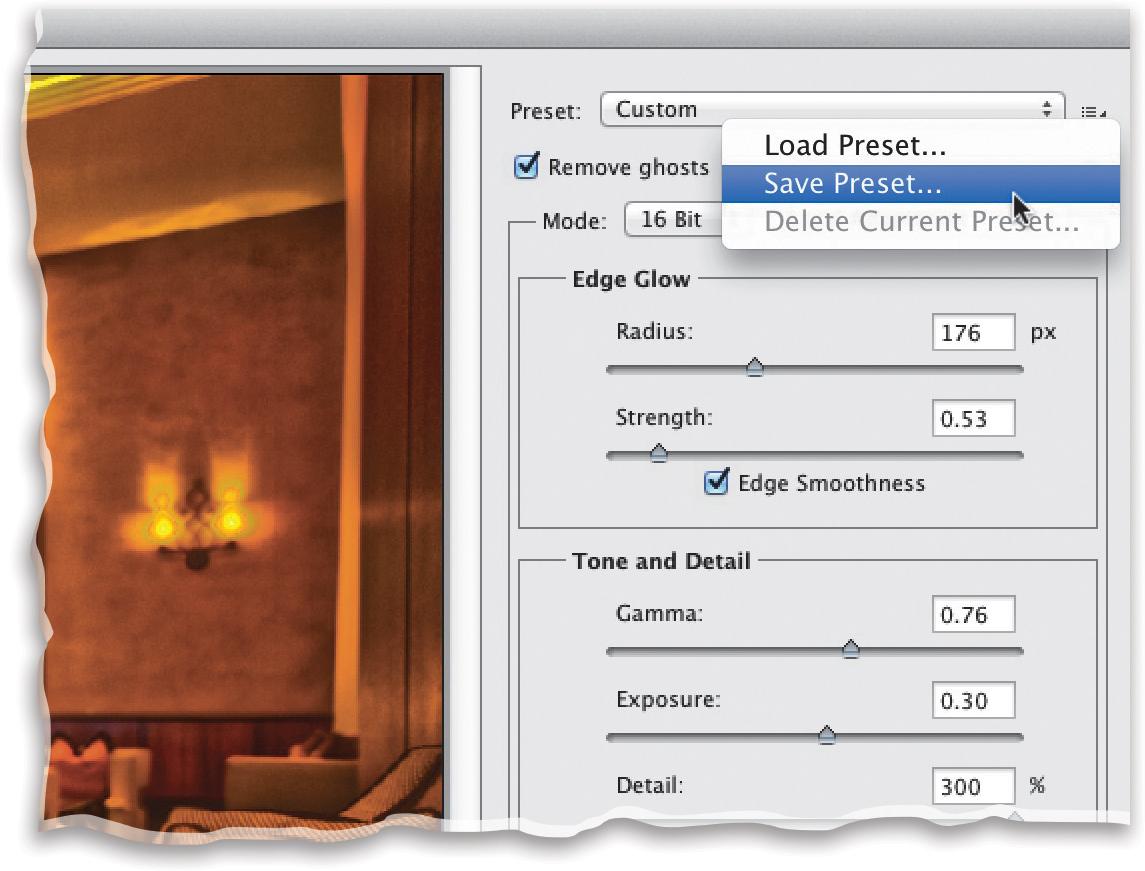
For now, let’s save these tweaked settings as our own custom preset by going to the flyout menu to the right of the Preset pop-up menu and choosing Save Preset (as shown here). Then, give your preset a name. I named mine “Scott 6” (I know, big surprise). This preset works well as a starting place for most images—it is a bit over the top, but we’ll deal with that soon enough. In the meantime, I want to note that I don’t really touch any of the other sliders here with the exception of the Highlight slider, which affects the brightest areas of the image. So, if it were an HDR of a cathedral, it would control how bright the windows in the cathedral appear. In this case, it’s the lighting in the room and the flicker of the candles. The Shadow slider is the other one I sometimes move to the right to open up the shadows, but I don’t use it nearly as much as the Highlight slider.
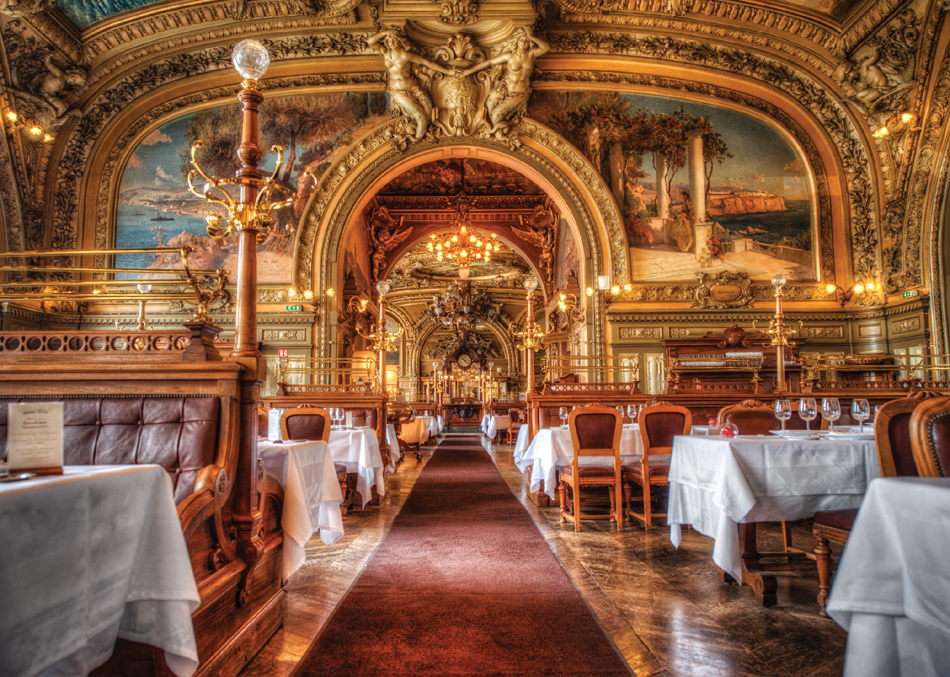
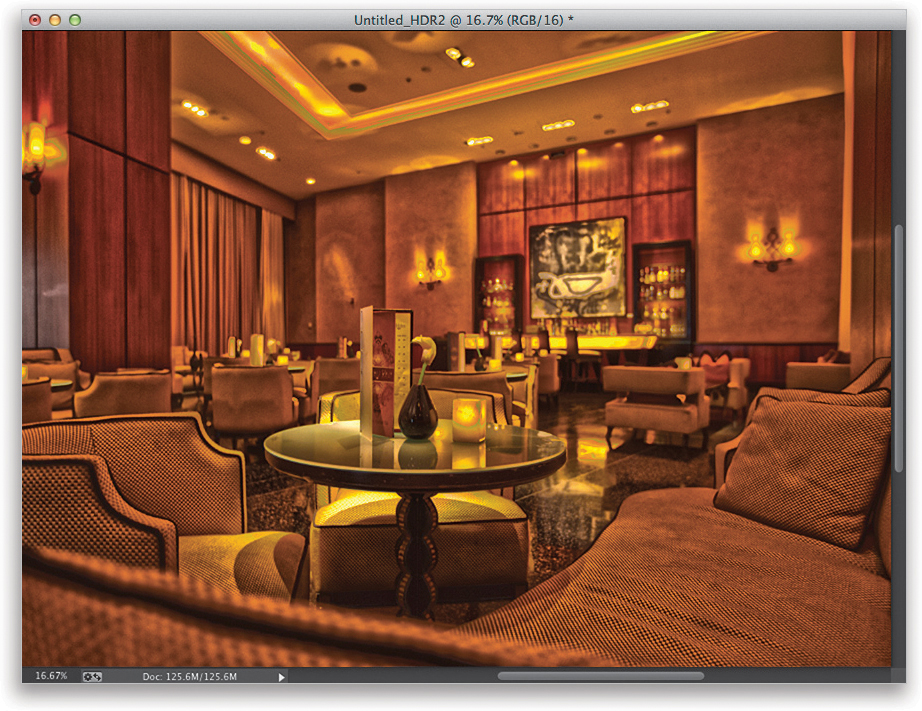
Go ahead and click OK in the Merge to HDR Pro dialog to open your now tonemapped image in Photoshop, as seen here. What we’re looking to do here is come away with an image that has some of the good things about HDR (like the enhanced detail and opened-up shadow areas), but keep a more realistic look (so the image doesn’t look obviously “HDR’d”).
STEP SIX:
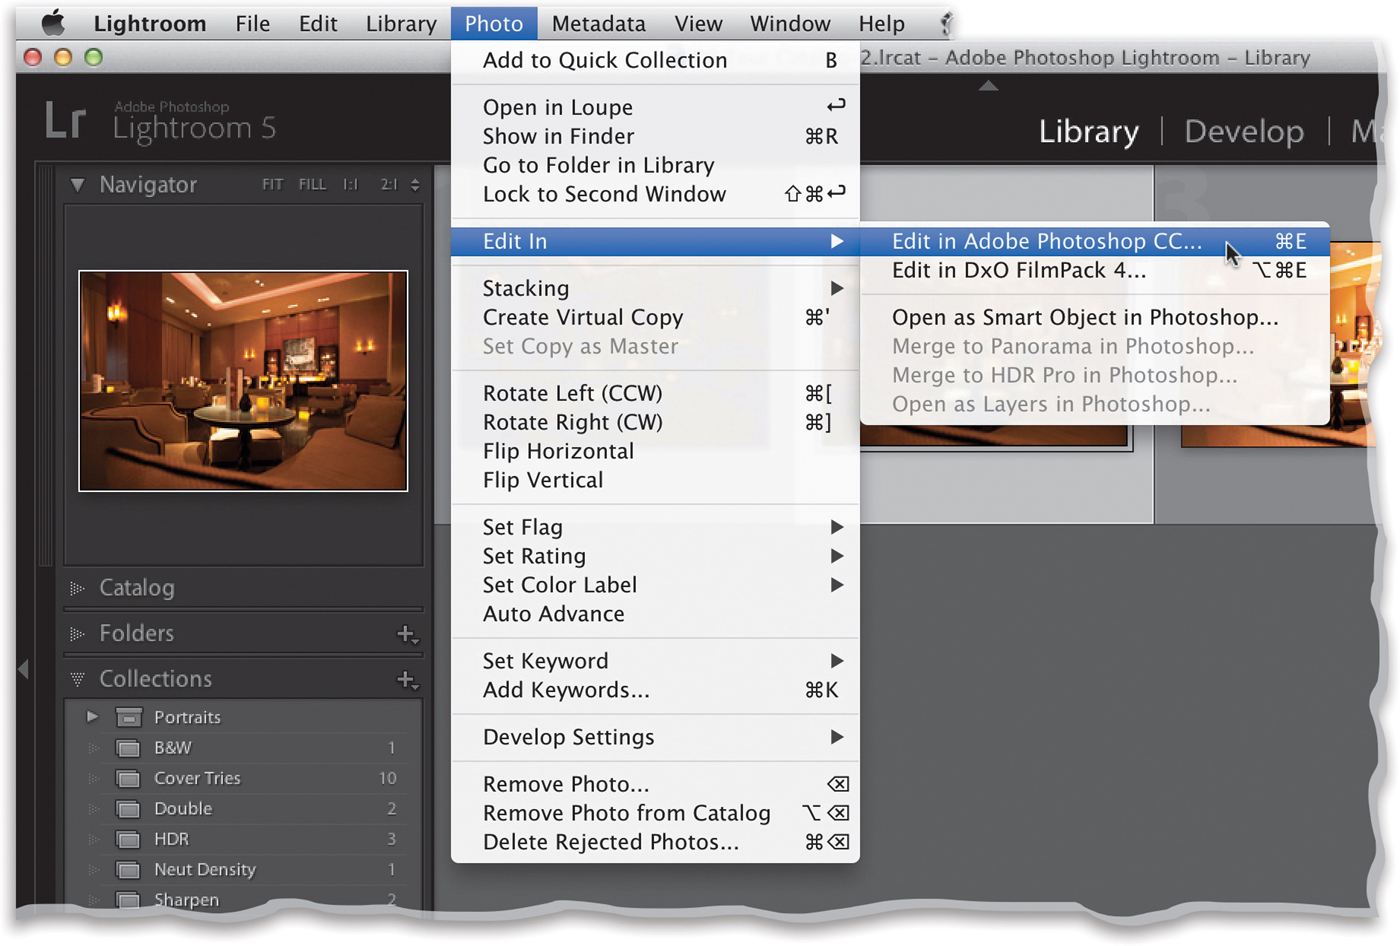
Now, go back to Lightroom to your three bracketed images. Press Command-D (PC: Ctrl-D) to deselect all three, and then click on the one that is the normal exposure. Press-Command-E (PC: Ctrl-E) to open this normal exposure image in Photoshop (or go under the Photo menu, under Edit In, and choose Edit in Adobe Photoshop, as shown here).
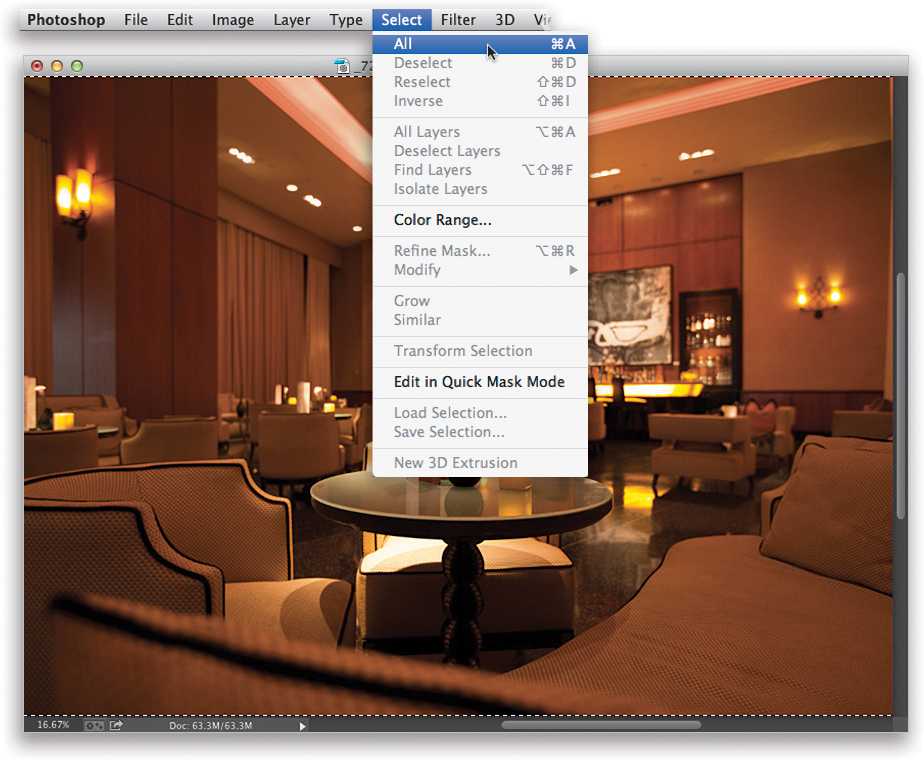
Once the image appears, press Command-A (PC: Ctrl-A) to put a selection around the entire image (or go under the Select menu and choose All, as shown here). Then, press Command-C (PC: Ctrl-C) to Copy the image into memory. Switch to your HDR image and press Command-V (PC: Ctrl-V) to Paste the normal exposure image right on top of your HDR image (it appears on its own separate layer, as seen in the next step).
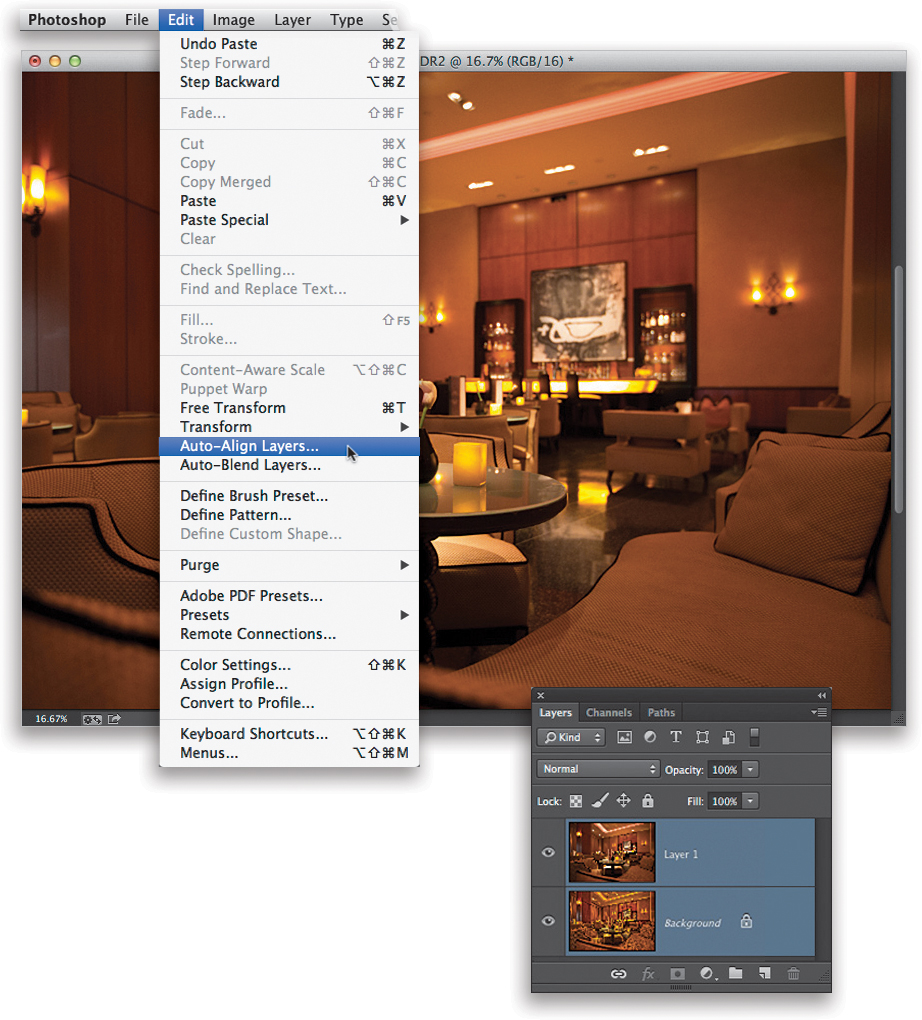
In most cases, the two images will align absolutely perfectly, but in this case it’s off by a few pixels (due to how Photoshop processed the HDR shot, since I didn’t shoot it on a tripod), but Photoshop can fix the alignment problem for you. Start by going to the Layers panel and selecting both layers (click on the Background layer, then Command-click [PC: Ctrl-click] on the other layer), then go under the Edit menu and choose Auto-Align Layers, as shown here. Once the dialog opens, leave the Projection set to Perspective and click OK, and in just a few seconds, the images on your two layers are perfectly aligned. (Note: When it does this aligning, you’ll usually have to go and crop the image just a tiny bit on all sides.) Next, in the Layers panel, click on the top layer (the normal exposure layer) to make it the active layer, then go to the bottom of the Layers panel and click on the Add Layer Mask icon (it’s the third one from the left).
Adding a layer mask allows us to paint over areas of the normal photo where we want the HDR image to show through. This is important because areas of the photo that are out of focus from a shallow depth of field look really funky (in a bad way) when you add HDR toning. In this case, the area against the back wall is out-of-focus, so we want to keep that area untouched, so it doesn’t have any effects on it. However, the area in the foreground, like the couch on the right, the tables, the marble floor, and the walls on the left side, would look great with the effect. So, press X to set your Foreground color to black, get the Brush tool (B) from the Toolbox, choose a medium-sized, soft-edged brush from the Brush Picker in the Options Bar, and then paint over just those areas (as shown here). These are the good parts of the HDR image, and now they’re added to our normal image. If you make a mistake, press X again to switch your Foreground color to white and paint over those areas, then switch back to black. By the way, avoid the arm of the couch right at the very front edge of the image (the foreground) since it’s very out of focus.

STEP 10:
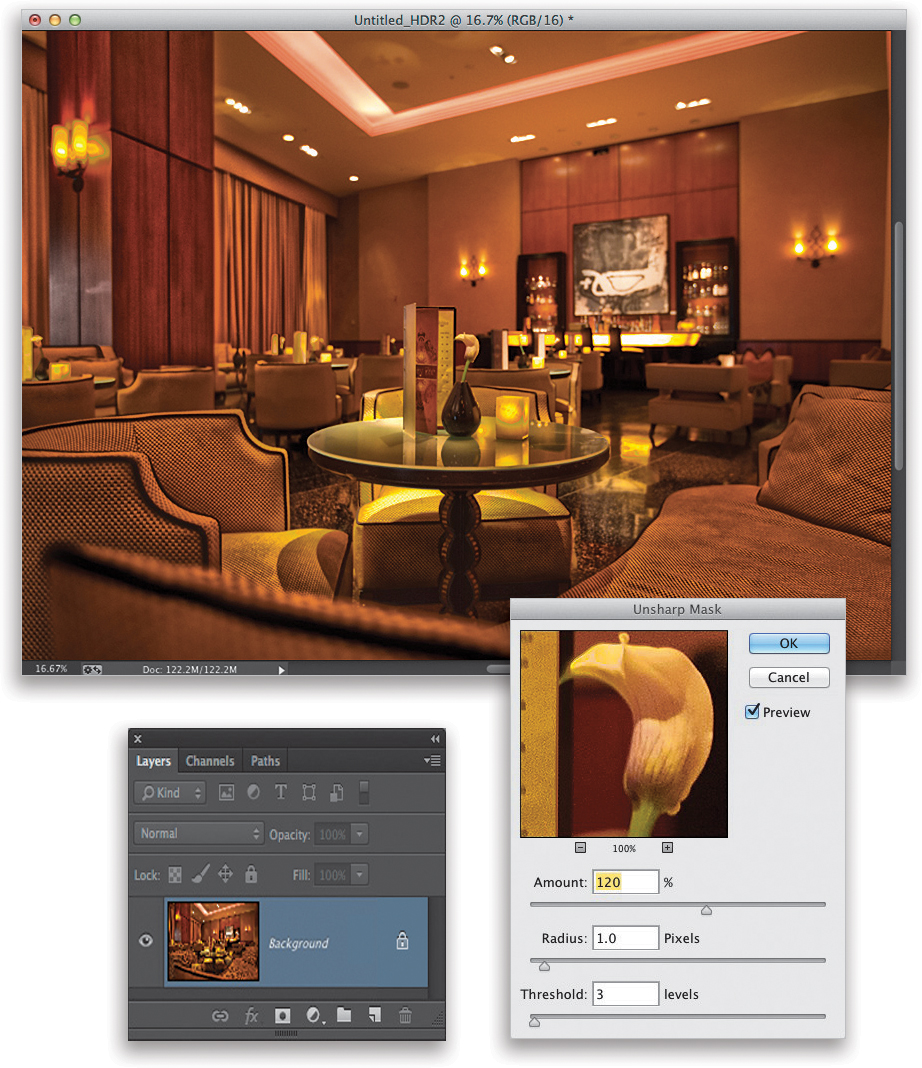
At this point, I do some sharpening and then a couple of finishing moves that are popular for HDR images. We’ll start with the sharpening, so let’s go ahead and flatten the image (getting rid of the all the layers)—go to the Layers panel’s flyout menu (at the top-right corner of the panel) and choose Flatten Image. Next, go under the Filter menu, under Sharpen, and choose Unsharp Mask. To add some nice punchy sharpening, enter Amount: 120%, Radius: 1.0, Threshold: 3, and then click OK to sharpen the image. Now, duplicate the Background layer by dragging it onto the Create a New Layer icon at the bottom of the Layers panel, or pressing Command-J (PC: Ctrl-J).
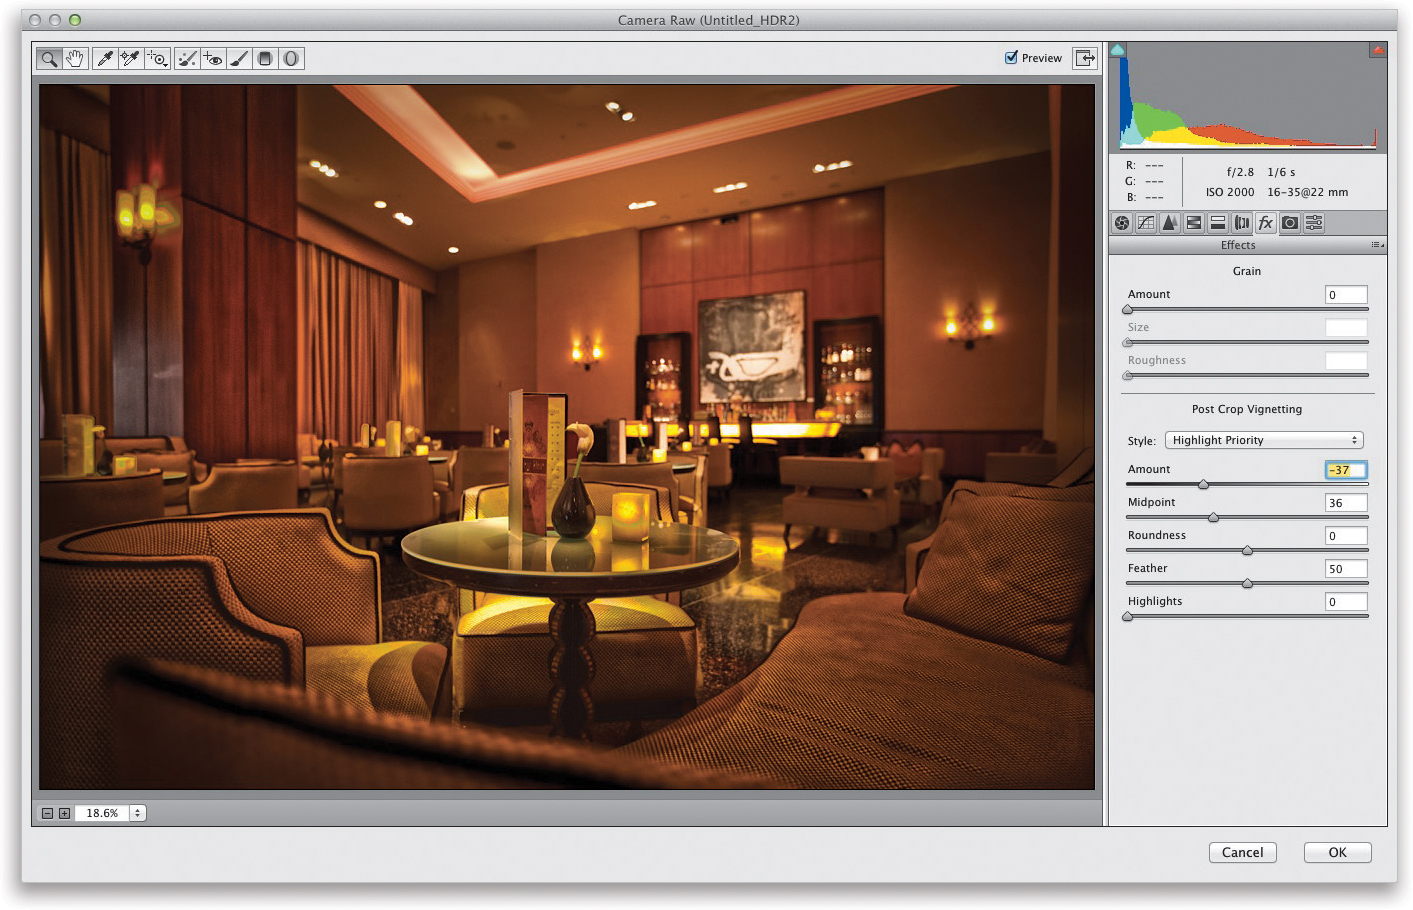
Now for our finishing effects: One of the most popular is to add an edge vignette (darkening the edges of your image all the way around it). If you’re using Photoshop CC, then go under the Filter menu and choose Camera Raw Filter to bring up the Camera Raw window (shown here), which is the same as Lightroom’s Develop module. Click on the Effects icon, then in the Post Crop Vignetting section, drag the Amount slider to the left (I dragged over to –37) to darken the image, then drag the Midpoint slider to the left (I dragged over to 36) to make the darkening extend more toward the center of the image, and then click OK. If you don’t have Photoshop CC, wait to add this vignette until your image is back in Lightroom, then in the Develop module go to the Effects panel and apply the same settings.
STEP 12:
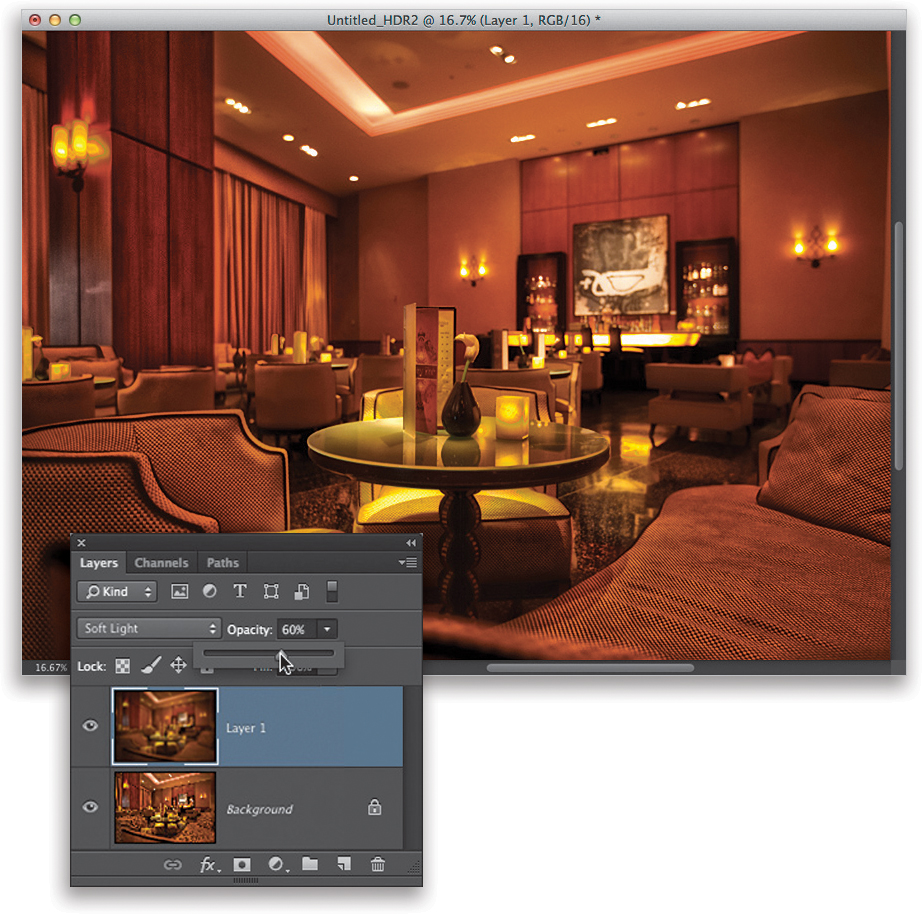
Another popular finishing effect is to add a soft, contrasty glow to the entire image. So, go under the Filter menu, under Blur, and choose Gaussian Blur. Enter 50 pixels (which is enough to make this layer majorly blurry, as seen here) and click OK.

Now we’re going to change the blend mode of this blurry layer from Normal to Soft Light (in the pop-up menu at the top left of the Layers panel). This not only lets the blur blend in with the rest of the image (as seen here), it also adds a warm, contrasty look to the overall image. In fact, it’s too warm and contrasty in most cases, so go to the Layers panel and lower the Opacity of this layer to 60% (as shown here), which gives you the warm contrast without overwhelming the image. I usually wind up at between 50% and 60% opacity on this layer.
STEP 14:
So, all we need to do now to get this image back over to Lightroom is to: (1) flatten the image, (2) save the file, and (3) close it. So, from the Layers panel’s flyout menu, choose Flatten Image, then press Command-S (PC: Ctrl-S) to Save it, and then close the image window. Go back to Lightroom and you’ll find that your new HDR file appears right next to the original image files you used to create it (as seen here).