Chapter 7. Sharpen
Sharpening and Dealing with Problems
How cool is this?! I found a 2011 movie short named Sharpen, so—BAM—that’s the title. Done. Boom. It’s too perfect. Now, I must admit, it doesn’t sound incredibly compelling, as IMDb simply describes it like this: “A boy talks about his family and recounts a traumatic event.” Snore! Every boy has a traumatic family story and, while I didn’t see the movie short, I’ll bet my traumatic childhood story is much more traumatic than this kid’s, so I thought I’d share it here: When I was a young boy, I always dreamed of taking a jet plane flight. I didn’t even care where the plane was going. The whole idea was just so amazing, and being a passenger on a commercial flight was about the best thing this little boy could imagine. My older brother Jeff got to take a number of flights, but I was always left behind. But one year, on my birthday, my mother and father surprised me—the three of us would fly on a big jet to the “Big Apple.” Finally, my dream would come true. The night before the flight, I couldn’t sleep. I kept picturing the free snacks, and the soft drinks, and how polite I would be to the flight attendants (more polite than any little kid on any jet had ever been). I’d ask if I could go up front and take a peek inside the cockpit at all those instruments and dials, and if they gave me a pin-on pair of wings, I would probably just black out and be in the fetal position on the floor of the plane—I was that excited. But when we got to the airport, and they started to board the flight, I noticed we didn’t board right away. So, I asked my mother if everything was okay since we weren’t boarding, and she got down on one knee, looked me in the eyes, and said, “Honey, we’re flying Southwest Airlines. There is no First Class.” I started to tear up, but I stayed strong, I looked over at my dad and said, “Dad, we’re at least in Business Class with lie-flat sleeper seats, right? We’re at least in Business Class, right Daddy?” They chuckled and my mom said, “Dear, there is no Business Class on Southwest. We’re in coach like everybody else.” Well, I burst into tears, and I started screaming and cussing, and began kicking her in the shins, and she was sobbing and her shins were bleeding, and right then a TSA agent came up and Tasered us both. Coach class. Really?! I haven’t spoken with either of them since. Take that, Sharpen kid with the “traumatic event.”
The Sharpening Filters
Seeing as Lightroom has sharpening available in the Develop module, why do people love to sharpen in Photoshop so much? Well, the main reason is: we can see the sharpening in Photoshop much better than we see it in Lightroom. I’m sure there’s some legitimate reason why, but whatever it is, the sharpening (at all magnifications) is just easier to see in Photoshop. Plus, you have more ways to sharpen (from subtle to over-the-top). Here are my four favorite ways:
#1 UNSHARP MASK
STEP ONE:
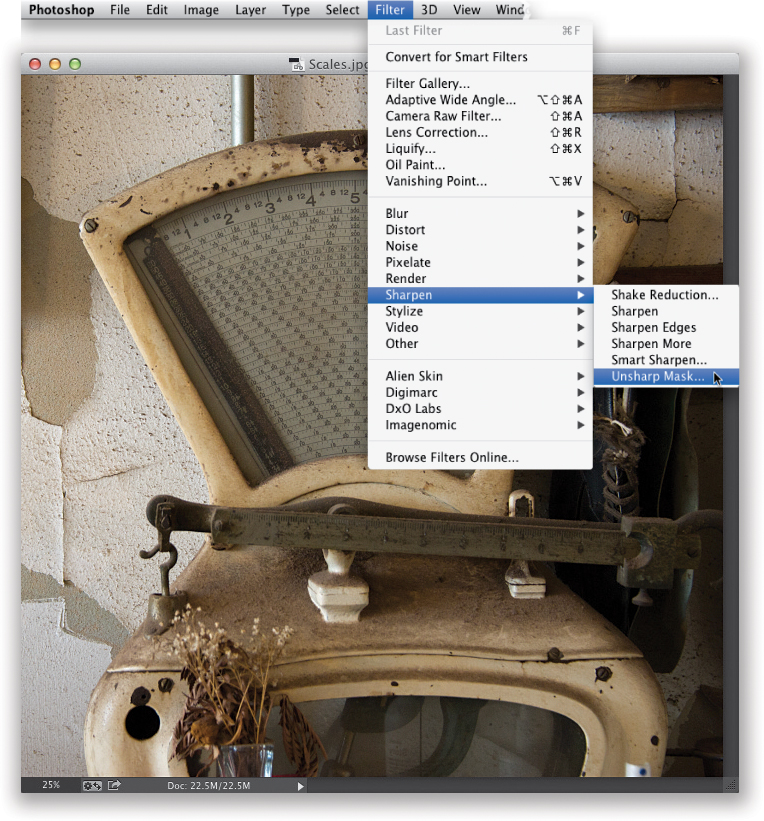
The most popular tool for sharpening in Photoshop is the Unsharp Mask filter (don’t let the name throw you—it’s a holdover from the traditional darkroom days). Go under the Filter menu, under Sharpen, and choose Unsharp Mask (as shown here).
There are three sliders in this dialog. The Amount slider determines the amount of sharpening applied to the photo; the Radius slider determines how many pixels out from the edge the sharpening will affect; and Threshold determines how different a pixel must be from the surrounding area before it’s considered an edge pixel and sharpened by the filter (by the way, the Threshold slider works the opposite way of what you might think—the lower the number, the more intense the sharpening effect). So what numbers do you enter? I’ll share the three settings I use the most these days: The first one produces a nice punchy sharpening and, of the three, it’s the one I use most. The next one I use for sports shots, landscapes, cityscapes, or things with lots of textures. The last one, web sharpening, is one I use if I’m working with a low-resolution file (like a photo taken with a cell phone), or any image that’s small in physical dimensions.

STEP THREE:
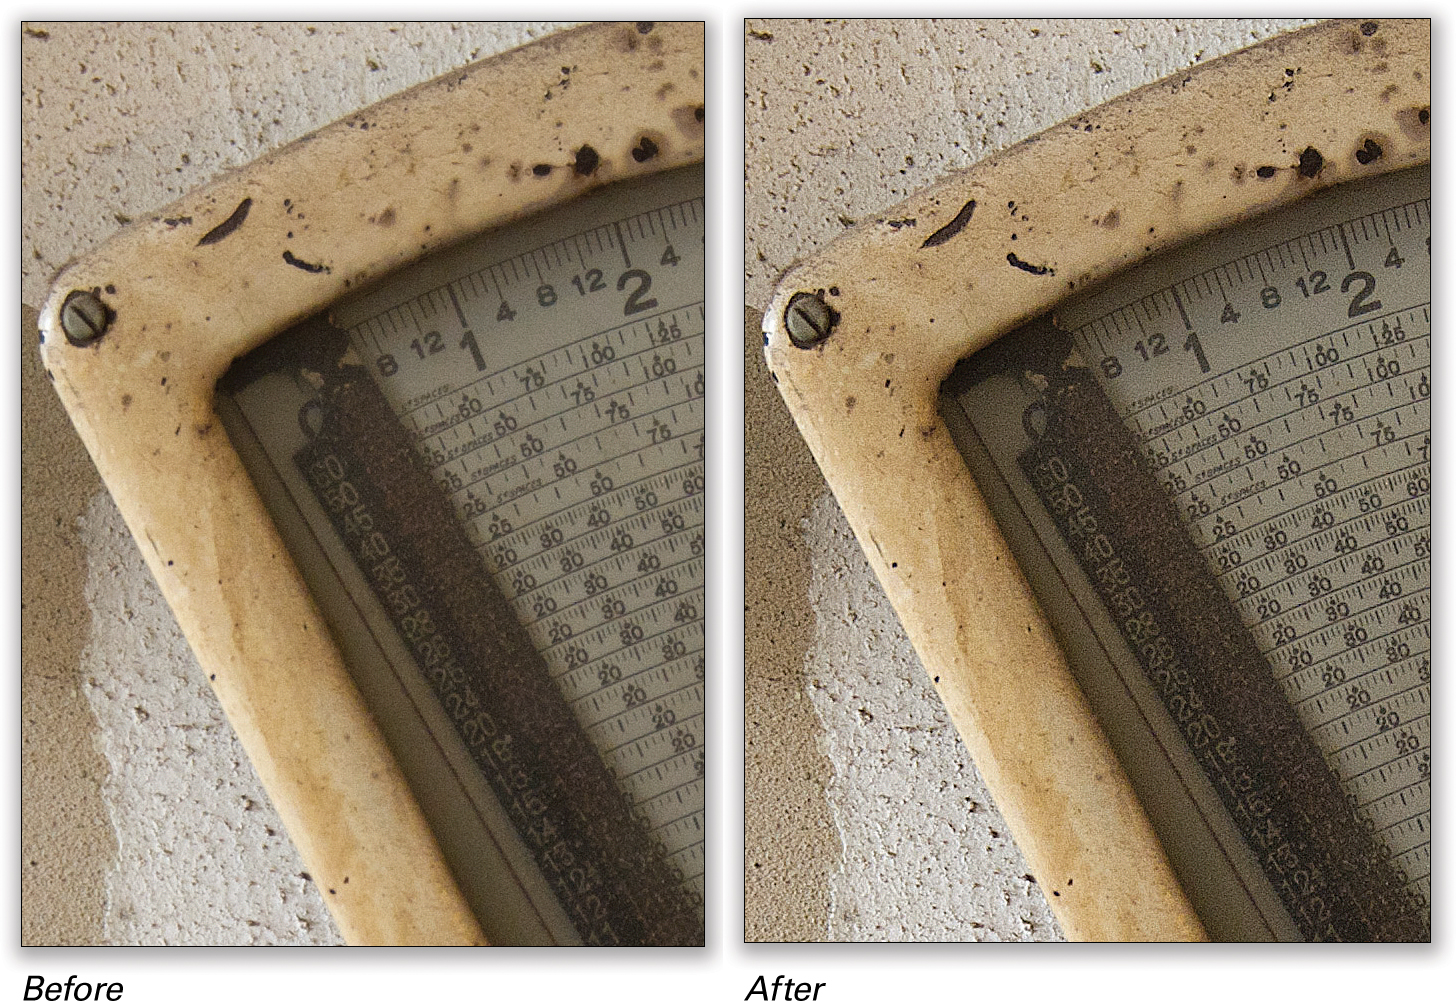
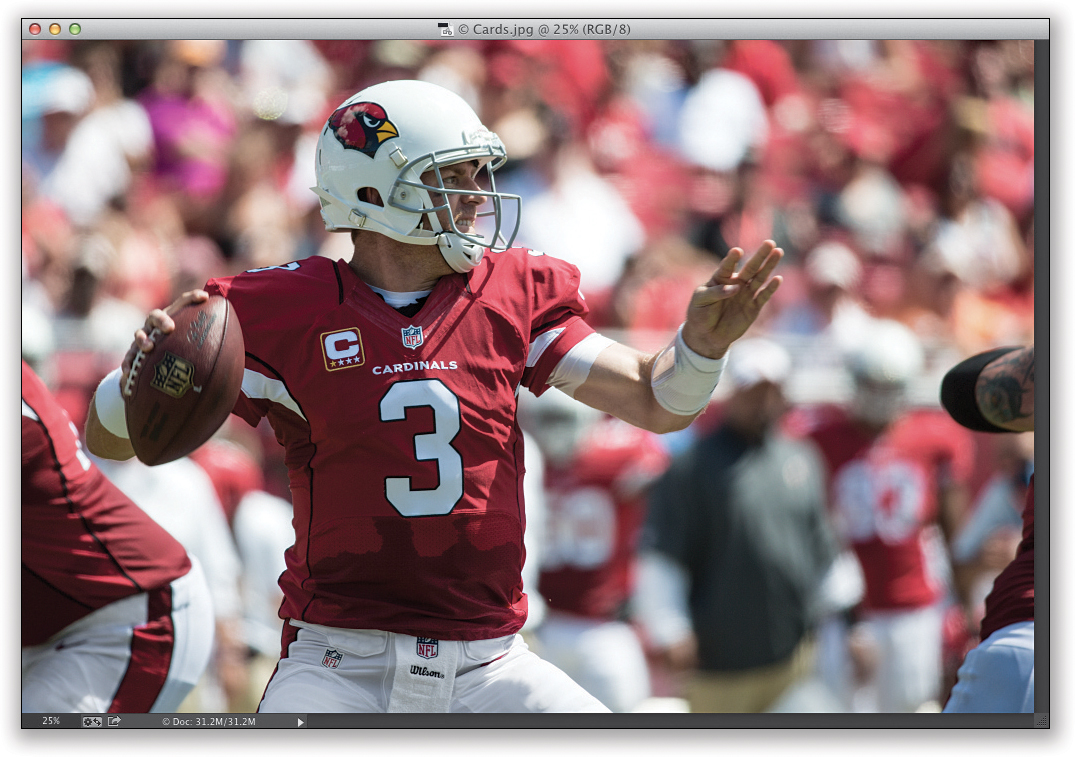
When you use the Unsharp Mask filter, you get two previews of your sharpening: (1) you see the effects right onscreen as you drag the sliders, and (2) you see a zoomed-in preview of how the sharpening is affecting your image in the small preview window inside the Unsharp Mask filter dialog itself. If you click-and-hold inside this preview, it gives you a “before” (unsharpened) view of your image, and when you release the mouse button, you see the after again. You can see a full before/after here at right where I added the heavy sharpening settings from the previous step (Amount: 100%, Radius: 1.5, and Threshold: 0). They work great here, since this is a photo with a lot of texture and metal (stuff that looks great when you add a lot of sharpening). By the way, Photoshop doesn’t do side-by-side before-and-afters like Lightroom. I had to duplicate the file, apply the sharpening to the image on the right, then leave the image on the left unsharpened.
STEP ONE:
This one is aptly named—it’s a sharpening filter using a better mathematical algorithm than Unsharp Mask (which, by the way, has been in Photoshop since version 1.0) that lets you apply more sharpening with less of the bad stuff associated with sharpening (increased noise, halos that appear around the edges of objects, or little specks or artifacts in the sharpened image). You find it right near where you find the Unsharp Mask filter. Go under the Filter menu, under Sharpen, and choose Smart Sharpen to bring up the dialog you see here.
STEP TWO:
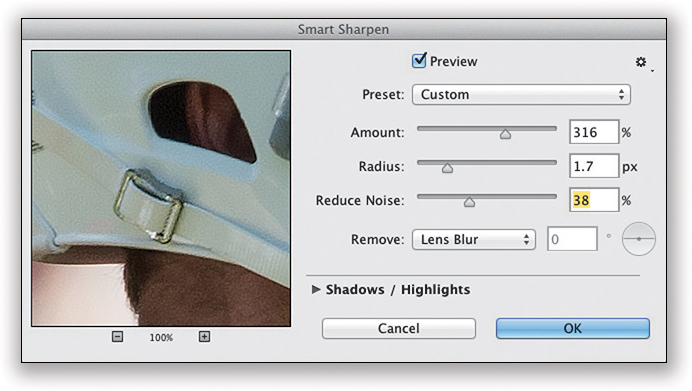
One of the downsides of sharpening has always been that if you apply a lot of sharpening, the edges start to get “halos” around them, but Smart Sharpen’s new algorithm lets you apply a higher amount of sharpening before halos start to appear. So, how do you know how far you can push the sharpening? Adobe recommends that you start by increasing the Amount slider to at least 300%, then start dragging the Radius slider to the right until you start to see halos appear around edges. When they appear, back the slider off by just a bit (until the halos go away). By the way, did I mention that the Smart Sharpen window is resizable? Yup, just click-and-drag the bottom-right corner out as large as you’d like (as seen in the next step).

Now you’ve got your Radius amount set correctly, so go back to the Amount slider and start dragging it to the right (above 300%), until the sharpening looks good to you (or haloing appears, but you’d have to crank it quite a bit before that happens). I ended up leaving mine at 300%. Also, do you see that Remove pop-up menu? Make sure it’s set to Lens Blur (it’s the only good one). The top choice (Gaussian) basically gives you the same math as Unsharp Mask, so you’re not getting the advantage of the “new math.” The bottom choice (Motion Blur) is for those one-in-a-million times where you can determine the exact angle of the motion blur and try to counteract it by entering the angle of the blur in degrees. I have never been able to do either. Stick to the Lens Blur option and you’ll be all right.

STEP FOUR:
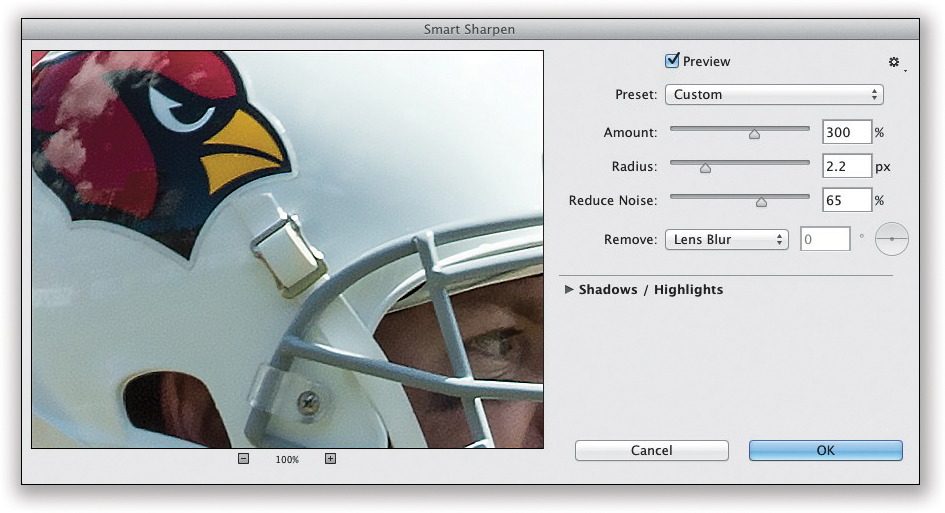
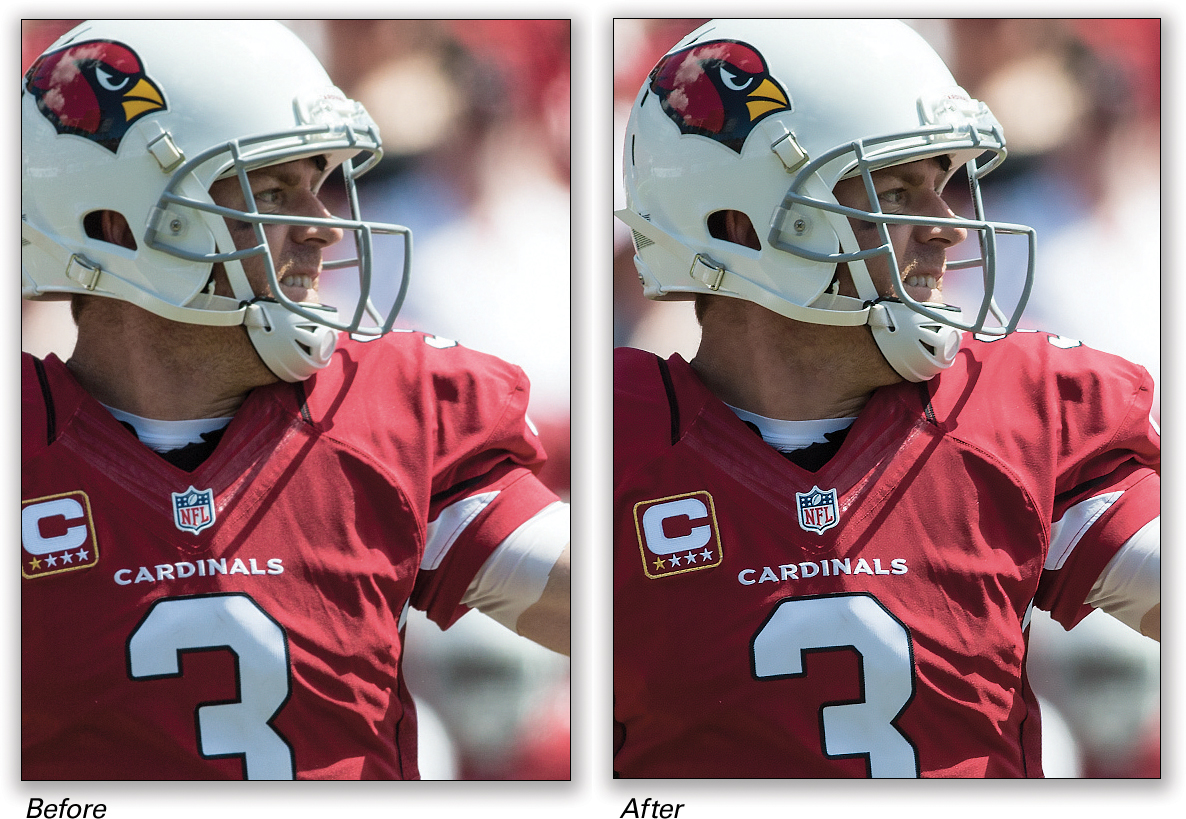
Sharpening (in general) tends to make any noise already in your photo more visible, which is why the Smart Sharpen filter has a Reduce Noise slider (added back in Photoshop CS6). The goal with this slider is not to decrease noise; it’s to let you add a lot of sharpening without increasing the noise, so after you apply your sharpening, then you’ll drag this slider to the right until the noise in the photo looks about like it did before you sharpened the image, which is what I did here in the before/after of the original unsharpened image, and the Smart Sharpened version on the right.
Tip: Save Your Settings as a Preset
If you find a set of settings you really like, you can save them as a preset by going to the Preset pop-up menu at the top and choosing Save Preset. Give it a name, and click Save, and now your settings preset will appear in that pop-up menu. Pretty handy.
STEP ONE:
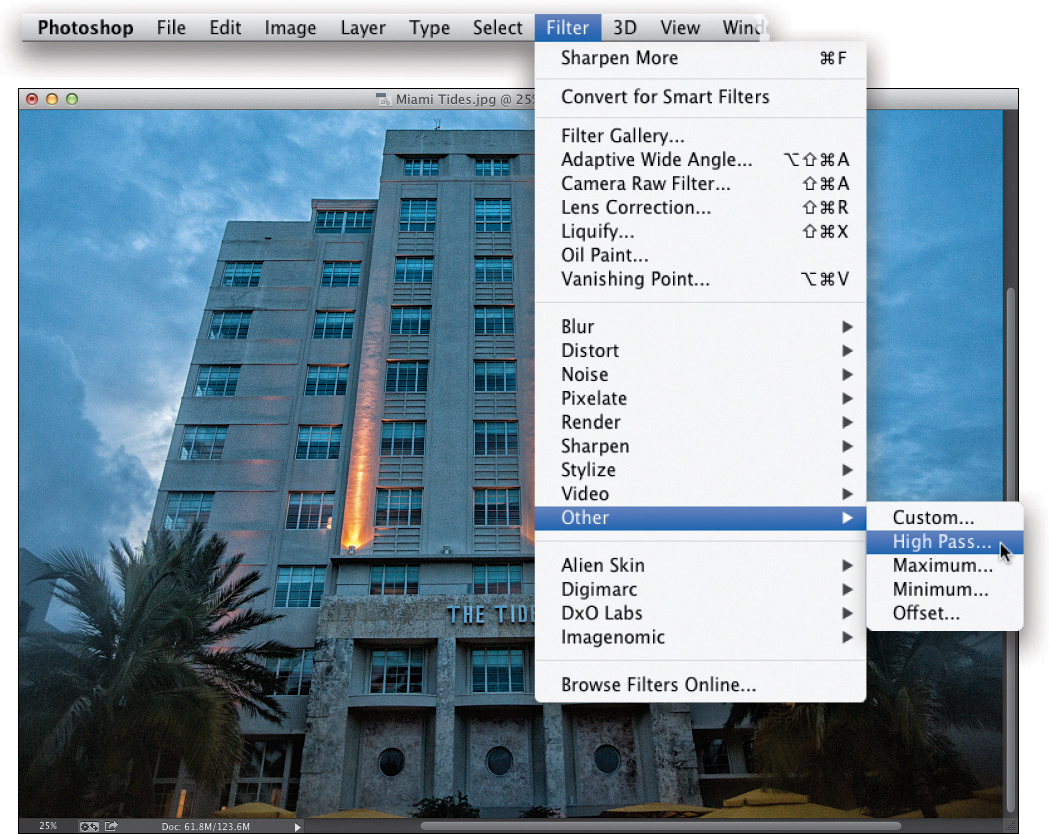
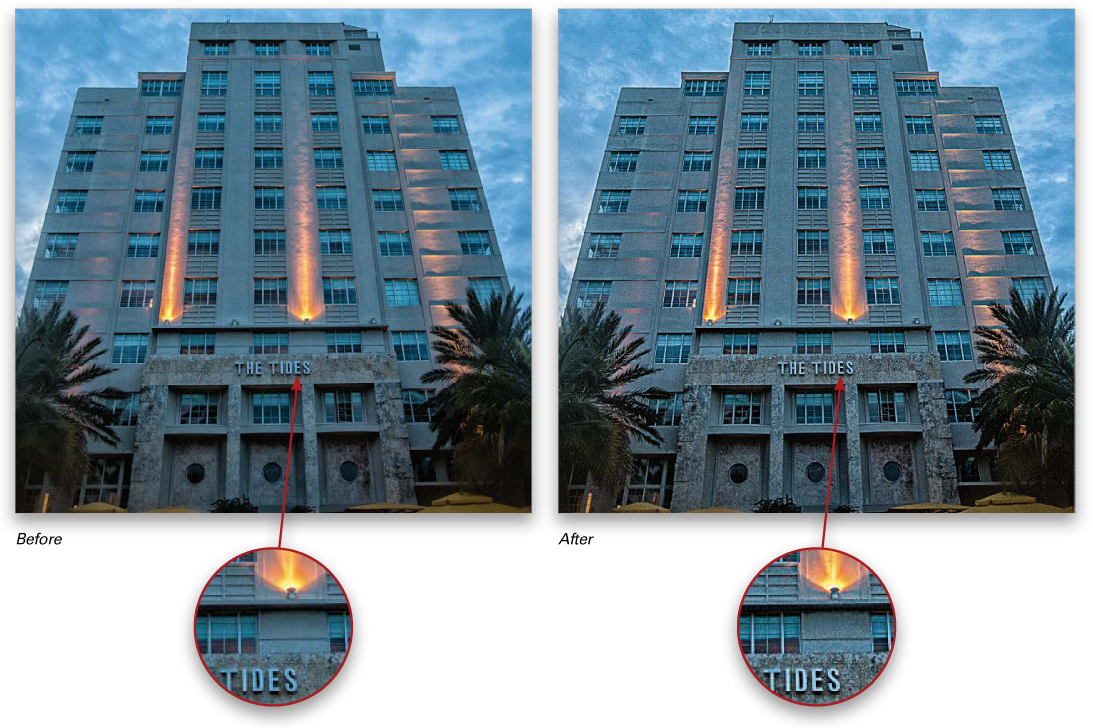
This is a very high level of sharpening that’s really popular with photographers who create HDR images or high-contrast effects, because it accentuates all the edges in the photo, and making those edges stand out can really give the impression of mega-sharpening. You start by duplicating the Background layer by pressing Command-J (PC: Ctrl-J), then go under the Filter menu, under Other, and choose High Pass (as shown here).
STEP TWO:
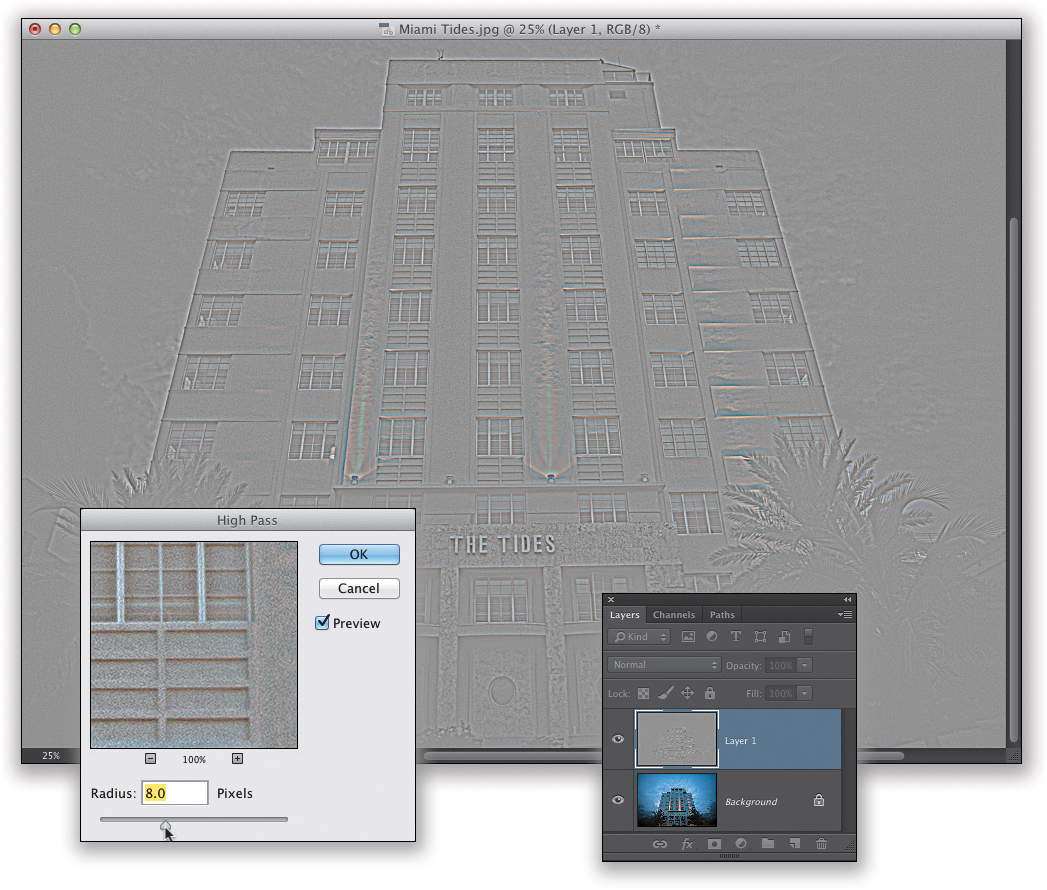
Start here by dragging the Radius slider all the way to the left (everything turns gray onscreen), then drag it over to the right until you start seeing the edges of objects in the image clearly appear. The farther you drag, the more intense the sharpening will be, but if you drag too far, you start to get these huge glows and the effect starts to fall apart, so don’t get carried away. For non-HDR images, go easy on the Radius amount—just drag until you see the edges clearly appear, then stop. Click OK.
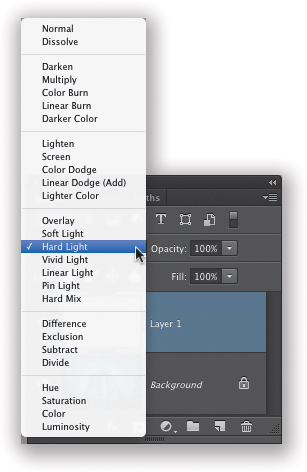
Go to the Layers panel, and change the blend mode of this layer from Normal to Hard Light. This removes the gray color from the layer, but leaves the edges accentuated, making the entire photo appear much sharper (as seen below). If the sharpening seems too intense, you can control the amount of the effect by lowering the layer’s Opacity in the Layers panel, or try changing the blend mode to Overlay (which makes the sharpening less intense) or Soft Light (even more so).
STEP ONE:
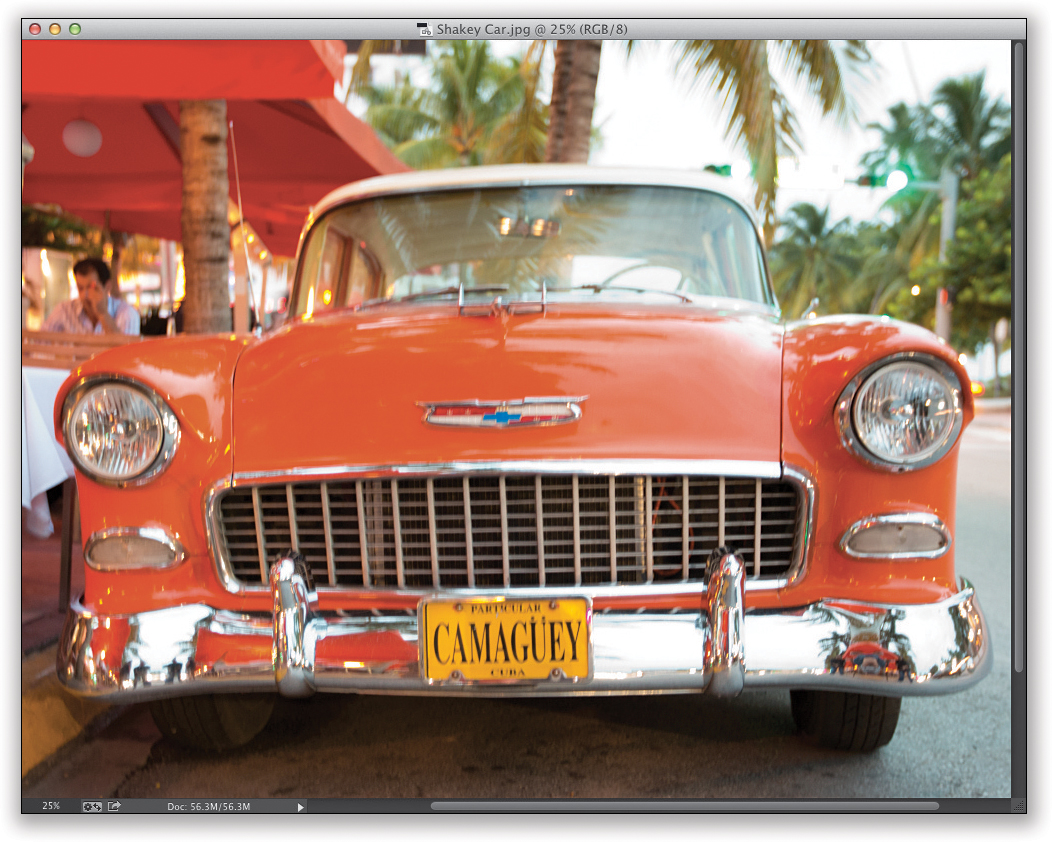
The Shake Reduction filter was introduced in Photoshop CC (so if you don’t have CC, you can skip this) and is designed to remove blurriness that was caused by shooting handheld with a slow shutter speed or a long lens. It only works if you moved the camera or lens while shooting. It doesn’t work if what made your photo blurry was your subject moving. Just so ya know. Also, this filter works best on images that don’t have a lot of noise, have a pretty decent overall exposure, and where you didn’t use flash. So, while it doesn’t work on every image, when it does, it’s pretty jaw-dropping. Here’s a shot I took in low light, handheld, and it is not sharp by any means.
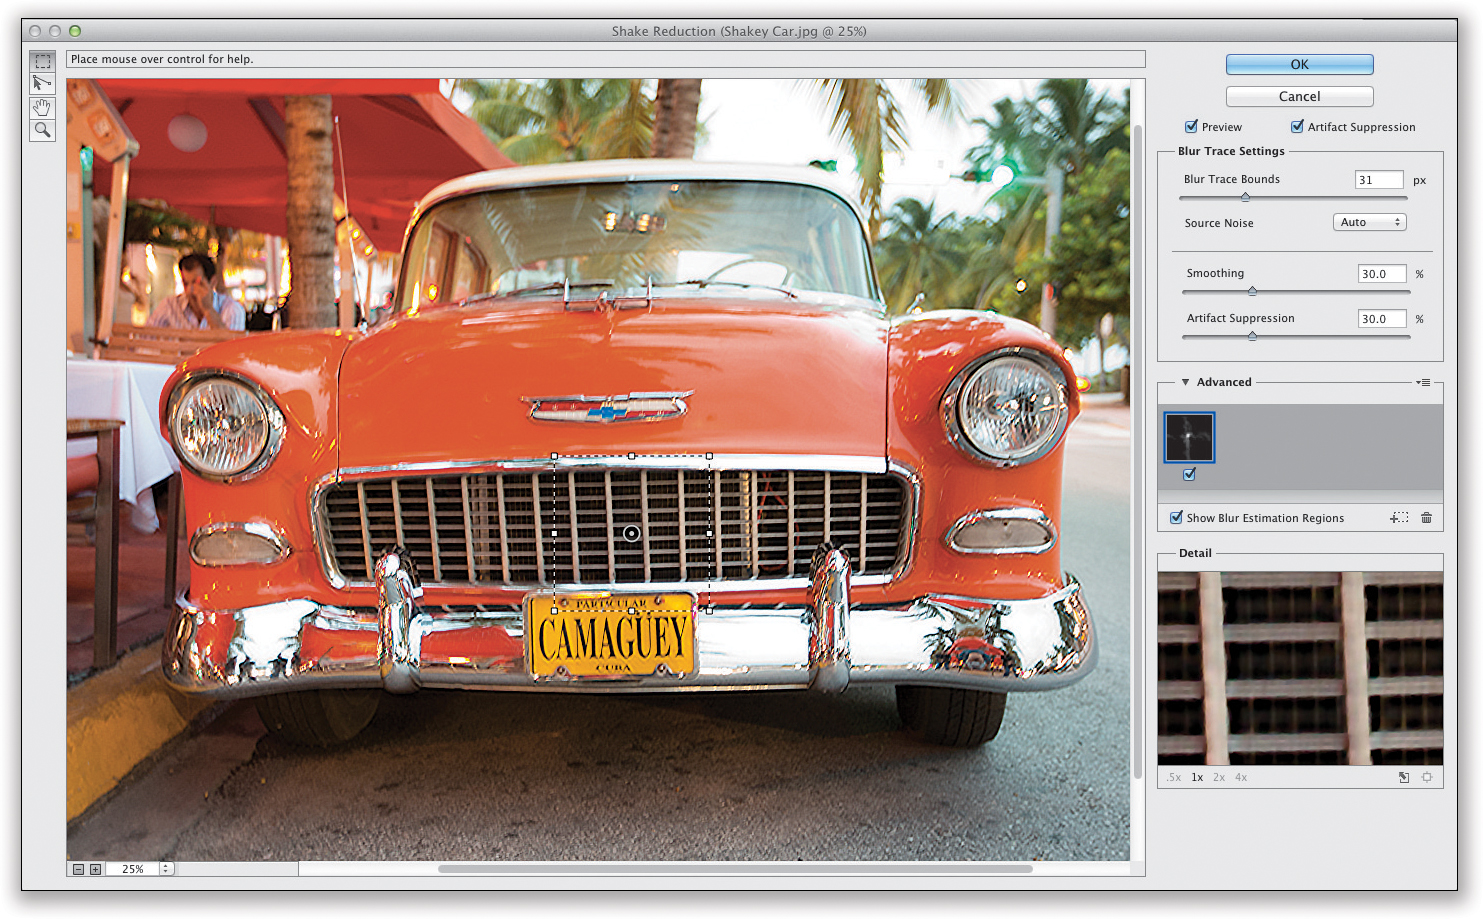
STEP TWO:
Go under the Filter menu, under Sharpen, and choose Shake Reduction to bring up the dialog you see here. When the filter opens, it immediately begins analyzing the image, starting in the middle (where most blurring occurs) and searching outward from there. You’ll see a little progress bar appear (as it’s thinking) near the bottom of the small preview on the right side of the dialog (it’s called the Detail Loupe). Once it’s done doing the math, it shows you its automated blur correction and, as you can see here, it did a pretty amazing job of saving the shot. It’s not perfectly 100% sharp, but the original was unusable. At least now, if I wanted to put it on Facebook or Twitter at web resolution, it would be totally passable, which I think is saying a lot. For most of us, this is all you’ll need to do: open the filter, let it do its thing, and you’re done.
Fixing Wide-Angle Distortion
Back in Photoshop CS6, Adobe introduced a filter called Adaptive Wide Angle that was invented for situations when you’ve got serious distortion or bending in an image from using a super-wide or fisheye lens. However, there are three things you need to know about this filter: (1) you’re not going to use it very often, (2) you’re either going to have to crop pretty massively after using it or use Content-Aware Fill to fill in the gaps, and (3) it actually does a pretty darn good job when you do need it.
STEP ONE:
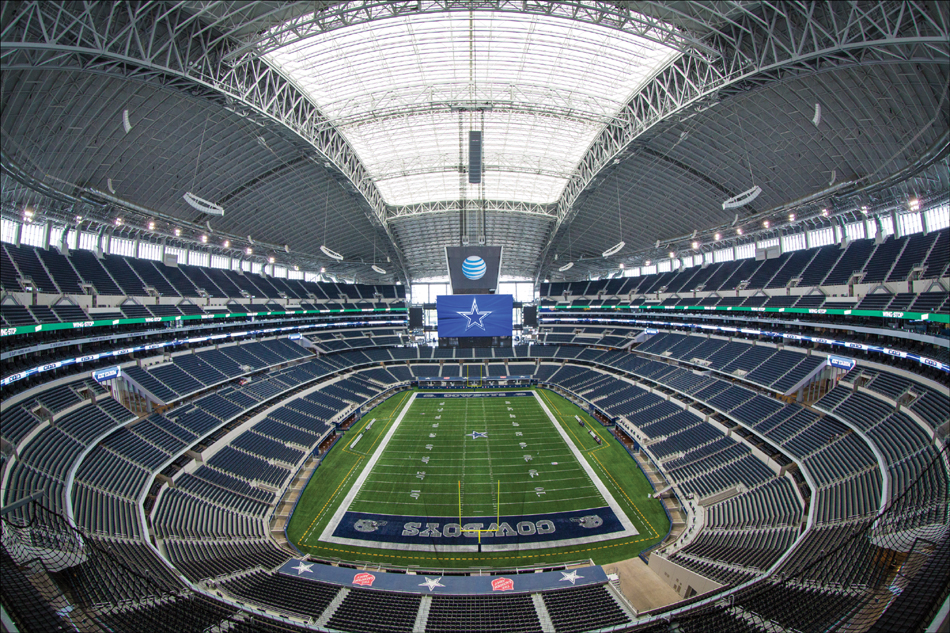
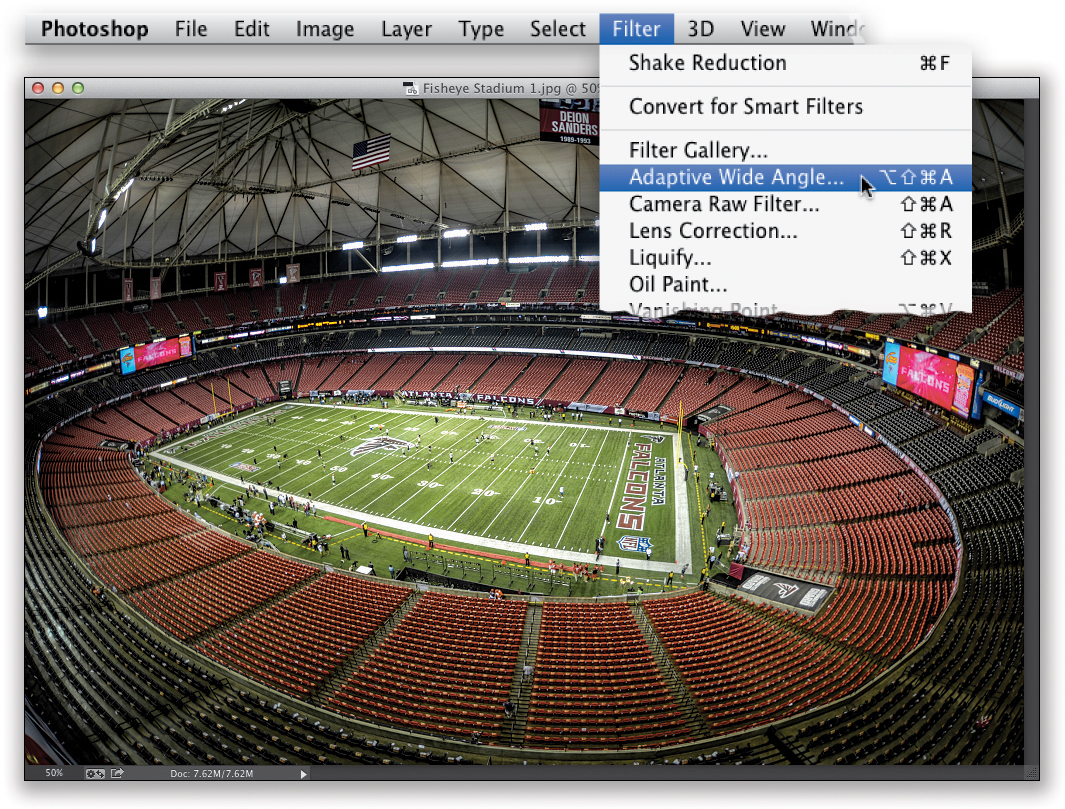
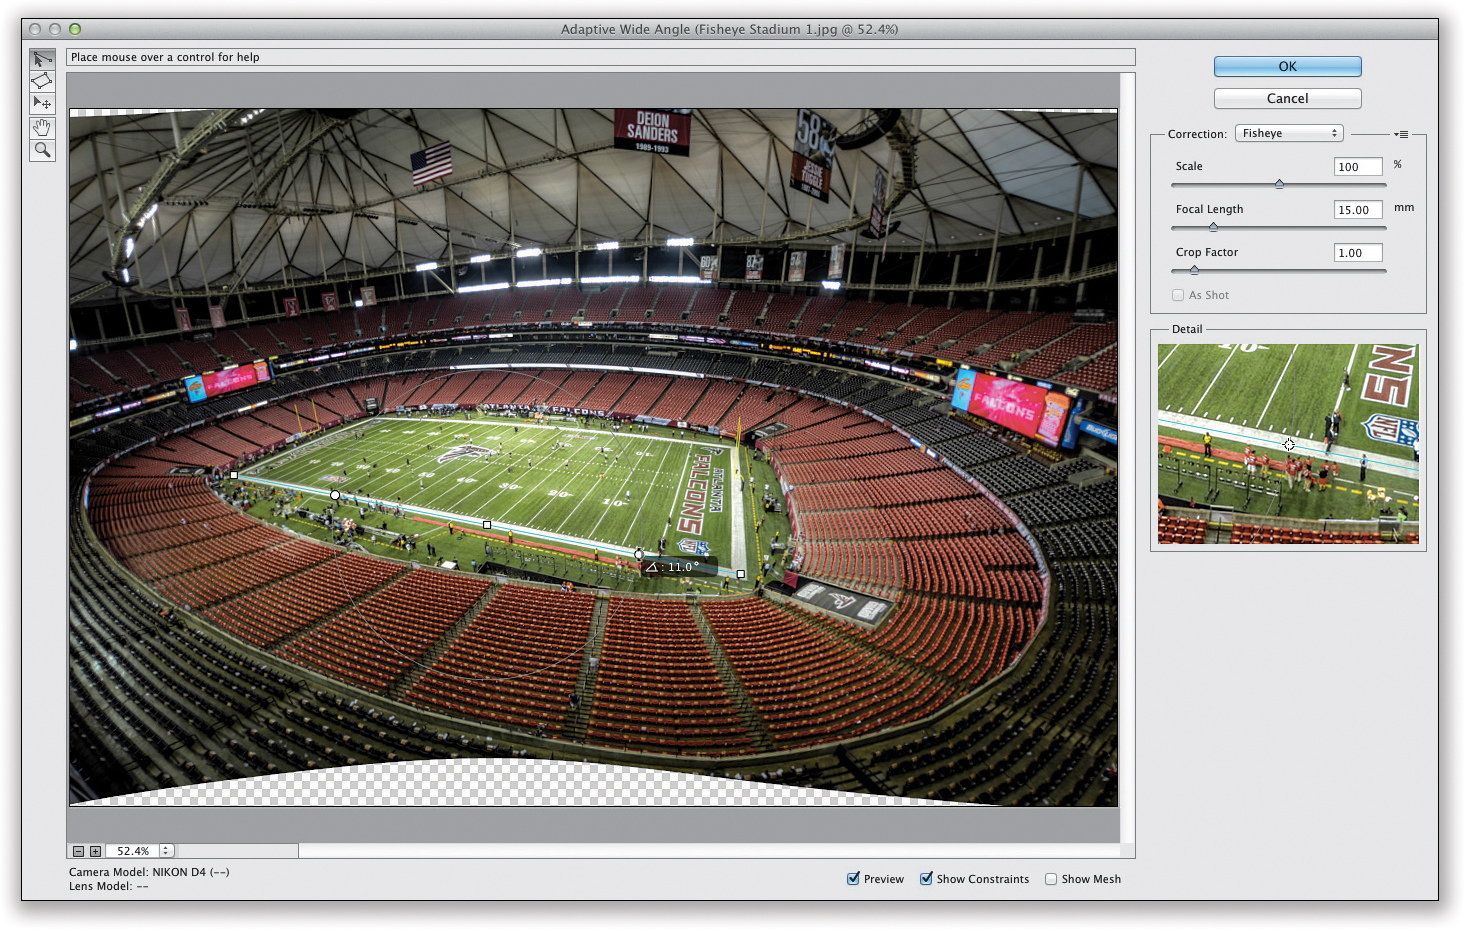
Open the photo that has a wide-angle lens issue you want to fix. In this case, it’s a fisheye shot of the Georgia Dome taken from up high in the stands well before the game. Obviously, I wanted the rounded fisheye look, and it looks great on the stands and roof, but seeing the field bowing like it does here just looks weird. Ideally, the lines on the field would still be flat, and that’s where the Adaptive Wide Angle filter shines. Go under the Filter menu and choose Adaptive Wide Angle.
STEP TWO:
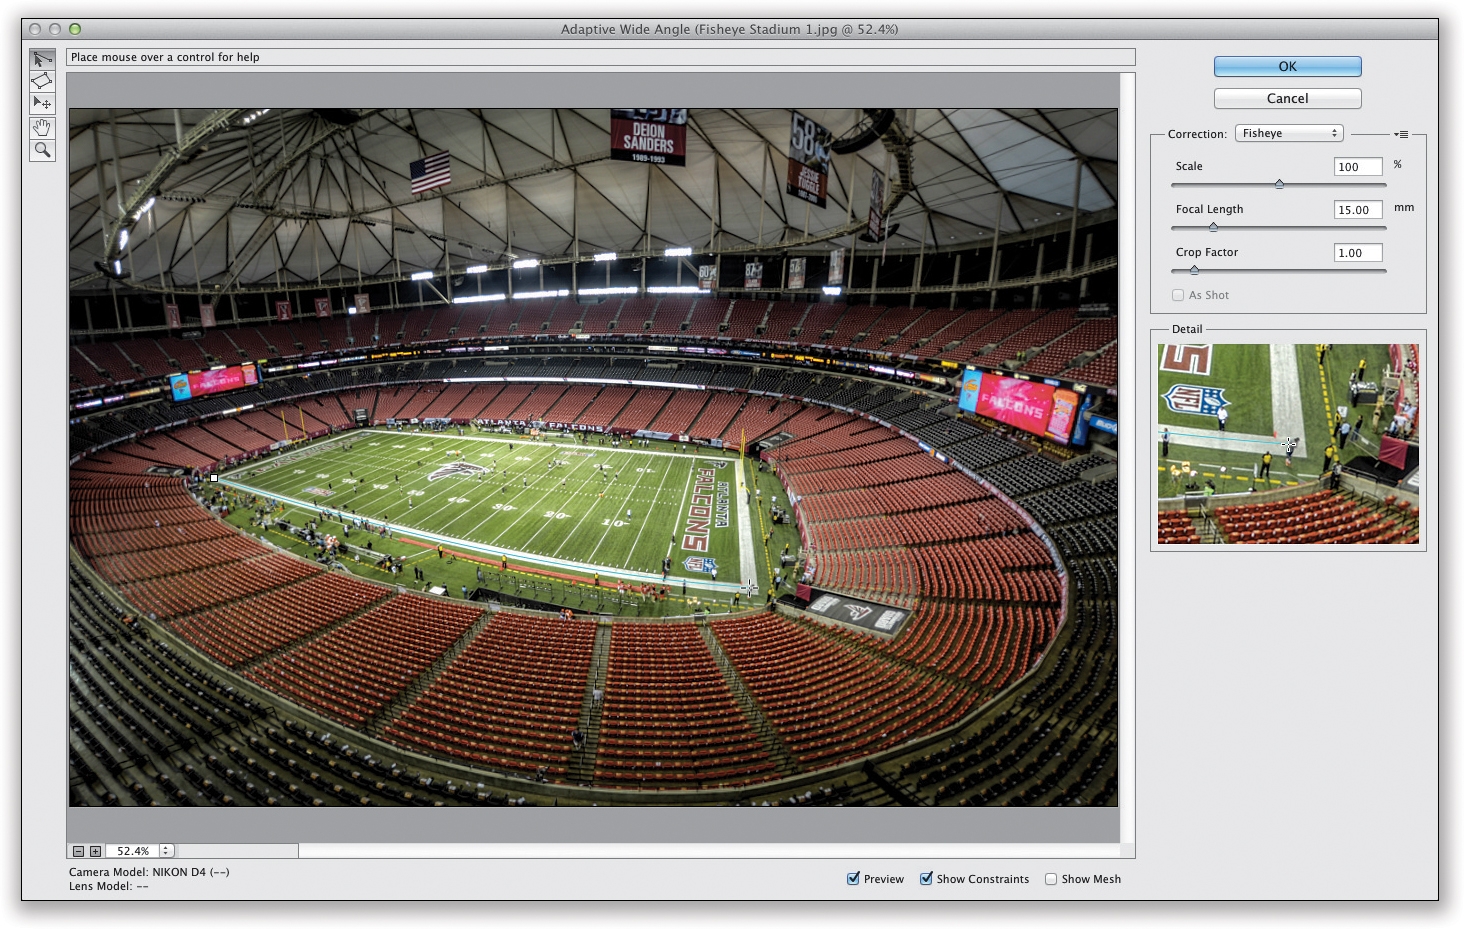
When the Adaptive Wide Angle dialog opens (shown here), it reads the lens data embedded into the photo by your camera (see the bottom-left corner of the dialog) and tries to apply an auto correction. Sometimes it does a pretty good job, but in this case, it’s so subtle that the field is still really bent, so we’ll have to help the filter out. With the Constraint tool (the first tool in the toolbox on the left), click at the base of the object you want straightened (the left corner of the field, here), and then as you move your cursor over to the right corner of the field, the aqua line you’re dragging literally bends (it does this automatically because it knows the lens you used, and what kind of problems you’re dealing with). You get a zoomed-in close-up of where you cursor is currently located in the Detail preview on the right (as seen here). If you mess up this Constraint line, Option-click (PC: Alt-click) once on it, and it’s gone.
When you drag out that line, it immediately straightens that area (as seen here), and you’ll see a thin circle with two handles (white dots) appear. Those handles let you fine-tune the angle of that line after you’ve laid it down, so if it’s off a little (or a lot), you can grab one of them and literally rotate it to change the angle of the fix (as shown here). You may have more than one area that needs to be straightened, so you can draw more than one line if you need it. You’ll also see gaps where it had to warp the image to do this straightening, so your image will have to be cropped down a bit when all this is over. Okay, that’s the basic plan: you take the tool and drag it over parts of your image that need to be straightened and it does its thing.
Tip: If Your Line Doesn’t Bend
If Photoshop recognized your lens and has a profile for it, then the lines will bend automatically, but if not, then it’s up to you to make the bend manually. Get the Constraint tool, click it on one side, then click at the end to complete your straight line. Then, go to the line, click on the center point, and bend the line so it fits.
STEP FOUR:
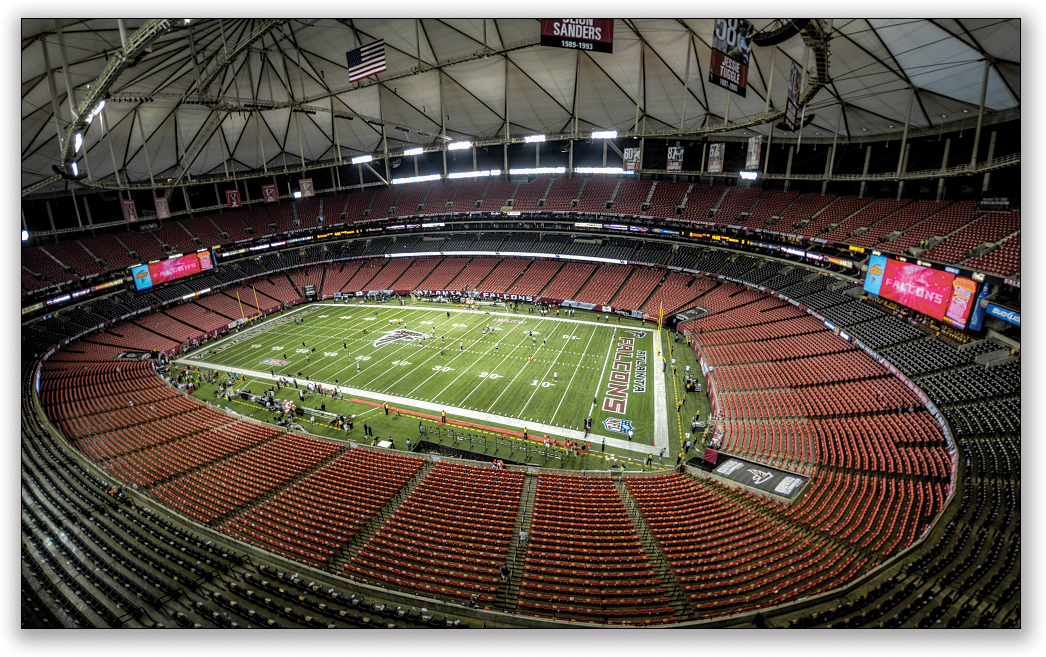
Once you click OK, you can see all the gaps that will need to be cropped away, so get the Crop tool (C) and click-and-drag in the bottom and top until most of the gaps are cropped away. Once you’ve cropped it, your image now appears as a layer, so you should flatten your image before you take it back to Lightroom.
Tip: Straightening Rectangles
If you need to quickly fix something like a doorway or window (a rectangle), then use the Polygonal Constraint Tool (the second tool down), which works like the Polygonal Lasso tool: just trace around your rectangle and it straightens it.
Fixing Group Shots the Easy Way
Group shots are always a challenge because, without a doubt, somebody in the group will be totally hammered (at least, that’s been the experience with my family. You know I’m kidding, right?). Okay, the real problem is that in group photos there’s always one or more people who blinked at just the wrong time, or forgot to smile, or weren’t looking at the camera, etc. Of course, you could just take their expression from another frame and combine it with this one, but that takes a lot of work. Well, at least it did before the Auto Blend feature. This thing rocks!
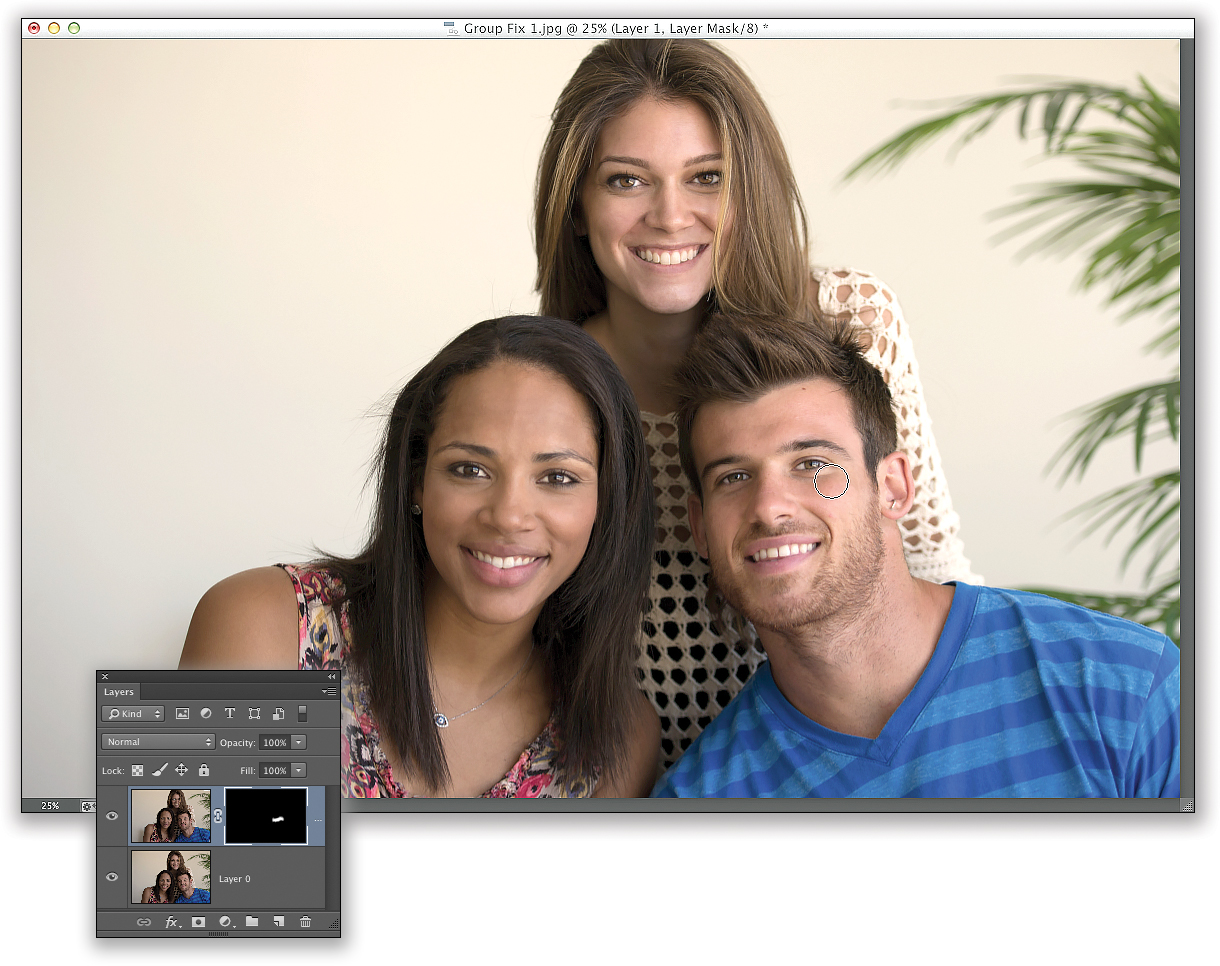
STEP ONE:
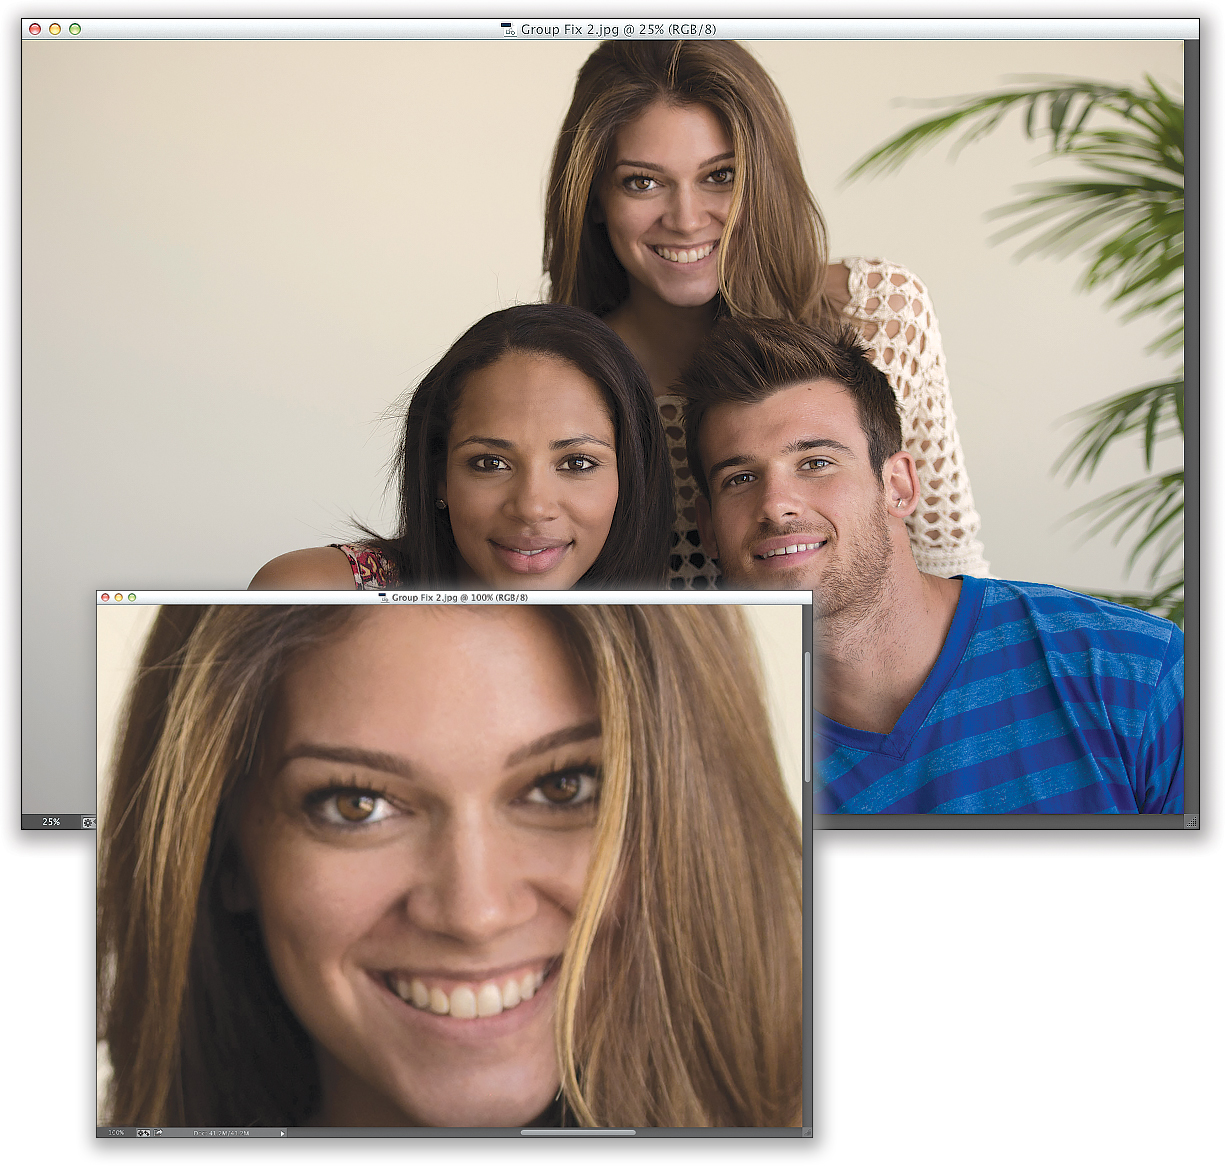
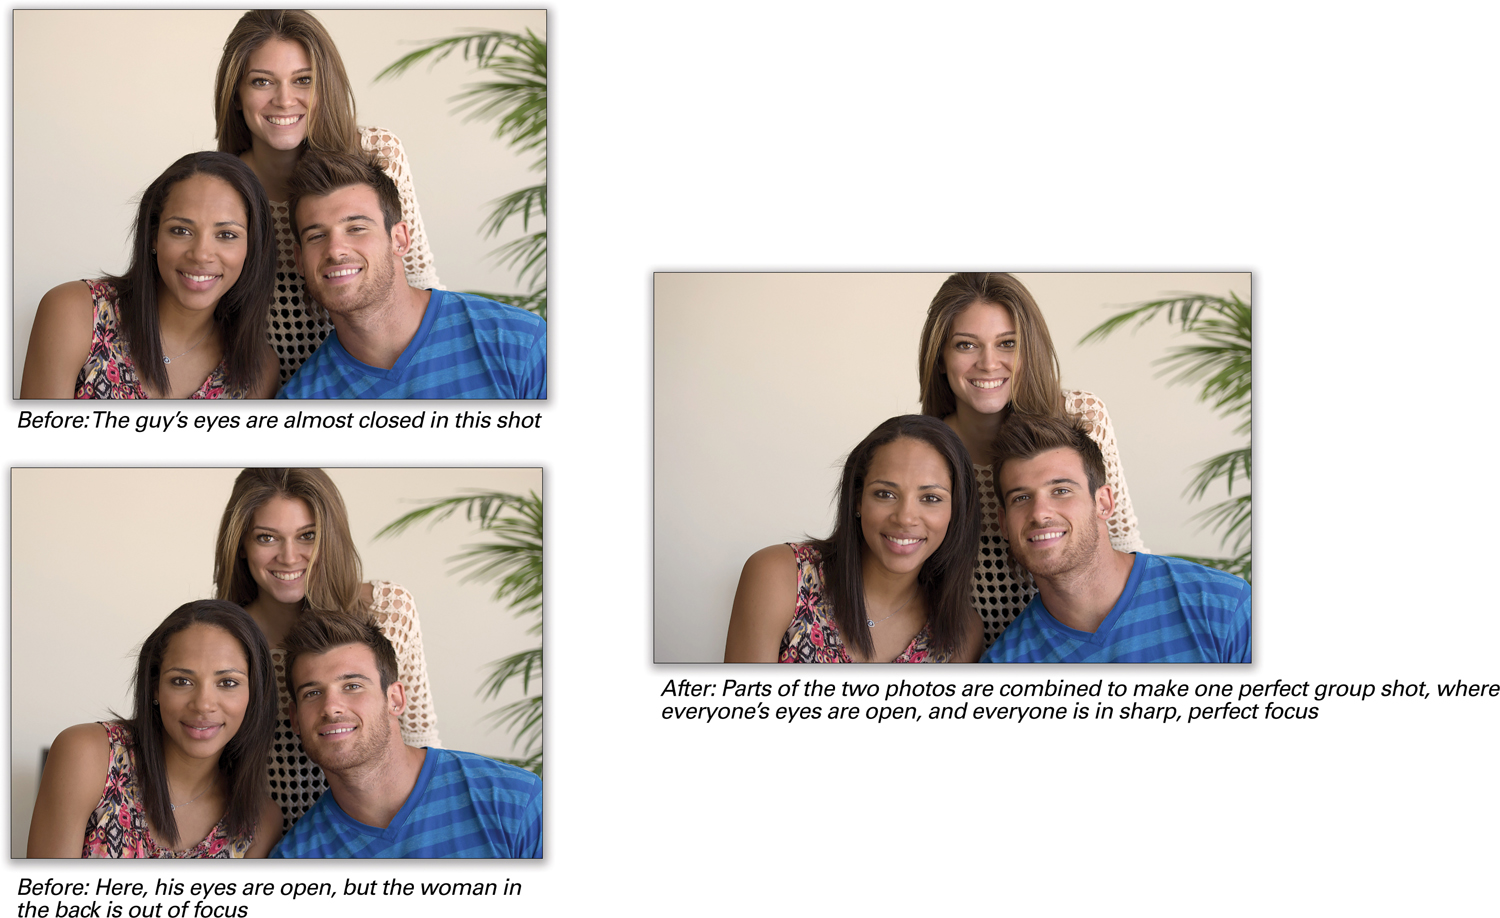
Here’s a group shot where all three of our subjects are in nice sharp focus, and I like the facial expressions on both women. But the guy in this shot was blinking when the shot was taken, so we’ll need to find another shot from that same shoot where he wasn’t blinking (this is why we never take just one or two shots of a group).

STEP TWO:
Here’s another shot taken just a few moments later. The guy looks great here, and he and the woman beside him are both in nice sharp focus, but the woman in the back moved a few inches back between frames, and now she’s out of focus (take a look at where I zoomed in on her face, and you can see it is quite soft focus-wise). So, the idea is to take the guy on the right from this shot and combine him with the previous photo to make one single group photo where they’re all in focus and his eyes are open.
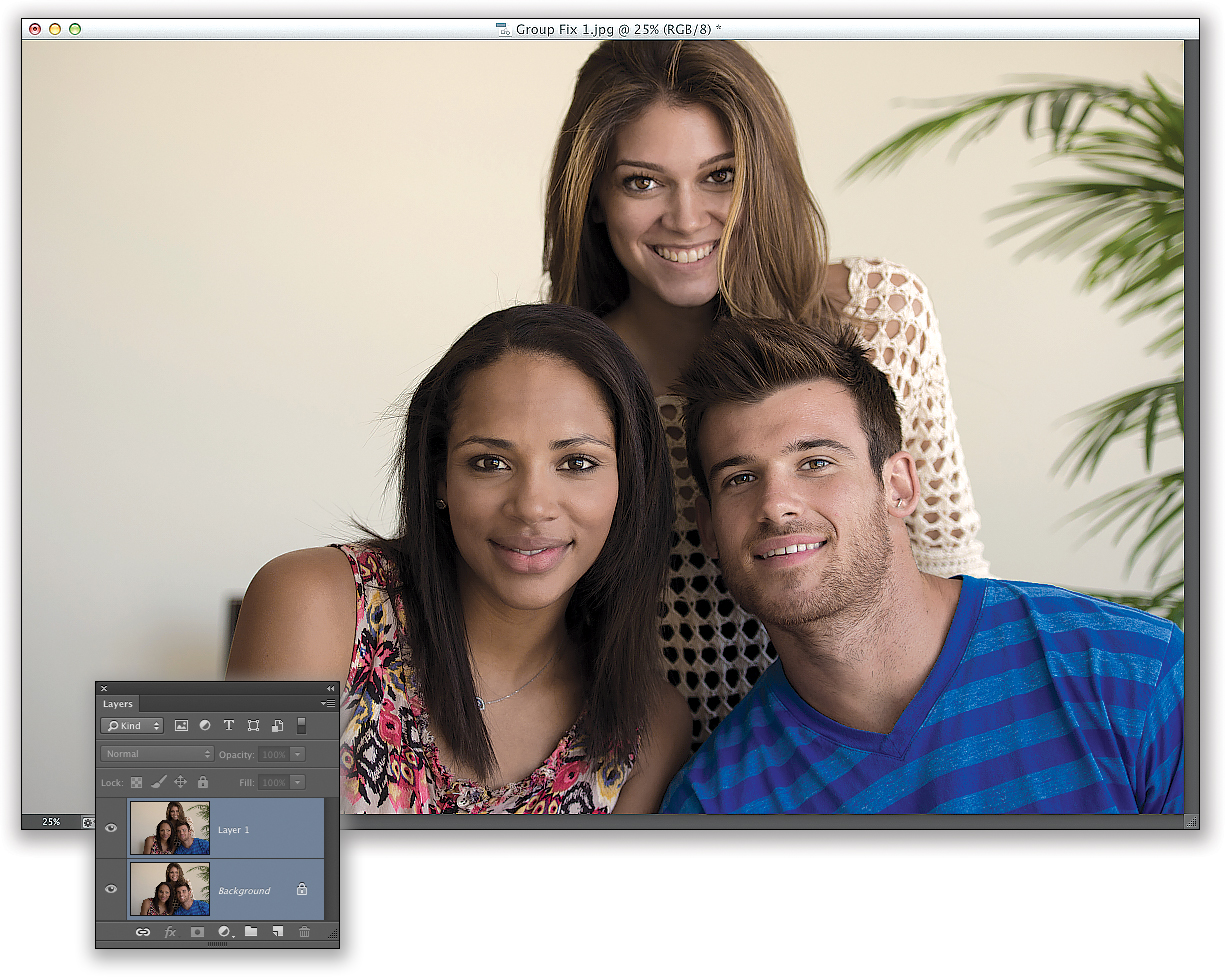
First, we need to get the two photos into the same document. So, click on the image where the guy’s expression looks good and press Command-A (PC: Ctrl-A) to put a selection around the entire image, then press Command-C (PC: Ctrl-C) to Copy that image into memory. Now, switch to the photo where the guy’s eyes are almost closed and press Command-V (PC: Ctrl-V) to Paste the image in memory right on top of it. The pasted image will appear on its own separate layer (as seen in the Layers panel here), but if any of our subjects moved even a tiny bit between frames (and we know they did, since the woman in the back is out of focus in the second shot), then the two photos won’t be perfectly aligned. Luckily, Photoshop can do the layer alignment for us. Start by going to the Layers panel and, with the top layer already selected, Command-click (PC: Ctrl-click) on the Background layer, so both layers are selected (as seen here).
STEP FOUR:
Now, go under the Edit menu and choose Auto-Align Layers. When the Auto-Align Layers dialog appears, click on the Auto radio button (if it’s not already selected), and then click OK to have Photoshop align the two layers for you (and it usually does a pretty darn amazing job at it, too!). However, to make two photos align where people moved a little during the shoot requires it to slightly resize and tweak the photos a bit to make that happen, which generally leaves a gap around the outside edges of the image (seen in the Layers panel here—look at the outside edges in the thumbnails). So, you’ll have to get the Crop tool (C) and crop the photo just a tiny bit, so you don’t see those gaps along the outer border (you’ll see that I cropped the image in the next step).

Now that they’re aligned, click on the top layer to select just that layer, then press-and-hold the Option (PC: Alt) key and click on the Add Layer Mask icon (the third icon from the left) at the bottom of the Layers panel to hide the top layer (with the guy’s eyes fully open) behind a black layer mask. Next, get the Brush tool (B), choose a medium-sized, soft-edged brush from the Brush Picker in the Options Bar and, with your Foreground color set to white, paint over the guy’s eyes and nose (that general area). As you do, it reveals the good version of him on the top layer (as shown here). In this case, the alignment worked so well that all I had to paint in was the area at the top of his face. But, depending on the image, sometimes you might have to paint more (like an entire face, or some hair, etc.), so don’t be afraid to reveal more of the good shot if you need to. Finally, go ahead and flatten the layers (from the Layers panel’s flyout menu). The original images and the final fixed image are shown below.
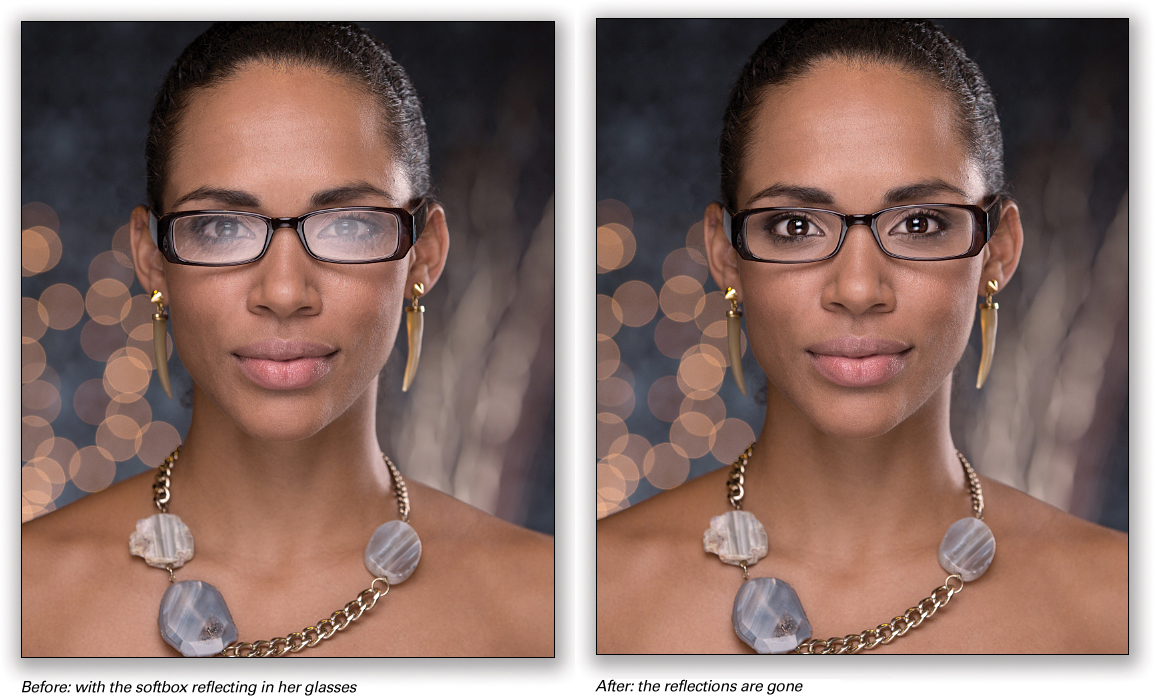
Fixing Reflections in Glasses
I get more requests for how to fix this problem than probably all the rest combined. The reason is it’s so darn hard to fix. If you’re lucky, you get to spend an hour or more desperately cloning. In many cases, you’re just stuck with it. However, if you’re smart, you’ll invest an extra 30 seconds while shooting to take one shot with the glasses off (or ideally, one “glasses off” shot for each new pose). Do that, and Photoshop will make this fix absolutely simple. If this sounds like a pain, then you’ve never spent an hour desperately cloning away a reflection.
STEP ONE:
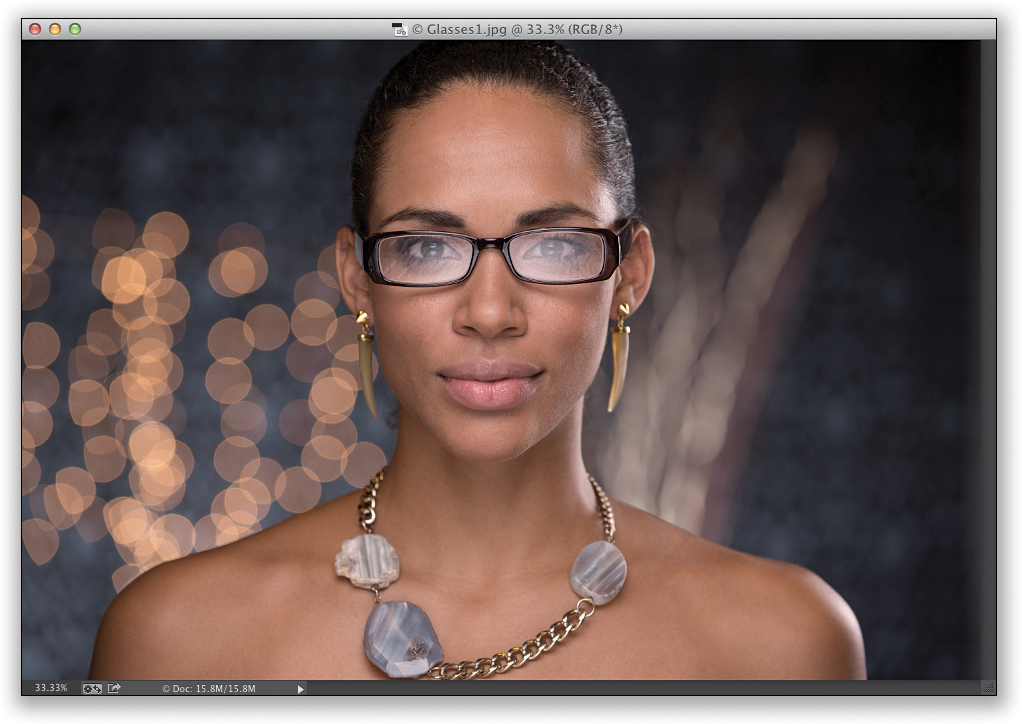
Before we get into this, make sure you read the short intro up top here first, or you’re going to wonder what’s going on in Step Two. Okay, here’s a photo of our subject with her glasses on and you can see the reflection in her glasses (pretty bad on the left side, not quite as bad on the right, but it definitely needs fixing). The ideal situation is to tell your subject that after you take the shot, they need to freeze for just a moment while you (or a friend, assistant, etc.) walk over and remove their glasses (that way they don’t change their pose, which they absolutely will if they take their own glasses off), then take a second shot. Luckily, I did that here.
STEP TWO:
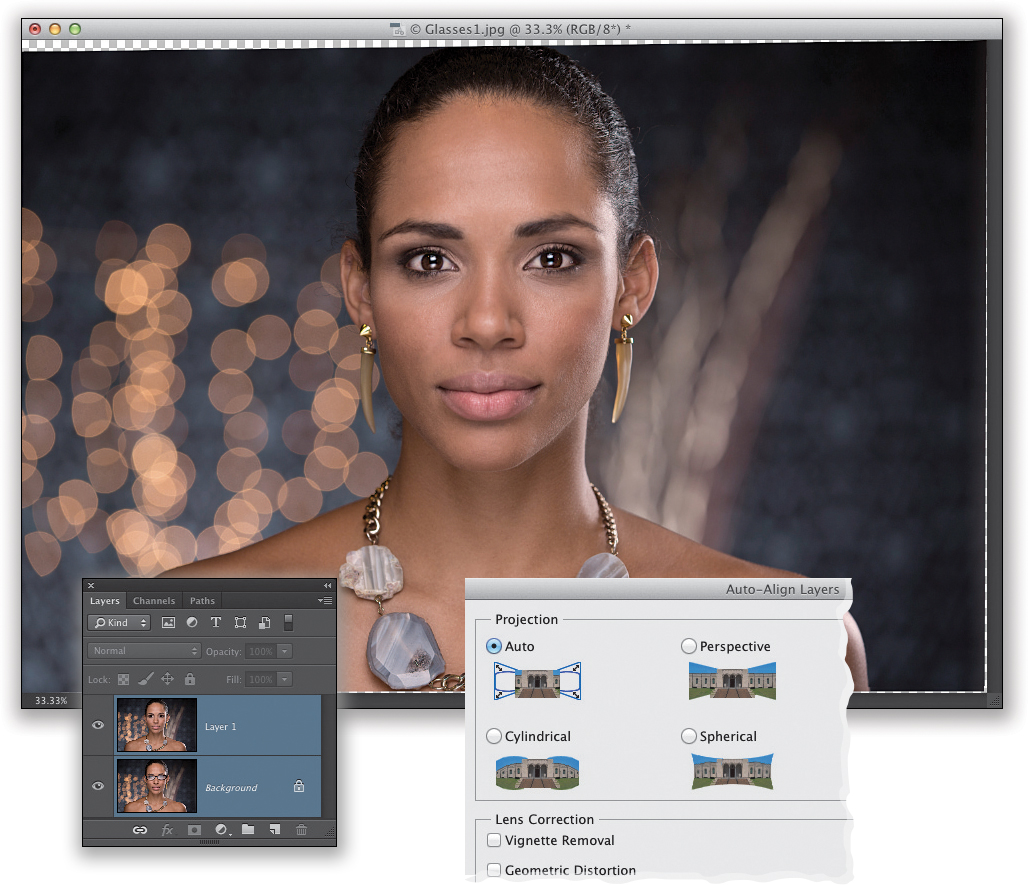
Since I could see there was a reflection in her glasses, I had someone remove them, and then I took another shot (her head moved slightly, but we’ll be able to line the two shots up pretty easily). With the second shot also opened in Photoshop, get the Move tool (V) and, with both images visible (floating), press-and-hold the Shift key and click-and-drag the “no glasses” photo on top of the “glasses” photo, so they appear in the same document (as seen here in the Layers panel).
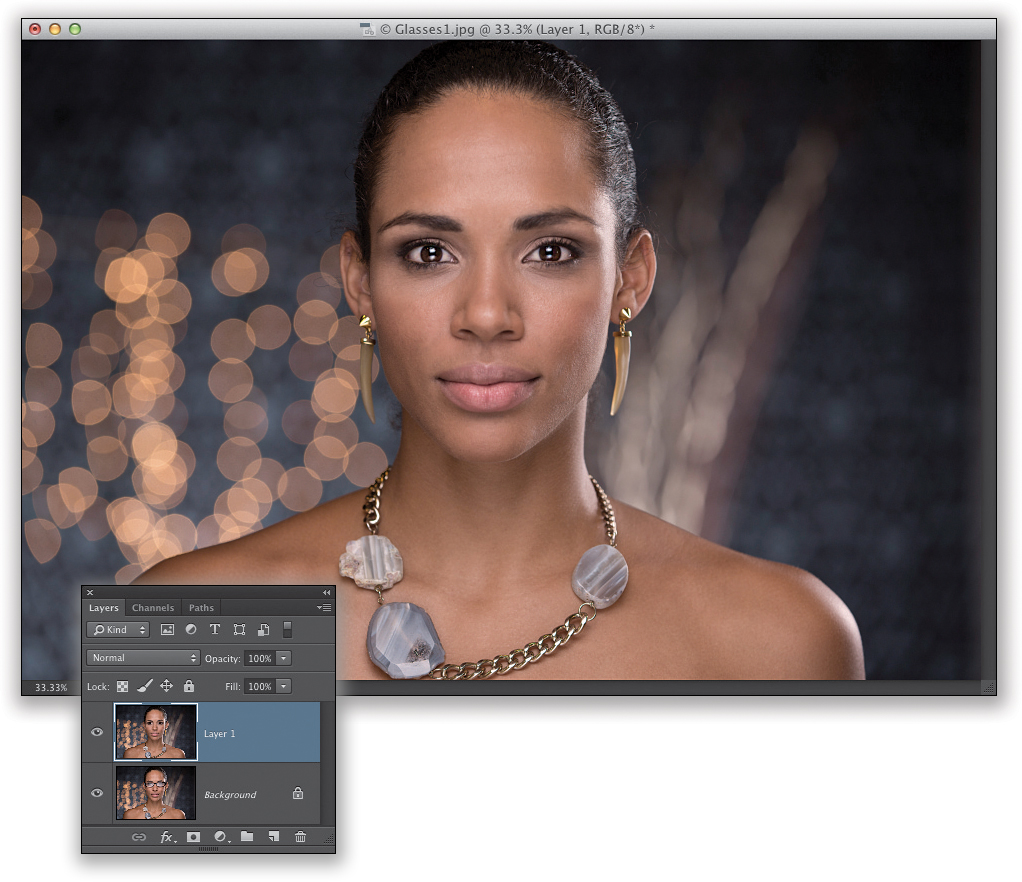
Now, holding the Shift key will help align the photos, but it’s still off a little because she moved slightly between the shots. So, we’ll get Photoshop to align them perfectly for us. Start by Command-clicking (PC: Ctrl-clicking) on each layer in the Layers panel to select them both, then go under the Edit menu and choose Auto-Align Layers. When the dialog appears (seen here), leave the Projection set to Auto and click OK. Once it’s done, you’ll probably end up with some transparent areas around the edges of your image, where Photoshop rotated the images while aligning them (also seen here), but we’ll take care of those later.
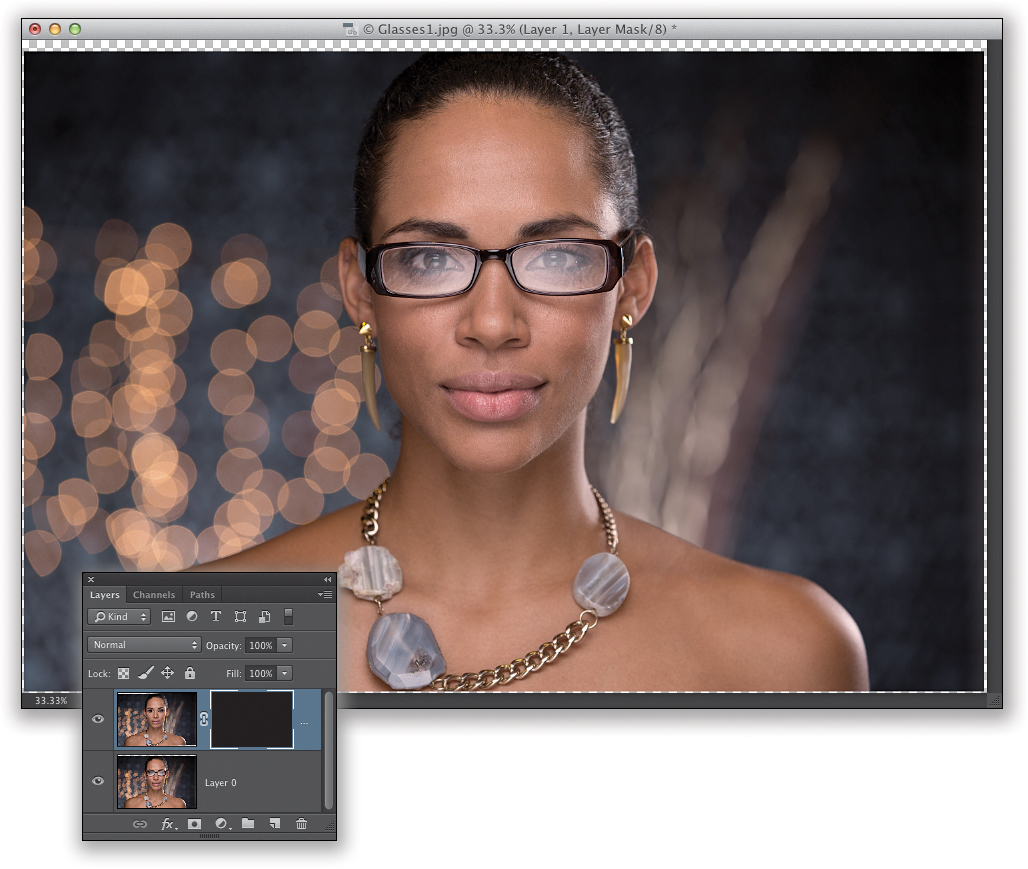
STEP FOUR:
Click on the top layer to make just that layer active, and then Option-click (PC: Alt-click) on the Add Layer Mask icon (the third icon from the left) at the bottom of the Layers panel to hide the top layer behind a black layer mask. You should now see the “glasses on” image, but in the Layers panel, you’ll see that the black layer mask on the “glasses off” layer is active (it has a white frame around it).
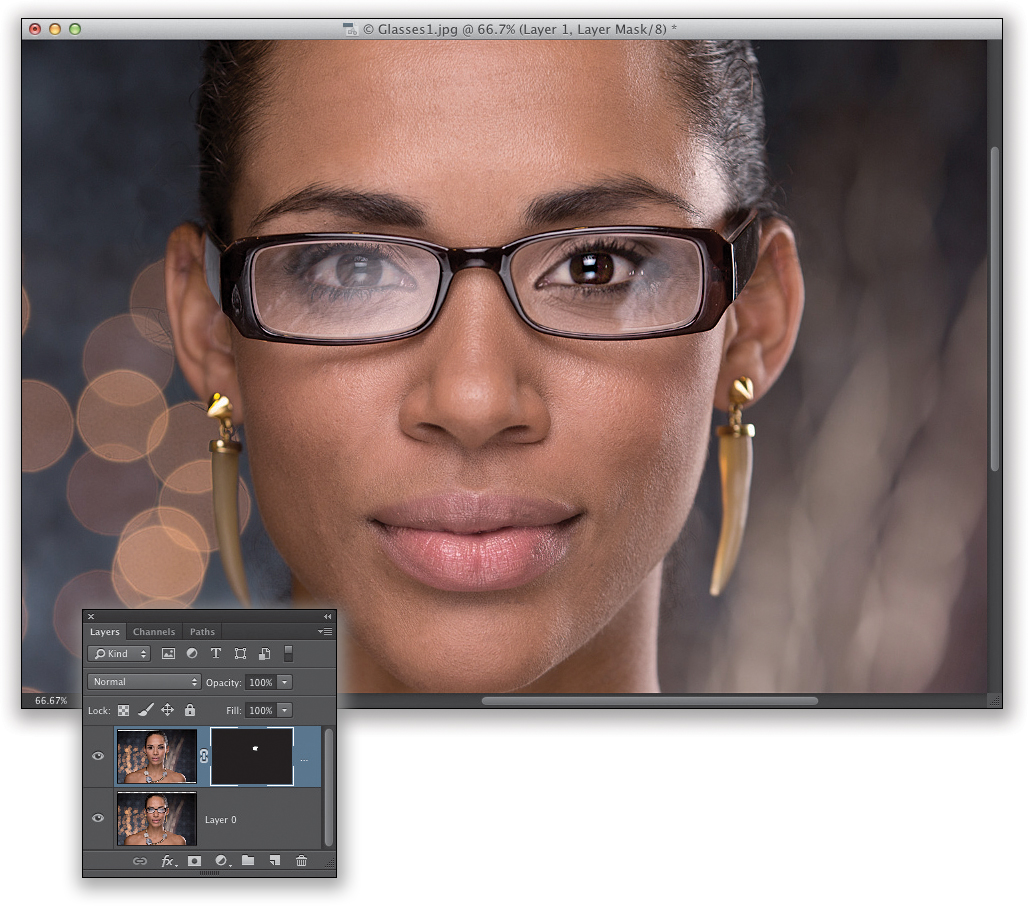
Use the Zoom tool (Z) to zoom in on her eyes, make sure your Foreground color is set to white, get the Brush tool (B), and choose a small, soft-edged brush from the Brush Picker up in the Options Bar. Then, simply start painting over the inside of the frame on the right, and it reveals the version of her eyes without the glasses on (as seen here). What you’re doing is revealing the top layer, but just where you want it. Once the eye on the right is done, do the same thing for the eye on the left. Make sure you use a small brush and be careful not to accidentally erase any of the frames. If you do make a mistake, no biggie—just press X to switch your Foreground color to black and paint the frames back in.
STEP SIX:
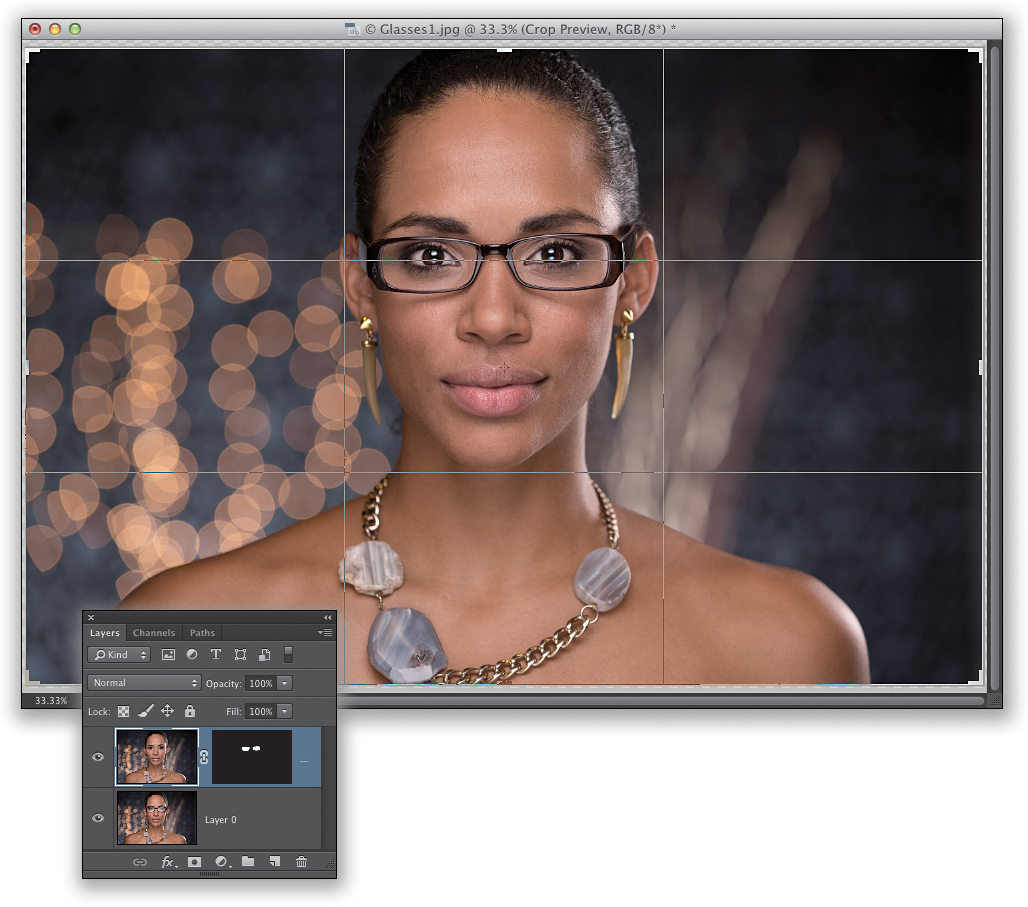
Once you’re finished, zoom back out so we can fix the transparent edges. Grab the Crop tool (C), drag the cropping borders in to the edges of the photo, and then press Return (PC: Enter) to complete your crop. Finally, you can go ahead and flatten your layers by choosing Flatten Image from the Layers panel’s flyout menu (at the top right of the panel). You can see a before/after on the next page.
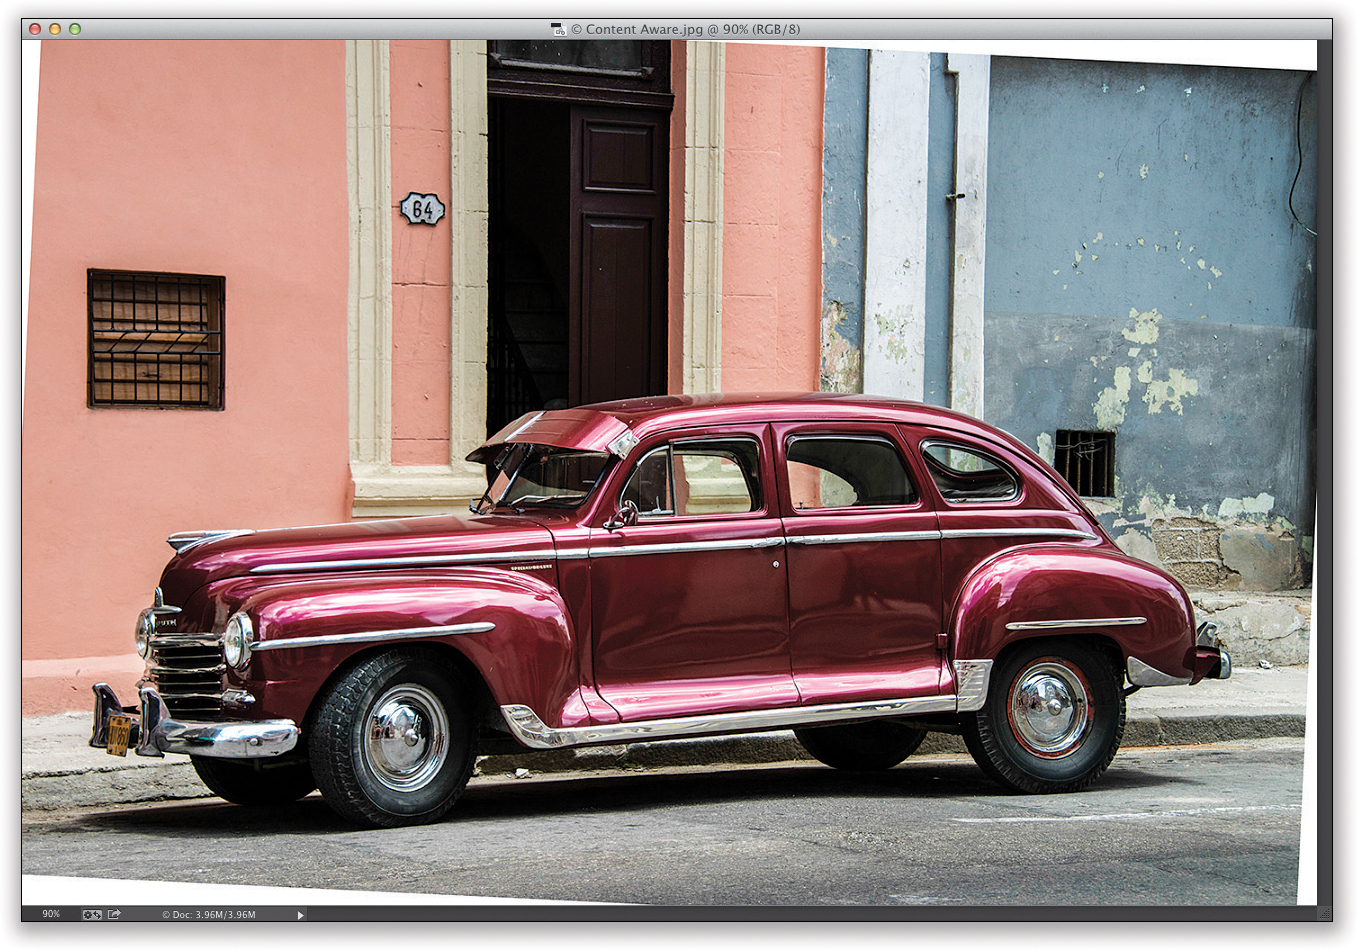
Removing Stuff Using Content-Aware Fill
Photoshop’s Healing Brush (a version of which is in Lightroom, called the Spot Removal tool) is great for removing spots, specks, wrinkles, and stuff like that. Its cousin, the Patch tool, is great for removing larger problems. But, there are lots of times when you need a different tool to take care of white gaps you get on the edges of your image, like when you’ve done a lens correction, or stitched together a pano, or in our case, rotated an image. Content-Aware Fill is perfect for this because it’s faster, easier, and cleaner.
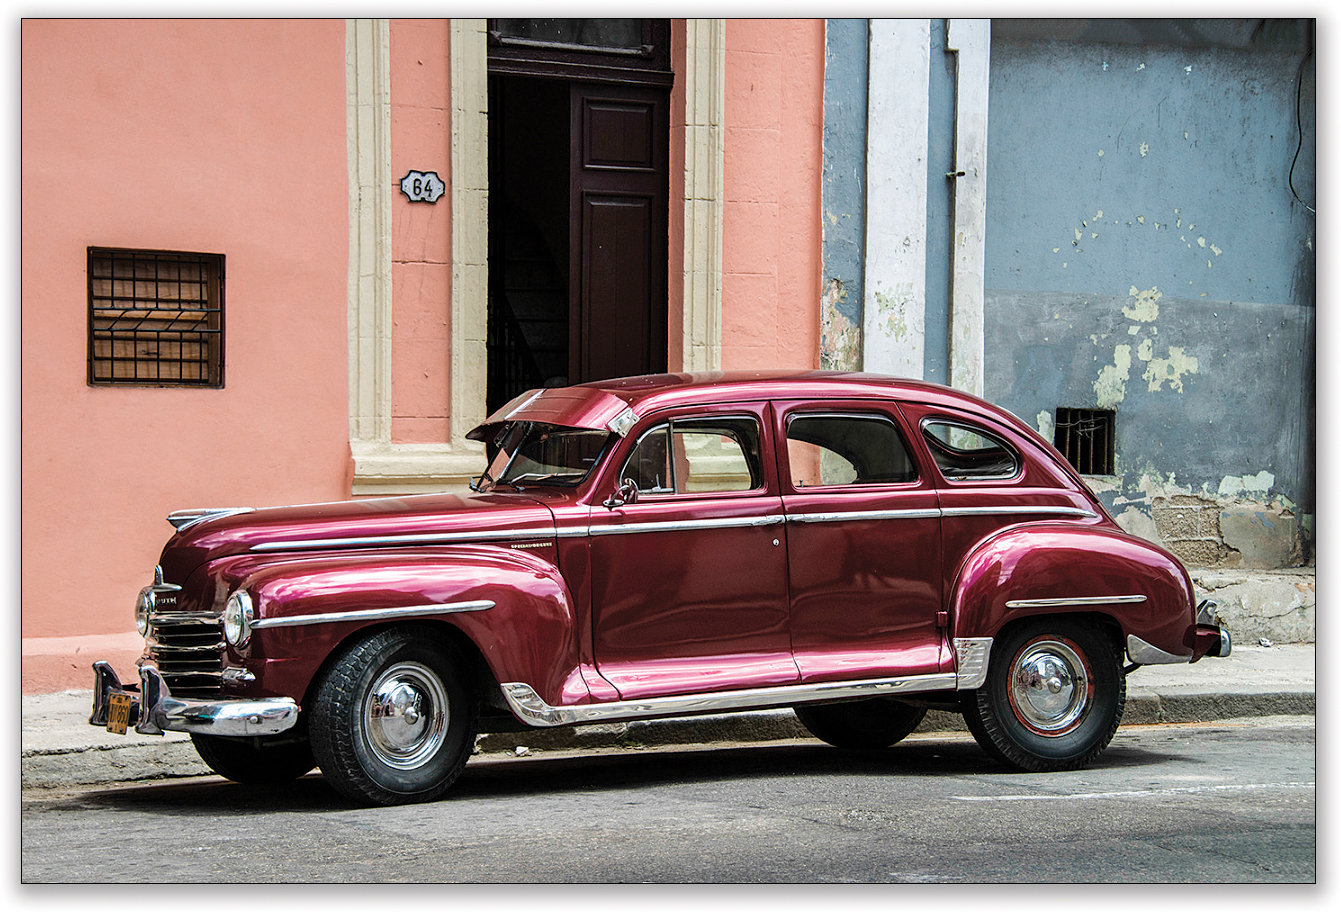
STEP ONE:
In this case, we rotated the image so the doorway behind the car is straight (the street is actually at an angle), but once we rotated the image, it left those white gaps in the corners. Of course, you could crop in tight until you’ve cropped all the white corners away, but then you’ve changed the composition of the photo, making the car’s front bumper very tight to the edge of the image (and generally, you wouldn’t want it that close because it would make the car look crowded). That’s the wonderful thing about Content-Aware Fill: you keep the same composition, but it fills in the blanks (so to speak).
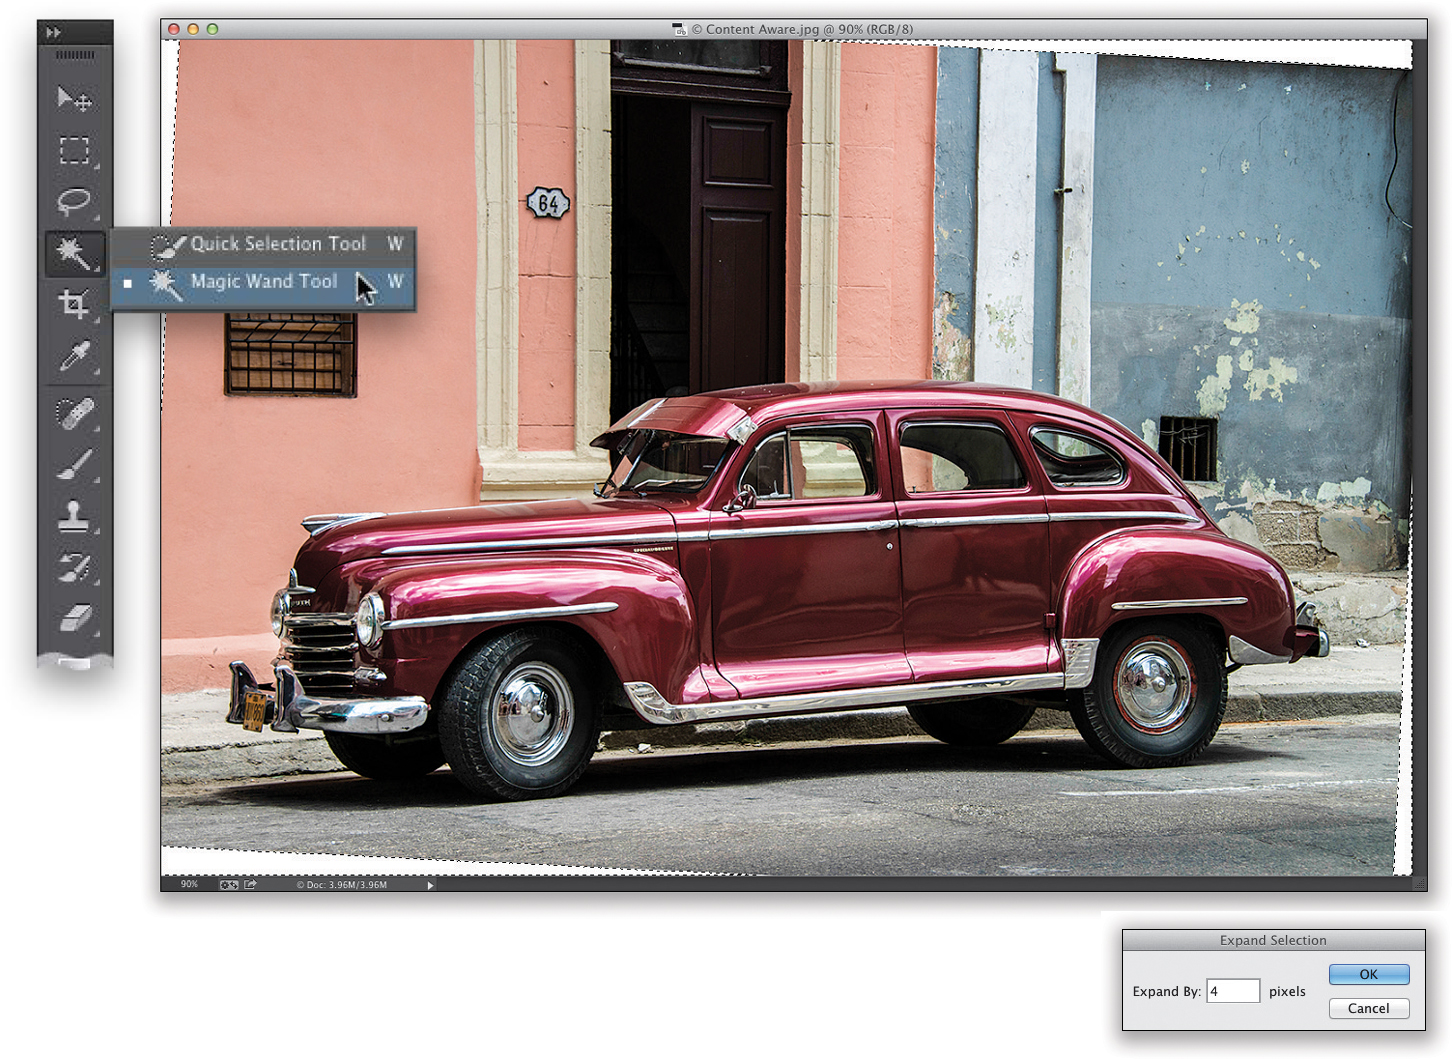
STEP TWO:
You start by selecting the white gap areas. When it’s a solid color like this, the Magic Wand tool (Shift-W) is usually your best bet: just click it once in one of those gap areas, then Shift-click on another area (holding the Shift key adds the second area to your first selection). Keep holding that Shift key down and click on the other white areas, until they’re all selected (as seen here). Once your selection is in place, you can help Content-Aware Fill do its thing by expanding that selection outward. So, go under the Select menu, under Modify, and choose Expand. When the Expand Selection dialog appears, enter 4 pixels and click OK, and your selection grows outward by that much.
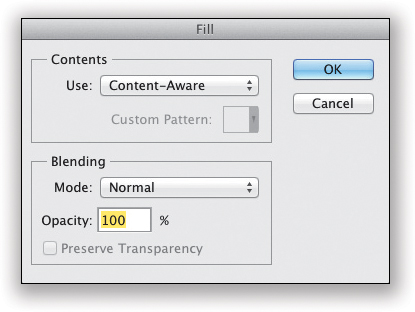
Next, go under the Edit menu and choose Fill. When the Fill dialog appears, choose Content-Aware from the Use pop-up menu (shown here). Now, just click OK, sit back, and prepare to be amazed (and then go ahead and Deselect by pressing Command-D [PC: Ctrl-D]).

STEP FOUR:
Not only are the white gaps gone, but look how it extended the white columns on the top right, and the sidewalk on the right behind the car. (That’s why it’s called “Content-Aware” Fill. It’s aware of what is around the object you’re removing and it intelligently fills it all in.) The more I use it, the more it amazes me, but part of using this effectively is learning its weaknesses (like the strange effect on the blue wall in the top right), and how to get around them when possible. I do want to mention that while Content-Aware Fill often does a perfect job, just about as often, it doesn’t work at all. It constantly surprises me in that it works brilliantly more times than I think it will, but in some cases, depending on the image and what you’re trying to remove or fill, it either doesn’t work at all or it fixes just part of the problem. If the results are just awful, press Command-Z (PC: Ctrl-Z) to Undo it. But, if it doesn’t look great, ask yourself this: “Did it at least fix part of it, or even most of it?” If it even fixes some of the problem, then you have that much less work to do with the Healing Brush and Clone Stamp tool, like in this image.