Chapter 8. Don’t Move
12 Things You’d Think You’d Need Photoshop For, But Ya Don’t
I thought it would be really helpful to wrap up the book with a special bonus chapter to keep you from jumping over to Photoshop for things you can actually do as well, or maybe even better, right within Lightroom. The reason this is called a “bonus” chapter is that I wasn’t even planning on having this chapter at all until I was about 3/4 of the way through writing the book, and then I realized that if I added a few more pages to the book, even if they’re blank pages with nothing on them, it would sell more copies, and if it sells more copies, then I get a cash bonus from my publisher, so...welcome to my bonus chapter. Okay, none of that is true. Well, the first part is (the part about doing more stuff in Lightroom), but in reality, the only way I get a cash bonus from my publisher is if I’m able to work a few naughty words into the book, because then the book can get an R rating from the NTSB, and book publishers know from decades of highly biased research that teens will buy any book with an R rating because there’s a good chance that if they remove 75% of the “clean” words, what’s left over is actually the entire lyrics to a rap song. Now all they have to do is put a drum track behind those lyrics, with enough bass response that it loosens the bolt holding your intake manifold in place (which can mess with your air/fuel ratio, which by the way wouldn’t be a bad name for a band) and, before you know it, they’re up on stage twerking like a boss with that guy you got to sing the chorus because you’re just a rapper and not a singer (but of course, that’s a best case scenario. Your mileage may vary). Anyway, I’m surprised you let me go this long without asking about where the title came from for this chapter. It’s actually from the 2004 Italian flick Don’t Move, starring Penelope Cruz, which I thought kinda fit since I’m telling you when not to move to Photoshop. Now, this movie is unrated, as best as I can tell, because it looks like it was only released in theaters in Italy, but I gotta believe a lot of Italian teens went to see it anyway because even though Penelope and co-star Sergio Castellitto aren’t doing anything particularly naughty on the movie poster, it looks like they’re about to, and for most teens, just the intent is enough.
12 Things You’d Think You’d Need Photoshop for, But Ya Don’t
A lot of times, when I talk to Lightroom users and they tell me why they want Photoshop, it’s actually for things that they didn’t realize Lightroom could either already do, or actually does better. So, I thought I’d include this bonus chapter on the top 12 things you might think you need to jump over to Photoshop for, but you can do right in Lightroom. Hope you find these helpful. By the way, they’re in no particular order.
#1: CREATING AN IRIS BLUR EFFECT
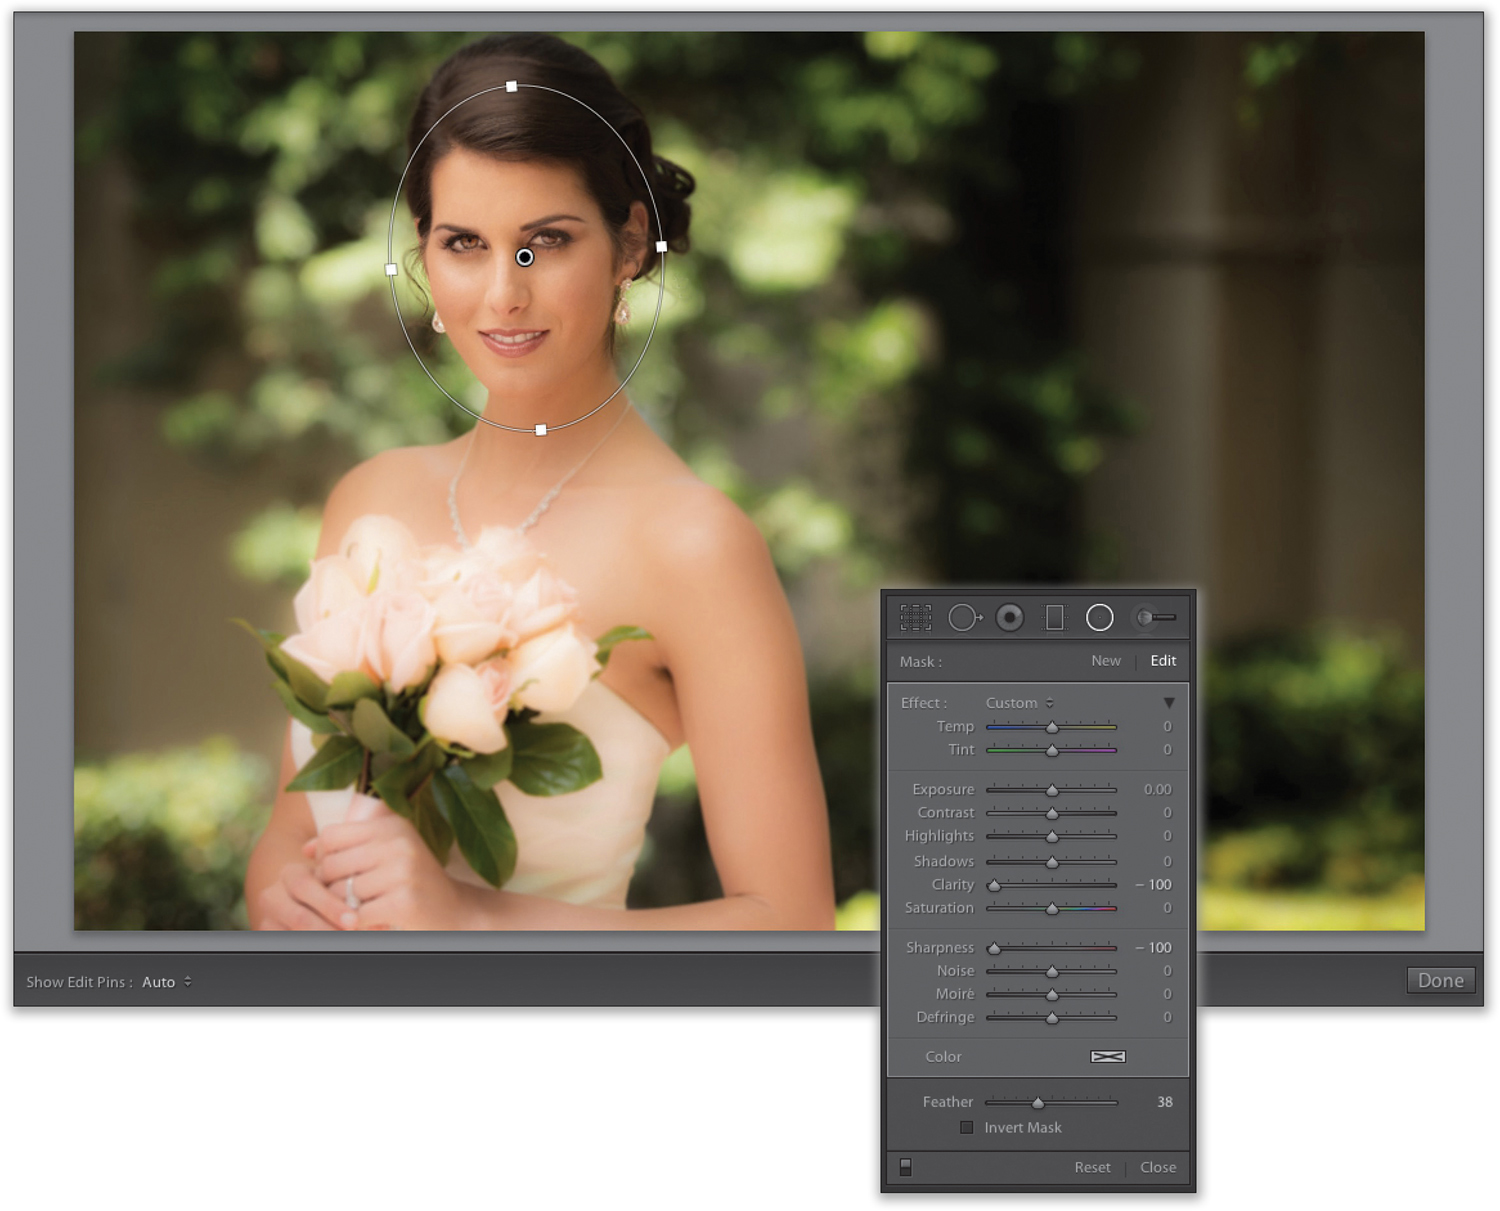
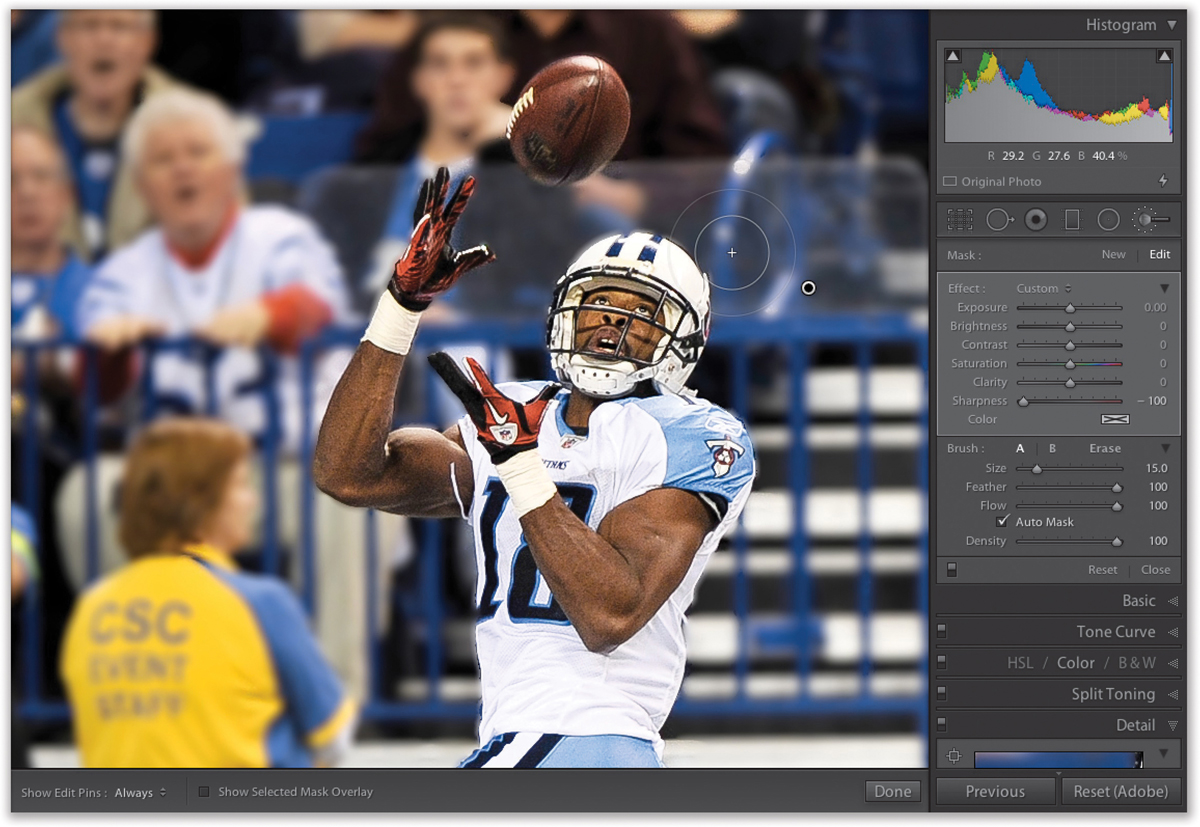
Photoshop’s popular Iris Blur filter enables you to pick one part of your image to be in focus (a circular or oval area), and then it gradually (or quickly) turns into an out-of-focus look. You can get a similar look in Lightroom’s Develop module: Get the Radial Filter (Shift-M), drag it out over the area you want to remain in focus, turn off the Invert Mask checkbox, then lower the Clarity to –100 and the Sharpness to –100. The Feather slider controls the transition between the sharp in-focus area inside the oval and the out-of-focus background—the higher the Feather amount, the softer the transition. So, if it doesn’t look sharp enough in the center of the oval, lower the amount.
#2: ADDING SELECTIVE COLOR EFFECTS
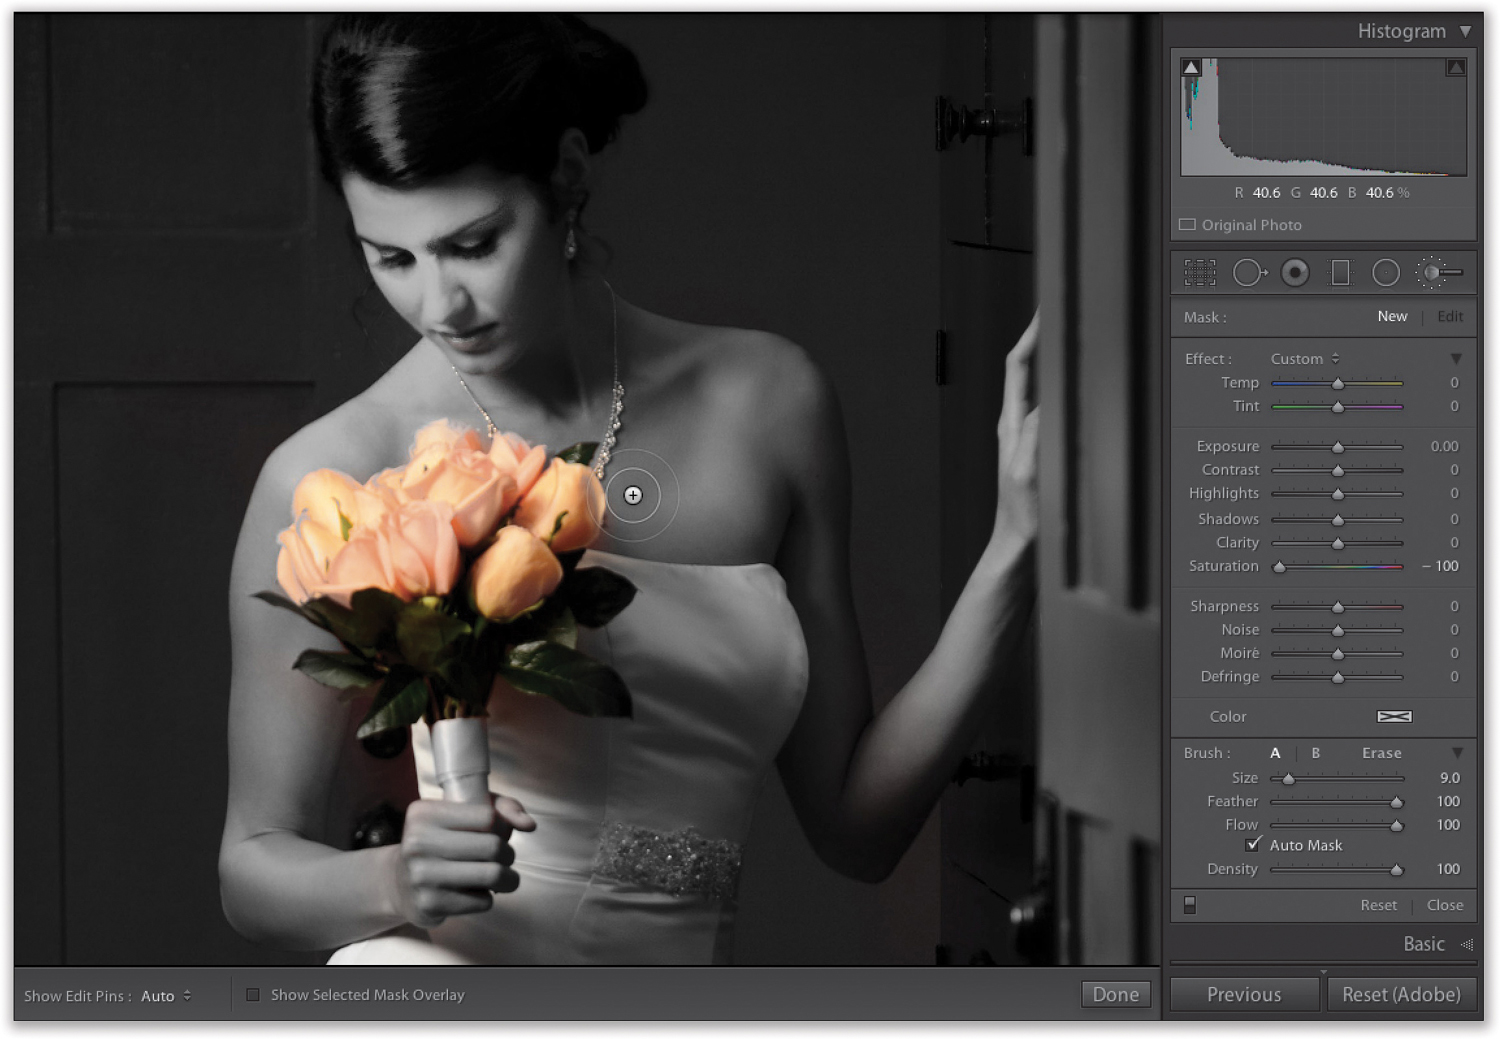
This is where the entire image is in black and white, except for one area (for example, a photo of a bride where everything is black and white, except her bouquet). In Photoshop, you’d duplicate the Background layer, convert the photo to black and white, add a layer mask, and paint the color back, or convert the image to black and white and use the History Brush to bring the color back. In Lightroom, go to the Develop module, get the Adjustment Brush (K), double-click on the word “Effect” to reset all the sliders to zero, and turn off the Auto Mask checkbox. Then, set the Saturation to –100 and paint over everything except the area you want to appear in color—stay clear of it by 1/2" or so. Now, turn the Auto Mask checkbox back on and paint right up to the edge of the area you want to remain in color—just keep the + (plus sign) crosshair in the center of the brush from crossing onto that area.
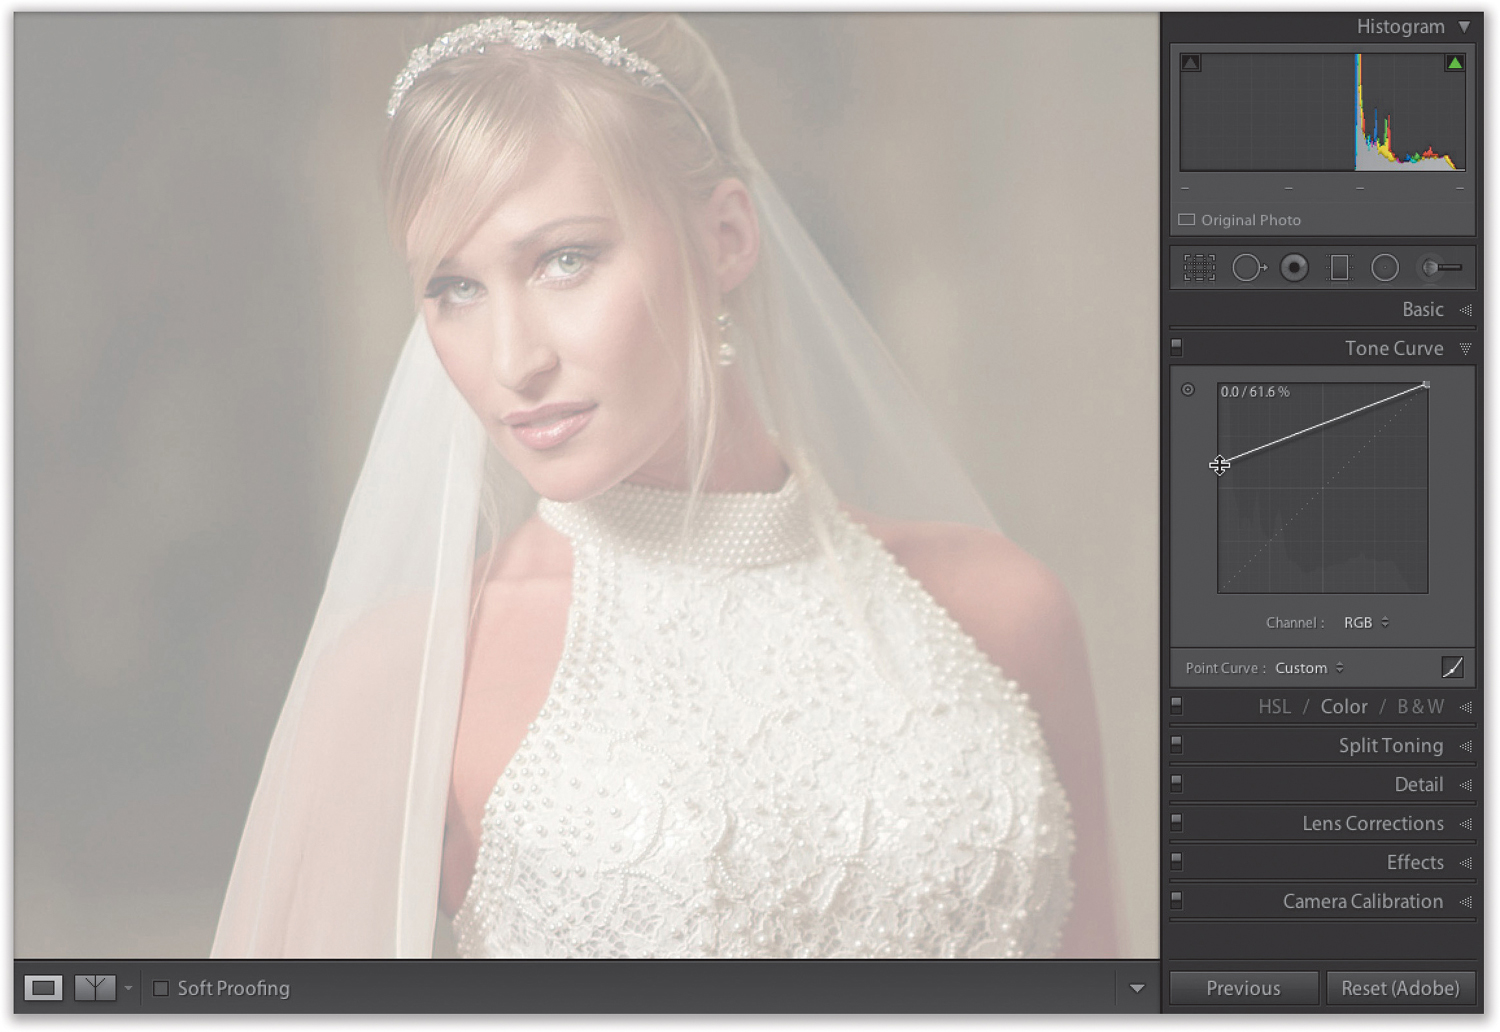
#3: CREATING A BACKSCREENED EFFECT
This is an effect often seen in wedding albums where an image appears faintly in the background, so you can put easily readable text over that image. We did this in Photoshop in Chapter 6 so we could place another image and some text over it, and add a couple layer styles. But, you can create this look in Lightoom by going to the Tone Curve panel (in the Develop module) and dragging the bottom-left corner point straight upward along the left side of the grid. The higher you drag, the more your image is backscreened.
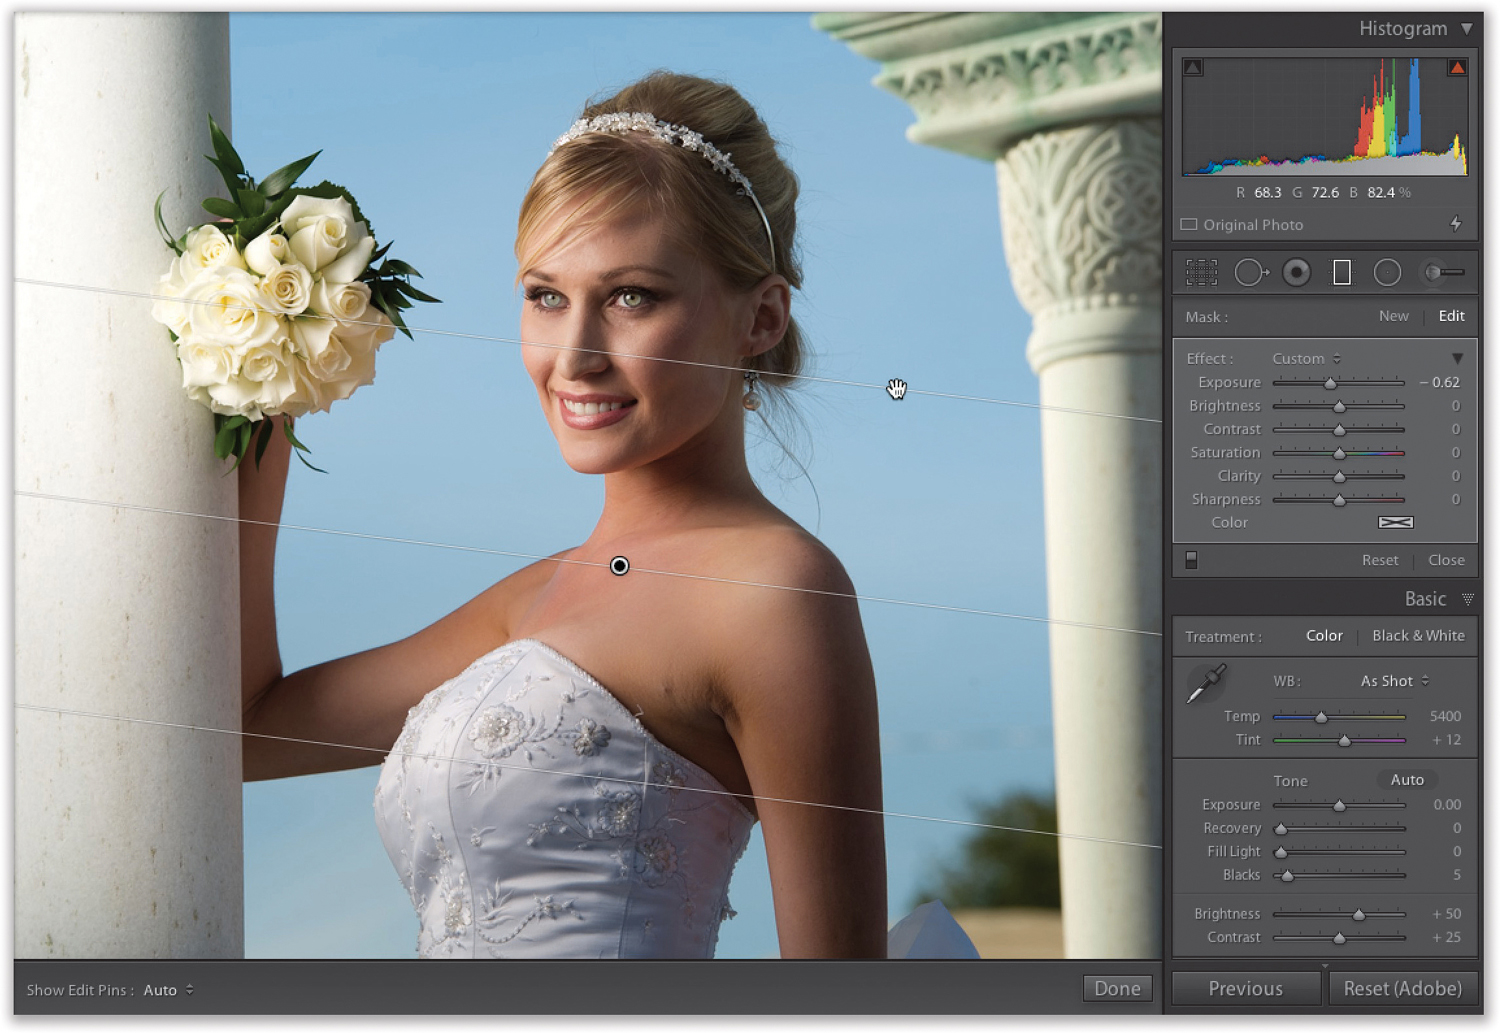
#4: FIXING AN OVER-LIT SHOT
If you have a portrait that has been evenly lit, but you want the image to appear as though the subject’s face is nicely lit and then the light falls off gradually darker, in Photoshop you’d add a Gradient adjustment layer, choose the Black to Transparent gradient from the Gradient Picker, click-and-drag out a gradient, then you’d change the blend mode of this layer to Soft Light, and it would effectively do the trick. In Lightroom, you’d use the Graduated Filter instead. Just get the Graduated Filter (M) from the toolbox, double-click on the word “Effect” to reset all the sliders to zero, and click-and-drag the Exposure slider to the left a bit. Then, click-and-drag the tool from the part of the photo where you want the light to be darker, up toward your subject’s face. Once you’ve dragged the tool, you can control how dark the lower part of the image appears using the Exposure slider.
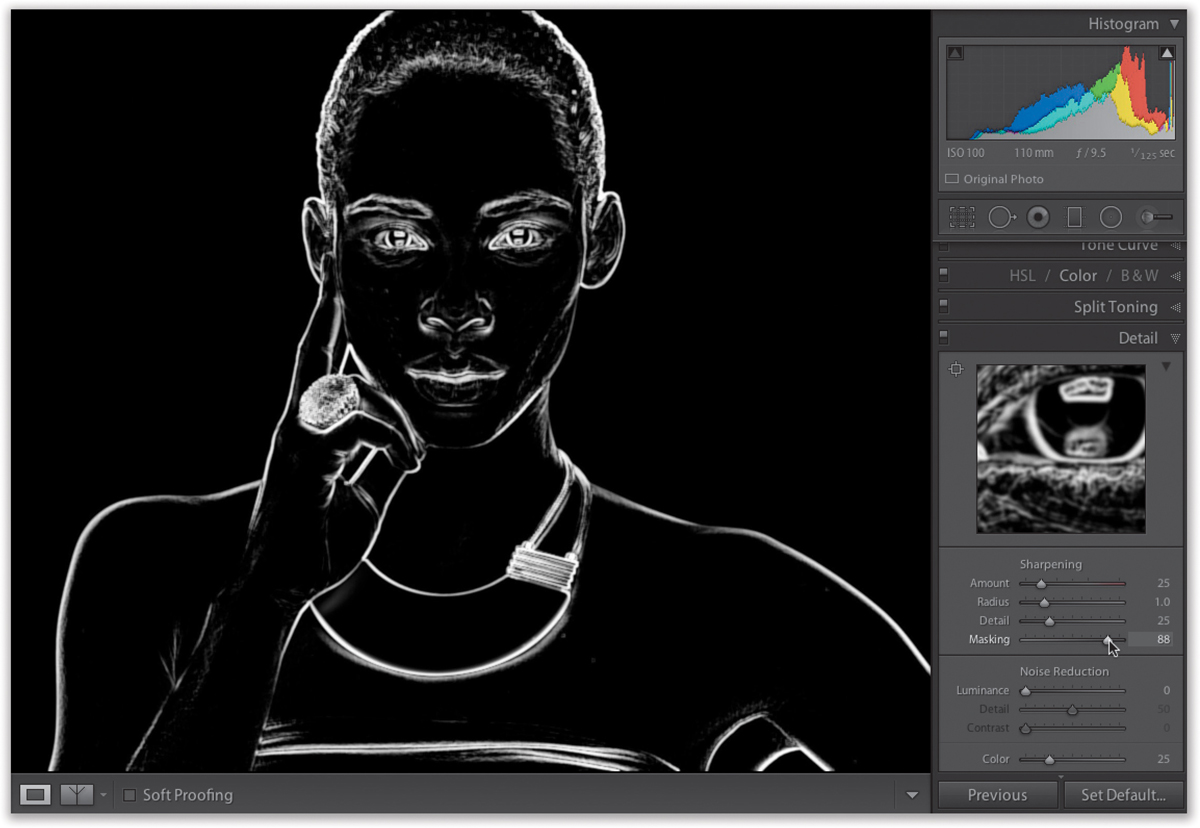
In Photoshop, you’d duplicate the Background layer, apply the Unsharp Mask filter, then add a black layer mask to hide the sharpened duplicate layer. You’d then paint in white over the areas you want sharpened (like the lips, eyes, eyebrows, hair, etc.) and avoid sharpening the skin. In Lightroom, you can do the same thing faster and easier: Just go to the Detail panel, under Sharpening, and set your Amount, then press-and-hold the Option (PC: Alt) key, and click on the Masking slider. The image turns solid white, meaning the entire image is being sharpened, but as you drag the slider to the right, the image starts to turn black, leaving just the detail areas of your subject in white. Only the areas that appear in white will be sharpened, and if you drag far enough to the right, all that will be left in white will be those detail areas you want sharpened (like her eyes, eyebrows, lips, etc.).
#6: RUNNING PHOTOSHOP PLUG-INS
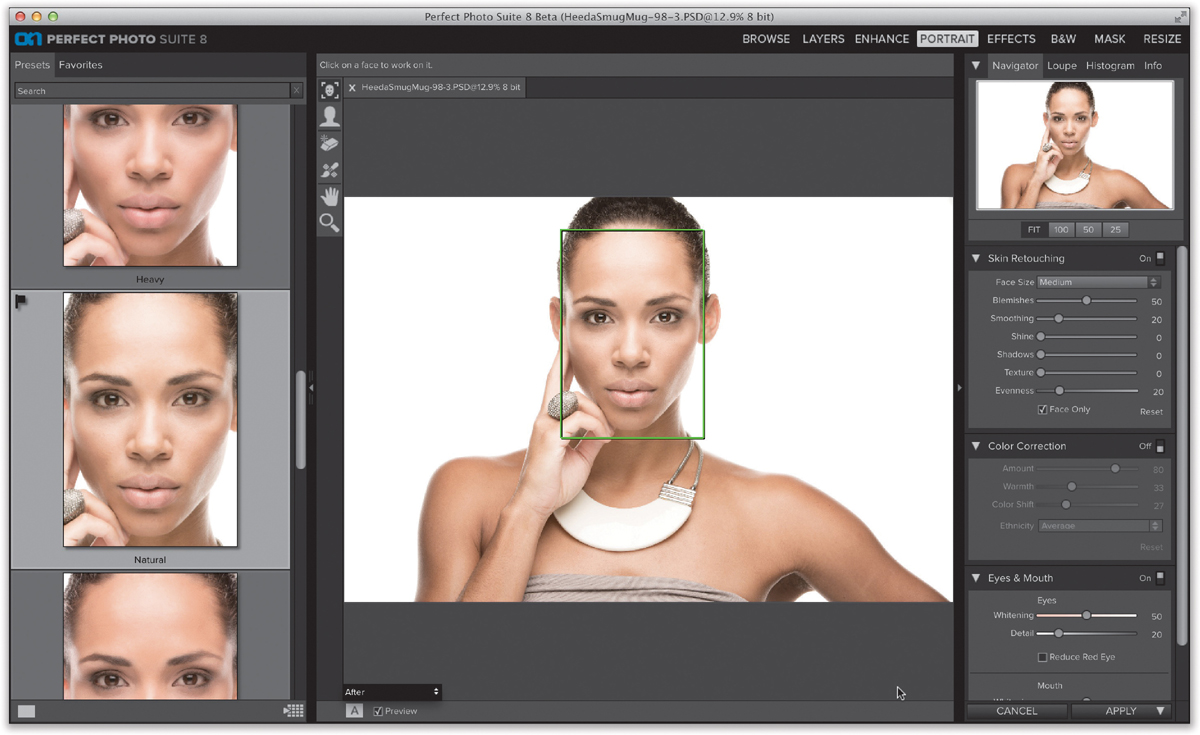
Photoshop has a plug-in architecture that lets you add third-party plug-ins for effects, for sharpening, and for a whole host of ways to expand Photoshop’s power. Although they’re usually called “Photoshop plug-ins,” today most of these plug-ins have a version made to work with Lightroom and they work exactly like their cousins over in Photoshop (but without going over to Photoshop). Once you’ve installed a Lightroom plug-in, you can access it by going under the File menu, under Plug-In Extras, and choosing the plug-in you want. This plug-in here is one of my favorites. It’s OnOne Software’s Perfect Photo Suite 8, and this is their Portrait module running on an image I selected in Lightroom.
#7: CREATING A SHALLOW DEPTH OF FIELD BACKGROUND EFFECT
In Photoshop, you’d duplicate the Background layer, add the Lens Blur filter to make the entire image blurry, and then add a layer mask and paint over your subject in black to remove the blurriness from them. In Lightroom, you can blur the background by getting the Adjustment Brush (K), lowering the Sharpness to –100, and painting over the background areas with the Auto Mask checkbox turned off. Now, turn on Auto Mask and paint right up to the edge of the area you want to remain sharp (again, keep the + [plus sign] crosshair in the center of the brush from crossing onto that area or it will become blurry, too).
#8: REDUCING NOISE
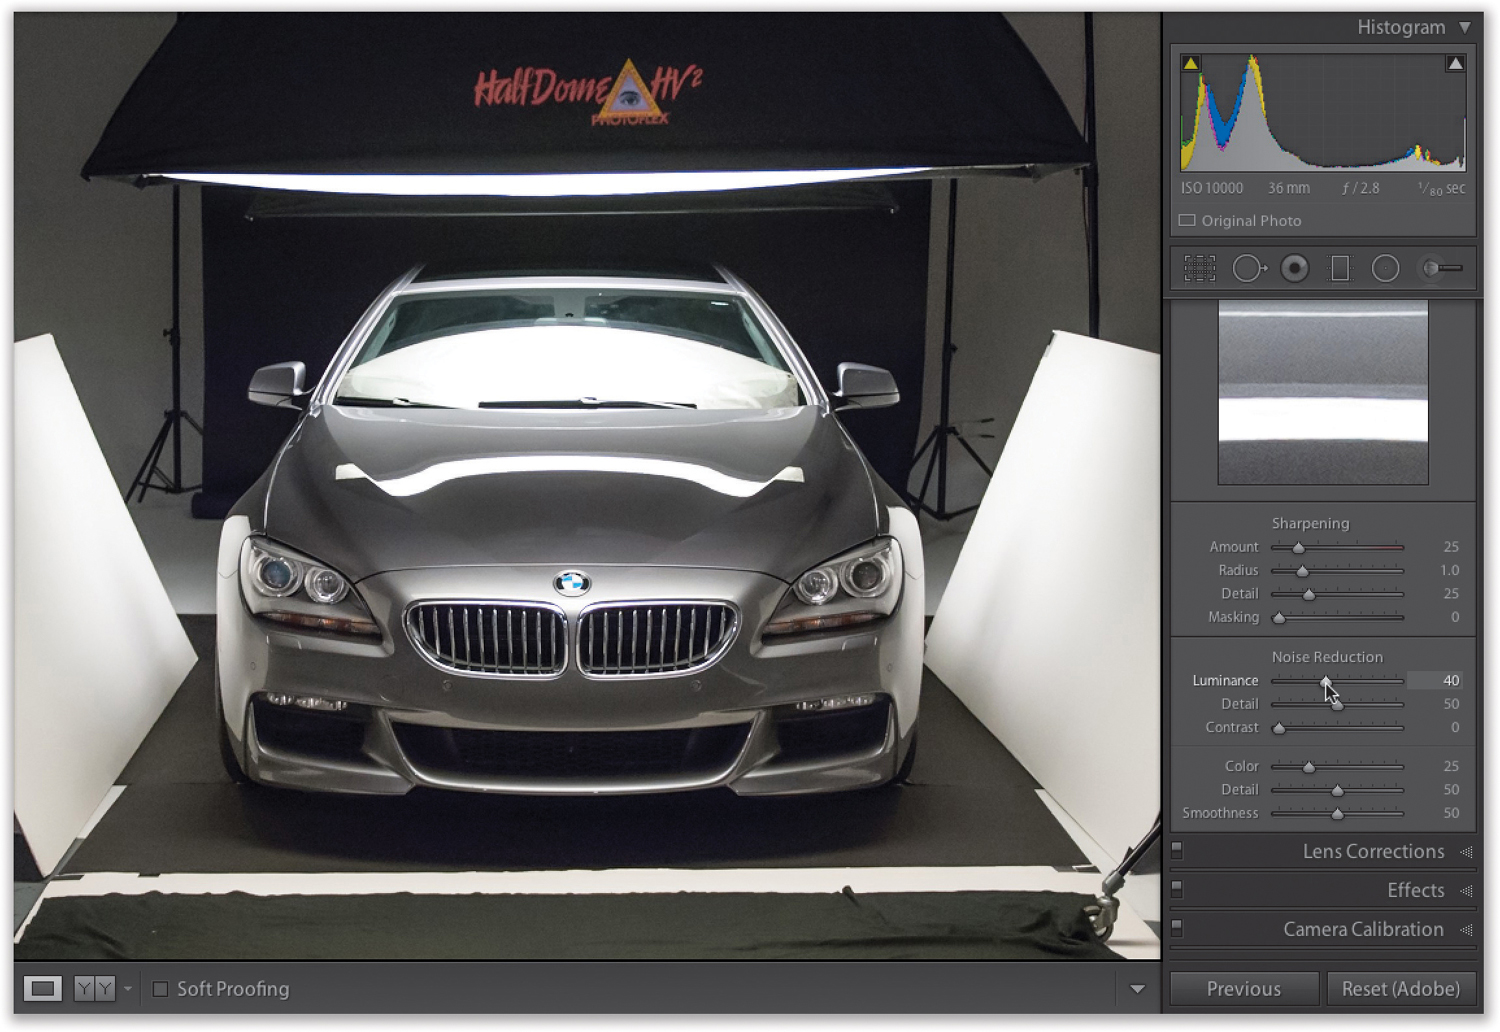
You don’t have to jump over to Photoshop to use a plug-in or filter to try to reduce noise in an image, because the best noise reduction out there is built right into Lightroom. Just go to the Detail panel and, in the Noise Reduction section, drag the Luminance slider to the right to reduce the amount of noise. (If you shot in RAW on your camera, this really rocks because you’re applying the noise reduction directly to the RAW image, rather than creating an 8-bit image in Photoshop and then applying a plug-in.) If the image looks a little flat after applying noise reduction, drag the Contrast slider to the right. This behind-the-scenes shot was taken at 10,000 ISO and, by increasing the Luminance amount here in Lightroom, the noise is hardly visible.
#9: USING THE LIGHTING EFFECTS FILTER
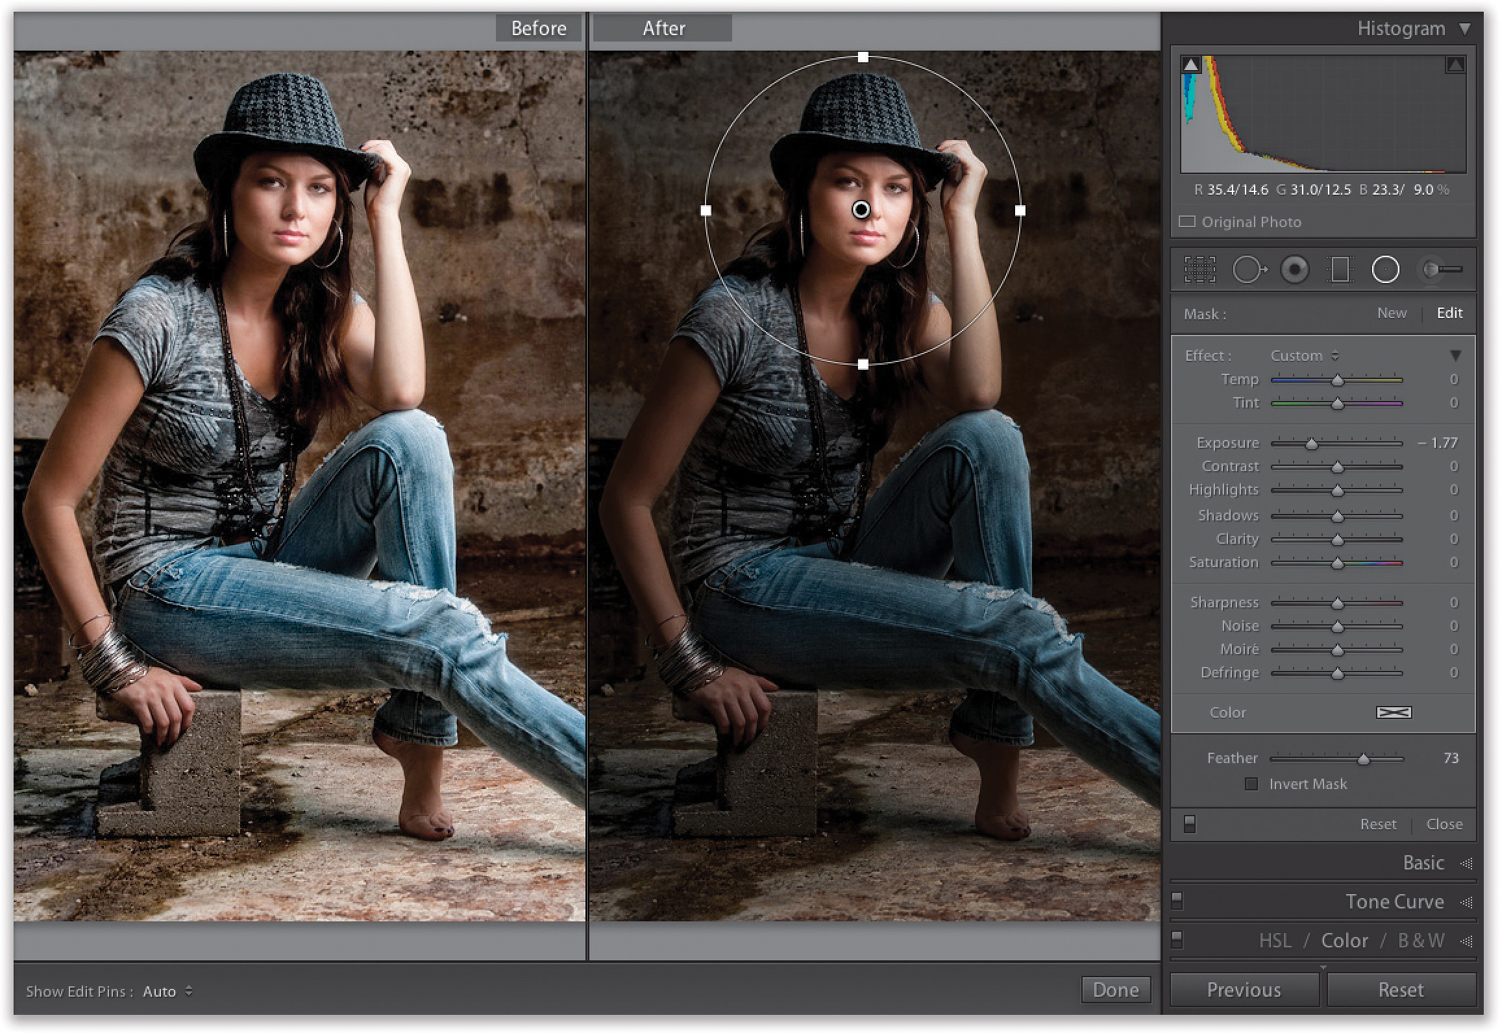
Photoshop has a great filter that lets you apply a spotlight effect over any part of your image you want to highlight by darkening all of the area around that spotlighted area (I like the Flashlight preset. In fact, it’s the only one I ever use). You can get the same look here in Lightroom: Get the Radial Filter (Shift-M) and double-click on the word “Effect” to reset all the sliders to zero. Now, drag the Exposure slider to the left a bit to darken the exposure, and click-and-drag out a circular or oval shape over the area you want to add the spotlight effect to. Turn off the Invert Mask checkbox, and the rest of the image is darkened while the area inside your circle remains unchanged, so it looks brighter. If you want it even brighter, click the New button, click-and-drag out a circle inside your existing circle, and then drag the Exposure slider to the right, and it brightens that area as much as you want.
#10: ADDING A PHOTO FILTER ADJUSTMENT LAYER
Photoshop has an adjustment layer that tries to replicate the look of traditional screw-on warming or cooling lens filters, like an 81 warming filter to add an orange tint for a warmer look, or an 80 cooling filter to add a bluish, cooler look. There are two ways to get this look right within Lightroom: Normally, I would do this by just dragging the Temp slider toward yellow for a warmer look or toward blue for a cooler look. Easy enough. If you want to try an alternate method, go to the Split Toning panel and, in the Shadows section, drag the Saturation slider over to 25, then drag the Hue slider toward yellow (for a warmer look) or blue (for a cooler look). For more of the effect, drag the Saturation slider to the right; for less, of course, drag it to the left.
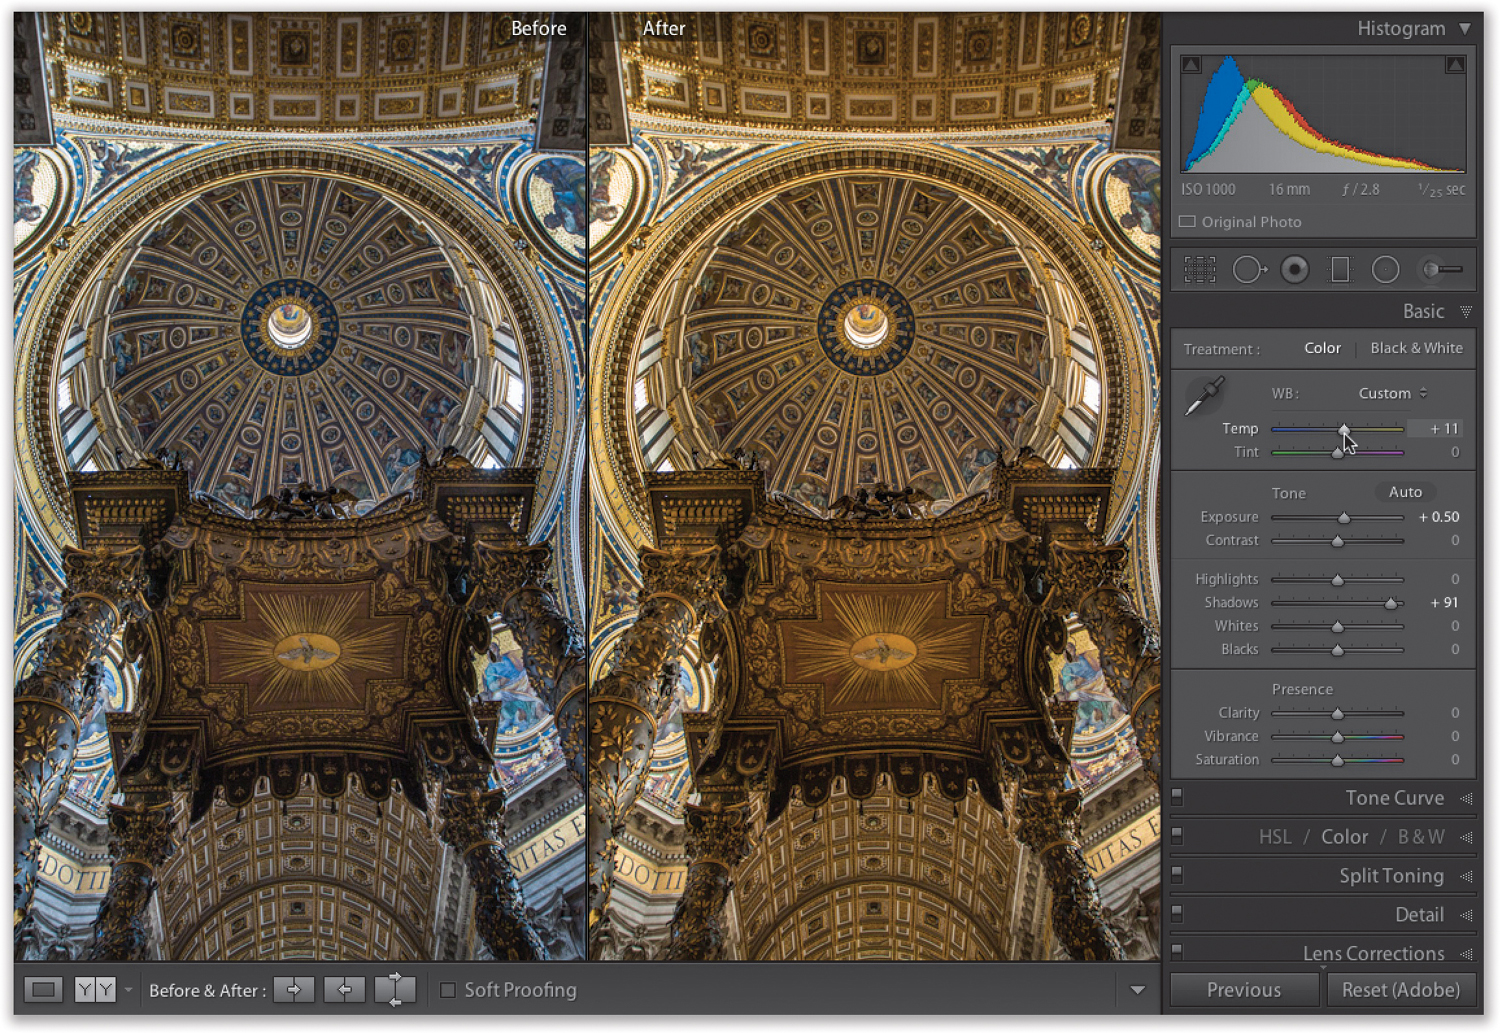
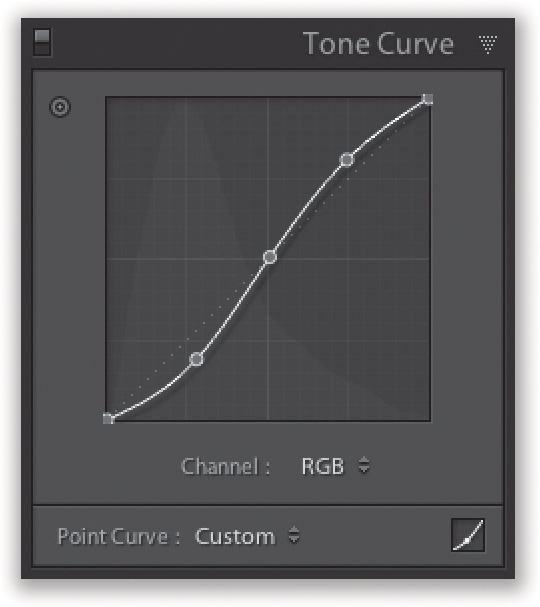
Since we do our color correction in Lightroom by correcting the white balance (if necessary), we really don’t have to jump over to Photoshop to use Curves for that. But, you could use Curves to create extra contrast, though, honestly, I never feel I need to do this, especially since Curves is right here in Lightroom if you really need it. Just go to the Tone Curve panel and there it is! You can click anywhere on the diagonal line to add a point. To create contrast, click once in the center of the diagonal line, then again in the top quarter of the line, and again at the bottom. Now, drag the top point you added upward to increase the highlights, and drag the bottom point you added downward to increase the shadows. This forms what’s called an “S-curve” and the steeper you make that curve, the more contrast it creates, all without jumping over to Photoshop.
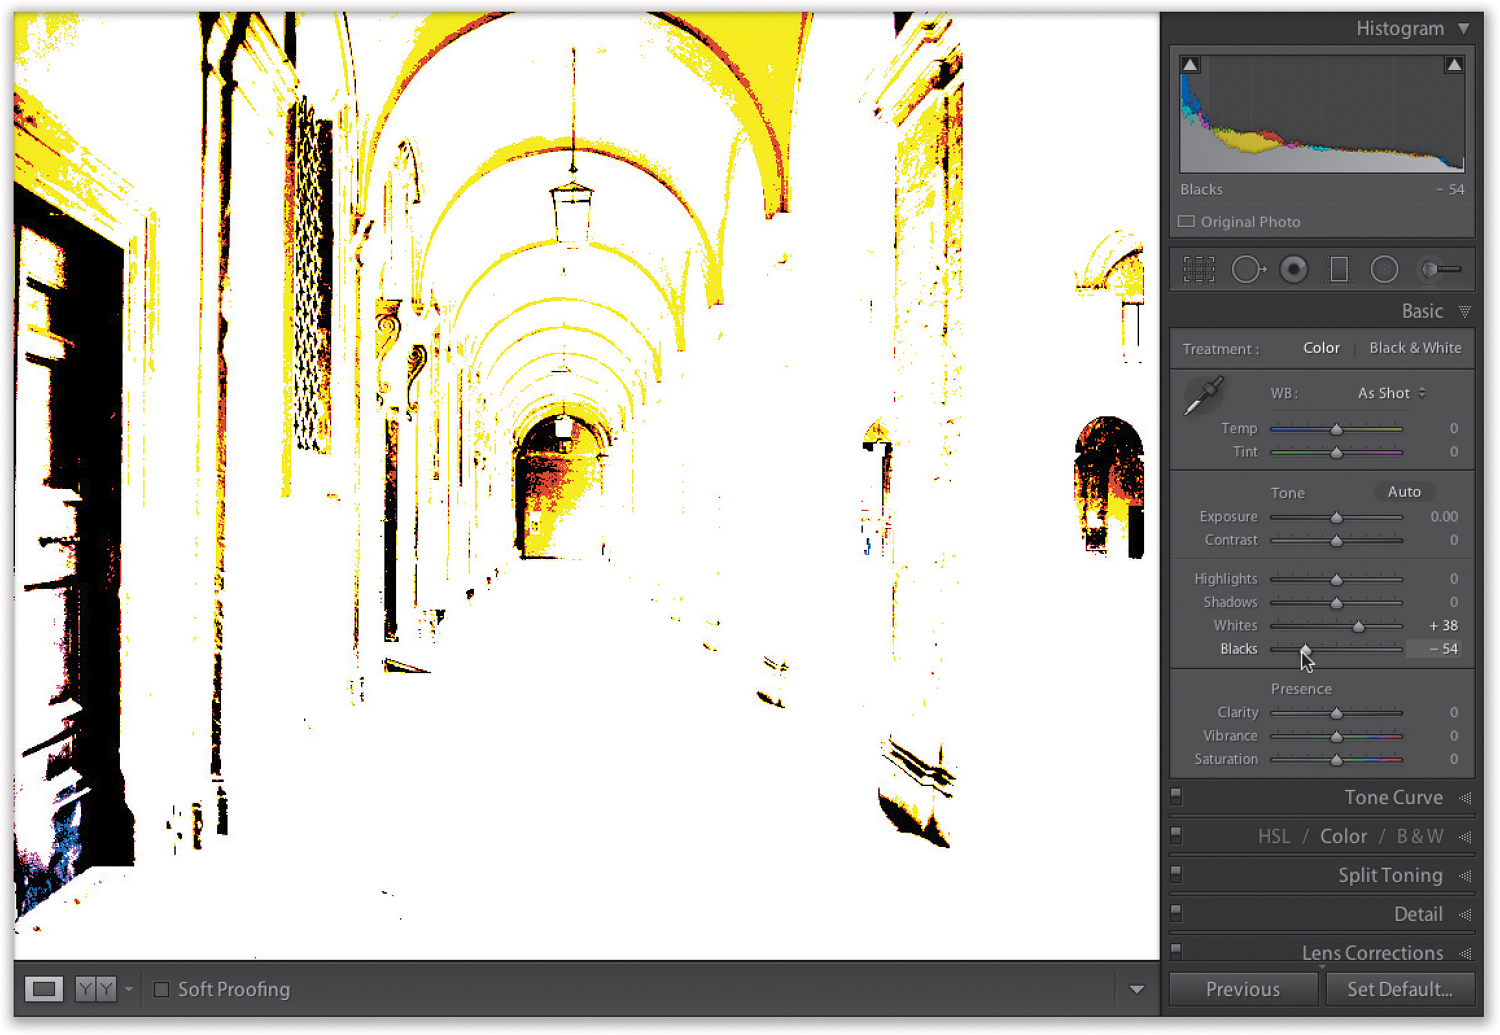
#12: SETTING YOUR WHITE & BLACK POINTS USING LEVELS
One of the reasons people love Photoshop’s Levels is that they can use it to set an image’s black point (the darkest the shadows will appear without turning them to solid black) and the white point (the brightest the highlights will get without clipping). Luckily, you can set your white and black points right within Lightroom. To set the white point, press-and-hold the Option (PC: Alt) key and click on the Whites slider, and the image turns black. Drag the slider to the right until parts of the image start to turn white (those areas are clipping, or losing detail), then back it off just a tiny bit. That’s it. You’ve set your white point. The Blacks slider works the same way, but the image turns white (as seen here). Drag to the left and when parts of the image start to turn black (those parts are now solid black), back off just a tiny bit.