2.5.3. Configuring the TextView
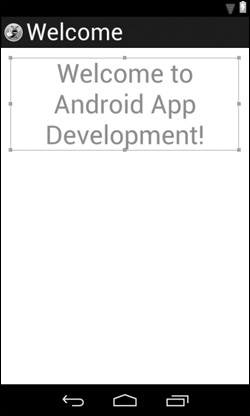
The Welcome app’s default GUI already contains a TextView, so we’ll simply modify its properties.
Configuring the TextView’s Text Property Using a String Resource
According to the Android documentation for application resources
it’s considered a good practice to place strings, string arrays, images, colors, font sizes, dimensions and other app resources in XML file within the subfolders of the project’s res folder, so that the resources can be managed separately from your app’s Java code. This is known as externalizing the resources. For example, if you externalize color values, all components that use the same color can be updated to a new color simply by changing the color value in a central resource file.
If you wish to localize your app in several languages, storing the strings separately from the app’s code allows you to change them easily. In your project’s res folder, the subfolder values contains a strings.xml file that’s used to store the app’s default language strings—English for our apps. To provide localized strings for other languages, you can create separate values folders for each language, as we’ll demonstrate in Section 2.8.
To set the TextView’s Text property, create a new string resource in the strings.xml file as follows:
1. Ensure that the welcomeTextView is selected.
2. Locate its Text property in the Properties window, then click the ellipsis button to the right of the property’s value to display the Resource Chooser dialog.
3. In the Resource Chooser dialog, click the New String... button to display the Create New Android String dialog (Fig. 2.16).

4. Fill the String and New R.string fields as shown in Fig. 2.16, check the Replace in all XML file for different configurations checkbox then click OK to dismiss the dialog and return to the Resource Chooser dialog. The String field specifies the text that will be displayed in the TextView, and the R.string field specifies the string resource’s name so that we can reference it in the TextView’s Text property.
5. The new string resource named welcome is automatically selected. Click OK in the Resource Chooser dialog to use this resource.
In the Properties window, the Text property should now appear as in Fig. 2.17. The syntax @string indicates that a string resource will be selected from the strings.xml file (located in the project’s res/values folder) and welcome indicates which string resource to select.

Configuring the TextView’s Text Size Property—Scaled Pixels and Density-Independent Pixels
The sizes of GUI components and text can be specified in various measurement units (Fig. 2.18). The documentation for supporting multiple screen sizes
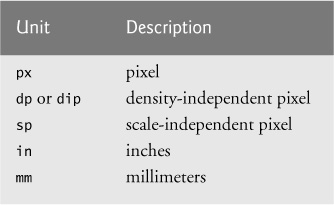
recommends that you use density-independent pixels for the dimensions of GUI components and other screen elements, and scale-independent pixels for font sizes.
Defining your GUIs with density-independent pixels enables the Android platform to scale the GUI, based on the pixel density of a given device’s screen. One density-independent pixel is equivalent to one pixel on a 160-dpi screen. On a 240-dpi screen, each density-independent pixel will be scaled by a factor of 240/160 (i.e., 1.5). So, a component that’s 100 density-independent pixels wide will be scaled to 150 actual pixels wide. On a screen with 120 dpi, each density-independent pixel is scaled by a factor of 120/160 (i.e., 0.75). So, the same component that’s 100 density-independent pixels wide will be 75 actual pixels wide. Scale-independent pixels are scaled like density-independent pixels, and they’re also scaled by the user’s preferred font size (as specified in the device’s settings).
You’ll now increase the TextView’s font size and add some padding above the TextView to separate the text from the edge of the device’s screen. To change the font size:
1. Ensure that the welcomeTextView is selected.
2. Locate its Text Size property in the Properties window, then click the ellipsis button to the right of the property’s value to display the Resource Chooser dialog.
3. In the Resource Chooser dialog, click the New Dimension... button.
4. In the dialog that appears, specify welcome_textsize for the Name and 40sp for the Value, then click OK to dismiss the dialog and return to the Resource Chooser dialog. The letters sp in the value 40sp indicate that this is a scale-independent pixel measurement. The letters dp in a dimension value (e.g., 10dp) indicate a density-independent pixel measurement.
5. The new dimension resource named welcome_textsize is automatically selected. Click OK to use this resource.
Configuring Additional TextView Properties
Use the Properties window to specify the following additional TextView properties:
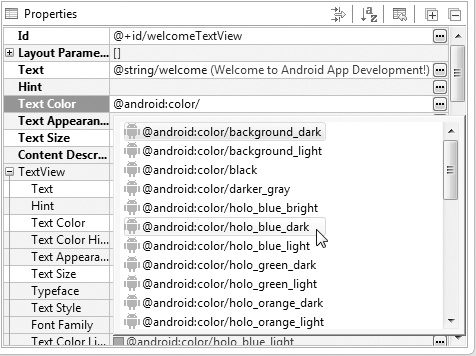
• Set its Text Color property to @android:color/holo_blue_dark. Android has various predefined color resources. When you type @android:color/ in the Text Color property’s value field, a drop-down list of color resources appears (Fig. 2.19). Select @android:color/holo_blue_dark from that list to make the text bright blue.
• To center the text in the TextView if it wraps to multiple lines, set its Gravity property to center. To do so, click the Value field for this property, then click the ellipsis button to display the Select Flag Values dialog with the Gravity property’s options (Fig. 2.20). Click the center checkbox, then click OK to set the value.

The Graphical Layout editor window should now appear as shown in Fig. 2.21.