
Hour 23. Implementing Replication and Sharding in MongoDB
What You’ll Learn in This Hour:
![]() What types of servers are involved in a MongoDB replica set
What types of servers are involved in a MongoDB replica set
![]() How replica servers provide fault tolerance
How replica servers provide fault tolerance
![]() How to deploy a MongoDB replica set
How to deploy a MongoDB replica set
![]() What type of servers are involved in a MongoDB sharded cluster
What type of servers are involved in a MongoDB sharded cluster
![]() How to choose a shard key
How to choose a shard key
![]() Ways to choose a partitioning method
Ways to choose a partitioning method
![]() How to deploy a MongoDB sharded cluster
How to deploy a MongoDB sharded cluster
When implementing MongoDB as a high-performance database, you should seriously consider applying replication and sharding. When implemented correctly, MongoDB’s replication and sharding feature can provide scalability and high availability for your data.
Replication is the process of setting up multiple MongoDB servers that act as one. The data stored in MongoDB is replicated to each server in the replica set. This provides the benefit of having multiple copies of your data in case of server failure. Replication also enables you to distribute the request load on read requests because data can be read from any of the servers in the replica set.
Sharding is the process of splitting up large datasets onto multiple servers. This enables you to scale data that otherwise would be too large for a single server to handle. The following sections discuss designing and implementing replication and sharding in MongoDB.
Applying Replication in MongoDB
One of the most critical aspects of high-performance databases is replication, the process of defining multiple MongoDB servers that have the same data. The MongoDB servers in the replica set are one of three types, as Figure 23.1 illustrates.
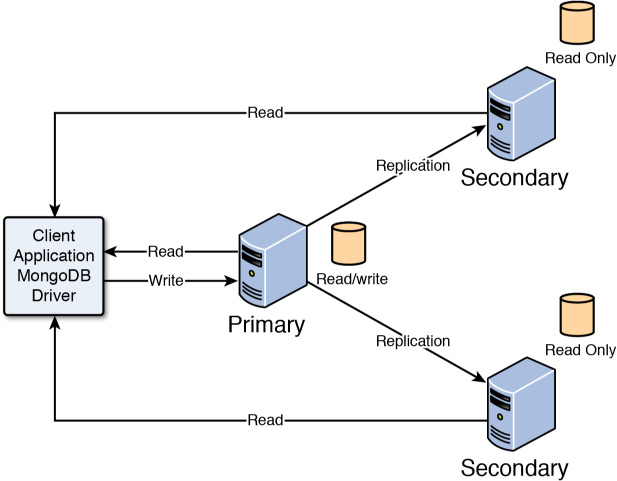
![]() Primary: The primary server is the only server in a replica set that can be written to. This makes sure the primary can ensure the data integrity during write operations. A replica set can have only one primary server.
Primary: The primary server is the only server in a replica set that can be written to. This makes sure the primary can ensure the data integrity during write operations. A replica set can have only one primary server.
![]() Secondary: Secondary servers contain a duplicate of the data on the primary server. To ensure that the data is accurate, the replica servers apply the oplog from the primary server so that every write operation on the primary server also happens on the secondary servers in the same order. Clients can read from secondary servers but not write to them.
Secondary: Secondary servers contain a duplicate of the data on the primary server. To ensure that the data is accurate, the replica servers apply the oplog from the primary server so that every write operation on the primary server also happens on the secondary servers in the same order. Clients can read from secondary servers but not write to them.
![]() Arbiter: The arbiter server is interesting. It does not contain a replica of the data, but it can be used when electing a new primary if the primary server experiences a problem. When the primary server fails, the failure is detected and other servers in the replica set then elect a new primary using a heartbeat protocol among the primary, secondary, and arbiter servers. Figure 23.2 shows an example of the configuration using an arbiter server.
Arbiter: The arbiter server is interesting. It does not contain a replica of the data, but it can be used when electing a new primary if the primary server experiences a problem. When the primary server fails, the failure is detected and other servers in the replica set then elect a new primary using a heartbeat protocol among the primary, secondary, and arbiter servers. Figure 23.2 shows an example of the configuration using an arbiter server.
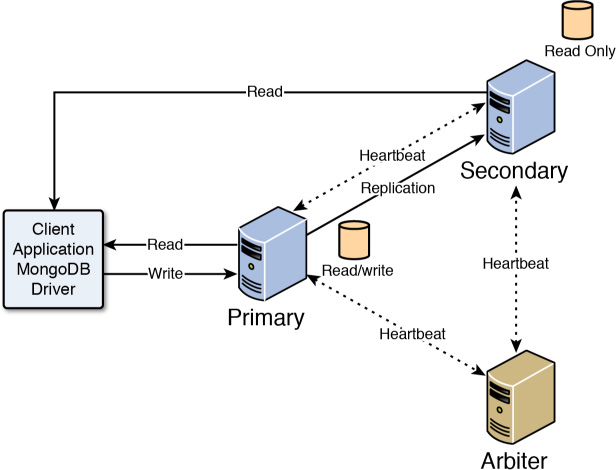
FIGURE 23.2 Implementing an arbiter server in MongoDB replica set to ensure an odd number of servers.
Replication provides two benefits: performance and high availability. Replica sets provide better performance because, although clients cannot write to secondary servers, they can read from them. This enables you to provide multiple read sources for you applications.
Replica sets provide high availability because if the primary server happens to fail, other servers have a copy of the data and can take over. The replica set uses a heartbeat protocol to communicate between the servers and determine whether the primary server has failed. If so, a new master is elected.
You should have at least three servers in the replica set. You should also try to have an odd number, which makes it easier for the servers to elect a primary. This is where arbiter servers come in handy. Arbiter servers require few resources, but they can save time when electing a new primary. Figure 23.2 shows the replica set configuration with an arbiter. Notice that the arbiter does not have a replica—it only participates in the heartbeat protocol.
Understanding Replication Strategy
When determining how to deploy a MongoDB replica set, you need to apply a few concepts. The following sections discuss some of the considerations in implementing a MongoDB replica set.
Number of Servers
The first question is how many servers to include in the replica set. This depends on the nature of data interaction from clients. If the data from clients is mostly writes, you will not gain a big benefit from a large number of servers. However, if your data is mostly static and you have a lot of read requests, having more secondary servers definitely makes a difference.
Number of Replica Sets
Also consider the data. In some instances, it makes more sense to break up the data into multiple replica sets, each containing a different segment of the data. This enables you to fine-tune the servers in each set to meet the data and performance needs. Consider this only if the there is no correlation between the data and if the clients accessing the data would rarely need to connect to both replica sets at the same time.
Fault Tolerance
How important is fault tolerance to your application? Your primary server likely will go down only rarely. If this wouldn’t really affect your application and you can easily rebuild the data, you might not need replication. However, if you promise your customer seven 9s of availability, then any outage is extremely bad—and extended outage is unacceptable. In those cases, it makes more sense to add servers to the replica set, to ensure availability.
Another consideration involves placing one of the secondary servers in an alternative datacenter, in case your entire datacenter fails. However, for the sake of performance, you should keep the majority of your servers in your primary datacenter.
By the Way
If you are concerned about fault tolerance, you should also enable journaling (see Hour 1, “Introducing NoSQL and MongoDB”). Journaling allows transaction to be replayed even if the power fails in your datacenter.
Deploying a Replica Set
Implementing a replica set is simple in MongoDB. The following steps describe the process of prepping and deploying the replica set:
1. Ensure that each member in the replica set is accessible to the others using DNS or hostnames. Adding a virtual private network for the replica servers to communicate on enhances the performance of the system because other traffic on the network will not affect the replication process. If the servers are not behind a DMZ and data communication is safe, you should also configure an auth and kwFile for the servers to communicate on, for security.
2. Configure the replSet value, which is a unique name for the replica set, either in the mongodb.conf file or on your command line for each server in the replica set. For example, the following command line starts a database and assigns it to replica set rs0:
mongod --port 27017 --dbpath /srv/mongodb/db0 --replSet rs0
3. Initiate the replica servers. You can initiate the replica servers from the MongoDB client and run the rs.initiate() command. You can run rs.initiate() on all servers in the replica set by connecting to them from the MongoDB client or you can use rs.initiate(config) and pass in a configuration object that contains the nodes you want to include in the replica set. The following shows an example of defining a configuration and passing it to rs.initiate():
rsconf = { _id: "rs0",
members: [ { _id: 1, host: "localhost:27017" },
{ _id: 2, host: "localhost:27018" },
{ _id: 3, host: "localhost:27019" }]}
rs.initiate(rsconf)
4. If you did not use a configuration file in the previous step, you need to add the secondary servers to the cluster by connecting the MongoDB shell to the MongoDB server that will act as the primary. Then you execute the following command for each secondary server:
rs.add(<secondary_host_name_or_dns>:<port>)
5. Use the following command to view the configuration on each server:
rs.conf()
6. Inside your application, define the read preference for reading data from the replica set. The previous hours have already described how to do this by setting the preference to primary, primaryPreferred, secondary, secondaryPreferred, or nearest.
Implementing Sharding in MongoDB
A serious problem many large-scale applications encounter is that the data stored in MongoDB is so enormous that it severely impacts performance. When a single collection of data becomes too large, indexing can cause a severe performance hit, the amount of data on disk can cause a system performance hit, and the number of requests from clients can quickly overwhelm the server. The application then gets slower at an accelerated rate when reading from and writing to the database.
MongoDB solves this problem through sharding. Sharding is the process of storing documents across multiple MongoDB servers running on different machines. This allows the MongoDB database to scale horizontally. The more MongoDB servers you add, the more documents your application can support. Figure 23.3 illustrates the concept of sharding. From the application’s perspective, there is a single collection, but there are actually four MongoDB shard servers, each containing a portion of the documents in the collections.

FIGURE 23.3 From the application’s perspective, there is only a single collection to access, but the documents for that collection actually are split across multiple MongoDB shard servers.
Understanding Sharding Server Types
Three types of MongoDB servers are involved when sharding your data. These servers each play a specific role to present a single unified view to the applications. The following list describes each server type. Figure 23.4 illustrates the interactions among the different types of sharding servers.
![]() Shard: A shard stores the documents that make up the collection. The shard can be an individual server, but to provide high availability and data consistency in production, consider using a replica set that provides primary and secondary copies of the shard.
Shard: A shard stores the documents that make up the collection. The shard can be an individual server, but to provide high availability and data consistency in production, consider using a replica set that provides primary and secondary copies of the shard.
![]() Query router: The query router runs an instance of
Query router: The query router runs an instance of mongos. It provides the interface for client applications to interact with the collection and obfuscates the fact that the data is shared. The query router processes the request, sends targeted operations to the shards, and then combines the shard responses into a single response to the client. A sharded cluster can contain more than one query router, which is a great way to load-balance large numbers of client requests.
![]() Config: Config servers store the metadata about the sharded cluster that contains a mapping of the cluster’s dataset to the shards. The query router uses this metadata when targeting operations to specific shards. Production-sharded clusters should have exactly three config servers.
Config: Config servers store the metadata about the sharded cluster that contains a mapping of the cluster’s dataset to the shards. The query router uses this metadata when targeting operations to specific shards. Production-sharded clusters should have exactly three config servers.
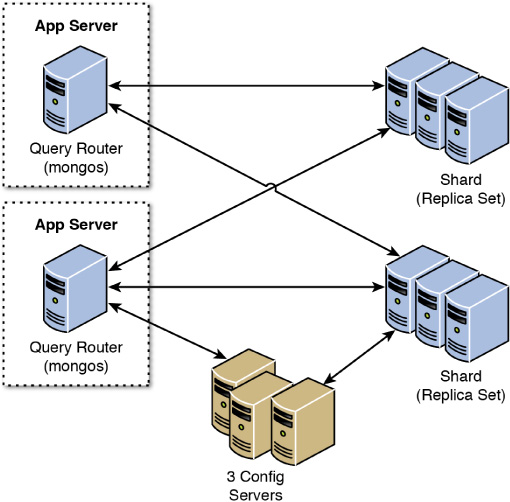
FIGURE 23.4 The router servers accept requests from the MongoDB clients and then communicate with the individual shard servers to read or write data.
Choosing a Shard Key
The first step in sharding a large collection is to decide on a shard key to determine which documents should be stored in which shard. The shard key is an indexed field or an indexed compound field that must be included in every document in the collection. MongoDB uses the value of the shard key to split the collection over the shards in the cluster.
Selecting a good shard key can be critical to achieving the performance that you need from MongoDB. A bad key can seriously impact the performance of the system, whereas a good key can improve performance and ensure future scalability. If you do not have a good key in your documents, you might want to consider adding a field specifically to be a sharding key.
When selecting a shard key, keep in mind the following considerations:
![]() Easily divided: The shard key needs to be easily divided into chunks.
Easily divided: The shard key needs to be easily divided into chunks.
![]() Randomness: When using range based sharding, random keys can ensure that documents are more evenly distributed so that no one server is overloaded.
Randomness: When using range based sharding, random keys can ensure that documents are more evenly distributed so that no one server is overloaded.
![]() Compound keys: It is best to shard using a single field when possible, but if a good single-field key doesn’t exist, then you can still get better performance from a good compound field than a bad single-field key.
Compound keys: It is best to shard using a single field when possible, but if a good single-field key doesn’t exist, then you can still get better performance from a good compound field than a bad single-field key.
![]() Cardinality: Cardinality defines the uniqueness of the values of the field. A field has high cardinality if it is very unique—for example, a Social Security number for a million people. A field has low cardinality if it is generally not very unique—for example, eye color on a million people. Typically, fields that have high cardinality provide much better options for sharding.
Cardinality: Cardinality defines the uniqueness of the values of the field. A field has high cardinality if it is very unique—for example, a Social Security number for a million people. A field has low cardinality if it is generally not very unique—for example, eye color on a million people. Typically, fields that have high cardinality provide much better options for sharding.
![]() Query targeting: Look at the queries you are using in your applications. Queries perform better if the data can be collected from a single shard in the cluster. If you can arrange for the shard key to match the most common
Query targeting: Look at the queries you are using in your applications. Queries perform better if the data can be collected from a single shard in the cluster. If you can arrange for the shard key to match the most common query parameters, you will get better performance. For example, you could shard documents based on the zip code of the user when all your queries are based on looking up users by zip code. That way all the users for a given zip code will exist on the same shard server. If your queries are fairly distributed across zip codes, a zip code key is a good idea. However, if most of your queries are on only a few zip codes, a zip code key is a bad idea because most of the queries will be going to the same server.
To illustrate shard keys, better consider the following keys:
![]() { "zipcode": 1}: This shard key distributes documents by the value of the
{ "zipcode": 1}: This shard key distributes documents by the value of the zipcode field. This means that all lookups based on a specific zipcode will go to a single shard server.
![]() { "zipcode": 1, "city": 1 }: This shard key first distributes documents by the value of the
{ "zipcode": 1, "city": 1 }: This shard key first distributes documents by the value of the zipcode field. If a number of documents have the same value for zipcode, they can be split off to other shards, based on the city field value. That means you are no longer guaranteed that a query on a single zip code will hit only one shard. However, queries based on zipcode and city will go to the same shard.
![]() { "_id": "hashed" }: This shard key distributes documents by a hash of the value of the
{ "_id": "hashed" }: This shard key distributes documents by a hash of the value of the _id field. This ensures a more even distribution across all shards in the cluster. However, it makes it impossible to target queries so that they will hit only a single shard server.
Selecting a Partitioning Method
The next step in sharding a large collection is to decide how to partition the documents, based on the shard key. You can use two methods to distribute the documents into different shards, based on the shard key value. Which method you use depends on the type of shard key you select:
![]() Range-based sharding: Divides the dataset into specific ranges, based on the value of the shard key. This method works well for shard keys that are numeric. For example, if you have a collection of products and each product is given a specific product ID from 1 to 1,000,000, you could shard the products in ranges of: 1–250,000, 250,001–500,000, and so on.
Range-based sharding: Divides the dataset into specific ranges, based on the value of the shard key. This method works well for shard keys that are numeric. For example, if you have a collection of products and each product is given a specific product ID from 1 to 1,000,000, you could shard the products in ranges of: 1–250,000, 250,001–500,000, and so on.
![]() Hash-based sharding: Uses a hash function that computes a field value to create chunks. The hash function should ensure that shard keys that have a very close value end up in different shards, to ensure good distribution.
Hash-based sharding: Uses a hash function that computes a field value to create chunks. The hash function should ensure that shard keys that have a very close value end up in different shards, to ensure good distribution.
It is vital that you select a shard key and distribution method that distribute documents as evenly as possible across the shards; otherwise, one server ends up overloaded while another is relatively unused.
The advantage of range-based sharding is that it is easy to define and implement. Also, if your queries are often range bases as well, this method is more performant than hash-based sharding. However, getting an even distribution is difficult with range-based sharding unless you have all the data up front and the shard key values will not change going forward.
The hash-based sharding method takes more understanding of the data, but it typically provides the best overall approach to sharding because it ensures a much more evenly spaced distribution.
The index used when enabling sharding on the collection determines which partitioning method is used. If you have an index that is based on a value, MongoDB uses range-based sharding. For example, the following implements a range-based shard on the zip and name fields of the document:
db.myDB.myCollection.ensureIndex({"zip": 1, "name":1})
To shard using the hash-based method, you need to define the index using the hash method. For example:
db.myDB.myCollection.ensureIndex({"name":"hash"})
Deploying a Sharded MongoDB Cluster
The process of deploying sharded MongoDB cluster involves several steps to set the different types of servers and then configure the databases and collections. To deploy a sharded MongoDB cluster, follow these steps:
1. Create the config server database instances.
2. Start the query router servers.
3. Add shards to the cluster.
4. Enable sharding on a database.
5. Enable sharding on a collection.
The following sections describe each of these steps in more detail.
Watch Out!
All members of a sharded cluster must be able to connect to all other members of a sharded cluster, including all shards and all config servers. Ensure that the network and security systems, including all interfaces and firewalls, allow these connections.
Creating the Config Server Database Instances
The config server processes are mongod instances that store the cluster’s metadata instead of the collections. Each config server stores a complete copy of the cluster’s metadata. In production deployments, you must deploy exactly three config server instances, each running on different servers, to ensure high availability and data integrity.
To implement the config servers, perform the following steps on each:
1. Create a data directory to store the config database.
2. Start config server instances, passing the path to the data directory created in Step 1 and also including the --configsvr option to denote that this is a config server. For example:
mongod --configsvr --dbpath <path> --port <port>
3. When the mongod instance starts up, the config server is ready.
By the Way
The default port for config servers is 27019.
Starting Query Router Servers (mongos)
The query router (mongos) servers do not require database directories because the configuration is stored on the config servers and the data is stored on the shard server. The mongos servers are lightweight, so it is acceptable to a mongos instance on the same system that runs your application server.
You can create multiple instances of the mongos servers to route requests to the sharded cluster. However, these instances shouldn’t be running on the same system, to ensure high availability.
To start an instance of the mongos server, pass in the --configdb parameter with a list of the DNS/host names of the config servers you want to use for the cluster. For example:
mongos --configdb c1.test.net:27019,c2.test.net:27019,c3.test.net:27019
By default, a mongos instance runs on port 27017. However, you can also configure a different port address using the --port <port> command-line option.
Did You Know?
To avoid downtime, give each config server a logical DNS name (unrelated to the server’s physical or virtual hostname). Without logical DNS names, moving or renaming a config server requires shutting down every mongod and mongos instance in the sharded cluster.
Adding Shards to the Cluster
The shard servers in a cluster are just standard MongoDB servers. They can be a standalone server or a replica set. To add the MongoDB serves as shards in the cluster, all you need to do is access the mongos server from the MongoDB shell and use the sh.addShard() command.
The syntax for the sh.addShard() command follows:
sh.addSharrd(<replica_set_or_server_address>)
For example, to add a replica set named rs1 on a server named mgo1.test.net as a shard in the cluster server, execute the following command from the MongoDB shell on the mongos server:
sh.addShard( "rs1/mgo1.test.net:27017" )
For example, to add a server named mgo1.test.net as a shard in the cluster server, execute the following command from the MongoDB shell on the mongos server:
sh.addShard( "mgo1.test.net:27017" )
After you have added all the shards to the replica set, the cluster will be communicating and sharding the data. For predefined data, it will take some time for the chunks to be fully distributed.
Enabling Sharding on a Database
Before sharding a collection, you need to enable the database it resides in to handle sharding. Enabling sharding doesn’t automatically redistribute the data; it just assigns a primary shard for the database and makes other configuration adjustments that enable the collections for sharding.
To enable the database for sharding, you need to connect to a mongos instance using the MongoDB shell and issue the sh.enableSharding(database) command. For example, to enable a database named bigWords, you would use
sh.enableSharding("bigWords");
Enabling Sharding on a Collection
After the database has been enabled for sharding, you are ready to enable sharding at the collection level. You do not need to enable sharding for all collections in the database—do so just for the one it makes sense on.
Use the following steps to enable sharding on a collection:
1. Determine which field(s) will be used for the shard key, as described earlier.
2. Create a unique index on the key field(s) using ensureIndex(), described earlier in this hour.
db.myDB.myCollection.ensureIndex( { _id : "hashed" } )
3. Enable sharding on the collection using the sh.shardCollection(<database>.<collection>, shard_key). The shard_key is the pattern used to create the index. For example:
sh.shardCollection("myDB.myCollection", { "_id": "hashed" } )
Set Up Shard Tag Ranges
After you have enabled sharding on a collection, you might want to add tags to target specific ranges of the shard key values. A good example of this is a collection sharded by zip codes. To improve performance, you can add tags for specific city codes (NYC and SFO) and the zip code ranges for those cities specified. Documents for specific cities then will be stored on a single shard in the cluster, which can improve query performance for queries based on multiple zip codes for the same city.
To set up shard tags, add the tag to the shard using the sh.addShardTag(shard_server, tag_name) command from a mongos instance. For example:
sh.addShardTag("shard0001", "NYC")
sh.addShardTag("shard0002", "SFO")
Then to specify the range for a specific tag (in this case, the zip code ranges for each city tag), you use the sh.addTagRange(collection_path, startValue, endValue, tag_name) command from the mongos instance. For example:
sh.addTagRange("records.users", { zipcode: "10001" }, { zipcode: "10281" }, "NYC")
sh.addTagRange("records.users", { zipcode: "11201" }, { zipcode: "11240" }, "NYC")
sh.addTagRange("records.users", { zipcode: "94102" }, { zipcode: "94135" }, "SFO")
Notice that multiple ranges were added for NYC. This enables you to specify multiple ranges within the same tag that is assigned to a single shard.
If you need to remove a shard tag later, you can do so using the sh.removeShardTag(shard_server, tag_name) method. For example:
sh.removeShardTag("shard0002", "SFO")
Summary
In this hour, you learned how to use replication to set up multiple MongoDB servers that act as one. You learned that there are primary, secondary, and arbiter replica servers. The data stored in MongoDB is replicated to each server in the replica set. This provides the benefit of having multiple copies of your data, in case of server failure, and distributes the request load on read requests because data can be read from any of the servers in the replica set.
You also learned that MongoDB sharding is the process of splitting up large datasets onto multiple database servers. You learned that sharding requires a key to determine which server to place a document on and how to choose and implement the shard key. You also implemented a sharded cluster on the example dataset.
Q&A
Q. How does data get moved between servers in the MongoDB sharded cluster?
A. An automatic process called the balancer runs. The balancer automatically moves chunks of data among the MongoDB shard servers to balance the data across the multiple servers.
Q. What happens to an unsharded collection in a sharded database?
A. Sharded databases have a primary shard. Collections that are not sharded are stored in the primary shard only.
Workshop
The workshop consists of a set of questions and answers designed to solidify your understanding of the material covered in this hour. Try answering the questions before looking at the answers.
Quiz
1. How do you check the status of servers in a sharded cluster?
2. How do you check the status of servers in a replica set?
3. What is an arbiter server for?
4. Which server do you connect your applications to in a sharded cluster the mongos, config, or shard server?
Quiz Answers
1. Use sh.status() from the MongoDB shell connected to the mongos server.
2. Use rs.status() from the MongoDB shell connected to the primary server.
3. The arbiter server helps in electing a new primary server in a replica set.
4. The mongos server.
Exercises
1. Try starting and stopping the replica set and sharded cluster a few times, to become familiar with the process. Remember that, because the ports overlap, they cannot be running at the same time.
2. Create a config file for a new shard server named shard3.conf with port 27023 and database code/hour23/data/shard3. Start the new server. Add it to the sharded cluster using the following command:
sh.addShard("localhost:27023")
3. With the replica set started, go back and run some of your applications that access the example words database and verify that they run against the replica set.
4. With the sharded cluster started, go back and run some of your applications that access the example words database and verify that they run against the sharded cluster.