
Chapter Two. Using Just One Light Like a Pro
Recipes for Great Results While Still Keeping Things Really Simple
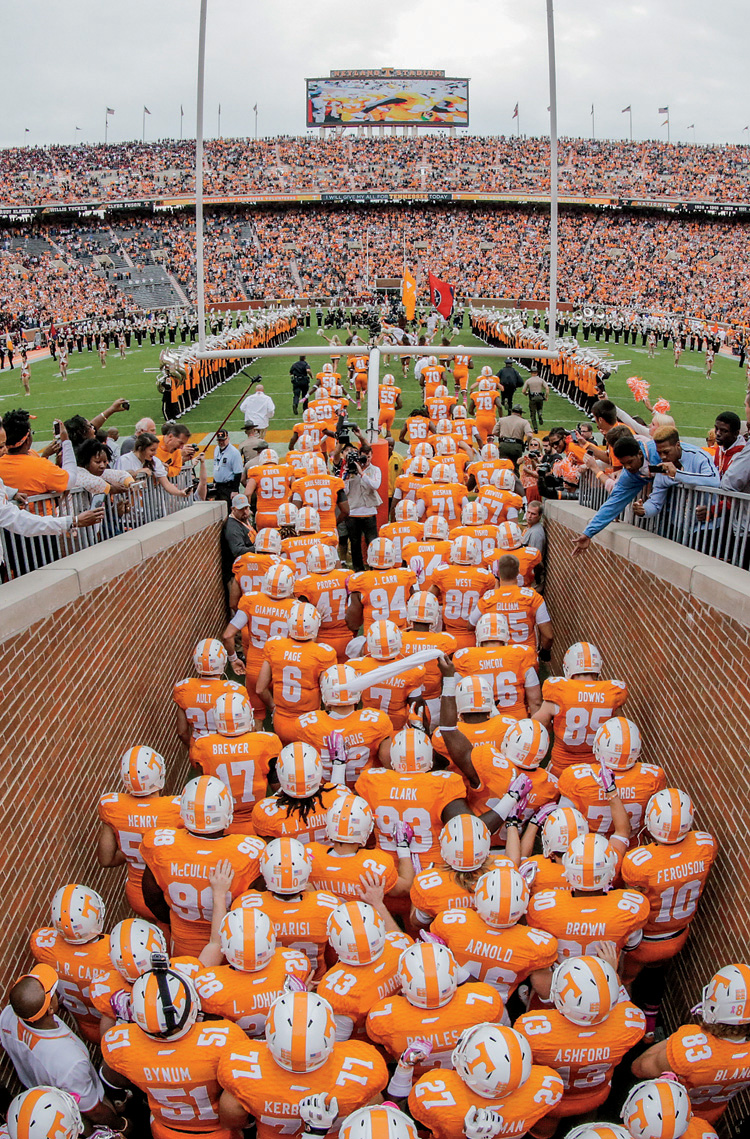
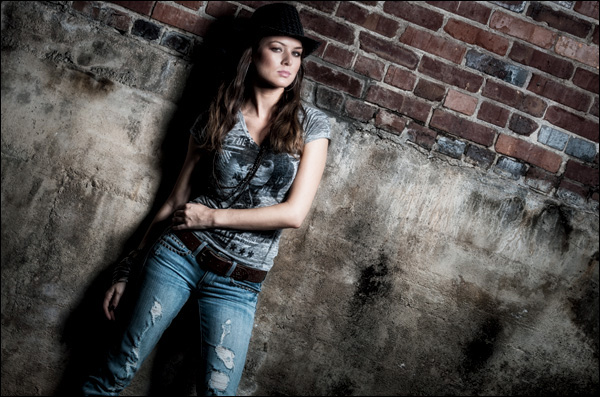
SHUTTER SPEED: 1/1250 SEC F-STOP: F/13 ISO: 3200 FOCAL LENGTH: 15MM | PHOTOGRAPHER: SCOTT KELBY
My friend, Dutch fashion and glamour photographer Frank Doorhof, has a great saying about lighting. He says: “If you think you need two lights, use one light. If you think you need three lights, use one light. If you think you need four lights, why are you reading a chapter about using one light?” Okay, he may not have said that last line, but I don’t speak Dutch so I can’t swear that he didn’t, but that’s not what’s important here. What is important is that you know with every fiber of your being that Frank Doorhof is traveling on a forged passport and by the time you read this, watch out—he’ll be in a Swiss jail doing time. I know, this story has a lot of holes in it, and it’s kind of cheesy, but does it really matter? (Oh come on, I should get bonus points for sneaking as many Swiss references as I did in just two short sentences. Swiss time? Holes, as in Swiss cheese? Watch, as in a Swiss watch. Matter, as in Matterhorn. Forged passport, as in forged passport, and cheesy, as in Kraft Macaroni & Cheese, which is perhaps the greatest foodstuff ever invented with the possible exception of tater tots, nature’s perfect food. Come on, that’s gotta be some kind of record.) Anyway, Frank’s right: you can do so much with just one light that you really don’t need to add more lights (unless, of course, you plan on reading the next chapter, which is about using more than one light, which can actually be a good thing unless, ironically, you live in Switzerland, where it’s forbidden due to their Single-Strobe Neutrality law, which has been in place since before WWII [Wayne’s World 2]). Anyway, there’s lots of important stuff to Swatch out for in this chapter—you can bank on it. (Boom! Two bonus points right there!)
One Light Outdoors
BEHIND THE SCENES: We’re actually at the edge of a parking garage with part of the downtown skyline behind us, and it’s late in the afternoon. We’re using just one light, with a small softbox because my focus is a headshot (well, head and shoulders), so I don’t need a very large softbox. We brought a small battery pack, so we didn’t have to search for a power outlet at the parking garage (we checked out the location the previous day, so we wouldn’t waste time during the shoot trying to find a good background, and when we were there, we didn’t see an easily accessible power outlet).
CAMERA SETTINGS: The lens is a 70–200mm f/2.8. I’m zoomed in tight, which will help put my background out of focus, and my f-stop is at f/6.2. Now, to get the background more out of focus, I could have lowered my f-stop to f/4 or f/2.8 and, since my ISO was 400, I definitely could have done that. So why didn’t I? I just wasn’t thinking about it—I was more concerned with the light, so I missed an opportunity for a better background. It happens. I did wind up lowering my shutter speed from its normal 1/125 of a second to 1/100 of a second to let a little more light appear behind my subject (lowering the shutter speed lets more of the natural existing light into your shot).
Final Image
THOUGHT PROCESS: The idea is to make it look much darker outside than it really is, so the portrait looks more dramatic. Beyond that, for shots like this, you want your subject to be lit solely by the strobe, not by the existing light—that’s what lights the background. This was taken about an hour before sunset, so the sky is still pretty bright, but when I shoot with a flash on location like this, I use a three-step process: (1) Place the subject with their back to the setting sun. (2) You’ll need to keep your shutter speed at 1/125 to start (so your flash doesn’t get out of sync with your camera), and then move your f-stop until you see the meter inside your viewfinder (either at the bottom or along the right side) move to the center. That tells you you’ve got a proper exposure (it’s not under- or overexposed). Once you have the proper exposure (in my case, f/2.8), darken it by a stop or two (don’t go by the numbers. Instead, darken the exposure, using a higher-numbered f-stop, until your subject looks like a silhouette. Here, I went from f/2.8 to f/6.2 [2-1/4 stops], and you could barely see her face in the shot). Finally, (3) turn on the flash (with a very low power). If the flash is too bright, just lower its power until you have a nice blend between the light from the flash and the ambient light.
POST-PROCESSING: Nothing much to do here beyond standard portrait retouching stuff: removing minor blemishes, spots, or specks on her shirt, and brightening the existing highlights in her hair using the Adjustment Brush in Lightroom (or Camera Raw).
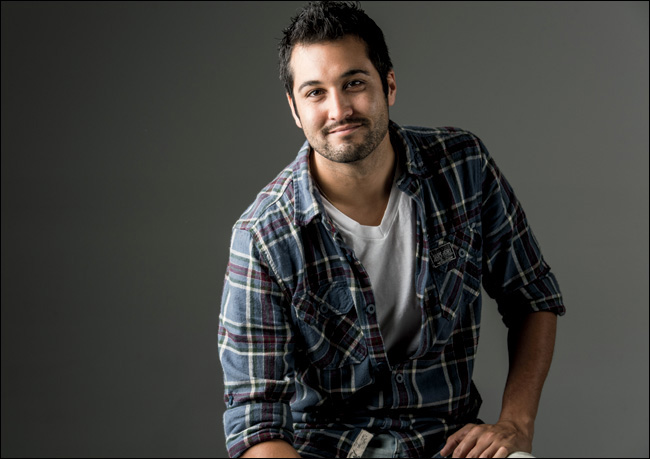
Dramatic Portrait Lighting
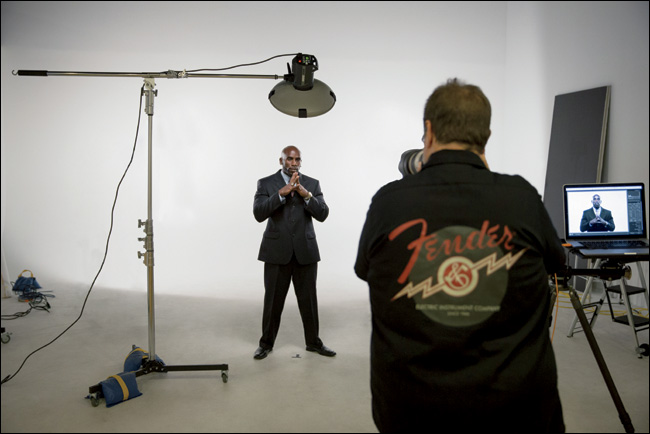
BEHIND THE SCENES: It doesn’t get much easier than this when it comes to lighting: just one light with a beauty dish attachment (it sends the light from the flash into the small round dish and then it bounces back out of the dish for some really nice, punchy light). Put this one light straight in front of your subject, up above their head, and aiming back at them at a 45° angle (or sometimes aiming even a little more steeply down). Since this is a photo of a guy, I didn’t put a diffusion sock over the front (that’s only for portraits of women, children, brides, etc.). To focus the light beam even tighter, I added a metal grid over the front of the beauty dish (you can see the black Velcro straps wrapping around the dish). It just narrows the beam and keeps it from spilling all over.
CAMERA SETTINGS: This couldn’t be any more of my standard studio camera settings than it is. The whole thing is textbook for my shooting style: it’s my go-to lens (the 70–200mm f/2.8), at my ideal studio f-stop (f/11), at my lowest, cleanest ISO (100 ISO), and my standard shutter speed (1/125 of a second).
Final Image
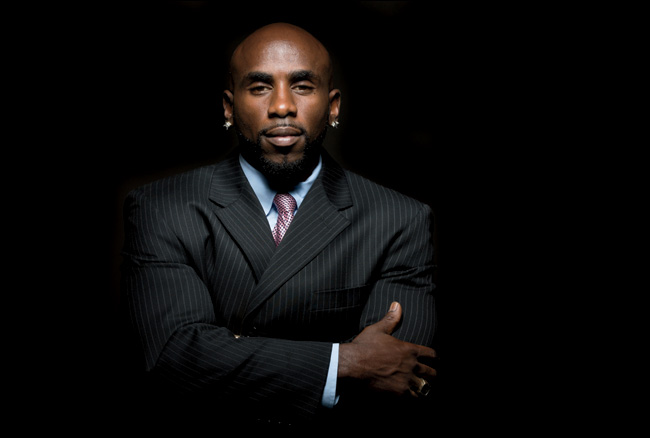
THOUGHT PROCESS: I love the simplicity and drama of this look. I love lighting with a nice falloff of light (his face is the brightest, it’s a little darker on his chest, and by the time you get to his crossed arms, it’s already starting to fall off to black). I had to tweak the position of the light a little bit so I didn’t overlight his bald head—I tipped it a little farther forward than I usually would. Now, if you look over at the production shot, you can see we’re shooting on a white background, but the background here is black. How is that? It’s because the light is basically aiming straight at the ground, and the white wall is probably 10 or more feet behind him, so none of the light actually makes it back to that wall, making the background go solid black. The only thing you might need to keep an eye on is that your subject’s eye sockets don’t get too dark, since the light is up above. If you see that happening, just have your subject raise their chin a little bit to get some extra light into their eyes.
POST-PROCESSING: When I’m shooting men, I often do two things to their skin: (1) I add some clarity using the Clarity slider in Lightroom’s Develop module (or in Camera Raw), which helps accentuate any texture in their skin and clothes. Then, (2) I desaturate the color of their skin a bit to give it a more modern treatment. You can either lower the Saturation slider in the Basic panel or go to the Hue/Saturation panel and lower the Saturation slider for just the Reds, so it desaturates the skin a bit.
Fashion Lighting
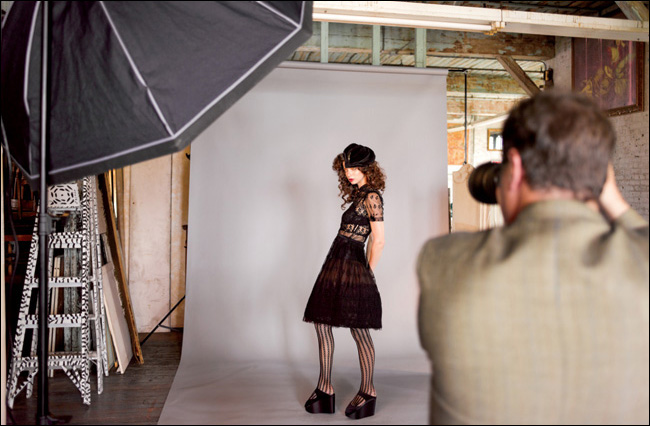
BEHIND THE SCENES: I’m on location here for a shoot at the Metropolitan Building, just across the bridge from New York City, in Long Island City. While I had the models there for the location shoot, I set up a small studio near where the hair, makeup, and styling were being done, so I could shoot on a solid gray background. It’s just a roll of gray seamless paper held up by two light stands with a pole in between them. We’re using just one large softbox—in this case, a 53" Elinchrom Midi Octa (right around $315)—over our flash. The softbox is big enough to do full-length photos, and I moved it back far enough from our subject to light her evenly pretty much from head to toe. Although I’m standing up here for some close-up shots, to get the proper perspective for the full-length shots, I sit down cross-legged on the floor.
CAMERA SETTINGS: I pretty much wanted everything in focus, so I used a higher numbered f-stop (anywhere from f/8 up to around f/11, usually). For this studio shoot, it’s the same basic idea: the lowest ISO (on the camera I took these shots with, it was 200 ISO), and my shutter speed at the standard 1/125 of a second. I once again used my trusty 70–200mm lens, but in this case, I had to zoom all the way to 70mm to get the full-length shot (and I still had to stand 15 feet or so back).
TAKE-AWAYS: Lighting and backgrounds for a fashion shot like this are very simple: one big softbox, a roll of gray seamless, and shooting down low for the right perspective.
Final Image
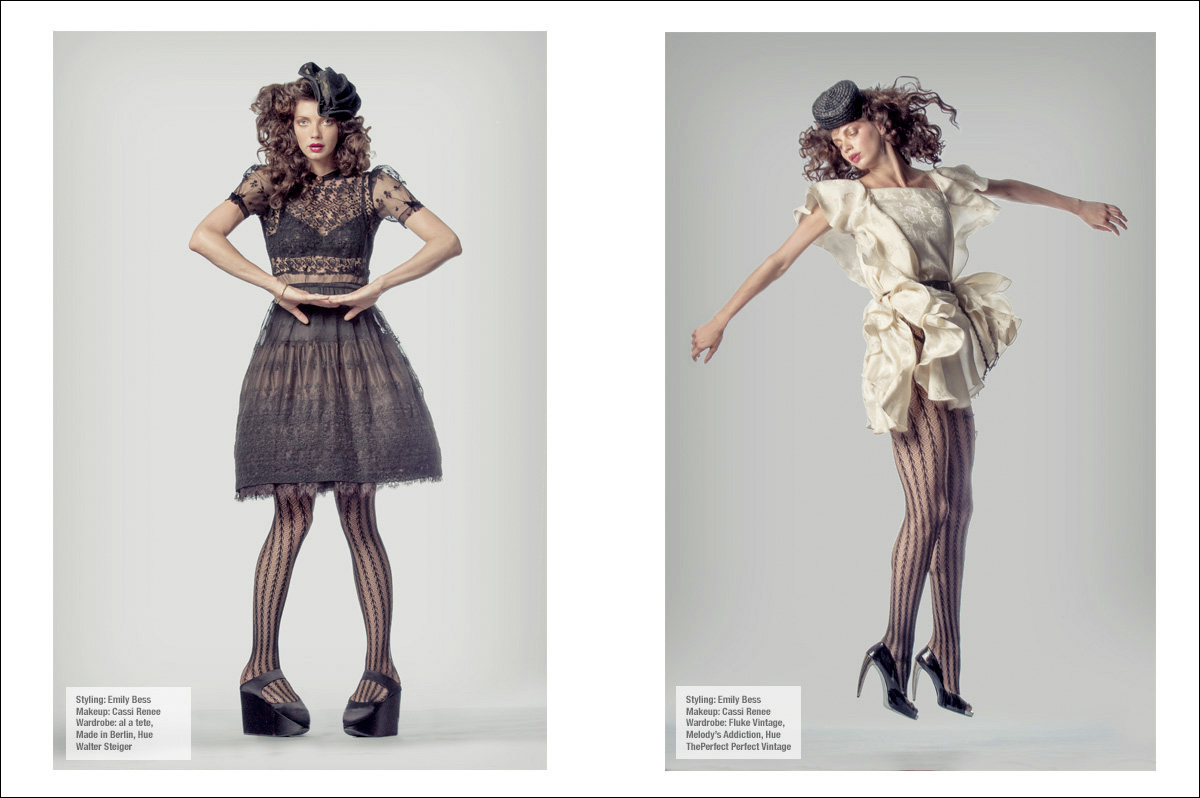
THOUGHT PROCESS: I’ve always been impressed at how simple most fashion lighting really is. With fashion, the primary focus is on the clothing, and the secondary focus is on the model, and if you really notice the lighting, then the focus isn’t where it should be (on numbers 1 and 2). That one big softbox does all the work (including lighting the gray background a bit), and it’s far enough back from the subject that the lighting is pretty even from top to bottom. Honestly, what makes a fashion shoot isn’t the lighting—like I said, it’s usually very simple. What makes it look like “fashion” is really mostly: (1) Having a fashion stylist with the right type of clothing and accessories. The accessories are huge in a shoot like this, and can make or break the image. (2) Having a hairstylist and/or makeup artist—this is another really important aspect and takes the overall look of the shoot up a big notch. You’re not going to see a big fashion shoot without both. (3) It takes a model with the right type of posing for fashion, and the reason I’m spending so much time on the clothing, hair, and makeup is because if you have a team putting those three aspects together, your job as photographer is actually very easy. One light. Gray background. Simple and classic, and what will “make” your shoot is the model, styling, hair, and make up. If you’re shooting fashion and you’re not really happy with what you’re getting, it’s probably not because of the lighting or camera settings. It’s because of the other stuff (model, styling, hair, and makeup). Yes, it honestly makes that big a difference.
Mixing Natural with Studio Lighting
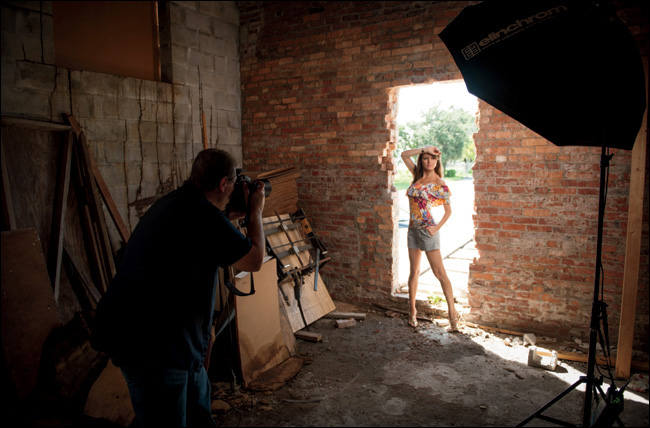
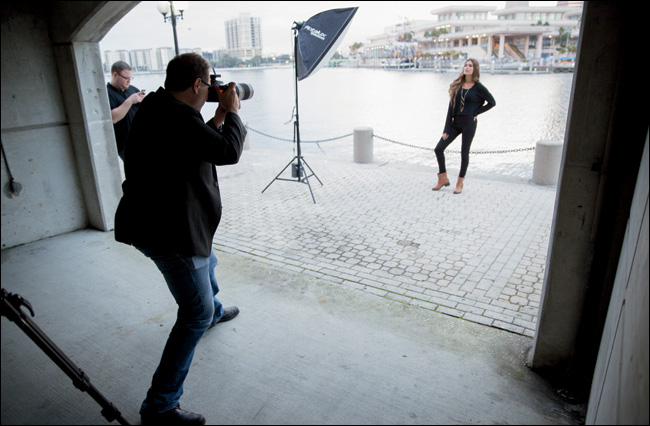
BEHIND THE SCENES: This shot was taken in the doorway of an old abandoned ice factory (we got special permission to shoot in there, and by special permission I mean they charged us a rental fee). This temporary hole in the brick wall was covered with a large wood panel, but they removed it so we could shoot through it like this. It’s the middle of the day and there is a ton of light coming in from behind her, so after a few test shots, I decided to just let the background completely blow out to white. With this strong back-lighting, she’s just about a silhouette standing there, so we brought in a 53" midi-octa softbox to light our subject. So, this is basically a one-light shoot with the sun doing the job of lighting her from behind and creating a rim light around her.
CAMERA SETTINGS: Unless I’m shooting a wedding, I don’t reach for this lens very often (I should probably use it more than I do because it is pretty awesome), but it’s the 85mm f/1.4 (Nikon’s is an f/1.4, Canon’s is an f/1.2, but both make an f/1.8 version that is about 30% of the price and you only lose 2/3 of a stop). It’s super-sharp, and you can create a super-shallow depth of field with it if you shoot it at or around f/1.4 (which I did—f/1.4). The rest of the settings are the same as always when using flash: the lowest, cleanest ISO (200 ISO on this camera), and the shutter speed at 1/125 of a second.
Final Image
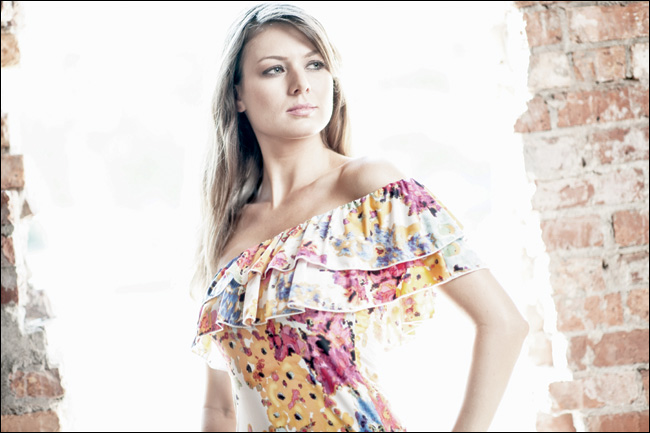
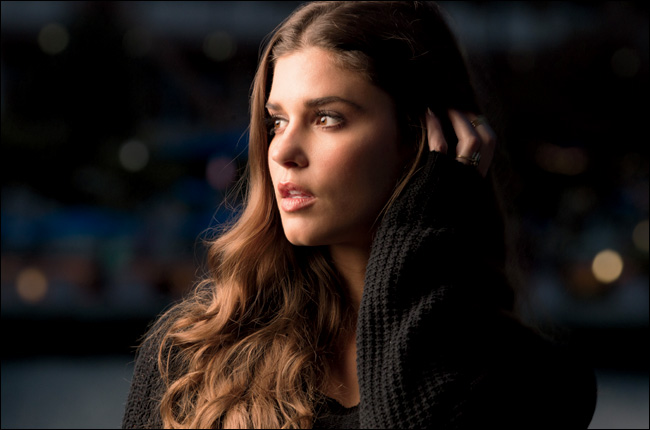
THOUGHT PROCESS: Once I looked through my viewfinder and saw how incredibly bright the light was streaming in from behind her, rather than try to fight it by changing my exposure in-camera or trying to reduce it later in Photoshop, I decided to embrace the light. I shot at f/1.4 and went really bright with the whole look, giving it an overall blown-out look (which I accentuated in Photoshop—more on that in a moment), so it’s “high key” to the max.
POST-PROCESSING: I think it’s pretty important that, if you’re going to try to reproduce the looks that I’m sharing here in the book, you can nail them. But, honestly, you’re not going to be able to get this look above with just f-stop, shutter speed, and ISO. It’s going to take some Photoshop (or Lightroom). The good news: it takes you literally less than 60 seconds to get this look using the Google Nik Collection’s Color Efex Pro. Just open it up, apply the High Key filter with the default settings, and you’re done. Easy peasy. If you don’t have Color Efex Pro, you can download a free trial copy from: www.google.com/nikcollection/ (click the Try Now button up top). It downloads their whole plug-in collection, but just go to the Color Efex plug-in (it works for Lightroom, Photoshop, Elements, or Apple Aperture).
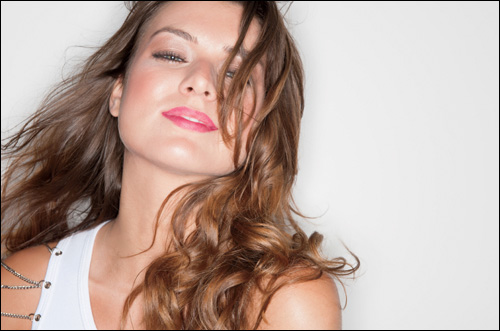
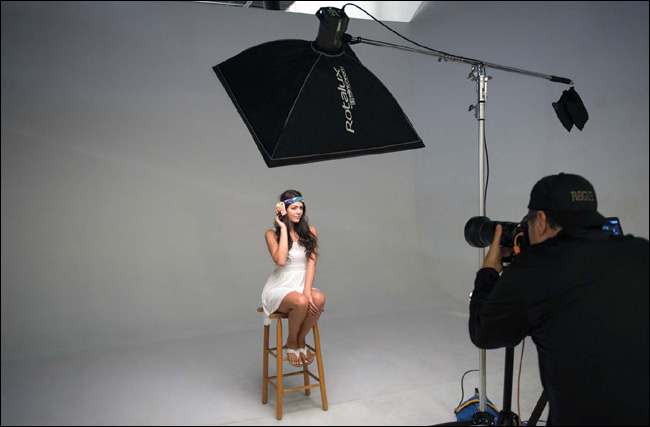
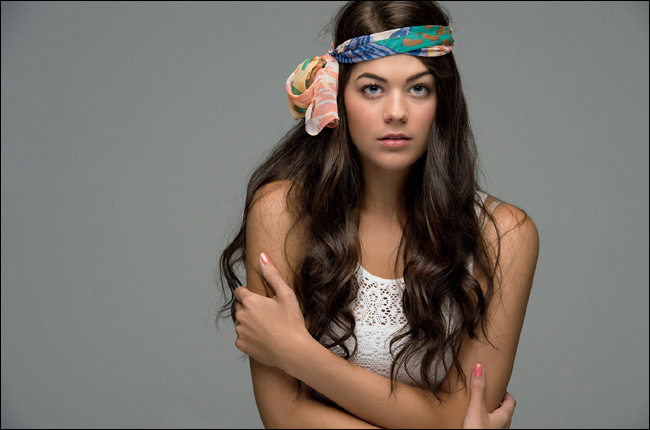
Big, Beautiful, Wrapping Light
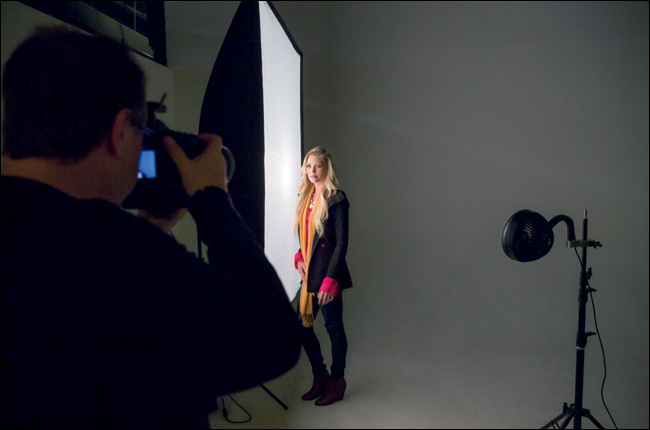
BEHIND THE SCENES: Here you can see the simple one-light setup using a really big softbox. It’s a 54x72" shallow softbox made by F.J. Westcott. As big as it is, it’s only $350 and, at that size, it creates some gorgeous light. The placement of the light couldn’t be any easier. Have your subject face forward, then put the light directly beside them. That’s it. Normally, that would put the other side of their face completely in shadow, but you’re going to position your subject very close to the softbox and the light will literally wrap around them, lighting the other side. In this case, I had our subject face the light to really light up her hair, but it’s really not necessary—they can face mostly toward the camera.
CAMERA SETTINGS: We’re in the studio here, and if I had to choose a favorite f-stop for portraits it would probably be f/11. Why f/11? Because, for portraits, it’s an f-stop that keeps everything perfectly in focus from front to back. Now that I’ve told you f/11 is probably my favorite, I actually shot this at f/10. Does that one f-stop make that big a difference? Honestly, no. At f/10, everything’s going to be perfectly in focus, too. It’s just that at f/11, I thought the lighting looked a little too dark. I could have cranked up the power on the light, but it was just easier (lazier) to lower the f-stop one stop and then the light looked much brighter. I was using my go-to lens: the ol’ 70–200mm f/2.8, and I was zoomed in to 100mm. My shutter speed was 1/100 of a second (I probably accidentally moved the dial during the shoot—it would normally be at 1/125 of a second). My ISO was 100.
Final Image
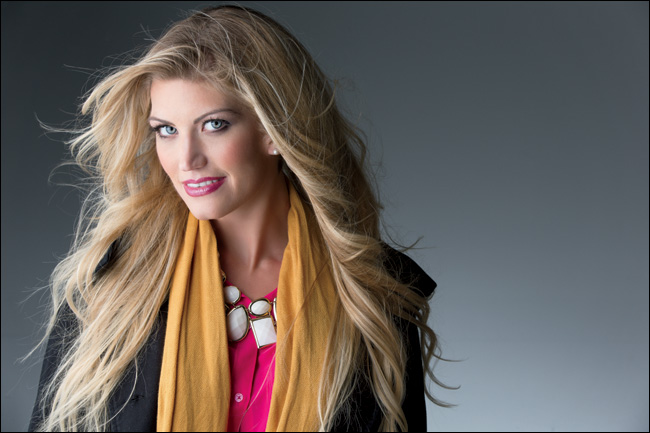
THOUGHT PROCESS: If I could tell you one hands-down, killer secret to getting really beautiful light, it would be to buy a really, really big softbox. The bigger the softbox, the more beautiful and wrapping the light, and it’s hard to make anyone look bad with a softbox this big (in fact, I’ve heard other photographers refer to it as cheating). With a softbox this big, you can literally just put it directly beside your subject, put them right in the center of it (as you see on the previous page), and it does the rest. One posing tip: to help the light wrap around your subject, have them “play” a little toward the light (in other words, don’t have them position their body so they are facing away from it—face them either straight ahead or aimed a little bit in the direction of the light). Also remember, whatever is closest to the softbox will be brightest (notice her arm on the left here).
POST-PROCESSING: Just your standard portrait retouching stuff: removing minor blemishes, spots, or specks on her clothes, and brightening the existing highlights in her hair using the Adjustment Brush in Lightroom’s Develop module (or Camera Raw).
TAKE-AWAYS: If you want really soft, creamy, luxurious, beautiful, wrapping light, get your hands on a really huge softbox, and the rest will take care of itself. Couple the size (bigger means softer) with getting your subject very close to the softbox (which makes it even softer), and you’ve got a tough combination to beat.
Entertainment Lighting
BEHIND THE SCENES: This is another one-flash look, but in this case we’re using a special ring light adapter that attaches over your existing hot-shoe flash (the one I’m using here is a Ray Flash adapter from ExpoImaging [www.expoimaging.com]). The ring flash adapter has a hole in the center and your lens extends through that hole, so the ring goes around it. The trademark look of a ring flash is flat, very bright light that creates a dark halo around the edges of your subject when they’re against a wall, which is why you usually see ring flash shots taken up against a wall. In this case, the “wall” is actually a studio V-flat (two large 4x8’ white reflector cards purchased at a local sign shop and connected to each other with a strip of black gaffer’s tape, so they form a “V” and can support themselves). I put her just in front of the V-flat, so you could see some of that dark halo on the wall behind her. I’m also using a small fan mounted on a light stand (the fan is from BLOWiT Fans [blowitfans.com]) to add movement to her hair.
TECH STUFF: I’m using a regular hot-shoe flash, and while normally I’d be at 1/4 power indoors like this, because the Ray Flash adapter eats up a lot of the power of the light as it redistributes it into a circle of light, and because a ring light look is very bright by nature, I powered up the strobe to its full power setting. That means it’s going to take a little longer between flashes for the flash to recharge before it can fire again. I’m shooting in manual mode at f/10 with a 1/125 of a second shutter speed at 200 ISO.
Final Image
THOUGHT PROCESS: I call this “entertainment” lighting because that’s where I see it most often used—in ads for things like Vegas nightclubs or in print ads for perfume or cologne, where they want the people in the ads to look like they are out clubbing and a photojournalist just happened to catch a shot of them as they were being fabulous. The light is bright and punchy like an on-camera hot-shoe flash, but without the harshness of a direct hot-shoe flash. Also, a lot of photographers like the round catchlights it produces in the subject’s eyes (even though only another photographer would ever notice). The Ray Flash I used here is designed to attach over an existing hot-shoe flash, but there are fully self-contained units, as well, my favorite being the Ring Flash 3000 from Elinchrom for their lightweight Ranger Quadra battery packs. It’s the lightest, easiest one I’ve ever worked with.
POST-PROCESSING: The lighting is pretty flat and usually very bright, so you might have some hot spots to deal with in Photoshop. I usually remove them altogether using the Healing Brush in one long stroke, and then I go under the Edit menu, choose Fade Healing Brush, and lower the Opacity so the highlights come back without the sweaty, shiny look.
TAKE-AWAYS: A ring flash is to lighting as a fisheye lens is to lenses. It’s a cool look every once in a while, but it can get old fast if you use it too much.
Dramatic Side Lighting
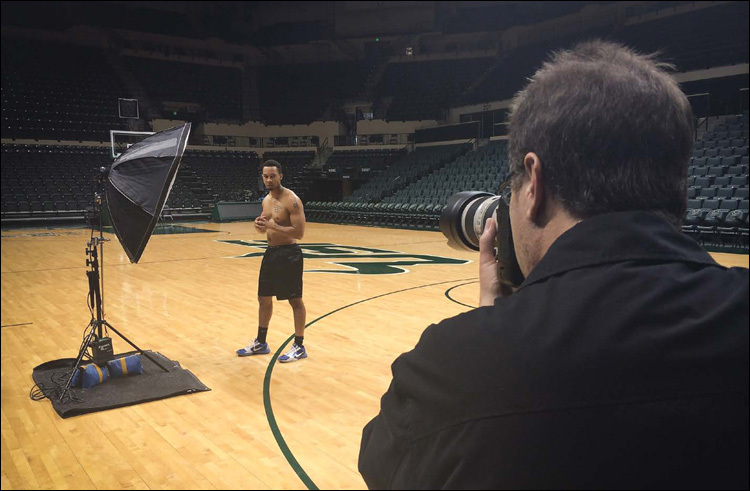
BEHIND THE SCENES: This pretty-large-sized, midi-octa softbox gets around, but the position here is directly beside the subject. It’s up a little higher than our subject and aiming down a bit. This is shot on location in a college basketball arena. We’re using one strobe with a battery pack (we’re using a battery pack, so we won’t have to run two 100’ extension cords to power the light). The padding underneath the light stand is there so we don’t scratch the hardwood court. We have two sandbags on the legs, so the whole thing doesn’t topple over (it’s pretty unlikely indoors like this, but hey, ya never know, right?).
CAMERA SETTINGS: All the lights on the court are turned on, but we don’t want the shot lit with the flat arena lights; we want it lit with our strobe. So, to have the scene kind of “fall off to black” (so the only thing lighting our subject is the strobe), you want to choose a high-number f-stop, like f/11 or higher (I chose f/16). This would mostly kill the arena light. Well, in fact, it did such a great job that I had to lower the shutter speed (it controls the room light) from my standard 1/125 of a second down to just 1/50 of a second just to see that he was still on a basketball court (I want the background to be pretty darn dark, but I do want you to see he’s on a court). Now, how did I know that 1/50 was the right amount? I didn’t. I did a few test shots at different (slower) shutter speeds (1/100, 1/80, 1/60, 1/50, and 1/30) and the one that looked best to me was 1/50, so I went with that. I’m using a 70–200mm lens and I’m standing quite a ways back to get a 2/3 body shot.
Final Image
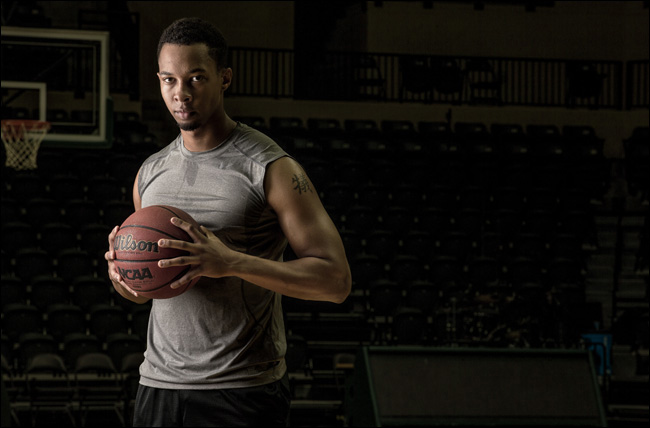
THOUGHT PROCESS: I wanted kind of a dramatic look with subtle lighting, but I didn’t want the background to get so dark that you couldn’t see the hoop or the stands behind him, so as I mentioned on the facing page, I had to adjust the f-stop up to a higher number (f/16) to make the flash not overlight the scene and fall off to black, and I needed to adjust the shutter speed a bit (slowing it) to see some detail in the background. Since the light is directly to his side, I had him turn his body toward the light (so it’s kind of facing the light), but then I had him turn his head a little toward the camera. (Note: In the production shot on the facing page, his shirt is off. After the shots with the gray shirt and basketball, I asked him to remove his shirt so I could get a shot of some of his really interesting tattoos—each one has its own fascinating story about his life.) It’s really just another simple one-light shoot: the light is directly beside him, his body is angled toward the light, his head is looking back at me—click.
POST-PROCESSING: For portraits of athletes like this, I do two things: (1) In Lightroom’s Develop module (or Camera Raw), I increase the Contrast amount (drag the slider way over to the right), and then (2) I add quite a bit of Clarity. That’s what makes his skin look shiny and it brings out the texture in his skin, clothes, and the ball. Of course, I sharpened it (like I would any photo), but in the case of an athlete’s portrait like this, I added a bit more sharpening than usual.
Filling In Shadows
BEHIND THE SCENES: Here we have one medium-sized softbox, up high and aiming down at our subject. It’s a little bit in front of him, aiming back at him. This would pretty much make the shadows on the far side of his face really dark, but we used a silver reflector (held up on a light stand with an A-clamp from Home Depot) to fill it in.
CAMERA SETTINGS: This is getting to be a pretty boring section of this chapter, but my studio settings are pretty consistent for the most part, because some things are constant in a studio environment, like my shutter speed, for example—it’s nearly always 1/125 of a second. If it’s something different for an indoor shoot, it’s probably because I accidentally moved the dial at some point during the shoot. I wouldn’t even notice it changed unless I went above 1/200 of a second. Then I’d know, because I’d start to see a dark gradient across at the bottom of the image, otherwise I just would have no way to tell. Another thing that stays the same is my ISO. When using a flash in the studio, it will always be at the lowest, cleanest setting (either 100 or 200 ISO, depending on which camera body I’m using). Lastly, my f-stop is usually around f/11, so everything stays in focus. If you see it drop to f/10, it’s either because I needed the light a little brighter and was too lazy to raise the power of the light, or because I (wait for it...wait for it...) accidentally moved the other dial during the shoot.
Final Image
THOUGHT PROCESS: I absolutely love shadows, and I have no problem whatsoever with the shadows on the far side of his face (right side from the camera position) going black. I think it adds drama and dimension, especially in photos of men. So, normally, I wouldn’t even mess with it, but I know there are folks who are “shadow adverse” and always want to see detail on that far side of the face, and that’s why I included this here in the book. In reality, you’re unlikely to see me using a reflector like this unless I am shooting fashion and it’s important that the clothing is lit evenly on both sides.
POST-PROCESSING: One thing I love about retouching guys is that you hardly have to do anything. Basically, I remove any major blemishes using the Healing Brush in Photo-shop, then I sharpen them to death (accentuating pores and skin texture on guys looks great, as opposed to when we retouch women and children and try to avoid accentuating that texture), and then I just save the file. Why so little retouching for guys? Nobody cares about guys. Well, outside of family members. ;-)
Simple, Flat Lighting
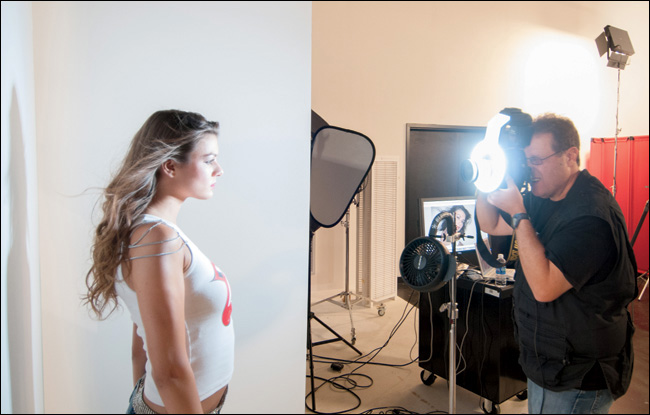
BEHIND THE SCENES: Here, our subject is sitting on a stool with a medium-sized softbox directly in front of her, up above her and aiming back down at her at a 45° angle. The boom stand is kind of important here or you’d have a metal pole right in front of you and you’d have to kind of shoot around it. I’ve done that, but it’s a pain, and you usually have to move a little off-center to make it work.
CAMERA SETTINGS: To keep everything in focus, I’m shooting at f/10, and the rest of my settings are pretty much my standard ones: the lowest ISO (100 on this camera), and the shutter speed at the standard 1/125 of a second. I’m once again using my trusty 70–200mm lens.
Final Image
THOUGHT PROCESS: This type of flat, straight-on lighting is somewhat flattering to the skin (it does a good job of minimizing skin blemishes or wrinkles), but what’s nice about it is it puts some lovely soft shadows on the neck. One reason the light is so soft is that the softbox is actually pretty large in relation to our subject and that really helps. For subjects with a lot of hair, the direct, straight-on light really brings out the highlights (as seen here).
POST-PROCESSING: Just standard portrait retouching stuff (removing a blemish, brightening the eyes or irises, removing any little wrinkles, etc.) and, of course (I know this goes without saying, but I’m saying it again anyway), sharpening.
Playing Up the Shadow
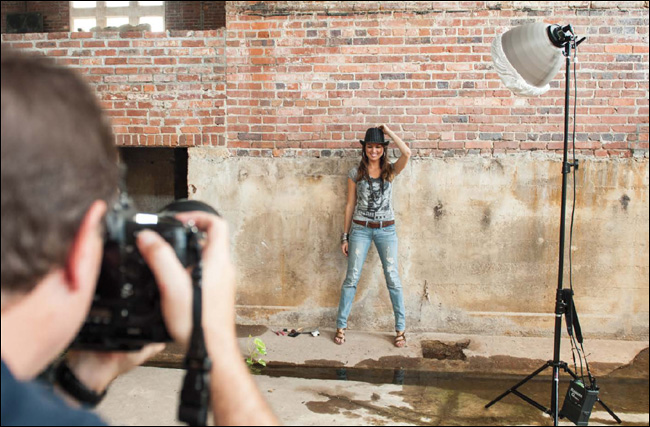
BEHIND THE SCENES: We’re shooting on location here, using just one light, up high on a stand, and we put a very large “long throw” reflector on it (so the light reaches farther and is more intense—so intense that we had to put a diffusion sock over the front, so it wasn’t so harsh). The reason there’s no softbox is because we’re trying to bring out the shadow on the wall behind our subject. It’s up so high because we’re trying to mimic the mid-day sun up high in the sky. We’re using a flash with a battery pack because we knew we would have limited access to power outlets at this location.
CAMERA SETTINGS: Pretty much the same as always, even though we’re on location: same low ISO (200 ISO), the standard 1/125 of a second shutter speed, and I’m using the 70–200mm lens again, but with an f-stop of f/5.6.
Final Image
THOUGHT PROCESS: If you look at any of the shots in this chapter (or even in my portfolio), you’ll notice that you don’t see shadows on the wall behind my subjects. We generally don’t want to see the shadows, so I position my subjects 8 to 10 feet from the wall. That way, their shadows wind up falling on the floor behind them. However, just for effect, this is one of those cases where I want to see the up-close texture on the wall and the shadow falling on it, and that’s why I chose the single light, up high, with that long throw metal reflector on it. That accounts for the semi-harsh look to the light and the shadow on the wall, but that won’t get you the final look you see above. That comes courtesy of Photoshop.
POST-PROCESSING: The entire look comes from Nik Software’s Color Efex Pro plug-in for Lightroom, Photoshop, or Elements. It’s my secret weapon for post-processing effects, but it’s not really a secret as tons of photographers use it every day. You can download a free trial copy from www.google.com/nikcollection/ (click the Try Now button up top). The plug-in allows you to apply multiple filters to an image, and I used three to get this particular look: (1) High Key (the default settings), (2) Bleach Bypass (the default settings), and (3) Glamour Glow (I clicked on the icon to the right of Glamour Glow and chose Strong Glow from its presets). Simply click the Add Filter button before selecting another filter, and then click OK. It applies all three to a copy of the layer. Now, lower the Opacity of this layer a bit until it looks good to you (I lowered it to 50%, in this case). I did a step-by-step video tutorial on this on the book’s companion webpage, found in the book’s introduction.