
Chapter Six. Shooting Travel Like a Pro
Recipes That Make Them Want to Visit That Place Right Now
SHUTTER SPEED: 1/60 SEC F-STOP: F/5.6 ISO: 200 FOCAL LENGTH: 44MM | PHOTOGRAPHER: SCOTT KELBY
How do you feel about adding more pressure to your travel plans? I’m talking serious stress even beyond the potential nightmare of being assigned a middle seat in coach for a 10-hour flight, or having to connect to the Internet at dial-up speeds, or sitting next to someone on the plane who is eating a foot-long Coney dog and bag of Doritos. Yes, I’m talking about the intense pressure to come back with photos from your trip that conform to the mental expectations of all your friends and relatives who have seen the incredible amount of gear you own, which in their minds equates to you coming back from your trip and literally blowing their minds with National Geographic-quality travel shots. Well, my friends, I’m here to do one thing and one thing only, and that is to alleviate your stress through a simple time-tested method. If you want National Geographic-style photos, it starts with actually subscribing to National Geographic, but don’t subscribe to the print version, get the digital tablet version (for iPad and Android tablets). Then, when you see the type of image on their pages that you’d like to be taking, blow it up large on the screen, take a screen capture of that shot, crop it so all you see is the picture itself, and then email yourself that photo and save it to your camera roll. Repeat for about two dozen photos from a few different issues. Do you see where I’m going with this? Right! This way, you have no photo stress whatsoever. In fact, why even lug all that camera gear in the first place, right? Heck, why even read this chapter or this book, for that matter? Whoa, now cowboy...let’s not get carried away here.
Hiding Tourists, Cars, Buses, etc.
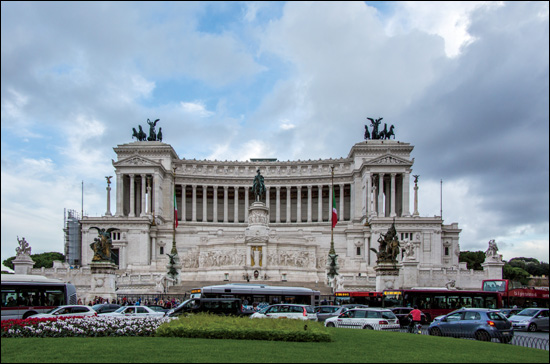
BEHIND THE SCENES: This shot was taken in the heart of Rome, Italy. I was standing in a small park across the street from what is locally known as the “typewriter” (its official name is Altare della Patria [Altar of the Fatherland], and I’ve also heard it referred to as the “wedding cake”). No matter what you call it, or what time of day you’re standing in front of it, the view will pretty much always have cars, buses, scooters, and tourists right in front of it.
CAMERA SETTINGS: For travel photography, I’m generally a “one body, one lens” guy (I’ve tried it both ways—also taking tons of gear, lugging it all over, and switching lenses all day—and I’ve found that no matter which lens I have on at a particular time, it’s always the wrong one). My go-to full-frame lens for travel now is a 28–300mm f/3.5–6.3 (the equivalent for a cropped sensor lens would be an 18–200mm f/3.5–5.6). Nikon makes a great 28–300mm. It’s small, not too heavy, surprisingly sharp, and the street price is right around $1,050. Canon makes a 28–300mm, as well, but it’s very heavy (3.7 lbs), it’s very large, and it’s very expensive (street price around $2,700). This is why I use the Tamron 28–300mm f/3.5–6.3 (available for Canon, Nikon, and Sony), which is very lightweight (1.3 lbs), reasonably sharp (not as sharp as the Nikon or Canon, but not terrible), and its street price is only around $630. In the final image, I’m zoomed out wide at 35mm, and I’m at f/6.3 at a shutter speed of 1/100 of a second (it was kind of overcast). My ISO was at 100.
Final Image
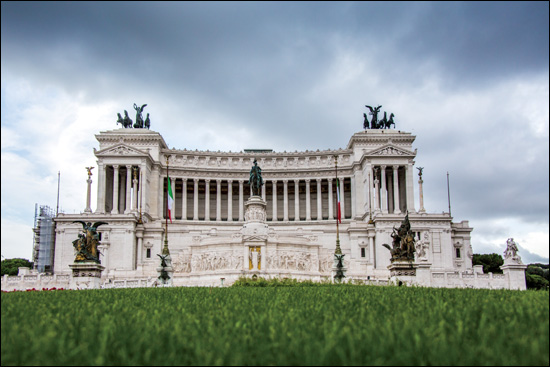
THOUGHT PROCESS: Using Photoshop to somehow clone all those cars and buses out of the way would be a nightmare, because you’d have to rebuild a lot of the front of the building. So, instead, try this: get down really low. This is exactly what I did here. This totally changes your perspective and field of view, and uses the foreground grass to hide stuff like cars and buses. There was a very short fence in place to keep people from walking on the grass, so I stuck my camera body between the rungs of the fence and positioned it just above the grass (so you wouldn’t see blades of grass in front of my lens), and then took the shot. Composition is a bit of a guessing game when you’re shooting down this low, so I turned on Live View so I could see what I was shooting on the back LCD monitor. Once I had it pretty close, I switched off Live View and took the shot you see above. It took me a few shots to get it right, but that’s okay—the film is free, right? By the way, you can use this same trick shooting your kid’s sporting events to hide the outfield fence on a baseball field, or the empty stands on a soccer field, or to hide anything in your line of sight when standing.
POST-PROCESSING: Not much to do on this shot—just added some contrast and sharpening, and used the Shadows slider to open up the shadows in the building a bit (just drag it to the right in either Lightroom’s Develop module or in Camera Raw). While this makes for a good example, it doesn’t make a really great shot, especially with that scaffolding on the left side of the building. Want to see how to get rid of stuff like that? Watch the video I made to show you how on the book’s companion webpage (mentioned in the book’s introduction).
There’s a Picture in There Somewhere
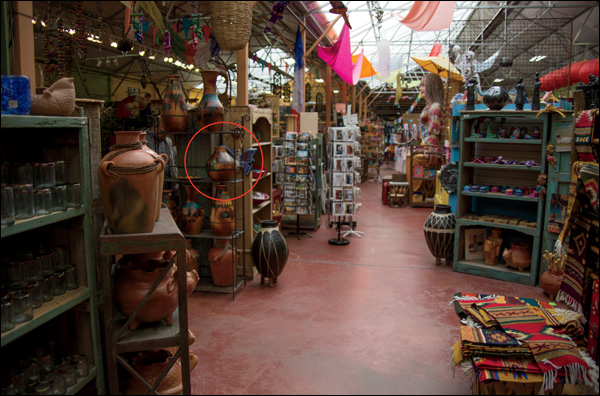
BEHIND THE SCENES: This was taken inside Jackalope, one of the awesome gift shops in Santa Fe, New Mexico. I took my students there a few years ago during a workshop at the Santa Fe Photographic Workshops campus. It made such an impression, I went back again this year. Lots to shoot indoors and out, and the place is very camera friendly.
CAMERA SETTINGS: I used my same go-to travel setup here (the one I talked about a couple pages ago—one camera body and my go-to travel lens, the Tamron 28–300mm f/3.5–6.3). For the final image, I’m zoomed in reasonably tight at 200mm and, at that zoom amount, my f-stop could only go as low as f/5.6. (Remember: this is a variable aperture lens, so when I shoot wide, at 28mm, my f-stop can go as low as f/3.5 but as I zoom in tighter, that number is forced to go up. In this case, at 200mm it increased to f/5.6. If I zoomed in even tighter, it would be at f/6.3.) Because we were indoors, I had to bump up the ISO to 400 to get my shutter speed to 1/60 of a second (that’s about the minimum most folks can hand-hold a shot and still have it nice and sharp. Any slower and your image would be a little blurry). So, to sum up, I’m at f/5.6, at 1/60 of a second shutter speed, at 400 ISO. The behind-the-scenes shot above was shot at 28mm (wide angle), so I could get my f-stop down to f/3.5, and that increased my shutter speed to 1/640 of a second—plenty of speed to get a sharp shot. So, while it’s nice and sharp, it’s just a “meh” shot, which is why I needed to zoom in to make something out of it.
Final Image
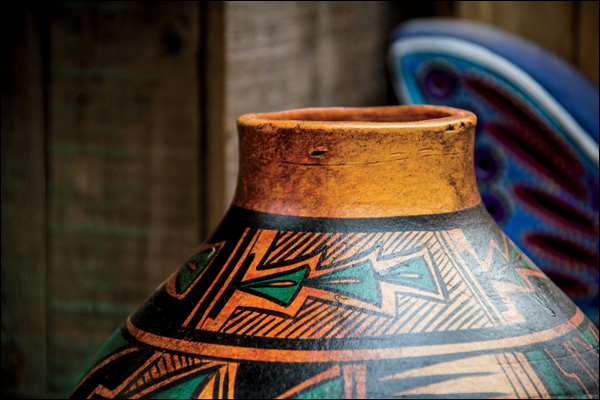
THOUGHT PROCESS: We’ve all been in these situations before where you see all this cool stuff in one place, but it’s so busy or crowded (like at an indoor market or busy city square) that it’s hard to think there’s even a shot there. In situations like this, it helps to remember that we don’t have to show everything we see in front of us—we can pick and choose what winds up in the frame. We can literally use our camera to cut this giant, busy, messy scene into small visual chunks that fit in our frame. That way, we can keep the distractions to a minimum. In this case, I really liked the colors on this one particular vase on a shelf alongside other gifts for sale in the shop. By zooming in tight, we only reveal what’s in our frame—which, in this case, was just this one vase—as if it were all alone. If I had moved even an inch to the right, you would have seen the price tag of the butterfly carving behind it. So, while I’m composing the shot, I’m moving a few inches in either direction to see which one gives the least distracting image, and this was my favorite of the ones I took. Besides the color, what drew me to shooting it in the first place was the soft, diffused light from the skylights above (pretty rare in gift shops, I’d have to say). Now that I’ve mentioned how you can visually chop a scene like this into little pieces inside your frame, go back and look at that image on the facing page, and you’ll see how many good shooting opportunities are actually there.
POST-PROCESSING: I increased the Contrast amount in Lightroom’s Develop module (or Camera Raw), and then I darkened the outside edges by dragging the Post Crop Vignetting Amount slider to the left in the Effects panel. That’s pretty much it.
Moving to Hide Distracting Stuff
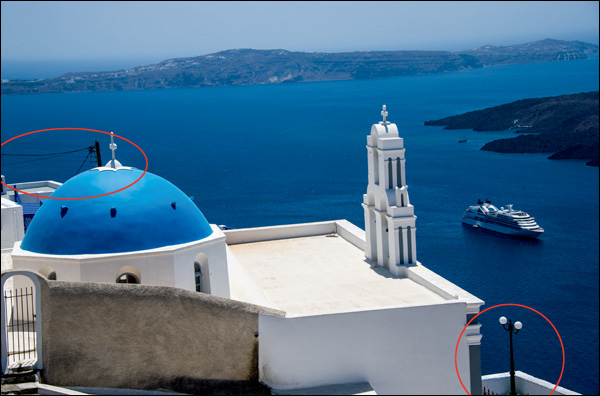
BEHIND THE SCENES: This was taken on the island of Santorini, Greece, which is famous for its whitewashed buildings and beautiful blue accent colors. There’s a distracting light post and a small fence in the bottom-right corner here, and there’s a telephone pole, wires, and some other distracting junk near the top left (both are circled in red here). I had my lens zoomed out a little, to 70mm, for this shot. I could have gone wider, but then there would’ve been other distracting things in the frame, like air conditioning units and messy looking chairs and other distracting junk.
CAMERA SETTINGS: This was taken with a 28–300mm f/3.5–5.6 lens at f/8. It was a bright, sunny day, so at 200 ISO, my shutter speed was 1/1600 of a second.
Final Image
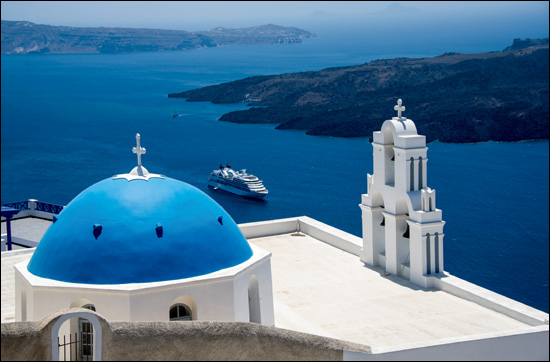
THOUGHT PROCESS: I think one of the best things you can do for your travel shots is to keep them “clean” and keep any distracting things in the frame to a minimum. That’s what I was trying to do here. You can see that the ship has moved from the right side of the bell tower to the left side, but of course the ship itself didn’t move—I did. I walked a few feet up and down the street overlooking this church trying to find a spot where I could frame the image without seeing the telephone pole and wires on the left and the black light post and fence on the right. I walked just far enough that it visually put the ship on the left side of the bell tower. This shot is literally taken just a few feet from where the first shot was taken, yet look at the difference in hiding the distracting elements. Personally, I liked it better with the ship on the right side of the bell tower, but sometimes you have to make a trade off. In this case, the cleaner, less-cluttered shot won out.
POST-PROCESSING: You don’t need to do much to a bright, sunny, daylight shot like this. I just increased the Contrast amount a bit in Lightroom’s Develop module (or Camera Raw) and sharpened it. Note: I sharpen every photo, so if I didn’t mention it in one of the recipes here in the book, just know that every photo gets sharpened, normally using Photoshop’s Unsharp Mask filter. My favorite settings for travel photos? Amount: 120%, Radius: 1.0, Threshold: 3.
Finding Simplicity in a Busy Outdoor Scene
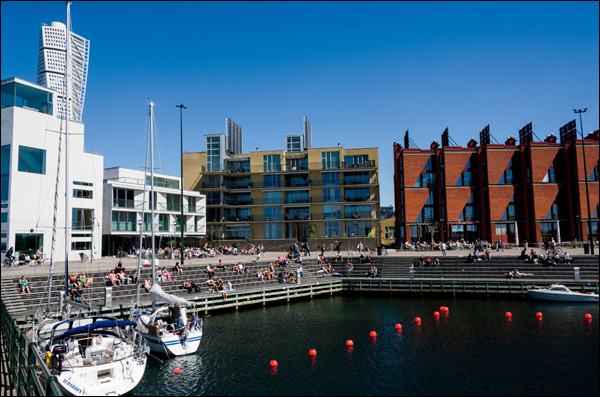
BEHIND THE SCENES: This was taken in Malmö, Sweden, just across a long bridge linking Copenhagen, Denmark, to Sweden. We made the drive (and paid the most expensive bridge toll of my entire life—I believe it was in the $50 range) to shoot a famous high-rise building that I didn’t know even existed until someone mentioned on Twitter that I should try to shoot it. The building is called the “Turning Torso,” and you can see it in the top left of the image here, climbing up above the shopping/entertainment and living area built up around it along this cute harbor. This wide-angle shot is kind of “snapshotty”—I took it to help me remember what it was like there. But, outside of that, there’s not a lot going on artistically in the image. I’m sure it looks much like everybody else’s shot who was standing right beside me when I took this from the pier.
CAMERA SETTINGS: Same lens as usual—the 28–300mm f/3.5–5.6—and I’m zoomed out as wide as I can go at 28mm. I chose f/11 for my f-stop, so the Turning Torso in the background would be sharp and in focus, just like the condos in the foreground. It’s a bright, sunny day, so my ISO is 200 and my shutter speed is 1/500 of a second.
Final Image
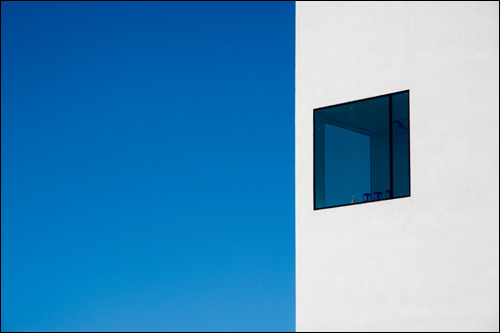
THOUGHT PROCESS: As I walked around the small harbor, I spotted the very modern-looking condo on the far left of the image on the facing page (the one where you see the Turning Torso rising above it). What drew me to find this shot within all that busyness that is the harbor is the fact that I looked up and saw this very clean, very modern, just simple-looking white building against a blue, cloudless sky. The window, and that fact that you see through to the window on the other side, sealed the deal for me that there was a decent shot somewhere. So, I stood in the harbor with my lens zoomed in to 122mm. Not that tight in, but I was fairly close to the building by this time, and I wanted to make sure I left plenty of blue sky to the left of the building. That empty area is called “white space” or “negative space,” and since it’s essentially empty, what it does is draws the viewer’s eye directly toward your subject (in this case, the condo window).
POST-PROCESSING: I added a little Vibrance to the image using the Vibrance slider in Lightroom’s Develop module (or Camera Raw), which made the already blue sky a little bluer. Just drag that slider to the right a little bit and you’re there.
Shoot the Details Instead
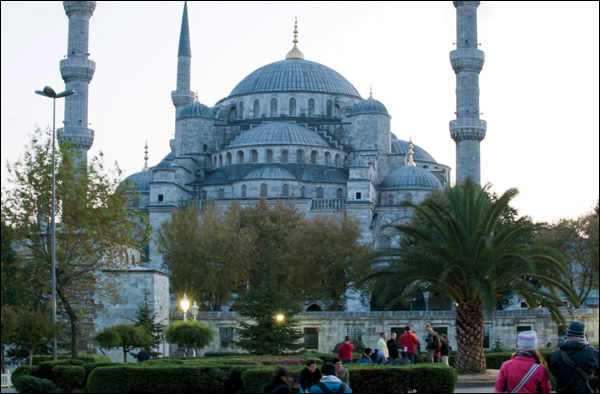
BEHIND THE SCENES: Here’s a shot from Istanbul, Turkey, of the famous Sultan Ahmed Cami Mosque, also known as the “Blue Mosque,” taken just before sunset. The problem with capturing something so large like this is that you’re surrounded by distracting stuff—everything from tourists to street lamps—which makes it really hard to capture this, or nearly any large structure, unless you’re up very high shooting down on it.
CAMERA SETTINGS: I shot with a 70–200mm f/2.8 lens zoomed in to 135mm. My f-stop was f/5.6 and my shutter speed was 1/15 of a second, so I was on a tripod. My ISO was 200 ISO (the lowest, cleanest ISO for the camera body I was using).
Final Image
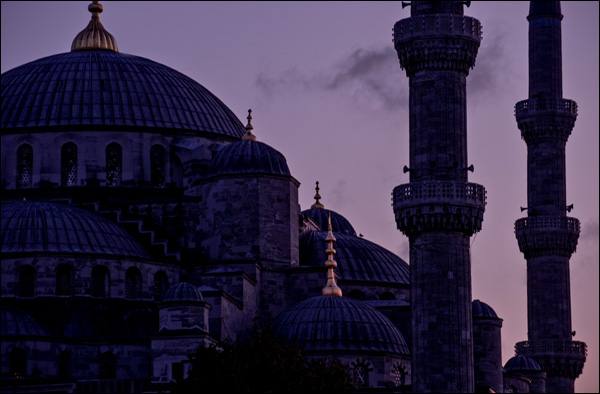
THOUGHT PROCESS: In my Shoot Like a Pro seminar tour (which is based on this series of books), I talk about how challenging it is shooting things like the exteriors of cathedrals, theaters, opera houses, and the like, because they’re not usually all by themselves on a flat, unobstructed piece of land. They’re usually downtown, and they’re usually surrounded by either construction/restoration equipment (think construction cranes, barriers, and fences) or local businesses with signs, power lines, and such. It makes capturing a clean, unobstructed shot of these large structures really tough. That’s why I recommend zooming in and focusing on just one important part of the structure, like I did above. I also waited until the sun had gone down. This was taken 1 hour and 11 minutes after the shot you see on the facing page, which also means I had to shoot on a tripod because the light was so low (there was no way I could get to the 1/60 of a second or faster shutter speed I would need to hand-hold this shot). By only showing part of the structure, you’re bringing the viewer something they wouldn’t see if they were just standing there. Plus, zooming in tight on an important detail area is a very powerful and dynamic way to present a large structure like this.
POST-PROCESSING: Just three main things: (1) The mosque is backlit, so I dragged the Shadows slider in Lightroom’s Develop module (or Camera Raw) to the right a bit to bring out detail in the shadows. (2) To enhance the texture, I dragged the Clarity slider to the right, and then (3) I dragged the Tint slider to the right toward magenta to make the sky color more interesting.
The Waiting Game Gamble
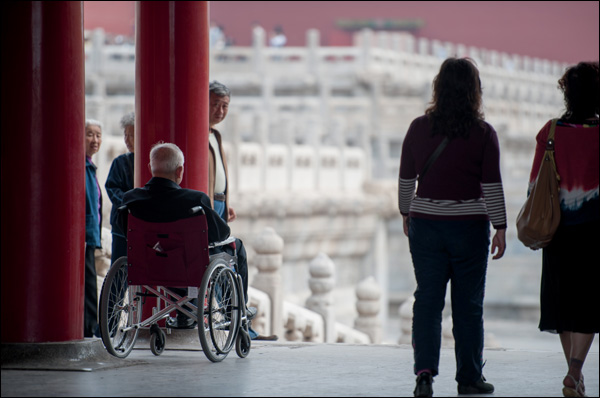
BEHIND THE SCENES: This shot was taken during a guided tour of Beijing’s Forbidden City. Just a natural light shot. As you might imagine, the Forbidden City is packed full of tourists. You’re seeing just a tiny hint of that here because there are literally thousands visiting the grounds at any given time, which makes it a challenge to get any shots without them in every frame.
CAMERA SETTINGS: To put the background out of focus, I shot this at f/2.8 and I was using my 70–200mm f/2.8 lens zoomed in to 140mm in the final image (this was taken a few years ago when I carried more than one lens. Besides this lens, I was carrying a wide-angle zoom, as well). Even though I was in the shade (for the most part), at f/2.8 I was able to get a shutter speed of 1/1600 of a second. My ISO was set at the cleanest native ISO for that full-frame camera body, which was 200 ISO.
Final Image
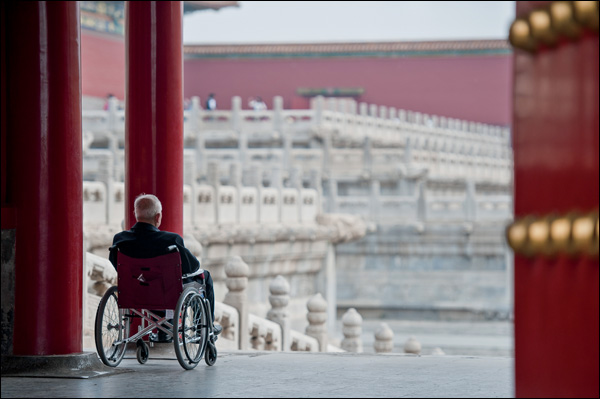
THOUGHT PROCESS: Once I had passed through this opening, I looked back to see a family with their grandfather in a wheelchair, and they had positioned him facing the courtyard while they were looking at something to the left of him. I thought to myself, “Man, this would make a powerful shot if there was no one else in the frame.” The problem was there were still family members around him and some tourists walking through, as well. So, I just decided to wait and see if I got lucky. I leaned against the red door you can see on the far right of the frame, put the camera up to my eye, and composed the shot the way I would want it (leaving lots of negative space to his right, so your eye is drawn immediately to him). Then I just stood there, leaning and waiting, hoping that his family might walk out of my frame for even just a moment. Within about 5 or 6 minutes of waiting, sure enough, they all stepped off the left side of the frame, leaving him alone for just a few seconds. I was already framed up, in position, so all I had to do was press the shutter button and I got it. Two seconds later, here came more tourists, and then the family came back, but I already had the shot. This “waiting game” is certainly a gamble and, in this case, I got lucky—they did walk away and there was a slight pause in the non-stop parade of tourists. But, all I had to lose was time. Well, the tour group did go on ahead without me, and I was the last one back to the tour bus, but that’s another story.
POST-PROCESSING: Just added a little contrast using Lightroom’s Develop module’s (or Camera Raw’s) Contrast slider, and a little sharpening using the Unsharp Mask filter in Photoshop.
Zooming to Hide Distractions
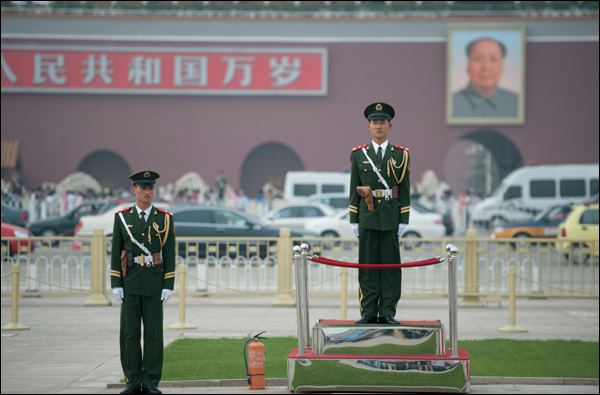
BEHIND THE SCENES: Here, we have two guards, manning their post in Beijing’s Tiananmen Square, with a backdrop of the main entrance of the Forbidden City (they do a flag-raising ceremony here each day). There are a lot of problems with this photo, including the fact that the guard on the left looks somewhat distracted and, of course, the fire extinguisher isn’t adding a lot to the shot. There are also a lot of cars and buses between the guards and the Forbidden City entrance across the street. All of these things are competing for your attention when this shot is really just about the guard on the podium.
CAMERA SETTINGS: For the final image on the facing page, I was using a 70–200mm f/2.8 lens zoomed all the way in to 200mm to put the background as out of focus as I could. (Note: I had to walk a few feet backward to be able to frame the shot with lots of negative space on the right side of him.) For the same reason, my f-stop was f/2.8. My shutter speed, even this late in the day, was 1/1600 of a second (thanks to using such a wide-open f-stop like f/2.8). My ISO was set at the cleanest native ISO for that full-frame camera body, which was 200 ISO.
Final Image

THOUGHT PROCESS: By zooming in tight when you have distracting objects in the frame (like a fire extinguisher or a bored guard), you can eliminate a lot of distractions in your image and simplify it, which generally makes it stronger. In this particular case, one of the benefits of zooming in was that I was able to frame the subject so it looks like he’s under the ever-watchful eye of Chairman Mao Zedong across the street. The fact that the guard appears to be glancing a suspicious look helps sell the story even more (though capturing his suspicious look was just plain luck). By putting the background out of focus, it visually separates the guard from the busy background, and by composing the image with all that negative space to the right of him, it helps draw your eye directly to him. It makes for a much more dynamic image all around.
POST-PROCESSING: Just two things: I used Photoshop’s Clone Stamp tool to remove some distracting things from the background, including red cones and part of a truck on the edge of the frame. I also sharpened the image using Photoshop’s Unsharp Mask filter, but as I mentioned earlier, I sharpen every single image, so that second part is a given.
Changing Time and Perspective
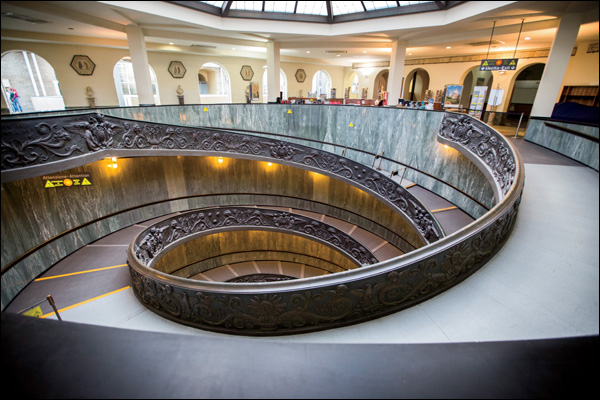
BEHIND THE SCENES: This is a photo of a gift shop in the Vatican Museums in Rome, Italy (I know, Vatican City is technically its own sovereign city within the borders of Rome; no need to write in. LOL!). At the end of your tour, you’re left in a gift shop and you leave by winding your way down this beautiful staircase. If you search on Google for this stairway, you’ll find lots of shots of it. But, nearly all the shots have lots of tourists winding down that staircase, which isn’t surprising since the Vatican is one of the most-visited museums in the world, welcoming more than 5 million visitors per year (yikes!). However, I wanted to get a shot of it without any tourists or other distractions.
CAMERA SETTINGS: Although there seems to be a lot of natural light, there’s not nearly as much as you’d like. For the image on the next page, I set my f-stop to f/3.5 and, even at that, I had to raise my ISO to 1600 to get my shutter speed up high enough (to just 1/60 of a second) to get a sharp, crisp hand-held shot. Because I generally shoot travel with a 28–300mm f/3.5–5.6 lens, that’s what I had with me. But, since I knew I would be shooting a lot of cathedral interiors in Rome, I also brought a wider lens. Even though I rarely used it (and only carried it with me once the entire trip), it paid off here as this shot was taken at 16mm (the lens was a 16–35mm f/2.8).
Final Image
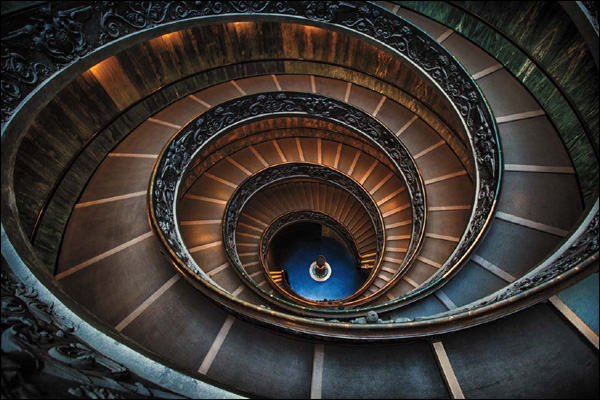
THOUGHT PROCESS: There are really only two ways to get a shot of this stairwell without it being full of tourists (well, without having to resort to a lot of Photoshop work anyway), and that’s to either get there really early (before anyone makes it to the gift shop), or at the very end of the day, but you run the risk of having security force you to leave as the place is closing. Doing research before a trip like this is critical. I had learned that if you arrange a private tour, not only do you skip the incredibly long lines, but they also let you into the Vatican an hour before the general public (and the massive crowds). So, as soon as we started, I saw the gift shop off in the distance and asked the tour guide if I could run over there and grab a few shots. Once there, the flat perspective you see on the facing page is just that—flat. But, if you change your perspective and lean over the railing (like I did here), you get this beautiful view of the entire staircase winding its way down. I had to hold the camera with my arms stretched out, so I shot in burst mode. That way, even if a shot or two wasn’t perfectly in focus, at least one of them probably would be. I also hedged my bets by shooting there for about 10 minutes, from different angles all around the gift shop, trying different amounts of zoom, and I wound up with the shot you see above.
POST-PROCESSING: I did three things in Lightroom’s Develop module (you can also do these in Camera Raw): (1) I darkened the edges all the way around by dragging the Post Crop Vignetting Amount slider, in the Effects panel, to the left a bit. (2) I increased the Vibrance amount a little to bring out the blue at the bottom of the stairs and the orange light on the stairs. (3) I added contrast using mostly the Contrast slider, but I added a little bit of Clarity (which adds midtone contrast), as well.
Another Trick for Hiding Tourists
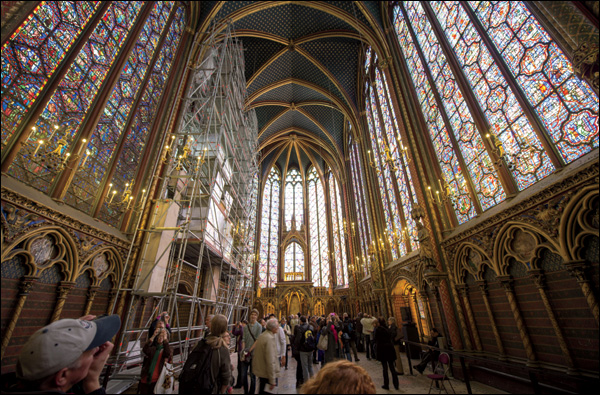
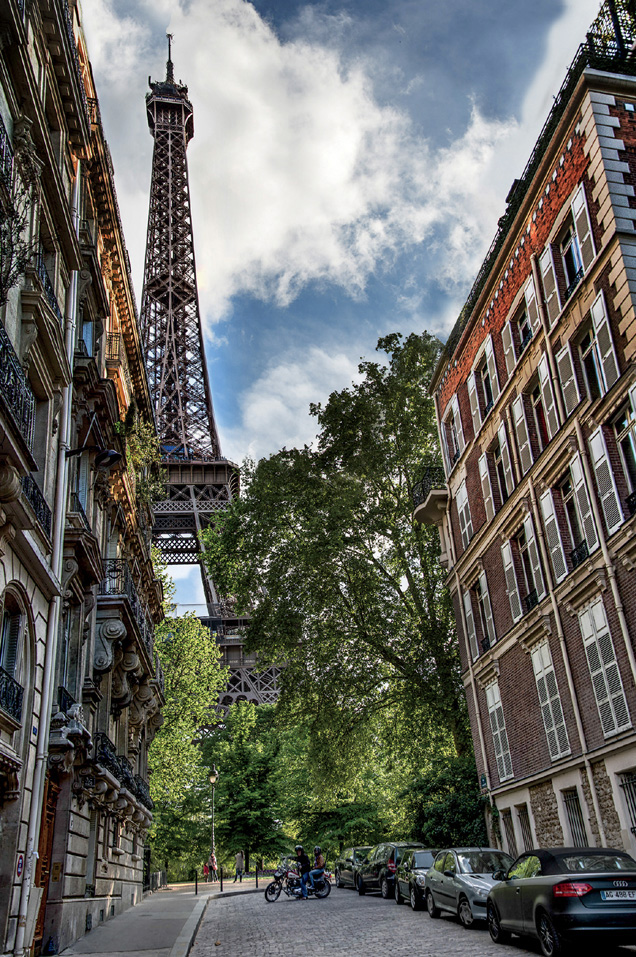
BEHIND THE SCENES: This is Sainte-Chapelle in Paris, France. It’s one of the most amazing churches I’ve ever seen because it has these tall, amazing, stained glass windows on all sides, all the way around the entire church. Everything below the stained glass is gold leaf, and the whole place is just stunning. It’s also very small and, as such, it’s always very crowded, and like almost any church, theater, opera house, or hall in Europe, it’s also under restoration—you can see scaffolding along the entire left wall above. Believe it or not, I can deal with that, but the tourists are a different problem and that’s what this recipe is about: avoiding the tourists.
CAMERA SETTINGS: For the final shot, I used a 14–24mm f/2.8 lens and took the shot at 14mm. Even at f/2.8, and at 800 ISO, I could only get my shutter speed to 1/20 of a second. That is very risky for hand-holding a shot (no tripods allowed here) and, in all honesty, I should have increased my ISO to get my shutter speed above 1/60 of a second. I can only imagine the reason I didn’t raise my ISO was I just simply wasn’t paying enough attention (I was seriously blown away at seeing this church and very distracted with what was standing before me—I really hadn’t expected it would be so amazing in person). So, I attribute the fact that I got a sharp shot at 1/20 of a second to a steady hand and a lot of luck, because my hand-holding just usually isn’t that steady.
Final Image
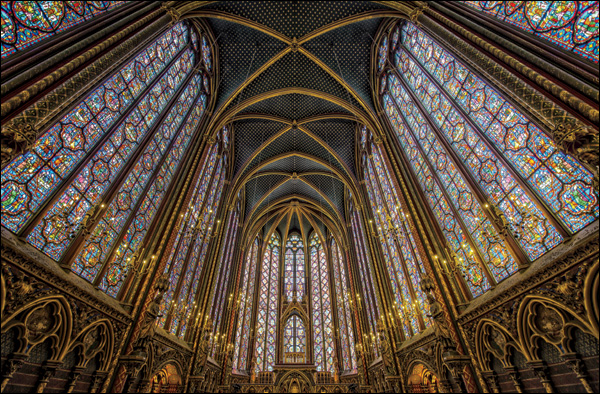
THOUGHT PROCESS: I can’t tell you how many times I’ve shown this shot to someone who has been to Sainte-Chapelle and they said, “How in the world did you get this shot without the place being packed with people?” Now, I mention in the previous recipe about getting there before all the tourists do. But, that doesn’t always work because often, when they first open the doors in the morning, waiting behind those doors is a wall of tourists. It just depends on how early it opens, and the earlier it opens, the better chance you’ll have that there won’t be as many tourists in line that early. However, that’s not the trick I used to get this shot, which was taken just moments after the shot on the previous page was taken. The trick is simply to raise the camera high enough that you’re looking just over the tops of the heads of the tourists. They’re all still there, but I composed the shot aiming upward—just over their heads. If I lowered my lens barrel even a half-inch, you’d see the tops of their heads. I’ve used this trick again and again over the years and it works like a charm. You’d think viewers would say, “Where’s the bottom of the church?” but not a single one has (only when I tell them the trick do they realize the floor is missing).
POST-PROCESSING: This shot has a lot of post-production because (1) it’s an HDR shot, so I had to combine three images into one. And, (2) I had to select the right half of the photo in Photoshop, copy it onto its own layer, flip it horizontally, and then drag it over the scaffolding to hide it. I did a video tutorial to show you how it’s done (I posted this, and other post-production tutorials, on the book’s companion webpage mentioned in the book’s introduction).
Shooting the Food
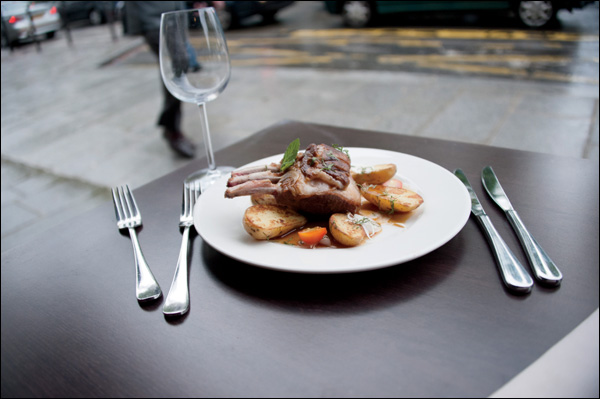
BEHIND THE SCENES: This was taken at an outdoor cafe (well, it’s not an outdoor cafe per se—there’s plenty of seating indoors, but I asked to sit outdoors), right along the Seine River and just behind Notre Dame, in Paris. It’s a simple setting, and I took a wide shot to show you the regular view of a tasty French dish. Hey! Where’s the wine?
CAMERA SETTINGS: For the final shot you see on the facing page, I was using my trusty 28–300mm f/3.5–5.6 zoom lens, and I zoomed in tight to 135mm (I was pretty darn close to the dish, so at 135mm I was really in tight). I used the widest (smallest numbered) aperture I could, which in this case was f/5.6. My ISO was set to 1600, since it was a cloudy, rainy day, but that was actually higher than I needed because my shutter speed was 1/500 of a second. So, I could have come down to maybe as low as 400 ISO and still had at least 1/60 of a second. Lowering that ISO would have given me a cleaner image (noise-wise), but as it is, you really don’t see any noise to speak of (and I didn’t run any noise reduction plug-ins or anything).
Final Image
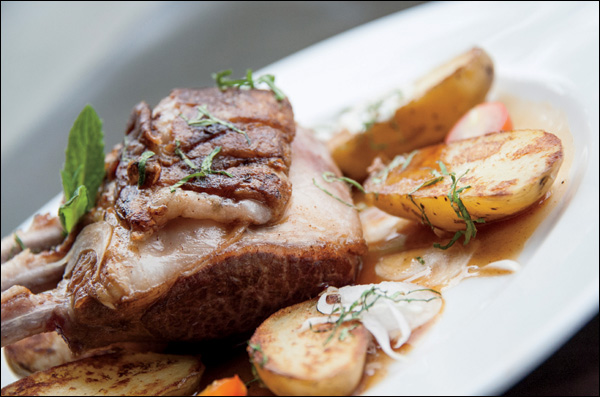
THOUGHT PROCESS: I have a simple recipe for shooting food while on vacation, and it pretty much works every time. It starts with (1) asking to either sit outside or to sit by a window. If you can’t do either, the rest isn’t going to work because when it comes to food, the lighting is critical, and it needs to be natural light. I’m not saying it’s impossible to get a decent food shot inside the restaurant with their tungsten lighting, but it sure is a lot harder because there are usually multiple light sources and weird shadows and color problems. So, if you can either sit outside or at a window, the rest is simple. (2) Set your f-stop to your lowest (widest) possible setting (in my case, I could only go as low as f/5.6, but if you can get to f/4, or even f/2.8, it will look even better). (3) Your goal is not to shoot the entire plate of food—just shoot a portion of it (just like with a big building, only shoot the detail). So, stand up, and then zoom in really tight on one area of the dish (as seen here). It’s okay to cut off the ends of the dish—just get in really tight. This will put the front of your food in focus, and the back of the food out of focus. At the same time, when you’re zoomed in tight like this, it puts the foreground closest to you out of focus, as well. Perfect! (4) Now, tilt your camera at a 45° angle to the left or right (your choice) and take the shot. So, to recap: sit outside or by a window; set your f-stop wide open; stand and zoom in tight; then, tilt and fire!
POST-PROCESSING: Not much to do here. I just added a little contrast and sharpening. Why do I always add contrast after the fact? Because I shoot in RAW mode, which means it turns the in-camera contrast off. So, the photos look flat without me adding some contrast in Lightroom’s Develop module (or Camera Raw) after the fact. If you shoot in JPEG mode, the camera adds contrast automatically.
Going on a Stakeout
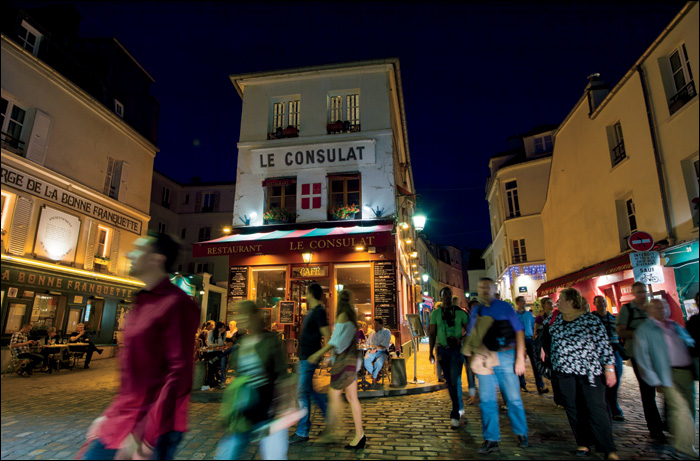
BEHIND THE SCENES: The photo above was taken at 8:14 p.m. in a very busy part of Montmartre—a popular artist’s colony near the Basilica of Sacré-Coeur, overlooking Paris. Behind this non-stop parade of tourists is a charming little bistro surrounded by a cobblestone street (and a popular photo spot, although I had never shot it before. In fact, I didn’t even know it was there, even though I had visited Montmartre many times before. Don’t know how I never got back to this spot, but somehow I hadn’t until a friend took me there).
CAMERA SETTINGS: The image you see on the facing page was taken with a 14–24mm f/2.8 super-wide-angle lens at 15mm (why 15mm? I’m sure I accidentally nudged the barrel at some point and moved it from 14mm to 15mm. It happens). Since this was at night, my shutter needed to be open much longer than the 1/60 of a second I use for hand-holding shots, so I had to put my camera on a tripod to keep it steady. My shutter speed wound up being 1/6 of a second (way slower than I could possibly hand-hold my camera). Since I was on a tripod, I could use my lowest, cleanest ISO, which was 200 ISO. My f-stop was f/2.8 (probably should have used a higher f-stop—maybe f/11—which would have left my shutter open longer, but might have resulted in a deeper focus. Honestly, though, with a wide-angle lens like this, even at f/2.8 you can see everything’s pretty much in focus throughout the picture, so I don’t sweat it as much).
Final Image
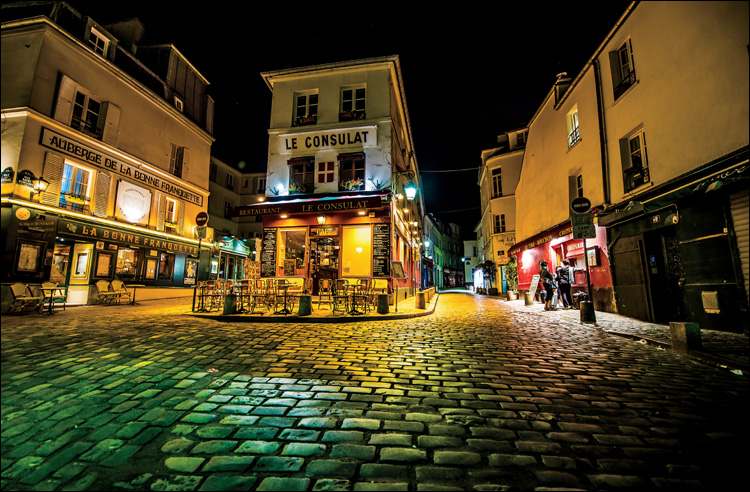
THOUGHT PROCESS: The photo above was taken at 9:36 p.m. that same night (about an hour and 20 minutes after the first one was taken). Waiting until just after the bistro had closed (so all its lights were still on) and all the other tourists had gone away really paid off. In that hour and 20 minutes, we went and grabbed a bite to eat and then came back to that exact same location, knowing that it would now be pretty much empty. I still had to wait about 10 minutes for a moment where the streets were fully empty (there were still a few tourists making their way home from dinner, and if you look on the far right, you can see a few in line getting a crêpe for the road). I wanted to use the cobblestone street as my foreground, so I got my tripod down as low as I could get it (I splayed out the legs as far as they would go). Then, to keep the camera perfectly still, instead of pressing the shutter button with my hand (which could cause a tiny bit of movement in the camera), I used a cable release to take the shot. That way, my hand never touched the camera, and the shot would be super-sharp.
POST-PROCESSING: The big thing I did here was to add a lot of clarity, using the Clarity slider in Lightroom’s Develop module (or in Camera Raw). Dragging it to the right enhances the texture in the image, making the cobblestones appear shiny. Then, I got the Adjustment Brush and painted over the cobblestones with the Contrast set to 100 (full power) to make them even shinier, which helped the reflections stand out in the cobblestones even more.