
Chapter Eight. Shooting Other Stuff Like a Pro
Photo Recipes for All That Other Stuff That We Shoot
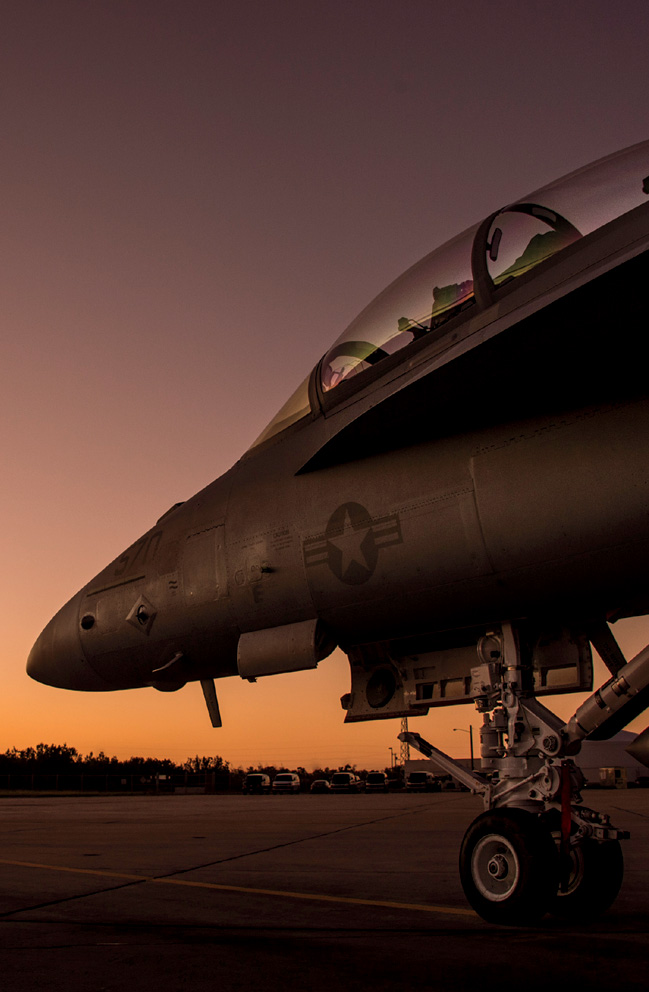
SHUTTER SPEED: 1/30 SEC F-STOP: F/7.1 ISO: 400 FOCAL LENGTH: 28MM | PHOTOGRAPHER: SCOTT KELBY
What do you call things that you don’t have an exact name for? Oh, that’s easy. That’s “stuff.” For example, if you’re out with a friend shooting, and your friend says, “Hey, take a shot of that stuff over there,” you know exactly what they mean and you turn and nail the shot. Now, imagine that same scenario, but you can’t use that amazing catchall term and, instead, you have to try to describe it. Your friend turns to you and says, “Hey, take a shot of that over there?” You say, “Where?” They say, “Over there! That area over to your right.” You say, “I don’t see it.” Your friend says, “Oh my gosh, it’s right over there.” You have no idea what they’re talking about so, of course, you miss the once-in-a-lifetime shot of a killer whale jumping fully and completely up out of the water, chasing a fully grown male seal who somehow manages to avoid the razor-sharp teeth of the graceful mammal, and you’re just standing there as the whale watches hopelessly as his catch of the day escapes into the icy waters below your inflatable Zodiac chase boat. If your friend had just said, “Take a shot of that stuff,” you’d be walking up to the podium right about now to accept your World Press Photo award (Best of Show) for the image you titled, “The One That Got Away,” and just as the flashes of the press on hand are firing, and you’re lifting the heavy crystal award over your head and waving to your breathtakingly handsome husband and two perfect kids (one boy, one girl), and you’re daydreaming about the new full-frame body you’re going to buy with your $10,000 Best of Show check, your cell phone rings. It’s National Geographic, and you’re about to explode with excitement until you hear that it’s actually one of their lawyers, and they want to talk to you about some screen captures you have on your tablet. See, that’s the kind of “stuff” I’m talking ’bout!
Product Photography
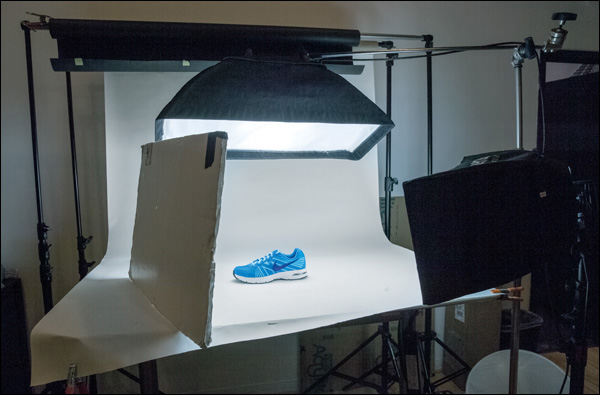
BEHIND THE SCENES: Don’t let the setup here fool you, this is just a simple two-light setup and both lights are using the exact same, inexpensive softbox—a 1x3’ Westcott strip bank (they run around $150 each at B&H Photo). The lights themselves are my go-to lights for product photography—Spiderlite TD6s, also made by Westcott (they’re continuous lights, not flashes; more on these on the facing page). My goal was simply to light the sneaker as evenly as possible, and I used a modified product lighting setup I learned from commercial photographer Jim DiVitale. Having one softbox behind the product and aiming forward covers the top of the shoe and some of that light wraps around to the front, as well (the softbox is a much larger light source compared to the size of the sneaker, so the light spills around it), but just that light alone leaves the side facing the camera a little shadowy. Technically, I could fix that in Lightroom (or Camera Raw) by using the Adjustment Brush and just painting over that area to brighten the exposure, but I wanted to get it right in-camera.
CAMERA SETTINGS: The only downside of these lights, compared to strobes, is that they don’t put out as much light, so you’ll usually have to shoot on a tripod. I’m shooting with my 70–200mm f/2.8 at 110mm. My f-stop was f/8 (to keep lots of sharpness throughout) and my shutter speed was 1/15 of a second (hence, the whole shooting on a tripod thing—that’s too slow to hand-hold). My ISO was just 100, so I could have cranked it up to around 400 probably to get enough shutter speed to hand-hold if I didn’t want to be on a tripod.
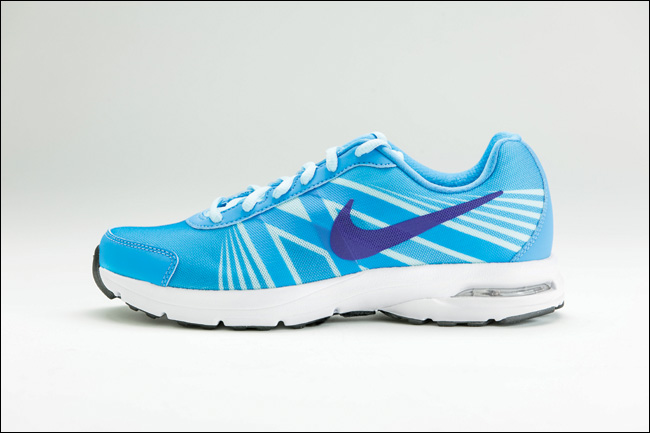
Final Image
THOUGHT PROCESS: I mentioned that these lights aren’t flashes, they’re continuous lights, so they’re always on. They are very bright, they’re daylight balanced, and they use specially designed fluorescent bulbs, so they don’t really emit any heat. The advantage of these “always on” lights is “what you see is what you get.” Positioning the lights is so much easier—as you move a light, you see the result right as you’re moving it. It’s really perfect for product photography like this (no flash triggers, no modeling lights, no guessing game)—it couldn’t be easier. Plus, they’re cheaper than most decent flashes or strobes (or even Nikon or Canon hot-shoe flashes, which are around $550 each, whereas the West-cott TD6s are in the $450 range).
POST-PROCESSING: I brightened the overall exposure a bit in Lightroom’s Develop module (or Camera Raw), and I increased the contrast a bit, as well. And, of course, I sharpened the image quite a bit using Photoshop’s Unsharp Mask filter, using these settings: Amount 90, Radius 1.5, Threshold 0.
Car Detail Shots
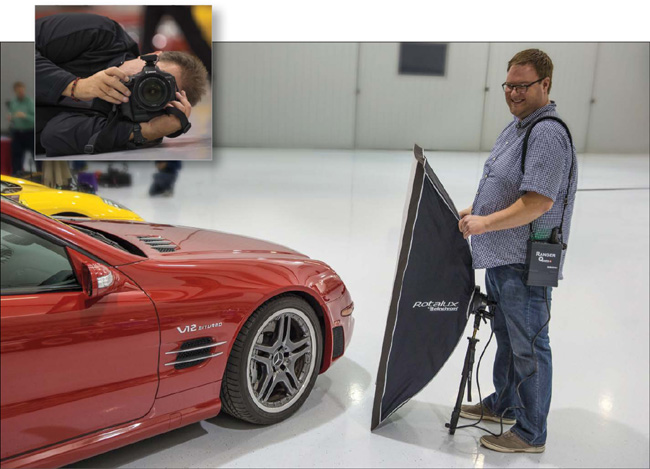
BEHIND THE SCENES: Here, it’s another strip bank (I love these things). This particular one is made by Elinchrom, and my assistant, Brad Moore, is aiming it to the right of the front wheel of a Mercedes-AMG on display. He is holding the softbox at a 90° angle to where I’m shooting from, which is lying down on the ground to the left side of the wheel (as seen in the inset. Luckily, it was a really clean floor—when you’re shooting cars, it’s usually not). We’re using a portable Elinchrom flash unit (called a Ranger Quadra, which is a small flash with a battery pack, so you can take it on location).
CAMERA SETTINGS: For close-up car detail shots like the final you see on the facing page, I’m usually using a 24–70mm f/2.8 lens, and my f-stop is f/22 pretty much every single time (we’ll look at my f/22 on the facing page). My ISO is 200 and my shutter speed is 1/100 of a second.
Final Image
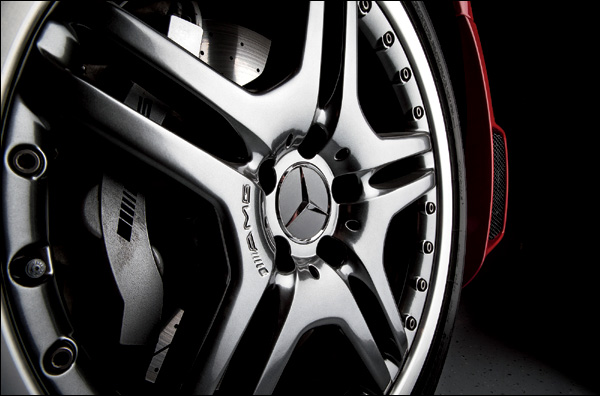
THOUGHT PROCESS: I learned this technique from UK-based automotive photographer Tim Wallace, and the first time I tried it, I just couldn’t believe how well it works. It’s based on the fact that if you shoot at f/22 with a strobe like this, the light will fall off to black as soon as the light from the flash runs out. So, even though I took this shot in a very brightly lit airplane hangar, the light immediately falls off to black. It’s really pretty amazing. So, what you’re seeing in the shot, for the most part, is the reflection of the tall, thin softbox in the metal rim. Its tall, thin shape (although you’ll wind up turning it wide when you’re shooting different parts of the car) is really perfect for creating beautiful highlights and reflections in the paint, windows, hood, fenders—you name it. So, it’s actually an amazingly simple setup: one flash with a 1x3’ softbox (or if you can spring for it, get the next larger size, which is around 2x5’, which will come in handy for lighting a larger area), and then you set your f-stop at f/22. You’ll be amazed. The rest of the time you’ll spend just trying different angles (my basic setup is to treat the light like I’m playing billiards: aim in from one side, set up the light at a 90° angle on the other side, and the light bounces off like a billiard ball does when it hits the rail—right back at you).
POST-PROCESSING: In Lightroom’s Develop module (or Camera Raw), I increased the Shadows amount a tiny bit, added lots of clarity to enhance the detail and make it a little shinier, and then removed all the little specks, dust spots, and junk with Photoshop’s Clone Stamp tool. Pretty easy stuff.
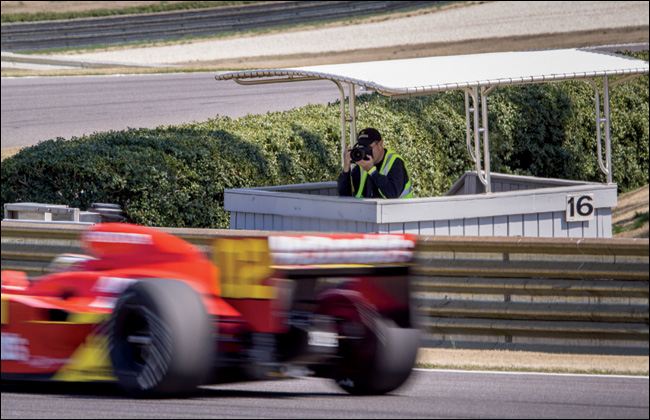
BEHIND THE SCENES: In this shot, we’re trackside at an Indy race shooting a 200–400mm f/4 lens (sometimes supported by a monopod). I usually have ear protection on because those cars are louder than a screaming toddler on a red-eye (I had them off here), and I have a Hoodman Loupe around my neck, which I use to view my LCD screen on the back of my camera when I’m out in the direct sun. I’m also shooting from a kinda low perspective (with my elbows leaning on the edge of the box) to make the cars look bigger and more aggressive.
CAMERA SETTINGS: Again, I’m using a 200–400mm lens, but I’m only zoomed to 280mm. My ISO is 100 (it was a bright, sunny day), and my shutter speed is a slow 1/50 of a second. At that slow of a shutter speed, my shot would be way, way overexposed unless I used an f-stop that let in just a little bit of light, and the one that made my exposure look closest was f/22. Not my usual f-stop for action sports, but I’m not trying to freeze the action, I’m trying to show motion (more on that on the next page).
Final Image
THOUGHT PROCESS: With sports action photos, I’m usually trying to get my shutter speed to at least 1/1000 of a second because that will freeze the motion of the car (or the athlete). However, when you’re shooting from the side of the track like this, you can clearly see the wheels and, from a viewer’s perspective, the wheels shouldn’t be frozen (like the car is parked on the track), they should be spinning, like you see here. To get that wheel spin, and the overall sense of motion created by the blurred background behind the car, you have to choose a really slow shutter speed and pan along with the car (I try to get my center focus point right on the driver’s helmet because if that part isn’t in focus, the shot’s going in the trash). What creates that blurred background is your body motion. Basically, you’re trying to smoothly swivel your hips and move right along with the car as it zooms by, firing in high-speed continuous mode the whole time. You’ll definitely wind up with a lot of frames that are way too blurry to use, but within that set of maybe 10 to 15 frames, there will usually be one that is really sharp, and we’re just looking for that “one” right? Right! So, don’t let it bum you out if there are a bunch of blurry ones—just try to get one out of every burst. It’ll take a little practice, but within a few minutes, you’ll start to have bursts where you have one or two, and that is a big win!
POST-PROCESSING: In Lightroom’s Develop module (or Camera Raw), I increased the contrast by dragging the slider to the right, and, of course, I sharpened the image (as always) using Photoshop’s Unsharp Mask Filter.
Shooting Action
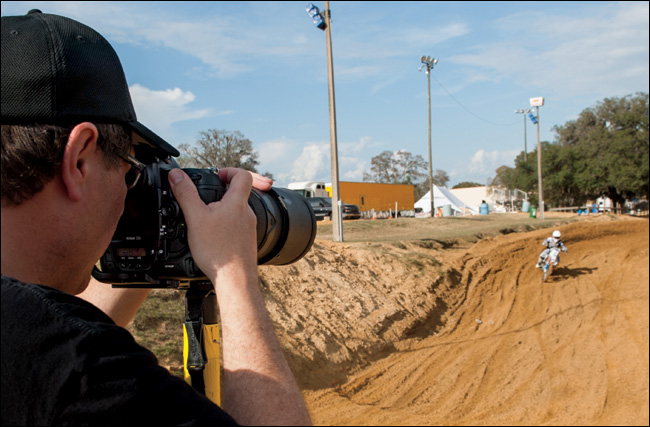
BEHIND THE SCENES: We’re on a motocross track, here (I know, duh), and I’m shooting practice runs (this isn’t an actual race or I wouldn’t be standing this close to the track). I’m using a long lens with a monopod, and it’s a pretty bright, sunny day.
CAMERA SETTINGS: I’m using a 300mm lens on a full-frame body, and my f-stop is f/2.8, so the background is nice and blurry. My ISO is set at 200 (the lowest, cleanest ISO available on the particular camera body I was using), and my shutter speed is 1/1600 of a second.
Final Image
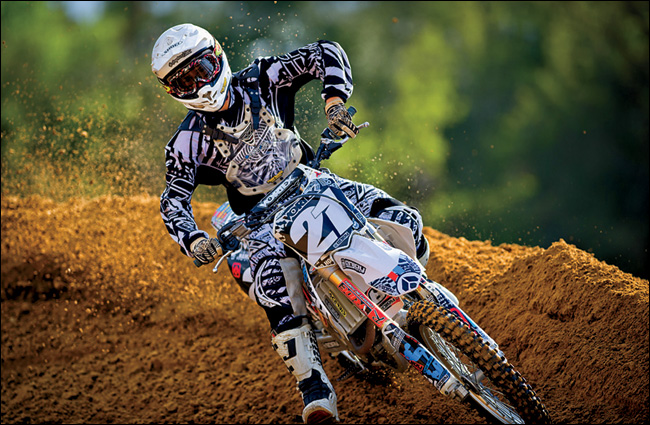
THOUGHT PROCESS: There are three things we need to do to get a shot like this: (1) We’ve got to freeze the motion so the shot is absolutely crisp and clean, and to do that we need at least 1/1000 of a second shutter speed (again, I was at 1/1600 for this shot). Luckily, on a bright, sunny day that’s usually no problem at all, especially when we’re using an f-stop like f/2.8, which helps us (2) put the background behind the rider out of focus, which separates him from the background (this is what we want). But, let’s get back to that freezing-the-motion thing. There is something to watch out for here, and that is your angle when you’re freezing motion with a car, bike, or motorcycle. If you shoot any of these from the side of the track where you can see their wheels, this faster shutter speed will literally freeze their wheels like they’re parked. You can get away with this if you’re shooting them pretty much straight on, like we are here, but if you can see the sides of the wheels, they should be spinning, which means you have to use a dramatically slower shutter speed and use a panning technique, so you see the motion of the wheels (see the previous recipe with the Indy car). (3) The third thing (and this is a biggie) is framing the shot so you don’t see distracting stuff in the background, and that was a real challenge here with light poles and trailers and junk in the background. Just keeping the background in mind while shooting makes a difference.
POST-PROCESSING: In Lightroom’s Develop module (or Camera Raw), I added contrast and clarity (the clarity really makes that flying dirt stand out) and, of course, I sharpened it in Photoshop with the Unsharp Mask filter using these settings: Amount 120, Radius 1.0, Threshold 0.
It’s All About Composition
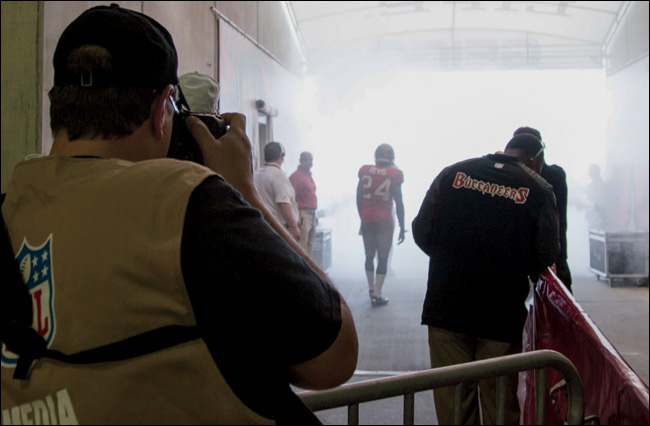
BEHIND THE SCENES: This is behind the scenes at a football game, before the players take the field. The players come out through CO2 smoke cannons (although this is a pro game, they do the same thing at the local high school here, where the players come through an inflatable tunnel, but they use fire extinguishers instead of CO2 cannons).
CAMERA SETTINGS: This is shot with a 70–200mm f/2.8 lens zoomed all the way in at 200mm. My f-stop is at f/2.8, and I’m at an ISO of 1000. That put my shutter speed way higher than I actually needed. I only needed 1/1000 of a second, but I got 1/6400 of a second, so I could have lowered it a lot.
Final Image
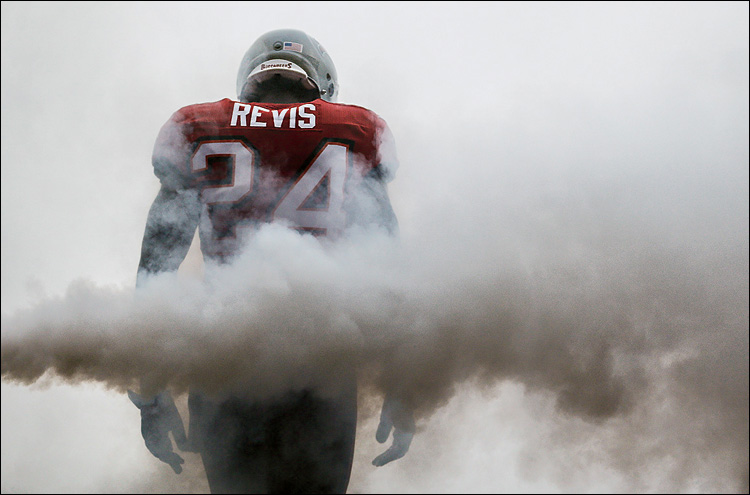
THOUGHT PROCESS: Framing is what this type of shot is all about. You can see from the behind-the-scenes shot on the facing page that there are people standing all around in a busy environment, but our job as a photographer is to frame up just the piece of it that we want our viewers to see. We don’t want them to see the two guys standing on the left, or the guy in front of me to the right, or the railing just a foot to the right edge of the frame. We have that choice when we frame up the shot. Also, he’s going to run out right down the middle of the entryway, but we usually don’t want our subject right in the center (dead center is dead awful). Just remember, we’re in charge of the framing, and to create a more dynamic image, we can compose the shot so he’s off to one side or the other in our frame, even though he’s standing in the center. So, basically, this shot is about composition and luck, in that he happened to look down before he ran out. Maybe he was meditating or maybe he was looking to see if his shoe was untied before he took the field, but either way, it was luck that he did it while I was framed up to shoot it.
POST-PROCESSING: In Lightroom’s Develop module (or Camera Raw), I added some contrast, and of course sharpened the image, but what makes this shot is applying a tonal contrast effect using a plug-in (both OnOne Software’s Perfect Photo Suite plug-in and the Google Nik Collection’s Color Efex Pro plug-in have really great Tonal Contrast filters—more on these in Chapter 9). However, I did apply the effect to a duplicate of the Background layer in Photoshop, and then I lowered the Opacity of that layer, so you only see a little of the effect and not the full amount.
On-Location Product Shoot
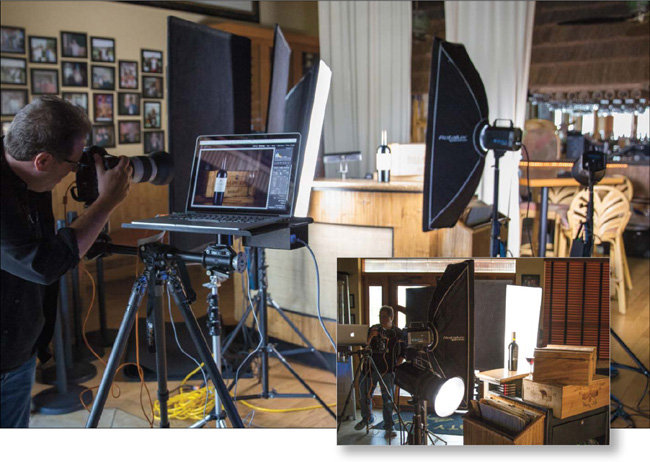
BEHIND THE SCENES: I asked a local restaurant if they would mind if we came in before they opened so we could do a shoot for a wine based in California. They didn’t know who I was, but I guess because we asked nicely they said, “Sure, come on in.” The reason I wanted to shoot in this particular restaurant was that it had wine crates placed all over the restaurant as decoration, and I wanted to use them as background props. Here, we’re using the hostess stand just inside the front doors of the restaurant as our shooting table. I shot it because it had a reflective marble countertop. I’m using three lights in total: There are two flashes lighting the bottle—one on each side and a little bit in front, aiming at each other—that have 1x3’ tall strip bank softboxes. The third light is literally aimed at the background with no softbox attached (seen in the inset). I wasn’t planning to use a third light, but it was so dark behind the wine crates that it just went to black and started looking like a studio shoot with a black background, so we aimed a light at the background with a very low power setting just to get some light back there. Lastly, those big black squares (next to the light on the left) are there to block the natural light coming in through the restaurant’s front doors and keep it from hitting the bottle.
CAMERA SETTINGS: I was using my go-to lens, the 70–200mm f/2.8, zoomed in to 135mm. My f-stop was f/2.8 (so the background would be soft), my shutter speed was 1/125 of a second (pretty standard for flash shots), and my ISO was 200.
Final Image
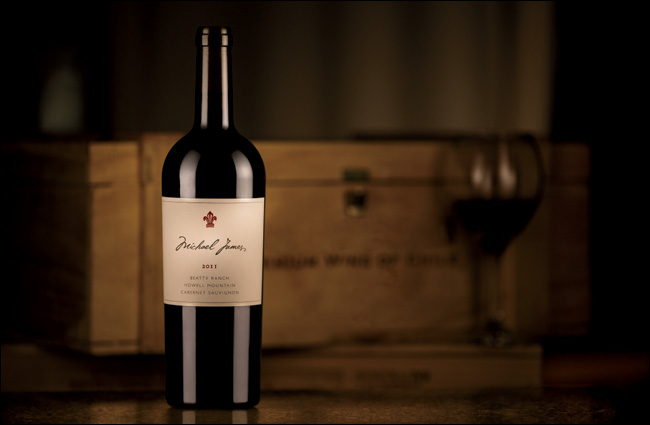
THOUGHT PROCESS: Choosing the lighting for this job was pretty easy because when you’re shooting wine bottles, the go-to softboxes to use are those tall, thin strip banks because they create those long, thin, white highlights you see on both sides of the bottle. I chose to use two strip banks (one on either side, which is why you see two long vertical highlights on the bottle), but it’s also very popular to use only one strip bank and just have one tall highlight on the bottle. It’s strictly a personal choice, but since I didn’t know which one the client would want, I shot all the setups I did that day using both, and then just one, so they’d have a choice. As for positioning the lights, the farther forward your lights are from the front of the bottle, the closer to the center of the bottle those highlights will appear. If you want them more off to the edges of the bottle, move the lights back to where they’re almost behind the bottle a little bit.
POST-PROCESSING: When I looked at the final shot, the name of the wine on the label was just a little dark, so in Lightroom’s Develop module (or Camera Raw), I used the Radial Filter to put a circle of light right over the name (just click-and-drag out an oval, position it over the name, then click on the Inside radio button, so the slider you move affects just what’s inside that oval. Then, drag the Exposure slider a little bit to the right. You can also increase the Feather amount to make the transition from light to dark very subtle). Lastly, I added a slight darkening to the edges all the way around by going to the Effects panel, under Post Crop Vignetting, and dragging the Amount slider to –9.
Lighting Pets
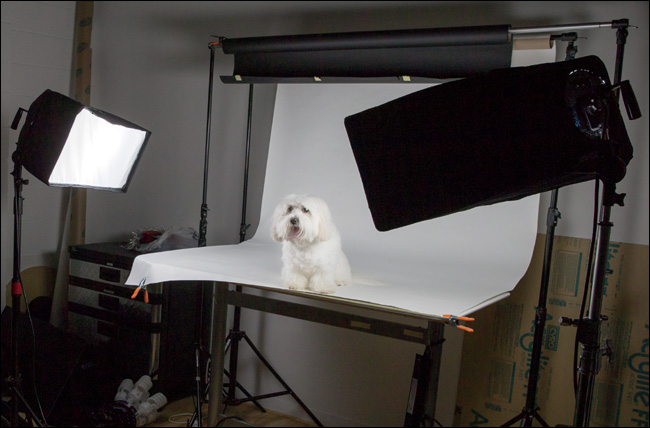
BEHIND THE SCENES: Behold the wonder and majesty that is Maggie the Wonder Dog, our beloved family dog (she’s a Coton de Tulear and just a really sweet doggie. In fact, she’s sitting here beside me on the couch as I write this, hoping that somehow I will suddenly get up and bring her a treat. She’s probably due for one for being our model). I’m using continuous lights here: Westcott Spiderlite TD6s with 1x3’ strip banks, one on either side and a bit in front. The advantage of using these continuous lights is, since they’re always on, they don’t flash, and since they don’t flash, they don’t freak out dogs or cats, which is a big plus. We’re using a 5’-wide roll of white seamless paper for our backdrop.
CAMERA SETTINGS: Since continuous lights aren’t as bright as flashes, I’m shooting on a tripod at f/8. I’m at 1/160 of a second and 1600 ISO (I wanted a little faster shutter speed in case she moved a bit). I’m using a 70–200mm f/2.8 lens zoomed in to 140mm.
Final Image
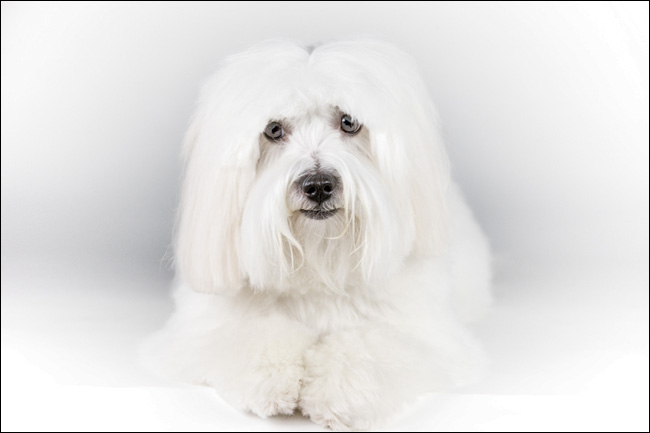
THOUGHT PROCESS: If you look at the behind-the-scenes shot on the facing page, you can see we have Maggie TWD up on a table. For photographing small pets, this table idea can be really handy because it makes it easy to adjust the lights and to primp and fluff the pet. The pet can’t wander off to go exploring like they would when they’re on the floor, and it’s more comfortable for you because you can shoot without having to lie down (for the right perspective, you have to shoot from their height). You do have to be super careful that the pet doesn’t freak out and jump or fall off the table, so this won’t work for every pet (well, probably every cat, right?). Once you decide whether you want to shoot on the floor or on a table for small pets (like Maggie Doggie), then you’ll need to find ways to get their attention, and one way is to use a dog whistle. When they hear the whistle, they perk up, look in your direction, and maybe even tilt their head to the side. If you don’t have a dog whistle, don’t worry, there’s an app for that. The one I use is Dog Whistler Pro (for IOS). It’s 99¢ in the App Store, but there are number of different ones to choose from.
POST-PROCESSING: Since I only used two lights, I didn’t have one lighting the background to make it solid white, so the background was fairly gray. It looked “okay,” but I wanted a white background. So, in Photoshop (or Elements) I created a new blank layer, filled the layer with white, and then used the Eraser tool, with a huge, soft-edged brush, to cut a hole right in the center of that white layer to reveal Maggie on the layer below.
Shooting Cityscapes at Dusk
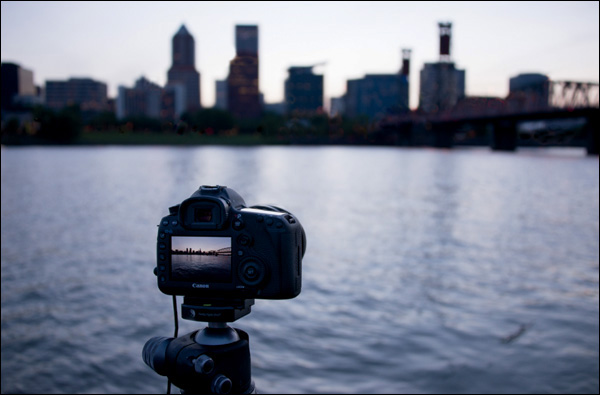
BEHIND THE SCENES: We’re set up on a floating dock across the river from downtown Portland, Oregon, on a good sturdy tripod, and I have a cable release to minimize any camera movement that would happen when I press the shutter button. Since we’re shooting at dusk (and after dusk—more on that in a moment), we need to be on a tripod because our exposure will be fairly long (well, certainly longer than we could hand-hold).
CAMERA SETTINGS: I’m using a 16–35mm f/2.8 super-wide-angle zoom lens, zoomed all the way out at 16mm. I chose an f-stop that would put everything pretty much in focus (f/8), and my shutter speed was 1/10 of a second (much slower than I could hand-hold). To even get to 1/10 of a second, I had to raise my ISO to 1600, so there wasn’t much light out there at all.
Final Image
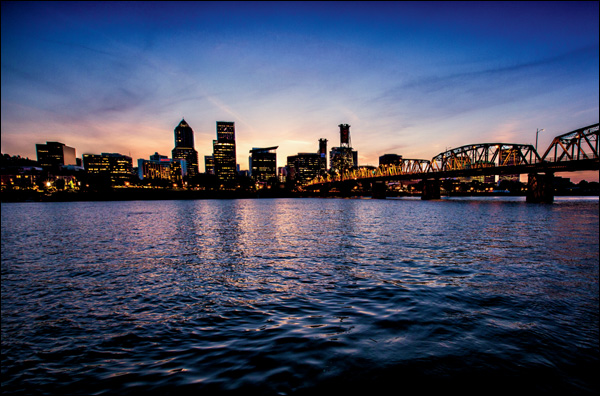
THOUGHT PROCESS: What you’re seeing above is part camera technique, part patience, and part Photoshop. It’s actually two photographs: The first is taken right after the sun goes down, so you get that nice sunset sky (well, there were hardly any clouds in the sky here, so it’s not an incredibly dramatic sky like I was hoping for). The problem is that right after sunset, it’s still not really dark outside (especially in Portland, where it stays light for quite a while), and so the lights of the city aren’t on yet. So, you’re going to need to take a second photo about 20 to 30 minutes later—way after sunset. It’s pretty dark in the sky now, but by that time, the lights in the city are mostly on and that’s what you need for the second image—the city lights (it doesn’t matter what the sky looks like for this second shot. This second shot is literally only to capture the city lights). You can’t move your tripod or the camera at all—not even a inch—between the “just after sunset” shot and when you take the “city lights” shot. Once you have both, then you’re going to take the “just after sunset” photo and add the city lights from the second photo to it in Photoshop (this is a very common technique, and the only way you get that beautiful sky [which we don’t really have here] mixed with beautiful city lights before they would actually be turned on).
POST-PROCESSING: You’re going to open both images in Photoshop, copy-and-paste the “city lights” shot onto the “just after sunset” shot, add a black layer mask, and paint in white over the buildings and bridge, and the city lights appear. If that sounds confusing, just watch the video tutorial I created on how to do that (then it’ll make sense. You can find it on the book’s companion webpage, mentioned in the book’s introduction).
Shooting a Starry Sky
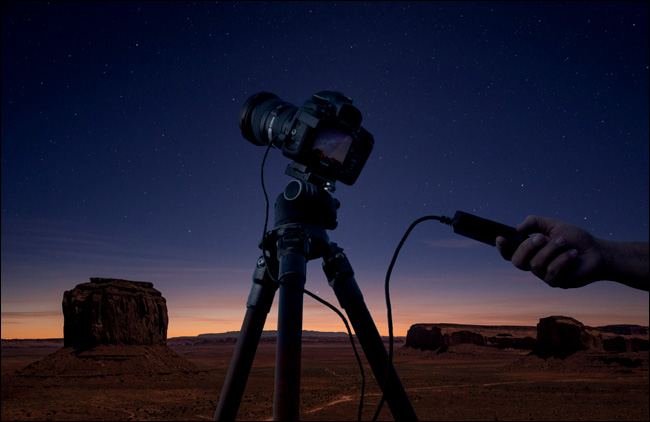
BEHIND THE SCENES: We’re taking a photo at nightfall, so it’s a very low-light situation. That’s why we’re on a tripod and using a cable release, so there’s absolutely no movement whatsoever from pressing the shutter button.
CAMERA SETTINGS: For a wide shot of the sky, you’re going to need a really-wide-angle lens, like the 16–35mm here, zoomed all the way out (at 16mm, here). Turn your autofocus off on the lens, and manually focus your lens to infinity. You do this one of three ways: (1) If you have a lens that has a Distance Scale window on the top of your lens barrel, rotate the focus ring on your lens until you see the infinity symbol (it looks like the number 8 lying on its side). If your lens doesn’t have a Distance Scale window on top, then (2) leave your autofocus on, aim at the moon (or the largest star you can find), or any light (even on the ground) far, far off in the distance, and once it’s focused, switch your lens to manual focus. Or (3) use your camera’s Live View feature. Press the magnifying glass button to zoom in really tight on your LCD window on the back of your camera, then switch off autofocus and manually focus on the stars. Once focused, then zoom the screen back out to normal. Now, you’re focused to infinity. The f-stop here was f/4, with a shutter speed of 15 to 20 seconds max (there’s not a whole lot of light up there, so that shutter has to stay open a long time, but if it stays open longer than 20 seconds, you’ll start to get star trails from the movement). The ISO was at 3200, which is pretty high, but you can help lessen the high-ISO noise by turning on Long Exposure Noise Reduction. Just know that after your 15- or 20-second exposure, your screen will go black as it takes another 15 seconds for the noise reduction to do its thing.
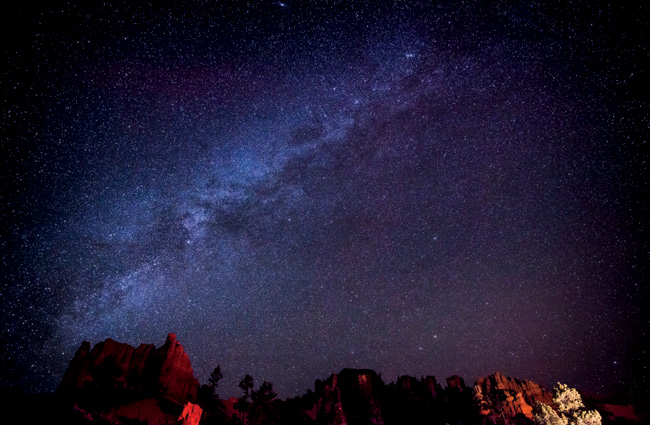
THOUGHT PROCESS: As you read on the facing page, the process of taking the picture is actually pretty easy—just some simple steps and settings. The challenging part of shooting stars and/or the Milky Way is finding the right location to take your shot—it has to be a sky with absolutely no light pollution whatsoever (light pollution is any light coming from a city, even one way off in the distance, or light from a neighborhood, or construction site, or any man-made light of any kind). You’ll also need a really dark, nearly moonless night—try to shoot near the new moon part of the cycle (other times, the light from the moon is so bright it tends to wash out the stars or Milky Way). In most cases, you’ll have to get quite far away from any city or town (literally, an hour or more—if you’re in the middle of nowhere, you’re probably in the right spot). Also, the Milky Way is only visible from around February to September (though July and August are thought to be the best overall times). Once you’ve found the right time and location, the rest is easy, but without the right location, you’re not going to get the results you’re looking for. When shooting stars, like in real estate, it’s “location, location, location!”
POST-PROCESSING: Start by increasing the Contrast amount quite a bit, and then you can further increase the brightness of the stars in Lightroom’s Develop module (or Camera Raw) by dragging the Highlights slider to the right. Of course, finish things off by applying Photoshop’s Unsharp Mask filter.