
5. Installing, Running, and Managing Apps
In This Chapter
![]() Installing or sideloading the apps you need
Installing or sideloading the apps you need
![]() Running apps and switching among apps
Running apps and switching among apps
![]() Troubleshooting apps and rebooting into Safe mode
Troubleshooting apps and rebooting into Safe mode
In this chapter, you learn how to install, run, and manage apps on your Android device. Along the way, you learn how to install apps from the Play Store, how to sideload apps from other sources, and how to force apps to stop when they misbehave.
Evaluating Permissions When Installing Apps
As I’m sure you know, the main source for apps for Android devices is Google’s Play Store. By launching the Play Store app from its icon on your device’s Home screen or Apps screen, you can visit the Play Store and browse or search through the hundreds of thousands of apps approved by Google for Android devices.
After you’ve found the app you want to install, you can install it by tapping the Install button (if the app is free) or the price button (if it is not).
If you have a Samsung device, one of the perks of signing up for a Samsung account is a $10 credit on the Play Store.
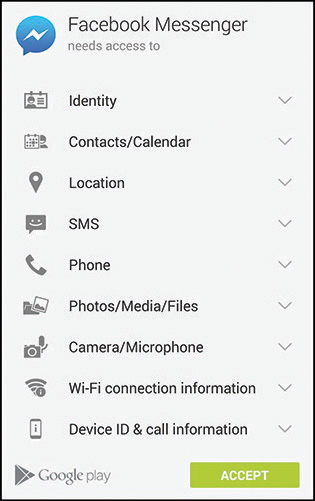
The key question during installation is which permissions the app needs. Don’t just “click through” this step by tapping the Accept button; instead, read the list of permissions, and make sure they fit the app and what you understand it to do.
There are no hard-and-fast rules for what you should allow and what you should refuse, because everything depends on the app and what it does. For example, a social-media app such as Facebook Messenger (see Figure 5.1) will need access to your contacts and calendar, location, photos, camera and microphone, and so on if it is going to revolutionize your social life, so you would accept the permissions if you wanted to install the app. By contrast, if a spreadsheet app requested the same permissions, you should run for the hills.
After you’ve tapped the Accept button, the installation proceeds. After the app is installed, you can run it easily by tapping the On button on its screen in Google Play. If you’ve displayed other screens elsewhere in the meantime, you can also launch the app from its Successfully Installed notification, or simply launch the app from the Apps screen as usual.
Getting a Refund on an App
If you buy an app and decide you don’t want to keep it—or you realize that you bought the wrong app—you can get a refund for it. Within two hours of making the purchase, return to the app’s screen in the Play Store app and tap the Refund button (see Figure 5.2).
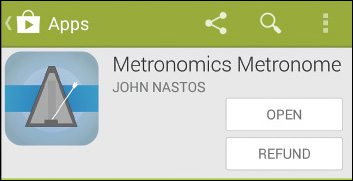
FIGURE 5.2 You can request a refund within two hours by tapping the Refund button on the app’s screen in the Play Store app.
![]() Tip
Tip
After two hours, you may still be able to get a refund. Open your web browser, go to the Play Store (play.google.com), and then sign in. Click the Store button in the left column; then tap or click the Menu button (the three vertical dots) in the row for the purchased item and select Report a Problem. In the Report a Problem dialog box, open the pop-up menu and select I’d Like to Request a Refund. Type an explanation in the text box and click or tap the Submit button.
Configuring Your Play Store Account
To make the Play Store app work the way you prefer, and to avoid getting unwanted notifications about updates to apps and games, spend a few minutes configuring your Play Store account. Open the Play Store app by tapping its icon on the Home screen or on the Apps screen; then tap the Play Store button in the upper-left corner and tap Settings on the menu panel to display the Settings screen (see Figure 5.3).
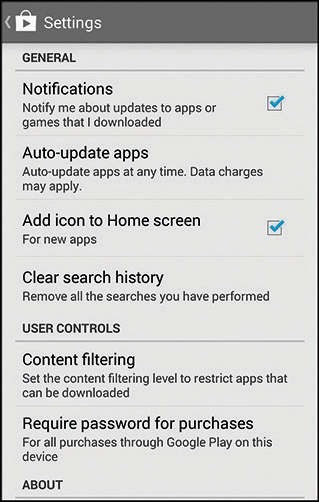
These are the settings you can choose:
![]() Notifications. Uncheck this box (it’s checked by default) if you don’t want to receive notifications about updates to apps or games you’ve bought or downloaded.
Notifications. Uncheck this box (it’s checked by default) if you don’t want to receive notifications about updates to apps or games you’ve bought or downloaded.
![]() Auto-Update Apps. Tap this button to display the Auto-Update Apps dialog box (see Figure 5.4), and then tap the appropriate radio button: Do Not Auto-Update Apps; Auto-Update Apps at Any Time. Data Charges May Apply; or Auto-Update Apps over Wi-Fi Only.
Auto-Update Apps. Tap this button to display the Auto-Update Apps dialog box (see Figure 5.4), and then tap the appropriate radio button: Do Not Auto-Update Apps; Auto-Update Apps at Any Time. Data Charges May Apply; or Auto-Update Apps over Wi-Fi Only.
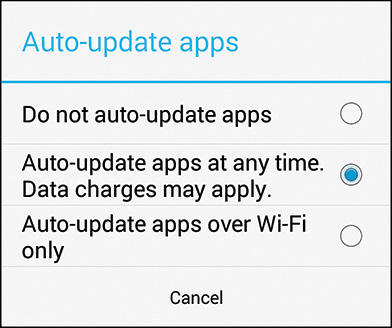
FIGURE 5.4 In the Auto-Update Apps dialog box, choose whether to update apps automatically over cellular or Wi-Fi, over Wi-Fi only, or not at all.
![]() Tip
Tip
Auto-Update Apps over Wi-Fi Only is usually the best choice in the Auto-Update Apps dialog box. Unless you have an unlimited data plan, it’s a mistake to update apps over the cellular connection.
![]() Add Icon to Home Screen. Check this box if you want each new app to add an icon to the Home screen. Usually, it’s best to uncheck this box, run most apps from the Apps screen, and add to the Home screen only icons for those apps you use the most.
Add Icon to Home Screen. Check this box if you want each new app to add an icon to the Home screen. Usually, it’s best to uncheck this box, run most apps from the Apps screen, and add to the Home screen only icons for those apps you use the most.
![]() Clear Search History. Tap this button to clear the history of the searches you’ve performed on the App Store. When you tap this button, no dialog box opens and no confirmation readout appears.
Clear Search History. Tap this button to clear the history of the searches you’ve performed on the App Store. When you tap this button, no dialog box opens and no confirmation readout appears.
![]() Content Filtering. Tap this button to display the Allow Apps Rated For dialog box (see Figure 5.5). You can then tap the appropriate radio button: Everyone, Low Maturity, Medium Maturity, High Maturity, or Show All Apps.
Content Filtering. Tap this button to display the Allow Apps Rated For dialog box (see Figure 5.5). You can then tap the appropriate radio button: Everyone, Low Maturity, Medium Maturity, High Maturity, or Show All Apps.
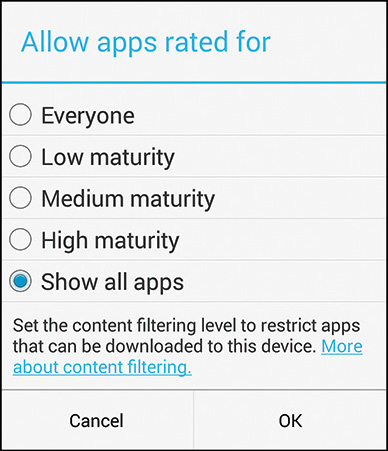
FIGURE 5.5 In the Allow Apps Rated For dialog box, choose the level of content filtering you want to apply for the App Store.
![]() Require Password for Purchases. Tap this button to display the Require Password dialog box, and then tap the appropriate radio button: For All Purchases Through Google Play on This Device, Every 30 Minutes, or Never.
Require Password for Purchases. Tap this button to display the Require Password dialog box, and then tap the appropriate radio button: For All Purchases Through Google Play on This Device, Every 30 Minutes, or Never.
Sideloading Apps
When you want to install an app that isn’t available on the Play Store, you can sideload it. Sideloading is a manual installation technique in which you get the app in a distribution file called a package file (which uses the .apk file format), copy the package file to your device, and then install the app. You may need to change a security setting in order to enable sideloading.
Installing a File Manager
To sideload apps, you need to use a file-management app such as ES File Explorer or Astro File Manager. If you already have such an app installed, you’re ready to begin. If not, open the Play Store app and install a file-management app. This section shows screens from ES File Explorer, which is free and works well.
Getting the Package File for the App
Next, you need the package file containing the app you want to load. These are the three main ways of getting the package file:
![]() Download the package file from the Internet. You can find many Android package files in online repositories. Some of the files are shared illegally, and some may contain malware as well as the apps, so you need to be careful.
Download the package file from the Internet. You can find many Android package files in online repositories. Some of the files are shared illegally, and some may contain malware as well as the apps, so you need to be careful.
![]() Get the package file from a company or organization. If your company or organization provides an Android app, the website may provide it for download, or an administrator may provide it on a physical device such as a USB On-the-Go drive.
Get the package file from a company or organization. If your company or organization provides an Android app, the website may provide it for download, or an administrator may provide it on a physical device such as a USB On-the-Go drive.
![]() Get the package file from another device. If you already have the app on another device, you can create a package file containing the app.
Get the package file from another device. If you already have the app on another device, you can create a package file containing the app.
How you create a package file depends on the file-management app you’re using, but here’s an example using ES File Explorer:
1. Open ES File Explorer.
2. Navigate to the App Manager folder.
3. Tap and hold the icon for the first app you want to package. ES File Explorer turns on selection mode and checks the check box on the icon.
4. Tap to check the box for any other app you want to package (see Figure 5.6).
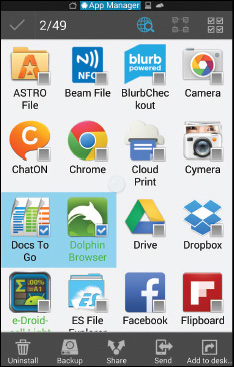
FIGURE 5.6 In ES File Explorer, check the box for each app you want to package, and then tap the Backup button.
5. Tap the Backup button at the bottom of the screen. The message “Backup application successfully” appears briefly.
You can now navigate to the /sdcard/backups/apps/ folder to locate the package file and copy it to the device on which you want to install it. You can copy the package file in any convenient way, such as these:
![]() Bluetooth. Transfer the file using Bluetooth, as discussed in Chapter 4, “Connecting to Networks and Devices.”
Bluetooth. Transfer the file using Bluetooth, as discussed in Chapter 4, “Connecting to Networks and Devices.”
![]() USB On-the-Go. Connect a USB On-the-Go memory stick to the source device and copy the file to the memory stick. Then connect the memory stick to the destination device and copy the file across.
USB On-the-Go. Connect a USB On-the-Go memory stick to the source device and copy the file to the memory stick. Then connect the memory stick to the destination device and copy the file across.
![]() Dropbox or a similar service. Upload the file to your Dropbox account from the source device and then download it to the destination device.
Dropbox or a similar service. Upload the file to your Dropbox account from the source device and then download it to the destination device.
![]() Email. If the file is small enough to go through email servers, you can simply send the file to an account that’s set up on the destination device.
Email. If the file is small enough to go through email servers, you can simply send the file to an account that’s set up on the destination device.
If you need an easier way to transfer a file from one Android device to another, install the app called File Beam (Touch to Send) written by Mohammad Abu-Garbeyyeh. This app enables you to transfer pretty much any file type, including .apk files, through Near Field Communication (NFC). You select the file in an app such as ES File Explorer, give the Share command, and then tap Beam File in the Share Via dialog box. Your device then prompts you to bring the devices back to back so that the NFC chips identify each other. You then tap the Touch to Beam prompt, and your device sends the file.
Setting Android to Allow Apps from Unknown Sources
Android has a security mechanism that prevents you from installing apps from what it calls “unknown sources”—in other words, from anywhere other than the Play Store. Follow these steps to allow yourself to sideload apps:
1. Open the Settings app.
2. Tap the Security button to display the Security screen. On some devices, you’ll need to use a different screen, such as Security & Screen Lock.
3. In the Device Administration section, check the Unknown Sources box. A warning dialog box opens (see Figure 5.7).
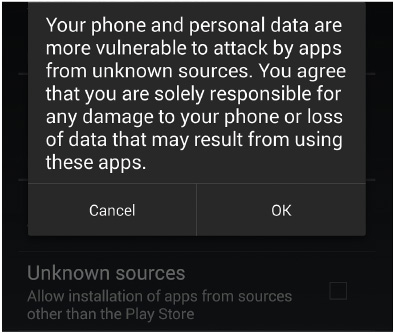
FIGURE 5.7 When you check the Unknown Sources check box, Android warns you that apps may attack your device and data.
4. Tap the OK button.
Sideloading the App
You can now sideload the app on your device. To start the installation, tap the package file to open it. For example, if you have copied the file to a folder, open your file-management app to that folder and tap the file. If you have received the app attached to an email message, tap the attachment file in the email app.
Android displays a screen showing the app’s name at the top. The Device Access list shows the permissions that the app requires (see Figure 5.8).
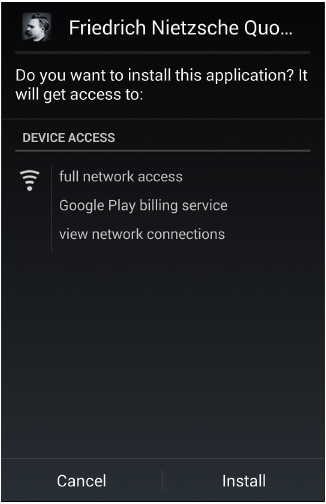
FIGURE 5.8 When sideloading an app, be sure to review the permissions in the Device Access list before tapping the Install button.
Review the permissions and tap the Install button if you want to proceed. When the installation is complete, you can run the app from the Apps screen.
Running Apps
After installing an app, you can run it from the Apps screen like any other app. If you will need to run the app frequently, create a shortcut for it on the Home screen.
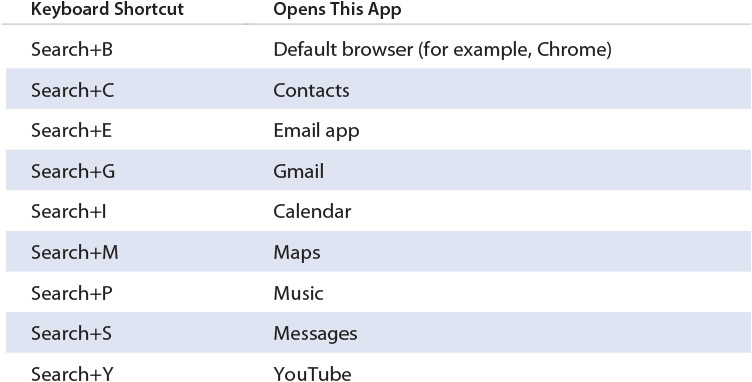
If you have a keyboard attached, you can run apps by using the keyboard shortcuts shown in Table 5.1.
![]() Tip
Tip
If you need to prevent other people who use your device from running particular apps or using certain features on it, try the AppLock app. This app enables you to choose which items to lock, so if you share your device with other people, you can prevent them from using apps and features without entering the AppLock password.
Working with the Recent Apps Screen
Android displays each app full screen, so you can work with only one app at a time. However, you can quickly switch from one app to another by using the Recent Apps screen. This screen also enables you to close an app or display its App Info screen.
Some skins include the ability to display multiple windows at the same time. For example, Samsung’s TouchWiz skin includes the Multi-Window feature, which works on both phones and tablets. Because of the amount of screen real estate involved, multiple windows tend to be more useful on tablets than on phones.
Switching Apps with the Recent Apps Screen
To switch apps, tap the Recent Apps button. The Recent Apps screen appears (see Figure 5.9), showing a list of the apps that are running. The most recent apps are the ones at the bottom of the list, which is the part of the list that appears on the screen at first. Swipe or drag down to scroll the list so that you see other apps.
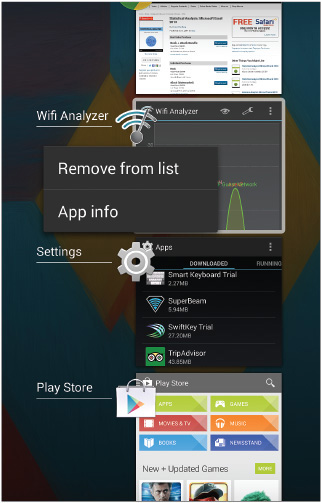
FIGURE 5.9 From the Recent Apps screen, you can tap the app you want to view, remove an app from the list, or display the App Info screen for an app.
When you find the app you want to display, tap its button.
Closing an App from the Recent Apps Screen
You can close an app from the Recent Apps screen by swiping it off the list to the left or to the right, whichever you find more convenient.
Alternatively, tap and hold the app’s button to display the pop-up menu, and then tap Remove from List on the menu.
Opening the App Info Screen for an App
When you need to force an app to stop, or you need to uninstall an app, you use the App Info screen for that app. You can display the App Info screen in two easy ways:
![]() Running app. If the app is running, tap the Recent Apps button to display the Recent Apps screen. Tap and hold the app’s button to display the pop-up menu, and then tap App Info.
Running app. If the app is running, tap the Recent Apps button to display the Recent Apps screen. Tap and hold the app’s button to display the pop-up menu, and then tap App Info.
![]() Any app. Open the Settings app, tap the Apps button to display the Apps screen, and then tap the button for the app.
Any app. Open the Settings app, tap the Apps button to display the Apps screen, and then tap the button for the app.
Forcing an App to Stop
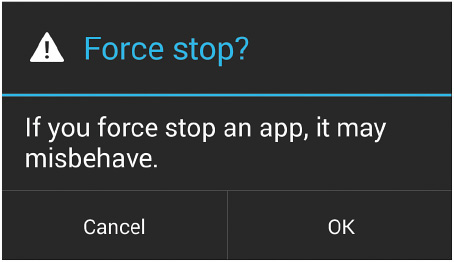
If an app stops responding to the touchscreen, you can force it to stop. To do so, display the App Info screen for the app and then tap the Force Stop button. In the Force Stop? dialog box that opens (see Figure 5.10), tap the OK button.
Clearing an App’s Cache, Data, or Defaults
If an app starts acting oddly, you may need to clear its cache or its data. If you have set it to be the default app for a particular action or file type, you can clear its defaults when you need to use another app for those purposes.
You can take all these actions from the App Info screen for an app:
![]() Clear Data. Tap this button, and then tap the OK button in the Delete App Data? dialog box that opens to delete all the app’s data, including any accounts you have set up in the app.
Clear Data. Tap this button, and then tap the OK button in the Delete App Data? dialog box that opens to delete all the app’s data, including any accounts you have set up in the app.
![]() Clear Cache. Tap this button to delete all the data that the app has cached. You’d normally want to do this if the cached data appears to have become corrupted and is making the app unstable or if you suspect the cache of containing sensitive data that you want to get rid of.
Clear Cache. Tap this button to delete all the data that the app has cached. You’d normally want to do this if the cached data appears to have become corrupted and is making the app unstable or if you suspect the cache of containing sensitive data that you want to get rid of.
![]() Clear Defaults. Tap this button to clear any default settings associated with the app. For example, if you’ve installed a Home screen launcher and made it the default, tapping the Clear Defaults button stops the launcher from running when you press the Home button. Instead, you can choose the launcher you want, and you can decide whether to make it the new default.
Clear Defaults. Tap this button to clear any default settings associated with the app. For example, if you’ve installed a Home screen launcher and made it the default, tapping the Clear Defaults button stops the launcher from running when you press the Home button. Instead, you can choose the launcher you want, and you can decide whether to make it the new default.
![]() Tip
Tip
If you need to clear the cached data from all your apps, you don’t need to go through them one by one. Instead, open the Settings app, tap the Storage button, and then tap the Cached Data button. In the Clear Cached Data? dialog box, tap the OK button, and Android wipes out all the data that apps have cached.
Uninstalling Apps
When you no longer need an app, you can uninstall it. Here’s how:
1. Open the App Info screen for the app.
2. Tap the Uninstall button. A confirmation dialog box opens, with its title bar showing the app’s name (see Figure 5.11).
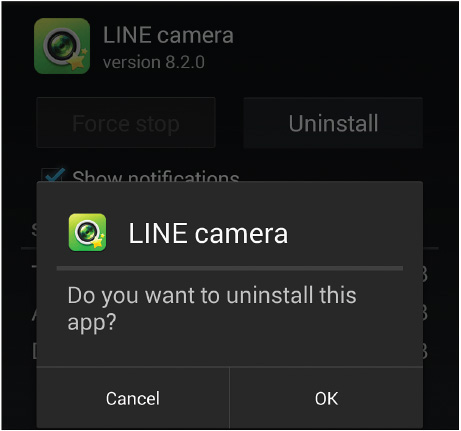
FIGURE 5.11 To uninstall an app, tap the Uninstall button on the App Info screen, and then tap the OK button in the confirmation dialog box.
3. Tap the OK button.
![]() Tip
Tip
After uninstalling an app, you can reinstall it easily from the My Apps list in the Play Store app.
![]() Note
Note
You can’t uninstall the apps built into Android. Instead, you can tap the Disable button on the App Info screen for the app. In the Disable Built-In App? dialog box that opens, tap the OK button. If you need to enable the app again, tap the Enable button that then appears on the App Info screen.
Rebooting into Safe Mode
If your device becomes unstable and crashes when you restart it, you can boot into Safe mode to prevent third-party apps from loading.
Here’s how to reboot into Safe mode:
1. Press and hold the Power button until the Power Off dialog box opens.
2. Tap and hold the Power Off button until the Reboot to Safe Mode dialog box opens (see Figure 5.13).
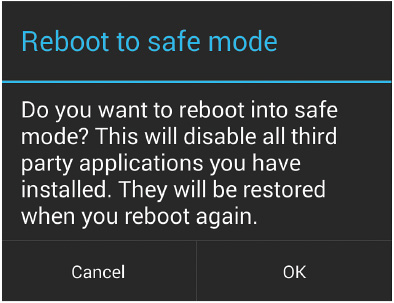
FIGURE 5.12 You can reboot into Safe mode to disable third-party apps that may be making your device unstable.
3. Tap the OK button.
![]() Tip
Tip
If the method for rebooting into Safe mode doesn’t work for your device, turn it off and then hold down the Volume Up button while you restart it.
After your device restarts, the words “Safe mode” appear in the lower-left corner of the screen so you can’t forget Safe mode is on. You can then uninstall apps as needed.
To leave Safe mode, power your device off as normal, and then power it back on.
Resetting App Preferences
When you need to return the settings on all your apps to their default state, you can reset your device’s app preferences. Normally, you’d do this either if configuration changes you’ve made have rendered your device unstable and you can’t work out which change caused the problem or if you want to be able to choose your default apps for particular tasks again.
Here’s how to reset app preferences:
1. Open the Settings app.
2. Tap the Apps button to display the Apps screen.
3. Tap the Menu button and then tap Reset App Preferences on the menu. The Reset App Preferences? dialog box opens (see Figure 5.13).

FIGURE 5.13 Tap the Reset Apps button in the Reset App Preferences? dialog box to reset the preferences for all the apps on your device.
4. Tap the Reset Apps button.
Should You Use a Task-Killer App?
As you know, your device uses random access memory (RAM) to store the apps you’re running. Your device has a fixed amount of RAM, typically ranging from 1GB for a low-end device to 3GB for a powerhouse. The more RAM, the more apps you can run at once.
You can find task-killer apps for Android—apps that enable you to kill (in other words, close) apps that are running in the background. The idea is to reclaim memory by removing apps from it, making more memory available to the apps you’re actually using.
Killing apps like this makes sense on the face of it, but it’s seldom if ever necessary. Android is pretty smart about managing memory and is designed to keep apps running in the background. When you display the Home screen or jump to another app, Android pauses the app you’ve just left unless it’s doing something that needs to continue, such as playing music or downloading the Library of Congress. Android keeps the app in memory, so your device can display the app almost instantly when you go back to it.
If you use a task killer to close the app, you do free up some memory. But if the app interprets its killing as an error having occurred, the app may restart automatically, taking up memory again and also consuming processor cycles to load.
The other point to bear in mind is that Android is designed to use memory efficiently. This means using as much of the memory as possible as much of the time, not trying to keep memory free for use in the future. So if you look at a breakdown of the memory your apps are using, you’ll probably see that the memory is full. That’s not a problem; it’s how it should be.
A task-killer app can be useful if an app keeps crashing, but normally you can close such an app using Android’s regular tools, as discussed earlier in this chapter. You should then remove the problem app from your device.