
9. Maximizing Your Productivity
In This Chapter
![]() Making the most of Google Now and Maps
Making the most of Google Now and Maps
![]() Managing your contacts and your schedule
Managing your contacts and your schedule
![]() Using Google Drive and Chromecast devices
Using Google Drive and Chromecast devices
In this chapter, you’ll learn how to use your Android device to maximize your productivity. You’ll dig into getting Google Now to do your bidding, including setting time- and location-based reminders, and examine how to get around in the Maps app. You’ll go through managing your contacts with the People app and managing your schedule with the Calendar app, and then use Google Drive to transfer and sync files. Finally, you’ll learn how to print documents from your device as well as other productivity-enhancing moves, such as cordoning off your work files from your personal files and controlling your computer using your Android device.
Streamlining Your Life with Google Now
Google Now is a powerful tool for locating information that will be helpful to you in your current situation. Google Now automatically displays a series of cards containing information about topics in which you have expressed an interest, such as weather for your current location, listings for the stocks you’re tracking, and traffic details for your upcoming appointments. You can find further information by asking questions, either speaking them into your device’s microphone or typing them into the Search box.
Google Now predicts your needs and offers information it judges may be helpful to you. You can adjust the information to make it suit your needs better.
Setting Up Google Now
If you haven’t used Google Now on your device, you can quickly set it up.
Tap and hold the Home button to display the Google Now circle, and then swipe to the Google button. The Get Google Now screen appears, and you can tap the Next button and then the Yes, I’m In button.
If the Google Now circle doesn’t appear when you tap and hold the Home button, you may need to install Google Now. Most devices come with Google Now, but some don’t. Tap the Play Store icon on the Home screen, search for Google search, and then install the app.
Navigating and Customizing Google Now
The Google Now home screen (see Figure 9.1) displays cards containing information.
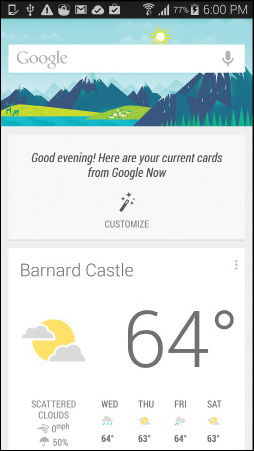
If you don’t want a card, swipe it off the screen. Google Now briefly displays a Done for Now button, with an Undo button that you can tap to recover the card if you swiped it by accident.
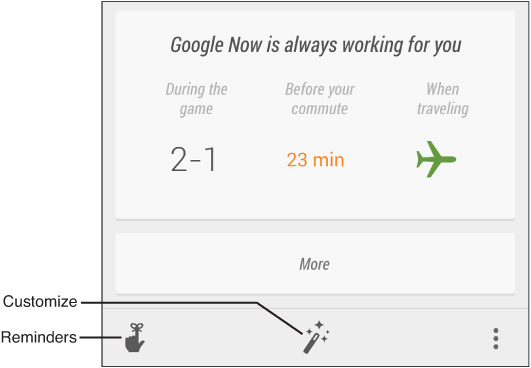
Scroll down to see other cards and to reach the controls for customizing Google Now (see Figure 9.2).
Customizing Google Now to Suit Your Needs
To get the most out of Google Now, you’ll want to customize it. To get started, tap the Customize button (the magic wand icon) at the bottom of the Google Now screen; if the Customize button appears at the top of the screen, you can tap it there instead. The Customize Google Now screen appears (see Figure 9.3).
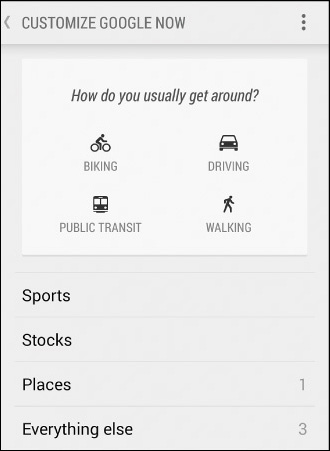
FIGURE 9.3 On the Customize Google Now screen, tap your usual means of getting around, and then use the Sports button, Stocks button, Places button, and Everything Else button to indicate your interests.
When you’re setting up Google Now, the How Do You Usually Get Around box may appear. Tap the Biking button, the Driving button, the Public Transit button, or the Walking button, as needed.
In the lower part of the Customize Google Now screen, tap each button in turn and use the resulting screen to start telling Google Now what interests you. For example:
1. Tap the Sports button to display the Sports screen.
2. Tap the Add a Team button.
3. Start typing the name of a team you follow.
4. Tap the correct item in the list of matches that appears. The team’s name appears on the Sports screen.
Adding your Work and Home places to the Places screen enables Google Now to provide more accurate commuting times (for example, drive times).
When you return to the Google Now screen, it displays information related to the interests you specified.
Choosing Settings for Google Now
Google Now gives you a wide range of settings that enable you to make it work your way. This section covers the most useful and important settings rather than taking you through every single setting.
To access the settings, tap the Menu button at the bottom of the Google Now screen, and then tap Settings on the menu. The Settings screen appears (see Figure 9.4).
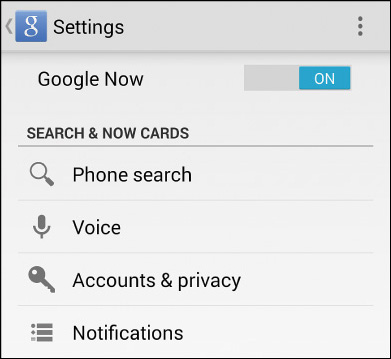
FIGURE 9.4 On the Settings screen, set the Google Now switch to On, and then use the buttons in the Search & Now Cards list to configure Google Now.
The main control here is the Google Now switch, which enables you to turn Google Now off if you don’t want to use it. Normally, you’ll want to keep this switch set to On.
To control what Google Now searches on your phone or table, tap the Phone Search button or the Tablet Search button, and then check or uncheck the boxes on the Phone Search screen (see Figure 9.5) or the Tablet Search screen.
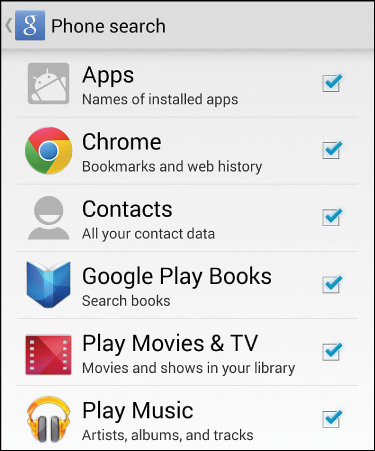
FIGURE 9.5 On the Phone Search screen or the Tablet Search screen, specify what to search by checking or unchecking the boxes.
To configure voice options, tap the Voice button and work on the Voice screen (see Figure 9.6). Here, you can adjust voice search by choosing these settings:
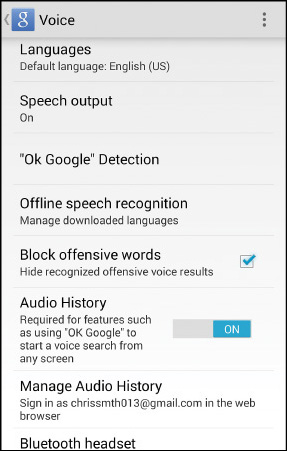
FIGURE 9.6 On the Voice screen, you can turn on or off “OK Google” hotword detection, manage offline speech recognition, and turn on recording through a Bluetooth headset.
![]() Language. Tap this button if you need to change the language.
Language. Tap this button if you need to change the language.
![]() Speech Output. Tap this button to display the Speech Output dialog box, and then tap the On radio button, the Hands-Free Only radio button, or the Off radio button, as needed.
Speech Output. Tap this button to display the Speech Output dialog box, and then tap the On radio button, the Hands-Free Only radio button, or the Off radio button, as needed.
![]() “OK Google” Detection. If you want to be able to say “OK Google” to start a voice search from the Home screen or from the Google Search app, tap this button, and then set the “OK Google” Detection switch on the resulting Settings screen to On.
“OK Google” Detection. If you want to be able to say “OK Google” to start a voice search from the Home screen or from the Google Search app, tap this button, and then set the “OK Google” Detection switch on the resulting Settings screen to On.
![]() Offline Speech Recognition. Tap this button to display the Download Languages screen. You can then tap the Installed tab to view the list of languages installed for offline speech recognition, tap the All tab to download other languages, or tap the Auto-Update tab to choose settings for updating languages.
Offline Speech Recognition. Tap this button to display the Download Languages screen. You can then tap the Installed tab to view the list of languages installed for offline speech recognition, tap the All tab to download other languages, or tap the Auto-Update tab to choose settings for updating languages.
![]() Tip
Tip
Choose the Auto-Update Languages over Wi-Fi Only radio button on the Auto-Update tab of the Download Languages screen. Don’t use the Auto-Update Languages at Any Time radio button unless your cellular device has an unlimited data plan.
![]() Block Offensive Words. Check this box to hide any offensive voice results.
Block Offensive Words. Check this box to hide any offensive voice results.
![]() Audio History. Set this switch to On to enable yourself to start a voice search from any screen by saying “OK Google.”
Audio History. Set this switch to On to enable yourself to start a voice search from any screen by saying “OK Google.”
![]() Manage Audio History. Tap this button to switch to your default browser and go to the screen for managing your Audio History.
Manage Audio History. Tap this button to switch to your default browser and go to the screen for managing your Audio History.
![]() Bluetooth Headset. Check this box to enable Google Now to listen to input from your Bluetooth headset.
Bluetooth Headset. Check this box to enable Google Now to listen to input from your Bluetooth headset.
To change which Google account your device is using for Google Now, and to protect your privacy, tap the Accounts & Privacy button on the Settings screen and choose settings on the Accounts & Privacy screen (see Figure 9.7). These are the options you can choose:
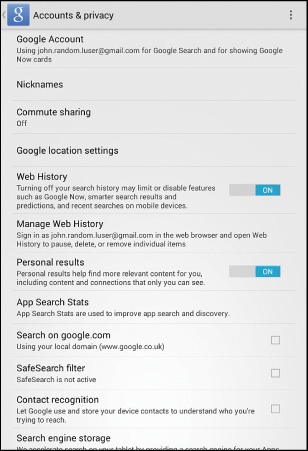
FIGURE 9.7 On the Accounts & Privacy screen, you can change your Google account for Google Now, control your Web History, and choose search options.
![]() Google Account. Tap this button to switch to another account you’ve already set up on your device. You can also sign out from your current Google account without switching to another account.
Google Account. Tap this button to switch to another account you’ve already set up on your device. You can also sign out from your current Google account without switching to another account.
![]() Nicknames. Tap this button to display the Nicknames screen, which shows a list of the nicknames you’ve created for Google Now.
Nicknames. Tap this button to display the Nicknames screen, which shows a list of the nicknames you’ve created for Google Now.
Creating Contact Nicknames in Google Now
To help Google Now identify the contacts you want to get in tap with (or ignore), you can create nicknames for them. For example, instead of trying to specify the right Joan out of the dozen Joans among your contacts, you can use the nickname “my wife.” This feature isn’t available on all devices, but it’s well worth trying if your device has it.
To create a contact nickname, open Google Now, say “OK Google” or tap the microphone icon, and then announce the person and the nickname. For example, say “Joan Smith is my wife” or “Alan Jones is the Head Honcho.”
The first time you try to create a contact nickname, Android may prompt you to enable the Contact Recognition feature. Do so, and you can then create the contact nickname and start using it.
![]() Commute Sharing. Tap this button to display the Commute Sharing screen. You can then choose which contacts can see your location using Google+ and control whether they see your commute updates.
Commute Sharing. Tap this button to display the Commute Sharing screen. You can then choose which contacts can see your location using Google+ and control whether they see your commute updates.
![]() Google Location Settings. Tap this button to jump to the Location screen in the Settings app, where you can choose the location mode and see which apps have requested your location recently.
Google Location Settings. Tap this button to jump to the Location screen in the Settings app, where you can choose the location mode and see which apps have requested your location recently.
![]() Web History. Set this switch to On to allow Google Now to use your recent web browsing and searches to help customize the cards it displays.
Web History. Set this switch to On to allow Google Now to use your recent web browsing and searches to help customize the cards it displays.
![]() Manage Web History. Tap this button to open your History page in your default browser. You can then view the list of your searches on the History page and remove any items you don’t want to leave there. Google keeps history for 180 days, and you can delete it at any time.
Manage Web History. Tap this button to open your History page in your default browser. You can then view the list of your searches on the History page and remove any items you don’t want to leave there. Google keeps history for 180 days, and you can delete it at any time.
![]() Personal Results. Set this switch to On to allow Google Search to personalize your search results by using your Web History. This feature should give you more helpful Google Now cards at the cost of some privacy.
Personal Results. Set this switch to On to allow Google Search to personalize your search results by using your Web History. This feature should give you more helpful Google Now cards at the cost of some privacy.
![]() Caution
Caution
Using the Personal Results feature in Google Now causes Google to store more data about what you do on the Web. Given that Google Now aims to provide you with targeted information, this is inevitable, but it’s important that you understand you’re giving up more privacy. You are the only person who can view this information unless a government agency comes along with a subpoena or a National Security Letter.
![]() App Search Stats or Manage History. Tap this button to display the Manage App History screen. Here, you can uncheck the App History box (it’s checked by default) if you want to prevent Google from storing and using links you follow in other apps. You can also tap the Clear App History button to clear your App History. You’d typically do this after unchecking the App History box.
App Search Stats or Manage History. Tap this button to display the Manage App History screen. Here, you can uncheck the App History box (it’s checked by default) if you want to prevent Google from storing and using links you follow in other apps. You can also tap the Clear App History button to clear your App History. You’d typically do this after unchecking the App History box.
![]() Search on Google.com. Check this box to search on the main Google.com website. If you uncheck this box, Google searches on the local domain for your geographical region, such www.google.com/au for Australia. If the main Google.com website is your default, this button doesn’t appear.
Search on Google.com. Check this box to search on the main Google.com website. If you uncheck this box, Google searches on the local domain for your geographical region, such www.google.com/au for Australia. If the main Google.com website is your default, this button doesn’t appear.
![]() SafeSearch Filter. Check this box to turn on the SafeSearch Filter feature, which attempts to screen out explicit sexual content.
SafeSearch Filter. Check this box to turn on the SafeSearch Filter feature, which attempts to screen out explicit sexual content.
![]() Contact Recognition. Check this box to allow Google to store your contacts and use them to interpret your Google Now requests. This feature is usually helpful.
Contact Recognition. Check this box to allow Google to store your contacts and use them to interpret your Google Now requests. This feature is usually helpful.
![]() Caution
Caution
Checking the Contact Recognition box uploads your device’s entire contacts list to Google’s servers. Again, this is necessary for the feature to work, but you should understand what’s involved.
![]() Search Engine Storage. You can tap this button to display the Search Engine Storage screen (see Figure 9.8), which enables you to see the apps storing search engine data and the amount of space the data is taking up. You can tap the Clear Now button to clear the contents of the items in the Storage Scheduled for Deletion area.
Search Engine Storage. You can tap this button to display the Search Engine Storage screen (see Figure 9.8), which enables you to see the apps storing search engine data and the amount of space the data is taking up. You can tap the Clear Now button to clear the contents of the items in the Storage Scheduled for Deletion area.
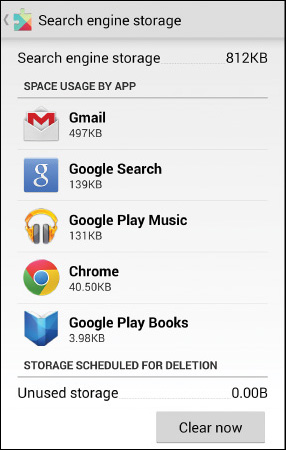
FIGURE 9.8 On the Search Engine Storage screen, you can see the apps that are taking up storage space for search engine data.
![]() Tip
Tip
From the Search Engine Storage screen, you can tap an app’s button to display the App Info screen for that app. The Storage readout on the App Info screen shows the amount of storage that the app is taking up; you can clear this space by tapping the Clear Data button. The Cache readout shows the amount of data the app has cached. You can delete this data by tapping the Clear Cache button.
![]() Caution
Caution
Neither the Storage data nor the Cache data on the App Info screen for an app is the same data as that which the Search Engine Storage screen shows the app as holding. Most apps have only a small amount—hundreds of kilobytes or a few megabytes—of search data, and it is seldom worth deleting the data to recover space. But if the data is sensitive, you may want to delete it.
![]() Help Improve Google. Check this box to allow Google Now to send Google statistics about how you use the app.
Help Improve Google. Check this box to allow Google Now to send Google statistics about how you use the app.
To finish configuring Google Now, tap the Notifications button on the Settings screen to display the Notifications screen. Here, you can check or uncheck the Show Updates from Google Now box, set a ringtone for urgent updates, and choose whether to have your device vibrate to signal urgent updates (if your device has a vibration motor).
![]() Tip
Tip
Set a distinctive ringtone for the “urgent” updates, because they include your reminders, time-to-leave notifications for your appointments, and warnings of unusual traffic conditions as well as public alerts.
Accessing Google Now from the Lock Screen
To access Google Now directly from the lock screen, tap the up-arrow button at the bottom of the lock screen and drag it up to the Google icon that appears.
You’ll need to unlock your device’s screen as usual, unless you don’t lock it. After you do that, you go straight to the Google Now screen.
Working with Reminders in Google Now
Google Now enables you to create reminders to track things you need to do.
To start working with reminders, display the Reminders screen by tapping the Reminders button at the bottom of the Google Now screen. The Reminders button shows a hand with a finger extended and a piece of string tied around it.
From the Reminders screen, you can start creating a reminder either by tapping the Add a Reminder button and then typing in the details or by saying “Remind me” and the specifics. For example, you could say “Remind me to take the planning spreadsheet to work today at 8 o’clock” to produce the new reminder shown in Figure 9.9.

FIGURE 9.9 You can set a reminder in Google Now either by speaking the reminder or by typing its details.
![]() Tip
Tip
For a time-based reminder, you can use general times such as “morning,” “afternoon,” or “evening” as well as specific times. You can also set a timer-based reminder by saying “in five minutes,” “in one hour,” or a similar phrase.
You can tie a reminder either to a time or to a place. To use a place, tap the Where radio button on the screen for setting a reminder, and then choose the place from the pop-up menu. You can choose a place you’ve already defined, such as Home or Work, or tap the Set Location button to set a different location.
![]() Tip
Tip
You can create a location-based reminder by using a phrase such as “when I get to work” when speaking a reminder.
After you’ve put all the details in place, tap the Remind Me at This Time button or the Remind Me at This Place button to add the reminder to your list.
If a Google search returns a card that includes a Remind Me on Google Now button, tap that button to set a reminder about that item quickly.
When a time or place triggers a reminder, your device displays a notification. You can tap the reminder to display it in Google Now or tap the Remind Me in 1 Hour button to snooze the reminder.
To delete a reminder, tap it on the Reminders screen, and then tap Delete in the Edit Reminder dialog box.
Navigating with Maps
Google’s Maps app enables you to find your location, explore a wide variety of places and optionally share them with others, and get directions from one place to another. You can save map sections for offline access, and you can choose settings to make the app work your way.
Making Sure You Know Essential Maps Moves
The Maps app is largely straightforward to use after you’ve grasped the essential moves:
![]() Navigate around the map. Tap and drag to move the map. Flick to move a larger distance, and then tap to slow down the movement if necessary.
Navigate around the map. Tap and drag to move the map. Flick to move a larger distance, and then tap to slow down the movement if necessary.
![]() Choose which map layers to display. Tap the Menu button to open the menu panel. Then tap the Traffic button, the Public Transit button, the Bicycling button, the Satellite button, or the Terrain button, as needed.
Choose which map layers to display. Tap the Menu button to open the menu panel. Then tap the Traffic button, the Public Transit button, the Bicycling button, the Satellite button, or the Terrain button, as needed.
![]() Note
Note
In Maps, the Menu button is the button with three horizontal lines. On phones, it appears in the lower-left corner of the screen; on tablets, it appears in the upper-left corner for variety.
![]() Go quickly to one of your places. Tap the Menu button to open the menu panel, and then tap Your Places to display the list of your places. Tap the place you want to display in Maps.
Go quickly to one of your places. Tap the Menu button to open the menu panel, and then tap Your Places to display the list of your places. Tap the place you want to display in Maps.
The Satellite and Terrain layers are mutually exclusive: You can view one or the other, but not both at once. Similarly, you can view only one of the Traffic, Public Transit, and Bicycling layers at a time.
![]() Show your location. Tap the Location button in the lower-right corner of the screen.
Show your location. Tap the Location button in the lower-right corner of the screen.
![]() Note
Note
Tap the Google Earth shortcut on the menu panel to switch to the Google Earth app and display the same place you’re viewing in Maps.
![]() Turn the map to show the direction your device is facing. Tap the Location button again. The Location button changes to a compass symbol. The Compass icon appears in the upper-right corner of the screen, with the red needle pointing north.
Turn the map to show the direction your device is facing. Tap the Location button again. The Location button changes to a compass symbol. The Compass icon appears in the upper-right corner of the screen, with the red needle pointing north.
![]() Zoom in. Place your finger and thumb together on the screen and pinch apart.
Zoom in. Place your finger and thumb together on the screen and pinch apart.
![]() Tip
Tip
You can also zoom by double-tapping. Simply double-tap to zoom in by a zoom increment on the point where you double-tap; double-tap again to zoom further. Double-tap with two fingers to zoom out by increments. You can also double-tap and hold to activate the Zoom feature, and then scroll down to zoom in or scroll up to zoom out.
![]() Zoom out. Place your finger and thumb apart on the screen and then pinch together. Alternatively, double-tap with two fingers.
Zoom out. Place your finger and thumb apart on the screen and then pinch together. Alternatively, double-tap with two fingers.
![]() Rotate the map. Place two fingers on the screen and turn them as needed. The Compass icon appears in the upper-right corner of the screen, with the red needle pointing north.
Rotate the map. Place two fingers on the screen and turn them as needed. The Compass icon appears in the upper-right corner of the screen, with the red needle pointing north.
![]() Return the map to north orientation. Tap the Compass icon.
Return the map to north orientation. Tap the Compass icon.
![]() Search for a place. Tap the Search box at the top of the screen, and then type or speak your search terms. Tap the icon for the type of result you want: food places, bars, gas stations, and so on. You can search using natural-language queries such as “Mexican restaurants in El Cerrito” or “museums in Albuquerque.”
Search for a place. Tap the Search box at the top of the screen, and then type or speak your search terms. Tap the icon for the type of result you want: food places, bars, gas stations, and so on. You can search using natural-language queries such as “Mexican restaurants in El Cerrito” or “museums in Albuquerque.”
If you want to see all the places Google Maps contains information about in the area you’re viewing, type * in the Search box and tap the Search button. Maps displays a red dot for each place. For busy places, this move works best when you’ve zoomed in a long way.
![]() Get directions. Tap the Directions arrow at the right end of the Search box at the top of the screen, and then specify the start location and the destination. Tap the button at the top of the screen to specify the transit type: driving, public transit, cycling, or walking.
Get directions. Tap the Directions arrow at the right end of the Search box at the top of the screen, and then specify the start location and the destination. Tap the button at the top of the screen to specify the transit type: driving, public transit, cycling, or walking.
![]() Tip
Tip
After getting directions, you can specify items to avoid by tapping the Route Options button and then checking the Avoid Highways box, the Avoid Tolls box, or the Avoid Ferries box in the Route Options dialog box.
![]() Drop a pin on the map. Tap and hold where you want to drop a pin. You can then tap the pin’s label to display the place info sheet. From here, you can tap the Save button to save the place to your Places list, tap the Share button to share the place with others, or tap the Route button to get directions to the place.
Drop a pin on the map. Tap and hold where you want to drop a pin. You can then tap the pin’s label to display the place info sheet. From here, you can tap the Save button to save the place to your Places list, tap the Share button to share the place with others, or tap the Route button to get directions to the place.
![]() Note
Note
When you want to remove a pin you’ve placed on the map, tap elsewhere on the map.
![]() Jump into Street View. Drop a pin for the place (as described in the previous paragraph), tap the pin’s label, and then tap the Street View button to go to the place in Street View. You can then look around by tapping and dragging, and move by tapping the white arrows that appear on the road. Tap the Back button when you’re ready to leave Street View.
Jump into Street View. Drop a pin for the place (as described in the previous paragraph), tap the pin’s label, and then tap the Street View button to go to the place in Street View. You can then look around by tapping and dragging, and move by tapping the white arrows that appear on the road. Tap the Back button when you’re ready to leave Street View.
![]() Tip
Tip
In Street View, tap the screen to display the onscreen controls, and then tap the button with the two curling arrows to make Street View change direction as you turn your device. This feature is great for using Street View to explore the place you’re actually in.
Saving Maps for Offline Use
When you want to be able to access a map even if you have no Internet connection, you can save it for offline use. You can then view the map as needed, update it when your device is online, and delete it when you no longer require it.
Saving a Map for Offline Use
Here’s how to save a map for offline use:
1. Tap the Search box and search for the place.
2. Tap the place name at the bottom of the screen to display the place info sheet.
![]() Tip
Tip
If you’ve browsed to the place rather than searched for it, the place name doesn’t appear at the bottom of the screen. To save the map, tap the Search box, tap the Back button to hide the keyboard if necessary, and then tap the Save Map to Use Offline button. You can also tap and hold to drop a pin on the map and then tap the pin’s place name to display the place info sheet.
3. Tap the Save Map to Use Offline button. Maps displays the Save This Map? prompt (see Figure 9.10).
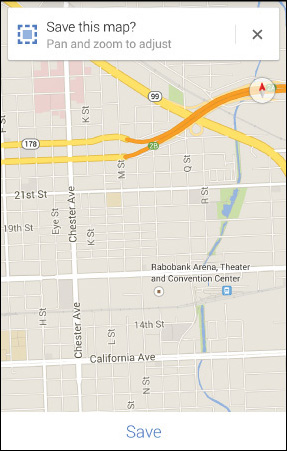
FIGURE 9.10 Pan and zoom the map to the area you want to save for offline use, and then tap the Save button.
4. If necessary, pan and zoom to make the map show the area you want to save.
5. Tap the Save button. Maps displays the Name Offline Map dialog box.
6. Edit the default name (if there is one) for the map as needed, or type a new name.
7. Tap the Save button. The Name Offline Map dialog box closes, and Maps saves the map.
Displaying Your Saved Maps
To display a saved map, tap the Menu button, tap Your Places on the menu panel, and then scroll down to the bottom of the Your Places screen. In the Offline Maps area, tap the map you want to display.
Updating, Renaming, and Deleting Saved Maps
To work with your saved maps, tap the Menu button, tap Your Places on the menu panel, and then tap the View All and Manage button in the Offline Maps box. On the Offline Maps screen that appears, you can tap the Menu button on a map and then tap Rename, Update, or Delete (as needed) on the menu.
![]() Note
Note
The Maps app automatically deletes your saved maps after 30 days. By updating your maps, you can keep them for longer.
Choosing Key Settings for Maps
If you use the Maps app heavily, spend a few minutes configuring its settings. Tap the Menu button and then tap Settings on the menu panel to display the Settings screen (see Figure 9.11). You can then choose these settings:
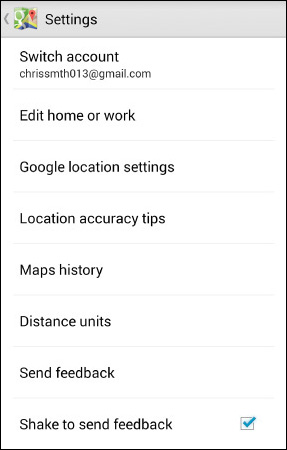
FIGURE 9.11 On the Settings screen in the Maps app, you can edit your home and work addresses, delete indiscretions from your Maps History, and change the distance units.
![]() Switch Account. Tap this button to switch to another Google account.
Switch Account. Tap this button to switch to another Google account.
![]() Edit Home or Work. To set or change your home address or your work address, tap this button, and then tap the Enter Home Address button (or the Edit Home Address button) or the Enter Work Address button (or the Edit Work Address button).
Edit Home or Work. To set or change your home address or your work address, tap this button, and then tap the Enter Home Address button (or the Edit Home Address button) or the Enter Work Address button (or the Edit Work Address button).
![]() Google Location Settings. Tap this button to jump to the Location screen in the Settings app, where you can choose the location mode and see which apps have requested your location recently.
Google Location Settings. Tap this button to jump to the Location screen in the Settings app, where you can choose the location mode and see which apps have requested your location recently.
![]() Location Accuracy Tips. Tap this button to display the Location Accuracy Tips dialog box, which tells you the Google Location Settings you can choose to improve location accuracy. If you’re already using the most accurate settings, Maps displays a message telling you that your location setting is already optimized.
Location Accuracy Tips. Tap this button to display the Location Accuracy Tips dialog box, which tells you the Google Location Settings you can choose to improve location accuracy. If you’re already using the most accurate settings, Maps displays a message telling you that your location setting is already optimized.
![]() Maps History. Tap this button to display the Maps History screen, which shows a list of the places you’ve visited in Maps. You can tap the × icon on the right of a history item to display the Delete dialog box (see Figure 9.12), and then tap the Delete button to delete that item from your Maps History.
Maps History. Tap this button to display the Maps History screen, which shows a list of the places you’ve visited in Maps. You can tap the × icon on the right of a history item to display the Delete dialog box (see Figure 9.12), and then tap the Delete button to delete that item from your Maps History.
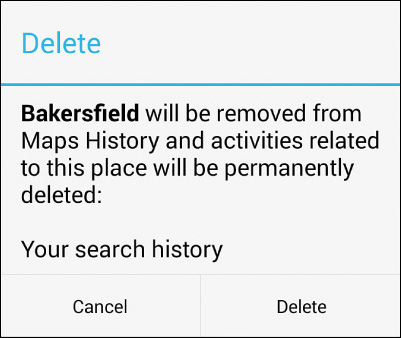
FIGURE 9.12 On the Maps History screen, you can delete an item by tapping its × icon and then tapping Delete in the Delete dialog box.
![]() Distance Units. Tap this button to display the Distance Units dialog box. You can then tap the Automatic radio button, the Kilometers radio button, or the Miles radio button, as needed.
Distance Units. Tap this button to display the Distance Units dialog box. You can then tap the Automatic radio button, the Kilometers radio button, or the Miles radio button, as needed.
![]() Send Feedback. Tap this button to display the Send Feedback screen, on which you can report mapping issues or send feedback either about the app itself or about location features.
Send Feedback. Tap this button to display the Send Feedback screen, on which you can report mapping issues or send feedback either about the app itself or about location features.
![]() Shake to Send Feedback. Check this box if you want to be able to start giving feedback by shaking your device. Tap the Send Feedback button in the Shake to Send Feedback dialog box that opens.
Shake to Send Feedback. Check this box if you want to be able to start giving feedback by shaking your device. Tap the Send Feedback button in the Shake to Send Feedback dialog box that opens.
Exploring the Heavens with Google Sky Map
If you enjoy exploring maps on your Android device, download and install the Google Sky Map app. This app is free from the Play Store and provides a fascinating view of the stars and planets.
The app follows the direction your device is pointing, so you can hold it up to the skies and see which heavenly bodies you’re gazing at. The Time Travel feature enables you to whizz through time to view the positions of the stars and planets at a particular point, such as the next sunset, next full moon, or the Apollo 11 moon landing.
Managing Your Contacts
Android’s People app gives you an easy way to store the information about your contacts. After launching the People app from the Apps screen, you can quickly browse your existing contacts using the Favorites tab, the Contacts tab, and the Groups tab. To navigate among these three tabs, either tap the tab buttons at the top of the screen or swipe left or right.
![]() Note
Note
On a phone, you can access your contacts through the Phone app as well as through the People app.
![]() Tip
Tip
If you want to be able to tell from the ringing which of your contacts is phoning you, set a distinctive ringtone for each key contact. To set the ringtone, open the contact, tap the Menu button, and tap Set Ringtone. In the Ringtones dialog box, tap the radio button for the ringtone you want, and then tap the OK button.
Adding a New Contact
To add a new contact, tap the New Contact button at the bottom of either the Favorites tab or the Contacts tab. If you have set up multiple accounts, the People app prompts you to choose the account in which to create the contact. You can then fill in the information for the contact, tapping the Add Another Field if necessary to add to the default selection of fields shown, and tap the Done button when you have entered all the available information.
Displaying Only the Contacts You Want to See
By default, the People app displays all the contacts you’ve added to it. If you have many contacts, you may find it helpful to narrow down the display to only those groups you need to see at any particular time.
Here’s how to control which contacts appear:
1. Tap the Menu button and then tap Contacts to Display to display the Contacts to Display screen (see Figure 9.13).

FIGURE 9.13 On the Contacts to Display screen in the People app, you can either tap the radio button for an account or tap the Customize radio button to make a more complex selection.
2. If you want to display all the contacts in a particular account, tap the radio button for that account. If you want to display contacts from multiple accounts, tap the Customize radio button to display the Define Custom View screen (see Figure 9.14).
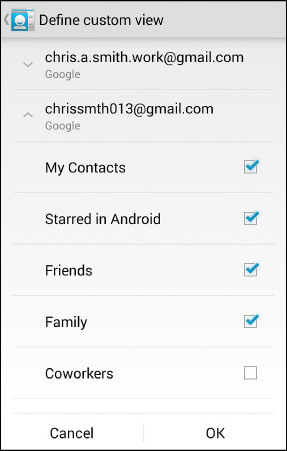
FIGURE 9.14 On the Define Custom View screen, check the box for each contact group you want to include.
3. Tap the downward caret to the left of an account’s name to expand the account, showing the groups it contains.
4. Check the box for each contact group you want to display.
5. Tap the OK button.
![]() Note
Note
The People app shows Contacts in Custom View or Contacts in Account at the top of the screen to indicate that you’ve restricted the display to only some contacts.
Joining and Separating Contacts
If you have two or more contact records for the same contact, you can join the records to give a single record containing all the information. Here’s how to join contacts:
1. Open one of the contacts.
2. Tap the Menu button and then tap Edit to open the contact for editing.
3. Tap the Menu button and then tap Join to display the contacts list. The Suggested Contacts list at the top shows any contacts that People thinks may be suitable.
4. Tap the appropriate contact. The Contacts Joined readout appears briefly.
5. Tap the Done button to stop editing the contact.
If you find you’ve joined two contacts by mistake, you can separate them. Open the contact for editing, tap the Menu button, and then tap Separate. The Separate Contact? dialog box appears; tap the OK button to effect the separation.
![]() Note
Note
If you’ve joined more than two contacts, the Separate command removes all the joins; you can’t separate one of the joined contacts without separating the others as well. So if you need to separate one contact but have two joined, you’ll need to join those two contacts again manually.
Importing and Exporting Contacts
The People app makes it easy to import contacts from other sources and to export contacts you want to share. To get started, tap the Menu button and then tap Import/Export. In the Import/Export Contacts dialog box (see Figure 9.15), tap the appropriate button:
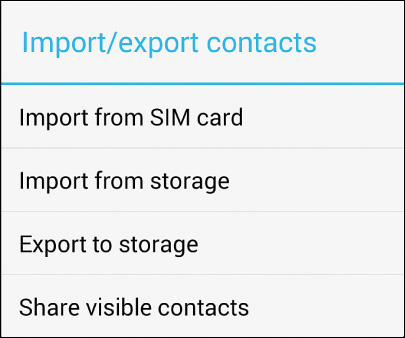
FIGURE 9.15 The Import/Export Contacts dialog box enables you to import contacts from a SIM card, import contacts from or export them to storage, or share your visible contacts.
![]() Import from SIM Card. If you have contacts stored on your SIM card, you can use this command to import them into the People app.
Import from SIM Card. If you have contacts stored on your SIM card, you can use this command to import them into the People app.
![]() Tip
Tip
The Import from SIM Card command is most useful for transferring contacts from your old phone’s SIM card to your new phone—providing that the phones take the same size SIM card or that you can get an adapter to make the old phone’s SIM card fit in the new phone. If not, export the contacts from the SIM card using the old phone, and then use a different means (for example, your Google account) to put the contacts on the new phone.
![]() Import from Storage. Use this command to import contacts from either built-in storage or an SD card you’ve inserted. If you have set up multiple accounts on your device, tap the appropriate account in the Create Contact Under Account dialog box.
Import from Storage. Use this command to import contacts from either built-in storage or an SD card you’ve inserted. If you have set up multiple accounts on your device, tap the appropriate account in the Create Contact Under Account dialog box.
![]() Export to Storage. Use this command to export your contact list to a file that you can then transfer to another device or save for backup. The Export Contacts? dialog box opens, showing the folder and filename of the vCard file to which Android will export the contacts. Tap the OK button to export them.
Export to Storage. Use this command to export your contact list to a file that you can then transfer to another device or save for backup. The Export Contacts? dialog box opens, showing the folder and filename of the vCard file to which Android will export the contacts. Tap the OK button to export them.
![]() Note
Note
On some devices, the Import/Export Contacts dialog box also contains the Export to SIM Card command.
![]() Share Visible Contacts. To share just some of your contacts, restrict the display to just that group using the technique explained in the previous section. Then give this command, select the app or service in the Complete Action Using dialog box, and tap the Just Once button. For example, you can tap the Gmail button to attach the vCard file containing the contacts to a new message in Gmail. You can then address and send the message.
Share Visible Contacts. To share just some of your contacts, restrict the display to just that group using the technique explained in the previous section. Then give this command, select the app or service in the Complete Action Using dialog box, and tap the Just Once button. For example, you can tap the Gmail button to attach the vCard file containing the contacts to a new message in Gmail. You can then address and send the message.
Mastering Your Schedule with Calendar
The Calendar app gives you an easy way to track your events on your Android device. You can display only those calendars you want to see at a particular time, sync events with your other devices, and share a calendar with other people.
If you haven’t already set up all the calendar accounts you want to use, add the missing ones now. In the Calendar app, tap the Menu button and then tap Settings to display the Settings screen. You can then tap the Add Account button and follow the prompts to add another account.
Best of all, you can configure the Calendar app so that it looks and works the way you prefer. Let’s start there.
Configuring the Calendar App
You can customize Calendar’s behavior by configuring its settings. To get started, tap the Menu button and then tap Settings. This brings you to the Settings screen, which gives you access to the general settings (which apply across all accounts) and the settings for each account (which affect only that account).
Choosing General Settings
Tap the General Settings button to display the General Settings screen (see Figure 9.16). You can then choose these settings:

FIGURE 9.16 On the General Settings screen for the Calendar app, you can configure the calendar view and your notifications and reminders.
![]() Hide Declined Events. Check this box to display events you’ve declined instead of displaying only those you’ve accepted (either definitely or tentatively).
Hide Declined Events. Check this box to display events you’ve declined instead of displaying only those you’ve accepted (either definitely or tentatively).
![]() Show Week Number. Check this box to have Calendar show a readout such as “Week 35” above the month and year.
Show Week Number. Check this box to have Calendar show a readout such as “Week 35” above the month and year.
![]() Week Starts On. Tap this button to display the Week Starts On dialog box, and then tap the Locale Default radio button, the Saturday radio button, the Sunday radio button, or the Monday radio button, to control which day appears at the start of the week.
Week Starts On. Tap this button to display the Week Starts On dialog box, and then tap the Locale Default radio button, the Saturday radio button, the Sunday radio button, or the Monday radio button, to control which day appears at the start of the week.
![]() Use Home Time Zone. Check this box to make Calendar show event times using your home time zone even when you’re traveling.
Use Home Time Zone. Check this box to make Calendar show event times using your home time zone even when you’re traveling.
![]() Home Time Zone. If this button shows the wrong time zone, tap it and use the resulting dialog box to select the right time zone.
Home Time Zone. If this button shows the wrong time zone, tap it and use the resulting dialog box to select the right time zone.
![]() Clear Search History. Tap this button to clear your search history. There’s no confirmation of the clearance.
Clear Search History. Tap this button to clear your search history. There’s no confirmation of the clearance.
![]() Notifications. Check this box to allow Calendar to raise notifications.
Notifications. Check this box to allow Calendar to raise notifications.
![]() Sound. Tap this button and use the Sound dialog box to select your notification sound.
Sound. Tap this button and use the Sound dialog box to select your notification sound.
![]() Pop-Up Notification. Check this box to enable pop-up notifications.
Pop-Up Notification. Check this box to enable pop-up notifications.
![]() Default Reminder Time. Tap this button to display the Default Reminder Time dialog box, and then tap the interval you want to use as the default. Your choices range from 1 Minute to 1 Week. You can change the reminder time for any given event.
Default Reminder Time. Tap this button to display the Default Reminder Time dialog box, and then tap the interval you want to use as the default. Your choices range from 1 Minute to 1 Week. You can change the reminder time for any given event.
![]() Quick Responses. Tap this button to display the Quick Responses screen, which contains four canned responses you can send in reply to invitations you receive. To change a quick response, tap it, edit it in the Quick Response dialog box, and then tap the OK button.
Quick Responses. Tap this button to display the Quick Responses screen, which contains four canned responses you can send in reply to invitations you receive. To change a quick response, tap it, edit it in the Quick Response dialog box, and then tap the OK button.
![]() Note
Note
You can’t create new quick responses at this writing, so you need to make do by changing the existing four quick responses to suit your needs.
Choosing Settings for Individual Calendar Accounts
To choose settings for your individual calendar accounts, tap the first account on the Settings screen in the Calendar app. On the Settings screen that appears (see Figure 9.17), check the box for each item that you want to sync, and uncheck all the other check boxes.
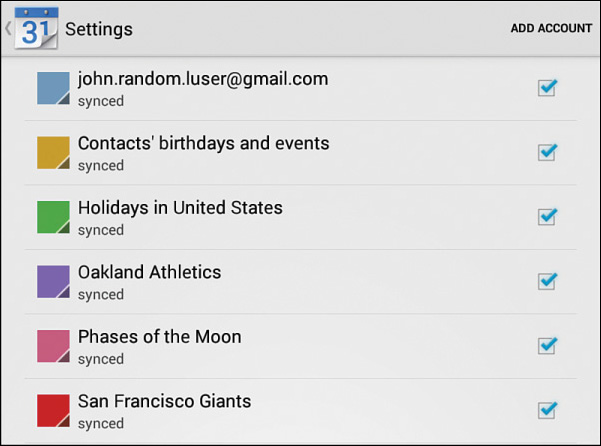
FIGURE 9.17 On the Settings screen for a calendar account, check the box for each item you want to sync.
Choosing Which Calendars to Display
Sometimes it’s useful to see all your commitments at once, but often you’ll find it better to display only some of your calendars so that you can focus on their events. For example, you may want to view only your work calendar so that you can see your work commitments separate from all your other commitments.
To control which calendar the Calendar app displays on a phone, tap the Menu button and then tap Calendars to Display. On the Calendars to Display screen, check the box for each calendar you want to display, and then tap the Back button to return to your calendar.
On a tablet, you can control which calendars the Calendar app displays by tapping the calendars in the list in the lower-right corner of the screen. Tap a calendar once, graying out its button, to hide its contents; tap the button again to display the calendar.
Controlling How the Calendar Appears
The Calendar app offers four views: Day, Week, Month, and Agenda. The first three views are self-explanatory. The Agenda view displays a list of events for the upcoming days, enabling you to get an overview of your commitments.
On a tablet, the lower-left part of the screen displays a month’s calendar in Day view and Week view, giving you an easy way of navigating to other dates. The lower-right part displays a list of the calendars you are using, enabling you to toggle the display of a particular calendar on or off easily.
![]() Tip
Tip
To hide the month’s calendar and the list of calendars on a tablet in Day view or Week view, tap the Menu button and then tap Hide Controls. When you want them back, tap the Menu button again and then tap Show Controls.
Creating Events
You can create a new event in any of these ways:
![]() Manually. Tap the appropriate time slot in the Calendar, and then tap the + sign that appears.
Manually. Tap the appropriate time slot in the Calendar, and then tap the + sign that appears.
![]() By voice. Launch Google Now and tell it the event details. For example, say “Create a meeting Monday morning at 10 a.m. with Alice and Bill.” Google Now is pretty good about getting the details straight, but if it doesn’t, you can fix them on the event sheet that it displays.
By voice. Launch Google Now and tell it the event details. For example, say “Create a meeting Monday morning at 10 a.m. with Alice and Bill.” Google Now is pretty good about getting the details straight, but if it doesn’t, you can fix them on the event sheet that it displays.
![]() From an email message. This approach works only with Gmail in a web browser, not in the Gmail app at this writing. If Gmail automatically underlines an event, move the mouse pointer over it and click the Add to Calendar button that appears.
From an email message. This approach works only with Gmail in a web browser, not in the Gmail app at this writing. If Gmail automatically underlines an event, move the mouse pointer over it and click the Add to Calendar button that appears.
![]() Tip
Tip
If you’ve turned on Google Now, make sure you add the location to each calendar event so that Google Now can display the navigation information and driving time on your cards.
Inviting Others to an Event
When creating an event to which you want to invite other people, tap the Guests field and enter the invitees. Start typing the first name or email address, and then tap the appropriate result in the list of matches that pops up. The Calendar app adds a button showing the contact’s name, and you can start typing the next name.
Dealing with Invitations
When you receive an invitation to an event, the Calendar app adds it to your calendar automatically. You can then tap the event to view its details, and then tap the Yes radio button, the Maybe radio button, or the No radio button in the Attending? area to give your response.
Sharing Your Google Calendars
Sending invitations works well for individual events, but if you need other people to be able to see every event in a particular calendar, you’ll find that sending invitations for each new event grows old fast. Instead, you’ll do better to share the calendar. As long as the calendar is a Google one, this is easy to do, but you need to use a web browser rather than the Calendar app at this writing.
Follow these steps to share a Google calendar:
1. Steer your web browser to calendar.google.com and log in if prompted.
2. Click the gear icon in the upper-left corner and then click Settings to display the Calendar Settings screen.
3. Click Calendars at the top of the screen to display the My Calendars list.
4. In the Sharing column, click the link for the calendar you want to share.
5. Click the Person box in the Share with Specific People section and type the email address of the first person with whom you want to share the calendar.
6. Click the Permission Settings pop-up menu and then click the appropriate level of permissions: Make Changes AND Manage Sharing, Make Changes to Events, See All Event Details, or See Only Free/Busy.
7. Click the Save button to make the changes.
![]() Caution
Caution
Instead of sharing a calendar with specific people, you can check the Make This Calendar Public box to make the calendar appear in public Google search results. Do this only for information you’re determined to share with the world at large. If what’s important is letting people know when you’re available and when you’re not, check the Make This Calendar Public box, but then check the Share Only My Free/Busy Information box below it before clicking the Save button to effect the change. Using this setting, people can see when you’re free and when you’re busy, but they can’t see the details of your events.
Transferring and Syncing Files with Google Drive
As you saw in Chapter 2, “Syncing Your Device,” you can use Google Drive as an easy way to put files on your Android device, but you’ll likely also want to use it for day-to-day file operations as well. In this section, you’ll look at how to set up Google Drive, navigate it, choose key settings, and add your documents to it and to your device.
Setting Up Google Drive
If you’re not sure whether the Google Drive app is installed on your device, tap the Apps button on the Home screen and look for the Drive icon. If it’s there, tap it to launch the Google Drive app; if not, tap the Play Store icon, search for Google Drive, and then install the app.
The first time you launch Google Drive, the app displays the Welcome to Google Drive screen. Swipe up to start reviewing the features. When you finish, the My Drive screen appears (see Figure 9.18).

FIGURE 9.18 The My Drive screen gives you quick access to the folders and documents you’ve stored on Google Drive.
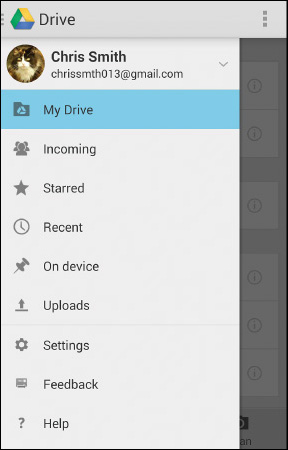
![]() Move among the different folders. Tap the navigation button to display the navigation panel (see Figure 9.19), and then tap the button for the folder you want: My Drive, Incoming, Started, Recent, On Device, or Uploads.
Move among the different folders. Tap the navigation button to display the navigation panel (see Figure 9.19), and then tap the button for the folder you want: My Drive, Incoming, Started, Recent, On Device, or Uploads.
![]() Toggle between List view and Thumbnails view. Tap the Thumbnails button (the four gray squares) or the List button (the four gray dots and horizontal lines) to switch views.
Toggle between List view and Thumbnails view. Tap the Thumbnails button (the four gray squares) or the List button (the four gray dots and horizontal lines) to switch views.
![]() Filter your documents. Tap the Menu button and then tap Filter By to display the Filter By dialog box. Tap the radio button—Folders, Presentations, Spreadsheets, Text Documents, Images, Videos, and PDF—for the type of item you want to view. Google Drive displays only items of the type you choose. A readout such as Filter: Folders or Filter: Images appears at the top of the screen.
Filter your documents. Tap the Menu button and then tap Filter By to display the Filter By dialog box. Tap the radio button—Folders, Presentations, Spreadsheets, Text Documents, Images, Videos, and PDF—for the type of item you want to view. Google Drive displays only items of the type you choose. A readout such as Filter: Folders or Filter: Images appears at the top of the screen.
![]() Tip
Tip
To remove a filter you’ve applied, tap the Google Drive logo or the Filter readout, and then tap My Drive on the menu panel.
![]() Sort your documents. Tap the Menu button and then tap Sort By to display the Sort By dialog box. Tap the radio button—Title, Last Modified, Last Opened by Me, Last Edited by Me, or Quota Used—by which you want to sort, and Google Drive displays the items in that order.
Sort your documents. Tap the Menu button and then tap Sort By to display the Sort By dialog box. Tap the radio button—Title, Last Modified, Last Opened by Me, Last Edited by Me, or Quota Used—by which you want to sort, and Google Drive displays the items in that order.
![]() Tip
Tip
Sort your documents by Quota Used when you need to see which of them is taking up the most space—for example, when your Google Drive is getting full and you need to free up space.
![]() Open a document or folder. Tap the thumbnail or the name.
Open a document or folder. Tap the thumbnail or the name.
![]() Download a document. Tap and hold it to display the dialog box of actions for the document (see Figure 9.20), and then tap the Download a Copy button.
Download a document. Tap and hold it to display the dialog box of actions for the document (see Figure 9.20), and then tap the Download a Copy button.
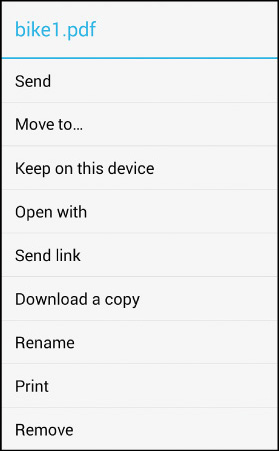
FIGURE 9.20 In the dialog box for a document, tap the Download a Copy button to download the document to your device.
![]() View information for a document or folder. Tap the Info (i) button on the thumbnail or the name button.
View information for a document or folder. Tap the Info (i) button on the thumbnail or the name button.
![]() Search for a document or folder. Tap the search icon at the top of the screen and type your search terms.
Search for a document or folder. Tap the search icon at the top of the screen and type your search terms.
Configuring the Cache, Encryption, and Data Usage
To get the best out of Google Drive, you should configure the cache, turn on encryption, and make sure the app transfers files via the cellular connection only if you want it to. Tap the Navigation button to display the menu panel, and then tap Settings to display the Settings screen (see Figure 9.21). You can then choose these settings:
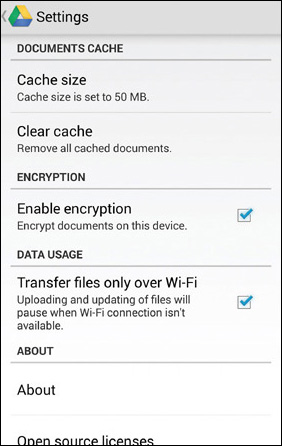
FIGURE 9.21 On the Settings screen for Google Drive, set the cache size and enable encryption. On a phone, you may want to restrict the app to using Wi-Fi.
![]() Documents Cache. Tap the Cache Size button to display the Cache Size dialog box, and then tap the radio button—25 MB, 50 MB, 100 MB, or 250 MB—for the cache size to use. If you use Google Drive extensively, set the Documents Cache to 250 MB (the maximum amount) to allow the app to cache plenty of data. Google Drive caches data so that it can provide it quickly on demand, without needing to download it from the Internet.
Documents Cache. Tap the Cache Size button to display the Cache Size dialog box, and then tap the radio button—25 MB, 50 MB, 100 MB, or 250 MB—for the cache size to use. If you use Google Drive extensively, set the Documents Cache to 250 MB (the maximum amount) to allow the app to cache plenty of data. Google Drive caches data so that it can provide it quickly on demand, without needing to download it from the Internet.
![]() Note
Note
You can tap the Clear Cache button in the Documents Cache area of the Settings screen for Google Drive to clear all your currently cached documents. Normally, you’d do this only if some documents have become corrupt and won’t open or sync.
![]() Encryption. Check the Enable Encryption box to encrypt your Google Drive documents on your device. If you have encrypted your Android device as a whole, you don’t need to enable encryption in the Google Drive app, but you can if you want.
Encryption. Check the Enable Encryption box to encrypt your Google Drive documents on your device. If you have encrypted your Android device as a whole, you don’t need to enable encryption in the Google Drive app, but you can if you want.
![]() Data Usage. Check the Transfer Files Only over Wi-Fi box if you want to prevent Google Drive using cellular data on your phone or cellular tablet.
Data Usage. Check the Transfer Files Only over Wi-Fi box if you want to prevent Google Drive using cellular data on your phone or cellular tablet.
![]() Caution
Caution
If you need your Google Drive files to be up to date all the time, uncheck the Transfer Files Only over Wi-Fi box, but keep a close eye on your data plan to make sure you don’t go over your limits.
Creating a Folder
Here’s how to create a folder on Google Drive:
1. From the My Drive screen, navigate to the folder in which you want to create the new folder.
2. Tap the Create (+) button to display the Create dialog box.
3. Tap the Folder button to display the Folder Name dialog box.
4. Type the name for the folder.
5. Tap the OK button.
Google Drive creates the folder and displays its contents—nothing so far. You can then upload documents to the folder, create new documents in it, or scan documents to it.
Adding Documents to Google Drive
You can quickly add documents to Google Drive in three ways. First, navigate to the folder in which you want to place the documents. Then take the appropriate action:
![]() Upload the document. Tap the Upload button, navigate to the file, and then tap it. Google Drive starts the upload automatically.
Upload the document. Tap the Upload button, navigate to the file, and then tap it. Google Drive starts the upload automatically.
![]() Create a new document. Tap the Create (+) button to display the Create dialog box; tap the Document button, the Spreadsheet button, or the Presentation button, as needed; and then create the document in the Docs module that opens. Tap the check box when you finish editing the document. Then tap the Docs button to close the document.
Create a new document. Tap the Create (+) button to display the Create dialog box; tap the Document button, the Spreadsheet button, or the Presentation button, as needed; and then create the document in the Docs module that opens. Tap the check box when you finish editing the document. Then tap the Docs button to close the document.
![]() Scan the document. If your device has a rear camera, tap the Scan button. Line up the document and tap the blue button to photograph it, and then use the cropping tools to crop the document as needed. You can tap the Type button and then tap the document type—None, Black & White, Color, or Color Drawing—on the Type pop-up menu. If you want to rename the document, tap the default name, type the new name, and then tap the OK button. Tap the check mark when the document is ready for upload to Google Drive.
Scan the document. If your device has a rear camera, tap the Scan button. Line up the document and tap the blue button to photograph it, and then use the cropping tools to crop the document as needed. You can tap the Type button and then tap the document type—None, Black & White, Color, or Color Drawing—on the Type pop-up menu. If you want to rename the document, tap the default name, type the new name, and then tap the OK button. Tap the check mark when the document is ready for upload to Google Drive.
Keeping Documents on Your Device
To keep a specific document on your device, tap the Info (i) button on the file to display the Information screen, and then set the Keep on Device switch to On.
![]() Tip
Tip
From the Information screen, you can also share a file, send it to others, rename it, move it to a folder, or print it.
Separating Work from Play on Your Device
If you use your Android device for both work and play, you may wish there were a way to keep your work files separate from your personal files. Google is working on such a feature, called Android for Work, for the next version of Android (Lollipop), but as of this writing, you need a third-party solution.
At this point, the best option is the Divide app from the company called Divide. Google purchased Divide (the company) in May 2014, so it seems likely that Android for Work will be based on Divide.
Divide creates a “work container” in which you do your work. You use this container to log in to a Mobile Device Management system rather than logging in with your device as a whole. That may sound abstruse, but consider this example: To connect to an Exchange Server system, you must give the administrator permission to wipe (erase) your device entirely. If you connect using your device, the administrator can wipe all its software; but if you connect using your work container, the administrator can erase the container, not the device.
Printing Documents
Even if you take your Android device with you everywhere, you may still need to print documents from it sometimes—for instance, so that you can show them to other people without having to hand over your device.
You have four main choices for printing from Android:
![]() Print to a Wi-Fi printer or Bluetooth printer that supports Android.
Print to a Wi-Fi printer or Bluetooth printer that supports Android.
![]() Print to an HP printer using the HP Print Service Plugin.
Print to an HP printer using the HP Print Service Plugin.
![]() Print to a cloud printer. A cloud printer is one that connects directly to the Web, receives your print jobs from the Google Cloud Print server, and prints them.
Print to a cloud printer. A cloud printer is one that connects directly to the Web, receives your print jobs from the Google Cloud Print server, and prints them.
![]() Print through your existing printer courtesy of your computer, Chrome, and your Google account.
Print through your existing printer courtesy of your computer, Chrome, and your Google account.
Printing to Local Printers
To print to a local printer, you’ll need a printer that directly supports Android.
As you’d imagine, for a Wi-Fi printer, you’ll need to connect your device to the same Wi-Fi network. Similarly, for a Bluetooth printer, make sure Bluetooth is enabled on your device, and pair the device with the printer.
If the app from which you want to print has a Print command, give that command, and work through the resulting dialog boxes or screens. For example, in Gmail, open a message for reading. To print the message, tap the message’s Menu button (not the main Menu button for the app) and tap Print. In the dialog box that opens, tap the printer, choose other options such as the copies and paper size, and tap the Print button.
If the app from which you want to print doesn’t have a Print command, you’ll need to use a third-party printing app. One example is PrinterShare, which you can download for free from the App Store. To print with such an app, you launch the app and use its controls to select the document you want to print. You can then choose which printer to use, select other options for printing, and send the document to the printer.
Print to an HP Printer Using the HP Print Service Plugin
The HP Print Service Plugin is a software component that comes preinstalled on some Nexus, Samsung, and HP Android devices. This plugin enables those Android devices to print to a wide range of HP inkjet and laser printers.
If your device has the HP Print Service Plugin installed, you can connect to a supported HP printer either via a wireless network or directly (if the printer supports direct wireless connections). Once connected, you can print to the printer.
Printing to Cloud Printers
Google’s overarching printing solution for its apps and devices is Cloud Print, an Internet-based service with which you can register a printer. To print using Cloud Print, you install the Google Cloud Print app or an equivalent app on your device, which enables your device to connect to printers registered on Cloud Print.
![]() Caution
Caution
Printing via Cloud Print raises moderate security concerns, because each document you print has to be sent across the Internet to Google’s servers so that it can then be transmitted to the printer. The documents you print are not private. Google keeps a copy of each document temporarily but deletes it when the print job is complete.
To print to a cloud printer, you open the document in the usual app you use for it and then give the Print command. Apps use different locations for the Print command, but you can usually find it easily. For example, in Google Docs, tap the Menu button, tap Share & Export, and then tap Print.
![]() Tip
Tip
If no cloud printer is available, you can “print” from your device by saving the document to Google Drive. You can then print the document from there afterward.
Printing on Your Existing Printer
To print on your existing printer that doesn’t directly support Android, you need to install third-party software on your device. You may also need to install software on your computer to make the printer visible on the network.
The specifics depend on the software, but here’s an example using the PrinterShare app, which is pretty straightforward. To set up printing with PrinterShare:
![]() Install the PrinterShare app on your Android device and use it to open the document you want to print.
Install the PrinterShare app on your Android device and use it to open the document you want to print.
![]() If the printer is connected to a Mac, you open System Preferences, go to the Sharing pane, and turn on Printer Sharing for the printer you want to use.
If the printer is connected to a Mac, you open System Preferences, go to the Sharing pane, and turn on Printer Sharing for the printer you want to use.
![]() If the printer is connected to a Windows PC, you install the PrinterShare app from the PrinterShare website (http://printershare.com).
If the printer is connected to a Windows PC, you install the PrinterShare app from the PrinterShare website (http://printershare.com).
You can then print to the printer from your Android device. PrinterShare provides its software for free but charges you to actually print. You can print a test page for free to make sure PrinterShare is a viable option for you.
Controlling Your Computer from Your Android Device
If you want to do even more with your Android device, set it up to control your computer. This move is great both for when you’re at home and don’t want to go to the next room and for when you’re at home and you need to access your computer at work without the commute.
To control your computer from your Android device, you typically need to install and run a server app on your computer and a client app on your device. The server app receives an incoming connection from the client and transfers data back and forth. The client app receives the data from the server, displays it for you (so that you can see what’s happening on your computer’s screen), and transmits your finger movements and your keystrokes to the server.
Various combinations of software are available, but these are the four most promising at this writing:
![]() Splashtop. Splashtop (www.splashtop.com) consists of a client app called Splashtop, which you install on the remote device (in this case, your Android device), and a server called Streamer, which you install on your PC, Mac, or Linux box. Splashtop comes in various different editions, such as Personal, Business, and Classroom.
Splashtop. Splashtop (www.splashtop.com) consists of a client app called Splashtop, which you install on the remote device (in this case, your Android device), and a server called Streamer, which you install on your PC, Mac, or Linux box. Splashtop comes in various different editions, such as Personal, Business, and Classroom.
![]() LogMeIn. LogMeIn (www.logmein.com) is a service that enables you to connect remotely to your PC or Mac across either a local network or the Internet. Using one of the LogMeIn client apps, such as the LogMeIn for Android app, you can use your Android device to control your PC or Mac after you have connected to it.
LogMeIn. LogMeIn (www.logmein.com) is a service that enables you to connect remotely to your PC or Mac across either a local network or the Internet. Using one of the LogMeIn client apps, such as the LogMeIn for Android app, you can use your Android device to control your PC or Mac after you have connected to it.
![]() Remote Desktop Connection. If your computer has one of the “business” versions of Windows, such as the Professional or Ultimate versions, you can turn on the Remote Desktop feature and connect to your computer using a Remote Desktop client app. Start with the Microsoft Remote Desktop app for Android, which is free, and move on to other apps if you find it doesn’t meet your needs.
Remote Desktop Connection. If your computer has one of the “business” versions of Windows, such as the Professional or Ultimate versions, you can turn on the Remote Desktop feature and connect to your computer using a Remote Desktop client app. Start with the Microsoft Remote Desktop app for Android, which is free, and move on to other apps if you find it doesn’t meet your needs.
![]() VNC client. Virtual Network Computing (VNC) is a feature for remotely viewing and controlling other computers. VNC consists of a server app and a client app. OS X includes a built-in VNC server that you can enable by checking the Screen Sharing box in the Sharing pane in System Preferences. You can then connect your Android device using a VNC client such as VNC Viewer from RealVNC Limited, which is available for free from the App Store.
VNC client. Virtual Network Computing (VNC) is a feature for remotely viewing and controlling other computers. VNC consists of a server app and a client app. OS X includes a built-in VNC server that you can enable by checking the Screen Sharing box in the Sharing pane in System Preferences. You can then connect your Android device using a VNC client such as VNC Viewer from RealVNC Limited, which is available for free from the App Store.
Using a Chromecast Device
Google’s Chromecast device provides easy way to display the content from your Android device on a large screen, such as an HDTV or a monitor. The Chromecast device is the size of a large (and swollen) thumb that connects to the HDTV or monitor via an HDMI port. Your Android device connects to the Chromecast device via Wi-Fi and plays content on it.
The device is simply called “Chromecast”—but the app you use to configure the device and to start casting your screen to it is also called “Chromecast.” So, this section uses the terms Chromecast device and Chromecast app for clarity.
Android plays content on the Chromecast device in two ways, depending on what the content is:
![]() Remote control. If the media file is online, Android causes the Chromecast device to connect to the file. If the media file is on your device, Android transfers the media file to the Chromecast device. Android then uses remote control to play back the file on the Chromecast device.
Remote control. If the media file is online, Android causes the Chromecast device to connect to the file. If the media file is on your device, Android transfers the media file to the Chromecast device. Android then uses remote control to play back the file on the Chromecast device.
![]() Streaming. The Android app you’re using plays the media file but streams the playback to the Chromecast device, which displays the video content and outputs the audio content.
Streaming. The Android app you’re using plays the media file but streams the playback to the Chromecast device, which displays the video content and outputs the audio content.
Setting Up a Chromecast with Your Android Device
You can set up your Chromecast device using your Android device or another device or computer. This section contains instructions for setup using your Android device.
1. On your Android device, go to the Play Store and install the free Chromecast app.
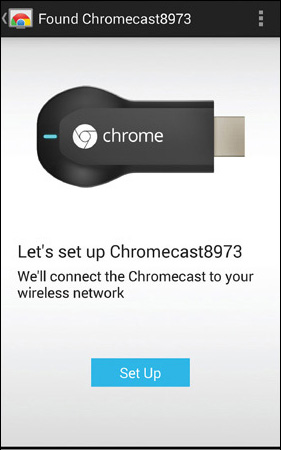
2. After installation, open the Chromecast app. The Chromecast app automatically searches for available Chromecast devices that need setting up. It then displays the Found screen showing your Chromecast device (see Figure 9.22).
3. Tap the Setup button and follow through the setup process until the Chromecast app displays the Change the Name of Your Chromecast screen (see Figure 9.23).

FIGURE 9.23 Type the name you want to assign your Chromecast device, and then tap the Set Name button.
4. Type the name you want to give the Chromecast device and then tap the Set Name button. The Chromecast app displays the Connect Chromecast to Your Wi-Fi screen (see Figure 9.24).
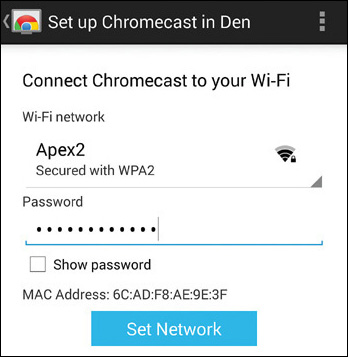
FIGURE 9.24 Use the controls on the Connect Chromecast to Your Wi-Fi screen to connect your Chromecast device to your wireless network.
5. Tap the Wi-Fi Network pop-up menu and then tap the network you want to use.
6. Tap the Password field and then type the password.
7. Tap the Set Network button. The Sweet! You Are Ready to Cast screen appears (see Figure 9.25).

FIGURE 9.25 When you see the Sweet! You Are Ready to Cast screen, you can start using your Chromecast device.
![]() Note
Note
At this point, the Chromecast device connects to the Internet and checks automatically for updates. If it finds an update, it downloads and installs it. You’ll see a message and progress readout on your TV screen while this is happening. During the update, the Chromecast device reboots. You don’t need to do anything at this point—just wait until the Chromecast screen appears again on your TV.
Casting Your Screen to the Chromecast Device
When a Chromecast device is available to your Android device, apps that support Chromecast display the Cast icon. For example, the YouTube app displays the Cast icon near the Menu button, as you can see in Figure 9.26.
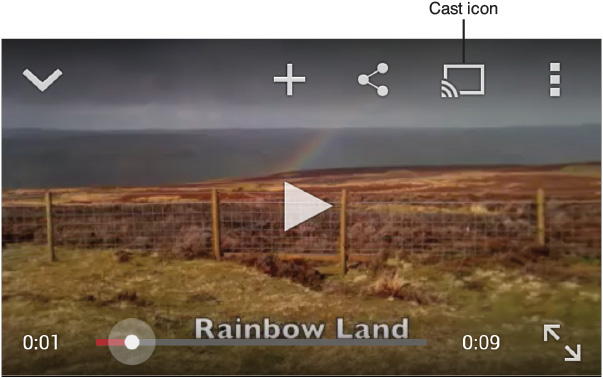
Tap the Cast icon to display the Connect to Device dialog box (see Figure 9.27), and then tap the Chromecast device you want to use.
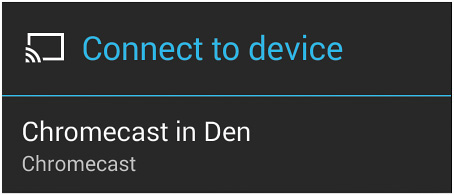
Android connects to the Chromecast device, and the Chromecast device begins playing back the content (see Figure 9.28).

Playing Music to the Chromecast Device
You can also use the Chromecast device to play music through the speakers connected to your HDTV or monitor. This can be great for sharing music with your friends or with your neighbors.
If the music file is stored online, Android causes the Chromecast device to stream it from the online site. If the music file is stored on your device, the device transfers the audio to the Chromecast device, and the Chromecast device then plays it back.
For example, in the Play Music app, tap the Cast icon to display the Connect to Device dialog box, and then tap the Chromecast device’s name. The Play Music transfers the music file to the Chromecast device and enables remote control, so you use the playback buttons in the Play Music app to control playback on the Chromecast device.
![]() Note
Note
After you’ve started the music playing on the Chromecast device, you can close the Play Music app (or even shut down your Android device) without the music stopping, because the Chromecast device is playing it. Closing the app (or shutting down your device) isn’t helpful unless you need to convince someone that Android isn’t streaming the audio to the Chromecast device.