13. Staying in Touch via Social Networking
In This Chapter
![]() Configuring and using Facebook and Twitter
Configuring and using Facebook and Twitter
![]() Using multiple Facebook accounts or Twitter accounts
Using multiple Facebook accounts or Twitter accounts
![]() Securing Facebook with two-factor authentication and Twitter with login verification
Securing Facebook with two-factor authentication and Twitter with login verification
Your Android device is great for keeping in touch with your contacts via social networking no matter where you go—or where they go. In this chapter, you’ll learn how you can make the most of Facebook and Twitter on your device.
Both apps are largely straightforward to use, especially if you are familiar with how the two services work. But both have serious implications for your privacy, so it’s essential that you configure them suitably. In particular, you should secure your Facebook account by setting up two-factor authentication and your Twitter account by applying login verification.
Getting Serious with Facebook
If you’re on Facebook, you’ll probably want to use your Android device to keep up with your friends’ latest news and to post your own.
Facebook makes it easy to share your information—too easy, many would say. You’ll have no difficulty posting, liking, or commenting, so we’ll concentrate on the other side of the equation: how to configure Facebook so that you’re sharing only what you want to share, and no more.
Most Android devices include the Facebook app, but if yours doesn’t, go to the Play Store and download it. You’ll then need to log in using your account.
Making the Right Decision When Logging In
When you’re logging in, the big decision comes on the Contacts Sync screen (see Figure 13.1), where you need to tap the right radio button out of these three:
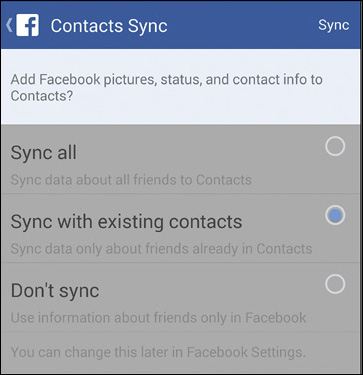
FIGURE 13.1 When logging in to Facebook, choose which of your Facebook information to sync to the contacts on your Android device.
![]() Sync All. Tap this radio button to sync data about all of your Facebook friends to your contacts on your Android device. This approach may mean adding many contacts to your device.
Sync All. Tap this radio button to sync data about all of your Facebook friends to your contacts on your Android device. This approach may mean adding many contacts to your device.
![]() Sync with Existing Contacts. Tap this radio button to sync data about only those Facebook friends who already have a contact record on your device. This is often the best option.
Sync with Existing Contacts. Tap this radio button to sync data about only those Facebook friends who already have a contact record on your device. This is often the best option.
![]() Don’t Sync. Tap this radio button to keep your Facebook friends separate from the contacts on your Android device, even if some of them are the same people.
Don’t Sync. Tap this radio button to keep your Facebook friends separate from the contacts on your Android device, even if some of them are the same people.
Tap the Sync button or the Done button—whichever button appears on the Contacts Sync screen after you have selected the radio button you want—to implement your choice.
Getting and Configuring Facebook Messenger
Until summer 2014, the Facebook apps for Android and other mobile platforms (such as Apple’s iOS) enabled you to send messages from within the app. But in summer 2014, Facebook started requiring you to use its separate Facebook Messenger app for sending messages. At this writing, there’s no way around using Messenger unless you’re prepared to give up sending messages on Facebook.
Getting Facebook Messenger
If the Facebook app prompts you to get the Facebook Messenger app, tap the Get App button and follow through the process of downloading and installing it from the Play Store.
![]() Note
Note
Facebook Messenger requires a daunting set of permissions, including Identity, Contacts/Calendar, Location, Photos/Media/Files, Camera/Microphone, and Device ID & Call Information. These permissions are necessary for the many functions that Facebook Messenger provides, such as taking selfies and videos and sharing them with your contacts.
![]() Caution
Caution
Installing Facebook Messenger causes Samsung devices to display the Potential Threat Alerts dialog box, which warns you that the app is authorized to access Messages. This looks like a problem, but it is not: If you want to be able to use Facebook Messenger, you need it to be able to send and receive messages.
After installing Facebook Messenger, tap the Open button on the Play Store screen to open the app. (If you’ve left the Play Store screen, go to the Apps screen and tap the Messenger icon there to open Facebook Messenger.)
On the Welcome to Messenger screen, tap the Continue button. Next, the Text Anyone in Your Phone screen appears (on a phone). You can either tap the Sync Contacts button to sync all your contacts continuously with Facebook, enabling you to see which of them are on Messenger (and, optionally, get in touch with them) or tap the Not Now button.
Whichever choice you make here, the What Number Can People Use to Reach You? screen appears. Make sure that the correct phone number appears, and then tap the OK button. (If you don’t want to provide your phone number at this point, tap the Not Now button and then tap the Skip button in the Skip Phone Number? dialog box that opens to nag you for the phone number.)
![]() Note
Note
Facebook doesn’t make the phone number you specify on the What Number Can People Use to Reach You? screen available to other people. Instead, it enables people who already have this phone number for you to contact you on this number.
Next, the Confirming Your Phone Number screen appears while Facebook sends you a confirmation code via instant message. Normally, Facebook Messenger receives this message automatically (because you gave it permission to access your messages) and dismisses the Confirming Your Phone Number screen. If not, type in the confirmation code manually and tap the Continue button.
![]() Caution
Caution
Facebook also sends you an email confirming that it has added this phone number to your account. If you receive one of these emails without adding a phone number to your account, open your browser, go to www.facebook.com/hacked, and click the My Account Is Compromised button. Don’t click the Secure Your Account link in the Facebook message about confirming your phone number because fraudsters can make convincing replicas of both the message and the Report Compromised Account page on Facebook’s website.
![]() Note
Note
If the Secure Your Account dialog box opens at this point, click the Continue button.
On the You’re on Messenger! screen, tap the Continue button to start using Facebook Messenger.
Navigating the Facebook Messenger Interface
Now that you have Facebook Messenger up and running, you’ll find your way around easily. As you can see in Figure 13.2, Facebook Messenger has four tabs:
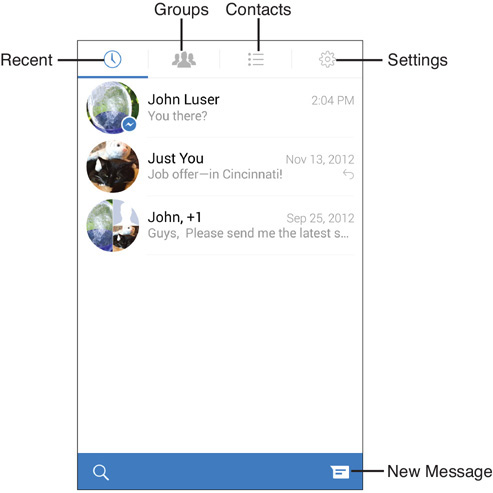
FIGURE 13.2 On the Recent screen, you can tap a chat to open it, or tap New Message to start a new message.
![]() Recent. Tap this tab to see recent activity. You can tap a chat to display it, or tap the New Message button to start a new message.
Recent. Tap this tab to see recent activity. You can tap a chat to display it, or tap the New Message button to start a new message.
![]() Groups. Tap this tab to display your list of groups. You can create a new group by tapping one of the New Group placeholders or by tapping the New Group button in the lower-right corner.
Groups. Tap this tab to display your list of groups. You can create a new group by tapping one of the New Group placeholders or by tapping the New Group button in the lower-right corner.
![]() Contacts. Tap this tab to display the Contacts screen. This screen has two tabs: the Messenger tab and the Active tab. Tap the Messenger tab to display your list of contacts. Tap the Active tab to display your active chats.
Contacts. Tap this tab to display the Contacts screen. This screen has two tabs: the Messenger tab and the Active tab. Tap the Messenger tab to display your list of contacts. Tap the Active tab to display your active chats.
![]() Settings. Tap this tab to display the Settings screen. See the next section for details.
Settings. Tap this tab to display the Settings screen. See the next section for details.
Choosing Settings for Facebook Messenger
To make Facebook Messenger work the way you want, tap the Settings icon on the tab bar and work on the Settings screen (see Figure 13.3). These are the settings you can choose on the main screen:
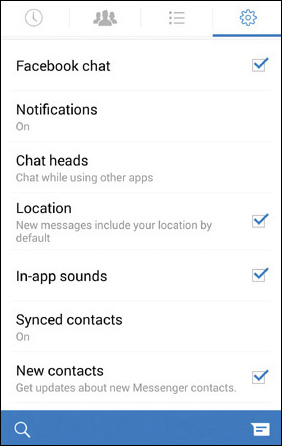
![]() Facebook Chat. Check this box to enable Facebook chat. Normally, you’ll want to do this.
Facebook Chat. Check this box to enable Facebook chat. Normally, you’ll want to do this.
![]() Notifications. Tap this button to display the Notifications screen. There are a bunch of these screens, and you’ll learn about them in the next section.
Notifications. Tap this button to display the Notifications screen. There are a bunch of these screens, and you’ll learn about them in the next section.
![]() Chat Heads. Tap this button to display the Chat Heads screen. Here, you can set the Chat Heads switch to On if you want to use Chat Heads or to Off if you don’t. You can also set the two options discussed in the nearby note.
Chat Heads. Tap this button to display the Chat Heads screen. Here, you can set the Chat Heads switch to On if you want to use Chat Heads or to Off if you don’t. You can also set the two options discussed in the nearby note.
If you use Chat Heads, you can check the Hide When Using Apps That Take Up the Full Screen box to remove Chat Heads when you’re using a full-screen app (such as a game). You can check the Start Conversations from the Notification Tray box to enable yourself to start a conversation in Facebook Messenger by tapping the Chat Heads notification in the Notifications panel.
![]() Location. Check this box if you want new messages you send to include your location unless you remove it.
Location. Check this box if you want new messages you send to include your location unless you remove it.
![]() Caution
Caution
Including your location in new messages is great for letting your friends know where you are, but if it raises any concerns about your security, uncheck the Location box and add your location manually to only those messages that need it.
![]() In-App Sounds. Check this box to allow Facebook Messenger to play sounds.
In-App Sounds. Check this box to allow Facebook Messenger to play sounds.
![]() Synced Contacts. This button shows whether Facebook Messenger is currently syncing your contacts. To change your setting, tap this button and then tap the OK button in the Synced Contacts dialog box.
Synced Contacts. This button shows whether Facebook Messenger is currently syncing your contacts. To change your setting, tap this button and then tap the OK button in the Synced Contacts dialog box.
![]() Note
Note
Turning off syncing removes all your phone’s contacts from Facebook Messenger.
![]() New Contacts. Check this box if you want to receive updates about new Facebook Messenger contacts.
New Contacts. Check this box if you want to receive updates about new Facebook Messenger contacts.
Choosing Notifications Settings for Facebook Messenger
You can choose the following settings on the Notifications screen for Facebook Messenger (see Figure 13.4):
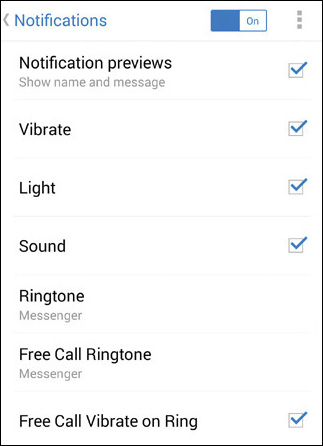
FIGURE 13.4 On the Notifications screen for Facebook Messenger, you can choose whether to view notification previews and whether to use vibration, light, and sound for notifications.
![]() Notifications. Set this switch to Off if you want to suppress all notifications temporarily.
Notifications. Set this switch to Off if you want to suppress all notifications temporarily.
![]() Notification Previews. Check this box to display previews of the friend’s name and the message. These previews are usually handy unless you get too many of them.
Notification Previews. Check this box to display previews of the friend’s name and the message. These previews are usually handy unless you get too many of them.
![]() Vibrate. Check this box to have your device vibrate when you receive a notification. This setting is available only on devices that have a vibration motor.
Vibrate. Check this box to have your device vibrate when you receive a notification. This setting is available only on devices that have a vibration motor.
![]() Light. Check this box to have your device pulse the notification light when you have a notification.
Light. Check this box to have your device pulse the notification light when you have a notification.
![]() Sound. Check this box to have your device play a sound when you receive a notification.
Sound. Check this box to have your device play a sound when you receive a notification.
![]() Ringtone. Tap this button, select the ringtone in the Ringtone dialog box, and then tap the OK button.
Ringtone. Tap this button, select the ringtone in the Ringtone dialog box, and then tap the OK button.
![]() Tip
Tip
The Free Call Ringtone setting enables you to use a different ringtone to identify free calls from paid calls.
![]() Free Call Ringtone. Tap this button, select your preferred free call ringtone in the Ringtone dialog box, and then tap the OK button.
Free Call Ringtone. Tap this button, select your preferred free call ringtone in the Ringtone dialog box, and then tap the OK button.
![]() Free Call Vibrate on Ring. Check this box if you want your phone to vibrate when you get a free call. This setting is available only on devices that have a vibration motor.
Free Call Vibrate on Ring. Check this box if you want your phone to vibrate when you get a free call. This setting is available only on devices that have a vibration motor.
Making Facebook Work Your Way
Facebook has a large number of settings that you can configure to make the Facebook app and the Facebook platform work your way. The default settings tend to be configured in ways that suit Facebook, so you’d be wise to spend a few minutes understanding what the settings do and configuring them to suit your needs.
Reaching the Settings
To reach the settings, tap the More button on the right side of the main toolbar. This brings you to the More screen, which starts with your profile picture and your Favorites list. Scroll down past the Apps list, the Feeds list, the Groups list, and the Pages list, and you’ll find the Help & Settings section.
Choosing App Settings
To get started choosing settings, tap the App Settings button to display the Settings screen (see Figure 13.5).
FIGURE 13.5 The main Settings screen includes vital settings such Facebook Chat, the Refresh Interval, and the notifications you receive.
You can choose these settings in the General Settings section:
![]() Facebook Chat. Tap this button to toggle Facebook Chat on or off.
Facebook Chat. Tap this button to toggle Facebook Chat on or off.
![]() Refresh Interval. Tap this button to display the Refresh Interval dialog box, and then tap the appropriate radio button: 30 Minutes, 1 Hour, 2 Hours, 4 Hours, or Never.
Refresh Interval. Tap this button to display the Refresh Interval dialog box, and then tap the appropriate radio button: 30 Minutes, 1 Hour, 2 Hours, 4 Hours, or Never.
![]() Tip
Tip
Set a longer refresh interval—or Never—to reduce the amount of battery power and data that Facebook takes.
![]() Messenger Location Services. Tap this button to display the Location dialog box, and then check or uncheck the Location Is On box. Tap the OK button to close the dialog box.
Messenger Location Services. Tap this button to display the Location dialog box, and then check or uncheck the Location Is On box. Tap the OK button to close the dialog box.
![]() Sync Photos. Tap this button and use the Photo Syncing screen to choose which photos and albums to sync.
Sync Photos. Tap this button and use the Photo Syncing screen to choose which photos and albums to sync.
![]() Video Auto-Play. Tap this button to display the Video Auto-Play dialog box, and then tap the appropriate radio button: On, Wi-Fi Only, or Off.
Video Auto-Play. Tap this button to display the Video Auto-Play dialog box, and then tap the appropriate radio button: On, Wi-Fi Only, or Off.
![]() Caution
Caution
Select the On radio button for Video Auto-Play only if you have a generous or unlimited data plan.
![]() Language. To change the language, tap this button, and then tap the appropriate radio button in the dialog box that opens. The default setting is Device Language, which works well for general purposes.
Language. To change the language, tap this button, and then tap the appropriate radio button in the dialog box that opens. The default setting is Device Language, which works well for general purposes.
You can choose these settings in the Notification Settings section:
![]() Notifications. Check this box to make notifications active and to make all the other settings in the Notification Settings section available.
Notifications. Check this box to make notifications active and to make all the other settings in the Notification Settings section available.
![]() Vibrate. Check this box to make your device vibrate to signal an incoming notification. This works only if your device has a vibration motor.
Vibrate. Check this box to make your device vibrate to signal an incoming notification. This works only if your device has a vibration motor.
![]() Phone LED. Check this box to have the phone LED flash to let you know there are incoming notifications.
Phone LED. Check this box to have the phone LED flash to let you know there are incoming notifications.
![]() Notification Ringtone. Tap this button to display the Notification Ringtone dialog box, tap to select a distinctive ringtone, and then tap the OK button.
Notification Ringtone. Tap this button to display the Notification Ringtone dialog box, tap to select a distinctive ringtone, and then tap the OK button.
![]() Wall Posts. Check this box to receive an alert when someone defaces your wall.
Wall Posts. Check this box to receive an alert when someone defaces your wall.
![]() Messages. Check this box to enable messages.
Messages. Check this box to enable messages.
![]() Comments. Check this box to receive alerts when people post comments.
Comments. Check this box to receive alerts when people post comments.
![]() Friend Requests. Check this box to receive alerts when you receive friend requests.
Friend Requests. Check this box to receive alerts when you receive friend requests.
![]() Friend Confirmations. Check this box to receive alerts when you receive friend confirmations.
Friend Confirmations. Check this box to receive alerts when you receive friend confirmations.
![]() Photo Tags. Check this box to receive alerts for events.
Photo Tags. Check this box to receive alerts for events.
![]() Event Invites. Check this box to receive alerts for event invites.
Event Invites. Check this box to receive alerts for event invites.
![]() Application Requests. Check this box to receive alerts for application requests.
Application Requests. Check this box to receive alerts for application requests.
![]() Groups. Check this box to receive alerts for changes to groups.
Groups. Check this box to receive alerts for changes to groups.
![]() Lock Screen Notifications Settings. Check this box to see notifications on the lock screen.
Lock Screen Notifications Settings. Check this box to see notifications on the lock screen.
The Chat Heads section of the Settings screen has only one button, the Messenger Settings button. Tap the button to jump to the Chat Heads screen of settings in the Facebook Messenger app.
Managing Your News Feed
To manage your news feed, tap the Manage News Feed button on the More screen, and then work on the Manage News Feed screen. Here, you can tap the Follow button to start following someone or tap the Following button to stop following someone. (There’s one button on each news feed item. The button displays either “Follow” or “Following,” as appropriate.)
Choosing Essential Privacy Settings
To maintain as much privacy as you want while sharing your information on Facebook, you must make sure that you choose suitable privacy settings. This section concentrates on the most important settings—those that will make the greatest difference.
Opening the Privacy Shortcuts Screen
You can configure the absolute minimum of privacy settings from the Privacy Shortcuts screen. Here’s how to display the Privacy Shortcuts screen:
1. In the Facebook app, tap the More button to display the More screen.
2. In the Help & Settings section, tap the Account Settings button to display the Settings screen.
3. Tap the Privacy Shortcuts button to display the Privacy Shortcuts screen (see Figure 13.6).
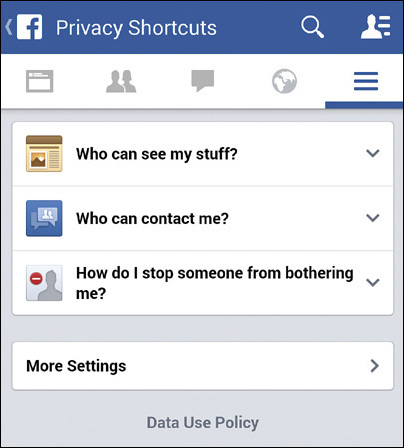
FIGURE 13.6 The Privacy Shortcuts screen gives you access to the three most important privacy settings, plus a More Settings button for those times when you want to dig into the Privacy settings.
![]() Note
Note
Depending on your device and your region, you may see a different screen (such as the Privacy screen) instead of the Privacy Shortcuts screen.
Controlling Who Can See Your Posts
On the Privacy Shortcuts screen, tap the Who Can See My Stuff? heading to display its contents (see Figure 13.7).
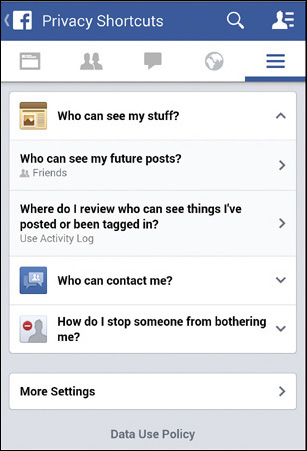
FIGURE 13.7 On the Privacy Shortcuts screen, expand the Who Can See My Stuff? section, and then tap the Who Can See My Future Posts? button.
Tap the Who Can See My Future Posts? button to display the Select Audience screen (see Figure 13.8). You can then tap the appropriate button: Public, Friends, Only Me, or a specific group.
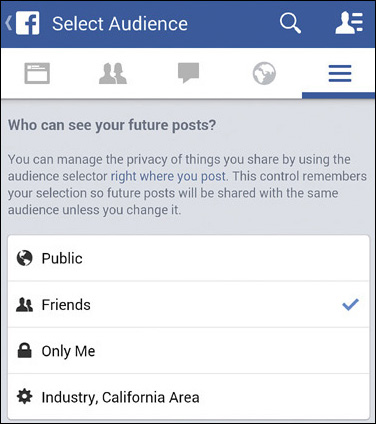
FIGURE 13.8 On the Select Audience screen, tap the button for the group with which you want to share your posts.
![]() Caution
Caution
Share your posts with the Public audience only if you are certain that you want to share everything you post on Facebook with anybody in the world, both now and forever onward. Sharing your posts with the Friends audience is usually a much better choice.
Reviewing and Sanitizing Your Activity Log
Tap the Back button to return to the Privacy Shortcuts screen, and then tap the Where Do I Review Who Can See Things I’ve Posted or Been Tagged In? button. The Facebook app displays the Activity Log screen (see Figure 13.9).
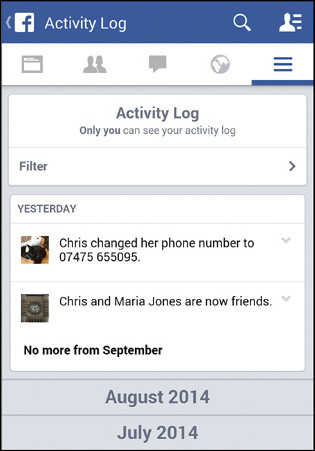
FIGURE 13.9 On the Activity Log screen, tap the Filter button to display the Activity Log Options screen.
![]() Tip
Tip
You can also go straight to the Activity Log screen by tapping the Activity Log button in the Help & Settings section of the More screen.
Tap the Filter button to display the Activity Log Options screen (see Figure 13.10), and then tap the button for the item type you want to view. The Activity Log screen appears again, this time showing the items of the type you chose.
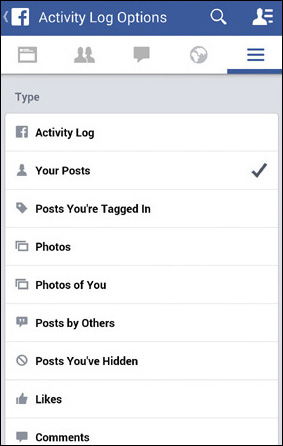
FIGURE 13.10 On the Activity Log Options screen, tap the button for the item type you want to view on the Activity Log screen.
![]() Note
Note
You can filter by a long list of item types, from Your Posts, Posts You’re Tagged In, and Photos all the way through Likes, Comments, and Friends to Questions, Location History, and Apps.
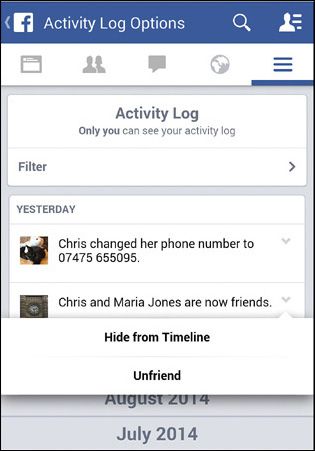
Tap a downward-caret button to display a menu of actions you can take with it. For example, on a friend announcement (see Figure 13.11), you can tap the Hide from Timeline button or the Unfriend button.
Controlling Who Can Contact You
To control who can contact you, tap the Who Can Contact Me? button on the Privacy Shortcuts screen to display its contents (see Figure 13.12).
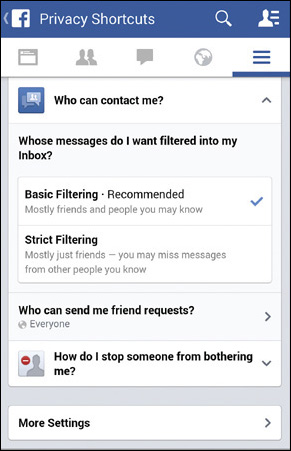
FIGURE 13.12 Expand the Who Can Contact Me? section on the Privacy Shortcuts screen to display the options for controlling who can contact you.
In the Whose Messages Do I Want Filtered into My Inbox? box, tap the Basic Filtering button or the Strict Filtering button, as needed.
![]() Tip
Tip
If you’re getting too many unwanted messages in your Inbox, try turning on Strict Filtering. By and large, this setting allows only your friends to send you messages, but Facebook also lets through some other messages that it has high confidence you will want. If you turn on Strict Filtering, visit your Other Messages folder periodically to make sure you’re not filtering out messages you want.
Next, tap the Who Can Send Me Friend Requests? button to display the Select Audience screen, and then tap the Everyone button or the Friends of Friends button, as needed.
![]() Note
Note
Friends of Friends is the sensible choice for friend requests except for a Facebook account that you use to maintain a public presence. For example, if you have a Facebook account for your band, you’d probably want to allow friend requests from everyone.
Blocking a Person Who is Bothering You
If someone is harassing you on Facebook, you can block that person. Follow these steps:
1. Tap the How Do I Stop Someone from Bothering Me? button on the Privacy Shortcuts screen to display the section’s controls (see Figure 13.13).
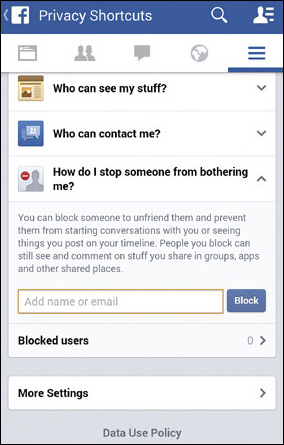
FIGURE 13.13 You can block someone from contacting you by typing his name or email address and then tapping the Block button.
2. Type the offender’s name or email address in the Add Name or Email box.
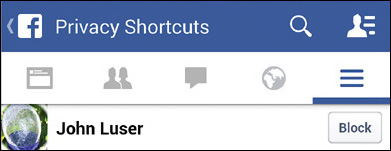
3. Tap the Block button. The Privacy Shortcuts displays a list of matches (see Figure 13.14).
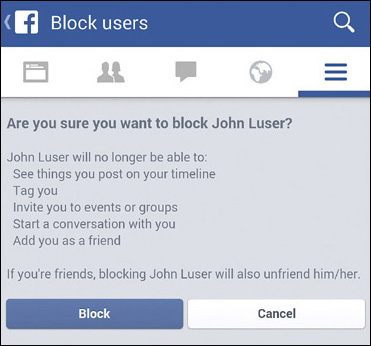
4. Tap the Block button for the person you want to block. The Block Users screen appears (see Figure 13.15), making clear that the person will not be able to see items you post on your timeline, tag you, invite you to events or groups, start conversations with you, or add you as a friend.
![]() Tip
Tip
If you’re not certain which of the list of matches on the Privacy Shortcuts screen is the person you want to block, tap the person’s name to display her profile.
5. Tap the Block button to block the person.
![]() Note
Note
Blocking someone with whom you’re a currently a friend also unfriends that person.
![]() Tip
Tip
To manage your blocked list, tap the Blocked Users button at the bottom of the How Do I Stop Someone from Bothering Me? section on the Privacy Shortcuts screen. On the Block Users screen, you can review the Blocked Users list, and tap the Unblock button to unblock someone if necessary.
If you run into abusive content, spam, or policy violations, tap the Report a Problem button on the More screen and follow through the procedure for reporting the problem to Facebook.
Securing Your Facebook Account with Two-Factor Authentication
As you know, the default means of authentication (proving your identity) to Facebook is entering your user ID and password. This is one-factor authentication and gives you only a modest amount of security. To help prevent anyone hacking into your account, you can set up two-factor authentication so that you have to enter a code each time you log in to Facebook from an unknown device.
![]() Tip
Tip
Please do set up two-factor authentication to secure your account. It takes minimal time and effort and provides pretty good protection against hacking.
Setting Up Two-Factor Authentication
Here’s how to set up two-factor authentication:
1. In the Facebook app, tap the More button to display the More screen.
2. In the Help & Settings section, tap the Account Settings button to display the Settings screen.
3. Tap the Security button to display the Security Settings screen (see Figure 13.16).
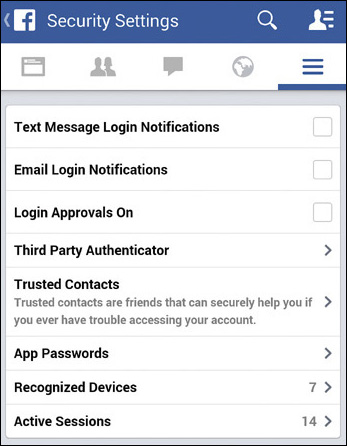
FIGURE 13.16 On the Security Settings screen, check the Login Approvals On box to start setting up two-factor authentication.
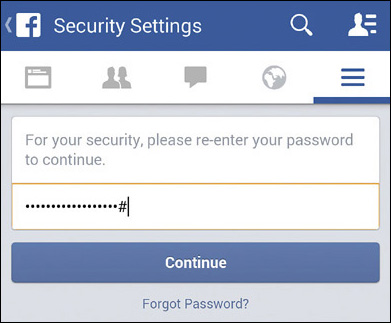
4. Check the Login Approvals On box. The Facebook app prompts you to re-enter your password (see Figure 13.17).
6. Tap the Continue button. The first Login Approvals screen appears (see Figure 13.18).
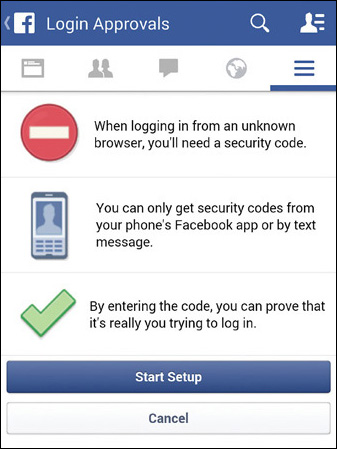
7. Tap the Start Setup button. The second Login Approvals screen appears (see Figure 13.19), showing the phone number to which Facebook will text a code to confirm.
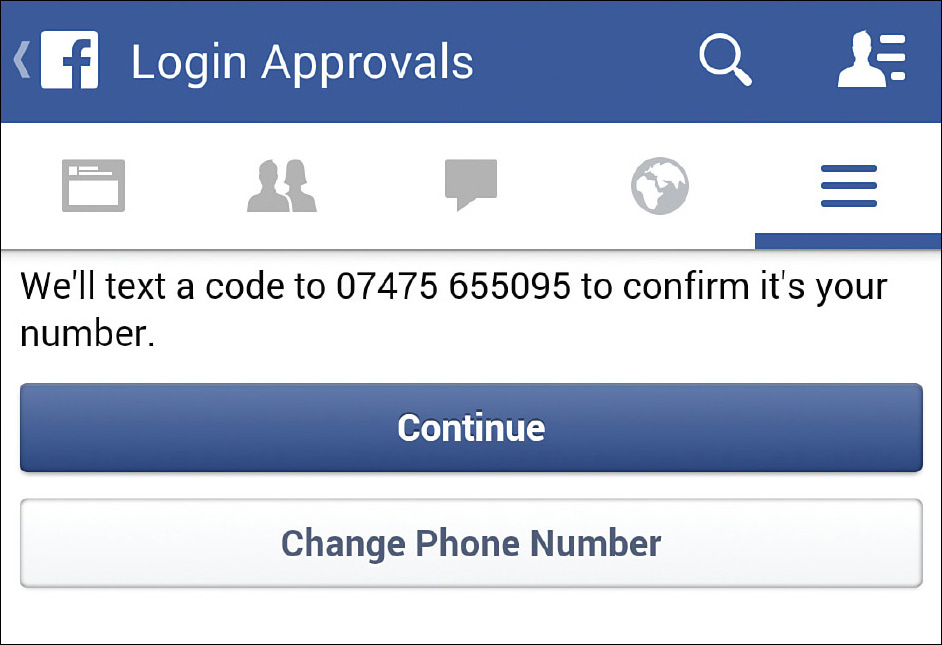
FIGURE 13.19 On the second Login Approvals screen, verify the phone number or tap the Change Phone Number button to provide a different phone number.
![]() Note
Note
If necessary, tap the Change Phone Number button and use the Set Up Security Code Delivery screen to add your mobile phone number to your Timeline.
8. Tap the Continue button. The third Login Approvals screen appears (see Figure 13.20), prompting you to enter the confirmation code that Facebook has texted to your phone.
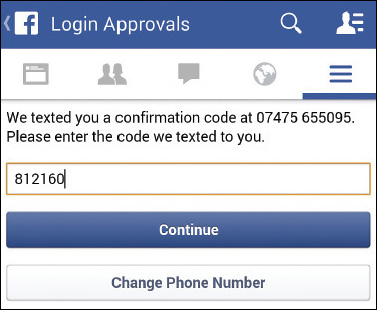
FIGURE 13.20 Enter the confirmation code that Facebook has texted you, and then tap the Continue button.
9. Type in the code.
10. Tap the Continue button. The final Login Approvals screen appears (see Figure 13.21).
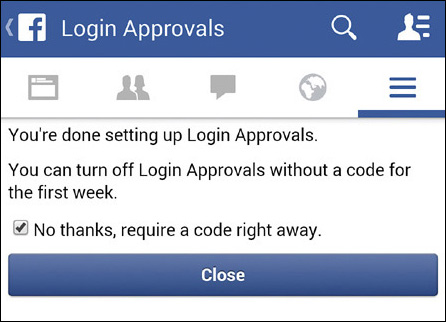
FIGURE 13.21 On the final Login Approvals screen, check the No Thanks, Require a Code Right Away box to tighten your security immediately.
11. Check the No Thanks, Require a Code Right Away box to decline Facebook’s offer to let you turn off Login Approvals without a code for the first week.
12. Tap the Close button. The Security Settings screen appears again.
![]() Note
Note
Facebook now sends you an email notifying you that Login Approvals is now activated.
Logging in with a Code
Now that you’ve turned on Login Approvals, you’ll need to enter a code when you log in from a different device. The Facebook app displays the Login Approval Required dialog box (see Figure 13.22) to let you know.
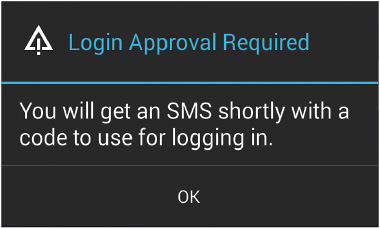
FIGURE 13.22 The Facebook app displays the Login Approval Required dialog box when you try to log in from a different device.
Tap the OK button, enter the code when you receive it in a text, and then tap the Continue button to log in.
Creating Your Own Login Approval Code
If you need to log in to Facebook using a different device, but your phone isn’t able to receive text messages, you can use the Code Generator to generate a code.
Tap the More button to display the More screen, and then tap the Code Generator button in the Help & Settings section. The Code Generator screen appears, showing a numeric code that changes every 30 seconds. Type in the code on the device that requires Login Approval, and then tap the Continue button.
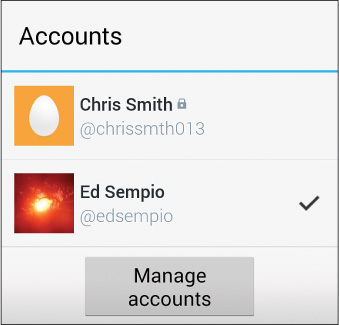
Using Multiple Facebook Accounts on the Same Device
Android’s Settings app includes a feature for setting up a Facebook account on your device. To get started, you open the Settings app, tap the Add Account button in the Accounts section, and then tap the Facebook button on the Add an Account screen. Android then walks you through the process of setting up the account.
This feature enables you to set up only one account on your device. If you go back to the Settings app and try to add another Facebook account, you get the message “Only one Facebook account is supported.”
Using Multiple Accounts by Logging Out and Logging In
The simplest way to use multiple Facebook accounts on your device is to log out of the account you’ve been using and then log in to the account you want to use next.
The Facebook app is set up to keep you logged in all the time so that you can share your news and views easily and receive updates from your friends and anyone else you have allowed to contact you. So normally you don’t need to log out unless you want to unhook yourself from Facebook for a while or you need to change accounts.
Here’s how to log out from Facebook:
1. Tap the More button to display the More screen.
2. Tap the Log Out button (at the bottom of the screen). The Log Out dialog box opens (see Figure 13.23).

FIGURE 13.23 Tap the Log Out button in the Log Out dialog box to log out of Facebook—for example, when switching from one account to another.
3. Tap the Log Out button. Facebook logs you out and displays the Log In screen.
Now that you’ve logged out of the account you were using, you can log in to the next account you want to use.
![]() Note
Note
If you’ve implemented two-factor authentication on the account to which you’re logging in, you’ll also need to enter a Login Approval code. This is the code from a text that Facebook sends to your phone or a code that you generate using the Code Generator on your phone.
Using Multiple Accounts by Using a Browser
Another way of using multiple Facebook accounts is to open a browser, go to the Facebook website (www.facebook.com), and log in. You can log in using a different Facebook account than you’re using in the Facebook app.
The advantage of this method is that you can be logged in to two or more accounts at once. The disadvantage is that some of the accounts are using the browser interface instead of the Facebook app, which is normally easier to use on a mobile device.
![]() Tip
Tip
If you need to use multiple Facebook accounts from within the same app, look at Friendcaster from OneLouder Apps. This free app (that offers in-app purchases, as usual) enables you to set up multiple accounts and switch among them. You set up your main account first, making it your primary account. To switch accounts, tap the Settings button (the cog icon), tap Accounts, and then tap the account you want to use.
Removing Your Facebook Account from Your Device
If you no longer need to use a particular Facebook account on your device, you can remove it.
![]() Caution
Caution
Removing a Facebook account from your device deletes all its messages and other data from your device. It also deletes all the contact information from Facebook.
First, log out of the Facebook app if it’s running. Tap the More button, tap the Log Out button, and then tap Log Out in the Log Out dialog box.
Next, close the Facebook app. Tap the Recent Apps button, and then swipe the Facebook app off the list to the left or right.
Last, remove your Facebook account. Open the Settings app and tap the Facebook button in the Accounts section to display the Sync screen. Tap the Menu button, tap Remove Account, and then tap the Remove Account button in the Remove Account dialog box (see Figure 13.24).
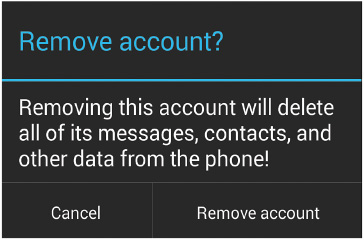
FIGURE 13.24 Tap the Remove Account button in the Remove Account dialog box to remove your Facebook account and all its data from your device.
Making the Most of Twitter
If you enjoy using Twitter, you’ll want to fully exploit it on your Android device. Twitter is pretty straightforward compared to Facebook, but you should still spend some time configuring the settings to suit your needs and avoid any unpleasant surprises. You’ll probably want to implement the login verification feature to secure your account against unauthorized access.
Signing In to Twitter
The first time you run the Twitter app, you sign in to your Twitter account. If you don’t have an account, tap the Create My Account button on the Welcome to Twitter screen to create an account using your Gmail address.
On the Sign In screen (for an existing account) or the Success screen (for an account you’ve just created), you need to pay attention to the check box called Upload My Address Book and Use My Phone Number to Connect Me with Friends and Send Me Text Updates. This box is checked by default, so you’ll need to uncheck it if you don’t want to upload all your contacts to Twitter.
![]() Tip
Tip
If you do leave the Upload My Address Book check box checked, go through the list on the Invite Friends screen and uncheck the boxes for any who won’t appreciate an invitation to join you on Twitter. Alternatively, tap the Skip button to skip sending invitations altogether.
After you sign in, the Twitter app prompts you to let it use your current location to “customize your experience” (see Figure 13.25)—in other words, to include location-specific information in what it shows you.
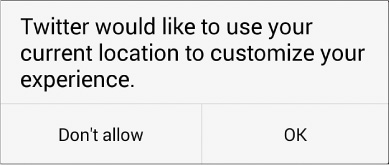
FIGURE 13.25 Tap the OK button in this dialog box if you want to allow Twitter to use your location.
![]() Tip
Tip
You can change Twitter’s access to your location information afterward by checking or unchecking the Location box on the General screen in the app’s settings.
Navigating the Twitter App
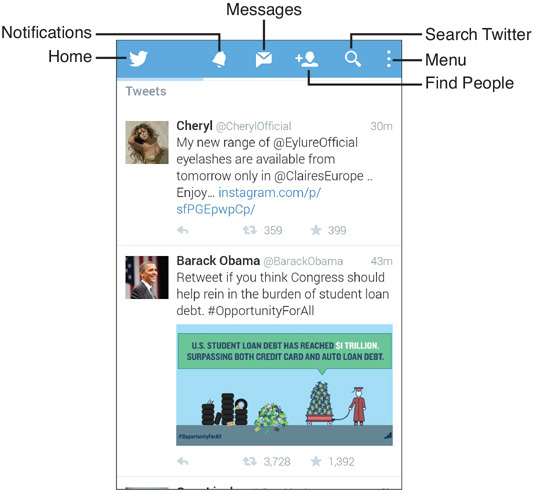
After you’ve finished setting up the app, you’ll see your Home screen (see Figure 13.26).
These are the main screens of the Twitter app:
![]() Home. The Home screen displays a list of tweets for you to browse. At the top of the screen, the Who to Follow list suggests other people you may want to follow.
Home. The Home screen displays a list of tweets for you to browse. At the top of the screen, the Who to Follow list suggests other people you may want to follow.
![]() Tip
Tip
The Home screen is at the top level of the Twitter app, so you tap the Back button to go back to it after navigating to another screen.
![]() Notifications. This screen displays updates when people follow you, retweet your tweets, make you a favorite, or mention you.
Notifications. This screen displays updates when people follow you, retweet your tweets, make you a favorite, or mention you.
![]() Messages. This screen displays your private messages.
Messages. This screen displays your private messages.
![]() Note
Note
When the Messages screen is empty, you can tap the Import Contacts button on the screen to upload your contacts to Twitter so that it can help you find friends and suggest users you may want to follow.
![]() Find People. On this screen, you can browse people on the Suggested tab or use the Popular tab to browse by topics (such as Music, Sports, or Entertainment). You can also tap the Search icon to display the Search field, and then search by keywords.
Find People. On this screen, you can browse people on the Suggested tab or use the Popular tab to browse by topics (such as Music, Sports, or Entertainment). You can also tap the Search icon to display the Search field, and then search by keywords.
![]() Search Twitter. Use this screen to search Twitter using keywords.
Search Twitter. Use this screen to search Twitter using keywords.
Configuring the Twitter App
Compared to Facebook, Twitter has refreshingly few settings, but there are enough to make a big difference to your Twitter experience.
Tap the Menu button, and then tap Settings to display the Settings screen (see Figure 13.27).
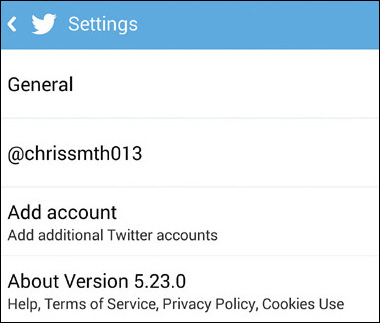
FIGURE 13.27 From the Settings screen, you can choose General settings, choose account-specific settings, and add other accounts.
Choosing General Settings
Start your configuration of the Twitter app by choosing General settings. These settings apply to all your Twitter accounts. Tap the General button on the Settings screen to display the General screen (see Figure 13.28). You can then choose these settings:
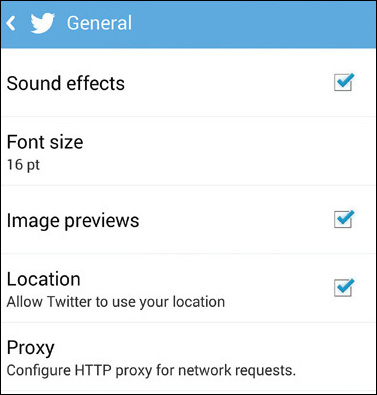
![]() Sound Effects. Check this box to enable sound effects.
Sound Effects. Check this box to enable sound effects.
![]() Font Size. Tap this button to display the Font Size dialog box and then tap the radio button for the font size you want.
Font Size. Tap this button to display the Font Size dialog box and then tap the radio button for the font size you want.
![]() Image Previews. Check this box if you want to display image previews. The previews are usually helpful for making tweets more comprehensible, but you may want to turn them off if you have a slow Internet connection.
Image Previews. Check this box if you want to display image previews. The previews are usually helpful for making tweets more comprehensible, but you may want to turn them off if you have a slow Internet connection.
![]() Location. Check this box to allow the Twitter app to use your location to customize the information it displays to you.
Location. Check this box to allow the Twitter app to use your location to customize the information it displays to you.
![]() Proxy. Tap this button to display the Proxy screen (see Figure 13.29). You can then check the Enable HTTP Proxy box to turn on proxying, tap the Proxy Host button and specify the hostname or IP address of the proxy server, and tap the Proxy Port button and enter the port number for the proxy server in the Proxy Port dialog box.
Proxy. Tap this button to display the Proxy screen (see Figure 13.29). You can then check the Enable HTTP Proxy box to turn on proxying, tap the Proxy Host button and specify the hostname or IP address of the proxy server, and tap the Proxy Port button and enter the port number for the proxy server in the Proxy Port dialog box.
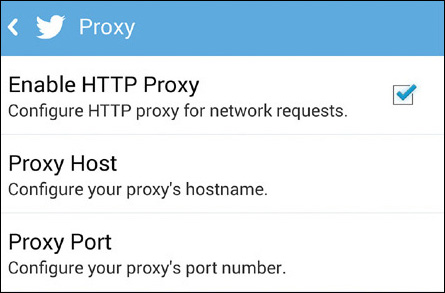
FIGURE 13.29 Use the Proxy screen to turn on proxying for Twitter and to specify the details of the proxy server.
A proxy server fulfills and redirects Internet requests. You may need to configure a proxy if your employer or organization blocks Twitter.
When you finish choosing settings on the General screen, tap the Back button to return to the Settings screen.
Choosing Settings for an Account
Now tap your first Twitter account on the Settings screen to display its settings screen (see Figure 13.30).
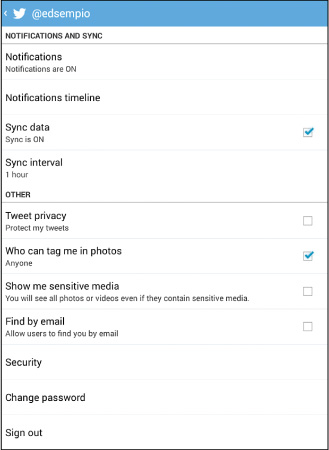
FIGURE 13.30 On the settings screen for an account, you can configure your notifications, privacy, and security.
These are the settings you can configure in the Notifications and Sync section:
![]() Notifications. Tap this button to display the Notifications screen (see Figure 13.31). You can then check the Vibrate box, the Ringtone button, and the Notification Light box to specify what feedback you receive for a notification. In the Notification Types section, choose which notification types to receive.
Notifications. Tap this button to display the Notifications screen (see Figure 13.31). You can then check the Vibrate box, the Ringtone button, and the Notification Light box to specify what feedback you receive for a notification. In the Notification Types section, choose which notification types to receive.
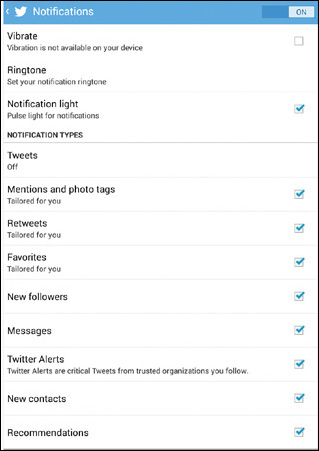
FIGURE 13.31 On the Notifications screen for an account, you can choose which types of notification to receive and which items to receive them for.
![]() Note
Note
For the Mentions and Photo Tags type, the Retweets type, and the Favorites type, you can not only check or uncheck the box but also tap the button to display a dialog box that gives you a choice of three radio buttons: Tailored for You, From Anyone, or Off.
![]() Notifications Timeline. Tap this button to display the Notifications Timeline screen (see Figure 13.32). You can then check the box for any timeline filter you want to apply to notifications.
Notifications Timeline. Tap this button to display the Notifications Timeline screen (see Figure 13.32). You can then check the box for any timeline filter you want to apply to notifications.
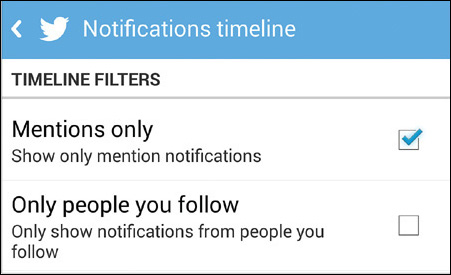
FIGURE 13.32 On the Notifications Timeline screen, check the box for each timeline filter you want to apply.
![]() Sync Data. Check this box to sync your Twitter data.
Sync Data. Check this box to sync your Twitter data.
![]() Sync Interval. If you check the Sync Data box, tap this button to display the Sync Interval dialog box, and then tap the sync interval to use, such as 15 Minutes.
Sync Interval. If you check the Sync Data box, tap this button to display the Sync Interval dialog box, and then tap the sync interval to use, such as 15 Minutes.
![]() Tweet Privacy. Check this box to protect your tweets, enabling you to control who is able to view them.
Tweet Privacy. Check this box to protect your tweets, enabling you to control who is able to view them.
![]() Who Can Tag Me in Photos. Tap this button to display the Who Can Tag Me in Photos dialog box, and then tap the Anyone radio button, the Only People I Follow radio button, or the Off radio button, as needed.
Who Can Tag Me in Photos. Tap this button to display the Who Can Tag Me in Photos dialog box, and then tap the Anyone radio button, the Only People I Follow radio button, or the Off radio button, as needed.
![]() Show Me Sensitive Media. Check this box if you want to see photos or videos deemed sensitive (in other words, offensive to some people).
Show Me Sensitive Media. Check this box if you want to see photos or videos deemed sensitive (in other words, offensive to some people).
![]() Find by Email. Check this box to enable people to find your Twitter name via your email address.
Find by Email. Check this box to enable people to find your Twitter name via your email address.
![]() Find by Phone Number. Check this box to enable people to find your Twitter name via your phone number.
Find by Phone Number. Check this box to enable people to find your Twitter name via your phone number.
![]() Security. Tap this button to implement login verification. You’ll learn how to do this a little later in this chapter.
Security. Tap this button to implement login verification. You’ll learn how to do this a little later in this chapter.
![]() Change Password. If you need to change your password, tap this button and work on the Change Password screen. As usual, you need to provide your current password to prove that you know it.
Change Password. If you need to change your password, tap this button and work on the Change Password screen. As usual, you need to provide your current password to prove that you know it.
![]() Sign Out. If you want to sign out of Twitter, tap this button and then tap the OK button in the Sign Out dialog box that opens.
Sign Out. If you want to sign out of Twitter, tap this button and then tap the OK button in the Sign Out dialog box that opens.
Signing out of Twitter removes all your Twitter data from your Android device. So normally you won’t want to sign out. Instead, just leave the Twitter app running so that you can access it quickly as needed, or close the app if you don’t want to use it for a while.
Adding Other Twitter Accounts
The Twitter app enables you to add multiple accounts to your device and use them alongside each other. To add an account, tap the Add Account button on the Settings screen, enter the details on the Sign In screen that appears, and then tap the Sign In button.
![]() Caution
Caution
On the Sign In screen on a phone, make sure you check or uncheck the box called Upload My Address Book and Use My Phone Number to Connect Me with Friends and Send Me Text Updates. This box is checked by default, so you’ll need to uncheck it if you don’t want to upload all your contacts to Twitter. If you do upload all your contacts, work through the list on the Invite Friends screen and uncheck the box for any contact who will not welcome an invitation to connect with you on Twitter.
Securing Your Twitter Account with Login Verification
To protect your Twitter account against being hacked, you should set up login verification on it. Here’s how to do that:
1. Tap the Menu button, and then tap Settings to display the Settings screen.
2. Tap the account you want to configure. The settings screen for the account appears.
3. Tap the Security button to display the Security screen (see Figure 13.33).
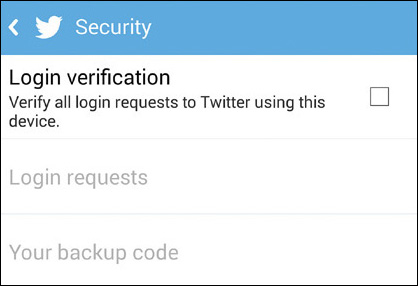
FIGURE 13.33 On the Security screen, check the Login Verification box to start setting up login verification.
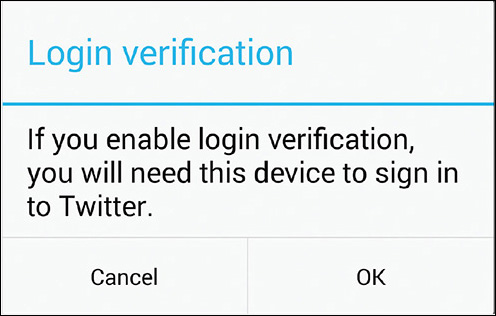
4. Check the Login Verification box. The Login Verification dialog box opens (see Figure 13.34), making sure that you know that you will need this device to sign in to Twitter.
5. Tap the OK button. The Your Backup Code dialog box opens (see Figure 13.35), offering to take a screenshot of your backup code and store it in your Android Gallery app.
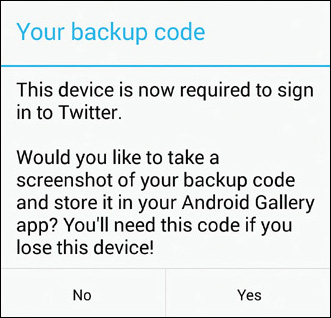
FIGURE 13.35 Tap the Yes button in the Your Backup Code dialog box if you want to take a screenshot of your backup code.
![]() Caution
Caution
Taking a screenshot is a good way to store your backup code—but only as long as nobody else can view the photos in the Gallery app. If you take the screenshot, be sure to use a secure means of locking your device. It is also a good idea to encrypt your device.
6. Tap the Yes button or the No button, as appropriate. The Your Backup Code screen appears (see Figure 13.36).
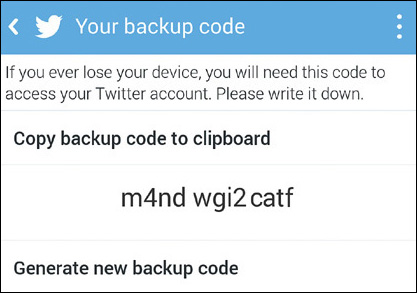
FIGURE 13.36 Memorize or write down the code that appears on the Your Backup Code screen. You can also tap the Copy Backup Code to Clipboard button to copy the code and paste it elsewhere.
7. Memorize the code or write it down.
8. Tap the Back button three times to leave the Settings screens and return to the Twitter screen you were using.
On the Security screen, you can tap the Login Requests button to review the login requests that have been made for your Twitter account.
![]() Note
Note
Now that you have applied login verification to your account, any login attempt displays the Verify Login screen prompting you for the login code. Type in the code that Twitter has just texted to you, and then tap the Send button. Once the login request is approved, you can start using the Twitter app.
Using Multiple Twitter Accounts
When you’ve set up multiple accounts in the Twitter app, you can easily switch from account to account by tapping the current account name on the Tweet screen. In the Accounts dialog box that opens (see Figure 13.37), tap the account to which you want to switch.