
8. Concurrency Tools
We shape our tools and then our tools shape us
Marshall McLuhan
The most important thing to notice about this chapter is that it is very, very short.
The Java language changed the world for developer tool-chains. Its strong static typing made possible the creation of powerful IDEs like Eclipse and IDEA. The power of these IDEs stems from the fact that they can analyze the source code, intermediate representations, and the byte-code binaries. Modern IDEs understand the deep structure of Java code and can perform complex operations like refactoring, jump to definition, and so on.
Without strong typing, it is much more difficult to implement such operations reliably. Even today, though most Java developers prefer structured IDEs, it is not uncommon to find dynamic language developers working with emacs, Sublime Text, or Vim. Without static typing, an IDE simply cannot offer that much more functionality than a simpler, lighter-weight editor.
Unfortunately, with respect to concurrency, Java is more like those dynamically typed languages. Even in constrained circumstances, it can be difficult to determine what threads might execute any give piece of code. It is in general impossible.
In this environment, the selection of tools available for verifying the correctness of concurrent code is small. The selection of tools available for analyzing and debugging an application with a concurrency error is even worse.
Static Analysis
Static analysis tools inspect code either before or after compilation, and attempt to discover problems and inconsistencies. In general, these tools prove statements about the code by applying collections of rules. Because Java’s wealth of strong static typing information is available to these rules, they can be pretty effective. Also, because they analyze the structure of the code, they do not require that a one-in-a-million bug actually must occur to find it.
They cannot, of course, find all problems. But they can find many problems! Releasing an application or a library without running it through one or more static analysis tools makes no more sense than sending out your resume without running it through a spell-checker.
Several static analysis tools are available. Many of them are chiefly directed at revealing security issues. Many require the purchase of some kind of license—something that many development houses find to be an entirely reasonable investment. Among the common for-profit static analysis tools that have at least some concurrency analysis capabilities are HP Fortify, SonarQube, and ThreadSafe.
Android Studio
Android Studio has its own built-in static analysis tools (see Figure 8.1). Called Inspections, they are configured from a pane in the standard Preferences dialog (under Editor > Inspections).
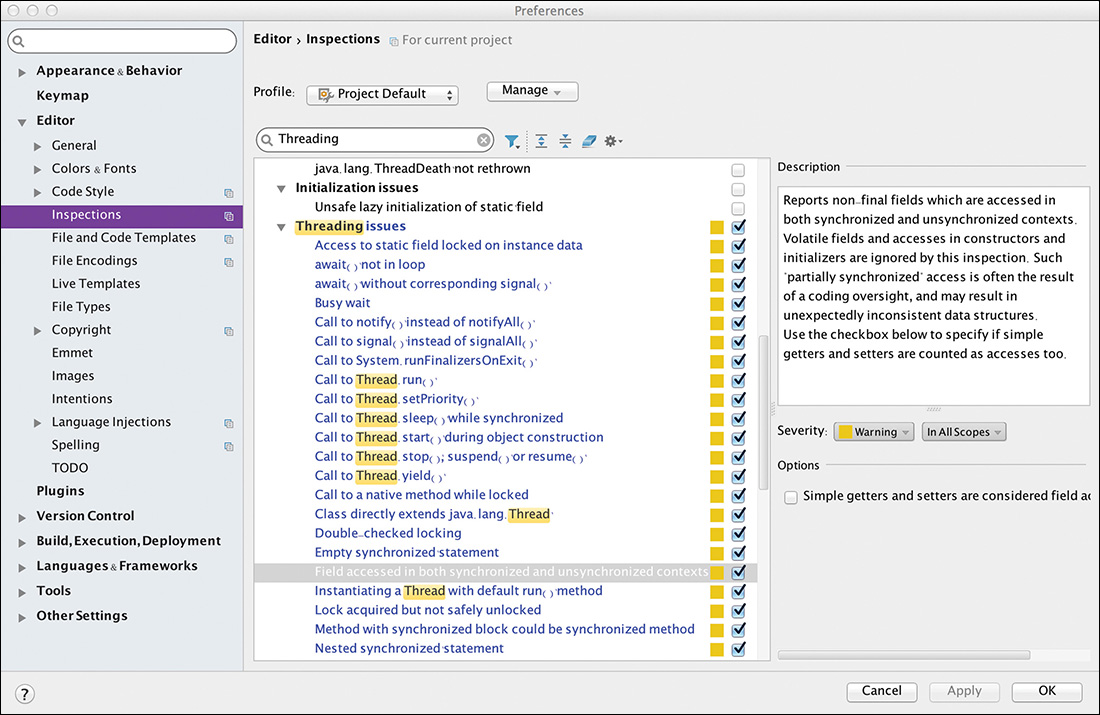
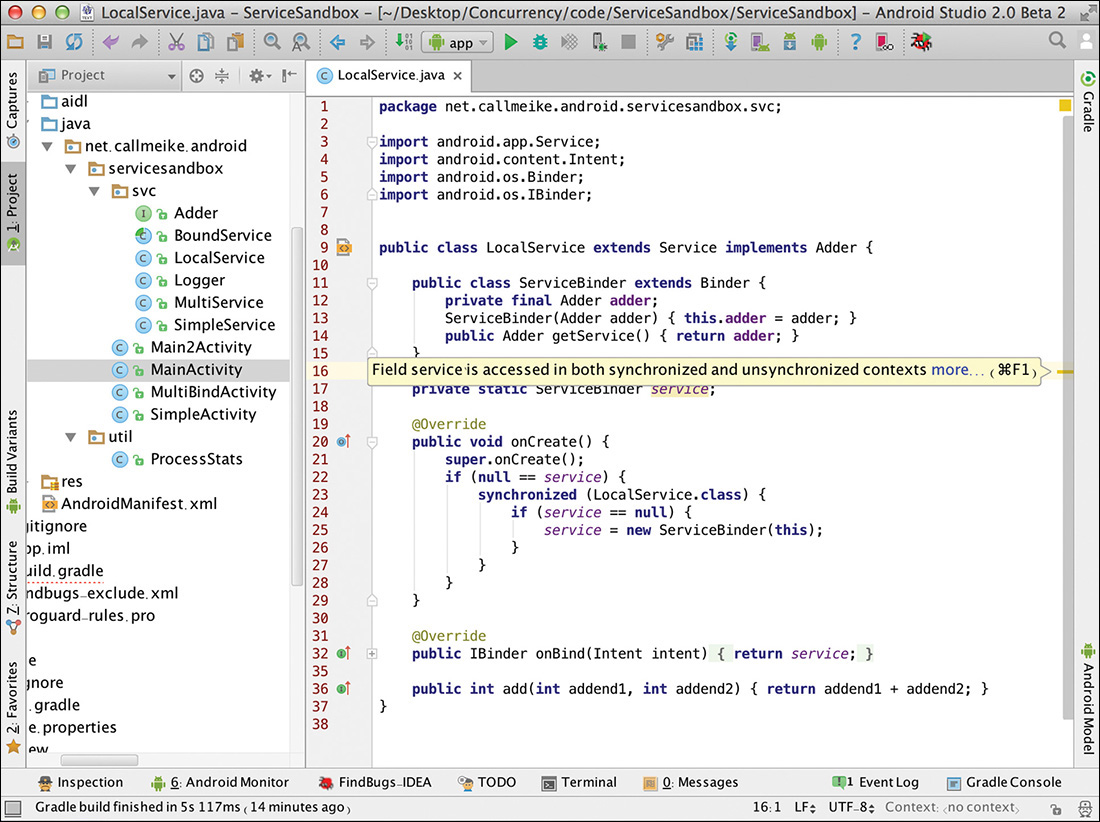
Inspections are very well integrated into Android Studio. Inspection violations show up as warnings in the right gutter of the editor, as shown in Figure 8.2. A developer could do worse than turning all the concurrency-related inspections on and, at the very least, understanding the exact cause of each warning they generate.
Findbugs
Findbugs, from the University of Maryland, is useful and free. It is available as a plugin for most common IDEs and build systems, including Gradle, IDEA (Android Studio), and Eclipse.
In addition to other checks, Findbugs inspects code for more than 40 concurrency-related issues. Some of the issues are simple “gottchas,” such as calling the run method of a thread or synchronizing on a boxed primitive. Findbugs can also catch trickier errors, even some that humans are likely to miss.
Findbugs with Android Studio
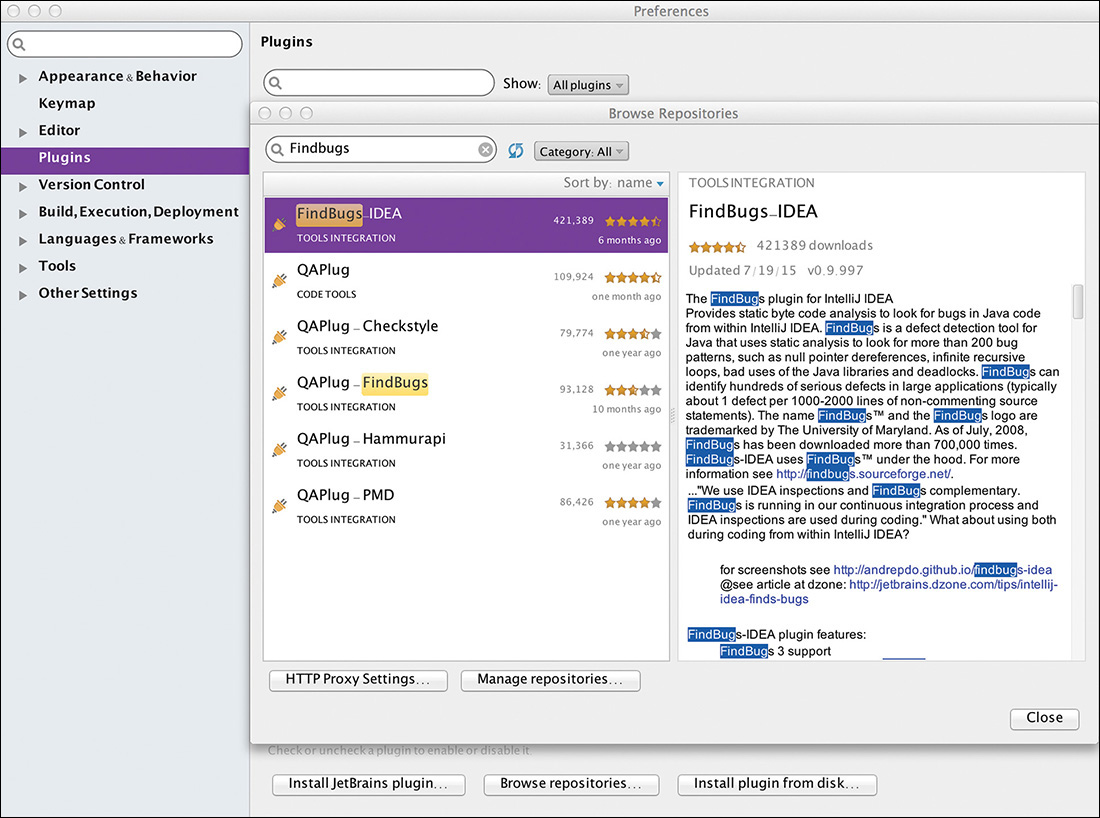
Configuring Findbugs for Android Studio is only slightly more difficult than installing the plugin. Using Studio’s standard plugin installation dialog, browse repositories for the plugin, as illustrated in Figure 8.3.
Once the plugin is installed, it must be configured. There should now be an entry for it under Other Settings in the Preferences dialog, as shown in Figure 8.4.
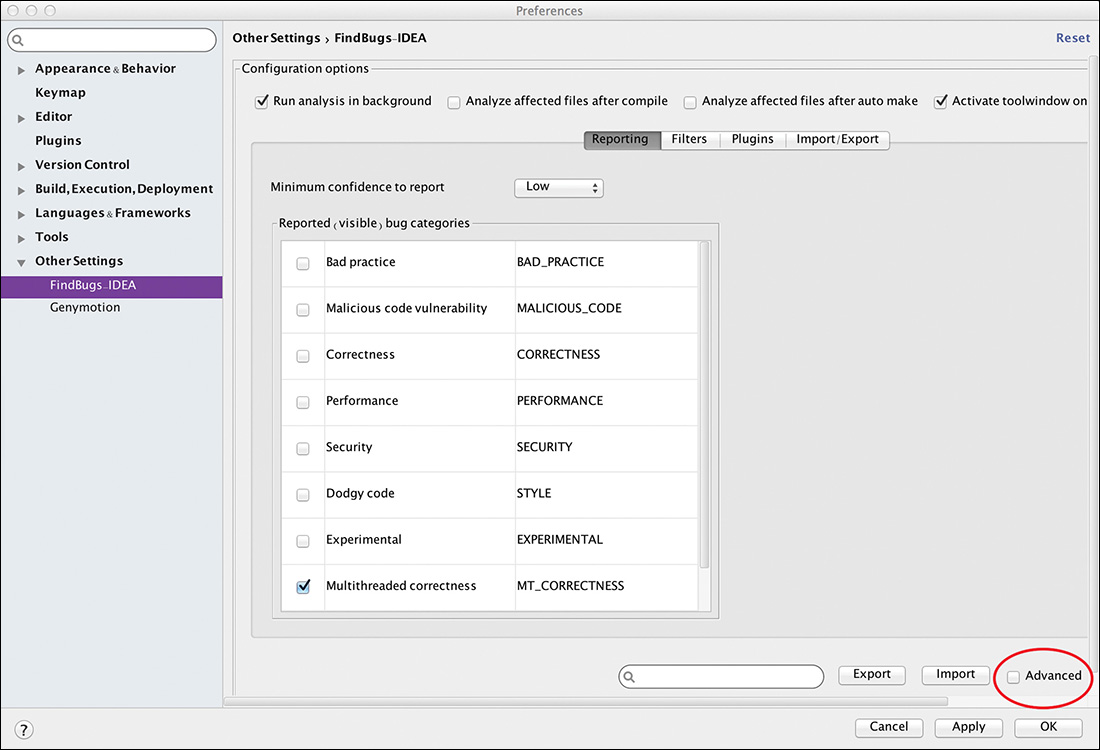
In this case, Findbugs has been configured to show only Multithreaded Correctness issues. It can make sense to run other checks as well.
Note that the level for “Minimum confidence to report” has been set to Low. Although it is important to keep the noise of false-positives down, it is a good idea, especially when restricting the search to concurrency issues, to start by reporting all potential issues and filtering only if it is necessary to do so.
Even more important is the Advanced button on the lower right. Checking it enables access to the otherwise invisible configuration page, shown in Figure 8.5.
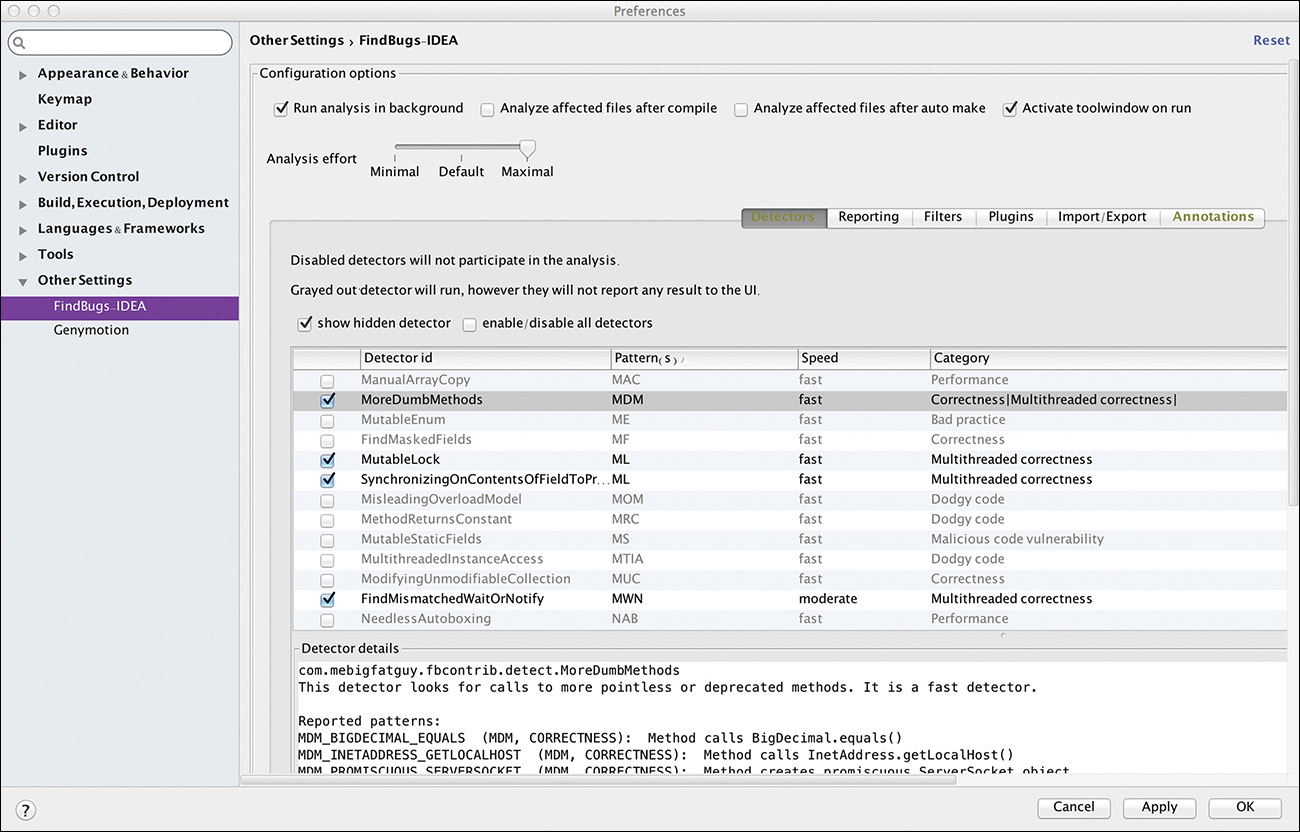
This page gives access to a couple of important things. A slider on the top left enables raising the analysis effort to Maximal. Because that means that it takes significant time for Findbugs to run, it is probably also a good idea to check the box that causes Findbugs to run in background.
Finally, this page enables turning detectors off and on individually. This is useful when considering the JCIP annotations, which are described in the next section.
As the last step in configuring the plugin, be sure to include all the available detectors. From the Plugin tab, check all the plugins as shown in Figure 8.6. The Android detectors are of particular interest. Any detectors that prove uninteresting can be excluded later.

Click OK to complete the configuration process.
Findbugs is now ready to run.
Listing 8.1 shows some example code for analysis. Obviously, it contains several errors. To analyze a project with Findbugs, first select Findbugs and click Analyze Project Files from IDEA’s Analyze menu. Figure 8.7 shows the results.
Listing 8.1 Successful Findbugs Example
public class LocalService extends Service implements Adder {
public class ServiceBinder extends Binder {
private final Adder adder;
ServiceBinder(Adder adder) { this.adder = adder; }
public Adder getService() { return adder; }
}
private ServiceBinder service;
@Override
public void onCreate() {
super.onCreate();
if (service == null) {
synchronized (this) {
if (service == null) {
service = new ServiceBinder(this);
}
}
}
}
@Override
public IBinder onBind(Intent intent) {
return service;
}
public int add(int addend1, int addend2) { return addend1 + addend2; }
}
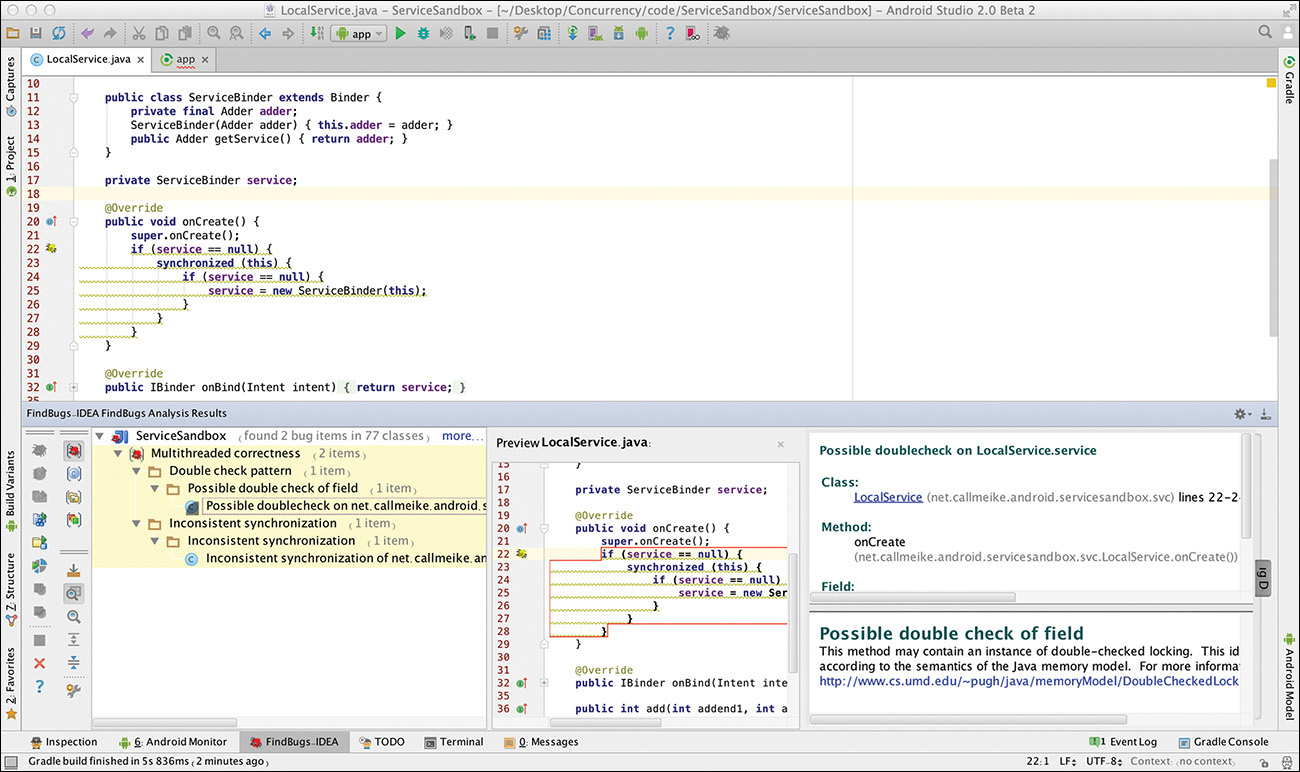
In this particular case, Findbugs correctly identifies both double-check locking and inconsistently synchronized access to the variable service as errors.
Although a powerful tool, Findbugs is not all-seeing. It misses the fact that there is no need for any synchronization at all in the code in Listing 8.1. Because all the methods there are guaranteed to run on a single thread—the main thread—the synchronized block is simply unnecessary.
Listing 8.2 is nearly identical to Listing 8.1. In fact, it contains exactly the same errors. Because the variable service is now static and the order of comparison is reversed in the first check of the double-check lock, Findbugs erroneously give this code a completely clean bill of health.
public class LocalService extends Service implements Adder {
public class ServiceBinder extends Binder {
private final Adder adder;
ServiceBinder(Adder adder) { this.adder = adder; }
public Adder getService() { return adder; }
}
private static ServiceBinder service; // static variable
@Override
public void onCreate() {
super.onCreate();
if (null == service) { // reversed comparison
synchronized (LocalService.class) {
if (service == null) {
service = new ServiceBinder(this);
}
}
}
}
@Override
public IBinder onBind(Intent intent) {
return service;
}
public int add(int addend1, int addend2) { return addend1 + addend2; }
}
Note
You must build your project to analyze it with Findbugs!
Findbugs analyzes the compiled Java bytecode. For it to analyze changes in the source code, that code must be recompiled. In IDEA, select Rebuild Project from the Build menu.
Findbugs with Gradle
An important use for static analysis is as part of a continuous integration system. Even in codebases in which it takes double-digit minutes to run a full Findbugs analysis, running it as part of the pre-commit regimen is an excellent backstop against careless oversight.
To do this, Findbugs must be incorporated into the build system. For Android, that means Gradle.
As of version 2.10, Gradle provides basic Findbugs support. Integrating that support with an Android project requires a little Gradle hacking. Listing 8.3’s template can be included and added to the build.gradle file for almost any Android project. It adds Findbugs tasks for all the project’s build variants.
Listing 8.3 Findbugs in Gradle
apply plugin: 'findbugs'
findbugs { toolVersion = "3.0.1" }
afterEvaluate {
def variants = plugins.hasPlugin('com.android.application')
? android.applicationVariants
: android.libraryVariants
variants.each { variant ->
def task = tasks.create("findbugs${variant.name.capitalize()}", FindBugs)
task.group = 'verification'
task.description = "Run FindBugs on ${variant.description}."
def variantCompile = variant.javaCompile
task.dependsOn(variantCompile)
tasks.getByName('check').dependsOn(task)
task.classes = fileTree(variantCompile.destinationDir)
task.source = variantCompile.source
task.classpath
= variantCompile.classpath.plus(project.files(android.bootClasspath))
task.effort = 'max'
task.reportLevel = 'low'
task.ignoreFailures = false
task.excludeFilter = file("findbugs-exclude.xml")
task.reports {
xml { enabled = false }
html { enabled = true }
}
}
}
The code in Listing 8.3 generates a new Gradle task for each build variant. Each new task runs Findbugs for that variant. The listing explicitly uses the version of Findbugs current at the time of this writing, version 3.0.1.
As shown, this code causes those new tasks to fail with a Findbugs error. This is probably desirable in the context of a build job. To ignore failures, simply change the sense of the ignoreFailures boolean.
The code in Listing 8.3 also depends on a Findbugs configuration file called findbugs-exclude.xml. Android projects contain a lot of auto-generated code that plays fast and loose with coding standards, making such an exclusion file nearly essential. Listing 8.4 gives a minimal example of such a file. There I give more information on creating an excludes file, and on configuring other Findbugs parameters in the official on-line documentation, here: http://findbugs.sourceforge.net/manual/index.html.
Listing 8.4 A Minimum Findbugs Filter
<FindBugsFilter>
<Match>
<Class name="~.*R$.*"/>
</Match>
<Match>
<Class name="~.*Manifest$.*"/>
</Match>
</FindBugsFilter>
Annotations
Annotations are an extension of basic static analysis. They are an additional tool that gives hints to a static analyzer, enabling it to make better analyses.
In the development environment, Android application code is compiled against a library of stubs. Because the stubs are empty and do not contain the actual implementations of the library methods, static analyzers cannot see that actual code and are severely constrained.
As an example, there is no way that a static analysis tool can figure out that the onHandleIntent method of an IntentService is run on a different thread from its onCreate method. This presents the opportunity for an extremely common error, initializing a field in onCreate and then accessing it from onHandleIntent without proper synchronization. Hints provided by annotations come very close to eliminating this problem.
JCIR Annotations
As noted earlier, anyone writing any concurrent code in Java should have a copy of the most excellent Java Concurrency in Practice (Göetz, 2006) near her desk. Among the many good things to come from that book is a proposal for a set of concurrency-related annotations. These annotations, commonly referred to as the JCIP annotations, were included in Java Specification Request (JSR) 305:
![]()
@GuardedBy (“guard-variable”): All access to the following declaration should be synchronized on guard-variable.
![]()
@Immutable: Instances of the annotated type are immutable.
![]()
@NotThreadSafe: An object that is not thread-safe. Objects are assumed to be not thread-safe, so this annotation is mostly documentation.
![]()
@ThreadSafe: Instance of this type can be used safely by multiple threads, concurrently.
Although JSR-305 seems to have stalled, several static analysis tools including Findbugs support, or partially support, these annotations. At the time of this writing, they seem to be supported in Android Studio both by the FindBugs Plugin and by native Inspections. The Android Studio Findbugs plugin is much less reliable.
Support Library Annotations
Of more interest to Android developers are the Android-specific annotations defined in Google’s Android support library. There are several of them, supported by both Eclipse and Android Studio. The annotations that relate to concurrency are:
![]()
@UIThread: The annotated method is intended to run only on the main thread.
![]()
@MainThread: This is normally identical to @UIThread. According to the documentation, although there is never more than one main thread, some applications run entire alternate UIs on threads other than this main thread. The documentation advises using @MainThread to annotate lifecycle methods (for example, onCreate and onResume) and @UIThread to annotate specifically UI-related methods (onMeasure and onDraw).
![]()
@BinderThread: The annotated method runs on a Binder thread, as mentioned in Chapter 6, “Services, Processes, and IPC.”
![]()
@WorkerThread: The annotated method runs on a thread not mentioned above. The doInBackground method from AsyncTask, and the onHandleIntent method from IntentService are examples of methods annotated with @WorkerThread.
All the code examples in this book use these annotations whenever relevant.
These annotations make somewhat weaker assertions about the code they annotate than the JCIP annotations do. The thing that makes these annotations powerful is that the stubbed version of the Android framework, against which developers build their applications, has been annotated with them. The code in Listing 8.5 demonstrates this.
Listing 8.5 Using the Android Support Annotations
public class SimpleIntentService extends IntentService {
// ...
@Override
protected void onHandleIntent(Intent intent) {
doSomething(); // !!! error
}
@MainThread
private void doSomething() {}
}
The call to doSomething is flagged as an error. Even though the onHandleIntent method in this listing is not annotated, the overridden method is annotated with the @WorkerThread annotation in the base class, IntentService. The call to the @MainThread annotated method from a @WorkerThread annotated method is obviously an error.
The Gradle lint task checks Android Support Annotations and can be used to run these checks for continuous integration.
Assertions
Static analysis only goes so far. Some concurrency testing must be done at runtime.
An obvious tool for making runtime concurrency checks is Java’s assert statement. It was possible to enable Java assertions in older versions of Android by entering the command:
setprop debug.assert 1
from the ADB (Android Debug Bridge) command line. The setting can be made persistent by including it in the file:
/data/local.prop
Unfortunately, though, as of API level 22 or so, Java assertions no longer work at all. They are completely unsupported as of this writing in the new Android runtime, ART.
Although that eliminates an obvious tool, it doesn’t eliminate the possibility of creating runtime concurrency checks. The static methods in the JUnit Assert class are one convenient way of enforcing class invariants. When using them, be careful not to drag the entire JUnit suite into the application. Use only junit.framework.Assert and, if necessary, use minification (ProGuard) to eliminate unneeded classes.
If all else fails, a simple if statement will suffice:
if (!Looper.getMainLooper().getThread().equals(Thread.currentThread()) {
throw new AssertionError(
"attempt to run this thing from other than the main thread");
}
The important decision with respect to assertions is what to do with them when they occur. This decision is often religious, and the choice made by any particular developer or team probably will not be affected by any discussion here. Most development teams, however, do agree on three goals for assertions:
![]() Report the error to someone that can fix it.
Report the error to someone that can fix it.
![]() Don’t do any permanent damage.
Don’t do any permanent damage.
![]() Don’t advertise the problem.
Don’t advertise the problem.
Perhaps the most common alternative is simply to enable assertions only during testing and to turn them off in production. Cross your fingers and hope for the best.
At the other end of the spectrum, an application with a good failure reporting and restart mechanism, such as Crashlytics, Flurry, and so on, might simply abort on an exception. In some ways this is ideal: the problem is reported and the application does not continue running in an unknown state. It usually has the downside, however, of being quite visible to the user.
Somewhere in between lies the gray area of reporting the error with some kind of event reporter, and attempting recovery.
Conclusion and Best Practices
Nearly every Android developer will have to deal with concurrent code. Doing so is difficult, finicky, and incredibly easy to get wrong. The tools available to support the work are no more than adequate.
There are some best practices that can make code more robust and less susceptible to strange, difficult-to-diagnose errors.
![]() Immutable objects are simple and thread-safe. Although some developers find the clutter annoying, nailing every possible value down with a final modifier can make code much easier to manage. Using the Builder pattern is a great way to create immutable objects.
Immutable objects are simple and thread-safe. Although some developers find the clutter annoying, nailing every possible value down with a final modifier can make code much easier to manage. Using the Builder pattern is a great way to create immutable objects.
![]() Code that runs on a single thread, whatever thread that happens to be, is easy to understand. If multithreading is necessary, try to keep it contained. Bury it in the framework so that most developers need not even be aware of it.
Code that runs on a single thread, whatever thread that happens to be, is easy to understand. If multithreading is necessary, try to keep it contained. Bury it in the framework so that most developers need not even be aware of it.
![]() As a corollary to the preceding point, try to make Java classes and source files single-threaded. Source files that are too big to fit into a single editor screen, and that contain methods that run on different threads, are accidents waiting to happen.
As a corollary to the preceding point, try to make Java classes and source files single-threaded. Source files that are too big to fit into a single editor screen, and that contain methods that run on different threads, are accidents waiting to happen.
![]() If it is necessary to have methods from a single class executed on multiple threads, annotate or comment those methods. There is nothing in the code itself that gives any indication of the threading strategy. The frequently heard excuse that “the code is the comment” is utterly inapplicable for multithreaded code.
If it is necessary to have methods from a single class executed on multiple threads, annotate or comment those methods. There is nothing in the code itself that gives any indication of the threading strategy. The frequently heard excuse that “the code is the comment” is utterly inapplicable for multithreaded code.
![]() Review multithreaded code very carefully. A fresh pair of eyes can often spot a tiny oversight in even the best-planned and well-executed designs.
Review multithreaded code very carefully. A fresh pair of eyes can often spot a tiny oversight in even the best-planned and well-executed designs.
![]() Use static analysis. Set the report criteria on the tool as low as possible and take the time to understand every anomaly it reports. Use multiple tools if possible. Annotate!
Use static analysis. Set the report criteria on the tool as low as possible and take the time to understand every anomaly it reports. Use multiple tools if possible. Annotate!
![]() Get as much code as you can out of Activities (and Fragments). An Activity is the manager for a page. It shouldn’t contain business logic.
Get as much code as you can out of Activities (and Fragments). An Activity is the manager for a page. It shouldn’t contain business logic.
![]() Get as much code as you can out of Android components in general. Use one of the modern UI patterns (Model-View-ViewModel, Model-View-Presenter) to get display logic out of your Activity. Keep your Services as the factories they should be and inject the implementation, either by hand or using an IoC (Inversion of Control) framework. Testing will be much easier.
Get as much code as you can out of Android components in general. Use one of the modern UI patterns (Model-View-ViewModel, Model-View-Presenter) to get display logic out of your Activity. Keep your Services as the factories they should be and inject the implementation, either by hand or using an IoC (Inversion of Control) framework. Testing will be much easier.
Create a few simple, clear execution strategies for long-running tasks, and then use them consistently. Where possible, use runtime assertions to validate them. Make it easy and routine to follow architecture.