
10. Sharing Photos Online

In this chapter, you’ll learn about some of the ways you can share your photos online. Topics include
→ Sharing your photos online from your computer and/or a mobile device
→ Using an online-based photo sharing service to share and showcase your photos
→ Sharing your photos using social media, including Facebook, Twitter, and Instagram
After you’ve taken and edited your photos, one of the great things about having Internet connectivity from your computer or mobile devices is that you can almost instantly share your photos with friends or family. If you choose, however, it’s also possible to showcase them online in a public forum (known as social media) so virtually anyone can see them.
Other benefits to having your photos stored online is that they become accessible to all your own computers and mobile devices and can be stored or archived remotely (in the cloud), so you always have a backup of your images if something happens to your equipment.
It’s important to understand the different types of online services you can use with your photos, and each serves a rather different purpose. Where it gets a bit confusing, however, is that many of these online service types overlap somewhat in terms of the features and functions they offer.
Before we look at specific online-based services and how to use them, let’s focus on the features and functions you can expect from the various types of online services, so you can more clearly define your own needs and then more easily choose which service type(s) best fit those needs.
Using Cloud Storage Services
Several examples of cloud-based file sharing services are discussed throughout this book. These include services such as Apple iCloud, Dropbox, Google Drive, and Microsoft OneDrive. These services enable you to back up, sync, and share your files (including your photos) online. In most cases, your computer or mobile device can be set up to automatically sync your digital image files with your cloud-based account, which then enables you to automatically sync the images between all of your own computers and mobile devices linked to that account. These cloud-based services do not, however, have a photo lab directly associated with them, nor are they designed exclusively for managing digital image files.
When it comes to digital photography-related tasks, these services allow you to upload images to your account, where they can be stored/archived in their original file size and resolution. In your account, you can set up an unlimited number of albums or folders in which you organize and store your digital images.
The biggest benefit to using cloud-based storage for file sharing purposes is that once you set up a single account, by installing the service-specific software or mobile app onto each of your own computers, smartphones, and/or tablets, it’s possible to sync your digital image library automatically, so all your images are available, whenever and wherever you need them.
Backups and File Syncing Happens Automatically
Once you set up one of these services (using a single account) on all of your own computers and mobile devices just once, your photos automatically back up and sync via that service. This happens on an ongoing basis and in the background.
These services, and others like them, provide a viable and secure online-based backup solution for your digital photos. To make things easier, based on what type of equipment you’re using, built in to the operating system of your computer or device is the software needed to use one of these services.
Built in to Windows PCs (version 8 and newer) is integration with Microsoft OneDrive. Incorporated into the Mac, iPhone, and iPad’s operating system is integration with Apple’s iCloud service, while Android devices have integration with Google Drive built in. That being said, all these services now offer free, downloadable software and mobile apps for most or all other hardware platforms.
Dropbox (www.dropbox.com) is an independent cloud-based file sharing service designed to work seamlessly across all hardware platforms, assuming you install the free Dropbox software or mobile app onto each of your PCs, Macs, smartphones, and tablets.
Chapter 16, “Backing Up and Archiving Your Digital Photo Library,” has more information about these services and how they can be used for image backup purposes.
What It Costs
When you set up a free account with any of these cloud storage services, you’re given a predetermined amount of online storage space. If you exceed this allocated space with your documents, files, content, and/or photos, you must acquire additional online storage for a monthly or annual fee. How much initial storage space you receive upon setting up an account, and what it costs to increase this storage space, varies by service but is typically less than $5 per month for enough online storage space to hold thousands of digital images, plus other content.
Using Online Photo Sharing Services
There are many independent online-based photo sharing services, including Flickr.com, Shutterfly.com, SmugMug.com, and SnapFish.com.
Several things set these services apart from cloud-based services. For example, these photo-sharing services enable you to back up or share your digital image files with others, but they’re not designed to automatically sync your image files between your own computers and mobile devices. In addition, these services have photo labs associated with them, so you can order prints and photo gifts, which are then shipped to the address you provide.
Online photo-sharing services are ideal for showcasing your images in the form of online galleries, and for sharing them with other people you invite to see your images.
As you’ll discover, social media services, such as Facebook, Instagram, Twitter, and Pinterest, can also be used to share images online. However, these are primarily public forums and give you less control over who can see your images.
It’s important to understand that the lines between what cloud-based services, online photo-sharing services, and social media services offer is becoming blurred, and the features and functions that are offered by these various services (all of which are online or cloud-based) often now overlap.
For example, Apple’s iCloud Photo Library enables you to back up, sync, showcase, and share your digital images and gives you control over who can view them. Apple’s iCloud Photo Library is part of Apple’s iCloud service that’s designed specifically to manage digital images. iCloud Drive is another iCloud features that can be used with image files but that works with any other type of file as well.
You’ll discover that the online-based services, such as Flickr.com, tend to serve two primary purposes for digital photographers. First, it’s possible to upload groups of images to these photo-sharing services in the form of online-based albums and then showcase and share those albums with select friends and family whom you invite to see your images. Your photos remain private, except to the people you invite to see them.
Depending on how you set up each album, the people you invite to view it can often download your photos to their computer or mobile device, plus leave comments about or “like” your images.
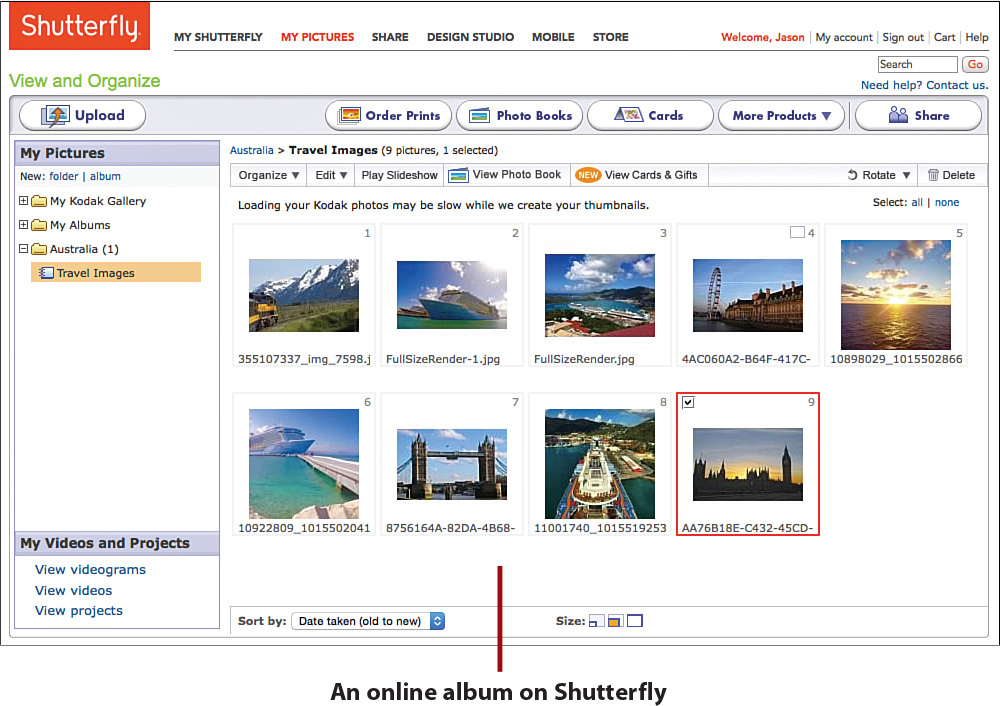
Second, these services usually have a photo lab associated with them, so you can order professionally created, paper-based prints in many different sizes and have them shipped directly to you or the intended recipient.
Popular online photo sharing services include
• Flickr—www.flickr.com
• iCloud Photo Library—www.apple.com/icloud/photos
• Photobucket—www.photobucket.com
• Picasa—https://picasa.google.com
• Shutterfly—www.shutterfly.com
• SmugMug—www.smugmug.com
• Snapfish—www.snapfish.com
Due to its popularity and compatibility with all hardware platforms, the next section demonstrates how to use Flickr. However, regardless of which photo sharing service you use, how each works and the features and functions offered are pretty similar.
Use Flickr.com to Showcase and Share Your Photos
To get started using Flickr.com (which is owned by Yahoo!), from your PC or Mac, launch your web browser, visit www.flickr.com. To use this service, you’ll need to set up or use your existing Yahoo! account. To access this service, follow the steps listed here:
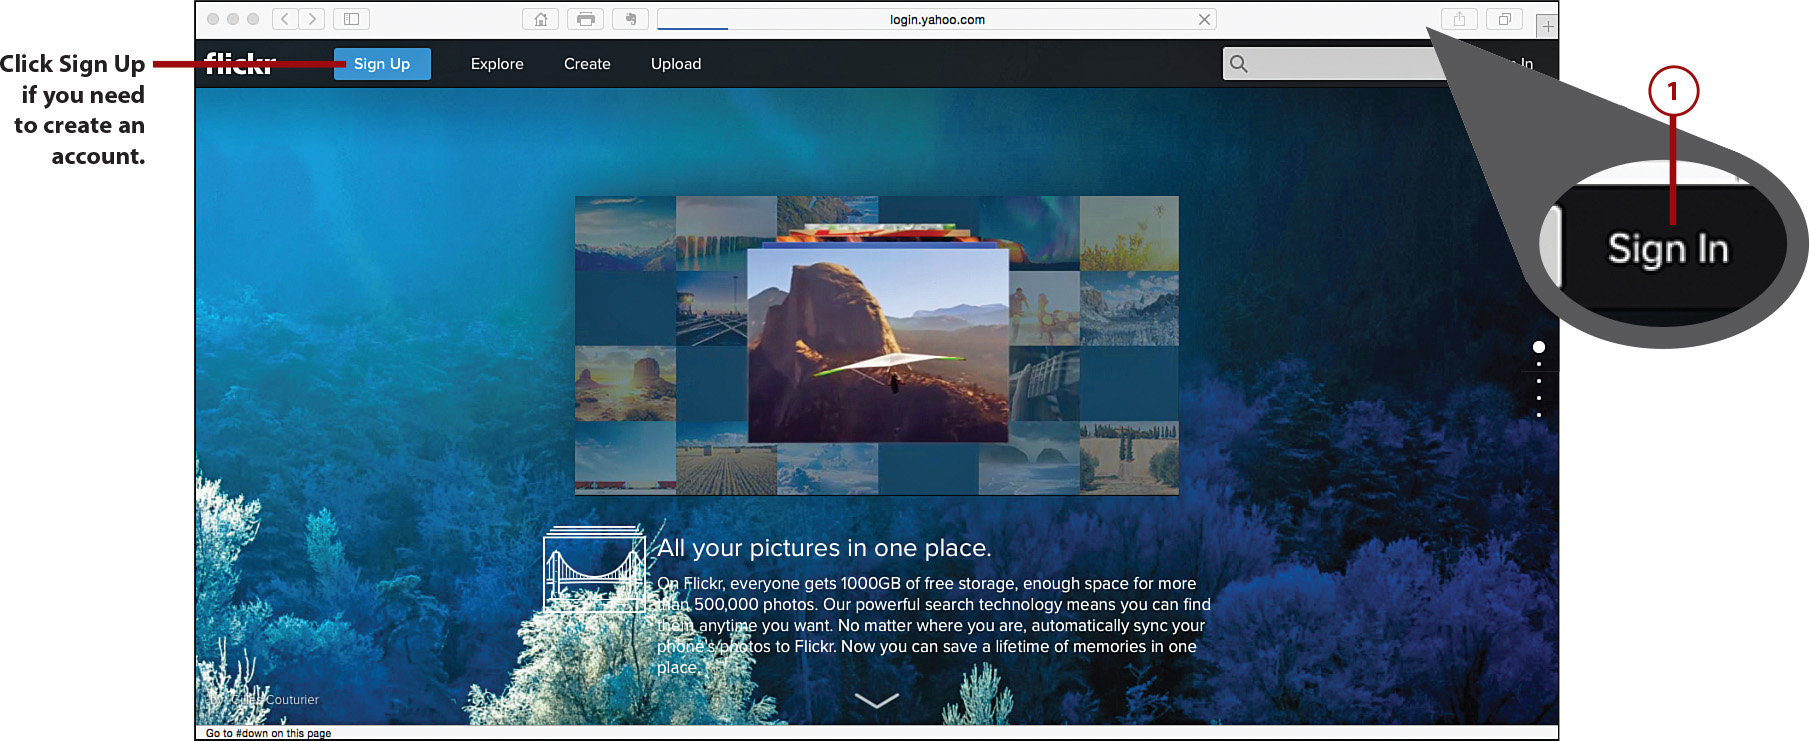
![]() From the Flickr.com website, click on the Sign In button.
From the Flickr.com website, click on the Sign In button.
Creating an Account
If you still need to create a Flickr account, click the Sign Up button instead and follow the instructions that the website provides. During this process you can choose, but are not required, to link your Flickr and Facebook accounts or invite people you know to view your images.

![]() When you’re ready to begin uploading photos to your Flickr account, click on the Upload option.
When you’re ready to begin uploading photos to your Flickr account, click on the Upload option.
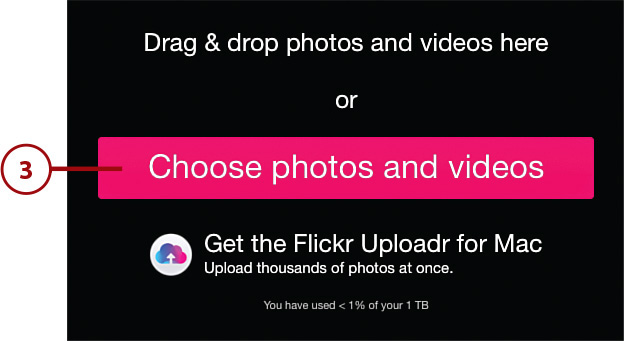
![]() Click on the Choose Photos and Videos button.
Click on the Choose Photos and Videos button.
Faster Uploads
You can also choose the option to download the Flickr Uploader software to your PC or Mac to speed up the image uploading process.
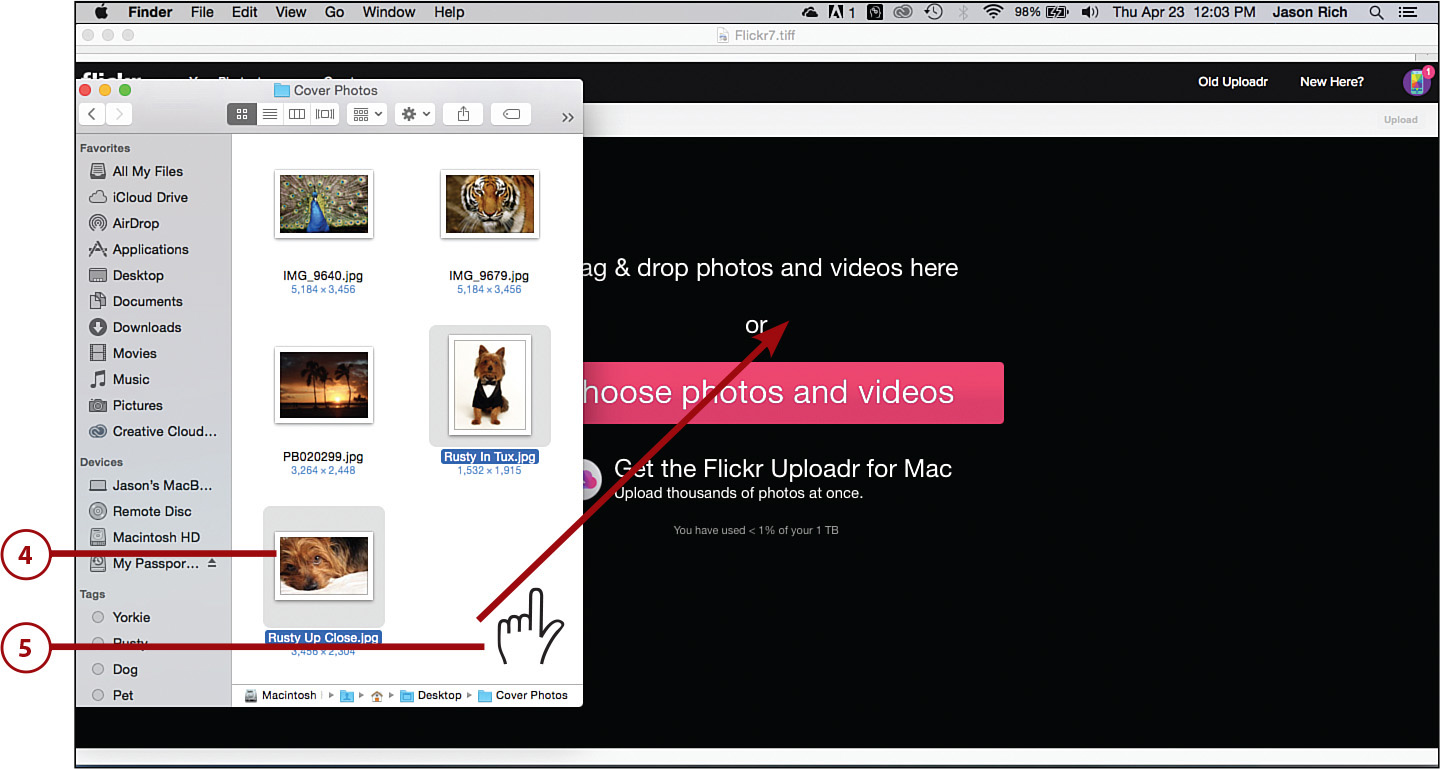
![]() Locate and select the images you want to upload using File Explorer on your PC or Finder on your Mac (shown).
Locate and select the images you want to upload using File Explorer on your PC or Finder on your Mac (shown).
![]() Drag and drop the images from your File Explorer/Finder window into the web browser (Flickr) window, and they immediately begin uploading to your Flickr account. Each uploaded image appears as a thumbnail on the web page.
Drag and drop the images from your File Explorer/Finder window into the web browser (Flickr) window, and they immediately begin uploading to your Flickr account. Each uploaded image appears as a thumbnail on the web page.
Speeds Vary
How long this upload process takes depends on the speed of your Internet connection, the file sizes of your images, and how many images you’re uploading.
![]() Click an uploaded image to select it.
Click an uploaded image to select it.
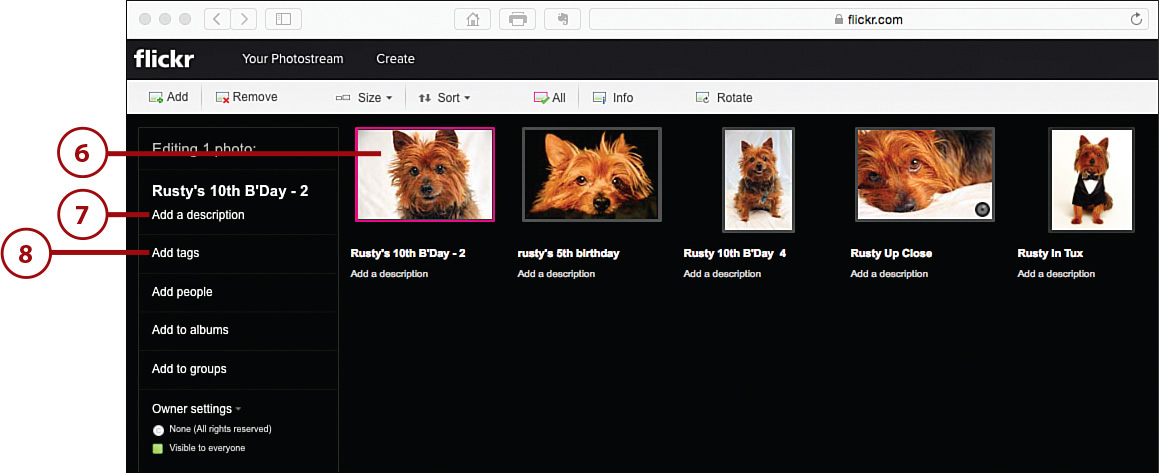
![]() Click on the Add a Description option to add a text-based description (caption) to that image.
Click on the Add a Description option to add a text-based description (caption) to that image.
![]() Click on the Add Tags option (optional) to add one-word tags that describe the image.
Click on the Add Tags option (optional) to add one-word tags that describe the image.
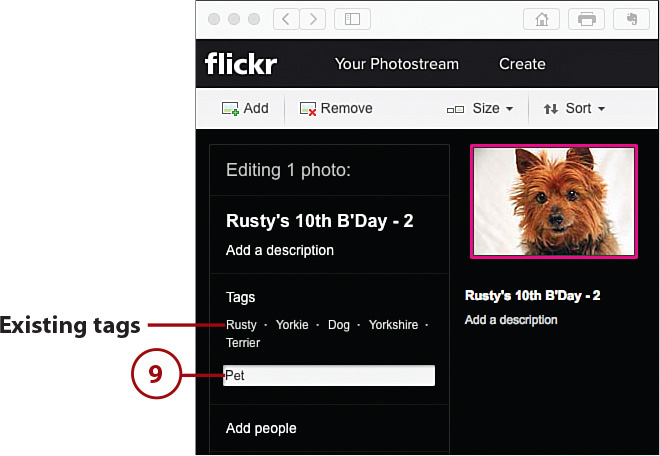
![]() Enter tags in the field provided. These tags are all searchable and make it easier to find your images. You can add as many tags as you want to each photo.
Enter tags in the field provided. These tags are all searchable and make it easier to find your images. You can add as many tags as you want to each photo.
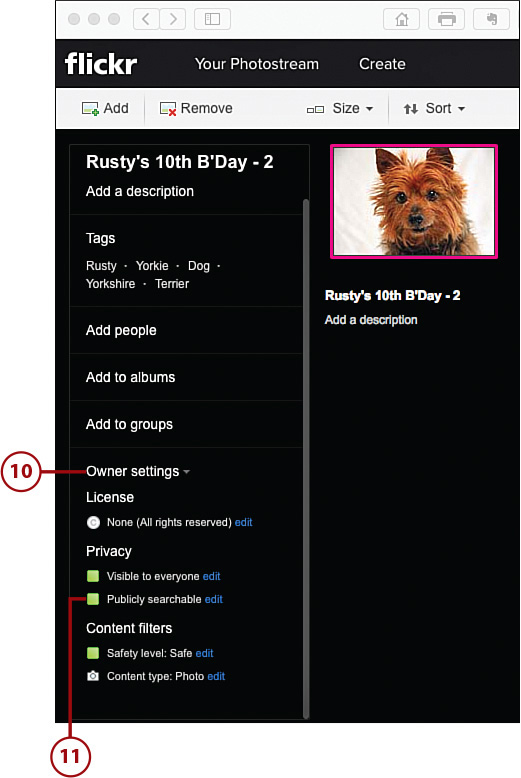
![]() Click on the Owner Settings option to reveal a more extensive menu that enables you to adjust the privacy settings associated with the selected photo.
Click on the Owner Settings option to reveal a more extensive menu that enables you to adjust the privacy settings associated with the selected photo.
![]() If you want to keep your images private, do not add check marks to the Visible To Everyone or Searchable options. Repeat steps 6 through 11 for each of your images.
If you want to keep your images private, do not add check marks to the Visible To Everyone or Searchable options. Repeat steps 6 through 11 for each of your images.
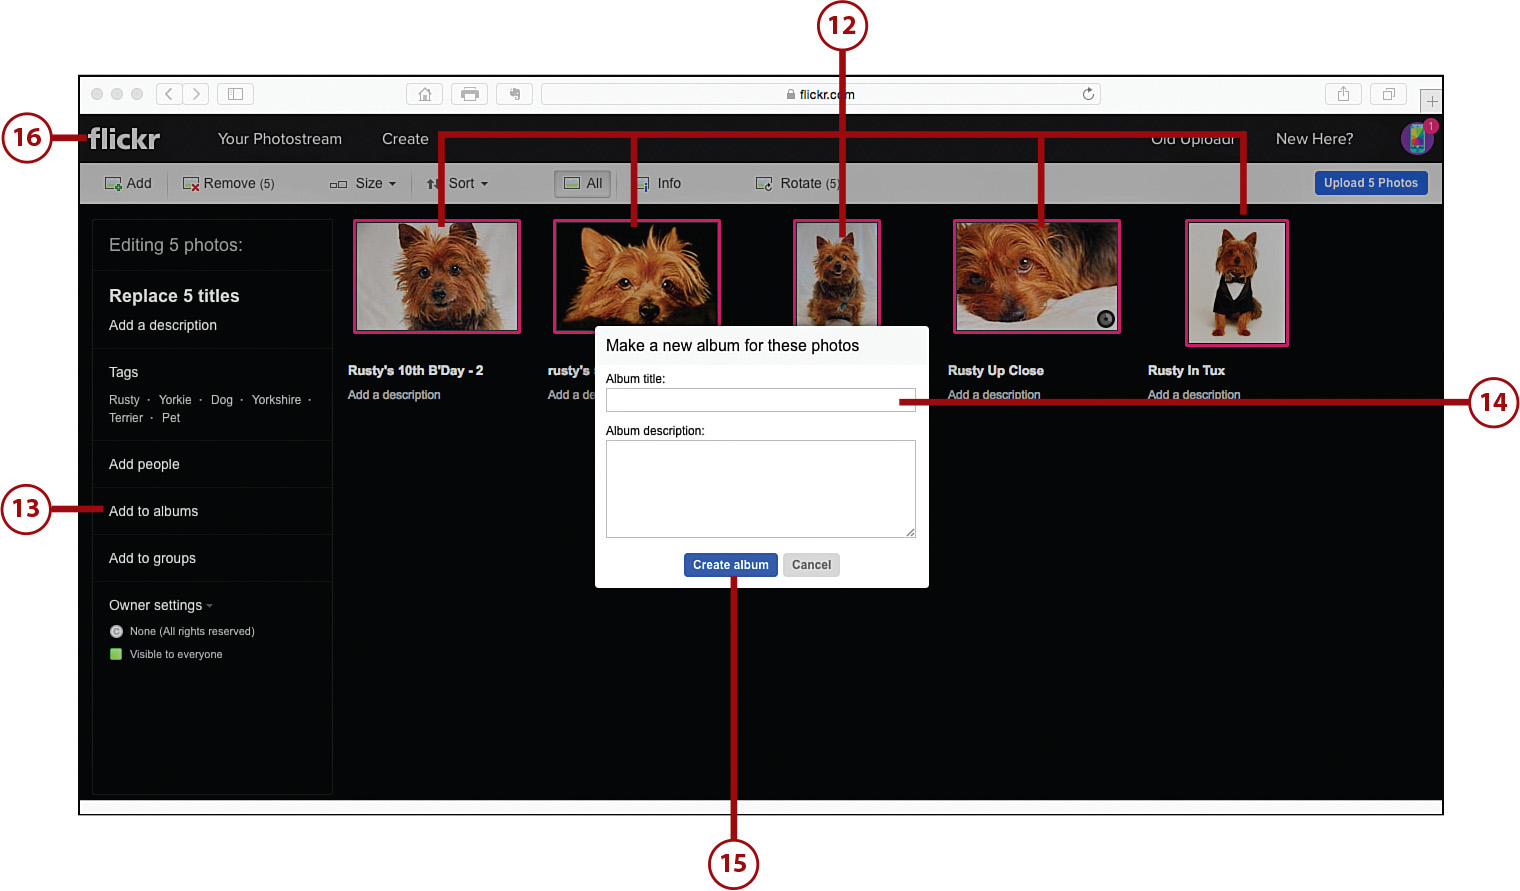
![]() To organize images into an album, select and highlight the uploaded images that you want to include.
To organize images into an album, select and highlight the uploaded images that you want to include.
![]() Click the Add To Albums link.
Click the Add To Albums link.
![]() Enter an album title and description.
Enter an album title and description.
![]() Click on the Create Album button. The selected images are now placed in that newly created album. You can create as many online albums as you want to store, organize, and showcase your images using Flickr.
Click on the Create Album button. The selected images are now placed in that newly created album. You can create as many online albums as you want to store, organize, and showcase your images using Flickr.
![]() Click on the Flickr logo to return to the main Flickr screen.
Click on the Flickr logo to return to the main Flickr screen.
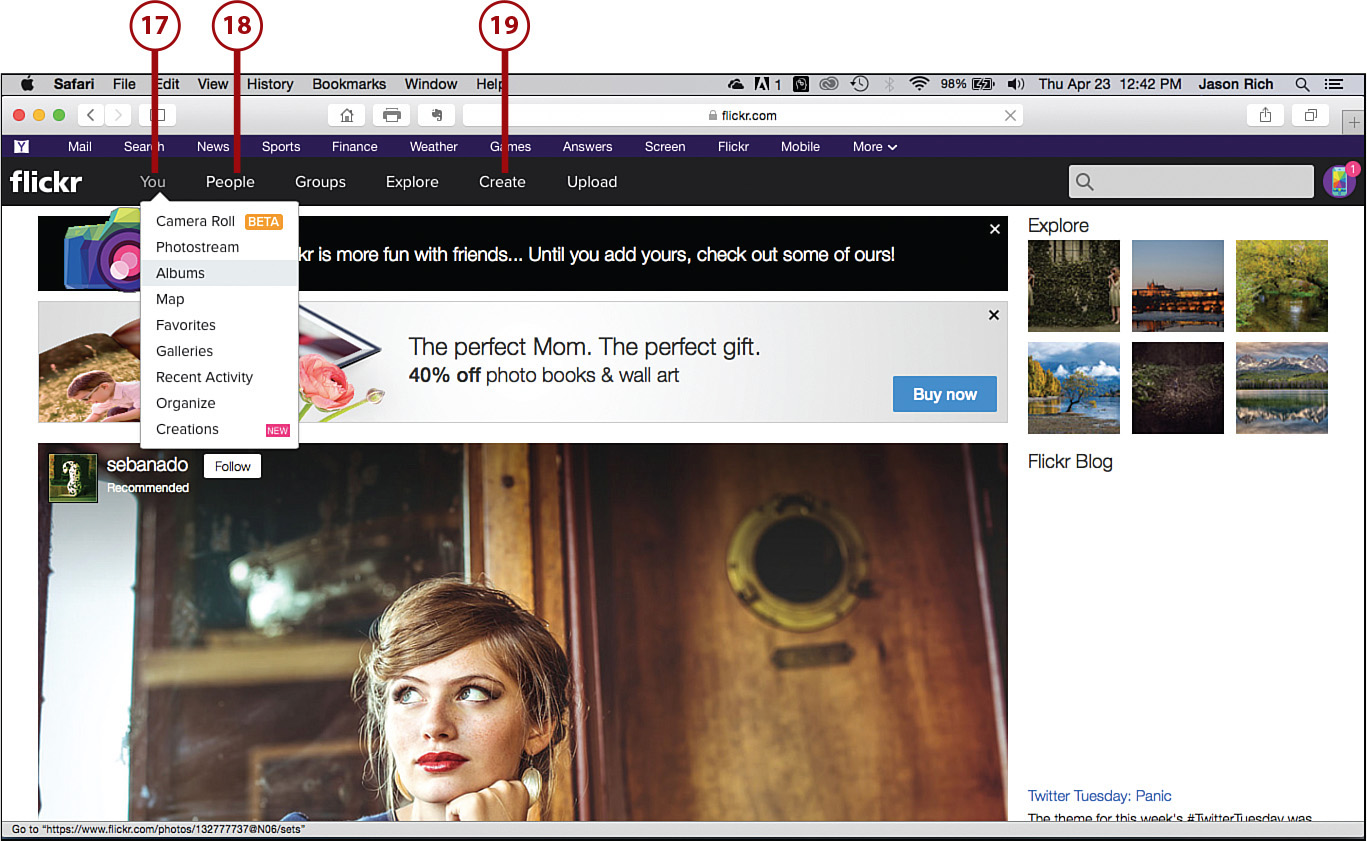
![]() Click on the You menu to access this pull-down menu that gives you a variety of options related to managing, viewing, and organizing your images.
Click on the You menu to access this pull-down menu that gives you a variety of options related to managing, viewing, and organizing your images.
![]() Click on the People option to share your images with specific people (or the general public) and to view other people’s images.
Click on the People option to share your images with specific people (or the general public) and to view other people’s images.
![]() Click on the Create option to design and order prints, photo gifts, or photo products, including photo books, that feature your images.
Click on the Create option to design and order prints, photo gifts, or photo products, including photo books, that feature your images.
Social Media Services
Facebook, Instagram, Pinterest, Snapchat, Tumblr, and Twitter are all popular online social media services that enable you to showcase and share your digital images in an online-based public forum.
In some cases, you can limit who sees your images to just friends, family, and real-life acquaintances, but in most cases, these services are designed to be public forums, meaning that anyone can search for and find (or stumble upon) your images and view them.
People love using social media as a way to share their images and interact informally with other people. However, it’s important that you understand who has access to your images and information once you publish content online.
Before you become active using one or more of these services, manually adjust the privacy settings associated with each service you use to limit your public exposure to a level you’re comfortable with.
Social Media = Public Forum
In general, if there are photos you do not want made public, for whatever reason, do not post them on social media, even on services that let you keep photos private. Anyone you invite to see a private photo can easily copy or share that image and make it public without your permission in a matter of seconds.
In general, using social media is fun, safe, and a great way to communicate with people you know, as well as meet new people from around the world. It’s important, however, to use common sense before sharing personal information or photos with strangers.
The following sections show you how to publish photos on different social networks. Because each network operates a little differently and it goes beyond the scope of this book, the sections do not cover service basics like creating an account or activities other than posting photos.
Getting Started with Facebook
Facebook is currently the world’s most popular social media service, with more than 1 billion active users worldwide. Using Facebook is free; however, it is an advertiser-supported service, so you will see ads on the screen as you use it. One of the reasons why Facebook is so popular is that you can manage your Facebook account from your computer or mobile device. From your computer, simply point your web browser to www.Facebook.com. From your smartphone or tablet, download and install the free Facebook app.
Beyond posting photos onto your Wall, in the form of Status Updates or Check Ins (an option available from the Facebook app on your mobile device), Facebook enables you to create and showcase custom-named, online-based photo albums.
Each album can contain as many images as you want, and you can have as many albums as you want within your Facebook account. Each photo and/or album can have a title, description, tags, location information, and additional metadata associated with it. For example, you can tag the people who appear in your images or showcase images by the time and date they were shot.
By Default, All Images Are Public
By default, all photos you upload to Facebook are public. This means any other Facebook user, anywhere in the world, can potentially see your images. Be sure to adjust the privacy settings to a level you’re comfortable with to determine who can view your images. To do this, click on the Privacy Shortcuts icon displayed near the top-right corner of the browser window when you visit www.facebook.com, after logging in to your account.
In addition to publishing photos on your Facebook Wall, or within an online-based album, it’s possible to send (or receive) private messages via Facebook that can also contain images. These messages are accessible only to the sender and recipient(s).
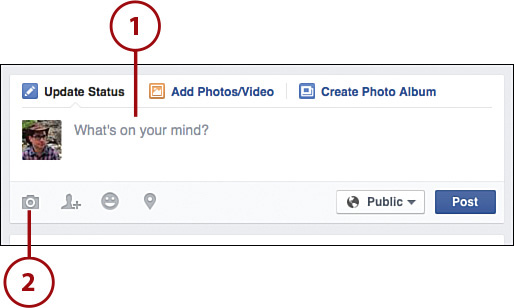
Publish Photos on Your Facebook Wall
To publish a single image or a small group of images on your Facebook Wall as a Status Update (or Check-In, if you’re using the mobile app), log in to your account and follow these steps:
![]() On your Wall or News feed, type a short text-based message that you want to include with your photos.
On your Wall or News feed, type a short text-based message that you want to include with your photos.
![]() Click on the Camera icon to select one or more photos or video clips and attach them to the Status Update message you’re composing.
Click on the Camera icon to select one or more photos or video clips and attach them to the Status Update message you’re composing.
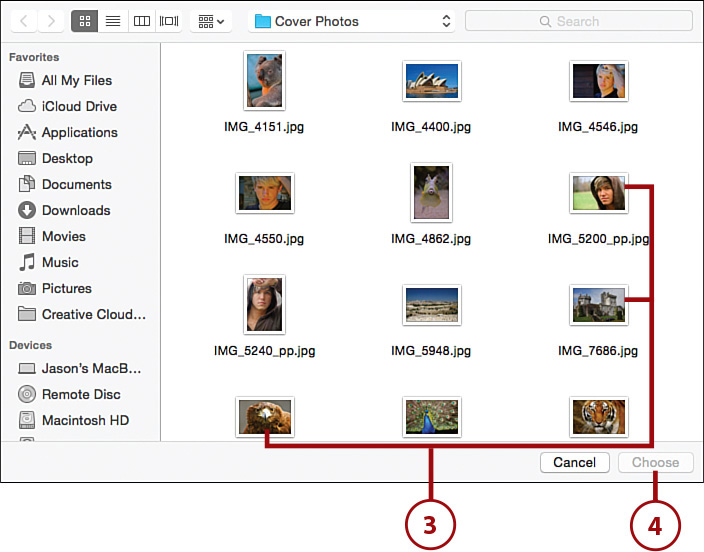
![]() In the File Explorer (PC) or Finder (Mac) window that appears, locate and select the images you want to publish online.
In the File Explorer (PC) or Finder (Mac) window that appears, locate and select the images you want to publish online.
![]() Click on the Choose button. Thumbnails for your images appear in the Status Update window.
Click on the Choose button. Thumbnails for your images appear in the Status Update window.
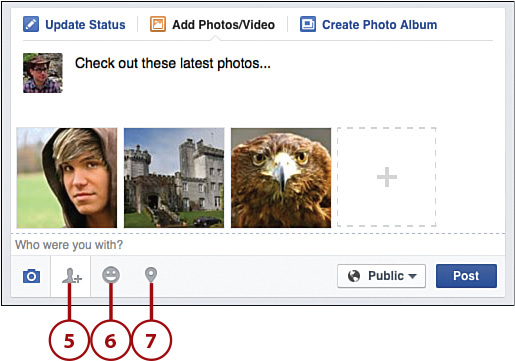
![]() Click on the Tag People icon to tag individuals (including yourself) who appear in each photo. This is optional. When you do this, the names of the people you tag in each photo are linked to that digital image, and this information becomes searchable and public.
Click on the Tag People icon to tag individuals (including yourself) who appear in each photo. This is optional. When you do this, the names of the people you tag in each photo are linked to that digital image, and this information becomes searchable and public.
![]() Click on the Emoticon icon to add an optional action to the message that’s related to what you’re doing or how you’re feeling.
Click on the Emoticon icon to add an optional action to the message that’s related to what you’re doing or how you’re feeling.
![]() Click on the Location icon to include your current location in the Status Update message.
Click on the Location icon to include your current location in the Status Update message.
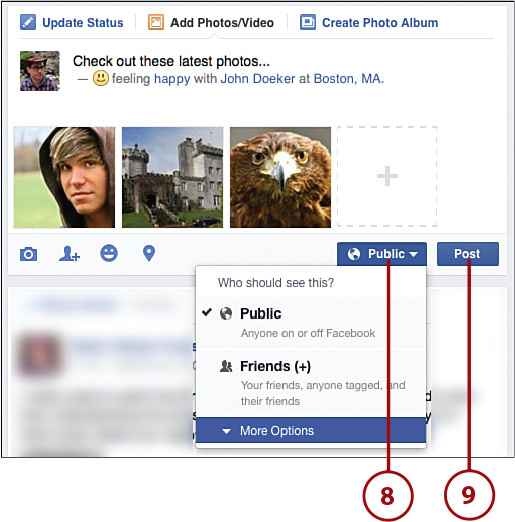
![]() From the Privacy pull-down menu, determine who can view your post. Options include Public or one of several other audiences to whom you can narrow access to your post.
From the Privacy pull-down menu, determine who can view your post. Options include Public or one of several other audiences to whom you can narrow access to your post.
![]() Click on the Post button to publish your message (and linked photos). What you publish almost instantly appears online.
Click on the Post button to publish your message (and linked photos). What you publish almost instantly appears online.
Edit or Delete a Post
You can edit or delete a Status Update by viewing it in Facebook, accessing the menu, and selecting the Edit Post or Delete Post option.
Edit Before You Post
When you upload an image to Facebook, before publishing it for others to see, you can use online-based image editing and enhancement tools to quickly improve or alter the image.
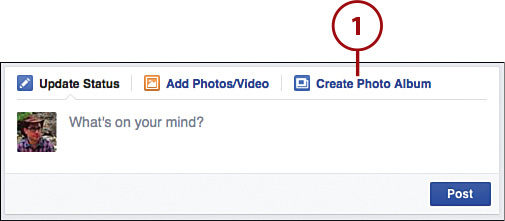
Create a Facebook Photo Album
Every Facebook account comes with the capability to create online-based photo albums that can be shared with your Facebook friends or the public. To create an album from the main Facebook page, follow these steps:
![]() From the Status Update window, click on the Create Photo Album option.
From the Status Update window, click on the Create Photo Album option.
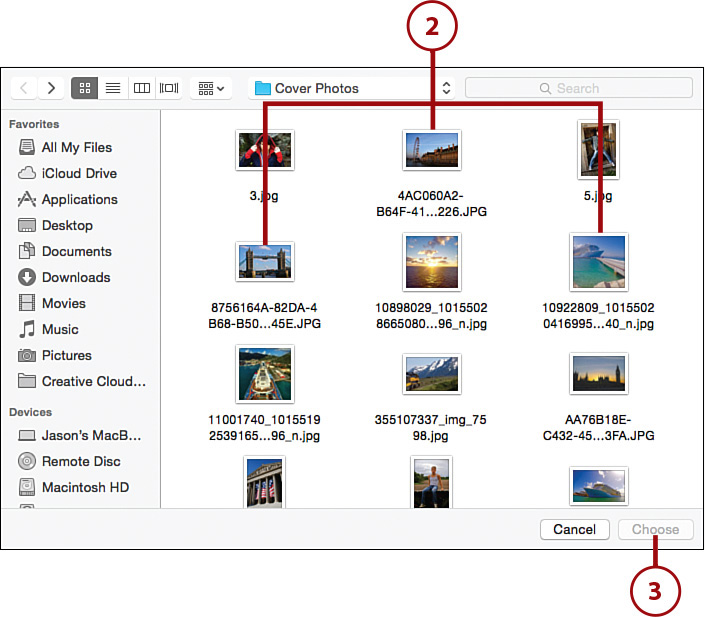
![]() From the Finder (Mac)/File Explorer (PC) window that appears, locate the images from your computer that you want to upload into this new album.
From the Finder (Mac)/File Explorer (PC) window that appears, locate the images from your computer that you want to upload into this new album.
![]() Click on the Choose button.
Click on the Choose button.
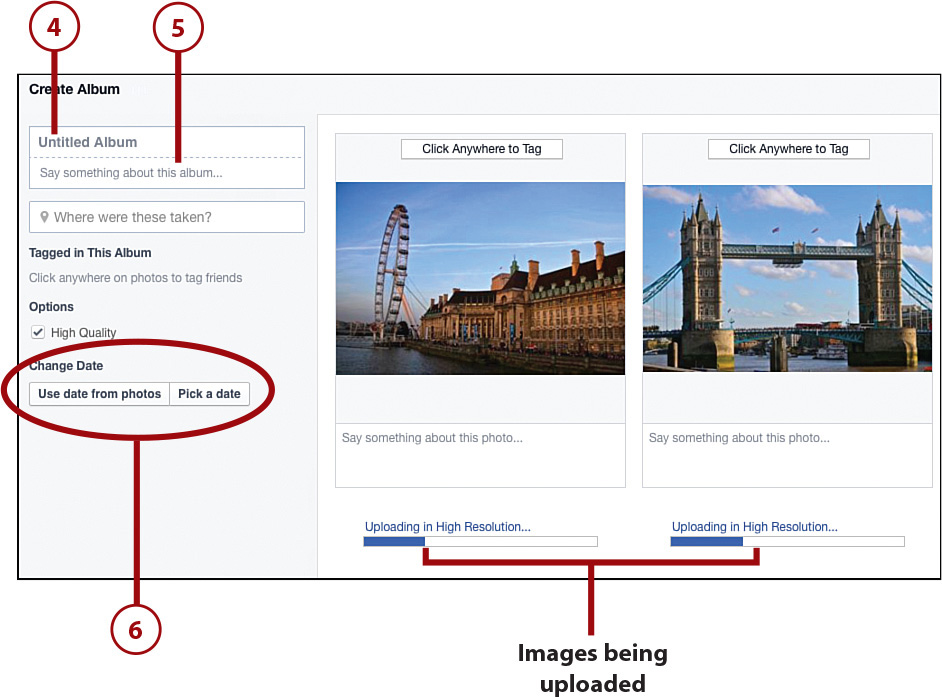
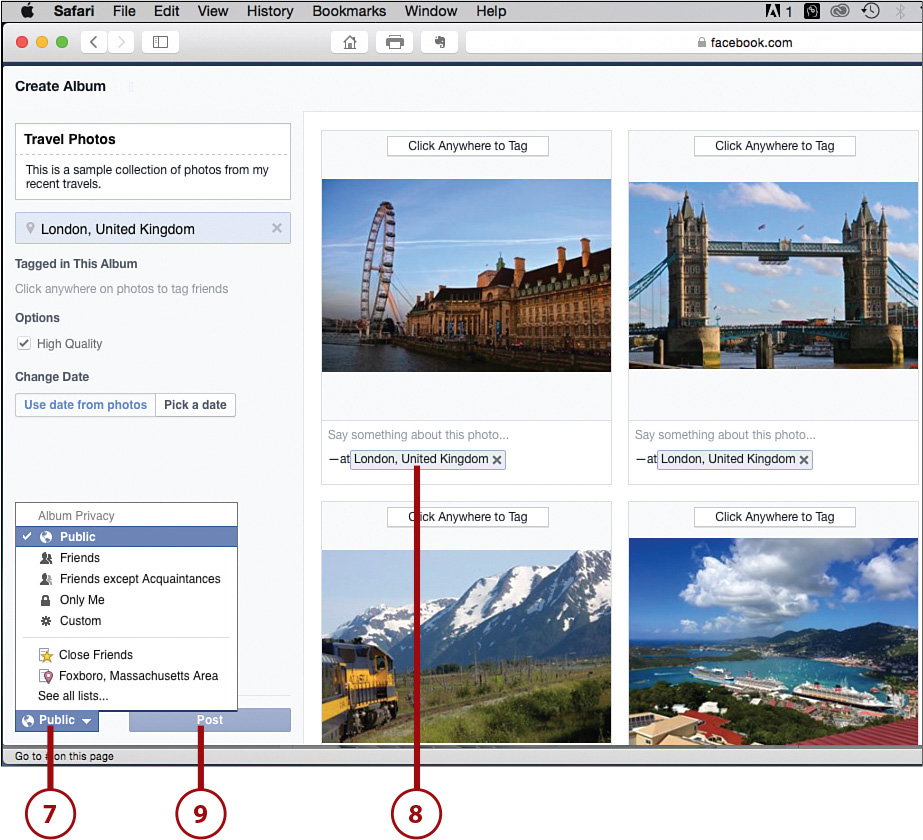
![]() From the Create Album screen, as your photos are uploading (or after they’ve uploaded), click on the Untitled Album field and add a descriptive name to your album.
From the Create Album screen, as your photos are uploading (or after they’ve uploaded), click on the Untitled Album field and add a descriptive name to your album.
![]() In the Say Something About This Album field, enter a one- or two-sentence description of the album.
In the Say Something About This Album field, enter a one- or two-sentence description of the album.
![]() Facebook automatically accesses the metadata stored in your image files and collects the date and time each image was taken. If you want to change this date, click on the Pick a Date option; otherwise, click on the Use Date from Photos option.
Facebook automatically accesses the metadata stored in your image files and collects the date and time each image was taken. If you want to change this date, click on the Pick a Date option; otherwise, click on the Use Date from Photos option.
![]() Click on the Privacy menu to determine who can access and view the album you’re creating. Each album can have different privacy settings associated with it.
Click on the Privacy menu to determine who can access and view the album you’re creating. Each album can have different privacy settings associated with it.
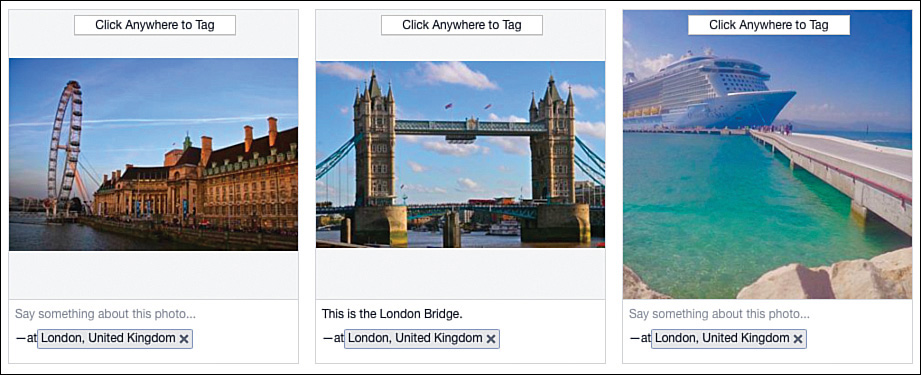
![]() Below each image thumbnail, type an optional caption for the photo in the Say Something About This Photo field.
Below each image thumbnail, type an optional caption for the photo in the Say Something About This Photo field.
![]() Once all the desired images have been uploaded and inserted into the album, and you’ve filled in all the desired fields and metadata information for each image, click on the Post button to publish the album on Facebook in your account.
Once all the desired images have been uploaded and inserted into the album, and you’ve filled in all the desired fields and metadata information for each image, click on the Post button to publish the album on Facebook in your account.
>>>Go Further: More Customizations
Getting Started with Twitter
Twitter is considered a “micro-blogging” service, because the posts you create with it (called tweets) can be only a maximum of 140 characters long. In a tweet, you can include text but also attach a photo, plus include location information, a website address, and/or hashtags (searchable keywords).
Although a Twitter account can be managed from any computer connected to the Internet, most people enjoy using it from their smartphone or tablet, when they’re out and about, to share details about their whereabouts and experiences with their online friends (who are referred to as followers).
Compose a Tweet Featuring Your Photo
Because Twitter integration is built in to the OS X operating system for Macs and the iOS operating system for the iPhone/iPad, for example, you can compose and send a tweet that contains a photo directly from the Photos app. To do this, select the image, tap/click on the Share icon, select the Twitter option, fill in each field, and then click on the Post option.
Composing and publishing a tweet and managing your Twitter account can also be done from the official Twitter app, or from a third-party app, like Twitterific, that’s designed for this purpose.
To compose a tweet and include a photo using the official Twitter app, sign in to your Twitter account and follow these steps (which are demonstrated here using an iPhone):
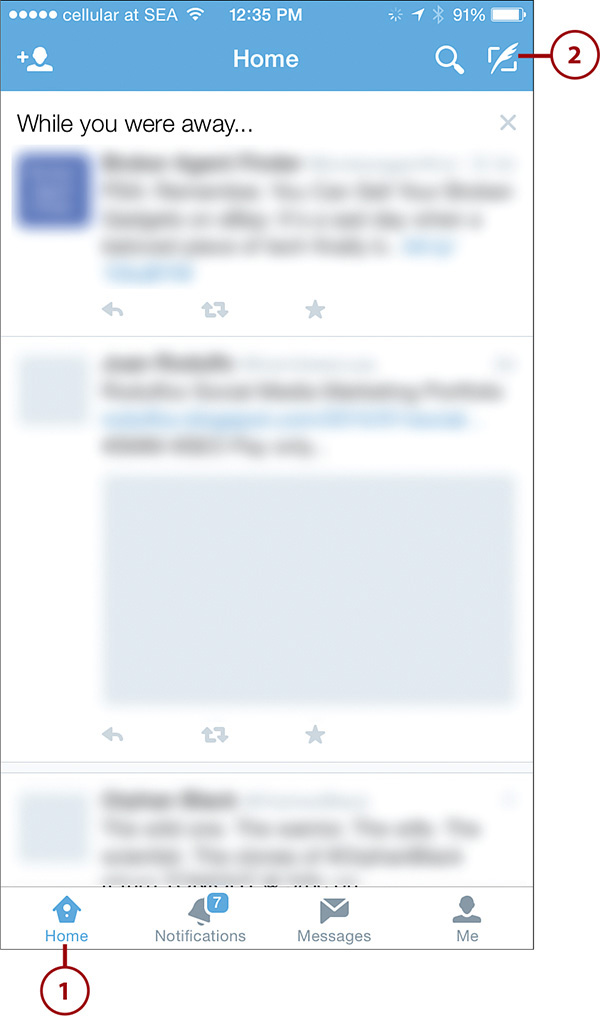
![]() From the main Twitter timeline screen, click on the Home icon.
From the main Twitter timeline screen, click on the Home icon.
![]() Click on the Compose icon.
Click on the Compose icon.
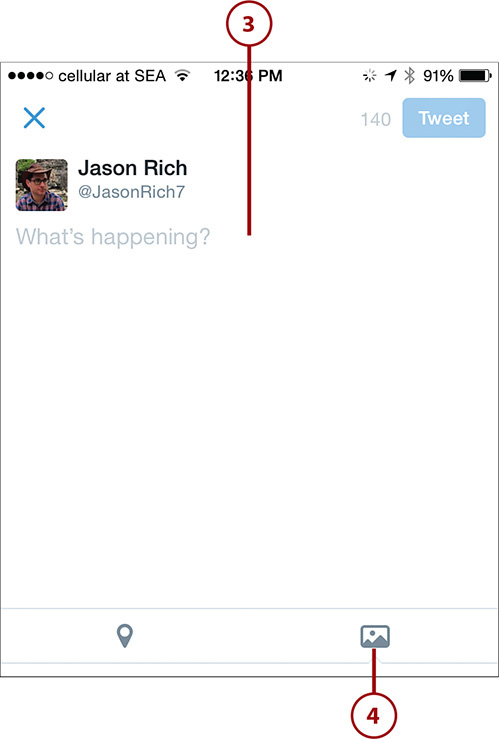
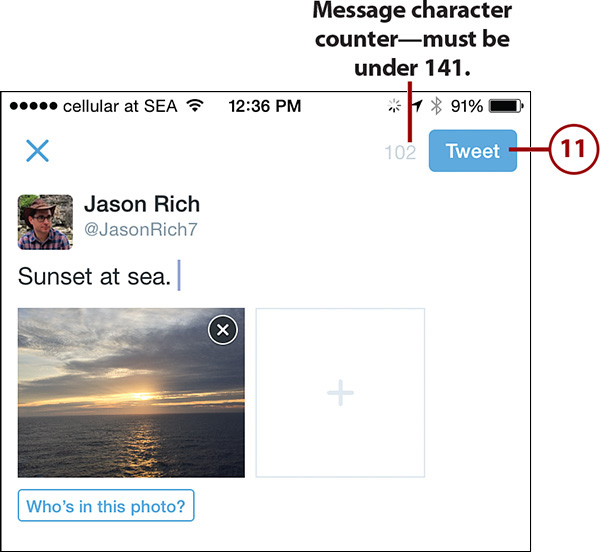
![]() In the What’s Happening? field, enter a text-based caption. This can include descriptive hash tags (#keyword), which help people find your tweet who are using a keyword search on Twitter. To alert specific people of the tweet, include their Twitter username (@username) into the body of the tweet message. This will result in that person being notified of your post.
In the What’s Happening? field, enter a text-based caption. This can include descriptive hash tags (#keyword), which help people find your tweet who are using a keyword search on Twitter. To alert specific people of the tweet, include their Twitter username (@username) into the body of the tweet message. This will result in that person being notified of your post.
![]() Tap the Picture icon to load a photo stored in your mobile device, or snap a photo using the camera.
Tap the Picture icon to load a photo stored in your mobile device, or snap a photo using the camera.
![]() Select a photo, and then tap its thumbnail to attach it to the tweet you’re composing. Tap on the “+” thumbnail to add an additional image (optional). (Not shown.)
Select a photo, and then tap its thumbnail to attach it to the tweet you’re composing. Tap on the “+” thumbnail to add an additional image (optional). (Not shown.)
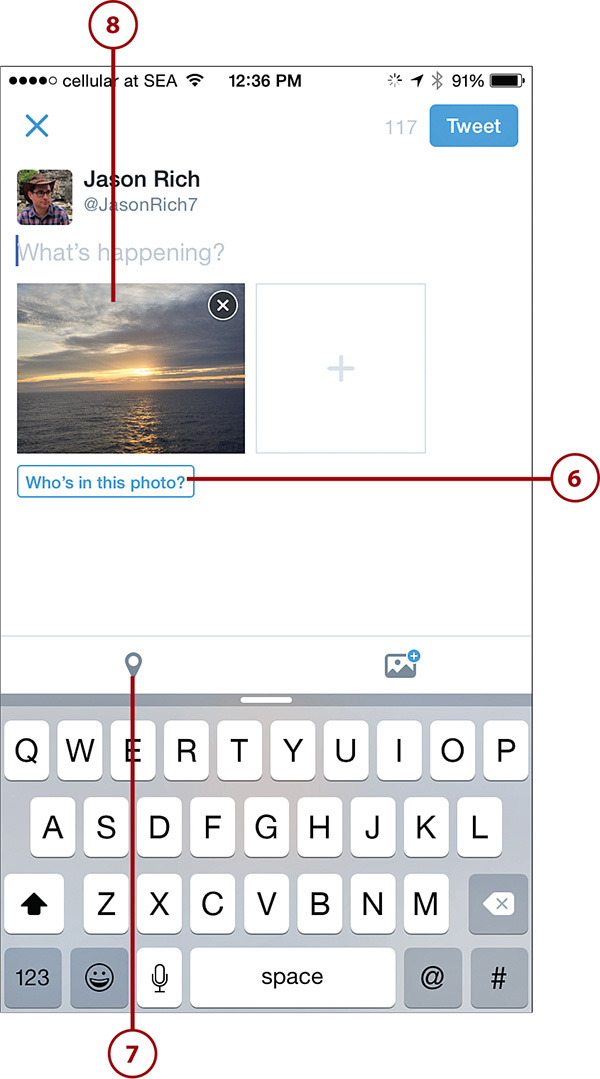
![]() Tap on the Who’s in This Photo button (if applicable) to tag people who appear in each photo (optional).
Tap on the Who’s in This Photo button (if applicable) to tag people who appear in each photo (optional).
![]() If you want to include the location where the photo was taken, click on the Location icon.
If you want to include the location where the photo was taken, click on the Location icon.
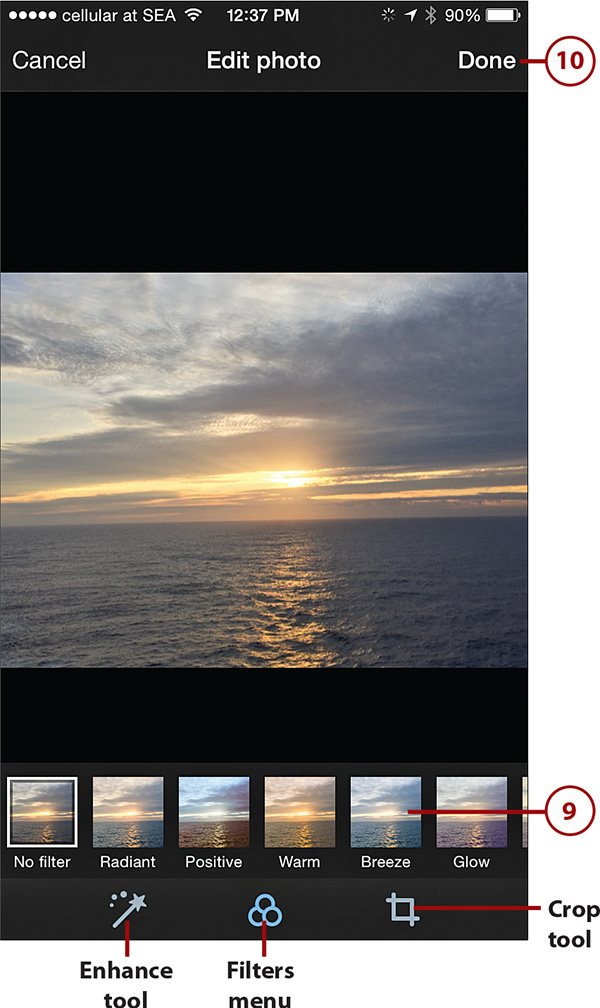
![]() To edit the selected photo using the photo enhancement tools built in to the Twitter application, tap on the image thumbnail.
To edit the selected photo using the photo enhancement tools built in to the Twitter application, tap on the image thumbnail.
![]() From the Edit Photo screen, tap on any of the special effect filters displayed along the bottom of the screen, or tap on one of the other two Edit command icons, which include Enhance (left) and Crop (right).
From the Edit Photo screen, tap on any of the special effect filters displayed along the bottom of the screen, or tap on one of the other two Edit command icons, which include Enhance (left) and Crop (right).
![]() Tap Done when you are finished making edits. (Or Cancel if you want to discard edits you’ve made.)
Tap Done when you are finished making edits. (Or Cancel if you want to discard edits you’ve made.)
![]() After you’ve composed the text-based portion of your tweet and have edited the attached image(s), tap on the Tweet button to publish your tweet online.
After you’ve composed the text-based portion of your tweet and have edited the attached image(s), tap on the Tweet button to publish your tweet online.
Getting Started with Instagram
Instagram is somewhat like Twitter, except instead of the focus of the service being on publishing 140-character text-based messages (with images attached), Instagram is all about sharing one photo at a time, with the photo being the main focus. Each photo you publish on your timeline can have a text-based caption and other information associated with it.
It’s also possible to include the location where the photo was taken and tag the people who appear in the photo. Built in to the official Instagram app for mobile devices is the capability to simultaneously publish your post on Instagram, Twitter, Facebook, Tumblr, and Flickr.
What most people love about Instagram is that when using the official Instagram app on your smartphone or tablet, you can snap photos from within the Instagram app (instead of using the Camera app), or you can choose an image already stored on your mobile device to publish online.
The Instagram App Offers Powerful Image Enhancement Tools
After you select a photo, the Instagram app has powerful but easy-to-use special effect filters and image editing tools you can quickly add to your image to enhance it before publishing it online.
Using the official Instagram app on your mobile device, create a free Instagram account the first time you launch the app, and then manage your account and publish photos to your account from your Internet-enabled smartphone or tablet.
Instagram enables you to publish one photo at a time online. Each image becomes part of your account and is displayed as part of your timeline. All images are public and available to your followers, as well as to people who use Instagram’s Search feature to find photos using keywords (hash tags).
Instagram Is All About the Square
Instead of displaying images in rectangular form, like most online photo sharing and social media services, Instagram crops and displays all images in a square shape.
Publishing Photos on Instagram
After creating a free Instagram account, to publish a photo online, launch the Instagram app and follow these steps (shown here on an iPhone):
![]() Tap on the Image Selection icon to select a photo.
Tap on the Image Selection icon to select a photo.
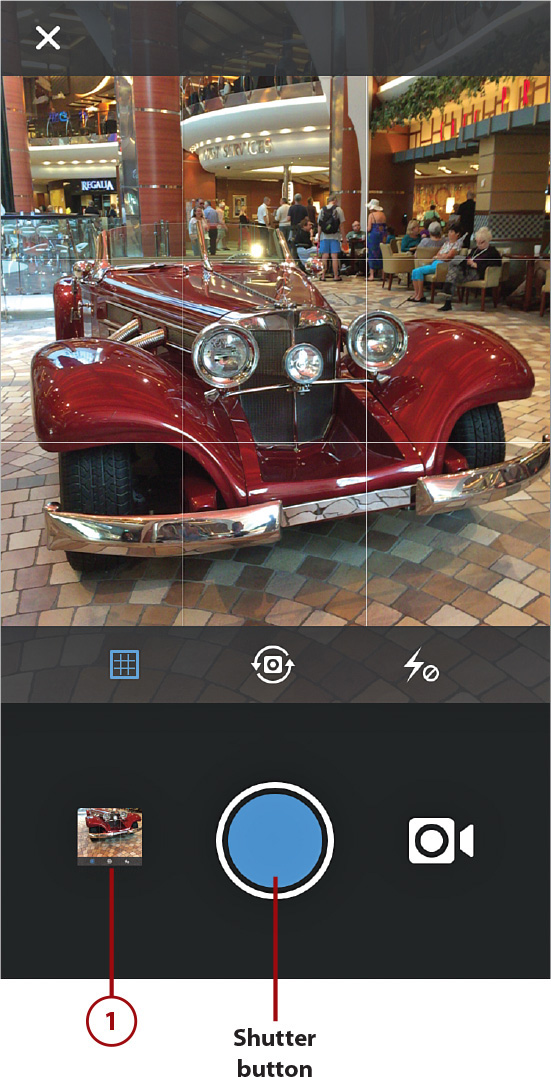
Snap a Photo
If you want to capture a new photo to share, just frame it on the screen and tap the Shutter button.
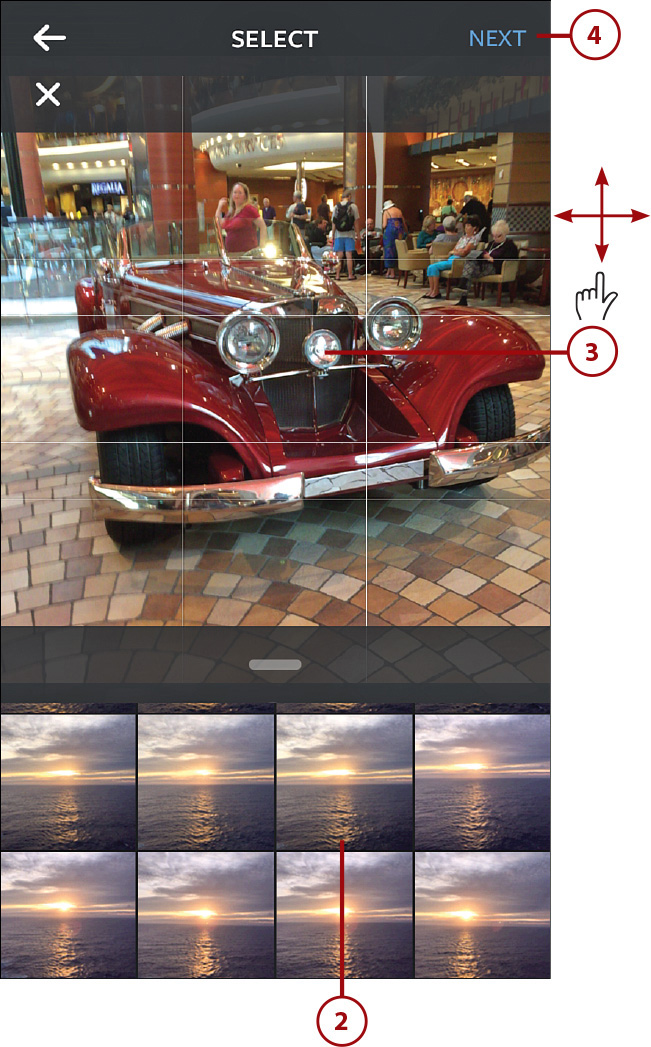
![]() Select the image you want to edit and publish.
Select the image you want to edit and publish.
![]() Use a reverse-pinch or pinch figure gesture to zoom in or out, and then reposition the image by placing your finger on the image, holding it down and dragging it around.
Use a reverse-pinch or pinch figure gesture to zoom in or out, and then reposition the image by placing your finger on the image, holding it down and dragging it around.
![]() Tap on the Next option when the image is framed how you want it.
Tap on the Next option when the image is framed how you want it.
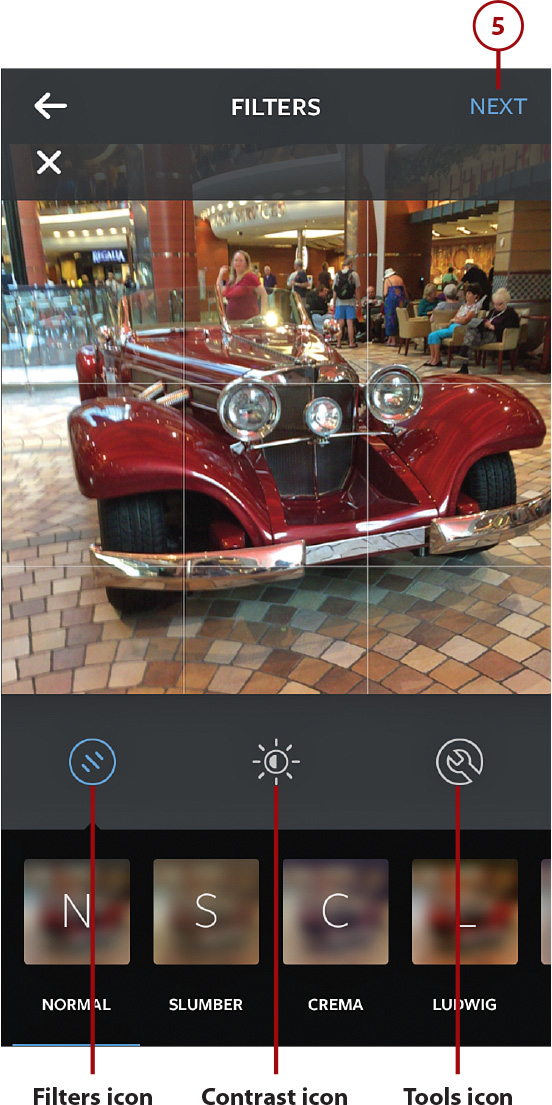
![]() Make any edit you want to your photo, and tap Next to Continue.
Make any edit you want to your photo, and tap Next to Continue.
![]() In the Write a Caption field, enter a text-based caption for your image. This can include searchable and descriptive hashtags (#keyword).
In the Write a Caption field, enter a text-based caption for your image. This can include searchable and descriptive hashtags (#keyword).
![]() Tap on the Tag People option to add the names of the people who appear in the photo. Adding this metadata links the people’s names to the digital image, and their names become searchable.
Tap on the Tag People option to add the names of the people who appear in the photo. Adding this metadata links the people’s names to the digital image, and their names become searchable.
![]() To include the location where the photo was taken, tap on the Name This Location option, and then select the location from the menu that displays. Your mobile device’s GPS feature is used to determine your whereabouts.
To include the location where the photo was taken, tap on the Name This Location option, and then select the location from the menu that displays. Your mobile device’s GPS feature is used to determine your whereabouts.
![]() To simultaneously publish your photo on Facebook, Twitter, Tumblr, and/or Flickr, for example, if you’re active on any or all these services, tap on each service’s respective listing to select it.
To simultaneously publish your photo on Facebook, Twitter, Tumblr, and/or Flickr, for example, if you’re active on any or all these services, tap on each service’s respective listing to select it.
![]() Tap on the Share button to publish your photo. Once your photo is published online, it is public and viewable by your followers or people who stumble upon it using Instagram’s Search feature.
Tap on the Share button to publish your photo. Once your photo is published online, it is public and viewable by your followers or people who stumble upon it using Instagram’s Search feature.

Edit or Delete Your Instagram Posts
After publishing content on Instagram, as you’re viewing your own timeline, you can select an image and then edit or delete it anytime in the future. To do this, tap on the Profile icon at the bottom of the screen, tap on the photo you want to edit or delete, and when you’re viewing it, tap on the More icon. From the More menu, select the Delete or Edit option.