
2. Html Basics Bonus Online Lesson
Lesson overview
In this lesson, you will gain some valuable skills and experience in writing HTML code and learn what productivity enhancements Dreamweaver brings to the job.
Writing your own HTML code
The idea of writing code may sound difficult or at least tedious, but creating a webpage is actually much easier than you think. In the next few exercises, you will learn how HTML works by creating a basic webpage and adding and formatting some simple text content.
![]() Note
Note
Feel free to use any text editor for these exercises. But be sure to save your files as plain-text or text-only.
1. Launch Notepad (Windows) or TextEdit (Mac).
2. Enter the following code in the empty document window:
<html>
<body>
Welcome to my first webpage
</body>
</html>
![]() Note
Note
TextEdit may default to saving the file as rich text (.rtf ); in this case you need to choose Format > Format As Plain Text before you can save the file as .html.
3. Save the file to the desktop as firstpage.html.
4. Launch Chrome, Firefox, Internet Explorer, Safari, or another installed web browser.
5. Choose File > Open. Navigate to the desktop, select firstpage.html, and then click OK/Open.
![]() Note
Note
In text editors you will have to type the .html extension yourself. Some text editors may try to change the .html extension or prompt you to confirm the choice.
Congratulations, you just created your first webpage. As you can see, it doesn’t take much code to create a serviceable webpage.

Understanding HTML syntax
Next, you’ll add content to your new webpage to learn some important aspects of HTML code syntax.
1. Switch back to the text editor, but don’t close the browser.
2. Insert your cursor at the end of the text “Welcome to my first webpage” and press Enter/Return to insert a paragraph return.
3. Type Making webpages is fun on the new line. Press the spacebar five times to insert five spaces. Finish by typing and easy! on the same line.
4. Save the file.
Although you saved the changes, you’ll notice that the new text doesn’t appear in the browser. That’s because you never see a webpage “live” on the Internet. It must be first downloaded to your computer and saved, or cached, on the hard drive. The browser is actually displaying the page that it downloaded originally. To see the latest version of the webpage, you’ll have to reload the webpage. This is important to remember as a web designer. People frequently miss changes in a website because they are looking at the cached versions of a page instead of the most current version. If your website will be updated frequently, it’s possible to insert a piece of JavaScript code that will reload a page automatically each time a browser window accesses it.
6. Refresh the window to load the updated page.

![]() Tip
Tip
In most browsers, you can press Ctrl+R/Command+R to refresh the page view.
As you can see, the browser is displaying the new text, but it’s ignoring the paragraph return between the two lines as well as the extra spaces. In fact, you could add hundreds of paragraph returns between the lines and dozens of spaces between each word, and the browser display would be no different. That’s because the browser is programmed to ignore extra white space and honor only HTML code elements. By inserting a tag here and there, you can easily create the desired text display.
![]() Tip
Tip
Another method for creating a nonbreaking space in Dreamweaver is by pressing Ctrl+Shift+spacebar/Command+Shift+ spacebar. This will generate the named entity . In most cases, the two entities are identical in use and performance; however, is not a valid entity for some applications, such as EPUB 2.0. Before you use a specific entity, make sure it is compatible with your workflow.
Inserting HTML code
In this exercise, you will insert HTML tags to produce the correct text display.
1. Switch back to the text editor.
2. Add the highlighted tags to the text as follows:
<p>Making webpages is fun and easy!</p>
To add extra spacing or other special characters within a line of text, HTML provides code elements called entities. Entities are entered into the code differently than tags. For example, the method for inserting a nonbreaking space is to type the   entity.
3. Replace the five spaces in the text with five nonbreaking spaces so the code looks like the following sample:
<p>Making webpages is fun     and
easy!</p>
![]() Tip
Tip
Feel free to copy and paste the entity code to save time.
4. Save the file. Switch to the browser and reload or refresh the page display.
The browser is now showing the paragraph return and the desired spacing.

By adding the tags and entities, the browser can display the desired paragraph structure and spacing.
Although line breaks, spacing, and even indentation are ignored by the browser, web designers and coders frequently employ such whitespace to make the code easier to read and edit. But don’t go crazy. Although whitespace doesn’t affect the display of a page in a browser, it can contribute to the time it takes to download and render a webpage overall. Whitespace and extraneous code contributes to what web developers call the overall weight of a page. When a page has too much weight, it downloads, renders, and operates in a suboptimal manner.
Formatting text with HTML
Tags often serve multiple purposes. Besides creating paragraph structures and creating whitespace as demonstrated earlier, they can impart basic text formatting, as well as identify the relative importance of the page content. For example, HTML provides six heading tags (<h1> to <h6>) you can use to set headings off from normal paragraphs. The tags not only format the heading text differently than paragraph text, they also impart additional meaning. Heading tags are automatically formatted in bold and often at a larger relative size. The number of the heading (1 through 6) also plays a role: Using the <h1> tag identifies the heading as being the highest in importance for search engines and other applications. In this exercise, you will add a heading tag to the first line.
1. Switch back to the text editor.
2. Add the highlighted tags to the text as follows:
<h1>Welcome to my first webpage</h1>
3. Save the file. Switch to the browser and reload or refresh the page display.
Note how the text display changed. It is now larger and formatted in boldface.

Web designers use heading tags to identify the importance of specific content to help improve their site rankings on Google, Yahoo, and other search engines. Headings also help individuals who use screen readers and other assistive devices that allow them to access web-based content.
Applying inline formatting
So far, all the tags you have used work as paragraph or standalone elements. These are referred to as block elements. HTML also provides the ability to apply formatting and structure to content that’s contained within the flow of another tag, or inline. A typical use of inline code would be to apply bold or italic styling to a word or a portion of a paragraph. In this exercise, you will apply inline formatting.
1. Switch back to the text editor.
2. Add the highlighted tags to the text as follows:
<p>Making webpages is fun     
<strong><em> and easy!</em></strong></p>
3. Save the file. Switch to the browser and reload or refresh the page display.

Strong and emphasis (em) are used in place of the tags for bold <b> and italic <i> because they provide enhanced semantic meaning for visitors with disabilities or visual impairment, but the result is basically identical.
Most formatting, both inline and otherwise, is properly applied using cascading style sheets (CSS). The <strong> and <em> tags are among the few still acceptable ways to apply inline formatting using specific HTML code elements. Technically speaking, these elements are more intended to add semantic meaning to text content, but the effect is still the same. Today, text tagged with <strong> and <em> still appears by default as bold and italics in most applications.
However, this may change in the near future. There has been an industry-supported move to separate the content from its presentation, or formatting, over the last decade. Although most browsers and HTML readers currently apply default formatting based on specific tags, this may not always be the case. See Lesson 3, “CSS Basics,” for a full explanation of the strategy and application of CSS in standards-based web design.
Adding structure
Most webpages feature at least three fundamental elements: a root (typically <html>), <head>, and <body>. These elements create the essential underlying structure of the webpage. The root element contains all the code and content, with the exception of any dynamic code that must load before the page content itself. This dynamic code is usually written in web programming languages such as ASP, Cold Fusion, or PHP. The <head> element holds code that performs vital background tasks, including styling, external links, and other information. The <body> element holds all the visible content, such as text, tables, images, movies, and so on.
The sample page you created doesn’t have a <head> element. A webpage can exist without this section, but adding any advanced functionality to this page without one would be difficult. In this exercise, you will add <head> and <title> elements to your webpage.
1. Switch back to the text editor.
2. Add the highlighted tags and content to the text as follows:
<html>
<head>
<title>HTML Basics for Fun and Profit</title>
</head>
<body>
3. Save the file. Switch to the browser and reload or refresh the page display.
Did you notice what changed? It may not be obvious at first. Look at the title bar or window tab of the browser. The words “HTML Basics for Fun and Profit” now magically appear above your webpage. By adding the <title> element, you have created this display. But it’s not just a cool trick, it’s good for your business too.

The content of the <title> tag appears in the browser title bar when the page is refreshed.
Google, Yahoo, and the other search engines catalog the <title> element of each page and use it, among other criteria, to index and rank webpages. The content of the title is one of the items typically displayed within the results of a search. It also appears automatically when you create a bookmark for that page in your browser. A well-titled page could be ranked higher than one with a bad title or one with none at all. Keep your titles short but meaningful. For example, the title “ABC Home Page” doesn’t really convey any useful information. A better title might be “Welcome to the Home Page of ABC Corporation.” Check out other websites (especially peers or competitors) to see how they title their own pages.
Writing HTML in Dreamweaver
So the inevitable question is, “If I can write HTML in any text editor, why do I need to use Dreamweaver?” Although a complete answer awaits you in the following 12 lessons, the question begs for a quick demonstration. In this exercise, you will re-create the same webpage using Dreamweaver.
1. Launch Dreamweaver CC (2015.1 release) or later.
2. Select the Design workspace from the Workspace menu or select Window > Workspace Layout > Design.
3. Choose File > New.
4. In the New Document dialog, select the New Document tab.
Select HTML from the Document Type column.
5. From the Framework section, choose the None tab.
6. If necessary, in the Doc Type menu, select HTML5.

Dreamweaver allows you to create different types of web-compatible files. You’ll learn more about the New Document dialog in subsequent lessons.
7. Click Create.
The New Document dialog opens in Dreamweaver. The window may default to one of four displays: Live view, Code view, Design view, or Split view.
8. If it’s not already selected, click the Code view button in the upper left of the document window.
The first thing you should notice in the Code view window is that Dreamweaver has provided a huge head start over using a text editor. The basic structure of the page is already in place, including the root, head, body, and even title tags, among others. The only thing Dreamweaver makes you do is add the content itself.

The advantages of using Dreamweaver to create HTML are evident from the very beginning: As you can see, all of the page structure is created already. All you need to do is add the content.
Both Dreamweaver and text editors allow you to write HTML code. With a text editor, you have to use a separate application to actually see what the webpage looks like. Dreamweaver provides a built-in method for previewing your finished webpage.
9. Click the Split view button.
In Split view, you can see the HTML code in one window of the program and a relatively accurate preview of the webpage in the other. Split view will save you hours of time loading and previewing pages in a separate application.
Dreamweaver also makes it a simple matter to format the first line with a specific HTML tag.
![]() Note
Note
Split view may use either Live or Design view to display side by side, or top to bottom, with the Code window. For simple pages like this, either one will do. See Lesson 1 for more information on customizing your workspace.
10. After the <body> tag, enter the following text:
Welcome to my second page
11. Move the cursor to the beginning of the “Welcome to my second page” text. Type < to open the code-hinting feature. Type h to filter the list to elements starting with “h”.
Dreamweaver automatically opens a drop-down list of compatible HTML, CSS, JavaScript, and other supported code elements. This is Dreamweaver’s code-hinting feature.
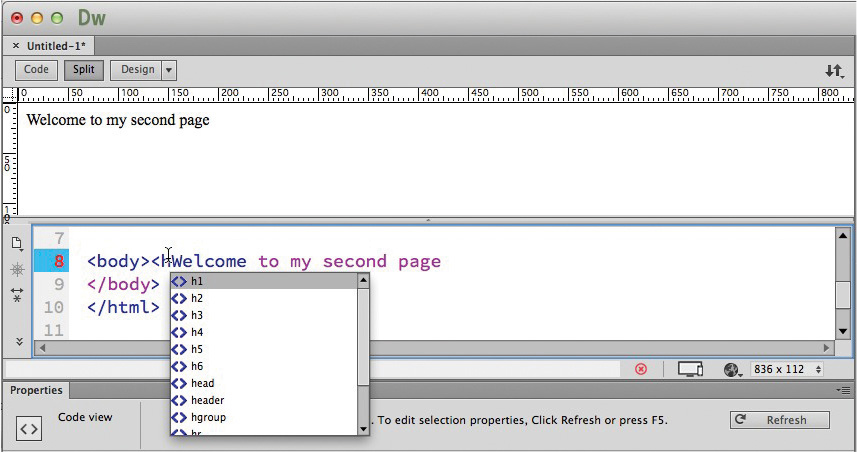
When activated, code hinting provides a drop-down list of applicable HTML, CSS, and JavaScript elements, as well as some in other languages.
12. Double-click h1 from the list to insert it in the code. Type > to close the element.
13. Move the cursor to the end of the text. Type </ at the end of the sentence.
Note how Dreamweaver closes the <h1> element automatically. You entered the <h1> tags after the fact, but many web designers add the tags as they write.
![]() Note
Note
The Property inspector is used frequently within the exercises in this book. If you do not see it in your interface, you can open it by selecting Window > Properties. If necessary, you can then dock it at the bottom of the document window.
14. Press Enter/Return to insert a line break. Type <p and press Enter/Return to close the hinting window and insert the element. Type > to close the tag.
15. Type Making webpages in Dreamweaver is even more fun! and then type </ to close the <p> element.
Tired of hand-coding yet? Dreamweaver offers multiple ways for formatting your content.
16. Select the word “more.” In the HTML tab of the Property inspector, click the B button and the I button to apply <strong> and <em> tags to the text.

![]() Tip
Tip
If the I button is not visible click the Refresh button in the Property inspector.
These tags produce the appearance of bold and italic formatting on the selected text.

Only two more tasks remain before your new page is complete. Note that Dreamweaver created the <title> element and inserted the text “Untitled Document” within it. You could select the text within the code window and enter a new title, or you could change it using another built-in feature.
17. Locate the Document Title field in the Property inspector and select the Untitled Document placeholder text.
18. Type HTML Basics, Page 2 in the Document Title field.
19. Press Enter/Return to complete the title.

The title field enables you to change the content of the <title> element without having to work in the HTML code.
The new title text appears in the code, replacing the original content. It’s time to save the file and preview it in the browser.
20. Choose File > Save. Navigate to the desktop.
Name the file secondpage and click Save.
Dreamweaver adds the proper extension (html) automatically.
21. Choose File > Preview in Browser and select your favorite browser.
The completed page appears in the browser window.

You have just completed two webpages—one by hand and the other using Dreamweaver. In both cases, you can see how HTML played a central role in the whole process. To learn more about this technology, go to the website of the W3 Consortium, at www.w3schools.com, or check out any of the books in the sidebar “Recommended books on HTML.”
![]() Note
Note
Dreamweaver uses the default web browser on your computer. You may install additional, alternate browsers and configure their use in the Dreamweaver Preferences dialog box.