
1. Customizing Your Workspace
Lesson overview
In this lesson, you’ll familiarize yourself with the Dreamweaver CC (2015.1 release) program interface and learn how to do the following:
• Use the program Welcome screen
• Switch document views
• Work with panels
• Select a workspace layout
• Adjust toolbars
• Personalize preferences
• Create custom keyboard shortcuts
• Use the Property inspector
• Use the Extract workflow
This lesson will take about 40 minutes to complete. Download the project files for this lesson from the Lesson & Update Files tab on your Account page at www.peachpit.com, store them on your computer in a convenient location, and define a site based on the lesson01 folder, as described in the “Getting Started” section of this book. Your Account page is also where you’ll find any updates to the lessons or to the lesson files. Look on the Lesson & Update Files tab to access the most current content.

Dreamweaver offers a customizable and easy-to-use WYSIWYG HTML editor that doesn’t compromise on power and flexibility. You’d probably need a dozen programs to perform all the tasks that Dreamweaver can do—and none of them would be as fun to use.
Touring the workspace
Dreamweaver is the industry-leading Hypertext Markup Language (HTML) editor, with good reasons for its popularity. The program offers an incredible array of design and code-editing tools. Dreamweaver offers something for everyone.
Coders love the range of enhancements built into the Code view environment, and developers enjoy the program’s support for a variety of programming languages and code hinting. Designers marvel at seeing their text and graphics appear in an accurate What You See Is What You Get (WYSIWYG) depiction as they work, saving hours of time previewing pages in browsers. Novices certainly appreciate the program’s simple-to-use and power-packed interface. No matter what type of user you are, if you use Dreamweaver you don’t have to compromise.

A Menu bar
B Document tab
C Referenced files interface
D Document toolbar
E New Features
F Workspace menu
G Files panel
H CC Libraries panel
I CSS Designer
J Insert panel
K Assets panel
L Behaviors panel
M Design/Live views
N Scrubber
O Coding toolbar
P Code view
Q Tag selectors
R Property inspector
The Dreamweaver interface features a vast array of user-configurable panels and toolbars. Take a moment to familiarize yourself with the names of these components.
You’d think a program with this much to offer would be dense, slow, and unwieldy, but you’d be wrong. Dreamweaver provides much of its power via dockable panels and toolbars that you can display or hide and arrange in innumerable combinations to create your ideal workspace. In most cases, if you don’t see a desired tool or panel, you’ll find it in the Window menu.
This lesson introduces you to the Dreamweaver interface and gets you in touch with some of the power hiding under the hood.
Using the Welcome Screen
The Dreamweaver Welcome screen provides quick access to recent pages, easy creation of a range of page types, and a direct connection to several key Help topics. The Welcome screen appears when you first start the program or when no other documents are open. The Welcome screen has gotten a facelift in the last few versions and deserves a quick review to check out what it offers. For example, it now has four main tabs: Create, New Features, Getting Started, and Tips & Techniques. Click the name of the tab to access these features.
Create
If the Create tab looks familiar it’s because it has been around in one form or another for many versions of Dreamweaver. As it has always done, it provides instant access to a list of up to your last ten files. At this moment, your screen may not display any filenames at all if you have not used Dreamweaver previously. Choosing a file from this list is a quick alternative to choosing File > Open when you want to edit an existing page.

In addition to recent documents, the Create tab enables you to create up to eight different web file types with a single click, including HTML, CSS, JavaScript, and PHP, as well as predefined starter templates and site setup interfaces.
New Features
When you select New Features in the Welcome screen, you see a list of the most recent features that have been added to the program. Click one of the topics and get a video- or text-based overview of these new tools and workflows. This tab is updated dynamically as new features are added to Dreamweaver.

Getting Started
Select Getting Started to access quick tutorials that can get you up and running in various basic techniques and workflows in Dreamweaver. Learn how to create a new layout or style it with CSS. Sample files and assets can be downloaded within each tutorial as needed.

Tips & Techniques
For more advanced tutorials, check out Tips & Techniques. Learn how to create a responsive website, preview your new designs on your favorite mobile devices, or access web fonts.

You may use the Welcome screen at any time while working in this book. When you’ve completed the lessons, you may prefer not to use the Welcome screen or even to see it. If so, you can close it by clicking the Close icon at the top of the screen. To bring back the Welcome screen, select Help > Welcome.
Exploring New Feature Guides
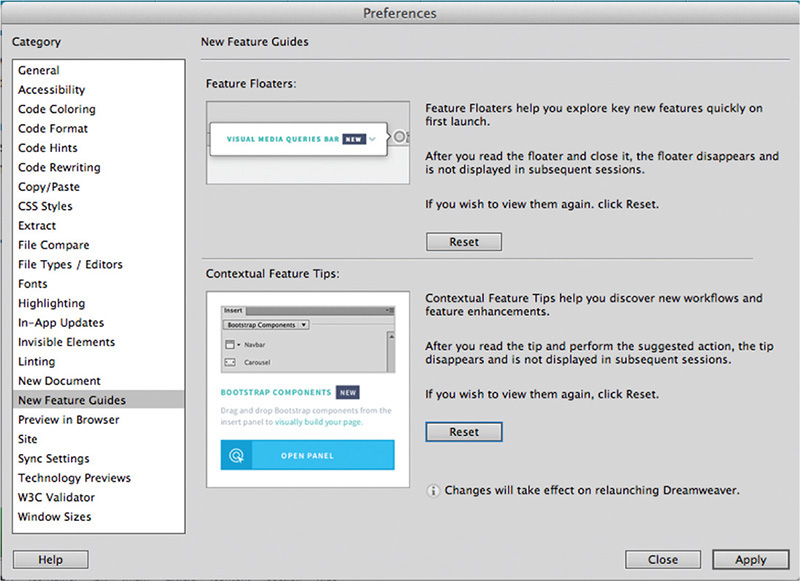
Another new enhancement to Dreamweaver CC (2015.1 release) is the New Feature guides, which will pop up from time to time as you access various features. The pop-ups will call your attention to new features or workflows that have been added to the program and provide handy tips to help you get the most out of them.

When a tip appears, you can reveal the entire content by clicking the pop-up. You can then close the pop-up by clicking the Close icon ![]() in the upper-right corner of each tip. When you close the tip, it will not appear again. If desired, you can display the tips again by resetting the option in Preferences.
in the upper-right corner of each tip. When you close the tip, it will not appear again. If desired, you can display the tips again by resetting the option in Preferences.
Switching and splitting views
Dreamweaver offers dedicated environments for coders and designers as well as a new option that allows you to work with Photoshop mockups.
Code view
Code view focuses the Dreamweaver workspace exclusively on the HTML code and a variety of code-editing productivity tools. To access Code view, click the Code view button in the Document toolbar.

Code view
Design view
Design view shares the workspace with Live view and focuses the Dreamweaver workspace on its WYSIWYG editor, which provides a reasonable depiction of the webpage as it would appear in a browser. With the advancements in CSS and HTML, Design view is no longer as WYSIWYG as it once was. But it does offer an interface that speeds up the creation and editing of your content. And at the moment, it’s also the only way to access certain Dreamweaver tools or workflows, as you will see in the upcoming lessons.
To activate Design view, choose it from the Design/Live views drop-down menu in the Document toolbar. Most HTML elements and basic cascading style sheets (CSS) formatting will be rendered properly within Design view, with the major exceptions of CSS3 properties, dynamic content, interactivity, such as link behaviors, video, audio, jQuery widgets, and some form elements. This may be the first version of Dreamweaver in which you spend more time in Live view than in Design view.

Live view
Live view is the new default workspace of Dreamweaver CC. It speeds up the process of developing modern websites by allowing you to visually create and edit webpages and web content in a browser-like environment, and it supports and previews most dynamic effects and interactivity.
To use Live view, choose it from the Design/Live views drop-down menu in the Document toolbar. When Live view is activated, most HTML content will function as it would in an actual browser, allowing you to preview and test most dynamic applications and behaviors.
In previous versions of Dreamweaver, the content in Live view was not editable. This has all changed. You can now edit text, add and delete elements, create classes and ids, and even style elements, all in the same window. It’s like working on a live webpage right inside Dreamweaver.
Live view is integrally connected to the CSS Designer, allowing you to create and edit advanced CSS styling and build fully responsive webpages without having to switch views or waste time previewing the page in a browser.

Live view
Split view
Split view provides a composite workspace that gives you access to both the design and the code simultaneously. Changes made in either window update in the other in real time.
To access Split view, click the Split view button in the Document toolbar. Dreamweaver splits the workspace horizontally by default. When using Split view, you can display the Code view with either Live or Design view.

Split view (horizontal)
![]() Note
Note
Split view can pair Code view with either Design or Live view.
If desired, you can also split the screen vertically by selecting the Split Vertically option on the View menu. When the window is split, Dreamweaver also gives you options for how the two windows display. You can put the code window on the top, bottom, left, or right. You can find all these options in the View menu. Most screen shots in the book that show Split view show Design or Live view at top or left.

Live Source Code
Live Source Code is an HTML code-troubleshooting display mode available whenever Live view is activated. To access Live Source Code, activate Live view and then click the Live Source Code icon ![]() at the top of the document window. While active, Live Source Code displays the HTML code as it would appear in a live browser on the Internet.
at the top of the document window. While active, Live Source Code displays the HTML code as it would appear in a live browser on the Internet.
The code window will interactively render changes to the elements, attributes, and styling as you interact with the content in the page. You can see this interaction by changing the width of the screen using the Scrubber until the horizontal navigation menu collapses to an icon. When you click the icon to open the menu, in Code view you will see that a class attribute of open is added to the menu interactively. The class is then removed when you close the menu. Without the live source code, you would not be able to see this interaction and behavior.
Be aware that while Live Source Code is active, you will not be able to edit the HTML code, although you can still modify external files, such as linked style sheets.

Inspect mode
Inspect mode is a CSS troubleshooting display mode available whenever Live view is activated. It is integrated with the CSS Designer and allows you to identify CSS styles applied to content within the page by moving the mouse cursor over elements within the webpage. Clicking an element freezes the focus on that item.
The Live view window highlights the targeted element and displays the pertinent CSS rules applied or inherited by that element. You can access Inspect mode at any time by clicking the Live view button whenever an HTML file is open and then clicking the Inspect icon ![]() at the top of the document window.
at the top of the document window.

Inspect mode
Working with panels
Although you can access most commands from the menus, Dreamweaver scatters much of its power in user-selectable panels and toolbars. You can display, hide, arrange, and dock panels at will around the screen. You can even move them to a second or third video display if you desire.

Standard panel grouping
The Window menu lists all the panels available in the program. If you do not see a desired panel on the screen, choose it from the Window menu. A checkmark appears next to its name in the menu to indicate that the panel is open. Occasionally, one panel may lie behind another on the screen and be difficult to locate. In such situations, simply choose the desired panel from the Window menu and the panel will rise to the top of the stack.
Minimizing panels
To create room for other panels or to access obscured areas of the workspace, you can minimize or expand individual panels in place. To minimize a standalone panel, double-click the tab containing the panel name. To expand the panel, click the tab once.

Minimizing a panel by double-clicking its tab
You can also minimize one panel within a stack of panels individually by double-clicking its tab. To open the panel, click once on its tab.

Minimizing one panel in a stack using its tab
To recover more screen real estate, you can minimize panel groups or stacks down to icons by double-clicking the title bar. You can also minimize the panels to icons by clicking the double arrow icon ![]() in the panel title bar. When panels are minimized to icons, you access any of the individual panels by clicking its icon or button. The selected panel will appear on the left or right of the icon, wherever room permits.
in the panel title bar. When panels are minimized to icons, you access any of the individual panels by clicking its icon or button. The selected panel will appear on the left or right of the icon, wherever room permits.

Collapsing a panel to icons or buttons
Closing panels and panel groups
Each panel or panel group may be closed at any time. You can close a panel or panel group in several ways; the method often depends on whether the panel is floating, docked, or grouped with another panel.
To close an individual panel that is docked, right-click in the panel tab and choose Close from the context menu. To close an entire group of panels, right-click any tab in the group and choose Close Tab Group.

To close a floating panel or panel group, click the Close icon ![]() that appears in the left corner of the title bar of the panel or panel group. To reopen a panel, choose the panel name from the Window menu. Reopened panels will sometimes appear undocked. Feel free to dock them as desired.
that appears in the left corner of the title bar of the panel or panel group. To reopen a panel, choose the panel name from the Window menu. Reopened panels will sometimes appear undocked. Feel free to dock them as desired.

Dragging
You can reorder a panel tab by dragging it to the desired position within the group.

Dragging a tab to change its position
Floating
A panel that is grouped with other panels can be floated separately. To float a panel, drag it from the group by its tab.

Pulling a panel out by its tab
To reposition panels, groups, and stacks in the workspace, simply drag them by the title bar. To pull out a single panel group when it’s docked, grab it by the tab bar.

Grouping, stacking, and docking
You can create custom groups by dragging one panel into another. When you’ve moved the panel to the correct position, Dreamweaver highlights the area, called the drop zone, in blue. Release the mouse button to create the new group.

Creating new groups
In some cases, you may want to keep both panels visible simultaneously. To stack panels, drag the desired tab to the top or bottom of another panel. When you see the blue drop zone appear, release the mouse button.

Creating panel stacks
Floating panels can be docked to the right, left, or bottom of the Dreamweaver workspace. To dock a panel, group, or stack, drag its title bar to the edge of the window on which you wish to dock. When you see the blue drop zone appear, release the mouse button.

Selecting a workspace layout
A quick way to customize the program environment is to use one of the prebuilt workspaces in Dreamweaver. These workspaces have been optimized by experts to put the tools you need at your fingertips.
Dreamweaver CC (2015.1 release) includes five prebuilt workspaces: Beginner, Code, Default, Design, and Extract. To access these workspaces, choose them from the Workspace menu located at the upper-right side of the program window.
Beginner workspace
The Beginner workspace simplifies the program interface by focusing on the bare essentials. It provides the new user a good balance between design and code, with a minimum number of panels displayed.

Beginner workspace
Code workspace
Users who work mostly with code will want to use the Code workspace, because it optimizes the panels and windows to provide an effective workspace for coding.

Code workspace
Default workspace
The Default workspace maximizes the document window and emphasizes the power provided by various panels, such as CC Libraries, Snippets, Insert, and CSS Designer.

Default workspace
Design workspace
The Design workspace focuses the available screen real estate on the Design and Live view window. Design is the default workspace for screen shots in this book.

Design workspace
Extract workspace
The Extract workspace provides a direct connection to the online interface for extracting CSS styles and image assets from Photoshop mockups uploaded to Creative Cloud. You can upload PSD files directly from Dreamweaver or post them in the Creative Cloud app or website once you are logged in to your account.

Extract workspace
Working with Extract
Extract is a new workflow that has been added to Dreamweaver CC (2015.1 release). It allows you to create CSS styles and image assets from a Photoshop-based mockup. You can create your webpage design using text and linked or embedded image layers and post the file to Creative Cloud, where Dreamweaver can access the styles, colors, and images to help you build your basic site design.

Build your design in Photoshop using text, images, and effects stored in layers.

Post your file to your Creative Cloud online folder right inside Dreamweaver.
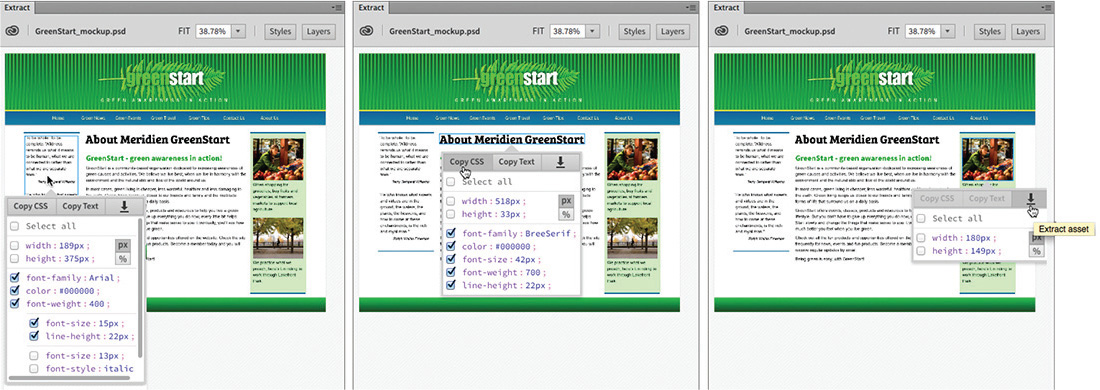
Access the various layers from the Extract panel inside Dreamweaver, copy styles and text, and even download image assets.
Try these features yourself by uploading GreenStart_mockup.psd, in the lesson01 resources folder, to your Creative Cloud account online folder. Go to helpx.adobe.com/creative-cloud/help/sync-files.html to learn how to upload files to your Creative Cloud account.
Adjusting toolbars
Some program features are so handy you may want them available all the time in toolbar form. Two of the toolbars—Document and Standard—appear horizontally at the top of the document window. The Coding toolbar, however, appears vertically, but only in the Code view window. You can display the desired toolbar by choosing it from the View menu. You can also display the toolbar by simply right-clicking the top of the document window and choosing the desired toolbar from the context menu.

Personalizing Dreamweaver
As you continue to work with Dreamweaver, you’ll devise your own optimal workspace of panels and toolbars for each activity. You can store these configurations in a custom workspace of your own naming.
Saving a custom workspace
To save a custom workspace, first create your desired configuration of panels, choose New Workspace from the Workspace menu, and then give it a custom name.

Saving a custom workspace
Editing preferences
In addition to the ability to order and arrange the program’s panels and toolbars, Dreamweaver’s Preferences dialog provides advanced customizations for many functions and workflows. There are way too many options to cover in this lesson, but let’s make one adjustment to give you a taste of the types of things you can do.
1. Click the Code view button at the top of the document window.
Dreamweaver is sporting a new dark color scheme in Code view. Some designers love it; some hate it. You can change it completely, or merely tweak it, right in Preferences.
2. In Windows, select Edit > Preferences.
In the Mac OS, select Dreamweaver CC > Preferences.

The Preferences dialog appears.
3. Select the Code Coloring category.
As you see from the dialog, Dreamweaver gives you fine control over various aspects of the code-editing interface. For example, you can change the colors one by one or select a theme and change them all at once.
4. Select Classic from the Theme drop-down menu.

The colors assigned to each item change. This scheme is the traditional color scheme of previous versions of Dreamweaver. At the moment, the changes have happened only in the dialog.
5. Click Apply in the lower-right corner of the dialog.

The Code window behind the dialog has changed to match the Classic color scheme. You can use this scheme as you work through the upcoming lessons.
It is the default scheme used for all the code-based screen shots in the book.
But feel free to use any of the predefined schemes or make your own.
6. Click Close.
Saved preferences persist from session to session and through each workspace.
Creating custom keyboard shortcuts
Another powerful feature of Dreamweaver is the ability to create your own keyboard shortcuts as well as edit existing ones. Keyboard shortcuts are loaded and preserved independently of workspaces.
Is there a command you can’t live without that doesn’t have a keyboard shortcut or that uses one that’s inconvenient? Create one of your own. Try this:
1. Choose Edit > Keyboard Shortcuts (Windows) or Dreamweaver CC > Keyboard Shortcuts (Mac OS).
![]() Note
Note
The default keyboard shortcuts are locked and cannot be edited. But you can duplicate the set, save it under a new name, and modify any shortcut within that custom set.
2. Click the Duplicate Set icon ![]() to create a new set of shortcuts.
to create a new set of shortcuts.
3. Enter a name in the Name Of Duplicate Set field. Click OK.

4. Choose Menu Commands from the Commands pop-up menu.
5. In the Commands window, choose File > Save All.

Note that the Save All command does not have an existing shortcut, although you’ll use this command frequently in Dreamweaver.
6. Insert the cursor in the Press Key field. Press Ctrl+Alt+S/Cmd+Opt-S.

Note the error message indicating that the keyboard combination you chose is already assigned to a command. Although we could reassign the combination, let’s choose a different one.
7. Press Ctrl+Alt+Shift+S/Ctrl+Cmd+S.
This combination is not currently being used, so let’s assign it to the Save All command.
8. Click the Change button.

The new shortcut is now assigned to the Save All command.
9. Click OK to save the change.
You have created your own keyboard shortcut—one you can use in upcoming lessons.
Using the Property inspector
One tool vital to your workflow is the Property inspector. In the built-in Dreamweaver workspaces, the Property inspector typically appears at the bottom of the workspace. If it is not visible in your program interface, you can display it by selecting Window > Properties and then dock it to the bottom of the document window as described earlier. The Property inspector is context-driven and adapts to the type of element you select.
Using the HTML tab
Insert the cursor into any text content on your page and the Property inspector provides a means to quickly assign some basic HTML codes and formatting. When the HTML button is selected, you can apply heading or paragraph tags as well as bold, italics, bullets, numbers, and indenting, among other formatting and attributes. The Document Title metadata field is also available in the Property inspector when Design view is active. Enter your desired Document Title in this field, and Dreamweaver adds it automatically to the document <head> section.

Using the CSS tab
Click the CSS button to quickly access commands to assign or edit CSS formatting.

CSS Property inspector
Image properties
Select an image in a webpage to access the image-based attributes and formatting controls of the Property inspector.

Image Property inspector
Table properties
To access table properties, insert your cursor in a table and then click the table tag selector at the bottom of the document window.

Table Property inspector
Using the Related Files interface
Webpages are often built with multiple external files providing styling and programming assistance. Dreamweaver enables you to see all the files linked to, or referenced by, the current document by displaying the filenames in the Related Files interface at the top of the document window. This interface displays the name of any external file and will actually display the contents of each file—if it’s available—when you simply select the filename in the display.

The Related Files interface lists all external files linked to a document.
To view the contents of the referenced file, click the name. If you are in Live or Design view, Dreamweaver splits the document window and shows the contents of the selected file in the Code view window. If the file is stored locally, you’ll even be able to edit the contents of the file when it’s selected.

Use the Related Files interface to edit locally stored files.
To view the HTML code contained within the main document, click the Source Code option in the interface.

Choose the Source Code option to see the contents of the main document.
Using tag selectors
One of the most important features of Dreamweaver is the tag selector interface that appears at the bottom of the document window. This interface displays the tags and element structure in any HTML file pertinent to the insertion point of, or selection by, the cursor. The display of tags is hierarchical, starting at the document root at the left of the display and listing each tag or element in order based on the structure of the page and the selected element.

The display in the tag selector interface mimics the structure of the HTML code based on your selection.
The tag selectors also enable you to select any of the elements displayed by simply clicking a tag. When a tag is selected, all the content and child elements contained within that tag are also selected.

The tag selector interface is closely integrated with the CSS Designer panel. You may use the tag selectors to help you style content or to cut, copy, paste, and delete elements.
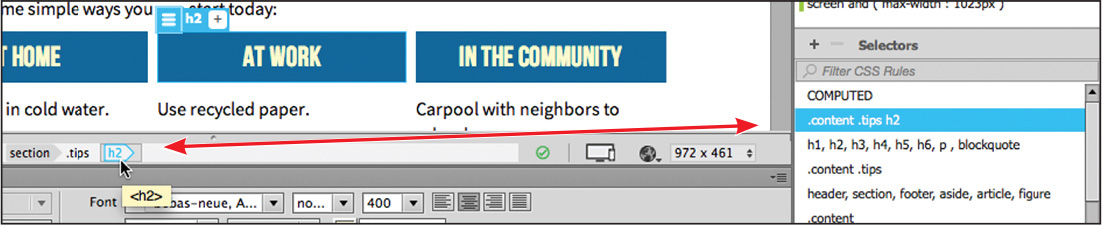
The tag selector is closely integrated with the styling and editing of elements.
Using the CSS Designer
The CSS Designer has been greatly improved in Dreamweaver CC (2015.1 release). Along with its visual method of creating, editing, and troubleshooting CSS styling, CSS Designer has gained new productivity enhancements for copying and pasting CSS styles from one rule to another. You can also decrease or increase the specificity of new selector names by pressing the up or down arrow keys, respectively.

The CSS Designer panel consists of four windows: Sources, @Media, Selectors, and Properties.
Sources
The Sources window allows you to create, attach, define, and remove internal embedded and external linked style sheets.

@Media
The @Media window is used to define media queries to support various types of media and devices.

Selectors
The Selectors window is used to create and edit the CSS rules that format the components and content of your page. Once a selector, or rule, is created you define the formatting you wish to apply in the Properties window.
In addition to allowing you to create and edit CSS styling, the CSS Designer can also be used to identify styles already defined and applied, and to troubleshoot issues or conflicts with these styles.
Properties
The Properties window features two basic modes. By default, the Properties window displays all available CSS properties in a list, organized in five categories: Layout ![]() , Text
, Text ![]() , Borders
, Borders ![]() , Background
, Background ![]() , and More
, and More ![]() . You can scroll down the list and apply styling as desired.
. You can scroll down the list and apply styling as desired.

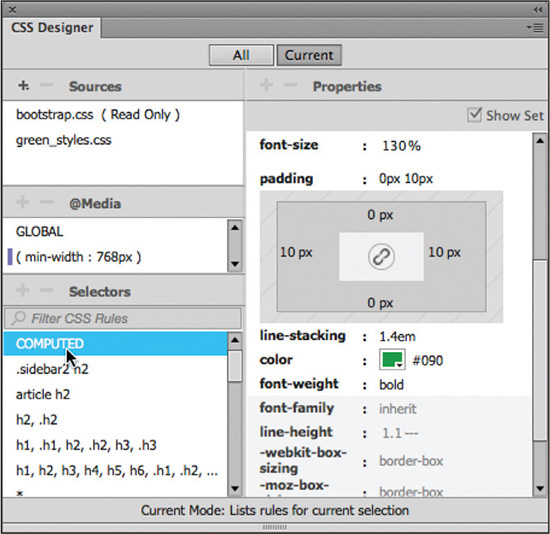
The second mode can be accessed by selecting Show Set at the upper-right edge of the window. In this mode, the Properties pane will then filter the list down to only the properties actually applied to the rule chosen in the Selectors window. In either mode, you can add, edit, or remove style sheets, media queries, rules, and properties.

Selecting the Show Set option limits the property display to only the properties that are styled.
The Properties pane also features a COMPUTED option that displays the aggregated list of styles applied to the selected element. The COMPUTED option will appear anytime you select an element or component on the page. When you’re creating any type of styling the code created by Dreamweaver complies with industry standards and best practices.
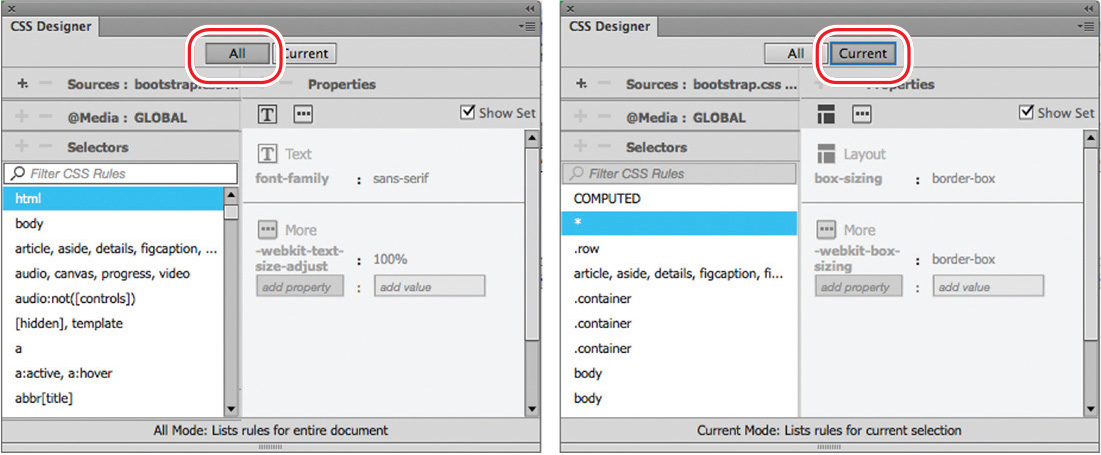
All and Current modes
In Dreamweaver CC (2015.1 release), the CSS Designer got two new buttons, All and Current, that enable specific functions and workflows within the panel.
When the All button is selected, the panel allows you to create and edit CSS style sheets, media queries, rules, and properties. When the Current button is selected, the CSS troubleshooting functions are enabled, allowing you to inspect individual elements and assess existing styling properties applied to a selected element. In this mode, you are able to edit existing properties, but you’re not allowed to add new style sheets, media queries, or rules. This interaction works the same way in all document views modes.

When the Current button is selected, the CSS Designer displays all styling associated with a selected element.
In addition to using the CSS Designer, you may also create and edit CSS styling manually within Code view while taking advantage of many productivity enhancements, such as code hinting and auto completion.
Using the Visual Media Query interface (VMQ)
A new addition to Dreamweaver CC (2015.1 release) is the Visual Media Query (VMQ) interface. Appearing above the document window, the VMQ interface allows you to visually inspect and interact with existing media queries, as well as create new ones on the fly using a simple point-and-click interface.
Open any webpage that is formatted by a style sheet with one or more media queries, and the VMQ interface will appear above the document window, displaying color-coded bars that specify the type of media query that has been defined. Media queries using only a max-width specification will be displayed in green. Media queries using only a min-width specification will be displayed in purple. Ones that use both will be displayed in blue.

Max-width media query in the VMQ interface

Min-width media query in the VMQ interface

Media using both max-width and min-width specifications
Using the DOM Viewer
The DOM Viewer is another new tool introduced recently that has already been improved in Dreamweaver CC (2015.1 release). It allows you to view the Document Object Model (DOM) to quickly examine the structure of your layout as well as interact with it to select and move existing elements and to insert new ones by drag and drop.

Using the heads-up displays
The movement toward Live view as the default Dreamweaver workspace has driven the development of new methods for editing and managing HTML elements. In Dreamweaver CC (2015.1 release), you will see a handful of new heads-up displays (HUDs) whenever you are working in Live view. All of them, except the Text HUD, allow you to add class or id attributes to the selected element and then insert references to the class or id in your CSS style sheets and media queries.
Position Assist HUD
The Position Assist HUD appears whenever new elements are being inserted in Live view, using either the Insert menu or Insert panel. Typically, the Position Assist HUD will offer the options Before, After, Wrap, and Nest. Depending on what type of element is selected and what item is targeted by the cursor, one or more of the options may be grayed out.

The Position Assist HUD allows you to control how elements and components are inserted in Live view.
Element HUD
The Element HUD appears whenever you select an element in Live view. When an element is selected in Live view, you can change the selection focus by pressing the up and down arrow keys; the Element HUD will then highlight each element in the page, in turn, based on its position in the HTML structure.

The Element HUD enables you to quickly apply classes, ids, and links, as well as basic formatting.
Image HUD
The Image HUD provides access to the image source, alt text, width and height attributes as well as a field to add a hyperlink.
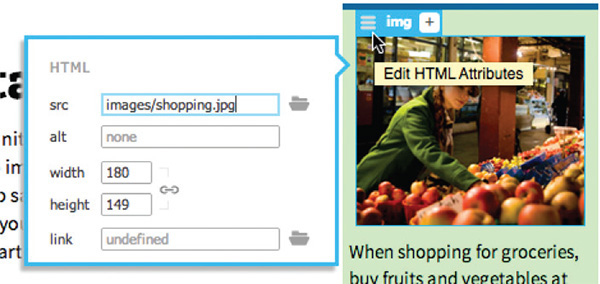
The Image HUD gives you quick access to the image source and allows you to add hyperlinks.
Text HUD
The Text HUD appears whenever you select a portion of text in Live view. The Text HUD allows you to apply bold <strong>, italic <em>, and hyperlink <a> markup to the text.

The Text HUD lets you apply bold, italics, and hyperlink markup to selected text.
Linting support
Dreamweaver CC (2015.1 release) provides live code error checking. Linting support is enabled by default in Preferences, which means the program monitors your code writing and flags errors in real time. The errors will be displayed in the new Output panel. Double-click the error message and Dreamweaver will jump to the error in the Code view window.

Enabling Linting support in Preferences to check your HTML code for errors.

Linting checks the file for coding errors in real time.
Introducing Emmet
Emmet is a new feature in Dreamweaver CC (2015.1 release) that allows you to supercharge your code-writing tasks. By entering shorthand characters and operators, Emmet enables you to create whole blocks of code with just a few keystrokes. To experience the power of Emmet, try this:
1. Select File > Open. Select emmet-test.html in the lesson01 folder and click Open.
2. Click the Code view button at the top of the document window.
Insert the cursor in the <body> section.
3. Type div and press the Tab key.

A full <div></div> element is created. The cursor should appear within it.
4. Type p*5 and press Tab.

Five <p> elements are created inside the <div>. Emmet also allows you to combine these operations to save even more time.
![]() Note
Note
As you work in Code view, you may need to click the Refresh button in the Property inspector to see the tag selectors.
5. Select the div tag selector.
Press Delete to remove the content.
The code created in steps 3 and 4 should be deleted.
6. Type div>p*5 and press Tab.

A <div> and five nested <p> elements are created all at once. Emmet can also generate placeholder text along with the HTML if desired.
7. Press Ctrl+Z/Cmd+Z to undo step 6.
The shorthand div>p*5 reappears, replacing the <div> and five <p> elements.
8. Edit the shorthand phrase as highlighted:div>p(lorem)*5. Press Tab.

This time, the <div> and five nested <p> elements appear with lorem ipsum placeholder text. You can see how Emmet can make dreary code-writing tasks much faster and even fun.
Check out http://emmet.io to learn more about Emmet.
Check out http://docs.emmet.io/cheat-sheet/ for a handy Emmet shorthand cheat sheet.

Exploring, experimenting, and learning
The Dreamweaver interface has been carefully crafted over many years to make the job of webpage design and development fast and easy. Feel free to explore and experiment with various menus, panels, and options to create the ideal workspace and keyboard shortcuts to produce the most productive environment for your own purposes. You’ll find the program endlessly adaptable, with power to spare for any task. Enjoy.
Review questions
1. Where can you access the command to display or hide any panel?
2. Where can you find the Code, Split, Design, and Live view buttons?
3. What can be saved in a workspace?
4. Do workspaces also load keyboard shortcuts?
5. What happens in the Property inspector when you insert the cursor into various elements on the webpage?
6. What new features have been added to the CSS Designer?
7. What can you do with DOM Viewer?
8. Does the Element HUD appear in Design view?
Review answers
1. All panels are listed in the Window menu.
2. The Code, Split, Design, and Live view buttons are components of the Document toolbar.
3. Workspaces can save the configuration of the document window, the open panels, and the panels’ size and position on the screen.
4. No. Keyboard shortcuts are loaded and preserved independently of a workspace.
5. The Property inspector adapts to the selected element, displaying pertinent information and formatting commands.
6. The CSS Designer now allows you to copy and paste styles from one rule to another and to change the specificity of a new selector name by pressing the up and down arrow keys.
7. The DOM Viewer allows you to visually examine the DOM and select and insert new elements.
8. No. HUDs are only visible in Live view.