
6. Programming Complications
Sometimes when you innovate, you make mistakes. It is best to admit them quickly, and get on with improving your other innovations.
Steve Jobs
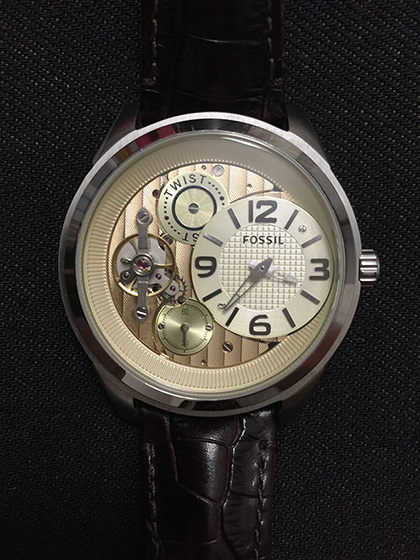
Complications on watches have always been one of the key differentiators of expensive timepieces. Put simply, a complication is a function on a timepiece that does more than just tell the time. Complications on a timepiece include alarms, tachymeters, chronographs, calendars, and so on. Figure 6.1 shows an example of complications on a watch.
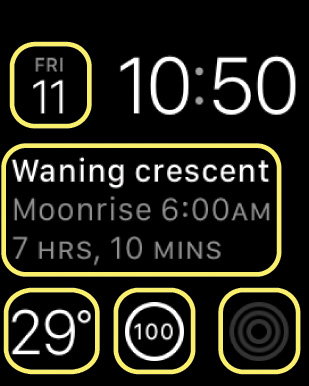
Apple has also aptly implemented complications on its various Apple Watch faces; numerous watch faces contain complications that display data from applications like Activity, Calendar, Weather, and so on. Figure 6.2 shows a watch face on the Apple Watch displaying five complications.
In watchOS 2, third-party apps can now also display data in watch face complications. In this chapter, I walk you through the process of creating an application that displays complication data.
Introducing the ClockKit Framework
The ClockKit Framework manages all the data displayed by the complications on the watch face on an Apple Watch. To support complications in your watch app, you need to provide a complication data source so that ClockKit can use the data for displaying on the watch face. Specifically, you need to implement the CLKComplicationDataSource protocol. This protocol contains the following methods:
![]()
getSupportedTimeTravelDirectionsForComplication:withHandler: is called to retrieve the Time Travel directions that your complication supports.
![]()
getTimelineStartDateForComplication:withHandler: is called to retrieve the earliest date that your complication is ready to supply data.
![]()
getTimelineEndDateForComplication:withHandler: is called to retrieve the latest date that your complication is ready to supply data.
![]()
getPrivacyBehaviorForComplication:withHandler: returns the privacy behavior for the specified complication style.
![]()
getCurrentTimelineEntryForComplication:withHandler: is called to display the timeline entry you want to display now.
![]()
getTimelineEntriesForComplication:beforeDate:limit:withHandler: is called to retrieve past timeline entries for the complication.
![]()
getTimelineEntriesForComplication:afterDate:limit:withHandler: is called to retrieve future timeline entries for the complication.
![]()
getNextRequestedUpdateDateWithHandler: is called to get the next update time for the complication.
![]()
getPlaceholderTemplateForComplication:withHandler: returns a static template to display in the selection screen for your complication.
The ClockKit Framework executes all the methods in the background well before the watch face displays your data in the complications. This execution model allows the user to instantly see the data displayed in the complications when the watch face lights up (such as when the user raises his or her wrist). Also, this gives the ClockKit Framework class sufficient time to fetch the data to be displayed in the complications.
Note
Time Travel is a new feature in watchOS 2 that allows your application to display time-sensitive information on watch faces with complications. Turning the Digital Crown back and forth displays events past and future. You learn more about this in the “Time Travel” section later in this chapter.
Placement for Complications
Complications on the Apple Watch are classified into the following families (see Figure 6.3):
![]() Modular Small: A medium-size square area used in digital interfaces
Modular Small: A medium-size square area used in digital interfaces
![]() Modular Large: A large rectangular area used in digital interfaces
Modular Large: A large rectangular area used in digital interfaces
![]() Utilitarian Small: A small square or rectangular area used in analog interfaces
Utilitarian Small: A small square or rectangular area used in analog interfaces
![]() Utilitarian Large: A rectangular area that spans the width of the screen used in analog interfaces
Utilitarian Large: A rectangular area that spans the width of the screen used in analog interfaces
![]() Circular Small: A small circular area used in analog interfaces
Circular Small: A small circular area used in analog interfaces
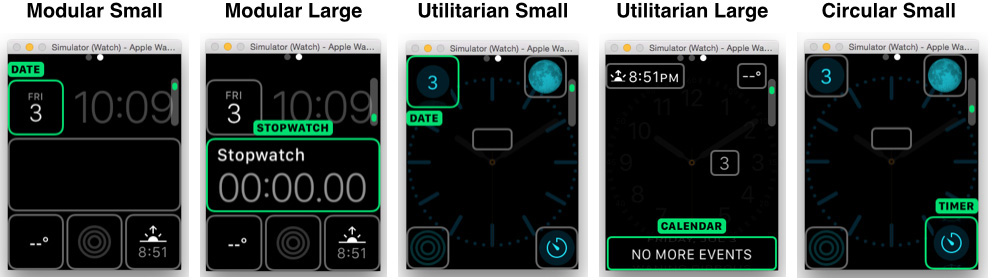
Note that the first two families (Modular Small and Modular Large) are used in digital watch faces, while the rest are used in analog watch faces.
The types of complications available are dependent on the individual watch faces; some watch faces support multiple complication families, while some do not support complications at all.
Using the Template Classes
For each of the complication families, you can use a complication template class to display the data in the complication. Table 6.1 shows the list of complication template classes that you can use for each complication family.
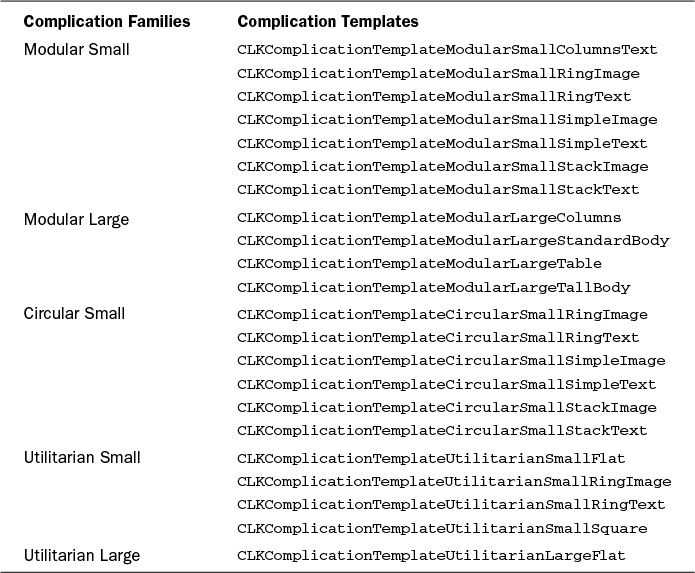
You learn how to use some of these template classes in the next section.
Building a Movie Showtime Complication Example
Now that you have a better idea of complications on the Apple Watch, let’s create a project to display complication data on the watch face.
In this project, your application displays information about movies that are currently playing in a theater. You display information on two complications:
![]() The timing of the various movies playing in a theater, past and present
The timing of the various movies playing in a theater, past and present
![]() The rating of each movie
The rating of each movie
Creating the Project
To create the project, follow these steps:
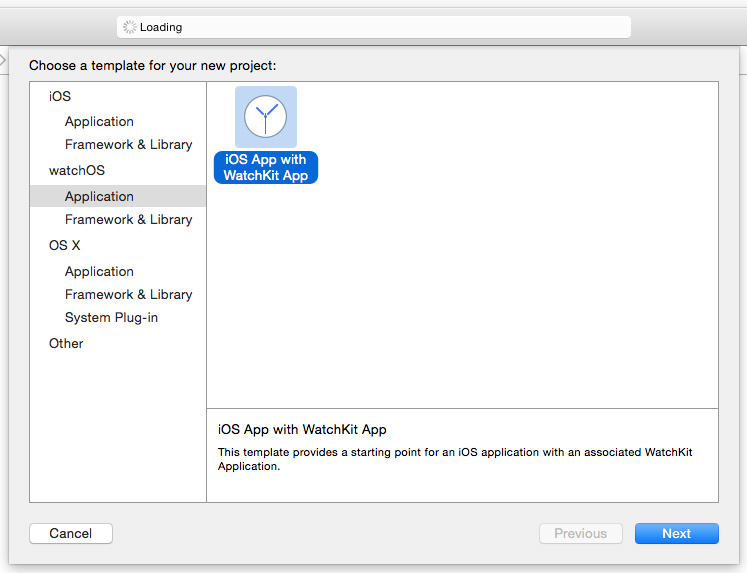
1. Using Xcode, create an iOS App with WatchKit App project (see Figure 6.4).
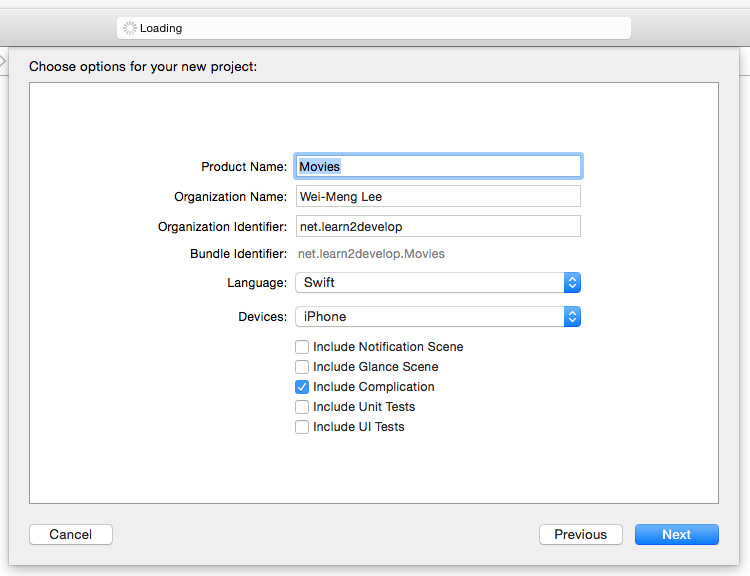
2. Name the project Movies. Also, uncheck the Include Notification Scene option and check the Include Complication option (see Figure 6.5). This makes Xcode configure the project with complication support.
3. When the project is created, observe that under Movies WatchKit Extension you have a file named ComplicationController.swift (see Figure 6.6).
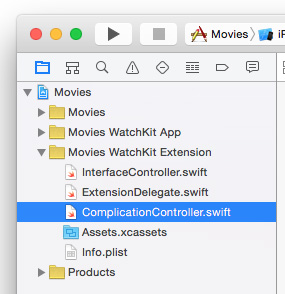
The ComplicationController.swift file contains the definition for the ComplicationController class, which implements the CLKComplicationDataSource protocol (described earlier in the “Introducing the ClockKit Framework” section). This protocol allows you to implement all the methods that pass your complication data to the ClockKit Framework.
Selecting Complication Families Support
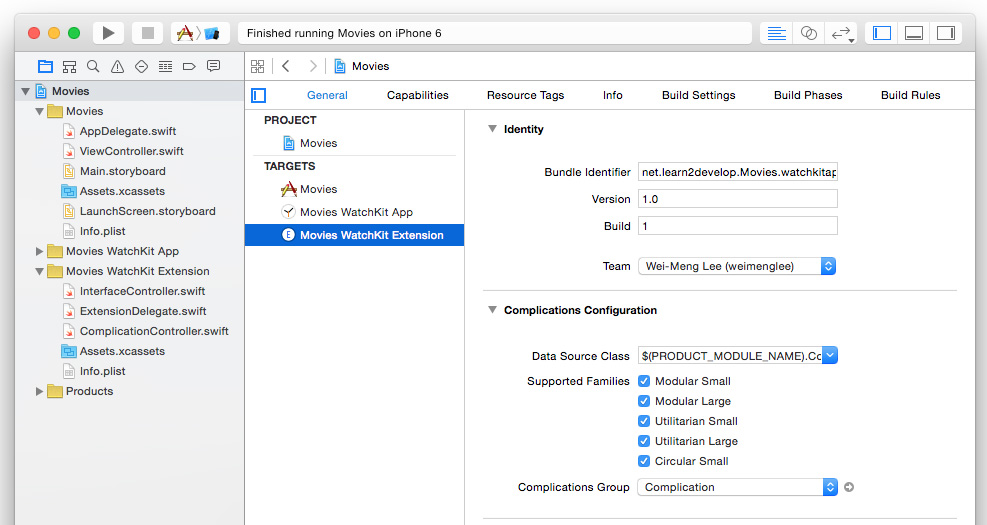
In the Project Navigator, selecting the Movies WatchKit Extension target shows all the complication families supported by your app (see Figure 6.7). You can uncheck those that you do not want to support. For this example, leave them all selected.
Creating the Complication Placeholder Template
Let’s now implement the first method in the ComplicationController class: getPlaceholderTemplateForComplication:withHandler:. This method returns a static template to display in the selection screen for your complication.
1. Add the following statements in bold to the ComplicationController.swift file:
import ClockKit
//---multipliers to convert to seconds---
let HOUR: NSTimeInterval = 60 * 60
let MINUTE: NSTimeInterval = 60
func getPlaceholderTemplateForComplication(
complication: CLKComplication,
withHandler handler: (CLKComplicationTemplate?) -> Void) {
// This method will be called once per supported complication, and
// the results will be cached.
// handler(nil)
var template: CLKComplicationTemplate?
switch complication.family {
case .ModularSmall:
let modularSmallTemplate =
CLKComplicationTemplateModularSmallRingText()
modularSmallTemplate.textProvider =
CLKSimpleTextProvider(text: "R")
modularSmallTemplate.fillFraction = 0.75
modularSmallTemplate.ringStyle = CLKComplicationRingStyle.Closed
template = modularSmallTemplate
case .ModularLarge:
let modularLargeTemplate =
CLKComplicationTemplateModularLargeStandardBody()
modularLargeTemplate.headerTextProvider =
CLKTimeIntervalTextProvider(startDate: NSDate(),
endDate: NSDate(timeIntervalSinceNow: 1.5 * HOUR))
modularLargeTemplate.body1TextProvider =
CLKSimpleTextProvider(text: "Movie Name",
shortText: "Movie")
modularLargeTemplate.body2TextProvider =
CLKSimpleTextProvider(text: "Running Time",
shortText: "Time")
template = modularLargeTemplate
case .UtilitarianSmall:
template = nil
case .UtilitarianLarge:
template = nil
case .CircularSmall:
template = nil
}
handler(template)
}
In this method, you first check which types of complications you want to support by examining the CLKComplication object that is passed in. For simplicity, in this chapter the code supports both the Modular Small and Modular Large complications. Once you determine the types of complications you want to support, you need to use one of the many templates available for each complication:
![]() For the Modular Small complication, use the
For the Modular Small complication, use the CLKComplicationTemplateModularSmallRingText class. This class allows you to display a single text string encircled by a configurable progress ring.
![]() For the Modular Large complication, use the
For the Modular Large complication, use the CLKComplicationTemplateModularLargeStandardBody class. This class displays a header row with two lines of text.
![]() For the rest of complications that you are not supporting, simply pass
For the rest of complications that you are not supporting, simply pass nil to the handler method.
Note
To display a string in a complication, you do not use the usual NSString class. Instead, you use the CLKSimpleTextProvider class. This class displays a single line of text. It also contains an abbreviated version of the string so that in cases where the string is too long to be displayed, it first uses the abbreviated version of the string before truncating it.
Besides the CLKSimpleTextProvider class, you also use the CLKTimeIntervalTextProvider class to display a string that shows a range of time. This class is smart enough to display the string efficiently by taking into consideration the space available for display and the user’s region and locale.
2. To test the application, select the Complication – Movies WatchKit App scheme at the top of Xcode (see Figure 6.8), and then select iPhone 6 + Apple Watch – 38mm. Press Command-R to deploy the applications onto the simulators.
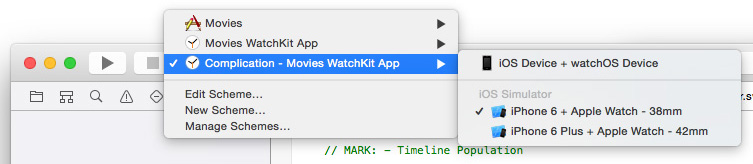
This deploys the iOS app and the WatchKit app onto the iPhone 6 and Apple Watch Simulator, respectively.
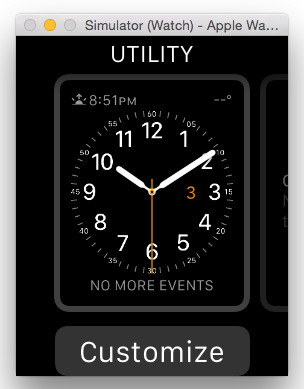
3. On the Apple Watch Simulator, press Command-Shift-2 to simulate a deep press. Then, click the watch face. You see that you can now customize the watch face, as shown in Figure 6.9.
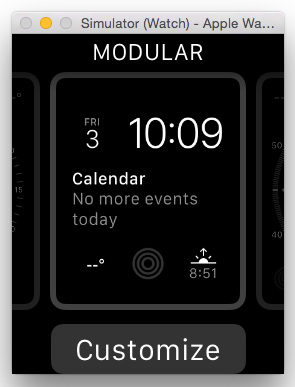
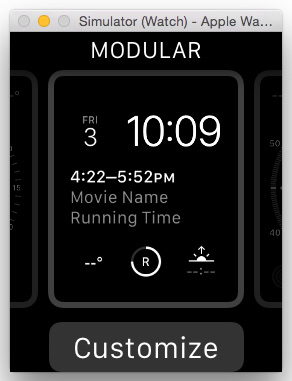
4. Press Command-Shift-1 to simulate a shallow press. Then, swipe the watch face to the left. You should now see the MODULAR watch face, as shown in Figure 6.10.
5. Click Customize. You now see that you can customize the watch face (see Figure 6.11).
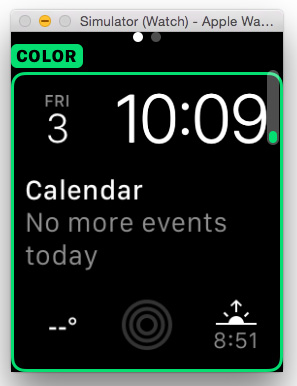
6. Click and swipe to the left and you should see the watch face as shown in Figure 6.12.
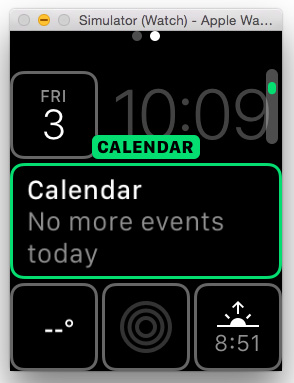
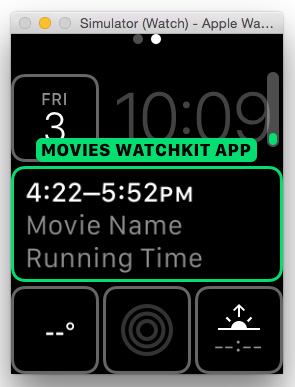
7. Select the complication of the watch face named CALENDAR and move the scroll wheel on your mouse (or move two fingers on the trackpad). The complication changes. Move the scroll wheel until you reach the MOVIES WATCHKIT APP item (the name of your app; see Figure 6.13).
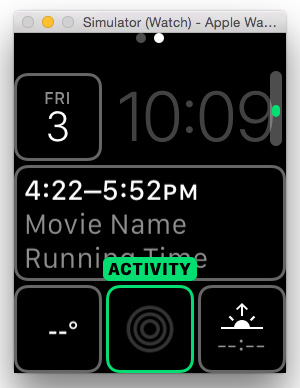
8. Select the complication in the middle of the bottom row (the one that says ACTIVITY; see Figure 6.14).
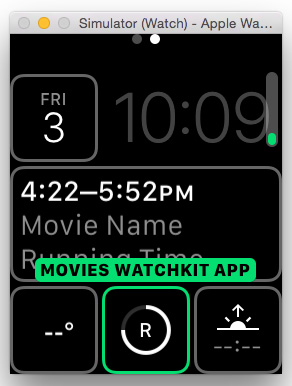
9. Move the scroll wheel (or two fingers on the trackpad) until you see MOVIES WATCHKIT APP (see Figure 6.15).
10. Press Command-Shift-2 and then click the watch face (see Figure 6.16).
11. Press Command-Shift-1 and click the watch face. The watch face should now look like Figure 6.17.
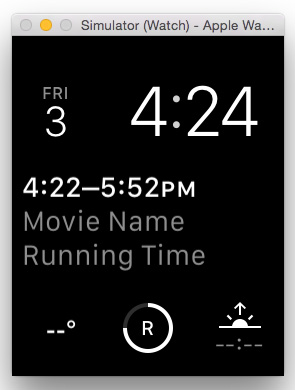
The first complication displays the following:
![]() A header showing a time interval of 1.5 hours, starting from the time the complication was added
A header showing a time interval of 1.5 hours, starting from the time the complication was added
![]() Two lines of text: “Movie Name” and “Running Time”
Two lines of text: “Movie Name” and “Running Time”
The second complication displays a three-quarters-complete circle, with the letter R within it.
Setting Privacy Behavior
The next method you need to implement is the getPrivacyBehaviorForComplication:withHandler: method, which returns the privacy behavior for the specified complication style.
If you want the complication data to display even if the watch is locked, use the ShowOnLockScreen enumeration:
func getPrivacyBehaviorForComplication(
complication: CLKComplication,
withHandler handler: (CLKComplicationPrivacyBehavior) -> Void) {
handler(.ShowOnLockScreen)
}
If not, use the HideOnLockScreen enumeration.
Populating the Complications with Real Data
Now that you can display the template complication, let’s display some real data so that you can see how complications really work:
1. In the ComplicationController.swift file (from the Movies project created in the previous section), add the following statements in bold:
import ClockKit
//---multipliers to convert to seconds---
let HOUR: NSTimeInterval = 60 * 60
let MINUTE: NSTimeInterval = 60
struct Movie {
var movieName: String
var runningTime: NSTimeInterval //---in seconds---
var runningDate: NSDate
var rating:Float //---1 to 10---
}
class ComplicationController: NSObject, CLKComplicationDataSource {
//---in real life, the movies can be loaded from a web service or file
// system---
let movies = [
Movie(movieName: "Terminator 2: Judgment Day",
runningTime: 137 * MINUTE,
runningDate: NSDate(timeIntervalSinceNow: -360 * MINUTE),
rating:8),
Movie(movieName: "World War Z",
runningTime: 116 * MINUTE,
runningDate: NSDate(timeIntervalSinceNow: -120 * MINUTE),
rating:7),
Movie(movieName: "Secondhand Lions",
runningTime: 90 * MINUTE,
runningDate: NSDate(timeIntervalSinceNow: 10 * MINUTE),
rating:8),
Movie(movieName: "The Dark Knight",
runningTime: 152 * MINUTE,
runningDate: NSDate(timeIntervalSinceNow: 120 * MINUTE),
rating:9),
Movie(movieName: "The Prestige",
runningTime: 130 * MINUTE,
runningDate: NSDate(timeIntervalSinceNow: 360 * MINUTE),
rating:8),
]
The previous statements created a structure to store movie information, and the movies array stored a list of Movie instances. Figure 6.18 shows the timeline of each movie and its corresponding showtime.

Note
I have programmatically set the timeline of each movie with respect to the current time so that it is easier for you to test your application. In real life, the content of the movies array would be fetched dynamically from a web service or the file system of the iPhone.
2. The next method to implement is the getCurrentTimelineEntryForComplication:withHandler: method. This method is called to display the timeline entry you want to display now. Add the following statements in bold to the ComplicationController.swift file:
func getCurrentTimelineEntryForComplication(
complication: CLKComplication,
withHandler handler: ((CLKComplicationTimelineEntry?) -> Void)) {
// Call the handler with the current timeline entry.
// handler(nil)
for movie in movies {
//---display the movie that is currently playing or the next one
// that is coming up---
if (movie.runningDate.timeIntervalSinceNow) >= 0) {
switch complication.family {
case .ModularSmall:
let modularSmallTemplate =
CLKComplicationTemplateModularSmallRingText()
modularSmallTemplate.textProvider =
CLKSimpleTextProvider(text: "(Int(movie.rating))")
modularSmallTemplate.fillFraction = movie.rating / 10
modularSmallTemplate.ringStyle =
CLKComplicationRingStyle.Closed
let entry = CLKComplicationTimelineEntry(
date:NSDate(),
complicationTemplate: modularSmallTemplate)
handler(entry)
case .ModularLarge:
let modularLargeTemplate =
CLKComplicationTemplateModularLargeStandardBody()
modularLargeTemplate.headerTextProvider =
CLKTimeIntervalTextProvider(
startDate: movie.runningDate,
endDate: NSDate(
timeInterval: movie.runningTime,
sinceDate: movie.runningDate))
modularLargeTemplate.body1TextProvider =
CLKSimpleTextProvider(
text: movie.movieName,
shortText: movie.movieName)
modularLargeTemplate.body2TextProvider =
CLKSimpleTextProvider(
text: "(movie.runningTime / MINUTE) mins",
shortText: nil)
let entry = CLKComplicationTimelineEntry(
date:NSDate(),
complicationTemplate: modularLargeTemplate)
handler(entry)
case .UtilitarianSmall:
handler(nil)
case .UtilitarianLarge:
handler(nil)
case .CircularSmall:
handler(nil)
}
}
}
}
When the getCurrentTimelineEntryForComplication:withHandler: method is fired, you want to display the next upcoming movie. So, you iterate through each movie and check to see if the difference between the movie’s running time and the current time is more than or equal to 0 (movies that started playing before the current time have a negative value for the timeIntervalSinceNow property):
for movie in movies {
//---display the movie that is currently playing or the next one
// that is coming up---
if (movie.runningDate.timeIntervalSinceNow >= 0) {
Once the first movie is located, you create a CLKComplicationTimelineEntry object to display the complication.
Note
A CLKComplicationTimelineEntry object represents the complication data to display at a specific date. You use a timeline entry to specify the date at which to display a specific set of data.
3. Redeploy the applications onto the simulators again. Once this is done, you should see the watch face as shown in Figure 6.19.
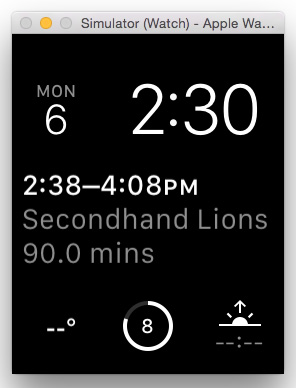
Observe the name of the movie and the rating of 8.
Time Travel
One of the cool new features in watchOS 2 is Time Travel. Time Travel allows your application to display time-sensitive information on watch faces with complications. Let’s modify our application so that it can display the titles of movies that were shown previously, as well as of movies that are coming up soon:
1. The getSupportedTimeTravelDirectionsForComplication:withHandler: method is already implemented by default:
func getSupportedTimeTravelDirectionsForComplication(
complication: CLKComplication,
withHandler handler: (CLKComplicationTimeTravelDirections) -> Void)
{
handler([.Forward, .Backward])
}
This means your application will display complication data for past events as well as future events.
2. Next, add the following statement in bold to the getTimelineStartDateForComplication:withHandler: method:
func getTimelineStartDateForComplication(
complication: CLKComplication,
withHandler handler: (NSDate?) -> Void) {
// handler(nil)
//---the earliest date your complication can display data is 6 hours
// ago---
handler(NSDate(timeIntervalSinceNow: -6 * HOUR))
}
This means that you want to display complication data for events that happened up to six hours ago.
3. Add the following statements in bold to the getTimelineEndDateForComplication:withHandler: method:
func getTimelineEndDateForComplication(
complication: CLKComplication,
withHandler handler: (NSDate?) -> Void) {
// handler(nil)
//---the latest date your complication can display data is 12 hours
// from now---
handler(NSDate(timeIntervalSinceNow: 12 * HOUR))
}
This means that you want to display complication data for events that will happen up to 12 hours from now.
4. Add the following statements in bold to the getTimelineEntriesForComplication:beforeDate:limit:withHandler: method. This method is fired to obtain an array of CLKComplicationTimelineEntry objects, which will contain all the movies screened before the specified date (passed as an argument through the method).
func getTimelineEntriesForComplication(complication: CLKComplication,
beforeDate date: NSDate, limit: Int,
withHandler handler: (([CLKComplicationTimelineEntry]?) -> Void)) {
// Call the handler with the timeline entries prior to the given
// date.
// handler(nil)
var timelineEntries: [CLKComplicationTimelineEntry] = []
//---find all movies before the current date---
for movie in movies {
if timelineEntries.count < limit &&
movie.runningDate.timeIntervalSinceDate(date) < 0 {
switch complication.family {
case .ModularSmall:
let modularSmallTemplate =
CLKComplicationTemplateModularSmallRingText()
modularSmallTemplate.textProvider =
CLKSimpleTextProvider(text: "(Int(movie.rating))")
modularSmallTemplate.fillFraction = movie.rating / 10
modularSmallTemplate.ringStyle =
CLKComplicationRingStyle.Closed
let entry = CLKComplicationTimelineEntry(
date:NSDate(timeInterval: 0 * MINUTE,
sinceDate: movie.runningDate),
complicationTemplate: modularSmallTemplate)
timelineEntries.append(entry)
case .ModularLarge:
let modularLargeTemplate =
CLKComplicationTemplateModularLargeStandardBody()
modularLargeTemplate.headerTextProvider =
CLKTimeIntervalTextProvider(
startDate: movie.runningDate,
endDate: NSDate(
timeInterval: movie.runningTime,
sinceDate: movie.runningDate))
modularLargeTemplate.body1TextProvider =
CLKSimpleTextProvider(
text: movie.movieName,
shortText: movie.movieName)
modularLargeTemplate.body2TextProvider =
CLKSimpleTextProvider(
text: "(movie.runningTime / MINUTE) mins",
shortText: nil)
let entry = CLKComplicationTimelineEntry(
date:NSDate(
timeInterval: 0 * MINUTE,
sinceDate: movie.runningDate),
complicationTemplate: modularLargeTemplate)
timelineEntries.append(entry)
case .UtilitarianSmall:
break
case .UtilitarianLarge:
break
case .CircularSmall:
break
}
}
}
handler(timelineEntries)
}
The limit argument of the method indicates the maximum number of entries to provide. For efficiency, do not exceed the number of entries as specified.
5. Likewise, add the following statements in bold to the getTimelineEntriesForComplication:afterDate:limit:withHandler: method. This method is fired to obtain an array of CLKComplicationTimelineEntry objects, which will contain all the movies screened after the specified date (passed as an argument through the method).
func getTimelineEntriesForComplication(complication: CLKComplication,
afterDate date: NSDate, limit: Int,
withHandler handler: (([CLKComplicationTimelineEntry]?) -> Void)) {
// Call the handler with the timeline entries after the given
// date.
// handler(nil)
var timelineEntries: [CLKComplicationTimelineEntry] = []
//---find all movies after the current date---
for movie in movies {
if timelineEntries.count < limit &&
movie.runningDate.timeIntervalSinceDate(date) > 0 {
switch complication.family {
case .ModularSmall:
let modularSmallTemplate =
CLKComplicationTemplateModularSmallRingText()
modularSmallTemplate.textProvider =
CLKSimpleTextProvider(text: "(Int(movie.rating))")
modularSmallTemplate.fillFraction = movie.rating / 10
modularSmallTemplate.ringStyle =
CLKComplicationRingStyle.Closed
let entry = CLKComplicationTimelineEntry(
date:NSDate(timeInterval: 0 * MINUTE,
sinceDate: movie.runningDate),
complicationTemplate: modularSmallTemplate)
timelineEntries.append(entry)
case .ModularLarge:
let modularLargeTemplate =
CLKComplicationTemplateModularLargeStandardBody()
modularLargeTemplate.headerTextProvider =
CLKTimeIntervalTextProvider(
startDate: movie.runningDate,
endDate: NSDate(timeInterval: movie.runningTime,
sinceDate: movie.runningDate))
modularLargeTemplate.body1TextProvider =
CLKSimpleTextProvider(text: movie.movieName,
shortText: movie.movieName)
modularLargeTemplate.body2TextProvider =
CLKSimpleTextProvider(
text: "(movie.runningTime / MINUTE) mins",
shortText: nil)
let entry =
CLKComplicationTimelineEntry(
date:NSDate(
timeInterval: 0 * MINUTE,
sinceDate: movie.runningDate),
complicationTemplate: modularLargeTemplate)
timelineEntries.append(entry)
case .UtilitarianSmall:
break
case .UtilitarianLarge:
break
case .CircularSmall:
break
}
}
}
handler(timelineEntries)
}
6. That’s it! Deploy the applications onto the simulators again.
7. This time, turn the scroll wheel on your mouse to activate Time Travel. Turning back a few minutes displays World War Z, and turning back more than two hours displays Terminator 2 (see Figure 6.20, top).
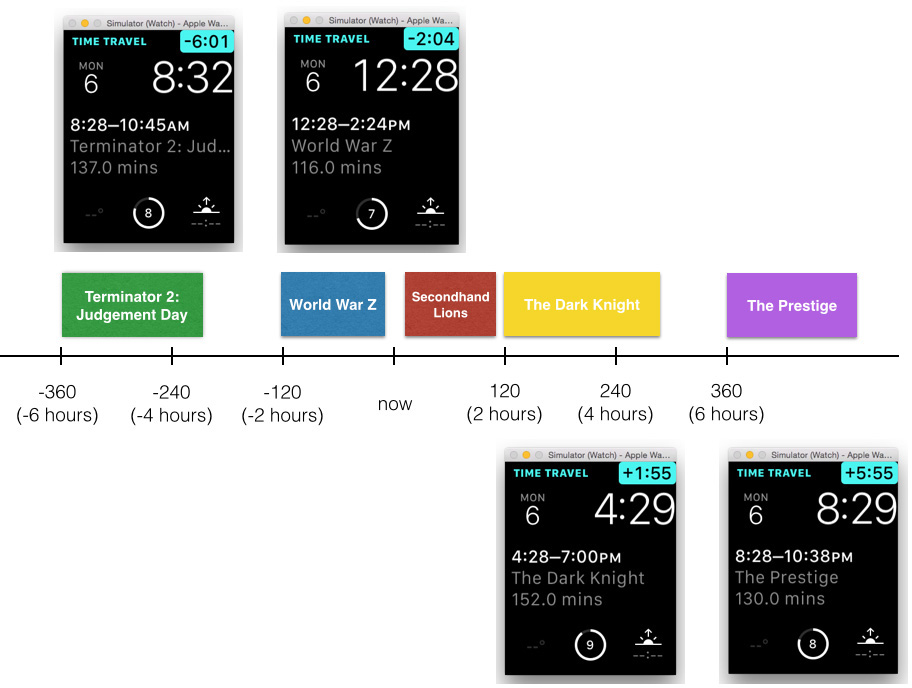
8. Move the time forward about two hours and you should see The Dark Knight, and moving forward about six hours displays The Prestige (see Figure 6.20, bottom).
Setting the Refresh Frequency
So, how often does the complication data get refreshed? You can programmatically specify how often ClockKit wakes up your application to request some data by implementing the getNextRequestedUpdateDateWithHandler: method:
func getNextRequestedUpdateDateWithHandler(handler: (NSDate?) -> Void) {
// Call the handler with the date when you would next like to be
// given the opportunity to update your complication content.
// handler(nil);
//---update in the next 1 hour---
handler(NSDate(timeIntervalSinceNow: HOUR))
}
In the previous statement, you indicated that the complication data should be requested every hour. However, this is entirely up to ClockKit, and hence it is not guaranteed. Apple, however, does recommend that you refresh your complication data either hourly or daily, and that each time you refresh you should fetch as much information as you need for each fetch cycle.
If your WatchKit Extension app notices that the complication data is stale, you can also force a manual refresh using the CLKComplicationServer class, like this:
import ClockKit
...
let complicationServer = CLKComplicationServer.sharedInstance()
for complication in complicationServer.activeComplications {
complicationServer.reloadTimelineForComplication(complication)
}
Note
Although you can programmatically force a refresh of your complication data, iOS internally allocates a limit as to how often your app can refresh its data. Once the limit is reached, your app will not be able to refresh until the next day. This feature is to enhance the battery life of the Apple Watch.
Summary
In this chapter, you saw what complications are and how they can be implemented in your application. You learned how to display some real data and implement Time Travel, which is a feature in watchOS 2 that allows users to use the Digital Crown to scroll through time-sensitive complication data on the various watch faces.