
1. Getting Started with WatchKit Programming
Design is a funny word. Some people think design means how it looks. But of course, if you dig deeper, it’s really how it works.
Steve Jobs
Apple Watch is a smartwatch created by Apple and officially announced by Tim Cook during the September 9, 2014, Apple event. It is touted as the next big thing after the launch of the iPhone and the iPad, and is expected to change the rules of wearables (just as the iPhone changed the smartphone industry and the iPad changed the tablet industry).
The Apple Watch runs on the watchOS operating system, which is based on iOS. The original watchOS 1.0 was released on April 24, 2015, along with the Apple Watch. Barely two months after its release, Apple announced the next version of watchOS at WWDC2015 (World Wide Developers Conference): watchOS 2. With watchOS 2, developers are now able to write native watch apps that run independently of the iPhone and are able to make use of the hardware features on the watch.
In this chapter, you learn about the architecture of Apple Watch applications and how they tie in with your iOS apps. Most importantly, you get your hands dirty by writing a simple Apple Watch app and deploying it onto the simulator.
Specifications of the Apple Watch
The Apple Watch is powered using a custom chip (dubbed the S1) from Apple. The back of the Apple Watch is a heart rate sensor, which is a set of LEDs and photodiodes mounted in a ceramic cover. The watch also has an accelerometer, WiFi, Bluetooth Low Energy (LE), and GPS. It is charged wirelessly using a magnetic charger, which snaps to the back of the watch.
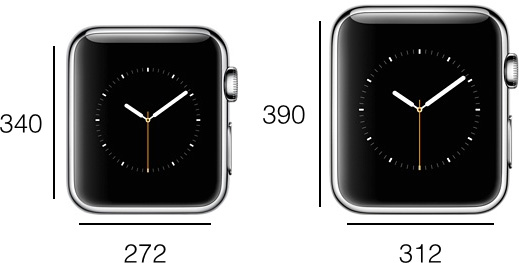
The Apple Watch comes in two sizes (see Figure 1.1):
![]() 38mm watch (small): Resolution of 272 pixels by 340 pixels
38mm watch (small): Resolution of 272 pixels by 340 pixels
![]() 42mm watch (large): Resolution of 312 pixels by 390 pixels
42mm watch (large): Resolution of 312 pixels by 390 pixels
To interact with the Apple Watch, you can use the following:
![]() Digital Crown: Allows you to scroll through lists of items, as well as zoom in or out of images, etc. The Digital Crown also acts as a Home button—pressing it returns you to the Home screen.
Digital Crown: Allows you to scroll through lists of items, as well as zoom in or out of images, etc. The Digital Crown also acts as a Home button—pressing it returns you to the Home screen.
![]() Force Touch: A pressure-sensitive touchscreen, allowing it to tell the difference between a tap and a press.
Force Touch: A pressure-sensitive touchscreen, allowing it to tell the difference between a tap and a press.
![]() Taptic Engine: A haptic feedback system, which taps on your wrist to inform you of notifications and vibrates when you rotate the Digital Crown.
Taptic Engine: A haptic feedback system, which taps on your wrist to inform you of notifications and vibrates when you rotate the Digital Crown.
Getting the Tools for Development
To develop Apple Watch applications for watchOS 2, you need Xcode 7 or later, which you can download from the Mac App Store.
Xcode 7
The examples in this book were written and tested using Xcode 7. At the time of writing, Xcode 7 is in beta. Hence, you should expect to see some minor changes in screenshots in this book when the final release of Xcode 7 is available.
Xcode 7 contains the WatchKit framework that is used to create Apple Watch applications. In addition, Xcode 7 also comes with the Apple Watch Simulator, which allows you to test your Apple Watch application without using a real device.
What Is WatchKit?
WatchKit is a framework (similar to other frameworks such as CoreLocation or MapKit, for those of you familiar with iOS development) that contains all the classes that are necessary to create Apple Watch applications.
Understanding the WatchKit App Architecture
An Apple Watch application consists of three components (technically known as bundles):
![]() A containing iOS app that is used to install the Apple Watch application through the iPhone
A containing iOS app that is used to install the Apple Watch application through the iPhone
![]() A WatchKit app containing the UI of the watch application
A WatchKit app containing the UI of the watch application
![]() A WatchKit Extension containing the code of the watch application
A WatchKit Extension containing the code of the watch application
Note
The Apple Watch is compatible with iPhone 5, iPhone 5c, iPhone 5s, iPhone 6, iPhone 6 Plus, iPhone 6s, and iPhone 6s Plus running iOS 8.3 or later.
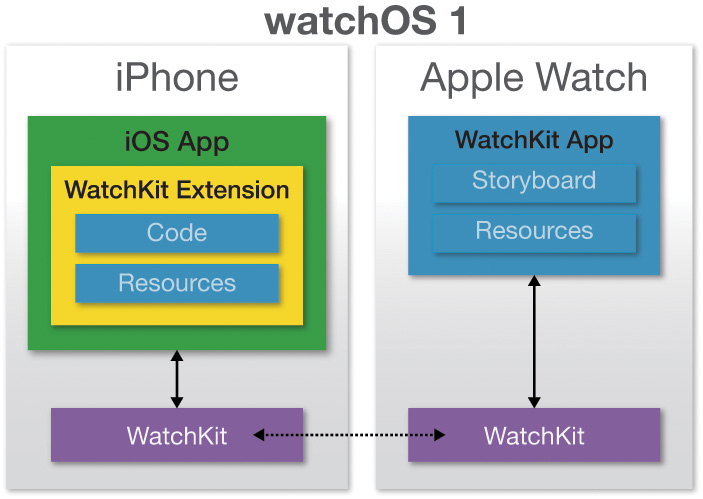
In watchOS 1.x, the WatchKit Extension (the application logic of your watch app) is hosted within the containing iOS app running on the iPhone (see Figure 1.2). The UI of your watch app is on the Apple Watch itself. This execution model is limited, as all interactions with the watch app must be communicated back to the iPhone, and hence the watch itself has this inherent reliance on the iPhone in order to work. This architecture has resulted in users reporting that first-generation watch apps were sluggish and took a long time to load.
Note
The iPhone and the Apple Watch communicate with each other using a Bluetooth LE (Low Energy) connection. The WatchKit framework encapsulates all the communication details, and it is totally transparent to the developer.
In watchOS 2, the WatchKit Extension is moved to the Apple Watch (see Figure 1.3), so now the UI and application logic of your watch app are executed directly on the watch itself. This model enables developers to build more responsive apps, without having to send data back and forth between the containing iOS app and the watch app. In addition, the watch can connect directly to known WiFi networks, and your watch app can run independently without the help of the paired iPhone.
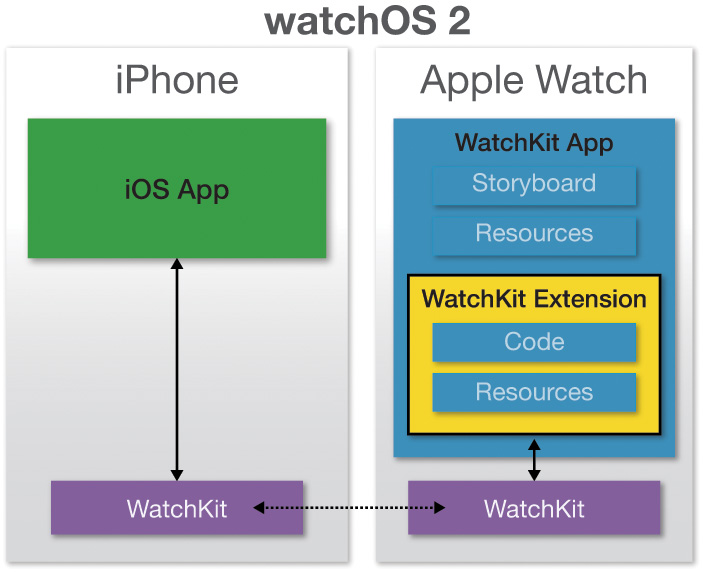
The WatchKit app only contains the storyboards and resources needed to create the user interface of your Apple Watch application; the code for managing the interactions with your Apple Watch application resides in the WatchKit Extension.
Note
The WatchKit app does not contain any source code files. All source code files reside in the WatchKit Extension.
Deploying Apple Watch Apps
For deployment, the WatchKit app and the WatchKit Extension are packaged together within a single iOS app bundle (see Figure 1.4). So, to develop an Apple Watch application, you first need to develop an iPhone application.

When the user installs an iOS application containing the WatchKit app and WatchKit Extension, he or she is prompted to install the WatchKit app and extension if a paired Apple Watch is available. Once the WatchKit app and Extension are installed on the Apple Watch, the watch app can be launched directly from the Apple Watch Home screen.
Interaction between the Apple Watch and iPhone
There are times when your watch application needs to communicate with the containing iOS application. For example, the iPhone may be tracking the location of the user and trying to find a nearby restaurant. When a restaurant is found, the iPhone app would like to send the restaurant details to the Apple Watch. On the Apple Watch, the watch application might also need to communicate with the iPhone app, such as if the user wants to save the particular restaurant to his or her Favorites list on the iPhone.
To facilitate communications between the iPhone app and the watch app, Apple provides the Watch Connectivity Framework. Figure 1.5 shows the Watch Connectivity Framework providing a communication link between the watch app and its corresponding iOS app.

Figure 1.5 Interactions with the Watch app and the iOS app are handled by the Watch Connectivity Framework
Types of Apple Watch Applications
For this release of the WatchKit framework, you can develop the following types of Apple Watch applications:
![]() WatchKit apps: Apps that run on the Apple Watch and interact with the containing iOS app on the iPhone.
WatchKit apps: Apps that run on the Apple Watch and interact with the containing iOS app on the iPhone.
![]() Glances: A supplemental way for the user to view important information from your app. Glances do not support interactions with users—tapping on a glance launches the WatchKit app. Chapter 9, “Displaying Glances,” discusses glances in more detail.
Glances: A supplemental way for the user to view important information from your app. Glances do not support interactions with users—tapping on a glance launches the WatchKit app. Chapter 9, “Displaying Glances,” discusses glances in more detail.
![]() Notifications: Displays notifications received by the iPhone (either local or remote notifications); apps can customize the notification interface. (Chapter 8, “Displaying Notifications,” discusses notifications.)
Notifications: Displays notifications received by the iPhone (either local or remote notifications); apps can customize the notification interface. (Chapter 8, “Displaying Notifications,” discusses notifications.)
![]() Complications: Complications are display elements on watch faces that display data from applications like Activity, Calendar, Weather, and so on. In this version of WatchKit, your application can display complications data on watch faces. (Chapter 6, “Programming Complications,” discusses complications.)
Complications: Complications are display elements on watch faces that display data from applications like Activity, Calendar, Weather, and so on. In this version of WatchKit, your application can display complications data on watch faces. (Chapter 6, “Programming Complications,” discusses complications.)
Hello, World!
Now that we have all the basics covered, you must be raring to go and yearning to get your hands dirty! So, without further ado, make sure you download and install Xcode and let’s create your first Apple Watch app!
Creating an iPhone Project
The first step toward creating an Apple Watch application is to create an iPhone application. To do this, follow these steps:
1. Launch Xcode and select the iOS App with WatchKit App template (see Figure 1.6).
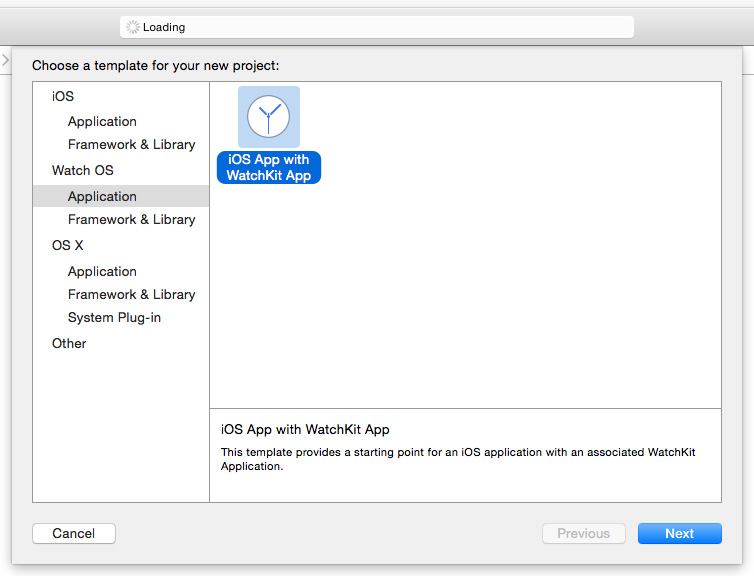
2. Click Next.
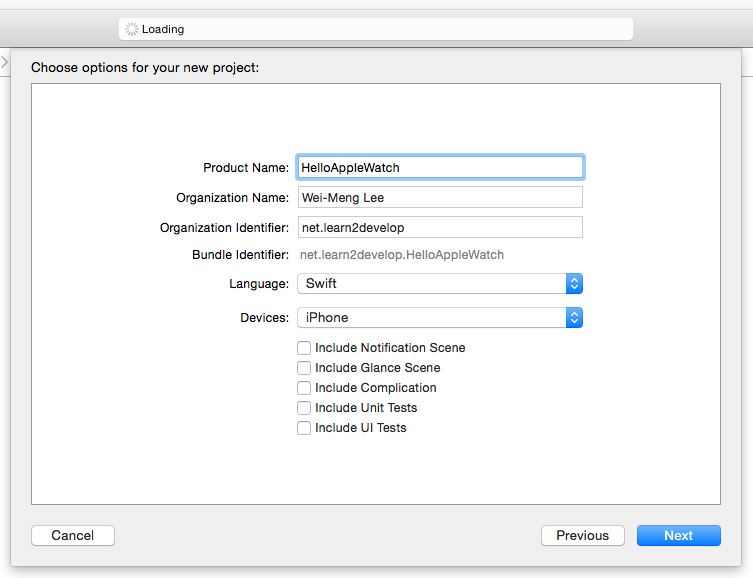
3. Name the project as follows (see Figure 1.7):
Product Name: HelloAppleWatch.
Organization Name: Either your name or your organization’s name.
Organization Identifier: Usually, the reverse domain name of your organization (e.g., com.example). The Bundle Identifier is formed by concatenating the Organization Name with the Product Name. If you intend to host your app on the App Store, the Bundle Identifier of your app must be unique.
Devices: iPhone.
Ensure that all the other options are unchecked.
4. Click Next.
5. Select a folder on your Mac to save the project, and click Create.
When the project is created successfully, you will see Xcode, as shown in Figure 1.8.

What you now have is an iPhone application project with an embedded WatchKit application. Observe the targets you have in your project, as shown in Figure 1.9.

Figure 1.9 The three main components of the project: the containing iOS app, the WatchKit app, and the WatchKit Extension
In particular, observe the three highlighted groups:
![]() HelloAppleWatch: The iOS app that acts as the container for the watch application
HelloAppleWatch: The iOS app that acts as the container for the watch application
![]() HelloAppleWatch WatchKit App: The WatchKit app that contains the UI of your watch application
HelloAppleWatch WatchKit App: The WatchKit app that contains the UI of your watch application
![]() HelloAppleWatch WatchKit Extension: The WatchKit Extension that contains the application logic of your watch application
HelloAppleWatch WatchKit Extension: The WatchKit Extension that contains the application logic of your watch application
Observe that the HelloAppleWatch WatchKit App target contains the Interface.storyboard file. This is the storyboard file that contains the UI of your watch application. The HelloAppleWatch WatchKit Extension target, on the other hand, contains the InterfaceController.swift and ExtensionDelegate.swift files, which is the code that is executed when the user interacts with the watch application.
Examining the Storyboard
Let’s look at the Interface.storyboard file located in the HelloAppleWatch WatchKit App target. Selecting the file displays it using the Storyboard Editor (see Figure 1.10). It contains a single Interface Controller, which is similar to a View Controller in your iPhone application. When the user loads the application on the Apple Watch, the initial Interface Controller from the main storyboard is loaded.

When you select the Interface Controller and examine the Class attribute under the Identity Inspector window, you will see that it is connected to a class known as InterfaceController (see Figure 1.11).

WatchKit App Lifecycle
The InterfaceController class is stored in the file named InterfaceController.swift. It is located within the HelloAppleWatch WatchKit Extension target. Listing 1.1 shows the content of the InterfaceController class.
Listing 1.1 Content of the InterfaceController Class
import WatchKit
import Foundation
class InterfaceController: WKInterfaceController {
override func awakeWithContext(context: AnyObject?) {
super.awakeWithContext(context)
// Configure interface objects here.
}
override func willActivate() {
// This method is called when watch view controller is
// about to be visible to user.
super.willActivate()
}
override func didDeactivate() {
// This method is called when watch view controller is
// no longer visible.
super.didDeactivate()
}
}
The InterfaceController class is a subclass of the WKInterfaceController class. When subclassing the WKInterfaceController class, you can override a couple of methods to handle the lifecycle of an Interface Controller:
![]() init—The designated initializer for the Interface Controller objects. Note that Xcode does not create this method by default.
init—The designated initializer for the Interface Controller objects. Note that Xcode does not create this method by default.
![]() awakeWithContext:—Fired when the Interface Controller is displayed for the first time; useful for object initializations, updating your UI, etc.
awakeWithContext:—Fired when the Interface Controller is displayed for the first time; useful for object initializations, updating your UI, etc.
![]() willActivate—Fired when the user interface is visible to the user; useful for updating the user interface, setting up timers, etc.
willActivate—Fired when the user interface is visible to the user; useful for updating the user interface, setting up timers, etc.
![]() didDeactivate—Fired when the user exits your app explicitly or stops interacting with the Apple Watch; useful for cleaning up resources, saving data, etc.
didDeactivate—Fired when the user exits your app explicitly or stops interacting with the Apple Watch; useful for cleaning up resources, saving data, etc.
Note
Chapter 2, “Apple Watch Interface Navigation,” discusses the lifecycles of the Interface Controller in detail.
In addition to the InterfaceController.swift file, the WatchKit Extension target also includes the ExtensionDelegate.swift file. Its use is very similar to that of the AppDelegate.swift file in the iOS app—it handles events that are fired when your watch application has finished launching, becomes active, or becomes inactive. Listing 1.2 shows the content of the ExtensionDelegate class.
Listing 1.2 Content of the ExtensionDelegate Class
import WatchKit
class ExtensionDelegate: NSObject, WKExtensionDelegate {
func applicationDidFinishLaunching() {
// Perform any final initialization of your application.
}
func applicationDidBecomeActive() {
// Restart any tasks that were paused (or not yet started) while the
// application was inactive. If the application was previously in
// the background, optionally refresh the user interface.
}
func applicationWillResignActive() {
// Sent when the application is about to move from active to
// inactive state. This can occur for certain types of temporary
// interruptions (such as an incoming phone call or SMS message) or
// when the user quits the application and it begins the transition to
// the background state.
// Use this method to pause ongoing tasks, disable timers, etc.
}
}
Modifying the Interface Controller
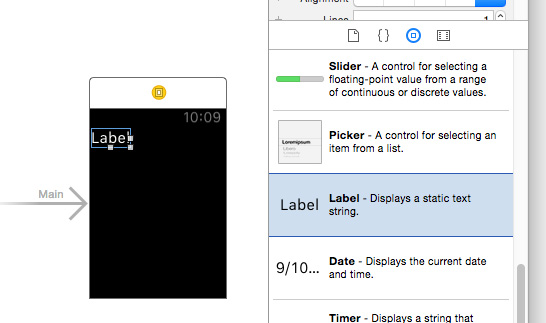
Now that we have discussed the underlying details of the parts that make everything work, it is time to do something visual and fun! In the Interface Controller found inside the Interface.storyboard file, drag and drop a Label control (from the Object Library) onto it (see Figure 1.12).
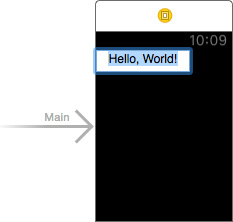
Double-click the Label control and type Hello, World!, as shown in Figure 1.13.
Running the Application on the Simulator
Finally, you are ready to test the application on the iPhone and Apple Watch Simulators. In Xcode, you need to first set the scheme to HelloAppleWatch WatckKit App (see Figure 1.14). Also, ensure that iPhone 6 + Apple Watch – 38mm is selected. Once this is done, press Command-R to deploy the application onto the iPhone Simulator.

Figure 1.14 Ensure that the HelloAppleWatch WatchKit App scheme is selected before running the project
Note
You can choose to test your application on either the 38mm or 42mm Apple Watch Simulator.
The first time you launch the iPhone and Apple Watch Simulators, you may see a prompt on the iPhone Simulator, requesting permission for the Apple Watch Faces to access your location. Click Allow (see Figure 1.15).

Figure 1.15 The iPhone Simulator asking for permission to allow the Apple Watch Faces to access your current location
You should now see the Apple Watch Simulator running the application (see Figure 1.16).
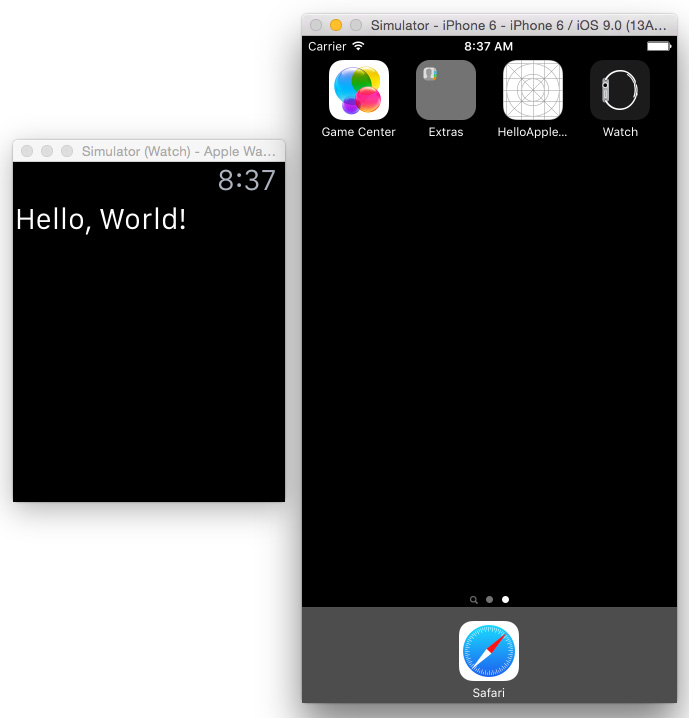
Note that only the watch app runs on the Apple Watch Simulator; the iOS app is installed on the iPhone Simulator, but it’s not launched.
Summary
In this chapter, you learned the basics of developing for the Apple Watch. You first read about the specifications of the watch, and then you learned about the architecture of third-party apps that you can build. Most importantly, in watchOS 2, the processing of your Apple Watch app is now performed on the Apple Watch, rather than on the iPhone as in watchOS 1. This change is significant because you can now write responsive watch apps that run natively on the Apple Watch. It also allows you to access the hardware features of the watch, such as the accelerometer.
You also wrote your first Apple Watch application and tested it on the Apple Watch Simulator. In the next few chapters, you learn more about the different views that you can use to build the UI of your Apple Watch applications, as well as topics such as how to communicate between the containing iOS app and the Apple Watch app.