9. Taking and Sharing Photos
In this chapter, you find out how to capture photos and screenshots, share photos via email and slideshows, and view and manage photos with Gallery.
![]() Tips for capturing photos
Tips for capturing photos
![]() Editing and sharing images
Editing and sharing images
![]() Performing screen captures
Performing screen captures
Along with transferring images from other sources, such as your computer, to your Galaxy S7, you can also take high-quality photos with your Galaxy S7, which can house thousands of photos organized in categories. You also have the capability to take screenshots of the Galaxy S7 interface.
The high-resolution screen on your Galaxy S7 offers a great way to showcase photos to friends and family, but you don’t have to stop there. You can also share pictures via Bluetooth, email, Facebook, Instagram, and more.
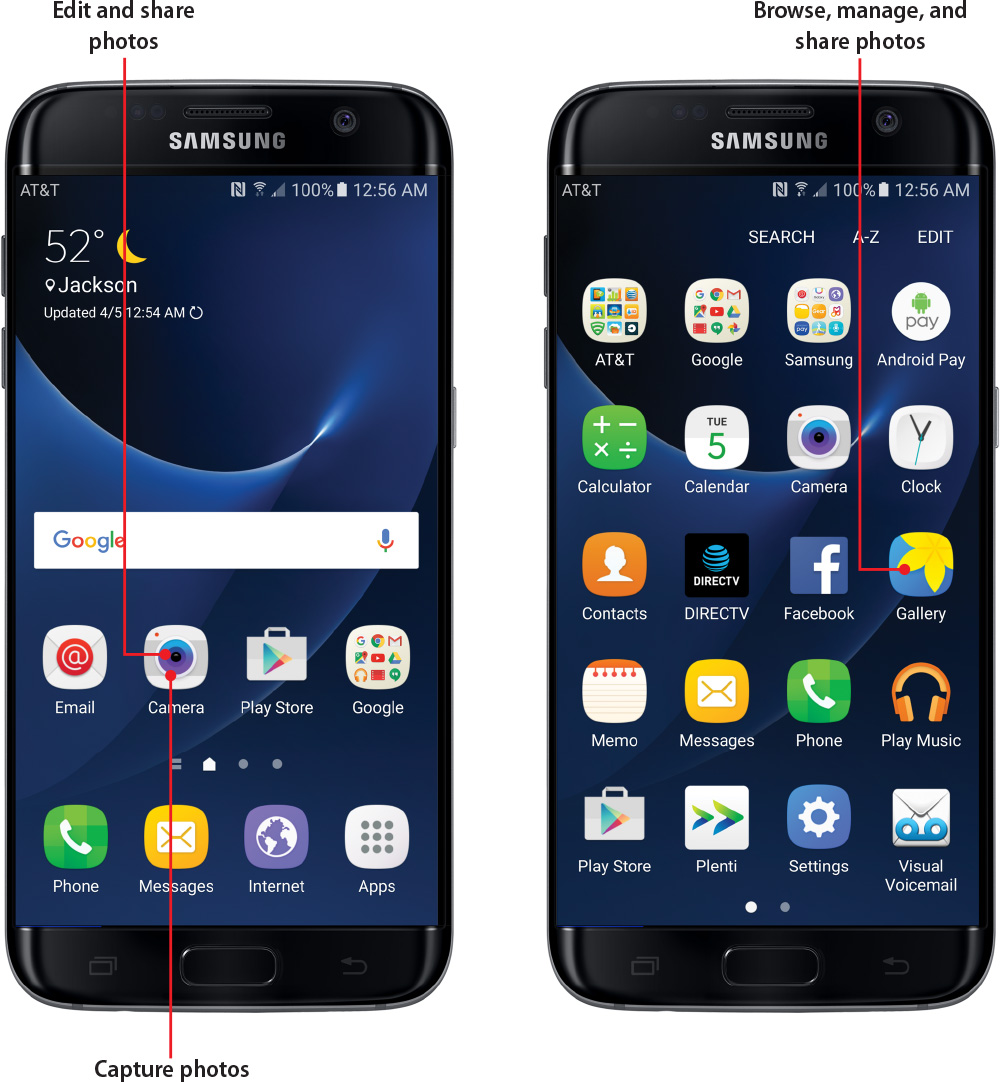
Using the Camera
Both the Galaxy S7 and S7 edge use a 12.0-megapixel rear-facing camera located on the back of the device to take photos, along with a 5.0-megapixel front-facing camera that you can use for self-portraits.
Taking a photo can be as simple as choosing a subject, composing your shot, and pressing a button. The Galaxy S7 is also equipped with some helpful features commonly found on dedicated photo cameras, including shooting modes, scene modes, manual exposure, white balance, flash, manual exposure, and ISO settings.
Why Does the Camera App Stop Running on Its Own?
If you don’t use the Camera app for two minutes, then the app automatically minimizes and you return to the Home page. This approach helps conserve battery life as the app is resource intensive. You can return to the Camera app by tapping the Recent Apps button and then tapping the Camera tile in the Recent Apps screen.
Change Quick Settings
1. On the Home screen, tap Camera.
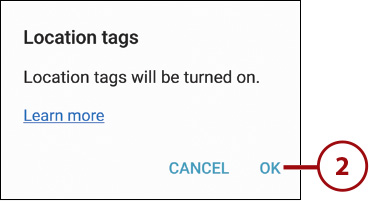
2. The first time you start the Camera app, the Location Tags window appears and informs you that location tags will be turned on. Tap OK to continue. The next time you start the Camera app, proceed to step 3.
Vertical or Horizontal View?
You can take pictures in the view that’s most comfortable for you: vertical or horizontal. The examples in this section starting with step 3 are in horizontal view, so when you use the Camera app, keep in mind that the location of features on the screen in vertical view will be different from what is described here. For example, in vertical view the Settings icon is in the upper-left corner of the screen, but in horizontal view the icon is in the lower-left or upper-right corner of the screen depending on how you hold the Galaxy S7.
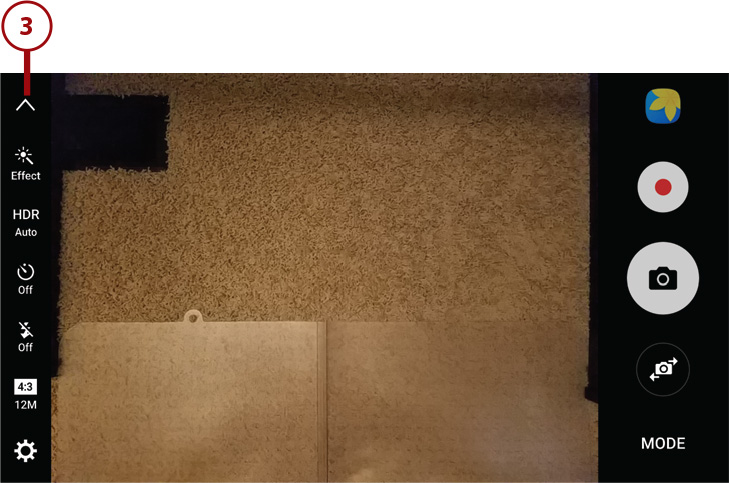
3. The Quick Settings icons appear at the left side of the Viewer screen. Hide the Quick Settings icons by tapping the up arrow.
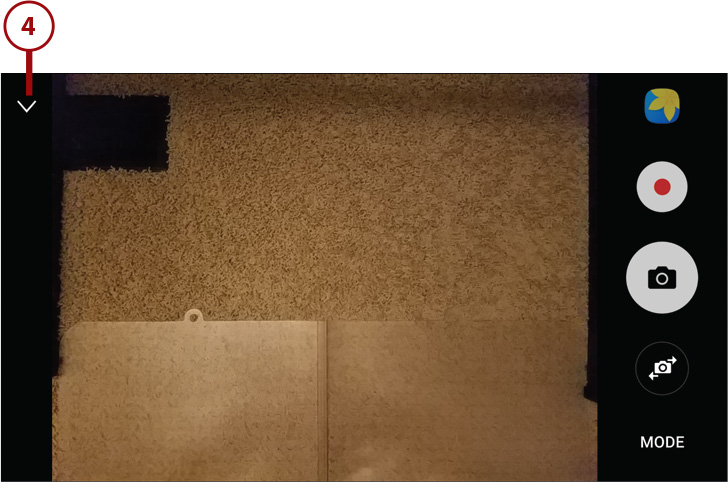
4. View the Quick Settings icons again by tapping the down arrow.
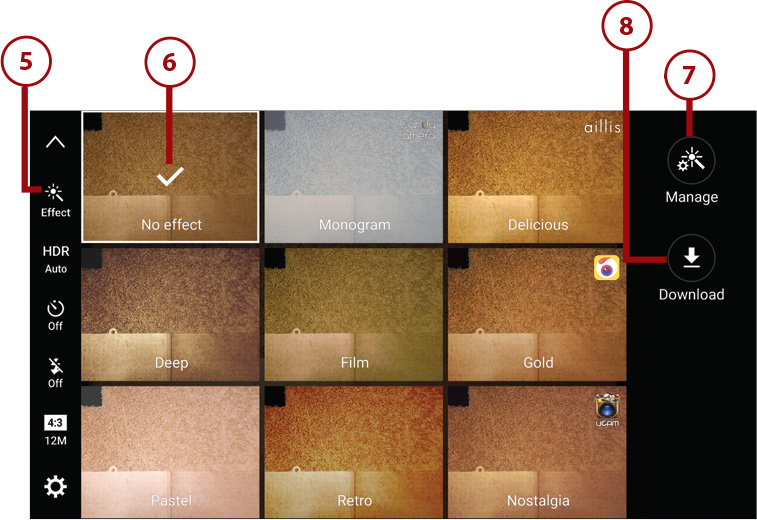
5. Select an effect to apply to your photo after you take the photo by tapping Effect.
6. Tap the Effect tile in the list; the selected effect appears with a checkmark in the center of the tile.
7. Tap Manage to rearrange the Effect icons in the Manage screen.
8. Tap Download to shop for and download another effect in the Galaxy Apps store.
9. An image that is too light or too dark degrades the appearance of your photos. The Galaxy S7 contains the HDR (High Dynamic Range) setting so the device automatically adjusts the brightness level for various bright or dark lighting conditions. HDR automatic mode is on by default, which means the Camera app checks the lighting conditions and applies the HDR feature if needed. Tap HDR Auto to turn the HDR feature on for every photo you take.
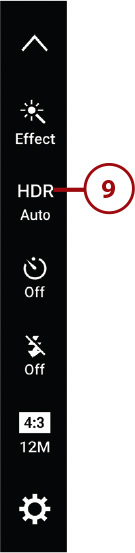
10. Tap HDR On to turn the HDR feature off.
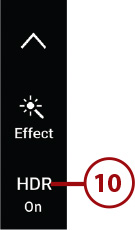
11. Tap HDR Off to return the HDR feature to automatic mode.
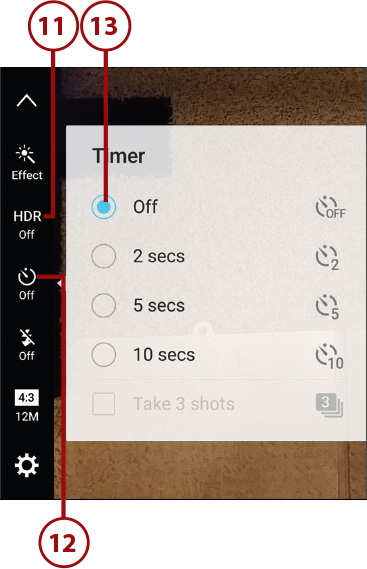
12. Tap the Timer icon to designate how long the Galaxy S7 should wait before the camera takes a photo. This is great when you want to set up the shot and then place yourself in the frame.
13. Select the timer option in the Timer window. The default option is Off, but you can select from 2 seconds, 5 seconds, or 10 seconds.
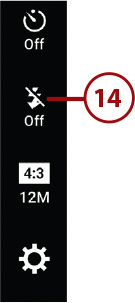
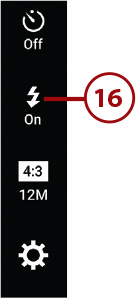
14. The camera flash is off by default. Tap the Flash icon to turn on automatic flash mode, which means the Camera app checks the lighting conditions and applies the flash if lighting is too dim.
15. Tap Flash Auto to turn the flash on for every photo you take.
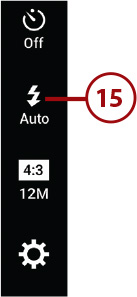
16. Tap Flash On to turn the flash off.
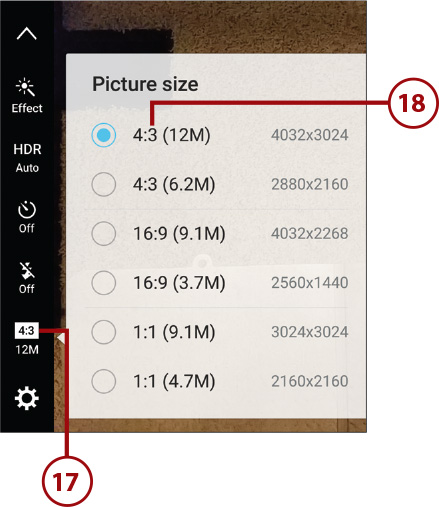
17. Tap the Picture Size icon to change the picture size and aspect ratio.
18. Select the picture size in the Picture Size window. The default size is a 4:3 aspect ratio; the corresponding image size of the photo and the picture size in pixels appear to the right of the aspect ratio. You can select two different picture sizes in 4:3, 16:9, and 1:1 aspect ratios.
What Is the Aspect Ratio?
The aspect ratio of a screen or image is the proportional relationship between the width and height, and it’s expressed as the width and height numbers separated by a colon. For example, a 4:3 screen aspect ratio means the rectangular dimensions of the screen are 4 units wide and 3 units high, and each unit contains 1,008 pixels.
View and Change Pro Settings
By default, the Camera app takes photos in Auto mode so you can take photos and know that they’ll look great. If you need more control over how your photos look, you can access Pro settings and make manual changes to the color effect, focus mode, white balance, ISO value, and exposure value.
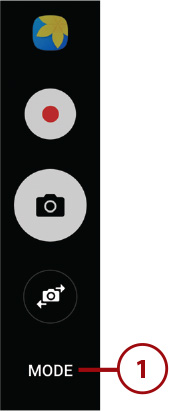
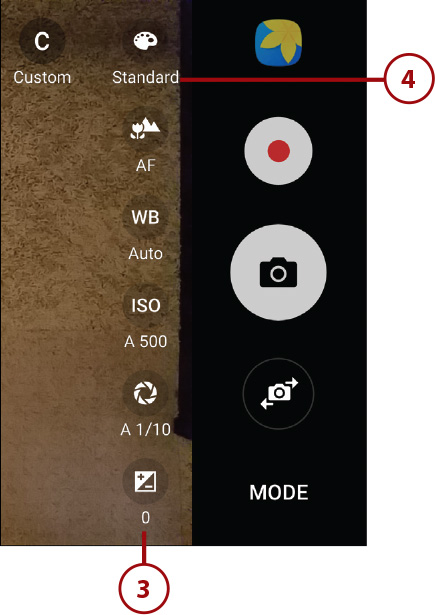
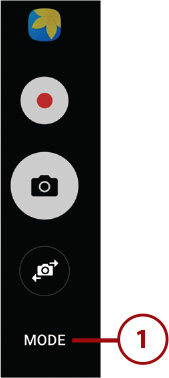
1. Tap Mode in the lower-right corner of the screen.
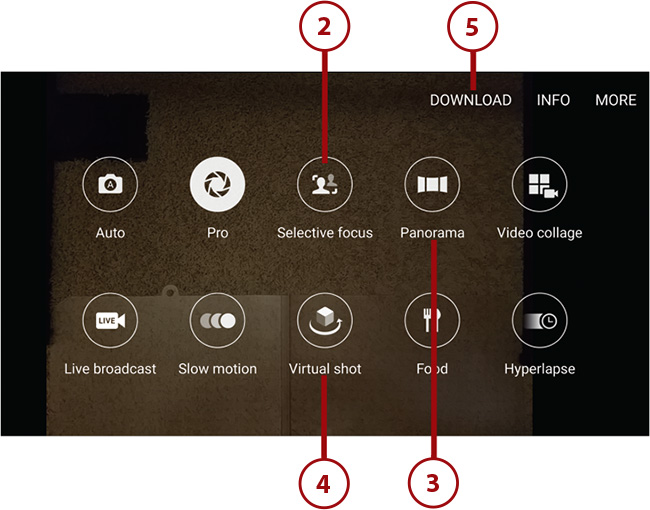
2. Tap Pro in the menu screen.
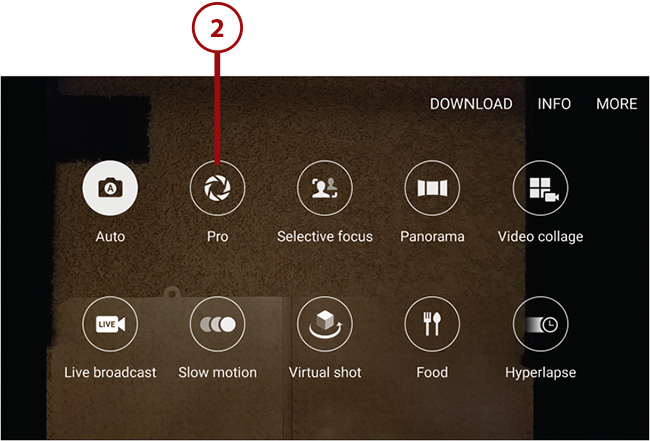
3. The Pro settings appear on the right side of the screen.
4. Tap Standard to apply a color effect after you take the photo.
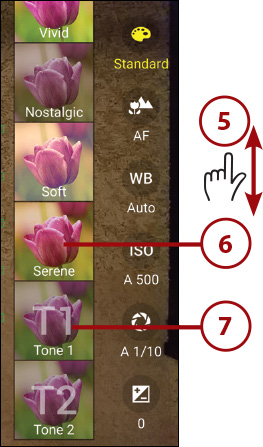
5. Swipe up and down the color effect list to view the effects. The default effect is Standard, which contains the default color settings. The selected effect has a white checkmark in the middle of the color effect tile.
6. Each tile shows you how the photo looks in comparison to the Standard effect.
7. Create a new custom effect by swiping down the list and then tapping Tone 1 or Tone 2. You can add up to two custom effects.
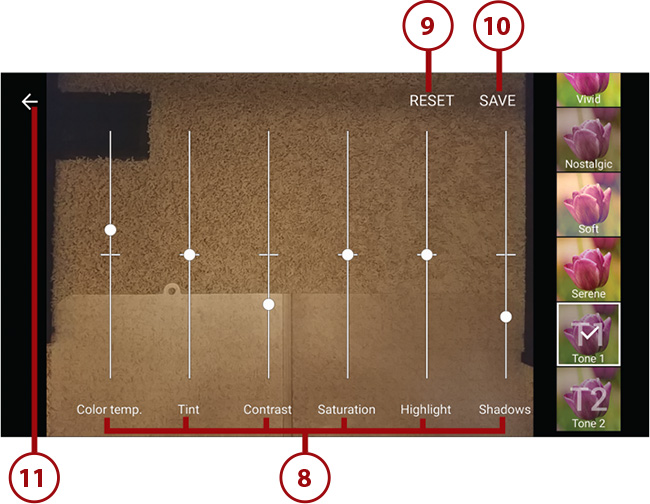
8. Change the effect by moving one or more of the six setting sliders up and down. You can change the color temperature, tint, contrast, saturation, highlight, and shadow levels. As you move each slider, the Viewer changes to show how your color effects will appear in a photo.
9. Reset effect settings to their default levels by tapping Reset.
10. Save your changes by tapping Save.
11. Return to the Viewer without making changes by tapping the Back icon.
12. Tap the Focus Mode icon to manually change the focus. The default is AF, which stands for Auto Focus, but you can slide the button on the slider bar up and down. You can swipe between close focus, which is signified by the flower icon, and broader focus, which is signified by the mountain icon.
13. The focus setting name below the Focus Mode icon (AF in this example) changes to MF, or Manual Focus, after you have manually set the focus.
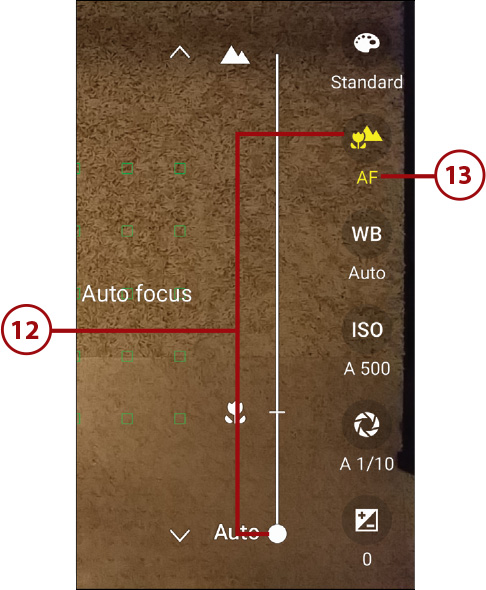
Can I Select a Focus Between Auto and Close?
You can’t select a focus on the slider bar between Auto and Close Focus. When you try, after you release your finger from the slider button the Camera app determines the setting to which the slider button is closest and then automatically moves to either the Close Focus or Auto setting in the slider bar.
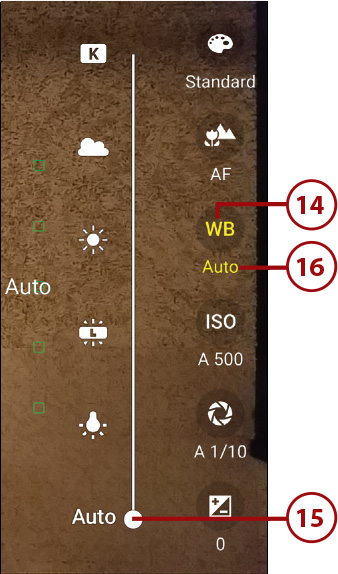
14. Tap the WB icon (WB stands for White Balance) to adjust the white balance for the camera. The white balance features help accurately reproduce colors when you are shooting in various lighting situations so that neutral colors, such as white and gray, are truly neutral and all colors are rendered without undesired color casts, or tints of colors that affect the entire photo evenly.
15. Move the slider button up and down between Incandescent, Fluorescent, Daylight, and Cloudy white balances. Move the slider button all the way to the top of the slider bar (next to the K icon) to set the white balance level manually.
16. The white balance level appears below the WB icon after you have selected a white balance mode or have set the balance manually.
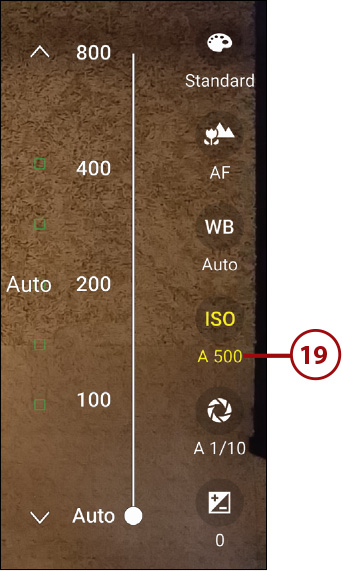
17. Tap the ISO icon to adjust the brightness level in your photo. The default level in the slider bar is Auto, which means the digital sensor in your camera senses the amount of light and changes the brightness level so you have a better chance of getting a good shot.
18. Slide the button in the slider bar up to achieve a proper brightness level in a low-light shooting environment, or slide the button down for a bright shooting environment. You can select from one of five levels: Auto, 100, 200, 400, and 800. If you release your finger from the button between one of the levels, the button moves to the level closest to the button.
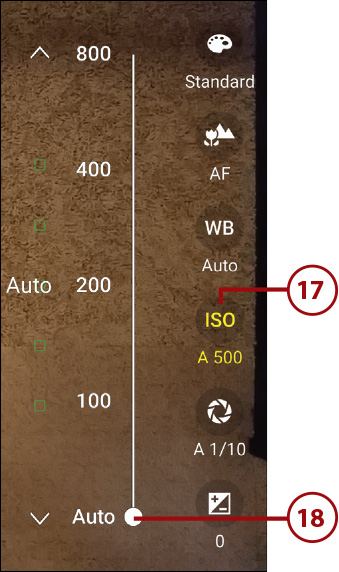
19. The level number appears below the ISO icon after you have selected the ISO level. (It’s A 500, which stands for Auto 500, in this example.) The Viewer also changes the light level so you can see whether the selected ISO level is appropriate for your environment.
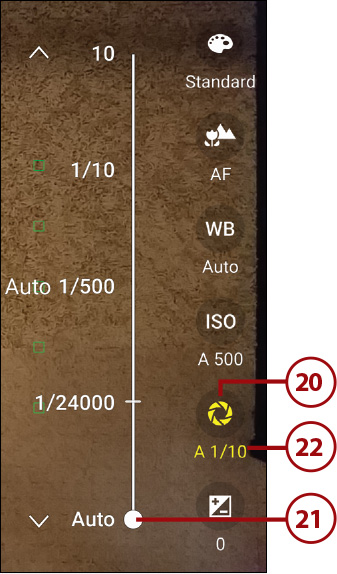
20. Tap the Shutter Speed icon to change your shutter speed. The speed determines how long the digital sensor in the camera is exposed to light when you take a photo. Slower shutter speeds allow more light in so the photo is brighter, which is ideal for taking photos in dark environments. Faster shutter speeds allow less light in so you can take pictures of fast-moving objects or effects such as a lightning strike. The default speed is Auto, which is 1/10th of a second.
21. Slide the button in the slider bar up to determine how long the digital sensor is exposed to light. You can select from one of five levels: Auto, 1/24000th of a second, 1/500th of a second, 1/10th of a second, and 10 seconds. If you release your finger from the button between one of the levels, the button moves to the level closest to the button. Remember that if the shutter speed is at any level other than Auto, you can’t change the exposure value because the Camera app automatically sets the exposure value to the appropriate level for your shutter speed.
22. The level number appears below the Shutter Speed icon after you have selected the shutter speed. (It’s A 1/10 in this example.) The Viewer also changes the light level so you can see whether the selected shutter speed is appropriate for your environment.
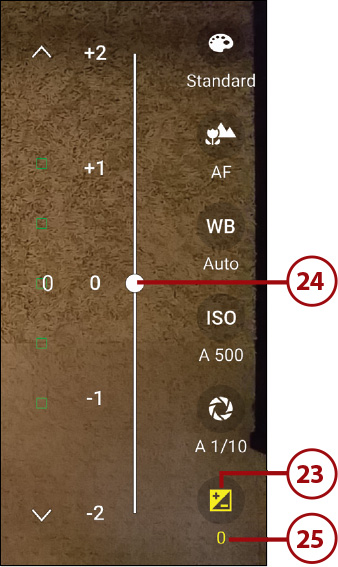
23. Change the exposure value by tapping the Exposure icon. The exposure value determines how much light the camera’s sensor receives.
24. Slide the button in the slider bar up if you’re in a low-light environment or slide the button down for a bright shooting environment. You can slide to any level between +2 and –2. 0 is the default setting.
25. The value appears below the Exposure icon after you have selected the exposure value. The Viewer also changes the light level so you can see whether the selected exposure value is appropriate for your environment.
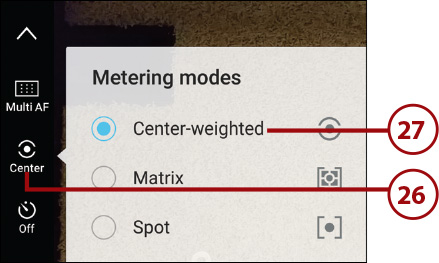
26. Tap Metering to set how the camera measures or meters the light source. This setting determines how the camera factors light in a scene to achieve the proper exposure.
27. Change the metering mode in the Metering Modes window.
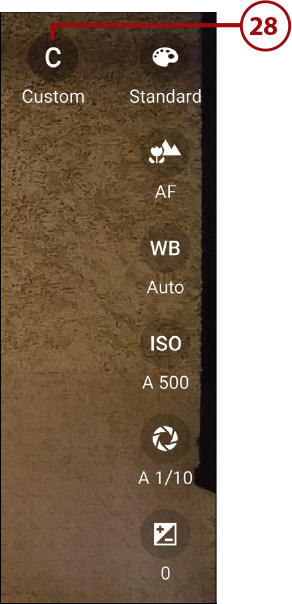
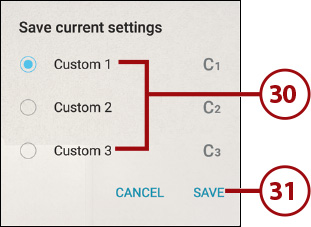
28. Save all your Pro settings so you don’t have to set them each time you use the camera by tapping Custom.
29. Tap Save Current Settings in the Custom Settings window.
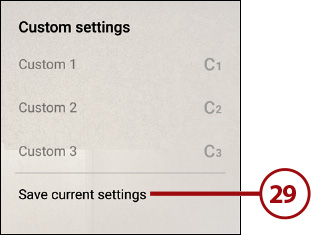
30. Tap one of the three custom setting names into which you can save your settings.
31. Tap Save.
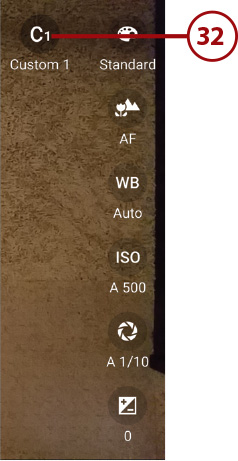
32. The custom setting icon appears in the Viewer so you can tap the icon to change to your preferred camera settings automatically.
Set Camera Modes
You can apply special effects to your photos by selecting from one of three camera modes. If you don’t see the camera mode you want, you can download other modes from Samsung’s Galaxy Apps store.
1. Tap Mode in the lower-right corner of the Viewer.
2. If you want to have one or more specific objects in your photo stand out, tap Selective Focus. After you take the photo, you can specify which object(s) have sharper focus and which objects do not.
3. Tap Panorama to take a picture and then use the onscreen guide to move the viewfinder and take seven more shots. Then you can stitch each individual shot together to capture a wide vista, such as landscapes and cityscapes.
4. Tap Virtual Shot to take a series of photos around an object by moving the Galaxy S7 around the object. When the Camera app finishes taking the photos, the app stitches those photos together and creates a brief video that shows a 270-degree view of the object.
5. If you don’t see a camera mode that meets your needs, tap Download to shop for other camera modes in the Galaxy Apps store.
6. Return to the Viewer by tapping the Back touch button (not shown).
Change Camera Settings
The Camera app contains a variety of settings you can view and/or change. Some of the settings allow you to change the video camera, but this section discusses camera settings only. Refer to Chapter 10, “Watching and Creating Videos,” for more information about video settings within the Camera app.
1. In the Viewer, tap the Settings icon to customize camera quick settings.
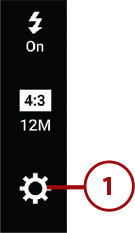
2. The Camera Settings screen appears with five setting options in the list.
3. Slide the Motion Photo slider from left (Off) to right (On) so the Camera app records a video for three seconds before you tap the Camera button. When you view the photo in the Preview screen, you can preview the video by tapping the Preview icon in the upper-right corner of the photo. Then you can capture a still image from that video if you want.
4. Slide the Tracking AF slider button from left (Off) to right (On) to focus on and track an object. If the object of your photo moves between the time the camera achieves focus and the time the photo is captured, the object will be blurred. With the Tracking AF feature on, the camera follows the moving object and keeps it in focus so your photo isn’t blurry.
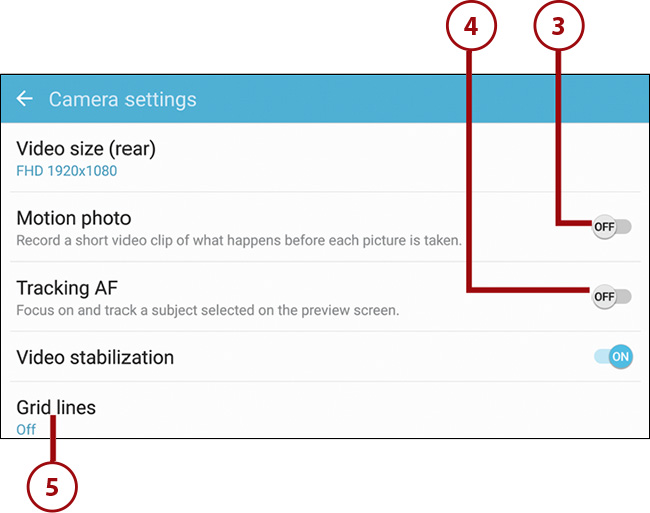
5. Tap Grid Lines to enable an onscreen grid that can help you with composition.
6. Swipe up on the screen to view the next four setting options.
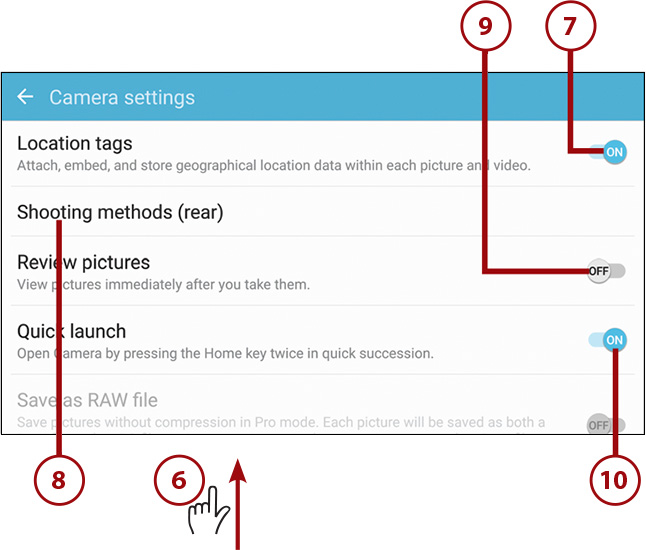
7. Slide the Location Tags slider to the left (Off) or right (On) to disable or enable, respectively, GPS tagging of the photos you capture. Embedded GPS information can come in handy if you use an application for photo editing and management, such as Photoshop, which enables you to use the location information to manage and showcase photos.
8. If you want to use your voice to take photos on the Galaxy S7, tap Shooting Methods (Rear). In the Shooting Methods (Rear) screen (not shown), slide the Voice Control slider button from left (Off) to right (On). You can use one of four different voice commands to capture a photo: Smile, Cheese, Capture, or Shoot. After you turn on voice control, return to the Camera Settings screen by tapping the Back icon in the upper-left corner of the screen.
9. Slide the Review Pictures slider to the right (On) or left (Off) to turn the review screen on or off, respectively. If Review is turned on, you see a preview of the photo you just shot in the Review screen.
10. By default, you can open the Camera app by quickly pressing the Home key two times. You can turn this feature off by sliding the Quick Launch slider button from right (On) to left (Off).
11. Swipe up on the screen to view the last five setting options.
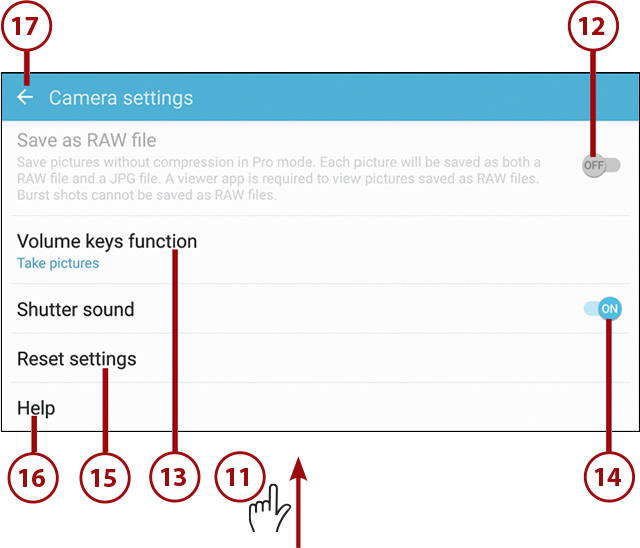
12. If you have selected Pro mode, slide the Save as RAW File slider to the right (On) or left (Off) to enable or disable, respectively, the ability to save files without compression when you take a picture in Pro mode. RAW pictures are saved in DNG file format and contain untouched pixel information straight from your camera sensor. Each picture you take will be saved in both DNG and JPG format files; you need a special app (like Photoshop) to view DNG files. If you take a burst picture in Pro mode then you can’t save the photos in DNG format.
13. Tap Volume Keys Function to determine if the volume key acts as the zoom key, the video recording key, or the camera key. The default is the camera key, shown as “Take pictures” underneath the Volume Keys Function setting name.
14. By default, the Camera app makes a noise similar to an old camera shutter when you tap the Camera button. If you don’t want to hear this sound, slide the Shutter Sound slider from right (On) to left (Off).
15. Tap Reset Settings to reset the Camera settings to their defaults.
16. Tap Help to get some quick onscreen help for the Camera app.
17. Return to the Viewer by tapping the Back icon.
What Is Burst Mode and How Do I Use It?
Burst Mode is built right into the Camera app and is useful when you want to take continuous photos within a few seconds, such as when you want to view different facial expressions a person makes over a few seconds. Just tap and hold on the Camera button as you take the shot. The Camera app stops taking photos after you release your finger or after the app has taken 30 photos. You can take up to 30 more photos in Burst Mode by tapping and holding on the camera button again.
Take a Photo
After you view and/or change Camera app settings, it’s easy for you to take a photo with your Galaxy S7.
1. In the Viewer, tap to switch between the rear-facing and front-facing cameras. Tap again to return to the previous camera view.
2. Compose the subject in the Viewer. By default, Camera automatically focuses on what is in the center of the Viewer or on the face(s) in your shot, as shown by the yellow circle around the faces in this example.
3. Hold your finger on the Camera button, level the shot, and then remove your finger from the button to capture the image. A thumbnail of the image appears in the Image Viewer.
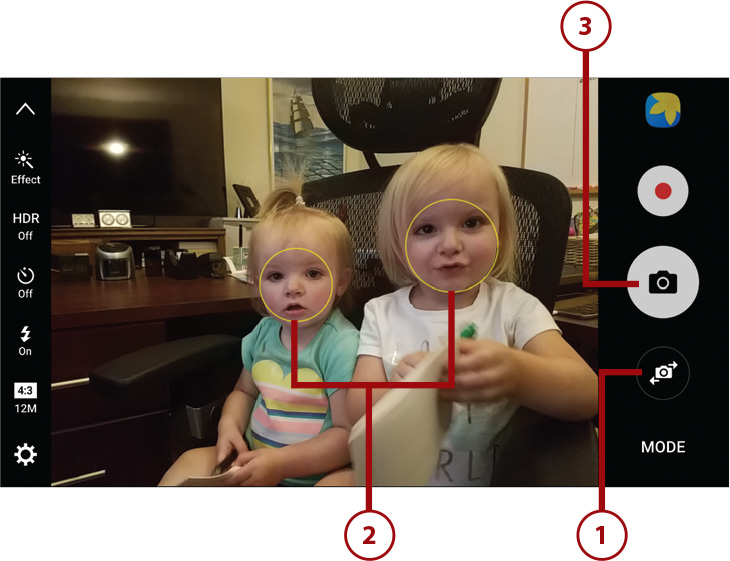
4. Tap the Image Viewer to review the image you just captured. You can also access your photos by tapping the Gallery icon under Applications from any Home screen.
Why Are the Viewer Icons on Opposite Sides of the Screen?
There are two ways to hold your Galaxy S7 in horizontal view: with the Home button to your left or to your right of the screen. Most of the examples in this chapter show the icons when the screen is held in horizontal view with the Home button to the right. When you rotate the screen 180 degrees so the Home button is on your left, the icons switch sides on the screen so the Camera button and Image Viewer are on the right side of the screen, as you see in this example.
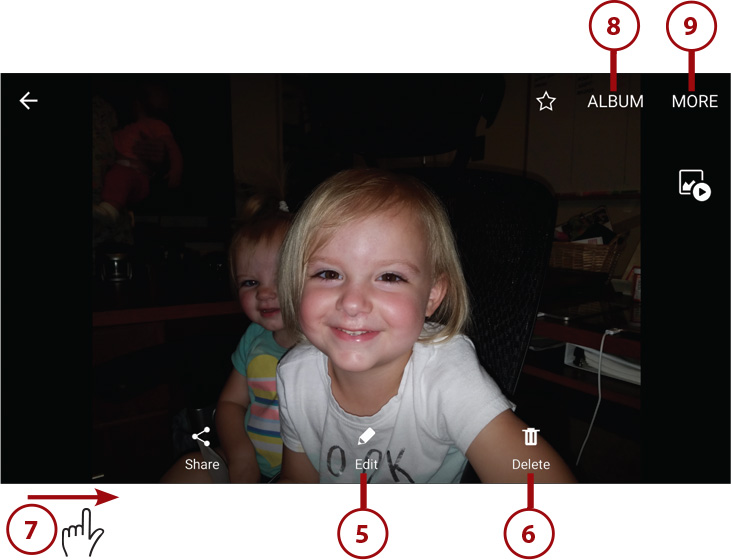
Navigating Image Viewer
Image Viewer provides a quick-and-easy way to review the photos you have just taken. It also enables you to quickly share your pictures as soon as you capture them or set them as wallpaper. You can also edit and delete unwanted photos in Image Viewer.
As soon as you take a picture, a thumbnail of that photo appears next to the Camera button. You can tap that thumbnail to review the picture you have taken and browse other photos.
1. Tap the Image Viewer to review the image.
2. The image opens full screen, the controls appear, and then they fade away. Tap the middle of the screen to access the controls again.
3. Tap to add the photo as a favorite that you can view in the Gallery app, which is covered later in this chapter in the “Working with Gallery” section.
4. Tap to access many options for sharing your photos through services and apps including the Messages app, the Memo app, the Maps app, the Photos app, Android Beam, Wi-Fi Direct, Bluetooth, Facebook, Hangouts, Kindle, Gmail, Email, Google Drive, and any other service (such as file storage) provided by your carrier. You can also view the photo on a connected device and print the photo, such as to a Bluetooth printer.
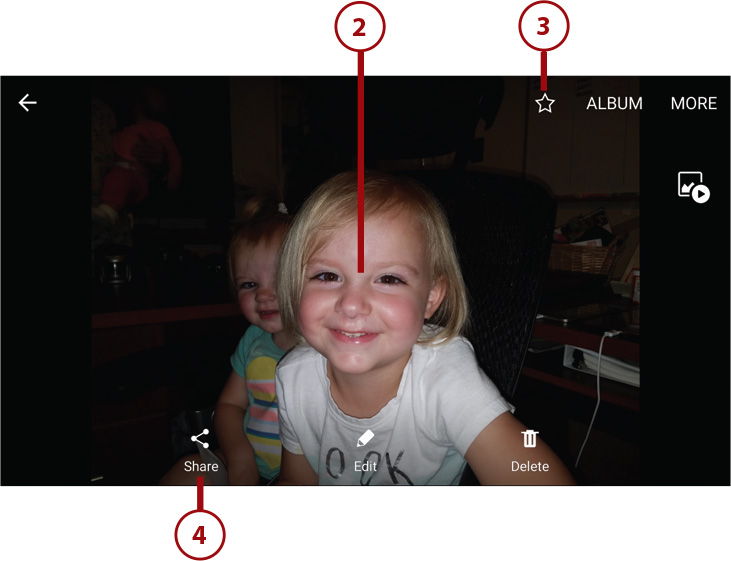
5. Tap to automatically adjust the photo for best viewing, rotate the photo, and crop the photo. You can also edit the photo in the Photo Editor app or create a collage of photos in the Collage app.
6. Tap to delete the currently displayed photo.
7. Swipe the image from left to right to navigate through all the photos you have captured.
8. Tap Album to view the album of all the photos you captured.
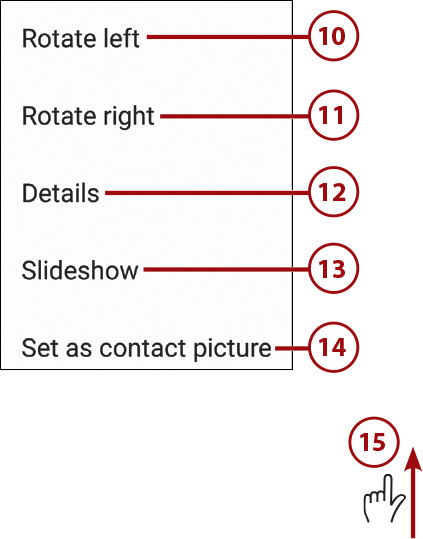
9. Tap More to access other options.
10. Tap to rotate the photo counterclockwise 90 degrees.
11. Tap to rotate the photo clockwise 90 degrees.
12. Tap to view details about the photo, including the time it was taken, the date it was captured, and the location where you took the photo.
13. Tap to begin a slideshow of your photos. After the slideshow begins, you can tap anywhere onscreen to end the slideshow.
14. Tap to set the current picture as a contact photo.
15. Swipe up in the menu to view more options.
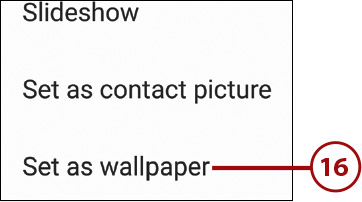
16. Tap to set the current picture as wallpaper on your Home screen, Lock screen, or the Home and Lock screens.
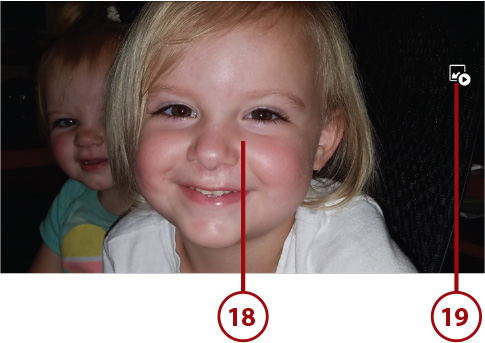
17. Close the menu by tapping the Back touch button (not shown).
18. With the menu closed, double-tap the image to zoom in. You can double-tap it again to zoom out and return the image to its normal size. You can also touch the screen with two fingers and then move them apart to zoom in on an image.
19. Tap the Preview button to view a preview video of what happened in the three seconds before you took the picture. When the video stops playing, you return to the Image Viewer screen.
20. Tap the Back touch button (not shown) to return to the Camera app and take more pictures.
Working with Gallery
Gallery offers a more robust photo and video management system than Image Viewer, but it has similar options for viewing, sharing, and editing photos.
Manage Photos with Gallery
By default, you can access the Gallery icon by flicking the main Home screen from left to right, or you can access it from the Apps menu.
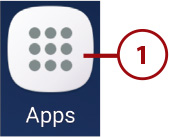
1. Tap the Apps icon on the Home screen.
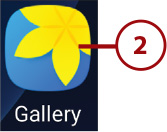
2. Tap Gallery in the Apps screen.
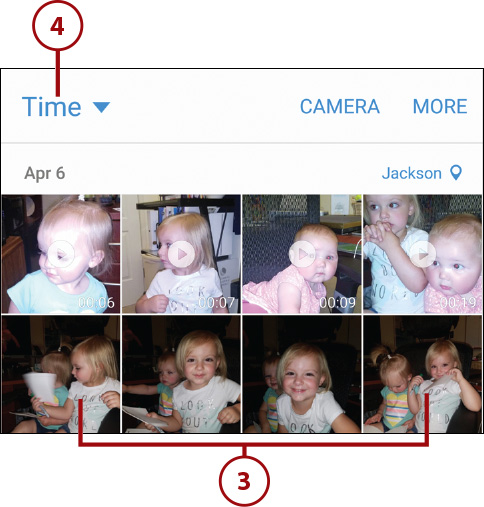
3. Content is arranged by the time the photos and videos were captured. If you have downloaded photos with your Galaxy S7 and transferred images from your computer, they are in here, too.
4. Tap Time to group your photos and videos in other ways. The name of this particular menu changes depending on which grouping method you have selected.
5. Tap the Time option to arrange photos and videos based on when they were taken.
6. Tap Events to arrange photos and videos by event, such as a birthday party. You can create events within the Events screen by tapping More in the menu bar, tapping Create Event, and then selecting the photos to add to your event.
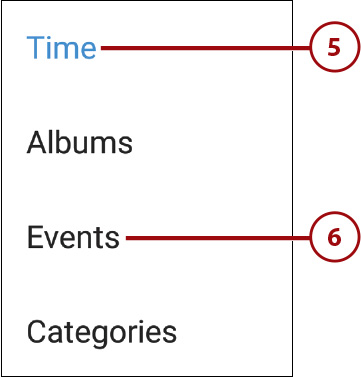
7. Tap Categories to arrange photos and videos based on various categories, such as People to show photos of people.
8. Tap Albums to arrange photos and videos based on how the photos and videos were captured. For example, the Camera album shows all photos and videos taken with the camera and the Screenshots album shows all your screen captures that you’ll learn to take later in this chapter. This example shows photos and videos in albums.

9. Tap Camera in the menu bar to access the Camera feature from Gallery and take more photos.
10. Tap More.
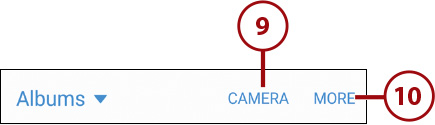
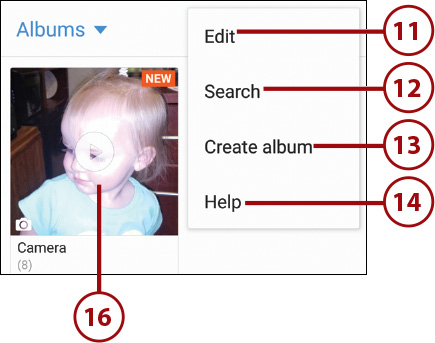
11. Tap Edit to select one or more complete albums to delete.
12. Tap Search to search for a photo by typing search term(s) in the Search box, or you can search in different categories such as events and location where the photo was taken.
13. Tap Create Album to create a new album.
14. Tap Help to get quick help for the Gallery app.
15. Close the menu by tapping the Back touch button (not shown).
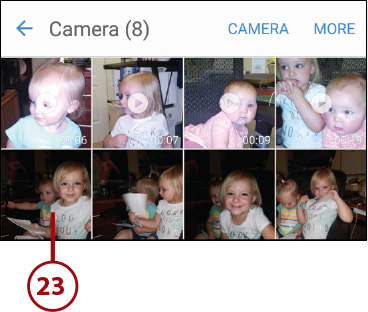
16. Tap an album to view all photos in it.
17. If you have more photos in the album than can fit on the screen, swipe up and down on the screen to view all thumbnail-sized photos in the album.

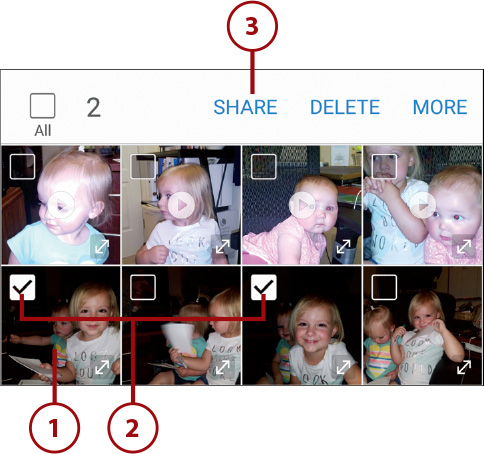
18. Tap and hold your finger on a photo for a couple of seconds to select it. The selected photo has a white checkbox with a black checkmark in the upper-left corner of the photo.
19. Tap Share to view options for sharing the selected image(s) in an email or Gmail message, on Google Drive, to OneNote or a memo, to another device using Samsung Quick Connect or a Wi-Fi Direct or Bluetooth connection, on Hangouts or Skype, Google+ or Facebook, or within the Instagram and Photos apps. You can also use your phone carrier’s messaging, mail, and/or file storage services if applicable. And you can print the photo, such as to a Bluetooth printer.
20. Tap Delete to delete the photo from the album and the Galaxy S7 altogether.
21. Tap More to either copy or move the photo to another album.
22. Select all photos in the album by tapping the All checkbox.

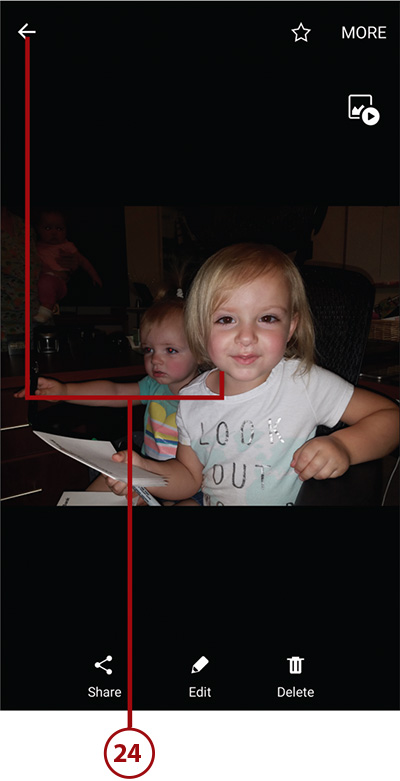
23. Turn off the image selection feature by tapping the Back touch button (not shown), and then tap a photo in the album to open it full screen.
24. Touch the middle of the screen to reveal the controls if necessary and then tap the left arrow icon in the menu bar to return to the previous screen.
Email Photos from Gallery
Emailing your photos to friends and family can be accomplished in just a few taps on your Galaxy S7. The following instructions presume you have set up an email account. If you haven’t, bookmark this page and read Chapter 6, “Email and Text Messages,” before you email your photos in the Gallery app.
1. Open the album that has the photo you want to email, and then touch and hold your finger on that photo to access more Gallery options.
2. Touch more photos that you want to share. A black checkmark appears within the white checkbox that appears in the upper-left corner of each photo, letting you know that it is selected. Email providers have varying file size limitations, so make sure you are aware of your provider’s limitations before emailing photographs.
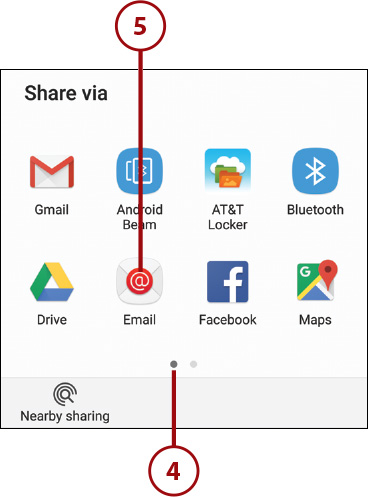
3. Tap Share to access the options in the Share Via window that appears in the bottom half of the screen. You can access these same Share options even if you are viewing a single photo in full screen mode.
Keep in mind that as you add an email account or Facebook account on your Galaxy S7, those options also display in the Share Via window.
4. Swipe to the appropriate page with the Email app icon.
5. Tap Email.
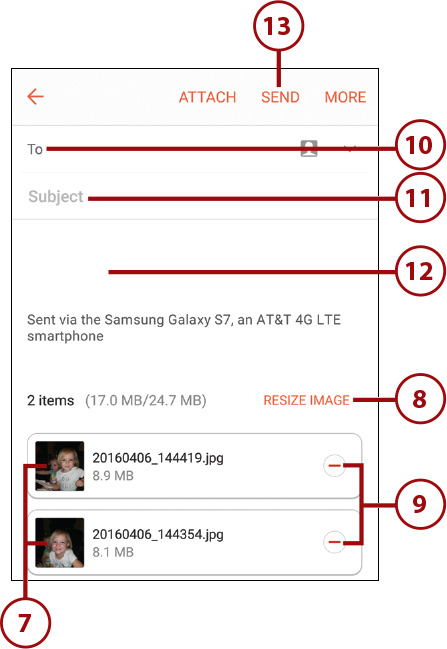
6. The Email app opens and displays the email message on the screen. Tap the Back touch button (not shown) to close the keyboard and view the photo files attached to the message.
7. A list of the attached photo files appears below the Subject field and includes a small thumbnail image of each photo as well as the filename.
8. Tap Resize Image to open the Resize Image window and resize all the images when you include them in the email message.
9. Remove the attachment from the message by tapping the red minus icon located to the right of the photo name.
10. Type the recipient’s email address into the To field. If you see the name of the recipient in the drop-down list as you type, tap the name of the recipient. After you add a recipient to the list, you can add another one by typing the recipient name; you don’t need any separator characters, such as a semicolon.
11. Tap in the Subject field and then type a subject for the email.
12. Tap in the Compose Email field to compose a message.
13. Tap Send to send the message.
Creating Screen Captures
Your Galaxy S7 has a very helpful feature that enables you to take screen captures of its interface. The ability to take screenshots can come in handy for educational purposes, especially if you want to post a few Galaxy S7 tips online.
1. Open the screen that you want to take the screenshot of and position the Galaxy S7 into the orientation in which you want to grab the screen capture: vertical or horizontal.
2. Press and hold the Power button and Home button at the same time, or use your hand to swipe across the screen. Refer to the Prologue to read about the Palm Swipe to Capture feature.
3. You hear the shutter sound effect as it takes the screen capture. The screenshot is saved to the Screenshots folder in the Gallery app, and the image is also saved to the clipboard.
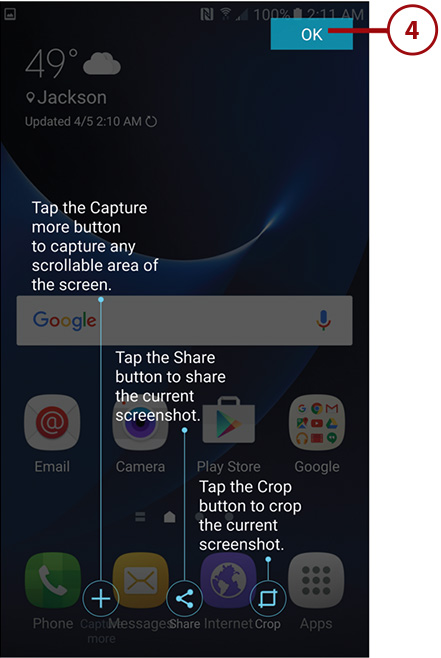
4. Three buttons appear at the bottom of the screen for about three seconds after you capture the screen, from left to right: Capture More (capture any scrollable area on the screen), Share (share the current screenshot), and Crop (crop the current screenshot). The first time you capture a screen, you see the tutorial screen; tap OK to close it. You won’t see this tutorial screen with subsequent screen captures.
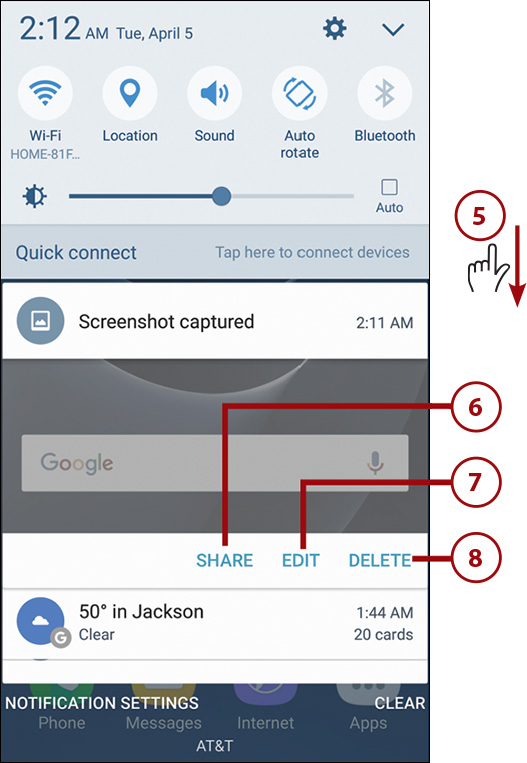
5. Swipe down in the Status bar to open the Quick Settings and Notification screen.
6. Tap Share to share the selected image(s) in an email or Gmail message, on Google Drive, to another device using Android Beam, Wi-Fi Direct, or Bluetooth connection, on Hangouts or Facebook, upload the link to the Photos app, send the image to your Amazon Kindle app, or as a link within the Maps, Memo, or Messages app. You can also use your phone carrier’s messaging, mail, and/or file storage services if applicable.
7. In the Screenshot Captured tile, tap Edit to edit the screenshot in the Gallery app.
8. Tap Delete to delete the screenshot. In the Delete window that appears, finish the deletion process by tapping Delete.