
8
Compression for Optical Discs
For some compressionists, optical media, whether via standard-definition DVD or Blu-ray Disc, will be the sole, or certainly primary, delivery medium for their compressed content. Although optical media formats are in decline and seem to be giving way to more dynamic media streaming technologies, they still play a critical role in delivering certain types of content, mainly educational pieces to schools or independent films to certain film festivals.
To understand the optical disc landscape, you have to take a quick trip back in time to the turn of the century. Affordable DVD players were released in 2000 and, after a couple of Christmas seasons, eventually dethroned the almighty VHS tape as the crowned king of home video. DVD became the best choice for delivery of standard-def content because of its ubiquitous nature. A few years later, it became clear that high-definition video also needed a consumer delivery medium. In 2002, technology companies assembled themselves into two camps backing two different disc formats: HD DVD and Blu-ray Disc.
Before commercial Blu-ray or HD DVD recorders became available, “hybrid” disc technology appeared, which allowed producers to record high-definition video footage onto regular DVD discs. You got only about 20 to 30 minutes of video per disc (double that for dual-layer DVDs), but that sufficed for many applications. Of course, you still needed either a Blu-ray or HD DVD player to play the results.
Between 2006 and 2008 there was an all-out format war. For those old enough to remember the original home video format war of the early 1980s, it was VHS vs. Betamax all over again. In February 2008, the main leader of the HD DVD group, Toshiba, announced it was abandoning the platform just after Warner Bros. announced it would be releasing its movies exclusively on Blu-ray.
So today, we have two disc formats popular enough to release content on: good ol’ standard-def DVD and the high-definition Blu-ray.
What’s a DVD?
At a high level, DVDs are incredibly simple. All DVDs have two components: content consisting of things such as video, slideshows, and audio; and the menus used by the viewers to navigate and access that content.
In the first days of DVD creation, you created/edited your content in one application and “authored” your actual DVD in another. Since then, programs have become more integrated. Still, DVD authoring is straightforward in concept: you create your menus and then link to your content.
What gets a little more complicated are the specific requirements necessary to ensure that your DVD plays on your target player. Although most authoring programs shield you from many of these technical details (because in theory all players should be standardized against one specification/standard), it helps to understand these requirements before starting production.
Producing SD DVDs
The first thing you’ll want to know when producing DVDs is what your target player is going to be. There are lots of different models of players at different price points with different features. Blu-ray players can also play SD DVDs but will usually upconvert your SD content to HD on playback (which sometimes doesn’t look all that great) on today’s HDTVs.
Because there are lots of different models of players, you have to produce your disc for the lowest common denominator. So, if you’re producing a disc to play on an end user’s $19.95 Walmart DVD player, you’ll have to use a certain kind of media and a limited set of compression technologies.
DVD Disc Types
In the early days of DVD recordable media, there was another format war between –R/RW (pronounced “dash R” or “dash RW”) and +R/RW (pronounced “plus R” or “plus RW”) and their respective recorders. The R stands for recordable and can be used only once, while the RW stands for rewritable and can be erased and rewritten.
Though both –R and +R will play on standard DVD players, DVD-R recorders required DVD-R media, and DVD+R recorders required DVD+R media. Since different vendors supported different standards (HP backed +R, while Apple went with –R), producers with different computers often needed to stock multiple standards of recordable media. Add rewritable and dual-layer media to the mix, which are also standard-specific, and your shelves could easily be filled with stacks and stacks of different discs.
Fortunately, after a few years of that nonsense, affordable “dual RW” recorders appeared that could record to media of both types. If you have a dual RW recorder, you can use both media standards; otherwise, you’ll need either +R or –R recordable media.
Note that both +R and –R are available in both single and dual layer, with the capacities shown in Table 8.1 (on the next page). If you’re producing a single-layer disc of either type, you have a capacity of 4.7 GB, which adds up to about 74 minutes of audio/video at a combined 8 Mbit/s, which is the highest recommended rate.
Table 8.1 Standard disc types and their characteristics
Standard options |
DVD±R/RW |
DVD±R/RW dual-layer |
Number of layers |
1 |
2 |
Capacity |
4.7 GB |
8.5 GB |
Video at 8 Mbit/s (in minutes) |
74 |
135 |
Dual-layer discs in both formats can hold up to 8.5 GB, sufficient for about 135 minutes of audio and video at 8 Mbit/s. Note that dual-layer discs have two layers on a single side, so you don’t have to turn the disc over to either record or play the disc. There are some dual-sided media around (mostly from Ritek) that you have to turn over to record and play, though we haven’t seen this type of disc used much.
One final caveat before moving on: not all recordable discs will play on all DVD players. See the sidebar “Compatibility Risks of Recordable Media” for more details.
SD Codecs
Now that you have the media side down, let’s address the codec side of this DVD you’re producing for your end user’s $19.95 Walmart DVD player. On a DVD, the only video codec you can use is MPEG-2, and all assets containing visual images will be compressed to MPEG-2.
For example, if you use your DVD-authoring program to create a slideshow, the authoring program will encode the slideshow into MPEG-2 video during the authoring process. If you create motion menus for your DVD, these will also be encoded into MPEG-2.
You probably won’t need to actually do anything to choose MPEG-2. As you can see in Figure 8.1, in the Project Properties dialog from Vegas DVD Architect, you really don’t have a video codec option, just an audio codec option.
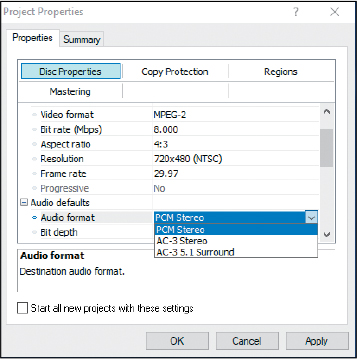
Figure 8.1 The Project Properties dialog from Vegas DVD Architect. All SD DVDs use the MPEG-2 video codec and either Dolby Digital, PCM, or MPEG (not shown) audio compression.
You have a bit more flexibility on the audio side, where you can choose Dolby Digital or PCM compression and sometimes MPEG-1 Layer II audio compression. All DVD players sold in U.S. markets must support the first two formats, while support for MPEG audio compression is optional (although most players do support it).
![]() NOTE
NOTE
There are two versions of the Dolby Digital encoder: Standard and Professional. Dolby Digital Professional offers better-quality encoding, but not all applications will offer both, so if audio quality is extremely important, you may want to investigate which version you are using.
Most prosumer and professional authoring programs offer Dolby Digital, and when it’s available, it’s the best option. You can recognize a Dolby Digital file by its .ac3 file extension. Some consumer programs offer only MPEG and PCM, and typically we’ll choose MPEG in that instance. If you choose PCM, it has a data rate of about 1.5 Mbit/s. To meet your 8 Mbit/s total target, this means you’ll have to drop your video data rate to 6.5 Mbit/s.
In contrast, both MPEG and Dolby Digital have configurable data rates that usually go as high as 400 Kbit/s or so, though most producers stick to 192 Kbit/s or less. At this rate, you have 7.8 Mbit/s to devote to video, which is about 20 percent higher than the 6.5 Mbit/s you’ll have with uncompressed audio. For this reason, it almost always makes sense to use some form of compressed audio, with Dolby being the best choice when available.
What the Heck Is a VOB?
As you may already know, if you produce an MPEG-2 file on your computer, it typically has an .mpg, .mp2, .mpv, or .m2v extension. Yet if you scan the contents of a DVD in Windows Explorer or Finder, you won’t find any files with that extension. Rather, as shown in Figure 8.2, you’ll see that all the large files have .vob extensions.
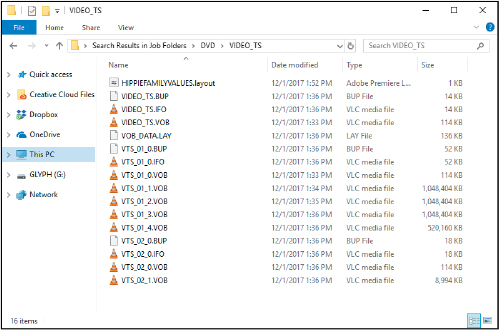
Figure 8.2 During the compiling stage, the authoring program combines menus and content into VOB files that DVD players know how to read.
Technically, a video object (VOB) file is a “container format” for the disc’s menus and content. If you copy a .vob file to your hard drive and change the extension to .mpg, your default MPEG player will probably play the video, though you’ll likely lose any interactivity.
![]() NOTE
NOTE
We mentioned transport streams as they relate to MPEG-2 in Chapter 2, but that is not the only way this codec gets bundled and used. Two more common stream formats exist known as program streams (PS) and elementary streams (ES). Program streams, also referred to as MPEG-2 PS, are the standard format for storing MPEG-2 video multiplexed (muxed) with other streams (such as audio or subtitles). Elementary streams, on the other hand, are the individual audio and video files that haven’t been muxed together. Each channel of the audio would be an individual file, so a 5.1 surround sound export would include six individual files.
More important, you should know that you can extract the original MPEG-2 files from a DVD using many consumer authoring and editing programs such as Adobe Premiere Elements or Pinnacle Studio, assuming the DVD isn’t copy-protected. This is often useful when you need to access videos that you’ve previously produced to DVD but have since deleted the source files from your production station.
In addition, if you do see a bunch of MPEG-2 files on the DVD, it probably won’t play on a desktop DVD player. Instead, you’ll need the VOB files in the proper Video_TS folder for the DVD to play. That’s why you need to go through the authoring stage to produce a DVD that will work on a TV-attached player.
What’s a Blu-ray Disc?
As Blu-ray Disc (BD) is the HD successor to DVD, what will content producers and compressionists need to know to be prepared to deliver in the Blu-ray format? The first thing you’ll need to do it is to get familiar with the basic specs, such as overall disc capacities (which directly affect bit budgeting), video resolution, and frame-rate support. Most important, you’ll need to wrap your head around codec support, which is a little more complicated with DVD because there is more than just one option. Table 8.2 provides the lowdown on Blu-ray Disc.
Table 8.2 Desktop producer’s view of Blu-ray Disc features
Features |
Blu-ray details |
Capacity: Single/double layers |
25/5/0 GB |
Video formats |
AVC/VC1/MPEG-2 |
Video resolution (maximum) |
1920 × 1080 24p or 50/60i HDTV |
Maximum video bit rate |
40 Mbit/s |
Audio formats |
Dolby Digital/DTS/PCM |
Interactivity |
Blu-ray Disc Java (BD-J) |
Recorders availability in the United States |
Since January 2007 |
We didn’t list all supported audio codecs, but Dolby Digital should clearly be the codec of choice for most desktop producers. The Blu-ray format enables interactivity beyond that offered by SD DVDs, although no prosumer program that we’re aware of supports these features. Rather, they simply extend current SD DVD features to the higher-capacity discs (and higher-quality video codecs).
Though there are levels of complexity in Blu-ray authoring, from the viewpoint of a desktop disc author, there’s very little difference between producing SD DVDs and high-definition Blu-ray Discs. That is, your menu and interactivity options are nearly identical to those offered on a DVD. Although you may want to choose a different video codec and a larger disc capacity when recording to your Blu-ray recorder, there’s no real learning curve for SD producers moving to desktop high-definition production.
With all of this in mind, let’s take a quick, high-level look at some of the issues related to producing Blu-rays; then we’ll dig in and actually produce an SD DVD and a Blu-ray Disc.
Producing Blu-ray Discs
To produce Blu-ray Discs, you have to understand the different types of Blu-ray Discs produced by the different authoring programs and how their differences might affect playback compatibility. In addition, some programs, such as Adobe Encore, can format and write full-length Blu-ray Discs to Blu-ray recorders. In contrast, some consumer authoring programs can produce Blu-ray-compatible discs on DVD media, allowing producers to produce discs with about 20 to 25 minutes of HD video without a Blu-ray recorder.
![]() NOTE
NOTE
You can find instructions for installing Adobe Encore in the sidebar “Installing Adobe Encore,” which appears in the section “Recipe for Producing Blu-ray Discs.”
Blu-ray Overview
There are three types of Blu-ray Discs. The richest set of authoring functionality is available with the HDMV (Movie Mode) specification, which includes pop-up menus, interactive graphics, and other content. To access this level of functionality, you’ll need a professional authoring program such as Scenarist BD, which is priced several times higher than prosumer programs such as Adobe Encore.
For the most part, only Hollywood producers use HDMV to author and then replicate their discs for mass-market consumption. Again, from a compatibility perspective, this type of disc is safest in terms of both media and format since replicated media is the most reliable and all consumer Blu-ray Disc players have been tested for compatibility with replicated HDMV discs.
Next is the Blu-ray Disc Movie (BDMV) specification, which offers the same level of authoring functionality as current DVDs but can include Blu-ray content and can write to Blu-ray media. This is the level of functionality provided by Adobe Encore, which essentially extends its DVD authoring capabilities to Blu-ray.
The least functional specification is Blu-ray Disc Audio/Visual (BDAV), which is offered by consumer-level programs such as CyberLink’s PowerProducer. BDAV discs don’t have menus, and viewers choose videos via a file manager available in all Blu-ray players. This can make playback comparatively primitive compared to BDMV options, at least until the video starts playing, at which point the quality of the high-definition video should be identical.
Recording Blu-ray Discs
There are essentially three ways to create a disc that will play in Blu-ray players.
Record a BDMV-formatted project to a full-capacity disc on a Blu-ray recorder. This is probably what most readers want to do, and it’s what we’ll demonstrate with Adobe Encore in this chapter.
Record a BDAV-formatted disc to a full-capacity Blu-ray Disc on a BD recorder, which is the level of Blu-ray support afforded by most consumer video-production programs, including CyberLink PowerProducer, which is shown in Figure 8.3.
Record a BDMV-formatted disc to an SD DVD. Though recorded on SD media, this disc will play back only on Blu-ray players. We’re recording to a dual-layer disc that will provide up to 63 minutes of Blu-ray video at the default 17,000 Kbit/s. This “hybrid” approach has the advantage of enabling HD production on normal DVD drives.

With this technical information as background, let’s look at the different workflows you’ll deploy to actually produce your DVDs.
That Whole Bit Budget Thing
For those of you jumping in at this section, bit budgeting refers to assigning audio and video bitrates to your source footage to make sure the compressed footage fits on your selected media. If you’re working with an integrated editing/authoring solution, you probably have to bit budget only when you’re ready to produce your disc. With most programs, you’ll have some kind of meter showing disc capacity as your guide.
On the other hand, when working with separate programs such as Adobe Premiere Pro and Adobe Encore, you’ll want to perform your bit budgeting before rendering from your editor to avoid double compression. Fortunately, bit budgeting is pretty simple. Each disc has a known capacity, and you have a certain number of minutes of content, so divide the latter into the former to figure out the data rate you need to fit the content on disc.
Complicating this equation is that capacity is measured in gigabytes, while data rate is measured in mega or kilobits; in addition, you probably care more about minutes of content on the disc, rather than seconds. To simplify things, we’ve illustrated the math in Table 8.3 and Table 8.4.
Table 8.3 Bit budgeting for DVDs at maximum capacity
Measurement |
Blu-ray |
Standard DVD |
Capacity (in bytes) |
25,000,000,000 |
4,700,000,000 |
In bits (times 8) |
200,000,000,000 |
37,600,000,000 |
Per sec max |
40,256,000 |
8,000,000 |
Seconds |
4,968 |
4,700 |
Minutes (divide by 60) |
83 (79) |
78 (74) |
Table 8.4 Bit budgeting for projects with 100 minutes
Measurement |
Blu-ray |
Standard DVD |
Capacity (in bytes) |
25,000,000,000 |
4,700,000,000 |
In bits (times 8) |
200,000,000,000 |
37,600,000,000 |
Minutes of content |
100 |
100 |
Seconds of content (times 60) |
6,000 |
6,000 |
Per second data rate |
33.33 (31.67) Mbit/s |
6.27 (5.95) Mbit/s |
Specifically, Table 8.3 answers the initial question you should always ask when producing a DVD: “Do I have to care?” That is, if you encode at the maximum data rate supported by the device, do you have sufficient disc capacity for the video in your project?
For Blu-ray devices, if you encode at the maximum bit rate, which probably isn’t necessary, you still have 83 minutes of capacity, though we always round the calculated number down by 5 percent to be safe, which brings us to the number in parentheses, 79. For DVD, where it’s recommend you stay below 8 Mbit/s combined audio and video data rate, the number is 74 minutes. If you have less content than any of these numbers, you’re safe.
If you’re exceeding that number, you must compute the bit budget for each second of compressed video, which is illustrated for a project with 100 minutes in Table 8.4. Briefly, you use the same capacity divided by the seconds of video in your production. Again, the computed rate for 100 minutes is shown first, and then 95 percent of that is in parentheses.
Remember to include the capacity needs of motion menus, slideshows, and first-play videos in your computation of total minutes of video. If you have unusually lengthy audio menus, you should subtract the total bit rate for that audio from the available capacity before dividing the balance by the number of minutes of video.
Once you have the total data rate, you’re in charge of divvying up that bit rate between audio and video. We typically use 192 Kbit/s for stereo audio and allocate the rest to video. If you’re producing in six-channel, 5.1 surround sound, you might go as high as 448 Kbit/s.
As they say in the construction business, when you calculate bit budget, “Measure twice, cut once.” Encoding video can take quite a long time. You don’t want to spend hours and hours encoding just to find out that your content won’t fit on the disc.
Note that there are several online sites with bitrate calculators, including www.videohelp.com/calc.htm, which even lets you download the calculator for desktop use when not online.
Whew! That’s enough background. Let’s produce some discs. We’ll start with creating a Blu-ray Disc with Adobe Encore and then briefly cover a way to create a simple DVD using Apple’s Compressor.
Recipe for Producing Blu-ray Discs
While Adobe Encore is officially unsupported, your Creative Cloud still gives you access to it. See “Installing Adobe Encore” for more information. With Encore you get BDMV authoring, which is basically the same feature set you get with SD DVDs, and you can burn single-layer Blu-ray Discs that can hold 25 GB of data.
Installing Adobe Encore
Adobe announced that its disc-authoring application Encore would not be updated past version CS6, effectively marking the end of its life. But the software still works, and if you have a Creative Cloud license, you can install it with a little bit of work.
Open the Creative Cloud menu and click the Apps tab.
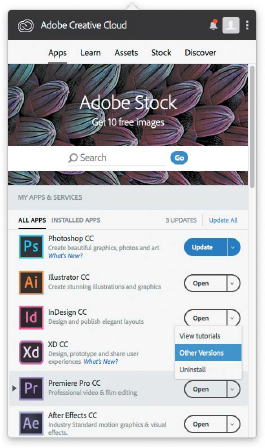
Find the listing for Premiere Pro CC and click the triangle button to the right of the Open/Update/Install button (Figure 8.4).
Choose Other Versions and click the install button next to CS6 (Figure 8.5).

Adobe Premiere CS6 will begin to install, and with it comes Adobe Media Encoder and Encore.
Encore is fairly compatible with most Blu-ray burners available. We’ve had good luck with drives from LaCie and LG but have run into problems with the Pioneer BDR-101. Preference is given to external USB drives because it simplifies working on multiple systems.
We’ve successfully used both Ridata and Verbatim media with the LaCie unit but can’t vouch for any other brands. Find one that works for you, and stick with it.
From a bit budget perspective, let’s keep it simple. Let’s say that you have 80 minutes of video, which, according to Table 8.3, you can encode at the maximum data rate of 40 Mbit/s and still fit the video on disc.
Working in Premiere Pro
You can and should insert chapter markers in Premiere Pro since this gives you frame-accurate placement and the ability to view the audio waveforms, which makes it simple to find periods of quiet and/or applause that mark many chapter points.
To set a chapter marker, follow these steps:
Move Premiere Pro’s Current Time Indicator to the target frame, right-click, and choose Set Chapter Marker (Figure 8.6).
In the dialog that appears, type the desired chapter name in the Chapter Marker Name field, and click OK (Figure 8.7). Encore can use this field to name buttons that you link to when creating your menus, so we always name our chapter markers precisely, including the capitalization we want for that button in our menu.


Producing an H.264 Blu-ray-Compatible File in the Adobe Media Encoder
To create an H.264 Blu-ray-compatible file from Premiere Pro using Adobe Media Encoder, follow these steps:
Choose File > Export > Adobe Media Encoder. In the Export Settings window (Figure 8.8), choose the following:
Format: Choose H.264 Blu-ray.
Preset: Choose a preset that matches your source footage and quality goals. In this example, we’ll use HD 1080p 23.976.
Export Video/Export Audio: Choose which content types to include in the final stream. We’ll select both.
Source Range: Choose either Entire Sequence or Work Area.
Customize your video settings for H.264 video by selecting the Video tab (Figure 8.9) and choosing the following:
Video Dimensions [pixels]: This should follow your choice of preset. If incorrect, change to match your source footage.
Frame Rate (fps): This should follow your choice of preset. If incorrect, change to match your source.
Field Order: This should be Progressive if the preset is a 1080p preset. If the chosen preset is interlaced, then it should be Upper.
Aspect Ratio/Profile/Level: If configurable (as shown), accept the default values.
TV Standard: Choose the appropriate standard. The standard for the United States is NTSC.
Bitrate Encoding: VBR, 1 Pass, and 2 Pass encoding are available. Choose the desired method.
Target and Maximum Bitrate [Mbit/s]: We could fit our 80 minutes of video at Blu-ray’s maximum bit rate of 40 Mbit/s, but this increases the risk of playback problems. Stick with the presets here unless the footage is very challenging.
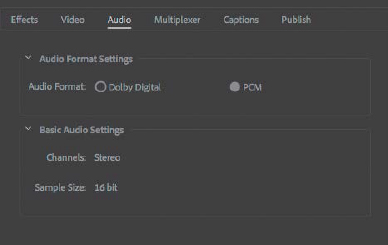
Configure your audio settings. Select the Audio tab (Figure 8.10), and choose PCM for the Audio Format. (We’ll encode to Dolby Digital in the next section in Encore.) Leave all other encoding options at their defaults.
Select your output destination and name the file. Click the green Play button in the upper-right corner to begin the encode process.


Creating a Blu-ray Disc in Encore
Now that you have your assets encoded, it’s time to start work in Encore. Here are the steps:
Launch Encore, and choose New Project in the Encore splash screen (or choose File > New Project in Encore). On the Basic tab of the New Project window (Figure 8.11), choose the following:
Authoring Mode: Choose Blu-ray.
Television Standard: This should be NTSC if your project is 29.97 or 23.976 frames per second.
Click the Default Transcode Settings button (Figure 8.12), and choose the following:
Automatic Transcoding: Choose the desired maximum.
Audio Transcoding: Choose Dolby Digital.
Then click OK to close the dialog, and start the new project.
Import the encoded content from the previous step.
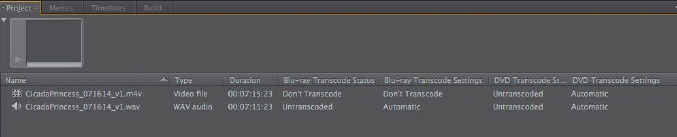
Now you have your project set up and assets imported. The main concerns at this point are to make sure you don’t re-encode the video or audio unnecessarily. You can resolve both issues on the Project tab (Figure 8.13).
For example, you can see that the H.264 file CicadaPrincess_071614_v1.m4v has Don’t Transcode in both the Blu-ray Transcode Status and Blu-ray Transcode Settings columns. This means that Encore finds the asset Blu-ray Disc compliant and won’t re-encode when recording the disc; it will simply copy the content to the disc. If you see Untranscoded for video files that you’ve attempted to encode into Blu-ray format, Encore will automatically transcode the video while building the disc, which can make the build process take much longer.
Before you panic, check to make sure you’re looking at the right column and are looking at the Blu-ray Transcode Status column, not DVD Transcode Status, which precedes Blu-ray status in the window (you can adjust which columns display by right-clicking the label area, choosing Columns, and then choosing the desired column). If you’re looking at the Blu-ray Transcode columns and the video columns say Untranscoded, you have to review your encode settings in Media Encoder.
Select both the video and audio and then click the Page icon at the bottom of the project window. Select Timeline. A new timeline with your encoded content in it will appear.
Connect any menus and configure the timeline’s end action by clicking the timeline in the Project panel and then adjusting settings in the Properties panel (Figure 8.14).
When you’re ready to produce your disc, choose File > Build > Disc.
Choose Blu-ray as the Format option and Blu-ray Disc as the Output option and then click Build (Figure 8.15). If you have problems, first try creating a Blu-ray image, save that to your hard drive, and then use it as your source for the next attempted burn. If you can create the image but can’t successfully record it to Blu-ray Disc, try a third-party recording program, or try copying the image to a different computer and recording to disc there.


Recipe for Producing SD DVDs
If you need to make a full-fledged DVD with multiple menus and custom buttons, you’ll need to find a copy of an application like Apple’s DVD Studio Pro (which Apple no longer supports) or Vegas DVD Architect or install Adobe Encore (see the previous “Installing Adobe Encore” sidebar for instructions). But if all you need is to make a simple auto-play disc as a work-in-progress screener or as a backup for a film festival, you can use Apple Compressor to encode and create the disc or disc image for you. Just follow these steps:
Import the movie to be encoded into Compressor.
In the settings panel on the left of the interface (you may have to click the Show/Hide Settings & Locations button in the top-left corner of the window), drag the Create DVD settings group onto the item in the batch window (Figure 8.16).
Select the output location of your encoded files by right-clicking the default location and choosing Location from the contextual menu.
Select the batch item and the job inspector on the right, scroll down until you find the Action section, and choose Create DVD as the post-encode action. Adjust the settings as desired (Figure 8.17).
If you want to simply build a disc image to burn later, select Hard Drive under Output Device, and then choose File under Build Type. If you want to burn a disc right away and have a DVD burner connected, you can choose that device. We usually recommend creating a disc image first and then using the Finder or a program like Roxio’s Toast to burn the final disc. This allows you to go through the creation process once and then burn as many copies as you need without rebuilding the disc each time.
Click Start Batch to begin encoding. An .m2v file and an .ac3 file will be saved to the output location, and if you selected Hard Drive in the Action settings, an .img file or DVD folder will be there as well. If you selected your DVD drive under Output Device, you’ll be prompted to insert a blank disc.


Apple’s Compressor is a good way to get a down-and-dirty DVD out the door with minimal effort and hassle. While it doesn’t give you much control over menu styles or the ability to create a disc with multiple tracks, it works for those times when you just need to get a piece of content onto a disc quickly.
While the need to create DVDs has greatly diminished in recent years, you still might need to create one every now and again. Having a DVD creation tool in your toolkit is still recommended, even if you don’t use it often.
Conclusion
Delivering video content on physical media is almost a thing of the past. There are several areas where Blu-ray and even DVD discs are still very much a required delivery format. But the software tools are becoming extinct, and it won’t be long before creating discs will be almost a completely niche process.
But then again, you may very well not care about DVD and Blu-ray distribution, and you wouldn’t be alone. Many people are skipping physical media altogether and going straight to the Web with their content. Compared to DVD encoding, creating and encoding video for the Web is a lot less standard—nearly anything is possible. While that may seem liberating, it actually makes optimizing the video more difficult because you have almost too many options.