
Chapter 3. Configure Connectivity
Computing devices do not typically work in isolation. Usually, devices are connected to networks to enable users to access services and resources. Sometimes, remote connectivity is required to enable a user’s connection to these services and resources. This chapter explores how to set up and configure networking and remote connectivity in Windows 10.
Skills covered in this chapter:
Skill 3.1: Configure networking
The ability to connect devices running Windows 10 to both wired and wireless networks is important, whether this is a home network or your organization’s network infrastructure. To configure networking settings correctly, you must understand fundamental IP settings and know how to configure name resolution. It is also important to know how to configure virtual private networks (VPNs) to enable remote connectivity to your organization’s network infrastructure. In addition, the MD-100 Windows 10 exam also covers network troubleshooting issues, and it is, therefore, important to know how to use Windows 10 networking tools to investigate and resolve network-related problems.
Configure client IP settings
Before you can configure any other network settings, such as name resolution or firewall settings, you must have a grasp of the underlying fundamentals of networking and how to configure both Internet Protocol version 4 (IPv4) and Internet Protocol version 6 (IPv6) network settings.
Overview of IPv4
IPv4 is a mature networking protocol and is widely used on almost all Internet-connected client devices. Each client on an IPv4 network is assigned a unique IPv4 configuration that identifies that client device. This configuration is based on a number of elements.
An IPv4 address IPv4 uses a 32-bit binary address, which is divided into four octets (or groups of eight digits), each of which is converted to a decimal number. Thus: 11000000101010000001000100000001 becomes 11000000.10101000.00010001.00000001 and converts to: 192.168.17.1.
A subnet mask A subnet mask is also a 32-bit binary string, entered as four decimal digits; it is used to indicate the client’s unique identity, known as the host ID, and the subnet where the client resides, known as the network ID.
A default gateway address To facilitate communications between network segments, or subnets, each client device is assigned the IPv4 address of a router in the local network that is used to forward network traffic destined for devices in other subnets.
A Domain Name System (DNS) server address DNS enables the client computer to resolve names into IPv4 or IPv6 addresses.
Need more review? IPV4 Addressing
To review further details about IPv4 addressing fundamentals, refer to the Microsoft website at https://docs.microsoft.com/en-us/previous-versions/windows/it-pro/windows-server-2008-R2-and-2008/dd379547(v=ws.10).
Subnets
A subnet is a network segment. One or more routers separate the subnet from other subnets. Each subnet on an internet has a unique ID, just as each host within a subnet has a unique ID. You must use the 32 bits of an IPv4 address to define both the host’s ID and the subnet ID in which that host resides.
Simple Networks
Remember that each 32-bit IPv4 address is divided into four octets. In simple IPv4 subnetting, whole octets are reserved for defining the subnet portion of the IPv4 address, as shown in Figure 3-1; consequently, the remaining whole octets are available for defining the host portion of the address.
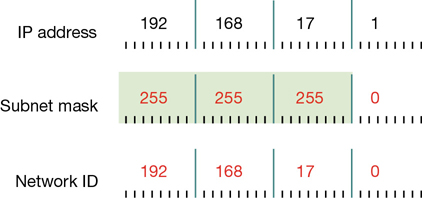
This simple subnetting is referred to as classful addressing, by which the address class, A, B, or C, defines the number of octets reserved for host and subnet IDs. Table 3-1 shows how this works.
Table 3-1 Characteristics of the default IPv4 address classes
Class |
First Octet |
Default Subnet Mask |
Number Of Networks |
Number Of Hosts Per Network |
|---|---|---|---|---|
A |
1 to 127 |
255.0.0.0 |
126 |
16,777,214 |
B |
128 to 191 |
255.255.0.0 |
16,384 |
65,534 |
C |
192 to 223 |
255.255.255.0 |
2,097,152 |
254 |
Note Other Address Classes
There are also class D and class E addresses. Class D addresses are used for multicasting when a client device is part of a group. Class E addresses are reserved and are not used for hosts or subnets.
Complex Networks
For some situations, using a classful addressing scheme can be ideal. But for many situations, it might be important to have more flexibility over the number of bits allocated to the subnet address portion of an IPv4 address. For example, instead of using 8, 16, or 24 bits for the subnet, you can use 12 or 18.
Bear in mind that the more bits you allocate to subnetting, the fewer bits remain for the host portion of the IPv4 address. That is, you can have more subnets, each containing fewer hosts, or you can have few subnets, each containing many hosts. Figure 3-2 shows how changing the subnet mask changes the subnet ID without changing the octets that define the whole IPv4 address. This scheme is often referred to as classless addressing, or Classless Interdomain Routing (CIDR).
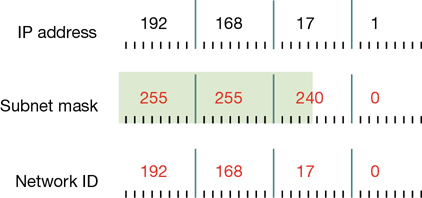
In Figure 3-2, notice how changing the subnet mask from 255.255.255.0 to 255.255.240.0 shifts the device from subnet 192.168.17.0 to 192.168.16.0. In this case, by shifting the mask to the left, we have allocated more bits to describe hosts in each subnet, with correspondingly fewer subnets. You can see that to express a host’s IPv4 configuration properly, not only must you state the IPv4 address, but you must also state the subnet mask. For example, in Figure 3-2, this host has an IPv4 configuration of 192.168.17.1/255.255.240.0.
![]() Exam Tip
Exam Tip
You will often see devices with IPv4 configurations shown as 192.168.17.1/20. The number after the slash denotes the number of sequential binary 1s in the subnet mask (20 in this instance). If the mask were 255.255.248.0, that would be represented as /21.
Need More Review? IPV4 Routing
To review further details about IPv4 subnetting and routing, refer to the Microsoft website at https://docs.microsoft.com/en-us/previous-versions/windows/it-pro/windows-server-2008-R2-and-2008/dd379495(v=ws.10).
Public and private addressing
Devices that connect directly to the Internet require a unique public IPv4 configuration. However, because of the limitation of the 32-bit addressing scheme of IPv4, there is a limit to the number of hosts that can be connected to the Internet using a public configuration. To alleviate this potential but significant problem, many organizations use private IPv4 configurations for their network clients, only using public IPv4 configurations for Internet-facing devices, such as routers.
The Internet Assigned Numbers Authority (IANA) has defined the address ranges shown in Table 3-2 as being available for private use. A technology, such as network address translation (NAT), is used to enable devices using private IPv4 configurations to communicate with the Internet.
Table 3-2 Private IPv4 address ranges
Class |
Mask |
Range |
|---|---|---|
A |
10.0.0.0/8 |
10.0.0.0–10.255.255.255 |
B |
172.16.0.0/12 |
172.16.0.0–172.31.255.255 |
C |
192.168.0.0/16 |
192.168.0.0–192.168.255.255 |
Configuring an IPv4 connection
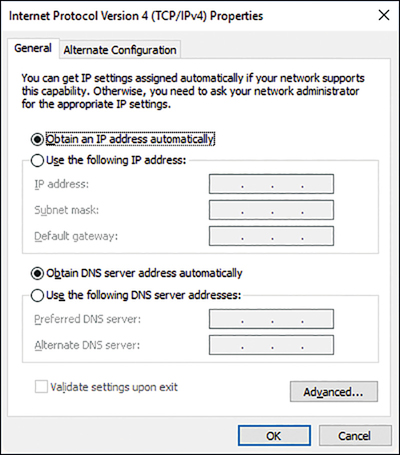
Devices running Windows 10 are configured to obtain an IPv4 configuration automatically by default, as shown in Figure 3-3.
Typically, Windows 10-based devices obtain their IPv4 configurations from a Dynamic Host Configuration Protocol (DHCP) service, perhaps running on a Windows Server 2019 server computer or provided as a service on a device such as a router or wireless access point (wireless AP).
![]() Exam Tip
Exam Tip
If a Windows 10-based device fails to obtain an IPv4 configuration from a DHCP server, it reverts to using an Automatic Private IP Address (APIPA). If your computer has an IPv4 address that starts with 169.254. X.Y, it is using an APIPA address. APIPA enables only local, subnet-based communications at best. You can override this behavior by opening the Alternative Configuration tab, shown in Figure 3-3, choosing User Configured, and specifying the IPv4 configuration to use when DHCP is unavailable.
To view or configure the IPv4 settings on your computer, perform the following procedure.
Right-click the network icon in the system tray and then click Open Network Internet Settings.
Click Change Adapter Options.
Right-click the appropriate network adapter and then click Properties.
Double-click Internet Protocol Version 4 (TCP/IPv4).
You can then configure the IPv4 settings. Click Use The Following IP Address and then specify the following: IP Address, Subnet Mask, Default Gateway, Preferred DNS Server, and Alternative DNS Server (Optional).
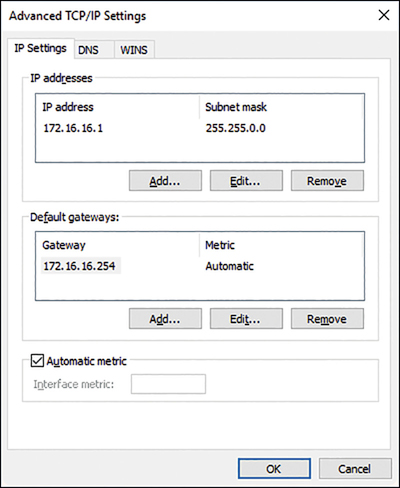
You can also configure a number of options from the Advanced TCP/IP Settings dialog box. From the Internet Protocol Version 4 (TCP/IPv4) Properties dialog box, click Advanced to open the dialog box, shown in Figure 3-4.
Configure the options on the following tabs.
IP Settings Enables you to configure additional IPv4 addresses and default gateways manually for this network interface.
DNS You can define additional DNS server addresses for name resolution and additional DNS suffix processing options.
WINS The Windows Internet Name Service (WINS) is an older name resolution service used by earlier versions of Windows and Windows Server. Generally, you do not need to configure anything here.
Configuring IPV4 From The Command Line And By Using Windows Powershell
In addition to configuring IPv4 settings from the user interface, you can also use the Netsh.exe command-line tool and Windows PowerShell cmdlets. You can use the Netsh.exe command-line tool to reconfigure many network-related settings. For example, the following command reconfigures the IPv4 settings.
Netsh interface ipv4 set address name="Ethernet" source=static addr=192.168.17.1
mask=255.255.240.0 gateway=192.168.31.254
There are numerous Windows PowerShell cmdlets that you can use to view and configure network settings, some of which are shown in Table 3-3.
Table 3-3 Windows PowerShell IPv4 networking-related cmdlets.
Cmdlet |
Purpose |
|---|---|
Get-NetIPAddress |
Displays information about the IP address configuration |
Get-NetIPv4Protocol |
Displays information about the IPv4 protocol configuration |
Set-NetIPAddress |
Changes the IP address configuration |
Set-NetIPv4Protocol |
Changes the IPv4 protocol configuration |
For example, to change the IPv4 configuration for a network connection with Windows PowerShell, use the following cmdlet.
Set-NetIPAddress -InterfaceAlias Ethernet -IPAddress 192.168.17.1
Overview of IPv6
It is still the case that almost all computers and other devices connect to the Internet by using an IPv4 configuration. However, some network services and devices do require an IPv6 configuration, so it is important to understand the IPv6 fundamentals, including how to configure IPv6. There are a number of reasons to consider IPv6. These include:
Some services require IPv6 Services, such as DirectAccess, use IPv6 to facilitate remote connections.
Larger address space IPv6 uses a 128-bit address space, providing a vast increase in the availability of addresses for devices on the Internet.
Hierarchical addressing IPv6 uses a structured address space, which is more efficient for routers, helping to optimize network communications.
Support for stateless and stateful autoconfiguration You can configure your IPv6 devices to use DHCPv6 to obtain a stateful configuration, or you can rely on router discovery to use a stateless configuration, simplifying the process of enabling IPv6 on your network devices.
IPv6 addressing
As mentioned, IPv6 uses a 128-bit addressing scheme. This is usually written in hexadecimal.
The following is an example of an IPv6 address.
2001:CD8:1F2D::2BB:FF:EF82:1C3B
IPv6 uses the following three address types.
Unicast addresses Packets are delivered to a single interface.
Multicast addresses Packets are delivered to multiple interfaces.
Anycast addresses Packets are delivered to multiple interfaces that are the closest in routing distance.
Unlike IPv4, IPv6 does not use broadcast messages. Instead, unicast and anycast addresses in IPv6 can have the following scopes.
Link-local IPv6 hosts on the same subnet
Site-local IPv6 hosts in the same organization, also known as private site addressing
Global IPv6 Internet addresses
![]() Exam Tip
Exam Tip
Unicast site-local addresses are similar to IPv4 private addresses and have the FEC0::/64 prefix. Unicast link-local addresses are similar to IPv4 APIPA addresses and have the FE80::/64 prefix.
Configuring an IPv6 connection
Configuring IPv6 is almost identical to the process of configuring IPv4. By default, Windows 10 uses automatic IPv6 configuration. If a DHCPv6 server is available, it obtains its configuration from that service; otherwise, it will use stateless autoconfiguration. As with IPv4, you can use either the Windows user interface to configure IPv6, as shown in Figure 3-5, or you can use Netsh.exe or Windows PowerShell.
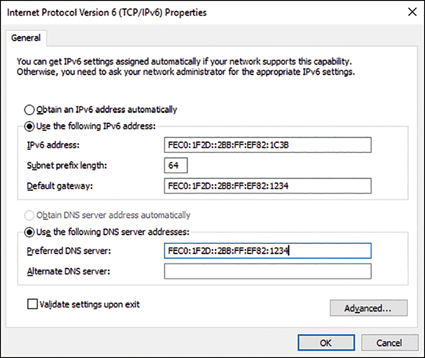
To view or configure the IPv6 settings on your computer, perform the following procedure.
Right-click the network icon in the system tray and then click Open Network Internet Settings.
Click Change Adapter Options.
Right-click the appropriate network adapter and then click Properties.
Double-click Internet Protocol Version 6 (TCP/IPv6).
There are numerous Windows PowerShell cmdlets that you can use to view and configure IPv6 network settings, some of which are shown in Table 3-4.
Table 3-4 Windows PowerShell IPv6 networking-related cmdlets
Cmdlet |
Purpose |
|---|---|
Get-NetIPAddress |
Displays information about the IP address configuration |
Get-NetIPv6Protocol |
Displays information about the IPv6 protocol configuration |
Set-NetIPAddress |
Changes the IP address configuration |
Set-NetIPv6Protocol |
Changes the IPv6 protocol configuration |
For example, to change the IPv6 configuration for a network connection with Windows PowerShell, use the following cmdlet.
Set-NetIPAddress -IPAddress 2001:CD8:1F2D::2BB:FF:EF82:1C3B -PrefixLength 64
Configure name resolution
Devices running Windows 10 communicate over networks by using names rather than IPv4 or IPv6 network addresses. A service on the Windows 10–based device, known as a client resolver, resolves names into IPv4 or IPv6 addresses. To configure Windows 10 networking, you must know how to configure name resolution.
Although IP addressing is not especially complex, it is generally easier for users to work with host names rather than with the IPv4 or IPv6 addresses of hosts, such as websites, to which they want to connect. When an application, such as Microsoft Edge, references a website name, the name is converted to the underlying IP address by using a process known as name resolution. Windows 10–based devices can use two types of names. These are:
Host names A host name, up to 255 characters in length, contains only alphanumeric characters, periods, and hyphens. A host name is an alias combined with a fully qualified domain name (FQDN). For example, the alias computer1 is prefixed to the domain name contoso.com to create the host name, or FQDN, of computer1.contoso.com.
NetBIOS names Less relevant today, NetBIOS names use a nonhierarchical structure based on a 16-character name. The sixteenth character identifies a particular service running on the computer named by the preceding 15 characters. Thus, LON-SVR1[20h] is the NetBIOS server service on the computer called LON-SVR1.
The way a client computer resolves names varies based on its configuration but is typically resolved as shown in Figure 3-6.
![A diagram represents the three typical stages of name resolution for a Windows 10[nd]based client computer. A computer running Windows 10 occupies the center of the image, with an arrow curved around to show the flow of the process. The arrow passes stage 1: the query of the local host name; stage 2: the check against resolver cache; and stage 3: the query of a DNS server. A piece of paper is shown adjacent to stage 2 to represent the copying of the Hosts file contents to the resolver cache.](http://images-20200215.ebookreading.net/5/3/3/9780135560624/9780135560624__exam-ref-md-100__9780135560624__graphics__03fig06.jpg)
The following process identifies the typical stages of name resolution for Windows 10–based devices.
Determine whether the queried host name is the same as the local host name.
Search the local DNS resolver cache for the queried host name. The cache is updated when records are successfully resolved. In addition, the contents of the local Hosts file are added to the resolver cache.
Petition a DNS server for the required host name.
![]() Exam Tip
Exam Tip
Windows 10 devices also use Link-Local Multicast Name Resolution for networks that do not provide DNS. You can find out more on the Microsoft Press Store website at https://www.microsoftpressstore.com/articles/article.aspx?p=2217263&seqNum=8.
Need More Review? IPV4 Name Resolution
To review further details about IPv4 name resolution, refer to the Microsoft website at https://docs.microsoft.com/en-us/previous-versions/windows/it-pro/windows-server-2008-R2-and-2008/dd379505(v=ws.10).
Configure DNS Settings
To configure DNS settings for either IPv4 or IPv6, perform the following procedure.
Right-click the network icon in the system tray and then click Open Network Internet Settings.
Click Change Adapter Options.
Right-click the appropriate network adapter and then click Properties.
Double-click either Internet Protocol Version 4 (TCP/IPv4) or Internet Protocol Version 6 (TCP/IPv6).
Click Use The Following DNS Server Addresses and then enter a valid IPv4 or IPv6 address for a DNS server that is accessible to the client.
You can also configure DNS settings by using Netsh.exe, as follows.
netsh interface ip set dns name="Ethernet" static 192.168.16.1
Alternatively, you can use Windows PowerShell to configure the DNS client settings.
Set-DNSClientServerAddress -interfaceIndex 12 -ServerAddresses ('192.168.16.1')
Configure Advanced DNS Settings
In addition to configuring the basic DNS client settings, you can configure advanced DNS settings, as shown in Figure 3-7. To configure these settings, from either the Internet Protocol Version 4 (TCP/IPv4) Properties dialog box or from the Internet Protocol Version 6 (TCP/IPv6) Properties dialog box, click Advanced and then click the DNS tab.
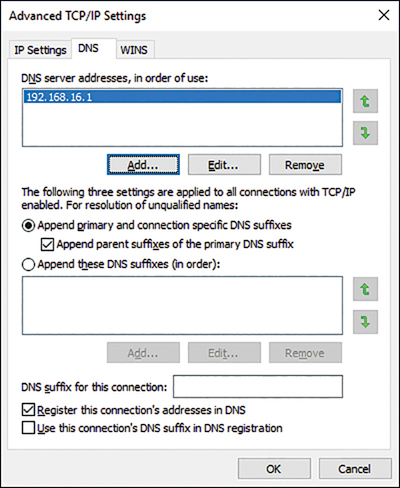
The advanced DNS settings are:
Append Primary And Connection Specific DNS Suffixes This option controls how the DNS resolver on the local client appends the DNS suffixes during queries. For example, if you query www and your computer’s primary suffix is contoso.com, the microsoft.com suffix is appended to your query to make www.contoso.com.
Append Parent Suffixes Of The Primary DNS Suffix In this example, the parent suffix of contoso.com is com. This option determines whether, after attempting www.contoso.com, the DNS resolver tries www.com.
Append These DNS Suffixes (In Order) This option enables you to define suffixes and order them for queries.
DNS suffix For This Connection You can define a DNS suffix for each network interface card installed in your device.
Register This Connection{{#}}8217;s Address In DNS Windows-based devices can register their IPv4 addresses with DNS servers that support dynamic updates of host records, such as the DNS server role service in Windows Server 2016.
Use This Connection{{#}}8217;s DNS Suffix In DNS Registration This option determines whether the IP addresses and the connection-specific domain name of this connection are registered with DNS.
Configure mobile networking
Setup Windows 10 for a cellular data plan
Some devices with Windows 10 installed can support connectivity by using cellular networks. This is useful for users who cannot always connect to Wi-Fi networks, but still need access to corporate services and resources.
To enable and configure cellular remote access in Windows 10 you must obtain a cellular data plan from a telecom provider. Microsoft can provide this service.
Need More Review? Get Online With Paid Cellular Data
To find out more about getting online with Microsoft cellular data packages, refer to the Microsoft website at https://support.microsoft.com/en-us/help/4027933/windows-10-get-online-with-paid-cellular-data.
Typically, your telecom provider must provide you with a suitable SIM card for your Windows 10 device. The SIM size might vary depending on the vendor of the device you intend to use. For example, if you or your users are intending to connect using a Microsoft Surface Pro device, you must obtain a Nano SIM from your telecom provider. Note that you can use the SIM card from your cellphone for this, but it must be the right size. Some hardware vendors, including Microsoft, support a built-in SIM, or Embedded SIM (eSIM). This enables you to use cellular data without obtaining a separate, physical SIM from a telecom provider. You can also combine the use of an external SIM and an eSIM, effectively creating a device that has two data plans; perhaps one for business and one for personal use—much like some users use their cellphones with dual-SIM.
After you have installed the SIM into your Windows device, you must configure Windows 10 to connect using cellular data. If you use a Microsoft data plan, you can configure network access simply by running the Mobile Plans app. This app is built-in to Windows 10. The app detects your eSIM (or SIM) and then guides you through the setup process. To set up cellular network access, use the following procedure:
Connect to the Internet using a wired or wireless connection.
Select the Network symbol on the taskbar, look for Get Connected beneath the name of your mobile operator, and then click Connect With A Data Plan. This will open the Mobile Plans app.
In Mobile Plans, do one of the following, depending on what your computer displays on the screen:
On the Connect Your Device page, enter your cellphone number, and then click Find My Mobile Operator. This enables you to determine if your telecom provider offers any plans.
If they do, click Continue. A webpage opens on your telecom provider’s website. Sign in (using your existing mobile account details) or create a new account if needed, and then follow the steps to add your device to your account.
If your provider doesn’t offer plans, click Choose From A List Of Mobile Operators. Choose a new provider, and then click Continue to go to the telecom provider’s website to set up a new account and plan.
On the Select A Mobile Operator To Get Online Now page, select a telecom provider, click Continue to go to their site, sign in, and then choose a plan.
When you want to use your mobile data connection, use the following procedure to connect:
Click the Network icon in the system tray.
In the list of available networks, choose the mobile network.
If you experience any problems with your cellular connections, use the following procedure to troubleshoot your connection:
Open the Settings app.
Click Network & Internet.
Assuming you have an eSIM or compatible SIM, you should see a Mobile tab on the left. Select the Mobile tab.
If you have multiple SIMs, then select whichever SIM you want to use for a given data plan, and click Use This SIM For Mobile Data.
Open the Mobile Plans app and choose a mobile operator from those listed.
Follow the instructions above to set up a plan with your telecom provider.
Setup Windows 10 as a mobile hotspot
Windows 10 devices are becoming lighter and more mobile. Often, users have multiple connected devices, including laptops, tablets, and cellular phones. Virtually ubiquitous Internet connectivity enables users to adopt an “always on” lifestyle. When users face situations where traditional connections, such as corporate Wi-Fi or Ethernet, are not available, they will look for other forms of connectivity, such as Wi-Fi hotspots; they also might use their mobile devices to connect to the Internet.
Broadband tethering, referred to as a Windows 10 Mobile hotspot, enables users to share their own Internet connections with others by enabling the device to function as a wireless “hotspot.” Similarly, users can connect to other users’ shared personal “hotspots,” provided they have the necessary credentials.
To connect to a shared mobile hotspot connection, follow these steps:
In Settings, click Network & Internet.
As shown in Figure 3-8, click the Mobile Hotspot tab.
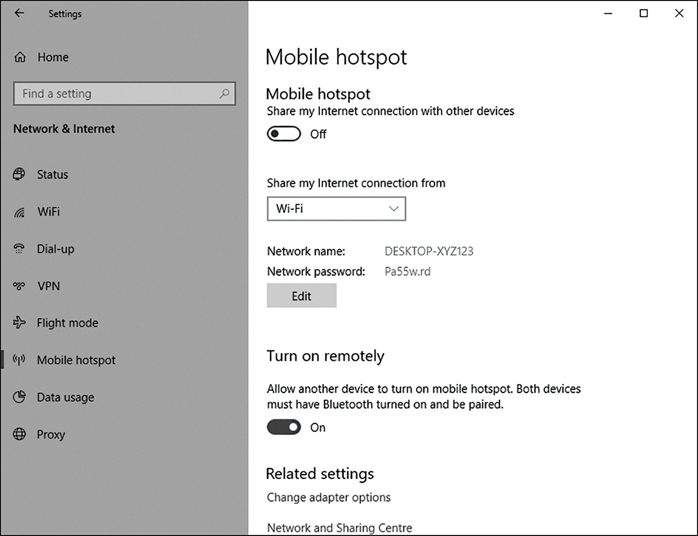
Figure 3-8 Enabling a mobile hotspot In the Share My Internet Connection From list, choose the appropriate network connection.
Click Edit and enter a Network name and Network password. These are used by other users who connect to your device.
Finally, enable the Share My Internet Connection With Other Devices option.
Configure VPN client
In Windows 10, creating a VPN enables data to be transferred through a virtual private network via a secured connection (tunnel) over a public network, such as the Internet, as shown in Figure 3-9.
Except in a few specialized scenarios, nearly all dial-up remote connections have been replaced by broadband-enabled VPN communications. Windows 10 still supports Point-to-Point Protocol (PPP), which can be used with a dial-up connection. This is an old protocol, but because it creates a direct connection and maintains a dedicated link between the two points, it is used as the starting point for most dial-up and PPP connections.
For the exam, you will be required to understand the different types of VPN protocol that Windows 10 supports and when each protocol should be used.
VPN protocols
Windows 10 supports four commonly used VPN protocols. Each protocol offers different characteristics and age. Typically, the newest protocol will be the most secure.
Point-to-Point Tunneling Protocol (PPTP) The oldest and what is considered one of the least secure of all supported VPN protocols. However, it can be used successfully in low-security scenarios because it is very easy to set up and still offers more protection than using PPP over the Internet. PPTP creates the tunnel and then can use several authentication methods, including the Microsoft Challenge Handshake Authentication Protocol versions 1 and 2 (MS-CHAP v1 and MS-CHAP v2), Extensible Authentication Protocol (EAP), and Protected Extensible Authentication Protocol (PEAP). If EAP is used, certificates can be used with PPTP; otherwise, they are not necessary
Layer 2 Tunneling Protocol (L2TP) This protocol uses the IP security extensions (IPsec) for encryption and encapsulation. L2TP encapsulates the messages with IPsec, and then encrypts the contents using the Data Encryption Standard (DES) or Triple DES (3DES) algorithm. The encryption keys are provided by IPsec using Internet Key Exchange (IKE). L2TP/IPsec can use pre-shared keys or certificates for authentication. Using a pre-shared key is useful during testing and evaluation, but should be replaced with a certificate in a production environment.
Secure Socket Tunneling Protocol (SSTP) This is a recent protocol introduced with Windows Server 2008 and supported on Vista SP1 or later. It encapsulates PPP traffic using the Secure Sockets Layer (SSL) protocol, which is widely supported on the Internet and passes through TCP port 443, which is the same as SSL. Using the Extensible Authentication Protocol-Transport Layer Security (EAP-TLS) authentication protocol together with certificates makes SSTP a very versatile and widely used protocol.
Internet Key Exchange, Version 2 (IKEv2) IKEv2 is most useful for mobile users and is the default protocol for Windows 10 and Windows 8.1 when trying to connect to remote access servers. This protocol is partially supported on Windows 7 and later versions of Windows and provides support for IPv6 traffic and the IKEv2 Mobility and Multi-homing (MOBIKE) protocol through the Windows VPN Reconnect feature, which allows automatic reconnection if a VPN connection is lost. Authentication is offered using EAP, PEAP, EAP-MSCHAPv2, and smart cards. IKEv2 will not support older authentication methods, such as Password Authentication Protocol (PAP) and Challenge- Handshake Authentication Protocol (CHAP), which offer low protection.
Authenticating remote users
Windows users authenticate using Kerberos when accessing the local network, but for remote authentication, this is not suitable; a separate protocol, which protects against network intrusion, must be used. During the initial negotiation sequence (using PPP) when a client connects to the remote computer, each party must agree on a shared authentication protocol to use. By default, Windows 10 will use the strongest protocol that both parties have in common.
In the Add A VPN Connection Wizard, Windows 10 offers three sign-in options when configuring a VPN, such as:
User name and password
Smart card
One-time password
In addition to these options, you can also configure Windows 10 to use the common authentication protocols:
EAP-MS-CHAPv2 This is a protocol that uses Extensible Authentication Protocol (EAP), which offers the default and most flexible authentication option for Windows 10 clients. It offers the strongest password-based mechanism for the client side, with certificates being used on the server side. Authentication can be negotiated based on certificates or smart cards, and EAP-MS-CHAPv2 is likely to be further extended and developed as technology advances. Windows 10 will aim to use this method for authentication connections where possible. IKEv2 connections must use EAP-MS-CHAPv2 or a certificate.
PAP This is the least secure protocol as it uses plaintext passwords. It is not considered secure and should only be used whenever other authentication methods cannot be negotiated.
CHAP Used for down-level client compatibility and has been surpassed by MS-CHAP v2. This protocol uses a pre-shared key between the client and server to enable encryption to take place.
MS-CHAP v2 Stronger than the CHAP protocol, with significantly improved security when partnered with EAP to enable encryption of the password.
Creating a VPN connection in Network And Sharing Center
To create a VPN in Windows 10, from the Network And Sharing Center, under Change Your Network Settings, click Set Up A New Connection Or Network and then click Connect To A Workplace.
To configure your VPN connection, in the Connect To A Workplace Wizard, provide the following information.
How Do You Want To Connect? You can connect by using an existing Internet connection or by dialing directly to your workplace.
Internet Address This is the name or IP address of the computer that you connect to at your workplace, as shown in Figure 3-10. Typically, this is an FQDN, such as remote .adatum.com.
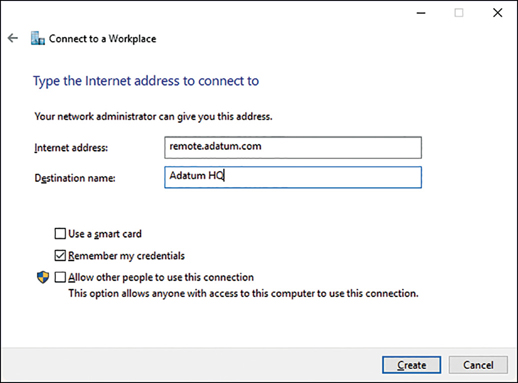
Figure 3-10 The Connect To A Workplace Wizard Destination Name This is the name of this VPN connection.
After you have created the VPN connection, from the Network And Sharing Center, click Change Adapter Settings, right-click your VPN connection, and click Properties. As shown in Figure 3-11, you can then configure additional options as required by your organization’s network infrastructure.
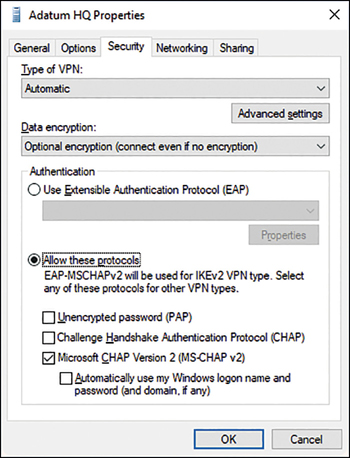
These settings must match the remote access device that your device connects to, and includes the following options
Type Of VPN Point-to-Point Tunneling Protocol (PPTP), Layer Two Tunneling Protocol with IPsec (L2TP/IPsec), Secure Socket Tunneling Protocol (SSTP), or Internet Key Exchange version 2 (IKEv2).
Data Encryption None, Optional, Required, or Maximum Strength
Under Authentication, you choose either Use Extensible Authentication Protocol (EAP) or Allow These Protocols. If you choose to use EAP, you then configure one of the following.
Microsoft: EAP-AKA (Encryption Enabled)
Microsoft: EAP-SIM (Encryption Enabled)
Microsoft: EAP-TTLS (Encryption Enabled)
Microsoft: Protected EAP (PEAP) (Encryption Enabled)
Microsoft: Secured Password (EAP-MSCHAP v2) (Encryption Enabled)
Microsoft: Smart Card Or Other Certificate (Encryption Enabled)
If you choose Allow These Protocols, you then configure the following options.
Unencrypted Password (PAP)
Challenge Handshake Authentication Protocol (CHAP)
Microsoft CHAP Version 2 (MS-CHAP v2)
Automatically Use My Windows Log-on Name And Password (And Domain, If Any)
![]() Exam Tip
Exam Tip
You can use the Connection Manager Administration Kit (CMAK) to create and deploy VPN profiles for remote access. This kit can be installed as a Windows 10 feature from Control Panel. Find out more from the Microsoft website at https://docs.microsoft.com/en-us/previous-versions/windows/it-pro/windows-server-2008-R2-and-2008/cc726035(v=ws.11).
Using the Settings app to create and configure a VPN
You can also use the Settings app to create and configure VPN connections. Use the following procedure:
Click Start and then click Settings.
In Settings, click Network & Internet.
Select the VPN tab, and then, in the details pane, click Add A VPN Connection.
On the Add A VPN Connection page, enter the following information:
VPN Provider: Windows (Built-In)
Connection Name
Server Name Or Address
VPN Type: Automatic (Default). You can also choose PPTP, L2TP/IPsec With Certificate, L2TP/IPsec With Pre-Shared Key, SSTP, or IKEv2.
Type Of Sign-In Info: User Name And Password, Smart Card, One-Time Password, or Certificate.
User Name And Password, although these options are only configurable if you selected User Name Or Password as the Type Of Sign-In Info.
Click Save.
After you have created the VPN, you can manage it from Network Connections in Control Panel. Alternatively, on the VPN page in the Network & Internet node in Settings, you can click the VPN and then choose Advanced Options. From there, you can reconfigure the VPN’s settings.
VPN profiles
Although manually configuring VPN connections is relatively simple, completing the process on many computers, with the same or similar settings, is very time-consuming. In these circumstances, it makes sense to create a VPN profile and then distribute the profile to your users’ computers.
When you use VPN profiles in Windows 10, you can take advantage of a number of advanced features. These are:
Always On This feature enables Windows to automatically connect to a VPN. The Always On feature can be triggered by sign-in when the desktop is unlocked, and on network changes. When the Always On profile is configured, VPN remains always connected unless the user disconnects manually or logs off the device. The profile is optimized for power and performance, and the profiles can be pushed and managed on devices using mobile device management (MDM) tools.
App-Triggered VPN You can configure the VPN profile to respond to a specific set of apps; if a defined app loads, then the VPN initiates.
Traffic Filters To protect the server from a remote attack, an administrator can configure policies on a Windows 10 device to inspect and, if necessary, filter VPN traffic before it is enabled to travel over the VPN. There are two types of Traffic Filter rules available:
App-based rules An app-based rule will only enable VPN traffic originating from applications that have been marked as being allowed to traverse the VPN interface.
Traffic-based rules Enterprise-level traffic-based rules enable fine-tuning of what type of traffic is allowed. By using the industry-standard rules covered by five tuple policies (protocol, source/destination IP address, source/destination port), administrators can be very specific on the type of network traffic that is allowed to travel over the VPN interface.
An administrator can combine both app-based rules and traffic-based rules.
LockDown VPN The LockDown VPN profile is used to enforce the use of the VPN interface. In this scenario, the device is secured to only allow network traffic over the VPN, which is automatically always on and can never be disconnected. If the VPN is unable to connect, then there will be no network traffic allowed. The LockDown profile overrides all other VPN profiles and must be deleted before other profiles can be added, removed, or connected.
![]() Exam Tip
Exam Tip
You can find out more about VPN profile options in Windows 10 from the Microsoft website at https://docs.microsoft.com/en-gb/windows/security/identity-protection/vpn/vpn-profile-options.
You can create and distribute Windows 10 VPN profiles with these advanced settings by using Microsoft Intune and/or Configuration Manager.
Need More Review? VPN Connections In Microsoft Intune
To review further details about VPN connections in Microsoft Intune, refer to the Microsoft website at https://docs.microsoft.com/intune/vpn-settings-configure.
Need More Review?How To Create Vpn Profiles In Configuration Manager
To review further details about creating VPN Profiles in Configuration Manager, refer to the Microsoft website at https://docs.microsoft.com/en-us/sccm/mdm/deploy-use/create-vpn-profiles.
Troubleshoot networking
Windows 10 is a reliable and robust operating system, and the networking technologies built into it are tried and tested. However, networking is an inherently complex area, and problems might occur on your network. When you are facing a networking problem, use an appropriate procedure for troubleshooting the issue. This procedure might include the following steps.
Determine the scope of the problem. Knowing how many users are affected can help you determine possible causes.
Determine the IP configuration. Verify that the network configuration of affected devices is correct.
Determine the network’s hardware configuration. Determine whether there are problems with the networking hardware or device drivers for that hardware.
Test communications. Perform a series of tests that help you pinpoint the nature of the problem. Tests might include
Verifying basic communications
Checking the routing and firewall configuration of your network
Testing name resolution
Testing connectivity to specific applications on servers
It is important that you know how to troubleshoot network-related problems that occur on your network to minimize disruption to your users.
Network troubleshooting tools
Windows 10 provides a number of tools that you can use to diagnose and resolve many network-related issues. These tools are identified in Table 3-5.
Table 3-5 Windows 10 network troubleshooting tools
Tool |
Purpose |
|---|---|
Event Viewer |
Windows collects information about system activity into event logs. For example, the System log stores information about IP conflicts and network-related service failures. |
Windows Network Diagnostics |
You can use Diagnose Connection Problems to help you diagnose and repair a network issue. Windows Network Diagnostics presents possible descriptions of the issue and suggests a potential solution. You can access this tool by clicking Troubleshoot Problems In Network And Sharing Center. |
IPConfig |
Use this command-line tool to display the current TCP/IP configuration of your Windows 10–based device. You can use the command with the following switches. ipconfig /all View detailed configuration information. ipconfig /release Release the leased configuration back to the DHCP server. ipconfig /renew Renew the leased configuration. ipconfig /displaydns View the DNS resolver cache entries. ipconfig /flushdns Purge the DNS resolver cache. ipconfig /registerdns Register or update the client’s host name with the DNS server. |
Ping |
This command-line tool can be used to verify connectivity to a target computer system by sending a series of network packets to that target system. Consider that many firewalls block the ICMP packets Ping uses, so you might receive false negatives. Type ping www.contoso.com. |
Tracert |
Use this tool to determine the path that packets take to a designated target computer system, which helps you diagnose routing-related problems. |
NSLookup |
Use this tool to troubleshoot name resolution. |
Pathping |
This traces a network route similar to how the Tracert tool works but provides more statistics on the hops through the network. |
Windows PowerShell |
In addition to the configuration cmdlets referred to earlier, there are also a number of Windows PowerShell cmdlets you can use to troubleshoot and test network connectivity. For example, the test-connection cmdlet behaves in a way similar to Ping.exe. Type test-connection www.contoso.com. |
Network Troubleshooter |
You can use the Network Troubleshooter tool from within Network & Internet in the Settings app. On the Status tab, click Network Troubleshooter. A wizard starts that scans the network configuration for problems, and where possible, makes suggestions about fixes. This is very similar to the Windows Network Diagnostics tool mentioned earlier. |
Network Reset |
You can use the network reset tool from within Network & Internet in the Settings app. On the Status tab, click Network Reset. Note that you should use Network Reset as a last resort. This is because it removes and then reinstalls your network adapters and related settings. This can help restore your Internet connection, but it might result in additional configuration work after the reset has been performed. |
Troubleshoot name resolution
Many network failures can be caused by a failure in name resolution, such as when the wrong server IP address is returned or a service has not registered itself with a DNS server correctly (or at all). When troubleshooting name resolution issues, use a suitable procedure, which might consist of the following steps.
Clear the DNS resolver cache. Use the Ipconfig /flushdns command from an elevated command prompt. This ensures that all subsequent name resolution attempts are performed rather than being satisfied from DNS resolver cache. You can also use the Clear-DnsClientCache Windows PowerShell cmdlet to achieve the same thing.
Attempt to verify basic connectivity by using an IP address. Use the Ping command, or the test-connection Windows PowerShell cmdlet, to verify communications to an IP address; for example, type test-connection 172.16.16.1.
Attempt to verify connectivity to a host name. Using the same tools, check whether you can communicate with a host by using its name, for example, test-connection LON-DC1. If this is successful, it is likely that your problem is not related to name resolution.
If the test is not successful, edit the Hosts file. Add the correct IP address and name to your hosts file. For example, add the line 172.16.16.1 LON-DC1.adatum.com to C:WindowsSystem32DriversEtcHosts. Repeat the procedure to verify connectivity to a host name. Name resolution should now be successful.
Display the resolver cache. Use the Get-DnsClientCache cmdlet (or use IPConfig /displaydns) to verify that the entry appears in a resolved cache. You have proven that the problem is likely a name resolution issue. Remove the entry from the hosts file and clear the resolver cache.
Test the name server. Test the name server by performing a query against it by using the Resolve-dnsname lon-DC1.adatum.com. cmdlet. Alternatively, use the NSLookup .exe -d2 LON-cl1.adatum.com. command. You can see the partial output from the Resolve-dnsname cmdlet in Figure 3-12.

Figure 3-12 Using Resolve-dnsname to test name resolution
The information returned from the name server test shows IP addresses of the server you queried against. It also shows which name servers provided the response. It is important to know how to interpret this returned information to diagnose any failures or faults properly.
Need More Review? Diagnosing Name Resolution Problems
To find out more about troubleshooting name resolution, refer to the Microsoft website at https://technet.microsoft.com/library/cc959340.aspx.
Configure Wi-Fi profiles
You can configure wireless networks by using one of several modes to suit your requirements and using one of a number of standards to secure the network and achieve compatibility between your wireless devices.
Modes
Wireless networking can be configured in one of three modes.
Ad-hoc This setting enables you to configure a wireless connection between devices in a peer-to-peer manner without requiring a wireless access point (AP).
Wi-Fi Direct This setting is a wireless networking standard that you can use to connect your wireless devices without a wireless AP. Similar to ad hoc wireless networking, it is typically used to connect to peripherals such as printers and media players.
Infrastructure Based on wireless APs, infrastructure networks consist of wireless local area networks to enable communications between wireless client devices.
Standards
To ensure compatibility between wireless networked devices, a number of standards have evolved. The 802.11x wireless standards are described in Table 3-6.
Table 3-6 802.11 wireless standards
Standard |
Definition |
|---|---|
802.11a |
Provides up to 54 megabits per second (mbps) and uses the 5 gigahertz (GHz) range. Not compatible with 802.11b. |
802.11b |
Provides 11 mbps and uses the 2.4 GHz range. |
802.11e |
Defines Quality of Service and multimedia support. |
802.11g |
For use over short distances at speeds up to 54 mbps. Backward compatible with 802.11b and uses the 2.4 GHz range. |
802.11n |
Increases data throughput at speeds up to 100 mbps, and it uses both 2.4 GHz and 5 GHz ranges. |
802.11ac |
Builds on 802.11n to achieve data rates of 433 mbps. 802.11ac uses the 5 GHz frequency range. |
Security
It is comparatively easy to gain access to a wireless network, so it is important to secure network traffic on your wireless network infrastructure. A number of wireless security standards exist that can help, as shown in Table 3-7. When choosing a security method, ensure that your wireless devices and infrastructure support that method.
Table 3-7 Wireless security standards
Standard |
Explanation |
|---|---|
Wired Equivalent Privacy (WEP) |
WEP is an old wireless security standard, and a number of documented security issues surround it. Use WEP only if there is no choice. |
Wi-Fi Protected Access (WPA) |
WPA has two variations. WPA-Personal. Easier to implement than WPA Enterprise and, therefore, ideal for smaller networks. Authentication is based on a password. The password and the network Service Set Identifier (SSID) generate encryption keys for each wireless device. WPA-Enterprise. Designed for larger networks and requires the use of a Remote Authentication Dial-In User Service (RADIUS) server to provide for authentication. |
WPA2 |
An improved version of WPA that is the de facto Wi-Fi security standard. It employs larger encryption key sizes than WPA. |
Configure wireless settings
After you have selected the appropriate wireless infrastructure components and chosen your wireless security standard, you must set up and configure your wireless network in Windows 10.
Connect To A Wireless Network
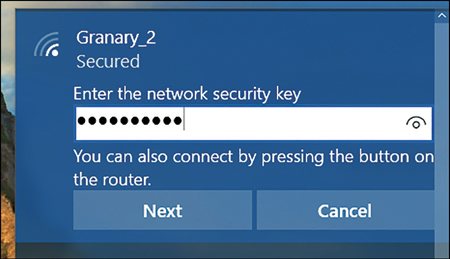
To connect to a wireless network, in the system tray, click the network icon to see a list of available wireless networks. Click the appropriate network and then click Connect. Enter the required security information as shown in Figure 3-13 and click Next.
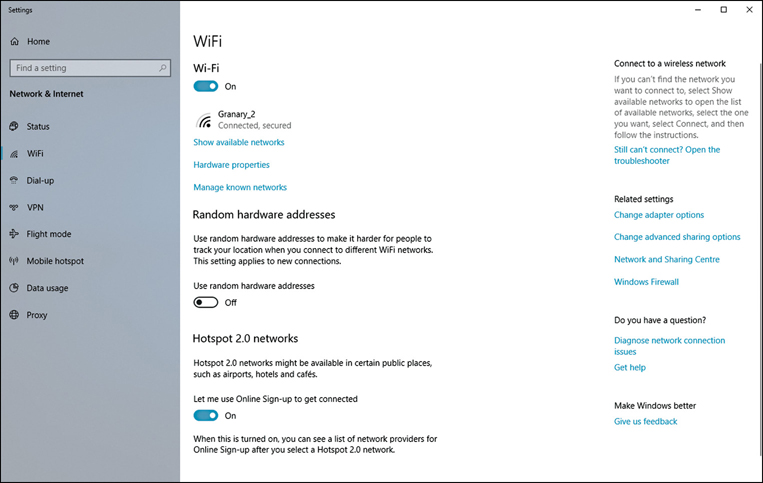
Configure Existing Wireless Networks
To review or edit your existing wireless networks, from Settings, click Network & Internet. On the Wi-Fi tab, shown in Figure 3-14, you can configure the following options.
Show Available Networks Enables you to view the currently available Wi-Fi networks within range of your device
Hardware Properties Enables you to view the properties of your Wi-Fi connection, including SSID, Protocol, Security type, Network band, Network channel, IPv4 and IPv6 configuration, and details about your Wi-Fi adapter
Manage Known Networks Enables you to view, configure, or forget any Wi-Fi networks to which your device has connected. To forget a Wi-Fi connection, click it, and then click Forget. To configure a Wi-Fi network, click it, and then click Properties. You can then view or configure the following:
Connect Automatically When In Range
Network Profile: Public Or Private. This option is only available when you are connected to the specific Wi-Fi network.
Set As Metered Connection
Random Hardware Address Enables your computer to use a different hardware address for each network to which it connects. This can help secure your device by making it harder to track your device’s location.
Hotspot 2.0 Networks Under this heading, you can enable the following options:
Let Me Use Online Sign-Up To Get Connected
Hotspot 2.0 Networks
For connecting to public Wi-Fi networks, Windows 10 supports the Hotspot 2.0 wireless 802.11u Wi-Fi standard. This should make connecting to hotspots in public places, such as airports, or coffee shops, easier and more secure.
Your device will attempt to connect you to available public hotspots automatically, in a similar fashion to cellular-style “roaming.”
There are several benefits to using Hotspot 2.0:
Public Hotspots become easier and more secure—your device will detect which Wi-Fi network is authentic and connect automatically.
Network Providers can partner with other providers. This will allow great network coverage and allow cellular-style “roaming.”
Encryption is enforced and utilizes enterprise-grade WPA2 encryption.
When you attempt to join a Hotspot 2.0 network for the first time, Windows 10 presents an “Online Sign-Up” screen with a list of available network providers. After you have set up an account with one of the providers, your device will be able to connect to other Hotspot 2.0 networks automatically in the future.
Enable Vpn Reconnect
VPN Reconnect uses the IKEv2 protocol with the MOBIKE extension to automatically re-establish a lost VPN connection without user intervention. For mobile users, the prevalence of dropped Wi-Fi or LTE connections can be frequent because of volatile signal strength. It is best to use and configure VPN Reconnect for your mobile users because this will reduce the frustration of having to reconnect manually, and it will also increase productivity.
The network outage time can be configured from five minutes up to an interruption of eight hours. To enable VPN Reconnect, follow these steps:
On the taskbar, in the search box, type VPN.
Click VPN Settings from the returned list.
In the Settings app, click Change Adapter Options.
Select the appropriate VPN adapter, and then click Change Settings Of This Connection, as shown in Figure 3-15.
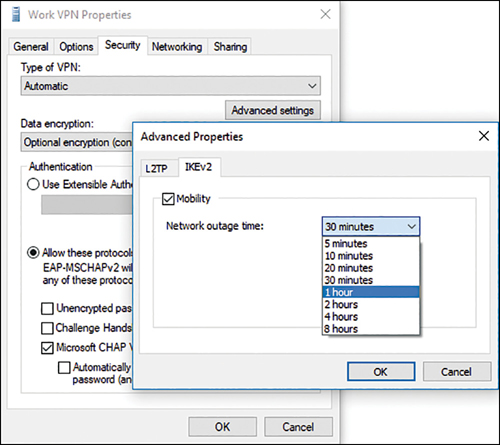
Figure 3-15 Configuring the Network Outage Time for VPN Reconnect Click the Security tab in the VPN Properties dialog box, and click Advanced Settings.
In the Advanced Properties dialog box, check the Mobility option on the IKEv2 tab.
Modify the Network Outage Time as necessary.
Click OK twice.
Advanced Settings
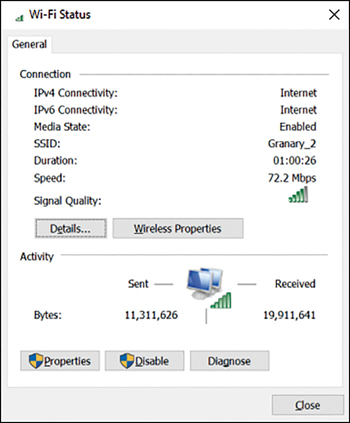
To configure advanced wireless settings, from the Network And Sharing Center, under View Your Active Networks, click the wireless network you want to configure, as shown in Figure 3-16. Then, in the Wi-Fi Status dialog box, click Wireless Properties. You can then view the security settings for your wireless network connection.
You can also manage wireless networks by using Netsh.exe. For example, to list the wireless network profiles on your computer, type:
Netsh wlan show profile
Need More Review? Using Netsh.Exe To Manage Wireless Networks
To find out more about managing Wi-Fi settings by using Netsh.exe, refer to the Microsoft website at https://docs.microsoft.com/en-us/previous-versions/windows/it-pro/windows-server-2008-R2-and-2008/dd744890(v=ws.10).
Configuring Wi-Fi Direct
Wi-Fi Direct is a standard developed with the Wi-Fi Alliance, is fully supported by Windows 10, and enables Wi-Fi Direct devices to connect seamlessly to one another. This can be achieved using Miracast over Infrastructure, which uses Ethernet if a network access point or secure ad hoc Wi-Fi network is available, or over a private ad hoc wireless network as and when required.
Wi-Fi Direct enables you to interact with other hardware, for example, print to a wireless printer or send your PowerPoint presentation to an external display.
Devices that are utilizing Wi-Fi Direct include mobile phones, cameras, printers, TVs, PCs, and gaming devices, such as Xbox One.
Wi-Fi Direct is very similar to Bluetooth, but only 10x faster. (Wi-Fi Direct transfers data at up to 250 Mbps, whereas Bluetooth 4.0 transfers data at up to 25 Mbps.)
As the technology continues to mature, Microsoft has upgraded and enhanced the application program interface (API) support with Windows 10 for developers to use when writing their software. Original equipment manufacturer (OEM) vendors are gradually incorporating Wi-Fi Direct into their devices, such as printers utilizing Wi-Fi Direct. Unlike Bluetooth, only one device needs to support Wi-Fi Direct, though they will still pair in much the same way as Bluetooth. For example, Miracast enables a Windows device to wirelessly display on to a projected screen, such as a TV or projector. Miracast is ideal for enabling screens that do not have built-in support for Wi-Fi Direct because it uses a High-Definition Multimedia Interface (HDMI) adapter, which plugs into the remote screen. Windows 10 can wirelessly connect to the Miracast adapter.
To use the Wi-Fi Direct technology, a user will turn on or enable the Wi-Fi Direct device, such as a Miracast adapter or printer, and Windows 10 will locate the device wirelessly and connect. Once connected, application files that are required for the user interface, such as display or printer dialog screens, are received directly from the Wi-Fi Direct device.
Some characteristics of Wi-Fi Direct are listed below:
Distance between devices (ad hoc Wi-Fi) Compared to Bluetooth, which creates a Personal Area Network of just a few feet, Wi-Fi Alliance states that Wi-Fi Direct devices can reach each other over a maximum distance of up to 656 feet.
Security Wi-Fi Direct uses either WPA2-PSK or WPA2-Enterprise security, which uses AES 256-bit encryption with a key-based encryption and authentication method.
Speed Wi-Fi Direct claims device-to-device transfer speeds of up to 250 Mbps.
Services Wi-Fi Direct Send, Wi-Fi Direct Print, Wi-Fi Direct for DLNA, Miracast, and Miracast over Infrastructure are the five services that currently utilize the Wi-Fi Direct standard.
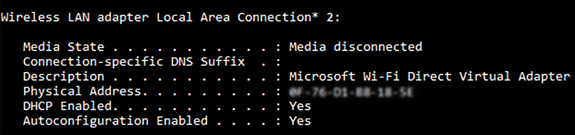
To set up Wi-Fi Direct in Windows 10, you need a compatible network adapter. Type ipconfig /all at the command line and verify that one of the network adapters listed returns the Description value Microsoft Wi-Fi Direct Virtual Adapter, as shown in Figure 3-17.
After you have checked that your wireless network adapter supports Wi-Fi Direct, use the Netsh.exe command-line tool to set up your Wi-Fi Direct network. You can use the following command to start the process of enabling Wi-Fi Direct.
netsh wlan set hostednetwork mode=allow ssid=Wi-Fidirect key=passphrase
Use the following command to start Wi-Fi Direct.
netsh wlan start hostednetwork
To stop the Wi-Fi Direct network, use:
netsh wlan stop hostednetwork
Skill 3.2: Configure remote connectivity
When you have a large number of computers to manage or a workforce that uses their devices in a number of locations, you must know how to enable and configure remote connectivity. It is also important to be able to manage those computers by using remote management tools.
Configure remote management
Windows 10 provides a number of tools that you can use to manage your organization’s computers remotely. These include Remote Assistance, Remote Desktop, Windows PowerShell remoting, and many management console snap-ins. Knowing which tools to use to support a given situation helps you address your users’ needs more quickly.
Remote management tools in Windows 10
You can use a variety of tools to manage Windows 10 devices remotely. Table 3-8 shows the available remote management tools in Windows 10.
Table 3-8 Windows 10 remote management tools
Tool |
Purpose |
|---|---|
Remote Assistance |
A built-in tool that provides for interaction with the remote user. By using Remote Assistance, you can view or take remote control of the user’s computer and perform remote management of it. You can also use a text-based chat facility to interact with the user. |
Quick Assist |
A built-in Microsoft Store app that enables you to offer or receive assistance quickly. As with Remote Assistance, you can view or take remote control of the user’s computer and perform remote management of it. To initiate a session, participants exchange a 6 digit security code. |
Remote Desktop |
A built-in tool that you can use to access a computer remotely over the Remote Desktop Protocol (RDP). In the past, users often accessed their computers from other locations by using Remote Desktop. Security concerns and the adoption of mobile devices have made this a less common use of this tool. However, you can also use Remote Desktop to manage a remote computer. It does not provide for user interaction and requires the user of the computer to sign out before you can access the computer remotely. |
Windows PowerShell |
Windows PowerShell is a powerful command-line management tool and scripting environment. You can use it to perform virtually any management function in Windows 10. You can also use Windows PowerShell to manage remote computers. This is known as Windows PowerShell remoting. |
Microsoft Management Console |
Microsoft Management Console (MMC) is an extensible interface for management applications in both Windows clients and Windows Server. To perform management by using MMC, a specific tool for the management task, known as a snap-in, is loaded into the console. For example, to perform management of disks and attached storage, you add the Disk Management snap-in to MMC. You can use MMC snap-ins to manage Windows 10 devices remotely by targeting the remote computer from the MMC interface. |
Selecting the appropriate remote management tool
Given that a variety of tools are available, it is important to know which one to use in a given situation. When considering the appropriate tool, use the guidance in Table 3-9 to help you make your choice.
Table 3-9 Selecting the appropriate Windows 10 remote management tool
Scenario |
Tool |
|---|---|
User requires help and guidance. For example, you must help the user perform a specific task in an application such as printing, using the appropriate settings. |
Remote Assistance or Quick Assist |
You must perform a single remote management task on a single computer and require no user interaction. |
Remote Desktop or MMC |
You must perform the same management task on several or many remote computers. |
Windows PowerShell |
You must perform a remote management task that you have performed many times in the past and expect to perform again in the future. |
Windows PowerShell |
You are unsure of the nature of a problem a user is experiencing on her computer and wish to investigate computer settings. |
Remote Desktop |
You want to be able to perform the same management task, using the same management tool on any computer. |
MMC |
You can see from Table 3-9 that you can sometimes use several methods to address a specific remote management scenario. It is, therefore, a question of choosing the most appropriate method. Generally, if you know you will be required to perform the same management task again, on the same or a different computer, it is worth considering Windows PowerShell remoting. If you need to provide user interaction, choose Remote Assistance or Quick Assist. After that, it’s probably a personal preference of whether you use an MMC snap-in remotely or Remote Desktop.
Configure remote management settings
Depending on the remote management tool you have decided to use, it is almost certain that you must configure the target computer (the one you wish to manage) and possibly the local management computer (the one you are using) to enable the selected remote management tool. For example, it is common to have to enable the appropriate feature through Windows Defender Firewall to allow for management of a remote Windows 10–based device.
Configuring Windows Defender Firewall To Enable Remote Management
To enable remote management through Windows Defender Firewall on a target computer, open Control Panel and complete the following procedure.
In Control Panel, click System And Security and then click Windows Defender Firewall.
In Windows Defender Firewall, click Allow An App Or Feature Through Windows Defender Firewall.
In Allowed Applications, click Change Settings.
In the Allowed Apps And Features list, scroll down and select the appropriate management feature.
For example, as shown in Figure 3-18, select Remote Assistance. This enables the selected management feature on the Private network location profile. If you also wish to allow the remote management feature on Public networks, select the Public check box.
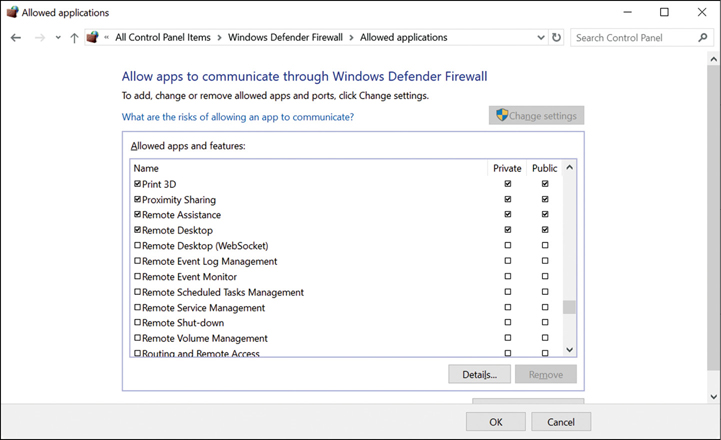
Figure 3-18 Allowing Remote Assistance through Windows Defender Firewall Click OK. The available remote management features are
Remote Assistance
Remote Desktop
Remote Event Log Management
Remote Event Monitor
Remote Scheduled Tasks Management
Remote Service Management
Remote Shutdown
Remote Volume Management
Virtual Machine Monitoring
Windows Defender Firewall Remote Management
Windows Management Instrumentation (WMI)
Windows Remote Management
Windows Remote Management (Compatibility)
It is not always feasible, or especially desirable, to reconfigure these settings manually on each computer to enable the appropriate remote management feature. Instead, in an Active Directory Domain Services (AD DS) environment, you can use Group Policy Objects (GPOs) to configure the desired firewall settings.
Enabling Remote Management Through System Properties
Both Remote Assistance and Remote Desktop can be enabled through the System Properties dialog box, as shown in Figure 3-19. To access these settings, open the Settings app and follow these steps.
Click System and then click About.
In the details pane, under Related Settings, click System Info.
Click Remote Settings.
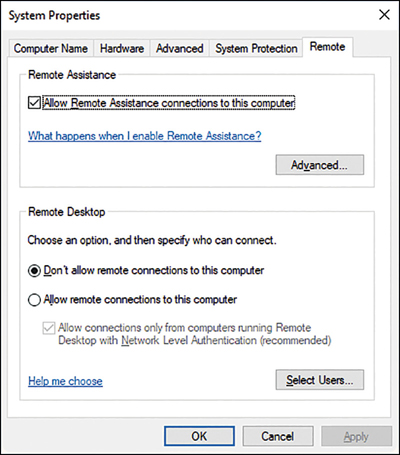
Enabling Remote Assistance
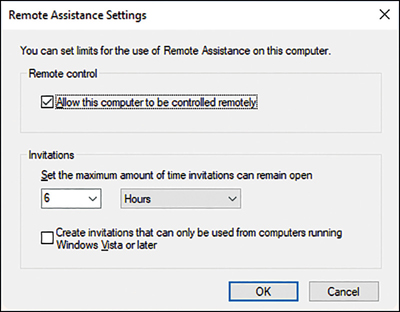
To enable Remote Assistance, on the Remote tab of the System Properties dialog box, select the Allow Remote Assistance Connections To This Computer check box. Then, optionally, click Advanced. As shown in Figure 3-20, you can then configure the following additional settings.
Allow This Computer To Be Controlled Remotely This setting enables you to determine whether the person providing remote support can take remote control of the computer or only view the computer desktop. This setting is enabled by default when Remote Assistance is enabled.
Set The Maximum Amount Of Time Invitations Can Remain Open One way of initiating a Remote Assistance session is for the user to invite the support person to connect. This setting defines the validity period of the invitations. The default is 6 hours.
Create Invitations That Can Only Be Used From Computers Running Windows Vista Or Later Windows Vista and later versions of Windows use a superior method of encrypting Remote Assistance network traffic. It is advised to select this option if you are using Windows Vista and later on all support computers.
Enabling Remote Desktop
To enable Remote Desktop, on the Remote tab of the System Properties dialog box, select the Allow Remote Connections To This Computer check box. Then, optionally, select Only Allow Connections From Computers Running Remote Desktop With Network Level Authentication (Recommended), shown in Figure 3-19. This setting improves the security of the Remote Desktop network traffic between the management computer and the target computer.
Click Select Users. As shown in Figure 3-21, you can then add the users or groups that you want to have remote access to this computer by using Remote Desktop. You can also enable Remote Desktop by opening the Settings app, selecting System, and then selecting the Remote Desktop tab.

![]() Exam Tip
Exam Tip
When you enable Remote Assistance or Remote Desktop by using these methods, the corresponding Windows Defender Firewall setting is automatically configured to allow the selected app.
Configure Remote Assistance
After you have enabled Remote Assistance, you can configure and use this tool to help your users to administer and manage their computers remotely. There are two fundamental ways of initiating a Remote Assistance session: one is for the user to request assistance, and the other is for the support person to offer it.
Requesting Help Using Remote Assistance
If a user is experiencing problems with her computer, she can request assistance from support personnel by using the Request Assistance feature of Remote Assistance. This is known as solicited remote assistance. To request assistance, the user must open Control Panel, select System And Security, and then click Launch Remote Assistance.
As shown in Figure 3-22, you can then choose between:
Invite Someone You Trust To Help You Choose this option if you require assistance.
Help Someone Who Has Invited You Choose this option if you can provide assistance.
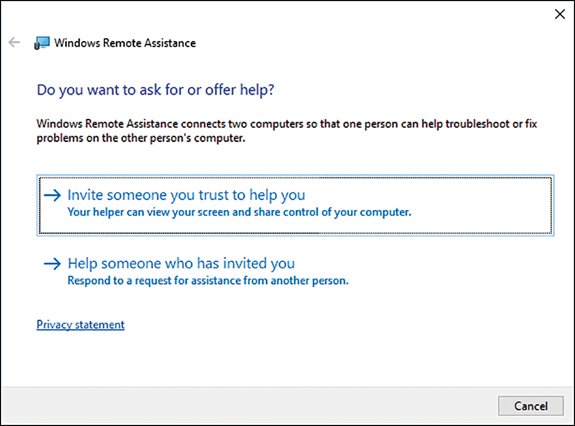
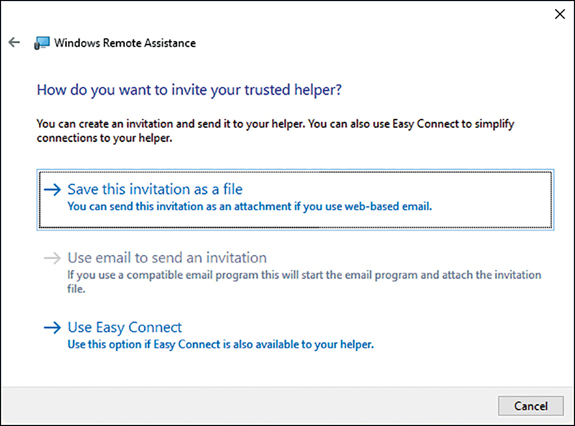
To request help, click Invite Someone You Trust To Help You. You can then choose from among three options, as shown in Figure 3-23. These are:
Save This Invitation As A File Choose this option to create an RA Invitations file. These have a .msrclIncident file extension. You are prompted to save the request file. Store this file in a location that is accessible to the user from whom you are requesting help. Typically, this location will be a file server shared folder. After you have defined a save location, a dialog box appears with the password for the remote assistance session. Share this password with your helper. When your helper double-clicks the file you saved, she is prompted for the password, and then the Remote Assistance session begins.
Use Email To Send An Invitation If you choose this option, your default email program is opened by Remote Assistance, and the invitation file is automatically attached to an email message. You must enter the email address of the person you want to invite. When you send the message, the same dialog box appears containing the session password. Again, share this password with your helper. When your helper double-clicks the attached file in the email you sent, she is prompted for the password, and then the Remote Assistance session begins.
Use Easy Connect Easy Connect enables you to establish a Remote Assistance session without the need to use an invitation file. After you have established an Easy Connect session, you can save the name of the helper for future use, enabling you to receive remote assistance without the need to exchange a password.
![]() Exam Tip
Exam Tip
Easy Connect only works if both computers are running Windows 7 or later and if both computers have access to the global peer-to-peer network. This network can sometimes be inaccessible to users of computers that are placed behind network routers that do not support the Peer Name Resolution Protocol. This protocol is used to transfer Remote Assistance invitations over the Internet.
![]() Exam Tip
Exam Tip
You can open the Windows Remote Assistance tool by running Msra.exe from the command line or the Windows Run dialog box.
Offering Help With Remote Assistance
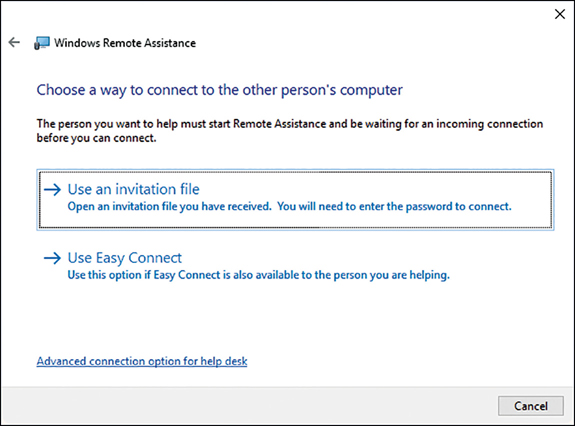
A user might not be in a position to request assistance. In these circumstances, an administrator can offer assistance. This is known as unsolicited remote assistance. To offer remote assistance, run Msra.exe and choose Help Someone Who Has Invited You. Then, on the Choose A Way To Connect To The Other Person’s Computer page, click Advanced Connection Option For Help Desk, as shown in Figure 3-24.
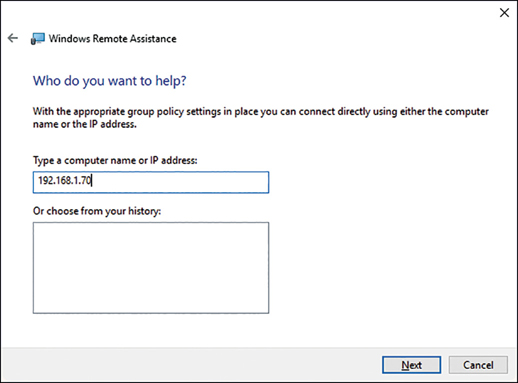
On the Who Do You Want To Help page, in the Type A Computer Name Or IP Address box, as shown in Figure 3-25, type the relevant computer name or IP address of the computer that you want to send the offer of help to and then click Next.
The user on the target computer must accept your offer, and then the remote assistance session is initiated. This is often a useful way to start a remote assistance session, especially when you are attempting to support novice users.
Configuring Remote Assistance With Gpos
Although you can configure the necessary settings for Remote Assistance manually on each computer, in an AD DS domain environment, it is easier to use GPOs to distribute the required settings. Table 3-10 shows the settings you can configure for Remote Assistance by using GPOs. To configure these settings, open Group Policy Management and locate the appropriate GPO. Open the GPO for editing and navigate to Computer Configuration > Policies > Administrative Templates > System > Remote Assistance.
Table 3-10 Configuring Remote Assistance with GPOs
Policy Setting |
Explanation |
|---|---|
Allow Only Windows Vista Or Newer Connections |
Enables Remote Assistance to generate invitations with more secure encryption. This setting does not affect Remote Assistance connections initiated by unsolicited offers or Remote Assistance. |
Turn On Session Logging |
Enables session logging. Logs are stored in the user’s Documents folder in the Remote Assistance folder. |
Turn On Bandwidth Optimization |
Provides performance improvements in low-bandwidth situations. Adjust from No Optimization through Full Optimization. |
Configure Solicited Remote Assistance |
Enables solicited Remote Assistance on a computer. If you disable this setting, it prevents users from asking for Remote Assistance. You also can use this setting to configure invitation time limits and whether to allow remote control. |
Configure Offer Remote Assistance |
Enables unsolicited Remote Assistance on this computer. |
Using Remote Assistance To Manage A Computer Remotely
After you have configured the desired settings and established a Remote Assistance session, you can perform the following tasks.
Request Control Enables you to ask the remote user for permission to take remote control of their computer. They must allow you to do this. Remember also that the ability to gain remote control is a configurable option.
Chat Enables you to open a chat window to communicate with the remote user. You can use this to explain what you are doing, or the remote user can use chat to discuss the details of their computer problem.
Using Microsoft Management Console (MMC) to manage remote computers
With both Remote Desktop and Remote Assistance, you use RDP to connect to a remote computer. After you establish a connection, you can perform any management task interactively just as if you were sitting at the remote computer. This is not the case with either MMC or Windows PowerShell remoting.
With MMC, you must enable the necessary remote management feature that you wish to exploit by modifying the Windows Defender Firewall configuration. Then you can use the appropriate management console snap-in and target the desired remote machine.
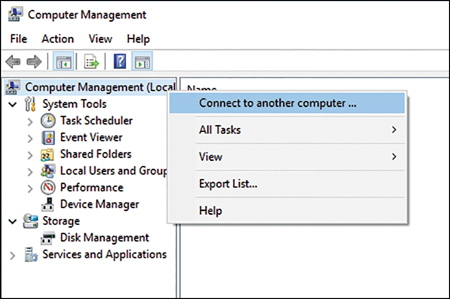
It is very easy to use MMC snap-ins to manage remote computers. Some management snap-ins enable you to specify additional computers to connect to from the console. As shown in Figure 3-26, you can right-click the uppermost node in the navigation pane and then click Connect To Another Computer.
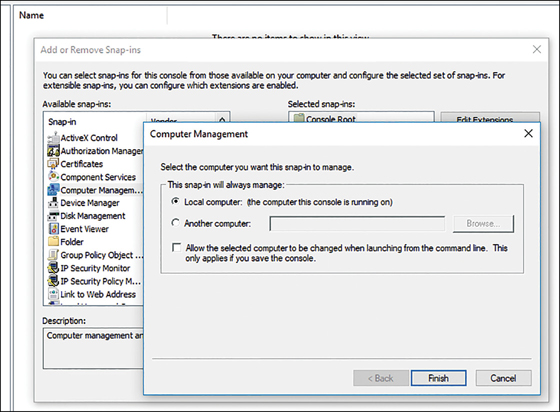
If the management snap-in you want to use does not enable you to connect to additional computers, you can create a new management console by running mmc.exe and adding the appropriate snap-in to the empty console. When prompted, specify Another Computer, as shown in Figure 3-27.
It is important to realize that the remote computer must recognize you. This means that you must authenticate your connection by using a username and password that have the necessary management rights on the target computer. This is simple in an AD DS domain environment because you can use domain admin credentials. However, in workgroup environments, this is trickier. Generally, you must be able to provide credentials of a member of the target computer’s local Administrators group.
In addition to authentication, the necessary Windows Defender Firewall feature must be enabled. The available remote management features are
Remote Assistance
Remote Desktop
Remote Event Log Management
Remote Event Monitor
Remote Scheduled Tasks Management
Remote Service Management
Remote Shut-down
Remote Volume Management
Virtual Machine Monitoring
Windows Defender Firewall Remote Management
Windows Management Instrumentation (WMI)
Windows Remote Management
Windows Remote Management (Compatibility)
After you have enabled the required remote management feature in Windows Defender Firewall and modified your MMC to connect to a remote computer using appropriate credentials, performing remote management is no different from performing local management.
Configure remote desktop access
After Remote Desktop is enabled on a computer, you can use the Remote Desktop Connection program to connect to the computer. When connected, you can use the computer as if locally signed in and perform all management tasks that your user account has the rights to perform. This makes using Remote Desktop particularly useful.
Creating and editing Remote Desktop connections
To create a Remote Desktop connection, from Start, click All Apps, click Windows Accessories, and then click Remote Desktop Connection. As shown in Figure 3-28, you must then specify the computer that you want to connect to. Use either a computer name or an IP address. You can configure additional connection properties by using the options discussed in Table 3-11.
Table 3-11 Configurable Remote Desktop Connection options
Tab |
Settings |
|---|---|
General |
|
Display |
|
Local Resources |
|
Experience |
|
Advanced |
|
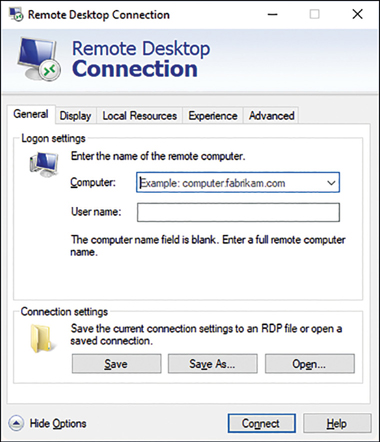
When you have finished configuring the connection, from the General tab, click Connect. You can also choose to save your configuration to a .rdp file for subsequent use.
Customizing Remote Desktop settings from the command line
You can open the Remote Desktop Connection app by running Mstsc.exe from the command line or the Windows Run dialog box. The Mstsc.exe command also enables administrators to launch the tool, with several parameters configured.
The default firewall port that Remote Desktop uses is 3389, and this needs to allow RDP traffic through for Remote Desktop to work. If an administrator changes the firewall port for RDP traffic, the revised port number must be specified in the command-line tool Mstsc.exe when launching the application.
The syntax for mstsc is
mstsc [<connection file>] [/v:<server[:port]>] [/admin] [/f[ullscreen]] [/w:<width>]
[/h:<height>] [/public] | [/span] [/multimon] [/edit "connection file"]
[/restrictedAdmin] [/remoteGuard] [/prompt] [/shadow:sessionID> [/control]
[/noConsentPrompt]] [/?]
The list of command-line parameters for Remote Desktop Connection are shown in Table 3-12.
Table 3-12 Command-line parameters for Remote Desktop Connection
Parameter |
Description |
|---|---|
<connection file> |
Specifies the name of a .rdp file for the connection. |
/v:<Server[:<Port>] |
Specifies the remote computer to which you want to connect. |
/admin |
This parameter is used to connect you to a session for the administration of a Remote Desktop Session Host server (The RD Session Host role service must be installed on the remote server). |
/edit <“connection file”> |
Opens the specified .rdp file for editing. |
/f |
Starts Remote Desktop Connection in full-screen mode. |
/w:<Width> |
Specifies the width of the Remote Desktop window. |
/h:<Height> |
Specifies the height of the Remote Desktop window. |
/public |
Runs the Remote Desktop in public mode where passwords and bitmaps are not cached. |
/span |
This enables the Remote Desktop width and height to be matched with the local virtual desktop, spanning across multiple monitors if necessary. |
/multimon |
Configures the Remote Desktop session monitor layout to render it identical to the client configuration. |
/restrictedAdmin |
Connects to the remote PC or server in Restricted Administration mode, which prevents login credentials being sent to the remote PC or server. Functionality and or compatibility may be impacted as the connection is made as local administrator. |
/remoteGuard |
Utilizes Remote Guard to protect the connection. No credentials are sent to the remote device; however, full access is provided. |
/shadow:sessionID |
Allows you to specify the SessionID to which you wish to connect. |
/control |
Allows control of the remote session. |
/noConsentPrompt |
Allows the connection to continue without user consent. |
/? |
Lists the available parameters. |
Configuring Remote Desktop with GPOs
Just as with Remote Assistance, although you can configure Remote Desktop settings manually on each computer, in an AD DS domain environment, it makes sense to configure these settings with GPOs. Table 3-13 contains the configurable GPO settings for Remote Desktop. To configure these settings, open Group Policy Management and locate the appropriate GPO. Open the GPO for editing and navigate to Computer Configuration Policies Administrative Templates Windows Components Remote Desktop Services.
Table 3-13 Configuring Remote Desktop with GPOs
Policy Setting |
Explanation |
|---|---|
Remote Desktop Connection Client Do Not Allow Passwords To Be Saved |
Determines whether users can save passwords on this computer from Remote Desktop Services clients. |
Remote Desktop Connection Client Prompt For Credentials On Client Computer |
If enabled, a user is prompted to provide credentials for a remote connection to a Remote Desktop server on their client computer rather than on the Remote Desktop server. |
Remote Desktop Session HostConnections Allow Users To Connect Remotely By Using Remote Desktop Services |
If enabled, users that belong to the Remote Desktop Users group on the target computer can connect remotely to the target computer, using Remote Desktop Services. |
Remote Desktop Session Host Device And Resource Redirection |
You use these settings to specify whether to allow or prevent data redirection from local devices (such as audio and clipboard) to the remote client in a Remote Desktop Services session. |
Remote Desktop Session HostSecurity Set Client Connection Encryption Level |
If enabled, all communications between clients and Remote Desktop servers is encrypted, using the encryption method specified. By default, the encryption level is set to High. |
Remote Desktop Session Host Session Time Limits |
These policies control session time limits for disconnected, idle, and active sessions and whether to terminate sessions when specified limits are reached. |
Troubleshooting Remote Desktop Connections
Remote Desktop is a powerful tool for administrators that enables them to manage PCs and servers within the enterprise. Some common problems encountered when trying to connect to a remote PC using Remote Desktop, and their resolution, are listed in Table 3-14.
Table 3-14 Troubleshooting Remote Desktop Connections
Problem |
Possible Resolution |
|---|---|
The remote PC can’t be found. |
|
There’s a problem with the network. |
|
The Remote Desktop port might be blocked by a firewall. |
|
Remote connections might not be set up on the remote PC. |
|
The remote PC might only enable PCs that have Network Level Authentication set up to connect. |
|
The remote PC might be turned off. |
|
Enable PowerShell Remoting
Although using Windows PowerShell cmdlets can sometimes seem daunting, they do offer a convenient and quick way of configuring many machines more quickly than by using a graphical tool. In addition, through the use of scripting, you can use Windows PowerShell to complete frequently performed management tasks.
Using Windows PowerShell to manage remote computers is referred to as Windows PowerShell remoting, but before you can use Windows PowerShell remoting, you must know how to enable and configure it.
Windows PowerShell is ubiquitous across the Windows platform, appearing in both Windows 10 and Windows Server. Therefore, using Windows PowerShell to perform management tasks on both local and remote computers makes sense because you can transfer those skills to other management and administration situations.
Many cmdlets in Windows PowerShell can be used with a -ComputerName parameter, making the use of the command remotely no more complex than specifying the name of the computer you want to run the command against. For example, to determine the IP configuration of a computer, you can run the following command.
Get-NetIPConfiguration -computername LON-CL1
However, not all cmdlets accept the -ComputerName parameter, and for these, you must enable and configure Windows PowerShell remoting. The function of Windows PowerShell remoting is to enable you to connect to one or several remote computers and execute one or more cmdlets or scripts on those remote computers and return the results to your local computer.
Although Windows PowerShell remoting is enabled by default on Windows Server 2016, you must manually enable it on Windows 10. To do this, complete one of the following procedures.
If necessary, start the Windows Remote Management service. You must also enable Windows Remote Management through the Windows Defender Firewall. As shown in Figure 3-29, you can do this by running the winrm quickconfig command at an elevated command prompt. When prompted, press Y and Enter twice.
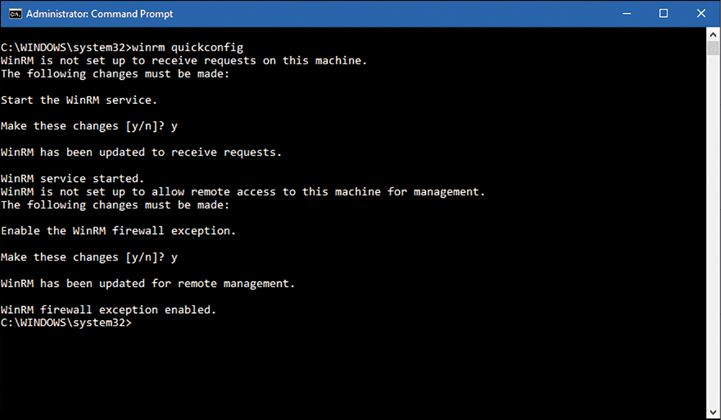
Figure 3-29 Enabling Windows Remote Management Note Winrm Quickconfig And The Public Network Location Profile
If one of your network connections is assigned the Public network location profile, this command fails, and you must manually configure the Windows Defender Firewall exceptions.
Alternatively, to enable Windows PowerShell remoting, you can run the enable-PSremoting -force cmdlet from a Windows PowerShell (Admin) window.
![]() Exam Tip
Exam Tip
Windows Remote Management uses HTTP. By default, both Windows Remote Management and Windows PowerShell remoting use TCP port 5985 for incoming unencrypted communications and TCP port 5986 for incoming encrypted communications.
Need More Review? Enable-Psremoting
To review further details about enabling Windows PowerShell remoting, refer to the Microsoft website at https://docs.microsoft.com/en-gb/powershell/module/Microsoft.PowerShell.Core/Enable-PSRemoting?view=powershell-5.1.
Using Windows PowerShell to manage remote computers
After you have enabled Windows PowerShell remoting, you can use Windows PowerShell cmdlets and scripts to manage the remote computer in virtually the same way that you manage local computers. However, you must first establish a connection with the remote computer.
After you have established a connection, you can run any cmdlets or scripts against the remote machine. When you connect to the remote computer and run a remote command against it, the command is transmitted across the network and run on the remote computer. The results are sent back to your local computer and displayed in your Windows PowerShell window.
One way to establish a remote connection and run a command is to use the invoke- command cmdlet. You can also use the Invoke-command cmdlet to establish a temporary remote connection. For example, the following command retrieves the contents of the system event log from the remote computer LON-CL1.
Invoke-Command -ComputerName LON-CL1 -ScriptBlock {Get-EventLog -log system}
If you intend to run several cmdlets, or to run more complex scripts, it is useful to establish a persistent connection to the remote computer. Use the New-PSWorkflowSession cmdlet to do this. For example:
$s = New-PSWorkflowSession -ComputerName LON-CL1
You can now use the Enter-PSSession command to establish the persistent connection.
Enter-PSSession $s
You will now have a Windows PowerShell prompt that looks like this.
[LON-CL1]: PS C:>
Any commands that you run in this session run on the LON-CL1 computer. The session remains active until you close with the exit-PSSession command.
You can also use these commands to establish remote connections with multiple computers. For example, to connect simultaneously to computers called LON-CL1 and LON-CL2, use the following command.
$s = New-PSSession -ComputerName LON-CL1, LON-CL2
Next, run the remote Windows PowerShell cmdlets against the new session.
Invoke-Command -Session $s -ScriptBlock { Get-EventLog -log system }
You can run any Windows PowerShell command remotely in this way.
Need More Review? An Introduction To Powershell Remoting: Part One
To review further details about using Windows PowerShell remoting, refer to the Microsoft website at https://blogs.technet.microsoft.com/heyscriptingguy/2012/07/23/an-introduction-to-powershell-remoting-part-one/.
Thought experiments
In these thought experiments, demonstrate your skills and knowledge of the topics covered in this chapter. You can find the answers to these thought experiments in the next section.
Scenario 1
You have been hired to deploy Windows 10 at a new office for Adatum Corporation. The office was a greenfield site with no computer infrastructure and has just had all the network cabling and wireless infrastructure installed by a contractor. You must help plan and implement networking services at the new location and verify that all equipment is working on the network.
As a consultant for Adatum, answer the following questions about networking.
You connected a number of devices to the wireless APs in the new building. They seem to be connected, but you want to verify that they can communicate with each other. Is it true that the Test-Connection Windows PowerShell cmdlet is the equivalent of the Ping command-line tool?
You want to be able to view the current network configuration of the installed laptops in the new building. Which of the following commands enable you to do this?
Ping
Tracert
NSlookup
IPconfig
Get-NetIPAddress
Netsh
You are troubleshooting name resolution to the LON-DC1 domain controller. You suspect a problem might reside with the configured DNS server that was just installed at the site. If you create an entry for LON-DC1 in the local hosts file of a test computer running Windows 10, which is used first, the DNS server or the local resolver cache?
You have been asked to set up a VPN solution for some users who want to work from home. Which VPN tunneling protocols can you use with Windows 10?
You notice that one of your computers has an IPv4 address that starts 169.254. What could this mean?
Scenario 2
You work in support at Adatum Corporation. Many of your users work in small branch offices. Some work from home, using work laptops. It is important for you to be able to manage these users’ computers remotely. As a consultant for Adatum, answer the following questions about remote management in the Adatum organization.
One of your users telephones the help desk, requiring assistance with an application. They need to know how to perform a grammar check with Microsoft Word 2016. They are not very experienced and, despite your best efforts and explanation of how the process works, they are still confused. What remote management tool might you consider using in this situation?
Another user calls the help desk. They’ve lost a file and need you to locate it. They’re due to leave the office for a conference this afternoon, and they tell you that’s the best time for you to resolve the issue. What remote management tool would you use?
You try to connect to this user’s computer later that afternoon, but despite knowing that the necessary Windows Firewall settings are configured, you cannot connect. Why?
You want to use Windows PowerShell remoting. You try to connect to a remote machine but are unsuccessful. What steps must you perform on the remote machine before Windows PowerShell remoting can work?
Thought experiment answers
This section provides the solutions for the tasks included in the thought experiment.
Scenario 1
Yes, the Test-Connection Windows PowerShell cmdlet is the equivalent of the Ping command-line tool.
The IPconfig, Get-NetIPAddress, and Netsh commands enable you to view the network configuration of computers running Windows 10.
The DNS resolver cache is checked before a DNS server is petitioned.
You can use the following VPN tunneling protocols: Point-to-Point Tunneling Protocol (PPTP), Layer Two Tunneling Protocol with IPsec (L2TP/IPsec), Secure Socket Tunneling Protocol (SSTP), or Internet Key Exchange version 2 (IKEv2).
It means that the device is configured to obtain an IPv4 address automatically and has been unable to obtain an IPv4 configuration from a DHCP server. This might be because the DHCP server is offline or because an insufficient number of addresses are available on the server.
Scenario 2
Using Remote Assistance would enable you to demonstrate how to perform the grammar check. You could take remote control of the user’s computer and show them the procedure.
Remote Desktop is the most suitable tool. Remote Assistance requires the interaction of the user to accept your connection request and, initially, to invite you to help. Remote Desktop requires no invitations and does not require the remote user to assist you in connecting.
The most likely reason you can’t connect is that Remote Desktop users must be granted access in addition to the Windows Firewall configuration changes being made.
You must start the Windows Remote Management service and reconfigure the Windows Firewall, and then Windows PowerShell remoting must be enabled. You can perform these steps by running either winrm quickconfig or by running enable-PSremoting.
Chapter Summary
Each device on a network requires a unique IPv4 and, optionally, IPv6 configuration.
Windows 10-based network devices use name resolution to change names in IP addresses for network communications.
Windows 10 supports four commonly used VPN protocols. These are Point-to-Point Tunneling Protocol (PPTP), Layer 2 Tunneling Protocol (L2TP), Secure Socket Tunneling Protocol (SSTP), and Internet Key Exchange, Version 2 (IKEv2).
Windows 10 uses common authentication protocols including EAP-MS-CHAPv2, PAP, CHAP and MS-CHAP v2.
VPN Reconnect is a feature supported when using IKEv2, which enables VPN connections to be automatically re-established if they are broken. VPN Reconnect uses the IKEv2 tunneling protocol with the MOBIKE extension.
Always On, App-triggered VPN, and LockDown VPN profiles are new VPN features in Windows 10 that enable administrators to implement enterprise-grade VPN requirements.
Wi-Fi Direct enables Windows 10 devices to interact with other hardware, such as printers, TVs, PCs, and gaming devices, such as Xbox One.
Windows 10 provides a number of tools that you can use to help troubleshoot networking issues.
You can choose from a number of management tools to perform remote management.
To configure and enable remote management settings, you must first modify the Windows Firewall configuration.
Remote Assistance and Quick Assist can be used to view or take remote control of a remote user’s computer.
Both Remote Desktop and Remote Assistance can be configured manually or by using GPOs.
Windows PowerShell remoting enables you to perform remote management of any Windows 10-based computer with Windows PowerShell.
Management console snap-ins support both local and remote connections.