Menus are perhaps the core of a Joomla site. In a static HTML site, they merely serve as navigation. In a Joomla site, they serve that purpose but also determine the layout of what a dynamic page will look like and what content will appear on that page when you navigate to it.
The relationship between menus, menu items, pages, and modules is perhaps one of the most confusing in Joomla. This chapter explains this relationship so that you can create a navigation scheme that works for your site.
In This Chapter
This chapter examines how the navigation (menus and links) is built for a Joomla website and how the different aspects interact to produce a coherent navigation structure. We look at each of the follow questions.
Each menu has a module that controls where and how the menu appears on a page. There are currently six menus that are installed in a default Joomla installation. If we go to the Menu Manager, we can see these six, as shown in Figure 5.1. One quick thing to point out in the Menu Manager is that you edit the menu by clicking the small menu item icon, not the title, as you might think.
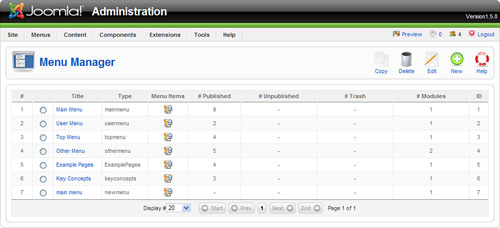
The six menus are as follows:
Main menu. Contains the main navigation for the default content.
User menu. A special menu that contains some functions for users when they are logged in.
Top menu. A duplication of some links that are in the main menu.
Other menu. Contains four offsite links to sites related to Joomla.
Key Concepts. Links to pages explaining layouts and extensions.
The Least You Need to Know
This menu structure is only Joomla’s suggestion or example. I actually personally created the example pages and key concepts menus and content as part of a team working on Joomla sample content. It’s very likely that the sample content will change and evolve over time and releases.
These six menus get installed when you choose to “install sample data” during the installation. In most cases you will need to create your own or revise these. You could even just delete them and start over again.
The first thing to understand is that each menu has at least one module associated with it. This module controls where and how the menu appears. For example, you could have a module that only appears on the home page and in the left column.
Flip to Chapter 1, “Content Management Systems and an Introduction to Joomla,” and read over the part about how a Content Management System is dynamic. The content gets pulled from the database and put into “placeholders” or “buckets” on the pages. A way to understand the previous paragraph is that the menu is the content in the database, and the module is a placeholder for it. If you want to position the menu, you move around its placeholder (the module) from the left-hand to the right-hand column for example. If you want to manage the content of the menu (the links), then you go to the Menu Manager.
The appearance of a menu is managed through the Module Manager, for example, whether a link gets an underline when you hover, what color the link is, and whether it looks like a button. All of these characteristics would be defined in the template’s Cascading Style Sheets (CSS) file (more on that in Chapter 9, “Creating a Pure CSS Template”) and are controlled in the Module Manager by using a module suffix (also explained further in Chapter 11, “Creating a Restaurant Site with Joomla”).
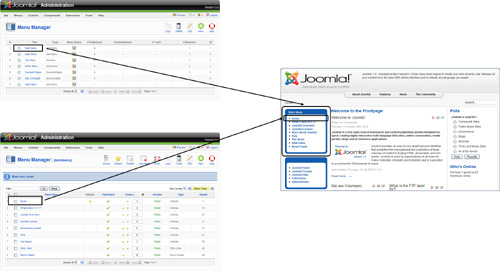
Figure 5.2 shows one of the default menus installed, the mainmenu. Shown is the menu in the Menu Manager, its corresponding module in the Module Manager, and how it is presented in the frontend.
The basic building blocks of these menus are the menu items. Each menu item corresponds to a single link in the frontend. Next we look at the importance of these menu items and what they do.
Answer: A lot!
In a Joomla site, all pages are generated dynamically. Joomla uses information from whatever link the site visitor just clicked to decide what the web page will contain and look like when he gets there.
You can think of a menu link as having three parts:
Where the link goes
What the Joomla page looks like after following the link
How the menu link’s appearance is controlled
The links on the menu are controlled by the menu item in that menu (here mainmenu) in the Menu Manager. This determines what pages they go to and the appearance of those pages. This is the “where” and the “what.”
In this example, the menu’s appearance (left column, brown background, and so on) is controlled by settings in the mainmenu module. This is the “how.”
Tip
You can actually have more than one module for a menu. For example, you could have a menu appear in the left column on the home page and in the right column on other pages in the site.
We saw in Chapter 4, “Content Is King: Organizing Your Content” menus and links have some important characteristics:
Menus control the site. Pages are dynamic and so don’t exist until linked to.
Menus/links and content are completely independent of each other in the database; content must be created and then linked to.
Menu links can be created as you are creating the content after it is saved.
Menu links can link to content or components.
Menu links determine the appearance of the page linked to.
Let’s look in more detail at the three parts of a menu item: the what, where, and how. To do this let’s create a menu item.
The Menu Manager contains all the menus on a site. Each menu controls where links go to and what the page looks like when you get there within a specific module.
To better understand the where and the what, let’s create a menu item (a link) within a menu. It doesn’t matter which menu at this point; you can pick any to try this out.
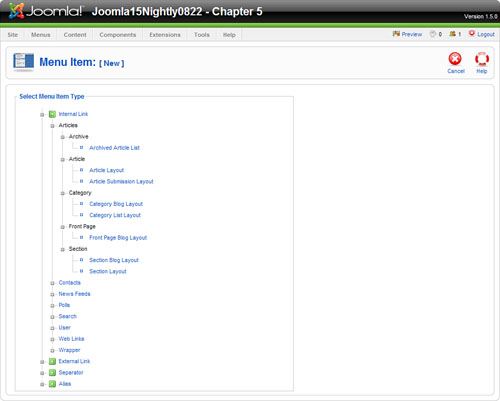
When you create a menu item, as we saw in Chapter 4, you get a screen where you are presented with a tree-like structure. You click the option to drill down to further choices. The top level of the tree is shown in Figure 5.3.
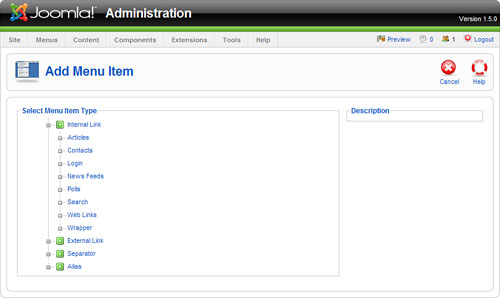
The purpose of this first screen is for you to decide what the page will look like when the link is followed. Joomla calls this a page’s layout. Different layouts combine one or more articles based on their section or category in a selection of styles. Let’s look at some of the main ones.
There are many choices, and you can only see one at a time, so I have created a compilation of them all, shown in Figure 5.4. If you have installed any components that can be linked to, such as Mosets Directory, they will also be shown as menu options.
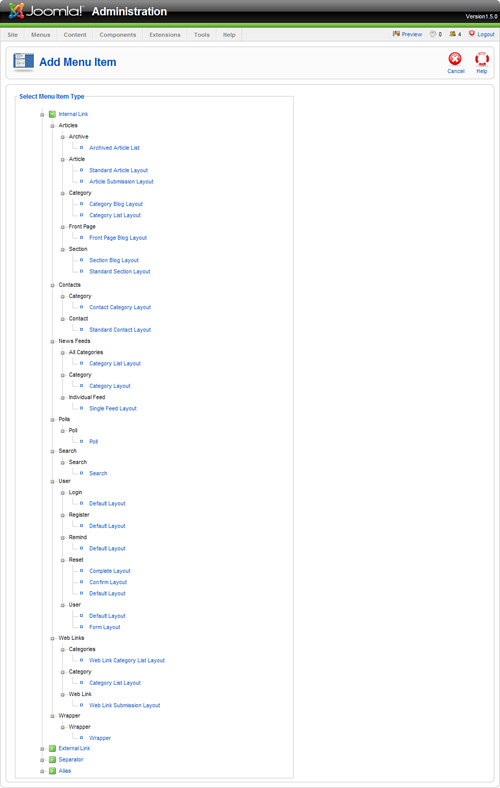
Now, this list is intimidating, but don’t panic. Right now, we only need to consider four of these options:
Articles→Category→Category Blog Layout
Articles→Category→Standard Category Layout
Articles→Section→Section Blog Layout
Articles→Section→Standard Section Layout
A menu link can go to three basic pages: a single article, an entire category, or an entire section. It could also go to the equivalents in a component, for example, a single component item or a component category. Which one you choose will depend completely on the site structure you have created.
The difficulty here is the content structure/hierarchy is arbitrary anyway, and there are several ways of setting up a site, as we saw in Chapter 4. This definitely makes for a very flexible system but one that can be a challenge to set up. Once you have set that up, you have to decide how you will construct the menus to link to it. So plan the site content structure in sections and categories and then plan the menus and how you will link to them.
Let’s return to our example of the widget site we have been using. We considered these two structures:
Sections | About Us | Services | Widget Blog |
Categories | About Us | Blue Widgets | Widget Blog |
Green Widgets |
And
Sections | AllContent |
Categories | About Us |
Blue Widgets | |
Green Widgets | |
Widget Blog |
In the first example, we could use links to either sections (About Us, Services, and Widget Blog) or links to the categories (About Us, Blue/Green Widgets, Widget Blog).
In the second example, we would be much more likely to use category links because we had everything bundled in one section.
Now that we’ve briefly looked at the where, let’s look at the what (what the pages look like). There are two basic layouts you can have when you follow a menu item: a blog and a standard layout. A blog is so named because it is similar to that seen on many blogs, a series of paragraphs with the opportunity to “Read More.” A standard layout is a table with all the articles listed as titles only.
Note
It is possible to create your own customized layouts of articles by creating overrides in the template. We will look at this in more detail in Chapter 9.
Thus we have two basic options of how to present content:
The blog layout shows content articles with the option of showing some “intro” or “teaser” text. There are also more presentation options; you can have one column or ten. The first few items can have summary text, and the rest could be just links. The blog format is much more flexible than the standard layout.
The standard (table) layout shows all content items with titles only. The titles are links to the items themselves.
Note
We have been talking about two types of blogs (sorry). The Widget Blog, discussed in our widget site, is a blog that we see all over the Web, blogspot.com, for example. Joomla, however, uses the word to describe a specific article layout. Of course, the name is taken from “blogs,” but just be aware that the word has a specific meaning in Joomla.
Let’s develop our site a little bit more so we can see what these layouts look like.
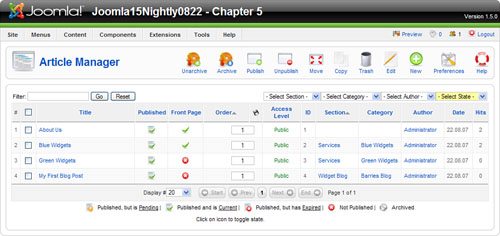
When we last left our widget site in Chapter 4, we had four articles in two sections (see Figure 5.5).
Now we have a few articles, we are going to create some menu links to them in blog and standard formats. We will actually have them pointing to exactly the same content; the layouts will simply be different. This also serves as a good example of how a one to one relationship does not exist between menu links and content.
Go to the Menu Manager and open the mainmenu. If you were following along in Chapter 4, you will have a few menu items that we created, as shown in Figure 5.6.
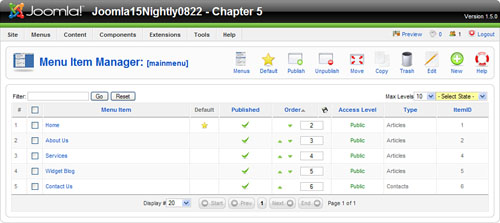
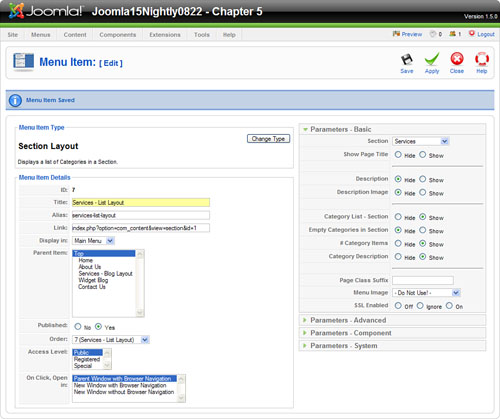
If you remember, in Chapter 4 we created links to section blog layouts. Let’s open one of these menu items and find out in more detail what a menu item is all about.
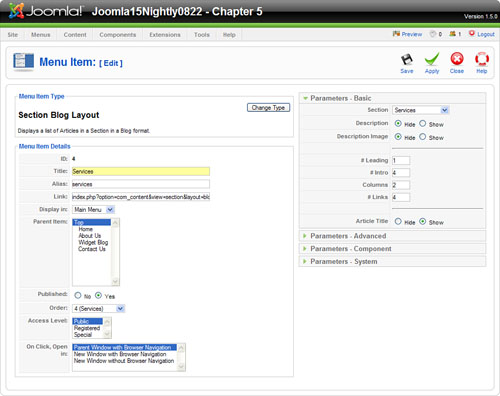
Open up the Widget Service menu item as shown in Figure 5.7.
Last, there are a host of parameters that control what the page will look like when the menu link is followed. This is the “what” that we originally started with in this chapter.
There are many parameters that can be set: basic, advanced, component, and system.
The choice of blog or table, and then the parameter settings in the menu item are the biggest factors in controlling the look and flow of a Joomla site. Note this description for a blog layout applies whether we are linking to a section or a category.
Rather than regurgitate the information on the Help site, let’s look at some of the more common or important parameters shown on the right side in Figure 5.7. The most important settings are those that determine how many items will be shown and in what format.
The basic parameters were shown expanded in Figure 5.7. In addition to the basic settings, such as whether the description/article title is shown and what section it is linked to, the basic parameters control how many articles are shown and how they are shown.
The basic choices are full width or multiple columns. It’s also possible to have some full width items and then break them into columns. It’s not currently possible to do this the other way around, to have, say, a couple of columns and then some full width items.
The parameters that control the number of columns in a blog layout are:
Leading. The number of full width content items.
Intro. The number of items that will show the “intro” text.
Columns. The number of columns to use. More than three will probably not look very good.
Links. The number of items that will be links only. They follow the ones that have intro text.
The advanced parameters, shown in Figure 5.8, determine the order in which articles appear.
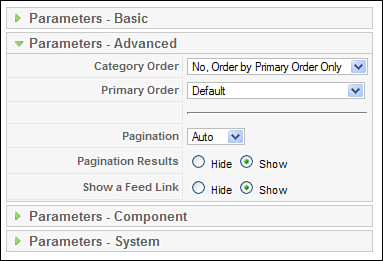
The actual order in which content items appear can be quite complicated. They could be listed by date, alphabetically, as selected in the content manager, to name a few. There are basically two overarching options:
You can sort (if you have more than one) the content into categories first by selecting anything other than “No, order by Primary Order only.” You can sort the categories alphabetically or by “Ordering,” which means the order that they appear in the Category Manager. Then the content items will get sorted by what you select in the Primary Order.
You can bundle all the items together by selecting the “Primary Order Only” and then whatever you desire in the Primary Order.
Obviously, these are only meaningful if you have items from more than one category in the link.
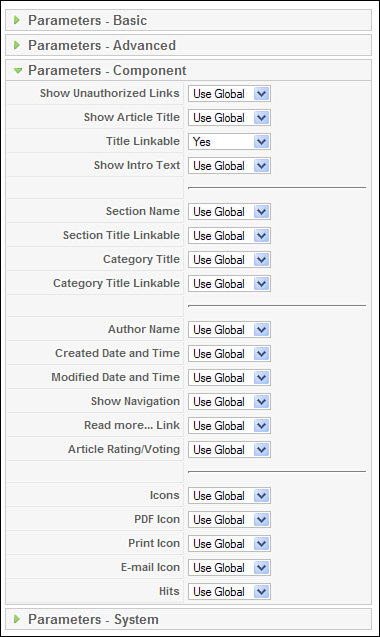
The component parameters, shown in Figure 5.9, are duplicates of ones in the Article Manager preferences, such as whether to show author names. Having these options allows you to override the global settings on a menu item (page-by-page) basis.
Last, the system parameters include settings such as whether the page title is to show, as shown in Figure 5.10.

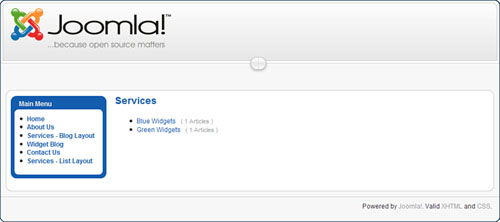
If we keep all of the default parameters, our live site will look like that shown in Figure 5.11.
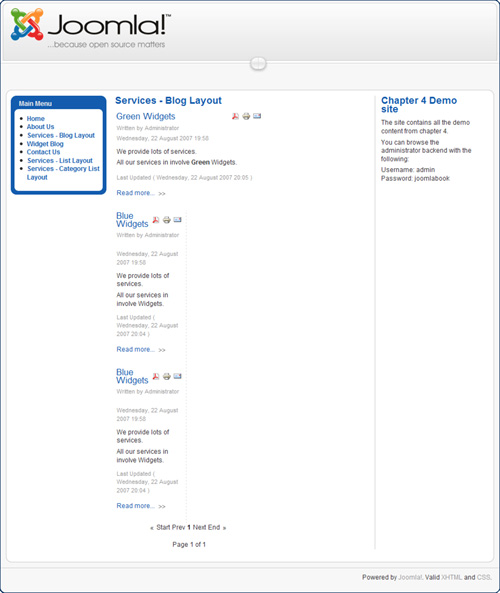
This screenshot is the blog that is shown with our two content articles. It’s a blog of a section. Here you can see there is one full width leading content item, and four are shown in two columns.
Next we create a page with the same articles from the services section, but shown in a list layout. Sometimes this is called a table layout or a standard layout. Let’s create a second menu item that links to the same content but presents it in a different format. In addition to showing the second main layout option in Joomla, this will also illustrate the concept that the content is dynamic and that the same content in the database can appear on many pages.
Going to the mainmenu in the Menu Manager, we click New and this time select the Section Layout from the option tree circled in Figure 5.12.
The New Menu Item screen is more or less the same as before except the parameters are different (see Figure 5.13).
Again, we give the menu link a title and make sure we select the correct section. The result in the frontend is shown in Figure 5.14.
The main difference in parameters from the blog layout is in the basic settings. As you can see in Figure 5.13, you can set various options for how the categories are listed.
There is little difference with the blog layout whether you have a menu item linking to a section or a category, but the parameters and presentation for the list/standard layout is a little different. Let’s create a list/standard layout to a category to see this in action.
Going to the mainmenu in the Menu Manager, we click New and this time select the Category List Layout from the option tree.
The New Menu Item screen is more or less the same as the Section List Layout, except the parameters are different (see Figure 5.15).
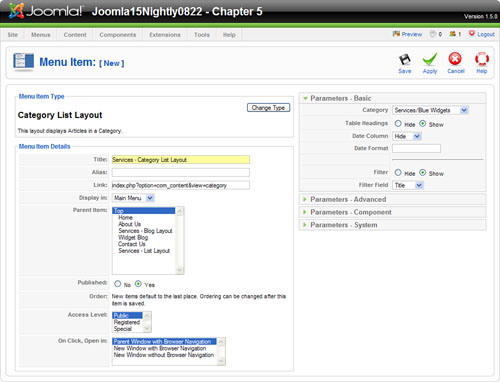
Again, we give the menu link a title and make sure we select the correct category. The result in the frontend is shown in Figure 5.16.
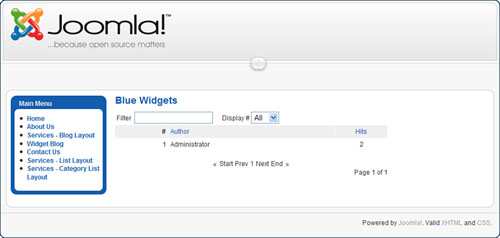
The main difference in parameters between this and the blog layout is in the basic settings. As you can see in Figure 5.15, you can set various options for how the articles are listed.
The Module Manager controls the placement and appearance of a menu, for example, whether you want the menu to be in the left or right column or if the links have a hover effect.
As mentioned previously, when you create a menu, a corresponding module is created for it. The module will be called whatever was used for the menu name.
Note
Any visual look and feel, like a hover effect, you want for a menu must be present in the CSS files of a template. Most templates have a number of options pre-created, and you select between them using the module suffix parameter.
As an example, let’s check out some templates. I am going to use some of the demos from www.joomlashack.com; you can find these four templates at
Their menus are shown in Figure 5.17.
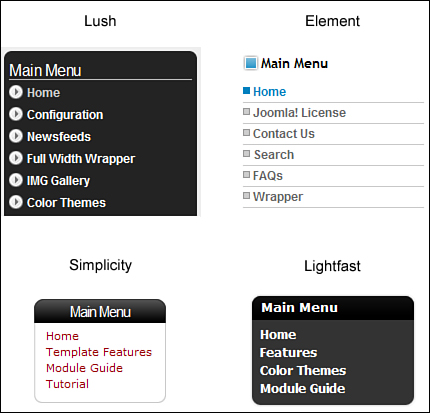
The underlying XHTML code outputted by Joomla is identical in these four examples. The difference is that slightly different menu links are used (which I consider content), and the CSS is different. All of that CSS is controlled by the template. The point to emphasize here is that the module and the template CSS are controlling the appearance of the menus.
Let’s see how this is done. If we go to the Module Manager (Extensions>Module Manager), we see a list of all the modules currently on the site (see Figure 5.18).
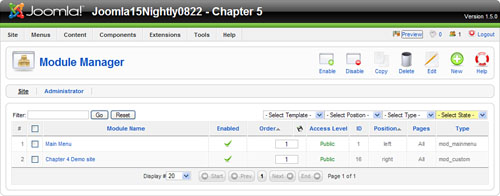
You can see in Figure 5.18 that we have a module called Main Menu, which corresponds to the...mainmenu. The module type for this is a mod_mainmenu.
Note
Joomla is talking about two different things for mainmenus! One is the name of the main menu of the site that serves as the main navigation in a default install. The second use of the term is that mod_mainmenu is the type of module that controls a menu, any menu. It probably should be called just mod_menu.
Let’s look closer at how we can control the menu. Clicking the Main Menu module gives you the parameters for that menu (see Figure 5.19).
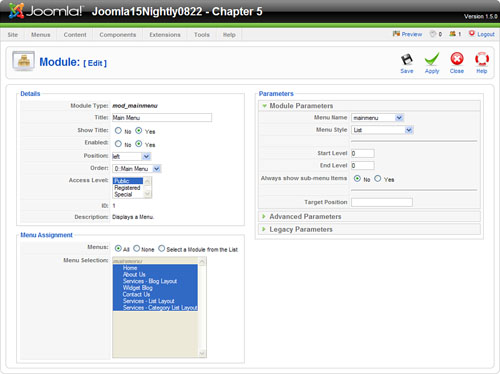
There are many options here for the parameters of the module. Let’s look at some of the more important ones.
Show Title determines whether the title is shown on the page output. This will be an H3 tag unless overridden in the template.
The Position option controls what module location the menu appears in. This is set by the designer of the template you are using. Note the descriptive location of a module, for example, left doesn’t have to actually be on the left. It will depend on where the designer put it. If using a third-party template, refer to the documentation provided.
Using the Access Level function starts to make your site much more interactive. Public is, well, public. Anyone will be able to see it. Registered means only registered users will see it. Special means it will only be visible to administrators. This parameter can be used in several ways. The most obvious use is to have a menu that links to pages that you have to register to see. More sophisticated is to have links to submit content for registered users. This is a great way to build a content rich site with lots of contributors. Setting a menu for special (admin) only is good while you are setting up the site or for functions you only want admin to use.
The Menu Style determines the output for your menu. There are two main ways to display your menu: One is to use a table for the layout (either vertical or horizontal), and the other is to use a bulleted list. In Chapter 9 I discuss at length template design and how to make W3C-valid websites. A big part of this is the subtle design differences between using tables or pure CSS for layout. This is getting technical; just know that you need to select whatever the template documentation calls for. Also you can’t have sublevels currently in 1.0.X with a flat list.
At the time of writing, Joomla 1.5 has legacy support for the previous way that a bulleted list was rendered (flat list) and a new way that allows more flexibility (list).
Thus there are four current options:
List. New method of showing a bulleted list
Vertical. Uses a vertical table
Horizontal. Uses a horizontal table
Flat List. Old method of showing a bulleted list
The key improvement to the new list is that you can now have submenus that will have flat/bulleted lists <ul> inside each other. This makes design tricks such as suckerfish drop-down menus possible without any third-party extensions.
The Menu Suffix and Module Class Suffix control the appearance of the menu. All of the menus will use CSS in the template to style how they look. By carefully coding the CSS, the menu’s appearance can be quickly and easily changed based on the suffixes used. An example of how this works might be different colored rounded boxes, as shown in Figure 5.17, with our Joomlashack examples.
Perhaps the most important parameter is the Menu Assignment. This controls which pages the menu will appear on. Now remember that a “page” only exists if a link points to it, so the list here is really a list of menu items (links) rather than pages. You can select All, None, or Select. You can also CRTL+click to select multiple pages...I mean links!
Joomla 1.5 has a feature with which you can create submenus, and they can be displayed in various ways. In the previous version of Joomla, it was not possible to have submenus if you were displaying your menu as a flat list. This was an issue because a flat list is a more standards-compliant method of displaying links.
In 1.5, this functionality was added to menus. It allows you to have submenus and flat lists. This is very important, as in the hands of a skilled template designer it allows you to do things such as have drop-down menus and images for links without having to resort to JavaScript or tables, both of which are bad for accessibility, SEO, and W3C compliance.
If “always show submenu items” is set to “yes,” you get the following output. Note that you must have the menu style selected as List, and I usually have the end level set to 99 to make sure it’s always expanded.
<ul class="menuthreelevel">
  <li id="current" class="active item1"><a href="#"><span>Home</span></a></li>
  <li class="parent item27"><a href="#"><span>1st Link 1st level</span></a>
    <ul>
      <li class="parent item34"><a href="#"><span>1st Link 2nd level </span></a>
        <ul>
          <li class="item52"><a href="#"><span>1st link 3rd level</span></a></li>
          <li class="item53"><a href="#"><span>2nd Link 3rd level</span></a></li>
        </ul>
      </li>
      <li class="item2"><a href="#"><span>2nd link 2nd level</span></a></li>
      <li class="item37"><a href="#"><span>3rd link 2nd level</span></a></li>
    </ul>
  </li>
  <li class="parent item41"><a href="#"><span>2nd link 1st level </span></a>
    <ul>
      <li class="item50"><a href="#">1st Link 2nd level</a></li>
      <li class="item48"><a href="#">2nd Link 2nd level</a></li>
      <li class="item49"><a href="#">3rd Link 2nd level</a></li>
    </ul>
  </li>
</ul>
Notice this output. There are multiple classes on the <li> tags allowing advanced templating.
In this chapter, we looked at menus and navigation for a Joomla website. It’s important to realize that the menu links actually control the appearance of the page that is linked through the menu link’s parameters in the Menu Manager.
We saw that
The initial four menus—main menu, other menu, top menu, and user menu—are only Joomla’s suggestions or examples. In most cases you will need to create your own or revise them.
The “backend” part of a menu, where the links go and what they do are controlled by the Menu Manager. The frontend part of a menu, where it is and what it looks like, is controlled by a menu’s module.
A menu link can point to content sections, categories, or individual content articles. They can also point to components.
There are two main layouts of a Joomla page, blog and standard. The blog layout displays intro text with a “Read More” link. The standard or list layout shows a table of linked titles. Which layout is used is determined by the menu link parameters.
A blog layout presents content items in any number of columns, with the option to show intro text along with a “Read More” link.
A standard layout shows articles as linked titles in a table. The presentation for a section is slightly different than for a category.
The module for a menu controls its placement on a page and its appearance. It also controls which pages the menu will appear on and what access level can see them (guest or registered user). The menu’s appearance is determined by code in the template’s CSS.
Various submenus are possible using advanced CSS techniques. These could be expandable menus or drop-downs.