In This Chapter
Joomla is one of the most popular open source Content Management Systems (CMS) on the planet. The first step in becoming part of the “Joomlasphere,” the vibrant community that exists around the Joomla Project, is to download Joomla and install it on your web server.
This chapter shows you how to get a Joomla-powered site up and running. The two steps are to find and download the latest files and to install them on a web server. This chapter describes both a local installation (your home computer) to use as you read this book (if you don’t have a hosting account or have a slow Internet connection) and real web server installations. The topics covered in this chapter are
How do I install Joomla?
Where can I find the most current Joomla files?
How do I unpack the Joomla files on my desktop computer?
How do I unpack the Joomla files on a hosting account?
How do I use the Joomla Installation Wizard?
How can I support the Joomla Project?
The process of installing Joomla involves three steps:
We will look at each of these in turn. There are two alternative paths you can take for step 2, either to unpack the Joomla file package on a remote hosting account or to create a web server that actually runs on your desktop/laptop computer. This second technique is a useful way to try out Joomla in creating a site and then transferring it to a hosting account.
The home of the Joomla Project is www.joomla.org. This is the website that acts as a focal point for the community of users and developers that are part of the “Joomlasphere.”
The Joomla site is actually a collection of separate sections and sites for different aspects of the project—with one exception: They are all powered by Joomla.
www.joomla.org—. The main Joomla site and news. This lists the official news blog for Joomla. You can subscribe to news via RSS by clicking the link in the left-hand column.
help.joomla.org—. Documentation and help for Joomla. This section is full of guides, help screens, and FAQs to help you get up and running with your Joomla site. Also found here is the official Joomla manual, currently version 1.0.11.
forum.joomla.org—. At over 150,000 members at the time of this writing, the official Joomla Forum is one of the biggest forums on the Web. You can get help from the active Joomla community, whether it’s for templates, translations, components, or just a general help question. When you are asking for help, remember that the forum is all volunteer, so provide as much detail on your problem as you can and be respectful.
extensions.joomla.org—. The Joomla extensions directory, packed with over 2,000 third-party extensions. Split into components, modules, and plugins, this is the place to come to extend the functionality of your Joomla website. It even includes useful reviews and rating tools so you can see what other people think of a particular extension.
shop.joomla.org—. Get your Joomla T-shirt here!
dev.joomla.org—. For developers, this is where you can find documentation on the Joomla API, blogs for the various developers of the core team, and various wikis and tutorials.
The last site is one that doesn’t run on Joomla, but it’s the one we are interested in right now. It’s called the forge and is located at www.joomlacode.org. It serves as the code repository both for the main Joomla files and the hundreds of GPL third-party extensions.
As I am writing this book, the next generation of Joomla, the version known as 1.5, is still in a version known as a Release Candidate. This means that feature development has been frozen, and bugs are being fixed that were found in Beta ready for a stable release. Hopefully by the time you are reading this book, it will be a stable release. With that in mind, be aware that the following description of how to download the Joomla files is sure to change, but I’ll try and explain the general concept of how the forge works so you should be able to find the files you need.
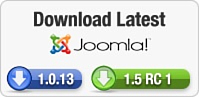
On the home page of Joomla, there will be some buttons that link directly to the forge files. Right now they look like Figure 2.1.
When you click the button to download 1.5 RC 1, you are sent to the forge at joomlacode.org. We have actually drilled down a few levels into the site, and the files we need to download are shown in Figure 2.2.
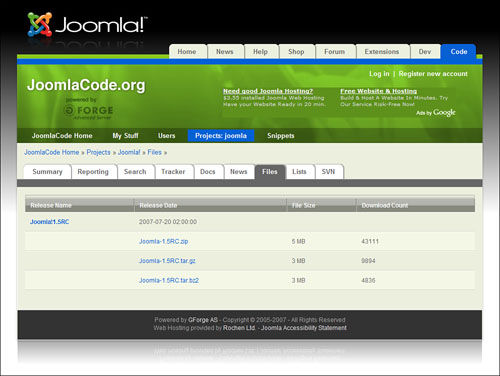
Here we see several different compression types/formats of the same file: zip, gz, and bz2. I usually download the zip file; it’s slightly bigger but more universal. Just click the one you want and you’ll get a dialog box asking you to save the file on your computer.
Before we move on, let’s take a quick look at how the files are structured in the older version of Joomla, 1.0.12. It’s more than likely that 1.5 will follow a similar format. If we click the button to download 1.0.12, we get a slightly different choice, as shown in Figure 2.3.
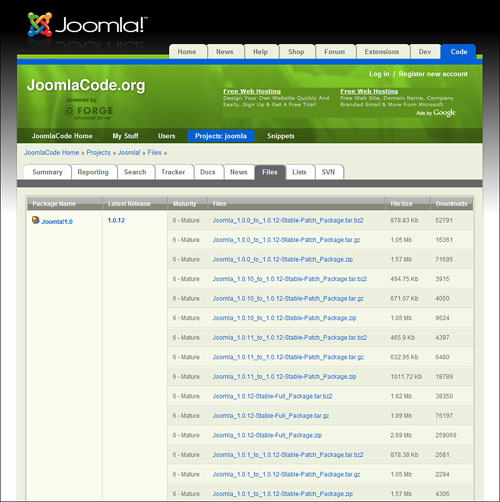
The bottom part of the screen shot has been cut off, the general idea is what we need.
You will see that halfway down are the files for the full package for this version; here it’s called Joomla 1.0.12-Stable-Full_Package.zip. There are the same three compression options as for 1.5. There are also many packages that are updates based on what version you currently have installed.
The naming convention for Joomla versioning is “A.B.C,” which represent the following elements:
A = Major release number—. Currently all versions of Joomla begin with “1” (1.X.X).
B = Minor release number—. This book is based on Joomla 1.5, as opposed to the previous version 1.0.
C = Maintenance release number—. Currently the 1.0 series is up to 1.0.13, so there have been 13 maintenance releases. We can expect 1.5 to follow a similar pattern starting at 1.5.0 for the stable release.
The Least You Need to Know
The core Joomla files are available for free at www.joomlacode.org. There are links directly to the files on the home page of www.joomla.org. When downloading them, make sure you are getting the correct version, either the full package or an update.
Note: Important
You cannot upgrade from Joomla 1.0 to Joomla 1.5. There are significant enough changes in the code that simply over writing files would break your site. The development team has carefully chosen to talk about migration (http://dev.joomla.org/component/option,com_jd-wp/Itemid,33/p,107/):
“Joomla 1.5 does not provide an upgrade path from earlier versions. Converting an older site to a Joomla 1.5 site requires creation of a new empty site using Joomla 1.5 and then populating the new site with the content from the old site. This migration of content is not a one-to-one process and involves conversions and modifications to the content dump.”
This has been a deliberate choice to minimize the number of users who might attempt the “overwrite the files” technique. More can be found in the forum (David Gal, http://forum.joomla.org/index.php/topic,63232.0.html):
“Joomla 1.5 is so significantly changed from 1.0 that there is no ‘upgrade’ path. This is the reason we are providing a migration path. The concept is to build a new site and to migrate data from the old site. Extensions need to be installed and configured as if the site is new. The core data migration does reconstruct menu items for core elements and also keeps core module records with configuration settings.”
The development team is very aware of the migration needs of Joomla. By the time you are reading this, there will be a developed process for it.
So now that we have a compressed Joomla file package of several megabytes, what do we do with it?
Note: Important
Before you begin installing Joomla, you will need to have a MySQL database ready for Joomla to use.
If you are installing locally (on your desktop) with WAMP5, it will have the permissions to create a database as you go through these steps.
If you are installing on a web host, you will need to pre-create an SQL database. Make sure you note the username, password, and database name. The most common way to set up a database will be through some sort of button/link in your hosting admin panel. Look for something that talks about MySQL databases.
If I unzip the Joomla file package I now have and try to run/open the main index.php file, it will open in some sort of editor by which you can see all the code. There will be no website. This is because Joomla is an example of client-server software.
Joomla is not a self-contained program, like Microsoft Word or Firefox. With these sorts of programs, you simply install them onto your computer by running an installation file. Joomla is very different by comparison.
Joomla is a complex series of Hypertext Preprocessor (PHP)[1] scripts that run on a web server. When you browse a Joomla site, these scripts are generated on the fly and create what you see on the pages of the site. The key term here is web server. This is an example of client-server scripting. The software is actually running on a different computer (the server), and you are interacting with it from a client (your web browser).
Thus you cannot download Joomla and try to run it on your computer like an EXE file. It has to have a server, which means you need to have a hosting account.
Now, before you shell out your hard-earned money for a hosting account, there is something else you can do first. You can actually run a web server on your local computer, in other words, your desktop or laptop. This is known as having a localhost. It may sound like I just contradicted myself from the previous paragraph but not quite. You can’t “run” Joomla itself on your own computer, but you can install a localhost web server for it to “run on.” In this scenario, your computer is acting as both the server and the client. One advantage is that your website will load very fast because it’s coming from your own computer. One disadvantage is that you will have to move or “port” the site to a real web host later. It’s still a great way to learn about Joomla before starting to develop your site.
The Least You Need to Know
Joomla needs a (web) server to run on. A good way to learn Joomla is to run a web server on your own computer, know as using a localhost. This makes the “website” blazingly fast.
To set up your localhost, you need some software that runs Apache, PHP, and MySQL on your computer. These are the component scripts of a remote web server on a hosting account. There are two popular packages that include all of these scripts, and both are free:
WAMP5—. (www.wampserver.com/en/index.php) for Windows
XAMPP—. (www.apachefriends.org/en/xampp.html) for Windows, Mac OS X, and Linux
I am going to quickly run through setting up WAMP5. Note that this package is Windows-specific. If you get stuck with this part of the process, you can refer to Appendix D, “Installing WAMP5,” for how to install Wampserver.
Download WAMP5 from www.wampserver.com/en and then install it. It will create a folder called c:wampwww.
Extract/unpack the Joomla package you downloaded into a folder inside www. It doesn’t matter what it is called. For example, c:wampwwwJoomla would work. Make sure that you don’t unpack it in such a way that you end up with two folders, for example, c:wampwwwJoomlaJoomla-1.5-RC1.
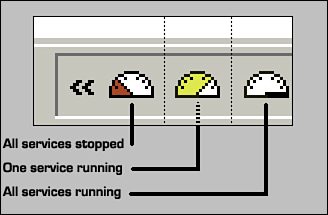
Run WAMP5. You should get a handy icon in your system tray (the icons at the bottom right of a window’s desktop), which will look similar to Figure 2.4. The figure shows three possible versions of the icon.
You need the dial to be white to continue.
Now open a browser and go to http://localhost (no “www”), or you can left-click the icon and select localhost. You should see a page that looks like Figure 2.5.

If you are not seeing this page, then you should stop and figure out why. You have to get this page before you can proceed. The WAMP5 site has some helpful troubleshooting FAQs and a forum. You should see your folder called “Joomla” in the list of Your Projects. Click that folder, and you will get taken to that website running locally on your computer.
Note
At some point, you will probably want to transfer your Joomla installation from your local computer to a host. Some guides on how to do this can be found on the Joomla forums: http://forum.joomla.org/index.php/topic,5556.0.html and http://forum.joomla.org/index.php/topic,5703.0.html.
The Least You Need to Know
There are several free packages that include all the files and scripts needed to run a web server on your desktop computer. Wampserver (WAMP5) is one for Windows.
At this point, all we have done is set up the Joomla files and are ready to install them. Before we see how to install Joomla, let’s take a quick look at the upload process if you have a hosting account.
Let’s assume you either have a hosting account or are going to get one. Joomla needs some minimum requirements to run, and they differ slightly for Joomla’s different versions. Joomla 1.5 has slightly higher requirements than Joomla 1.0.X.
Here are the minimum requirements for Joomla 1.5:
PHP 4.3.x or above—. www.php.net
MySQL 3.23.x or above—. www.mysql.com
Apache 1.13.19 or above—. www.apache.org
You must ensure that you have MySQL, XML and Zlib support built into your PHP. For assistance in making sure you have the proper support, refer to the Joomla Help Forums (specifically, http://help.joomla.org/content/view/34/132/).
For Joomla 1.5, it’s recommended you have PHP 4.4.3 or above (for enhanced security).
A thread on the Joomla forums lists various hosting companies who are active Joomla community members. The list can be found at http://forum.joomla.org/index.php/topic,6856.0.html.
Once you have a host that meets the requirements, you will need to upload the main Joomla files. There are two ways to do this:
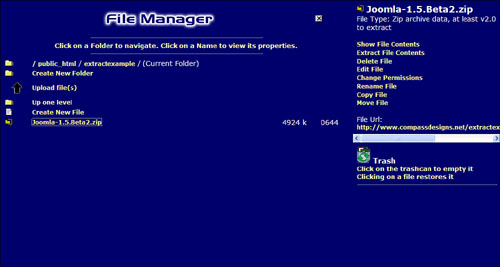
If you have Cpanel with your hosting company, the first method is perhaps the fastest way to do this, and almost all hosting companies provide it. Use this file manager to upload the zip file to public_html (or whatever you have on your host). You can then use it to extract the files. Just click the name of the file, and the option to extract will appear to the right as shown in Figure 2.6.
Many web hosts will have a tool called Fantastico, which allows the instant creation of a Joomla website along with all the databases needed. I actually don’t recommend using Fantastico. Although it makes the process easier, many hosts don’t always have the most current file releases.
If you have gotten this far, it means you have unzipped the Joomla package to either a remote web host or your local computer. Now for the fun stuff—actually installing Joomla.
This installation process is done via a browser and consists of several steps that set up and configure your Joomla site.
Using your browser of choice (mine is Firefox), navigate to the location of all the Joomla files. In my case, on a localhost, it is http://localhost/Joomla. You will see the first installation screen (see Figure 2.7).
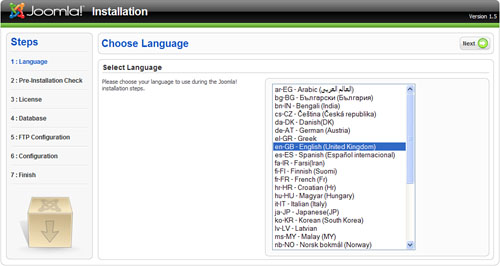
Figure 2.7 shows the first look at some of the internationalization features of Joomla 1.5. You can select among many languages for the installation instructions. After you have selected your language, the next screen you are presented with is the Pre-installation Check screen (see Figure 2.8).
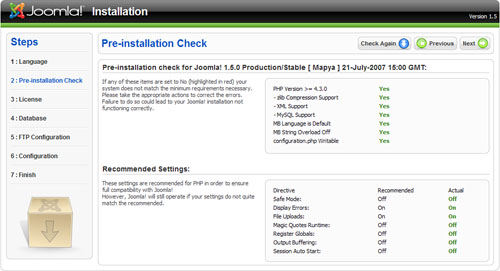
A critical part in the installation process, this screen checks to see if all the minimum system requirements are met.
The first set are required minimums for installation. If they are red (not met), then you need to find a new environment (change hosts) or talk your hosting provider into changing their environment (upgrading PHP for example). Note that the last item, whether configuration.php is writeable, is a permissions issue on a file that is much easier to rectify. You can usually change permissions through the Cpanel provided by your host. This is a tool that is standard with almost all hosting companies.
The second set is recommended settings. If you don’t meet them, you can still install Joomla, but you might experience problems with functionality and security.
When all items are green, you are ready to proceed. Click Next, which will bring you to the License screen (see Figure 2.9).
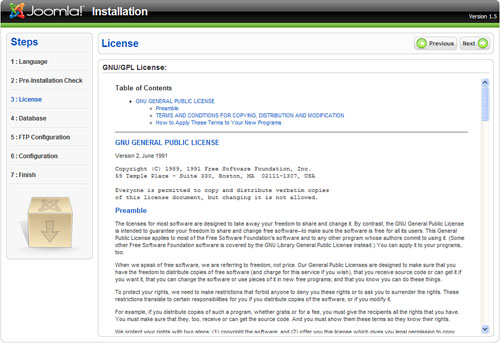
Joomla is released under a GNU/GPL license. One of the most common questions regarding this license is, “Can I remove the footer link that says Powered by Joomla.” It’s actually perfectly OK to do this; you just have to keep the copyright statement in the source code. However, I would recommend that you keep the link.
Why? Because Joomla is an open source project and is not sold, its development receives no funding. The bottom line is that hundreds of programmers around the world are developing this software that you are using right now. If you had to pay for that coding, it would cost over $2 million (www.ohloh.net/projects/20), but you get it for free. In return, keep the link; it will help the project gain in popularity and grow. Don’t hide the fact that you are using Joomla—be proud of it! Don’t be concerned about any kind of Search Engine Optimization (SEO) dilution with an extra link off your page. Links to authoritative sites actually help your SEO!
Joomla is a powerful piece of software. If you are using it for your website, take the time to make a donation, no matter how small. You can make a donation online at www.joomla.org/content/view/689/79/.
The next screen is Database Configuration (see Figure 2.10).

The Database Configuration screen is one of the main pages of the installation process; it’s where you need to enter important information about the database that your Joomla site will use. Note you will see a drop-down for the database type. Joomla 1.5 only really runs on SQL, but some of the foundation has been laid to use more types, for example Oracle, in the next release, 2.0.
The hostname will almost always be “localhost.” The username and password are provided by your hosting company, usually in an email you got when you created the account.
If you are installing on a localhost using WAMP5 or XAMPP, the username is usually “root,” and the password is nothing/blank.
Pick a database name for the SQL database that Joomla will use. Use some sort of name that is not confusing because other scripts use SQL databases, and before you know it, you might have several on your server and will need to tell them apart. Don’t use spaces in the name.
If you are running several Joomla sites but only have access to one database, you will need to use table prefixes to distinguish them, which you need to enter in the advanced settings.
If you have an existing site and are reinstalling over the top of it, you need to select Drop Existing Tables. If you need to keep a backup of them, select Backup Old Tables. Using “jos” as a table prefix is conventional unless you have multiple sites in the same database.
If all was successful, when you click Next you will populate the SQL database and move to the next step.
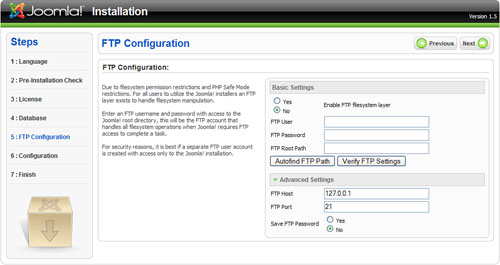
The previous version of Joomla, the 1.0.X series, had issues with ownership of files on a server. It’s a little bit technical, but this should give you the idea: It’s possible for files on an Apache web server to be owned by a user called “nobody.” Go figure. But there would be conflicts with who owned files, whether it was the FTP account or Apache itself. This lead to permission problems when Joomla tried to upload files.
Joomla 1.5 has the solution: It actually uses an FTP account for everything, so no conflicts arise.
If that was all a little confusing to you, just create an FTP account (or use the one provided by your hosting company) for Joomla to use and enter the details in the FTP Configuration screen shown in Figure 2.11.
The Main Configuration page is where you enter some information about your new site and determine how you will insert content into your site (see Figure 2.12).
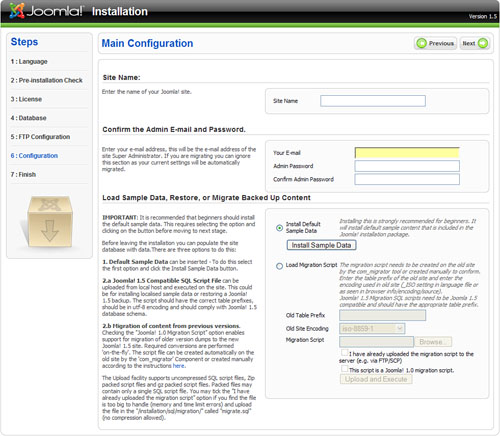
Give your site a name (pay attention to SEO keywords) and then enter the super administration information. The first user in the site will use this information and will automatically get super administrator status. Note that if you don’t change the password, it will use the one shown on the left. Make sure you write it down! Feel free to eat the sticky note you wrote it on once you have committed it to memory, but if you forget it immediately (which I have done) you will need to reinstall.
When it comes to the content of your sparklingly new site, you have three choices:
Install default sample data—. This installs the default Joomla content that you have probably seen all over the Web with “Welcome to Joomla.” Note that it also includes all the menus, navigation links, and sections/categories. If you are learning how to use Joomla, this is highly recommended. It’s easier to adapt and revise than to start from scratch. If you don’t click the Install Sample Data button, you’ll be starting out with a blank site!
Load local Joomla 1.5 SQL script—. This is an SQL file that might have a customized set of content.
Load migration script—. This is a special function that is part of a process to migrate a Joomla site running on 1.0 to 1.5 and requires a special component to do so.
Caution
In chapter 4 you will need a Joomla installation to follow along with the examples. The chapter starts with NO sample data installed, so skip this step if you want to use the installation you are creating right now.
Cross your eyes, close your fingers, and click Next. Hopefully you will see the screen shown in Figure 2.13. You now have a website “Powered by Joomla.”
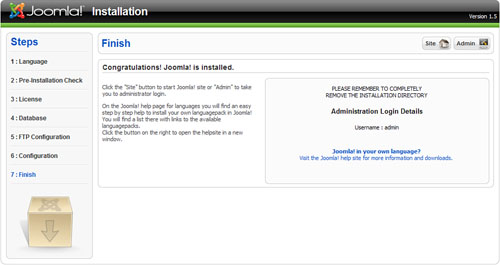
If you do get this result, you can investigate different language options, view the site, or jump right to the administration of your site.
If you don’t get this page, then you have some work to do. Often issues arise because of server environments. If the solution is not obvious, a useful step is to copy the error message or the main part of it and then search for it on the Joomla help forums, forum.joomla.org, and Google it. Chances are that someone else has already run into this error and has posted the solution online. (Useful trick: Include the message in double quotations in the search box so you search for the exact phrase.)
Installing Joomla is perhaps the biggest hurdle to getting starting on your website. You’ll need to create a MySQL database for Joomla and upload all of the files to a server. After these two steps are complete, it’s relatively easy to use the Joomla Installation Wizard that runs in a browser.
The core Joomla files are available for free at www.joomlacode.org. There are links directly to the files on the home page of www.joomla.org. When downloading them, make sure you are getting the correct version, either the full package or an update.
Joomla needs a (web) server to run on. A good way to learn Joomla is to run a web server on your own computer, known as using a localhost. This makes the “website” blazingly fast.
There are several free packages that include all the files and scripts needed to run a web server on your desktop computer. Wampserver (WAMP5) is one for Windows.
To install Joomla on a web host, your account will need to meet some minimum requirements. Make sure your host does; otherwise, it will cause problems later.
Installing Joomla is easiest with a three-step process:
Obtain the latest Joomla file package.
Unpack the package on a server.
Use a browser-based wizard to complete installation.
If you are new to Joomla, you should install the sample data, but realize it’s only a suggestion of how you can organize content.