Chapter 4
EIGRP
Lab 1: EIGRP Named Mode
This lab should be conducted on the Enterprise POD.
Lab Setup:
If you are using EVE-NG, and you have imported the EVE-NG topology from the EVE-NG-Topology folder, ignore the following tasks and use Lab 1-EIGRP Named Mode in the EIGRP folder in EVE-NG.
To copy and paste the initial configurations, go to the Initial-config folder → EIGRP folder → Lab-1.
Task 1
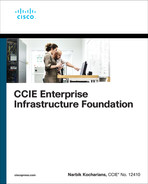
Configure EIGRP on R1, R2, and R3 based on the following policy:
Router | Interface | AS Number |
|---|---|---|
R1 | G0/9 G0/0 G0/2 G0/3 Loopback0–Loopback3 | 200 100 100 100 100 |
R2 | G0/9 G0/1 G0/3 Loopback0 | 200 100 100 100 |
R3 | G0/1 G0/2 Loopback0 | 100 100 100 |
R1 should be configured to use unicast to establish an EIGRP neighbor adjacency with R2.
R1 should use multicast to establish an EIGRP neighbor adjacency with R3.
R1, R2, and R3 should use an EIGRP named mode configuration to accomplish this task.
Task 2
Configure R4 and R5 in EIGRP AS 100. You must use named mode to accomplish this task.
Task 3
Configure R1, R4, and R5 to use unicast to establish their EIGRP neighbor adjacency.
Task 4
Configure R6 in EIGRP AS 200. This router should run EIGRP AS 200 on its G0/9 and Loopback0 interfaces. You should use an EIGRP named mode configuration to accomplish this task.
Task 5
Configure OSPF Area 0 on R6’s G0/9 and R7’s G0/9 and Loopback0 interfaces. The router ID of these routers should be configured as 0.0.0.x, where x is the router number.
Task 6
Configure R6 to redistribute OSPF into EIGRP such that R1 and R2 go directly to R7 to reach the 7.0.0.0/8 network.
Task 7
Configure the hello interval of all routers in AS 200 to be twice the default hello interval.
Task 8
Configure R4 such that in the worst-case scenario, it uses 10% of the bandwidth for its EIGRP updates. This policy should apply to the existing and future interfaces.
Task 9
Configure R1 to summarize its loopback interfaces and advertise a single summary in the EIGRP AS 100 routing domain.
Task 10
Configure R1 to limit the number of received prefixes from R5 to 10. R1 should be configured to receive a warning message once 50% of this threshold is reached and a warning message for every additional route that exceeds the threshold. You should configure Lo1–Lo10 on R5 by copying and pasting the initial configuration, called EIGRP-Lab-1-Task10.
Task 11
Configure R1 to limit the number of prefixes received from R4 to five. R1 should be configured to tear down the adjacency if R4 exceeds the specified threshold. Copy and paste the EIGRP-Lab-1-Task11 initial configuration on R4.
Task 12
Erase the startup configuration and reload the routers before proceeding to the next lab.
Lab 2: EIGRP and Bidirectional Forwarding Detection (BFD)

Task 1
Configure the routers based on the previous diagram. Do not configure any routing protocol.
Task 2
Configure EIGRP AS 100 on all directly connected interfaces of these two routers and ensure reachability. R5 should be configured using EIGRP classical mode, and R6 should use the EIGRP named mode configuration style.
Task 3
Configure and test BFD on these two routers.
Task 4
Erase the startup configuration of these two routers and reload the devices before proceeding to the next lab.
Lab 3: EIGRP Stub
Lab Setup:
If you are using EVE-NG, and you have imported the EVE-NG topology from the EVE-NG-Topology folder, ignore the following tasks and use Lab 3-EIGRP Stub in the EIGRP folder in EVE-NG.
To copy and paste the initial configurations, go to the Initial-config folder → EIGRP folder → Lab-3.
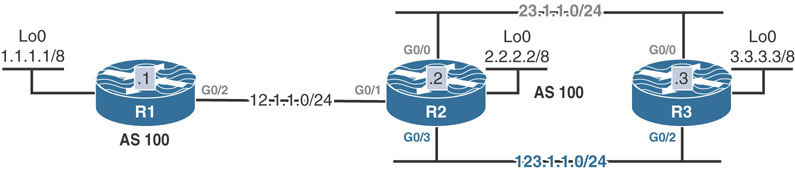
Task 1
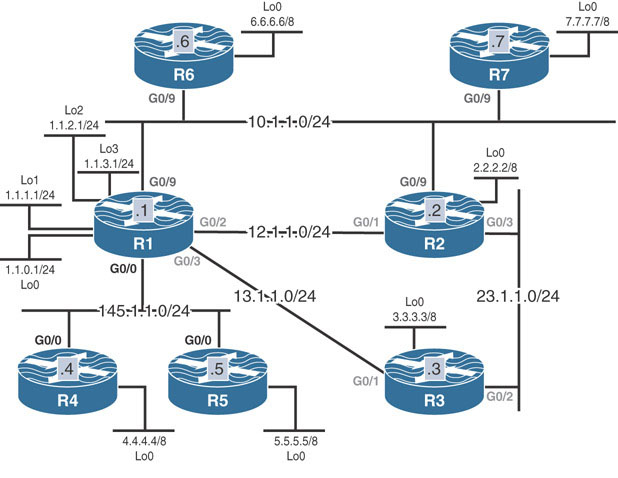
Configure EIGRP AS 100 on the G0/2 and G0/1 interfaces of R1 and R2, respectively, as well as on all loopback interfaces of these two routers. On R1 configure EIGRP using the classic mode, and on R2 configure EIGRP in named mode to accomplish this task. Do not run EIGRP on the G0/1 interface of R1 or the G0/2 interface of R2.
Task 2
Configure R1 and R2 to summarize their loopback interfaces in EIGRP.
Task 3
Configure the following static routes on R1 and R2 and redistribute them into EIGRP:
On R1: 11.0.0.0/8 via G0/1
On R2: 22.0.0.0/8 via G0/2
Task 4
Advertise the G0/1 interface of R1 and the G0/2 interface of R2 into RIPv2 and disable auto-summarization. You should redistribute RIPv2 into EIGRP and use any metric for the redistributed routes.
Task 5
Configure EIGRP stub routing on R1 by using the command eigrp stub connected. Test this option and verify the routes in the routing tables of both routers.
Task 6
Remove the eigrp stub connected option configured in the previous task and reconfigure EIGRP stub routing on R1 by using the eigrp stub summary command. Test this option and verify the routes in the routing tables of both routers.
Task 7
Remove the eigrp stub summary option configured in the previous task and reconfigure EIGRP stub routing on R1 by using the command eigrp stub static. Test this option and verify the routes in the routing tables of both routers.
Task 8
Remove the eigrp stub static option configured in the previous task and reconfigure EIGRP stub routing on R1 by using the command eigrp stub redistributed. Test this option and verify the routes in the routing tables of both routers.
Task 9
Remove the eigrp stub redistributed option configured in the previous task and reconfigure EIGRP stub routing on R1 by using the command eigrp stub receive-only. Test this option and verify the routes in the routing tables of both routers.
Task 10
Remove the eigrp stub receive-only option configured in the previous task and reconfigure EIGRP stub routing on R1 by using the command eigrp stub. Test this option and verify the routes in the routing tables of both routers.
Task 11
Erase the startup configuration and reload the routers before proceeding to the next lab.
Lab 4: EIGRP Filtering
Lab Setup:
If you are using EVE-NG, and you have imported the EVE-NG topology from the EVE-NG-Topology folder, ignore the following tasks and use Lab 4-EIGRP Filtering in the EIGRP folder in EVE-NG.
To copy and paste the initial configurations, go to the Initial-config folder → EIGRP folder → Lab-4.
Task 1
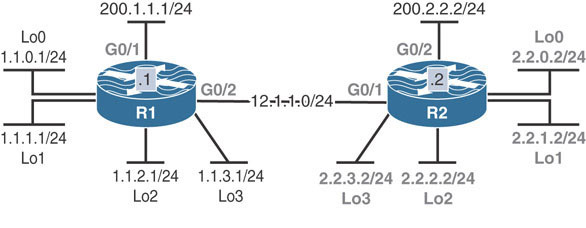
Configure EIGRP 100 on all routers and advertise their directly connected links into EIGRP.
Task 2
Configure R4 such that it filters existing (1.0.0.0/8, 11.0.0.0/8, and 111.0.0.0/8) and future networks behind R1. Do not use distribute-list, access-list, prefix-list, or route-map to accomplish this task.
Task 3
Configure R4 such that it uses R2 as its only connection to network 200.1.1.0 /24. You should use an access list to accomplish this task.
Task 4
Configure R4 such that it takes R3 to reach network 200.2.2.0 /24. R4 should only use R2 as the next hop to reach network 200.2.2.0/24 when R3 is down. You should use a standard access list to accomplish this task.
Task 5
Filter network 2.0.0.0/8 on R4. Do not use distribute-list or route-map to accomplish this task.
Task 6
Configure R4 to filter network 3.0.0.0/8.
Task 7
Erase the startup configuration and reload the routers before proceeding to the next task.
Lab 5: Advanced EIGRP Lab
Lab Setup:
If you are using EVE-NG, and you have imported the EVE-NG topology from the EVE-NG-Topology folder, ignore the following tasks and use Lab 5-Advanced EIGRP Lab in the EIGRP folder in EVE-NG.
To copy and paste the initial configurations, go to the Initial-config folder → EIGRP folder → Lab-5.
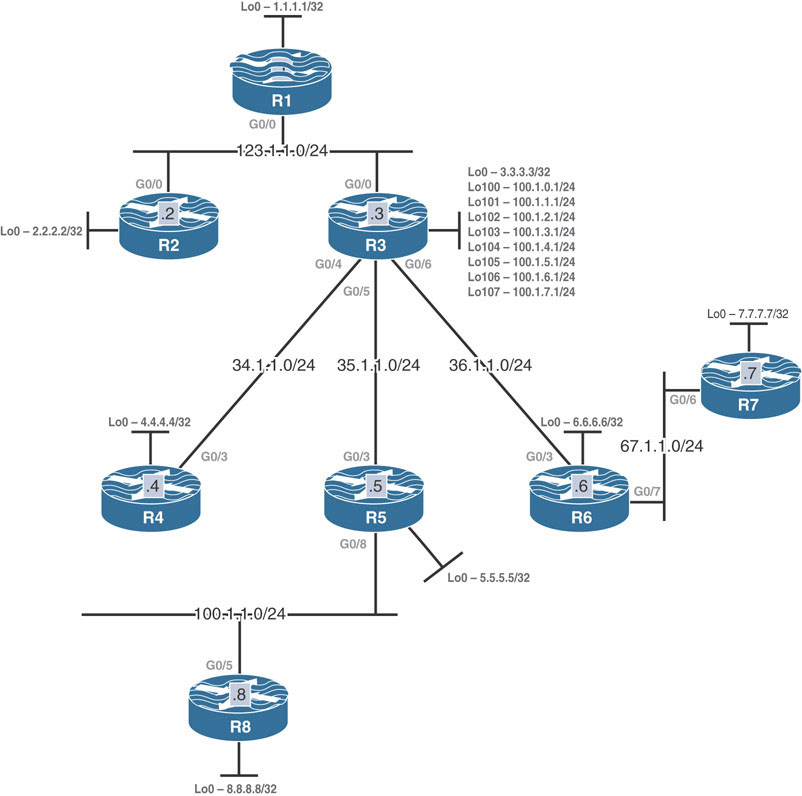
Task 1
Configure the G0/0 interfaces of R1, R2, and R3 in EIGRP AS 100. These routers should be configured to advertise their Lo0 interfaces in this AS, using the following policy:
These routers should be configured to reach each other’s loopback interface/s by going through R1.
Do not use Policy-based Routing (PBR) or configure another AS to accomplish this task.
Task 2
Configure R3’s G0/4, G0/5, and G0/6 in AS 300. Configure R4’s, R5’s, and R6’s G0/3 and loopback 0 interfaces in this AS.
Configure R3 to summarize its Lo100–Lo107.
The summary route should be advertised to R4, R5, and R6 based on the following policy:
R4 should receive the summary only.
R5 should receive the summary plus network 100.1.3.0 /24.
R6 should receive the summary plus all the specific routes.
Configure the minimum number of ip summary-address commands possible to accomplish this task.
Task 3
Configure EIGRP 300 on R4’s Lo134 and Lo135 and advertise a single summary in AS 300.
Task 4
Configure the G0/7 and Lo0 interfaces of R6 and the G0/6 and loopback 0 interfaces on R7 for EIGRP in AS 67.
R7 should be configured to advertise its Lo130, such that the command show ip route eigrp 67 on R6 produces the following output:
D EX 130.3.0.0/16 [170/130816] via 67.1.1.7, 00:00:16,
GigabitEthernet0/7
R7 should use redistribute static to accomplish this task. Do not configure a static route to accomplish this task.
Task 5
Configure the routers in AS 67 such that they log neighbor warning messages and repeat the warning messages every 10 minutes. You should disable logging of neighbor changes for this AS.
Task 6
Configure the routers in AS 67 such that a dead neighbor is detected within 3 seconds.
Task 7
Routers in AS 100 should be configured to use Bandwidth and not Bandwidth + DLY when calculating their composite metric.
Task 8
Configure R2 such that EIGRP never uses more than 25% of its G0/0 link’s bandwidth.
Task 9
Configure the G0/8 interface of R5 and the G0/5 and the Lo0 interfaces of R8 in AS 500.
Task 10
Configure R5 to inject a default route in AS 500 based on the following policy:
R5 should be configured to inject a default route plus networks 4.0.0.0/8 and 6.0.0.0/8 from AS 300.
Task 11
Erase the startup configuration and reload the routers before proceeding to the next task.
Lab 6: EIGRP Authentication
Lab Setup:
If you are using EVE-NG, and you have imported the EVE-NG topology from the EVE-NG-Topology folder, ignore the following tasks and use Lab 6-EIGRP Authentication in the EIGRP folder in EVE-NG.
To copy and paste the initial configurations, go to the Initial-config folder → EIGRP folder → Lab-6.
Task 1
Configure EIGRP based on the previous diagram. If this configuration is successful, these routers should be able to see and have reachability to all routes. You should use named mode configuration style when configuring R2 and R3 and classic EIGRP configuration style when configuring R1 to accomplish this task.
Task 2
Configure R2 to authenticate all existing and future directly connected interfaces using the strongest authentication method available. Use the minimum number of commands and CCIE as the password to accomplish this task.
R2 should authenticate R1 using MD5 and Cisco as the password.
In the future, R3 may have other neighbors that won’t need authentication.
Task 3
Erase the startup configuration and reload the routers before proceeding to the next lab.
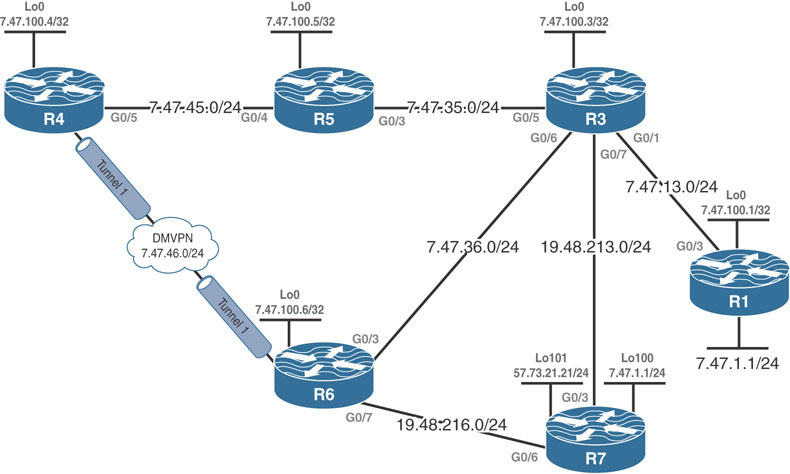
Lab 7: EIGRP Challenge Lab
Lab Setup:
If you are using EVE-NG, and you have imported the EVE-NG topology from the EVE-NG-Topology folder, ignore the following tasks and use Lab 7-EIGRP Challenge Lab in the EIGRP folder in EVE-NG.
To copy and paste the initial configurations, go to the Initial-config folder → EIGRP folder → Lab-7.
Note
Do not access R7 at all. You should only fix the problem identified in the ticket.
Ticket 1
R1 can’t reach R3’s Lo0. You must configure R1 to fix the problem.
Ticket 2
R6 does not have a stable EIGRP adjacency with R4. Do not use an EIGRP command to fix this ticket.
Ticket 3
When R3’s G0/1, G0/7, and G0/6 are down, R3 can’t reach R4’s Lo0. Do not remove any commands to fix this ticket.
Ticket 4
R1’s Lo0 should always have reachability to R4’s Lo0 and G0/5 interfaces, but it does not. You should fix this problem without configuring R1 or R4. You should not remove any commands to resolve this ticket.
Ticket 5
R3 is configured to use multiple paths to R4’s Lo0. However, it’s using only one of the paths.
Ticket 6
R6 can’t reach R7’s Lo101.
Ticket 7
R3 should establish a EIGRP adjacency with R8 over its G0/8 interface. You should make configuration changes on R3 only.
Ticket 8
Erase the startup configuration and reload the devices before proceeding to the next lab.