
Chapter 4. Ansible Basics
You learned a little about Ansible in Chapter 1, “Types of Network Automation,” and saw some examples of using it in Chapter 3, “Using Data from Your Network.” Ansible is the number-one tool used in enterprise networking automation. You can use it for most of the use cases covered so far, including configuration, provisioning, monitoring, compliance, interaction, testing, and reporting.
This chapter covers the following facets of Ansible:
• Main characteristics
• Installation
• Concepts such as variables, loops, and conditionals
• Inventory
• Playbooks
• Roles
After you have finished this chapter, you should be able to understand, build, and execute your own playbooks.
Ansible Characteristics
Ansible is agentless and uses SSH to connect to its targets. It has two types of nodes: control and managed node. A control node is a node where you have Ansible installed. It functions as a management station that connects to the managed nodes and executes instructions. Managed nodes are the targets where you want to execute operations (for example, network routers or switches); Figure 4-1 shows a reference architecture.

Figure 4-1 Ansible Architecture
Ansible uses YAML as its data format. Recall from Chapter 2, “Data for Network Automation,” that YAML is a human-friendly format.
Ansible has a modular architecture, which makes it an extensible tool. By default, Ansible comes with a set of modules. A module is a script written in a programming language (typically Python) that Ansible uses to interact with the nodes. You can download new modules or create your own. Most of the time, the available modules cover common operations, such as configuring devices, retrieving information from network devices, or interacting with specific software. However, when you can’t find a module that suits your need, you can go to Ansible Galaxy, which is a repository where you can find many different modules. Ansible has a huge community behind it, providing supporting.
Module operations are idempotent. This means that operations are executed only once, if the an operation is repeated more than one time, Ansible will not do any modification and output to the user a not changed message. Ansible understands whether any modification is needed and executes only the needed modification. For example, if you instruct Ansible to install Apache on a server that currently doesn’t have Apache installed, the first time it executes that playbook, it installs Apache. If you rerun the same playbook, it will not make any modification because Apache is already installed.
Note
If you build your own modules, it is possible that they will not exhibit idempotent properties. This logic must be programmed into a module.
Installing Ansible
Before you can install Ansible, you must have Python installed. You only need to install Ansible in your control node.
Ansible can be installed on most operating systems, including Red Hat, Debian, CentOS, and macOS. However, it cannot be installed on Windows.
When you install Ansible on a control node, it is important to consider the proximity of this node to the managed nodes as the distance can be a critical factor for latency. If you plan to manage a cloud environment, having a control node in the cloud is a good idea.
There are several Ansible versions, and it is recommended to install the latest version recommended unless you have a specific requirement that must be addressed with a particular version.
Because Ansible is a Python package, it can be installed using pip, which is a Python package manager. You can also install Ansible with your operating system package’s manager if you have one (for example, yum on CentOS).
You need to follow two required steps to install Ansible in a macOS workstation:
Step 1. Download and install pip.
Step 2. Install Ansible.
Example 4-1 shows the command syntax of these two steps. The two first commands represent step 1, and the third command represents step 2.
Note
macOS computers ship with Python installed. Depending on your operating system, you might have to install Python as a first step.
Example 4-1 Installing Ansible on macOS
$ curl https://bootstrap.pypa.io/get-pip.py -o get-pip.py
$ python get-pip.py –user
$ sudo python -m pip install ansible
After the installation finishes, you can verify your version with the command shown in Example 4-2.
Example 4-2 Verifying the Ansible Version
$ ansible --version
ansible 2.9.13
  config file = None
  configured module search path = ['/Users/ivpinto/.ansible/plugins/modules',
'/usr/share/ansible/plugins/modules']
  ansible python module location =
/usr/local/Cellar/ansible/2.9.13_1/libexec/lib/python3.9/site-packages/ansible
  executable location = /usr/local/bin/ansible
  python version = 3.9.0 (default, Oct 29 2020, 13:07:11) [Clang 12.0.0 (clang-
1200.0.32.21)]
Note
For avid macOS users, installing Ansible with Homebrew is also possible.
Inventory
An inventory file, sometimes referred to as a hosts file, is where you define which nodes are your target hosts (that is, managed nodes). When you run a playbook, you need to run it against specific machines, which you define in the inventory file.
By default, Ansible tries to find hosts in the path /etc/ansible/hosts, but it is a best practice to create specific inventory files and refer to them when you execute playbooks.
An inventory file can have one of several formats: YAML, JSON, or INI. In this chapter, we focus on YAML.
A YAML inventory should start with the all group, which can have hosts, variables, and children.
Hosts are the targets. They can be represented with hostnames or IP addresses. Example 4-3 shows a valid inventory file.
Example 4-3 Ansible Inventory
$ cat hosts.yml
---
all:
  hosts:
    10.10.10.1:
    10.10.10.2:
    10.10.10.3:
    switch01.example.com:
Variables are characteristics of hosts. They can be applied to single hosts or to host groups. In Example 4-4, host 10.10.10.1 has the variable status with the value prod. Furthermore, all hosts have the variable country with the value Portugal assigned.
Example 4-4 Ansible Inventory with Variable Assignments
$ cat hosts.yml
---
all:
  hosts:
    10.10.10.1:
      status: "prod” #THIS IS A HOST VARIABLE
    10.10.10.2:
    10.10.10.3:
    switch01.example.com:
  vars:
    country: "Portugal” #THIS IS A GROUP VARIABLE
Children are child groups. They can have their own hosts, variables, and children. Grouping is very useful. You should group hosts that have the same characteristics (for example, operating system, physical location). Grouping is helpful when you execute your playbooks.
Example 4-5 shows the creation of two groups (Portugal and Spain) that identify in the countries where devices are geographically located. When you execute this playbook, by using these groups, you can make changes to devices in a specific country by using only the appropriate group keyword.
Example 4-5 Ansible Inventory with Groupings
$ cat hosts.yml
---
all:
  children:
    Portugal: #THIS IS A GROUP
      hosts:
        10.10.10.1:
          status: "prod"
        switch01.example.com:
    Spain: #THIS IS ANOTHER GROUP
      hosts:
       10.20.20.1:
There are two default groups in this example: all and ungrouped. all contains all hosts, and ungrouped is for hosts that are not part of a group besides the group all. These are implicit concepts, and they may be omitted from the inventory file. However, as a general rule, an explicit definition is better than implicit one.
Example 4-6 helps you understand the concept of groups. In this example, the host 10.30.30.1 is not part of any group besides the group all, so it is part of ungrouped.
Example 4-6 Ansible Inventory with Ungrouped Hosts
$ cat hosts.yml
---
all:
  children:
    Portugal:
      hosts:
        10.10.10.1:
          status: "prod"
        switch01.example.com:
    Spain:
      hosts:
       10.20.20.1:
  hosts:
    10.30.30.1:
You can verify your inventory with an Ansible command. All you need is to have your inventory in a file format and execute the command ansible-inventory on it.
If you save the inventory in Example 4-6 in a file named hosts.yml, you can executed ansible-inventory and get the output shown in Example 4-7.
Example 4-7 Verifying an Inventory as Ansible Sees It
$ ansible-inventory -i hosts.yml -–list
{
    "Portugal": {
        "hosts": [
            "10.10.10.1",
            "switch01.example.com"
        ]
    },
    "Spain": {
        "hosts": [
            "10.20.20.1"
        ]
    },
    "_meta": {
        "hostvars": {
            "10.10.10.1": {
                "status": "prod"
            }
        }
    },
    "all": {
        "children": [
            "Portugal",
            "Spain",
            "ungrouped"
        ]
    },
    "ungrouped": {
        "hosts": [
            "10.30.30.1”
        ]
    }
}
As previously mentioned, the groups all and ungrouped are implicit definitions. The inventory shown in Example 4-8 displays exactly the same result, even though it omits the initial group all, if verified with the command ansible-inventory, as shown in Example 4-7. Try it for yourself by copying the inventory to a file and executing the ansible-inventory command. Doing so allows you to see in action the concept of implicit definitions.
Example 4-8 Ansible Inventory: Implicit Definitions
$ cat hosts.yml
---
Portugal:
  hosts:
    10.10.10.1:
      status: "prod"
    switch01.example.com:
Spain:
    hosts:
     10.20.20.1
10.30.30.1:
Tip
Run the inventory command for all of the previous inventory examples, and you can see how Ansible parses them, which helps you become familiar with the syntax.
In the event that your environment consists of a large number of sequential hosts, you can use a range function to define them, as shown here:
---
all:
  children:
    Portugal:
      hosts:
        10.10.10.[1:3]: #This represents 10.10.10.1, 10.10.10.2, and 10.10.10.3
This function also supports alphanumeric ranges.
Maintaining an inventory file is fine if your infrastructure does not regularly experience many changes or does not span thousands of devices. In case it does, however, Ansible offers you the possibility of having a dynamic inventory.
Dynamic inventories are scripts that collect information about your machines and return it to Ansible in JSON format. They can collect this information from multiple sources (for example, databases, files) using several techniques (for example, APIs, SSH).
This is a fairly advanced topic, but there are many prebuilt scripts for common use cases (for example, Amazon Web Services, OpenStack, Microsoft Azure) that you may be able to use.
Variables
Just as in other tools and programming languages, variables in Ansible are variable fields that can have values assigned. You can use them to parametrize and reuse the same value.
In Ansible you can assign variables by using the inventory, playbooks, files, or at runtime.
You saw in the previous section that you can assign variables to hosts or groups by using the inventory. In that case, you saw how to use the inventory file directly. However, Ansible also searches for directories named host_vars and group_vars in the inventory directory. Inside those directories, you can create files with the same name as your hosts or groups. Using this structure is the preferred way to assign variables to hosts. Example 4.9 shows this structure.
Example 4-9 Assigning Variables Using a Folder Structure
$ tree
.
├── group_vars/
│   └── Portugal.yaml
├── host_vars/
│   └── 10.10.10.1.yaml
└── hosts.yaml

$ cat hosts.yaml
---
all:
  children:
    Portugal:
      hosts:
        10.10.10.[1:2]:
  hosts:
    switch01.example.com:

$ cat group_vars/Portugal.yaml
---
type: "CAT9k"

$ cat host_vars/10.10.10.1.yaml
---
status: "prod"

$ ansible-inventory -i hosts.yaml --list
{
    "Portugal": {
        "hosts": [
            "10.10.10.1",
            "10.10.10.2"
        ]
    },
    "_meta": {
        "hostvars": {
            "10.10.10.1": {
                "status": "prod",
                "type": "CAT9k”
            },
            "10.10.10.2": {
                "type": "CAT9k”
            }
        }
    },
    "all": {
        "children": [
            "Portugal",
            "ungrouped"
        ]
    },
    "ungrouped": {
        "hosts": [
            "switch01.example.com"
        ]
    }
}
Note
The tree command is not natively installed in most operating systems. If you want to use it, you must install it.
In Example 4-9, you can see that all hosts from the group Portugal have the type CAT9K. But only the host 10.10.10.1 has the status prod. This is the behavior reflected in the files under the group_vars and host_vars directories.
You can also define variables in playbooks. You define them at the top of a playbook file by using the keyword vars, as shown in this example:
- name: Ansible Playbook to change TACACS keys for ASA Devices
  hosts: asa
  vars:
    tacacs_key: “C!sc0123”
Yet another way definite define variables is by using files. You can create YAML files with key/value pairs for your variables and refer to them in your playbooks.
Example 4-10 shows how to create a new file called variables.yaml and define two key/value pairs (tacacs_key and tacacs_servers). In this playbook, playbook.yaml, you can refer to this file in the var_files keyword by specifying the file path to the previously created variables file.
Example 4-10 Assigning Variables Using Variable Files
$ cat variables.yaml
---
tacacs_key: "C!sc0123"
tacacs_server: "10.10.10.253"

$ cat playbook.yaml
---
- name: Ansible Playbook to change TACACS keys for ASA Devices
  hosts: asa
  vars_files:
    - variables.yaml
As mentioned earlier, you can specify variables at runtime. You achieve this by using the -e argument when running a playbook, as shown here:
$ ansible-playbook playbook.yaml -e “tacacs_key=C!sc0123”
You will learn more on running playbooks later in this chapter.
You can pass a file reference instead of a key/value pair by using the @ symbol as a prefix to the file path, as shown here:
$ ansible-playbook playbook.yaml -e “@variables.yaml”
Separating the variables from the playbooks allows you to reuse the same playbooks in different environments. However, there are some variables that are tied to host types (for example, ansible_network_os). They can be defined in the inventory.
It is a good idea to avoid defining the same variable in different places. If you are working as part of a team, the team members should agree where the variables will be defined.
Tip
Separating variables from playbooks is crucial when you want to store them in a source control repository.
Besides the variables you have already seen, there is another type of variable, referred to as registered variable. This type is defined as a result of tasks, as shown here:
---
- hosts: all
  tasks:
     - shell: time
       register: result
After a variable is defined independently of the type, you can refer to it by using the following syntax:
{{ variable_name }}
Example 4-11 shows a playbook (play.yml) that defines a variable (example) and prints its value. This playbook is executed on the localhost.
Example 4-11 Ansible Playbook Using a Defined Variable
$ cat play.yml
---
- hosts: all
  vars:
    example: "This is an example variable”
  tasks:
     - debug:
        msg: '{{ example }}'

$ ansible-playbook -c local -i "localhost,” play.yml

PLAY [all] **********************************************************************

TASK [Gathering Facts]
*********************************************************************************
ok: [localhost]

TASK [debug]
*********************************************************************************
ok: [localhost] => {
    "msg": "This is an example variable”
}

PLAY RECAP **********************************************************************
localhost                  : ok=2    changed=0    unreachable=0    failed=0    skipped=0    rescued=0
ignored=0
Some variables should be kept secret, such as for credentials. An Ansible Vault allows you to store variables in encrypted format. You should use it instead of saving your secrets in plaintext.
Example 4-12 shows how to create an Ansible Vault and use it in a playbook. It starts by creating the Vault with a password and writing secrets inside it—in this case a key/value pair (the key example and the value This is an example variable).
The example then verifies that the Vault was saved correctly using the password. If you try to access the file—by using cat, for example—you see only gibberish.
The playbook in Example 4-12 is just like the one in Example 4-11, but it imports the Vault file. Notice that it refers to the variable by using the same syntax.
When you execute the playbook in this case, you get exactly the same output as in Example 4-11. The advantage here is that the secret information is kept secret, protected by a password.
Example 4-12 Ansible Playbook Using a Variable in a Vault
$ ansible-vault create vault.yml
New Vault password:
Confirm New Vault password:

Write your secret information inside:
example: "This is an example variable”

$ ansible-vault view vault.yml
Vault password:
example: "This is an example variable”

$ cat vault.yml
$ANSIBLE_VAULT;1.1;AES256
34616130343962613037383861653834333364666663306434316332323136626431393934623561
6663363131353237353463333361663762313037336437330a303464613765356238643236366439
32623434643336653564396338643961636261393464386137313664646239306431666337353436
3236633431633439320a363532626361616632363833376665653934653333326265356461353132
34383839353634646362623835336434633530353631396264316539656530613566373161643839
6139653434356364646461353934613432323239356262636233

$ cat play.yaml
- hosts: all
  vars_files:
    - ./vault.yml
  tasks:
     - debug:
        msg: '{{ example }}'

$ ansible-playbook -c local -i "localhost,” play.yml --ask-vault-pass
Vault password:

PLAY [all] ****************************************************************************

TASK [Gathering Facts]
****************************************************************************
ok: [localhost]

TASK [debug]
****************************************************************************
ok: [localhost] => {
    "msg": "This is an example variable”
}

PLAY RECAP ****************************************************************************
localhost                  : ok=2    changed=0    unreachable=0    failed=0    skipped=0
rescued=0    ignored=0
Playbooks
You have seen several Ansible playbooks already in this book. An Ansible playbook is composed by a number of plays, which are, in turn, composed of a number of tasks, which define actions. Figure 4-2 provides a visual representation of this structure.
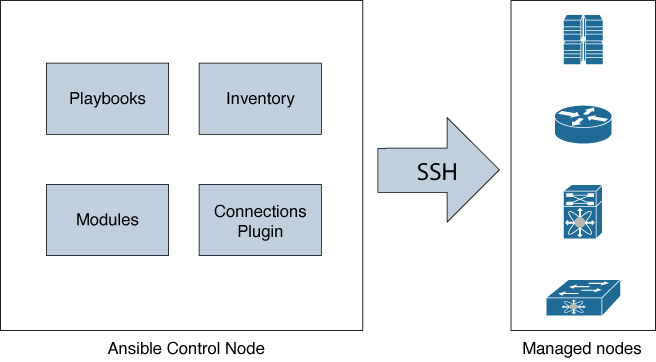
Figure 4-2 The Structure of Ansible Playbooks
Playbook are written in YAML. A simple playbooks could contain a single play, and a complicated one could achieve a complex workflow. In essence, a playbook is a list of instructions that you execute on remote systems (managed nodes).
Playbooks use modules, which are programs written in any language (but typically Python) that implement the logic needed to achieve a particular task.
Example 4-13 shows a task named Configure NTP that uses the module ios_ntp. This module implements the logic needed to push the configurations you provide to the network device (for example, connection type, translation from Ansible inputs to CLI commands).
Example 4-13 Ansible Playbook to configure NTP using ios_ntp
$ cat play.yaml
---
  - name: PLAY - Update NTP Configurations
    hosts: all
    tasks:
      - name: Configure NTP
        cisco.ios.ios_ntp:
          server: 10.0.100.1
          source_int: Loopback0
          logging: false
          state: present
You may have noticed the hosts keyword at the top of the play. A playbook needs to be instructed on what to run against, and you provide this instruction by using the hosts keyword. This is where you can refer to the hosts groups you created in your inventory file.
Example 4-14 shows two host groups defined, ios and nxos, as well as the all group. If you executed playbook1.yaml, it would run the tasks in all four switches; playbook2.yaml would only run tasks on Switches 3 and 4.
Example 4-14 Running a Playbook for a Specific Group of Hosts
$ cat inventory.yaml
all:
  children:
    ios:
      hosts:
        switch_1:
          ansible_host: "10.10.10.1"
        switch_2:
          ansible_host: "10.10.10.2"
    nxos:
      hosts:
        switch_3:
          ansible_host: "10.10.10.3"
        switch_4:
          ansible_host: "10.10.10.4"

$ cat playbook1.yaml
---
  - name: PLAY - Update NTP Configurations
    hosts: all

$ cat playbook2.yaml
---
  - name: PLAY - Update NTP Configurations
    hosts: ios
The following sections explore some of the logical constructs that you can use to build playbooks: conditionals, blocks, and loops.
Conditionals
You use conditionals when you do not want a task to execute always but you want to execute some tasks based on a condition being true. In Ansible, you achieve this by using the when statement. Ansible evaluates the when statement before running the task. You can use this feature based on many different conditions, some of the most common of which are registered variables and ansible_facts.
Typically, the when statement is used based on predefined variables, or facts gathered from devices.
Note
Ansible automatically gathers facts about the target host. You can access this data in the ansible_facts variable.
Example 4-15 shows a playbook with two tasks: The first one prints the hostname of the device, and the second one configures VLAN 656 if the device hostname is switch01. You can see from the execution output that the hostname of the switch is POD4-DC-01 and not switch01. Therefore, Ansible skips the VLAN configuration task.
It is important to note that this example and the following ones require a switch to interact with, and you must build your own inventory file as inventory.yml in order to be able to run the playbook.
Example 4-15 Configuring a VLAN Only on a Switch with a Specific Hostname
$ cat vlans.yaml
---
- name: Ansible Playbook to configure vlans for IOS Devices
  hosts: ios

  tasks:
    - name: print facts
      debug:
        msg: "{{ ansible_net_hostname }}"

    - name: Configure vlan 656
      cisco.ios.ios_vlans:
        config:
          - name: test_vlan
            vlan_id: 656
            state: active
            shutdown: disabled
      when: ansible_net_hostname == "switch01”

$ ansible-playbook vlans.yaml -i inventory.yml

PLAY [Ansible Playbook to configure vlans for IOS Devices] ********************

TASK [Gathering Facts]
*******************************************************************************
ok: [switch_1]

TASK [print facts]
*******************************************************************************
ok: [switch_1] => {
    "msg": "POD4-DC-01"
}

TASK [Configure vlan 656]
*******************************************************************************
skipping: [switch_1]

PLAY RECAP
**********************************************************************************
switch_1                   : ok=2    changed=0    unreachable=0    failed=0    skipped=1
rescued=0    ignored=0
An important aspect of conditionals is that they can be applied to blocks of tasks. Ansible uses blocks to group tasks.
All tasks inside a block are applied only if the condition evaluates to true. Example 4-16 shows an enhancement of the playbook from Example 4-15. The first task continues to simply print the device’s hostname. However, the second task is now a block that entails two tasks: It configures VLAN 656 and VLAN 668. Nonetheless, the condition remains the same: The hostname must be switch01. From the execution of the playbook in Example 4-16, you can see that because the device’s hostname still does not match the condition, both VLAN configuration tasks are skipped.
Example 4-16 Configuring Two VLANs Only on a Switch with a Specific Hostname
$ cat vlans.yaml
---
- name: Ansible Playbook to configure vlans for IOS Devices
  hosts: ios

  tasks:
    - name: print facts
      debug:
        msg: "{{ ansible_net_hostname }}"

    - name: block of vlan tasks
      block:
        - name: Configure vlan 656
          cisco.ios.ios_vlans:
            config:
              - name: test_vlan
                vlan_id: 656
                state: active
                shutdown: disabled
        - name: Configure vlan 668
          cisco.ios.ios_vlans:
            config:
              - name: test_vlan
                vlan_id: 668
                state: active
                shutdown: disabled
      when: ansible_net_hostname == "switch01”

$ ansible-playbook vlans.yaml -i inventory.yml

PLAY [Ansible Playbook to configure vlans for IOS Devices]*********************

TASK [Gathering Facts]
*******************************************************************************
ok: [switch_1]

TASK [print facts]
*******************************************************************************
ok: [switch_1] => {
    "msg": "POD4-DC-01"
}

TASK [Configure vlan 656]
*******************************************************************************
skipping: [switch_1]

TASK [Configure vlan 668]
*******************************************************************************
skipping: [switch_1]

PLAY RECAP
*******************************************************************************
switch_1                   : ok=2    changed=0    unreachable=0    failed=0
Tip
In Ansible, blocks are typically used for error handling.
Loops
A loop involves iterating over something. You can use a loop when you want to repeat the same task multiple times or with different inputs. In Ansible, you can achieve this with the keywords loop and item.
The playbook shown in Example 4-17 is a modification of the one in Example 4-16. This version uses a loop on a task to configure two different VLANs instead of two different tasks. Another difference between the playbooks is that the conditional block has been removed in this case.
From the execution of the playbook in this example, you can see both VLANs being configured on the switch.
Example 4-17 Configuring Two VLANs on a Switch Using a Loop
$ cat vlans.yaml
---
- name: Ansible Playbook to configure vlans for IOS Devices
  hosts: ios

  tasks:
    - name: print facts
      debug:
        msg: "{{ ansible_net_hostname }}"

    - name: Configure vlans
      cisco.ios.ios_vlans:
        config:
          - name: test_vlan
            vlan_id: "{{ item }}”
            state: active
            shutdown: disabled
      loop:
        - 656
        - 668

$ ansible-playbook vlans.yaml -i inventory.yml

PLAY [Ansible Playbook to configure vlans for IOS Devices] *********************

TASK [Gathering Facts] *********************************************************
ok: [switch_1]

TASK [print facts] *************************************************************
ok: [switch_1] => {
    "msg": "POD4-DC-01"
}

TASK [Configure vlans] *********************************************************
ok: [switch_1] => (item=656)
ok: [switch_1] => (item=668)

PLAY RECAP *********************************************************************
switch_1                   : ok=3    changed=0    unreachable=0    failed=0    skipped=0
rescued=0    ignored=0
You can use the same technique shown in Example 4-17 to iterate over lists of dictionaries. This is a useful feature when you have more than one attribute to iterate over.
Example 4-18 shows a playbook that configures two VLANs with specific names. It defines the VLAN IDs and names using a dictionary format and loops over them in the configuration task.
Example 4-18 Configuring Two Named VLANs on a Switch by Using a Loop
$ cat vlans.yaml
---
- name: Ansible Playbook to configure vlans for IOS Devices
  hosts: ios

  tasks:
    - name: print facts
      debug:
        msg: "{{ ansible_net_hostname }}"

    - name: Configure vlans
      cisco.ios.ios_vlans:
        config:
          - name: "{{ item.name }}”
            vlan_id: "{{ item.vlan_id }}”
            state: active
            shutdown: disabled
      loop:
        - { name: 'test_vlan1', vlan_id: '656' }
        - { name: 'test_vlan2', vlan_id: '668' }

$ ansible-playbook vlans.yaml -i inventory.yml

PLAY [Ansible Playbook to configure vlans for IOS Devices]
*******************************************************************************

TASK [Gathering Facts]
*******************************************************************************
ok: [switch_1]

TASK [print facts]
*******************************************************************************
ok: [switch_1] => {
    "msg": "POD4-DC-01"
}

TASK [Configure vlans]
*******************************************************************************
ok: [switch_1] => (item={'name': 'test_vlan1', 'vlan_id': '656'})
ok: [switch_1] => (item={'name': 'test_vlan2', 'vlan_id': '668'})

PLAY RECAP
**********************************************************************************switch
_1                   : ok=3    changed=0    unreachable=0    failed=0    skipped=0
rescued=0    ignored=0
There is another keyword, with_items, that you might encounter in place of loop. loop is a newer version that replaces with_items in most scenarios in newer versions of Ansible. You might see with_items, however, and you should know that it has the same structure as loop.
Tip
In older playbooks, you will more often find with_items than loop. You may choose to convert with_items to loop to keep all your playbooks consistent.
Example 4-19 shows the playbook from Example 4-17 adapted to use the keyword with_items.
Example 4-19 A Playbook to Configure Two VLANs on a Switch by Using with_items
$ cat vlans.yaml
---
- name: Ansible Playbook to configure vlans for IOS Devices
  hosts: ios

  tasks:
    - name: print facts
      debug:
        msg: "{{ ansible_net_hostname }}"

    - name: Configure vlans
      cisco.ios.ios_vlans:
        config:
          - name: test_vlan
            vlan_id: "{{ item }}”
            state: active
            shutdown: disabled
      with_items:
        - 656
        - 668
Note
The Ansible keyword is actually with_<word>, where <word> can be replaced with a value other than items that you might want to use in specific scenarios. For example, you might want to use the keyword with_indexed_items.
There is a special kind of loop that is worth highlighting: It uses the keyword until. This keyword retries a task until a certain condition is met, which is particularly useful for verifications. The syntax is as follows:
    - name: Check on an async task
      async_status:
        job_id: “{{ vlan_status.ansible_job_id }}"
      register: job_result
      until: job_result.finished
      retries: 5
      delay: 10
The keyword until is used with the condition that must be met, and it causes the playbook to retry to repeat the task a specified number of times. delay indicates the number of seconds that it waits between attempts.
Handlers
A handler is a special kind of task in a playbook. It behaves like a task but is executed only if notified to run. Tasks can notify handlers to run. Why would you need handlers? There are scenarios in which you just want something to be done if a task has run. For example, you might want to save the running configuration to the startup configuration only if modifications have been made to the running configuration.
By default, handlers only run at the end of an Ansible play. This default behavior means that handlers run only once even if notified by several tasks. This can be useful if you have several tasks making configuration changes but you only really want to save the configuration to the startup configuration after all changes have been made.
Note
You can execute handlers before the end of a play by using Ansible metadata.
The playbook in Example 4-20 tries to configures VLAN 656 on a switch. As you can see, if it is already configured, nothing happens. However, if it is not configured, the Ansible playbook creates this VLAN and notifies a handler that saves the switch’s configuration.
Example 4-20 A VLAN Configuration Playbook Using Handlers to Save the Configuration
$ cat handlers.yml
---
- name: Ansible Playbook to configure vlans for IOS Devices
  hosts: ios
  gather_facts: no

  tasks:
    - name: Configure vlan 656
      cisco.ios.ios_vlans:
        config:
          - name: test_vlan
            vlan_id: 656
            state: active
            shutdown: disabled
      notify: Save configuration

  handlers:
    - name: Save configuration
      cisco.ios.ios_config:
        save_when: modified
You can see the different execution steps when the VLAN exists and when it does not from the Ansible’s output on Example 4-21. In the first execution, the VLAN still did not exist, and so the task was run, and the handler was triggered, saving the configuration. In the second execution, the VLAN already existed, and Ansible simply informed you that everything was as intended.
Example 4-21 Possible Differences in Execution of the Playbook in Example 4-20
$ ansible-playbook handlers.yml -i inventory.yml

PLAY [Ansible Playbook to configure vlans for IOS Devices] *********************

TASK [Configure vlan 656]
*********************************************************************
changed: [switch_1]

RUNNING HANDLER [Save configuration]
*********************************************************************
changed: [switch_1]

PLAY RECAP *********************************************************************
switch_1                   : ok=2    changed=2    unreachable=0    failed=0    skipped=0
rescued=0    ignored=0

$ ansible-playbook handlers.yml -i inventory.yml

PLAY [Ansible Playbook to configure vlans for IOS Devices]
*********************************************************************

TASK [Configure vlan 656]
*********************************************************************
ok: [switch_1]

PLAY RECAP *********************************************************************
switch_1                   : ok=1    changed=0    unreachable=0    failed=0    skipped=0
rescued=0    ignored=0
Another important thing to note about handlers is that you can trigger multiple handlers from a single task. This is useful when you want to execute multiple operations. You define a list of handler names for the notify value.
In Example 4-22, the task that configures VLAN 656 notifies two handlers: Save configuration and Copy configuration. This is a common operation in networking: When you perform a configuration update, you typically want to commit that configuration into the device’s long-term memory and also export it for safekeeping.
Example 4-22 An Ansible Task with Multiple Handlers
$ cat handlers.yml
---
- name: Ansible Playbook to configure vlans for IOS Devices
  hosts: ios
  gather_facts: yes

  tasks:
    - name: Configure vlan 656
      cisco.ios.ios_vlans:
        config:
          - name: test_vlan
            vlan_id: 656
            state: active
            shutdown: disabled
      notify:
        - Save configuration
        - Copy configuration

  handlers:
    - name: Save configuration
      cisco.ios.ios_config:
        save_when: modified
    - name: Copy configuration
       copy:
         content: "{{ ansible_facts.net_config }}"
         dest: "router_bkup.txt”
Having multiple handlers can be useful, as shown here. However, when you have multiple handlers, your playbooks become increasingly complex and hard to read. An easier way to notify all your handlers is to use topics instead of enumerating all their names under notify.
Example 4-23 re-creates the Example 4-22, in which a VLAN configuration task notifies two different handlers (Save configuration and Copy configuration). This example creates the topic configuration changes, and both handlers subscribe to it. During the play’s execution, the configuration task publishes to this topic instead of calling the handlers by name.
Example 4-23 Ansible Task with Multiple listener Handlers
$ cat handlers.yml
---
- name: Ansible Playbook to configure vlans for IOS Devices
  hosts: ios
  gather_facts: yes

  tasks:
    - name: Configure vlan 656
      cisco.ios.ios_vlans:
        config:
          - name: test_vlan
            vlan_id: 656
            state: active
            shutdown: disabled
      notify: "configuration changes”

  handlers:
    - name: Save configuration
      cisco.ios.ios_config:
        save_when: modified
      listen: "configuration changes”
    - name: Copy configuration
       copy:
         content: "{{ ansible_facts.net_config }}"
         dest: "router_bkup.txt"
      listen: "configuration changes”
You can see that the code becomes more readable and decouples the handlers from their names. This example shows only a single task and two handlers, but the larger the scale (for example, tens of tasks or tens of handlers), the more this technique becomes a time and complexity saver.
Executing a Playbook
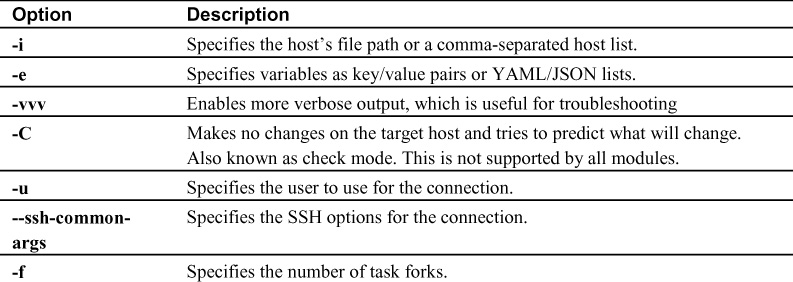
At this point, you have seen several playbooks executed. You execute a playbook from a control node by using the command ansible-playbook. This command can take a number of options, the most common of which are listed in Table 4-1.
Table 4-1 ansible-playbook Command Options
Tip
In a network, it is typical for managed systems to be behind a bastion/jump host. You can use --ssh- common-args with ProxyCommand to achieve this connectivity.
To execute a playbook, you use the following syntax:
$ ansible-playbook [options] playbook_name.yaml
Another option for running Ansible tasks is to use ad hoc commands. Ad hoc commands give you an easy way of executing a task quickly, but they are not reusable, as playbooks are. Ad hoc commands are often useful for doing quick tests or changes. The syntax for executing an ad hoc command is similar to the syntax for executing a playbook:
$ ansible host-pattern -m module [-a 'module arguments'] [-i inventory]
Note
In general, you want to use playbooks rather than ad hoc commands.
An example of usage of an ad hoc action could be creating a VLAN on a set of hosts:
$ ansible all -m cisco.ios.ios_vlan -a 'vlan_id=700' -i inventory.yml
This command executes the module ios_vlan on all hosts defined in inventory.yml with VLAN ID 700. The result is the creation of this VLAN in the event that it is not already present on the device. The following command execution is from an inventory file with a single switch (switch_1) where the VLAN 700 was not yet present:
$ ansible all -m cisco.ios.ios_vlan -a 'vlan_id=700' -i inventory.yml
switch_1 | CHANGED => {
    “ansible_facts": {
        “discovered_interpreter_python": “/usr/bin/python"
    },
    “changed": true,
    “commands": [
        "vlan 700”
    ]
}
When you execute Ansible playbooks or ad hoc commands, behind the scenes, Ansible copies Python scripts (which are responsible for making your tasks work) to the managed node and executes them there; this in the traditional workflow. This means the Python code responsible for achieving a task is not run from the control node; rather, it is copied over to the managed node and executed there.
Some systems (for example, network devices) do not support Python, but Ansible still works on them. In these special cases, Ansible executes the Python scripts locally on the control node. This is typically the case for connections that use APIs or, as previously mentioned, network devices.
By default, tasks are run in five hosts in parallel, but you can change this by using the -f parameter on the command line. The ability to execute a large number of hosts in parallel depends on the control node capacity.
Ansible uses a linear strategy so that all hosts in your inventory run each task before any other host can start the next task. You can change this to have Ansible execute tasks freely without waiting for other hosts or to execute all tasks on a host before moving to the next host. These changes should be applied only if necessary.
Example 4-24 shows how a serial execution would look. This example makes use of an inventory file with four different devices as part of a group named ios. To run this example, you must create your own inventory file with devices that are reachable from your workstation and part of a device group called ios.
Example 4-24 Ansible Serial Execution of Tasks
$ cat serial.yml
---
- name: Serial playbook
  hosts: ios
  serial: 2
  gather_facts: False

  tasks:
    - name: Get NTP status 1
      cisco.ios.ios_command:
        commands: show ntp status
    - name: Get NTP status 2
      cisco.ios.ios_command:
        commands: show ntp status

$ ansible-playbook serial.yml -i inventory.yml

PLAY [Serial playbook]
*********************************************************************

TASK [Get NTP status 1]
**********************************************************************************
changed: [ios1]
changed: [ios2]

TASK [Get NTP status 2]
**********************************************************************************
changed: [ios1]
changed: [ios2]

PLAY [ios]
**********************************************************************************

TASK [Get NTP status 1]
**********************************************************************************
changed: [ios3]
changed: [ios4]

TASK [Get NTP status 2]
**********************************************************************************
changed: [ios3]
changed: [ios4]
As you can see in Example 4-24, both tasks (NTP status 1 and 2) are executed on hosts ios1 and ios2 before being started on hosts ios3 and ios4. This could be particularly useful for rolling updates.
When executing a playbook, you might want some tasks to be executed only on the first host of your inventory. For example, you might know that the result will be the same for all the other hosts, and it would be a waste of CPU cycles and network bandwidth to rerun a playbook on all the others. You can achieve this by using the run_once flag, as shown in Example 4-25. Here, regardless of the number of hosts in your inventory, you would only retrieve the time from the first one because all the clocks in a network environment are typically synchronized to the same NTP server.
Example 4-25 Ansible run_once Task
$ cat run_once.yml
---
- name: run once playbook
  hosts: ios
  gather_facts: False

  tasks:
    - name: Get NTP status 1
      cisco.ios.ios_command:
        commands: show clock
      run_once: true
Ansible tasks in a playbook execution run synchronously. This means Ansible holds the SSH connection open until a task completes, without progressing to the next task. Yet you might need a different behavior for some of your tasks, such as for long-running tasks, as in these use cases:
• For tasks timing out due to the SSH session timer
• To run tasks concurrently
For such use cases, you can configure asynchronous tasks. This works with both playbooks and ad hoc commands.
You use two keywords when configuring asynchronous tasks: async and poll. You use async to configure the maximum wait timer for an Ansible task. poll is the time interval that Ansible uses to check the status of the running task; by default, it is 10 seconds.
The Ansible task in Example 4-26 sets the maximum timer (async) at 45 seconds and verifies its status every 5 seconds (poll).
Example 4-26 Asynchronous Ansible Task
$ cat async.yml
---
- name: Asynchronous playbook
  hosts: all
  gather_facts: False

  tasks:
    - name: Configure vlan 656
      cisco.ios.ios_vlans:
        config:
          - name: test_vlan
            vlan_id: 656
            state: active
            shutdown: disabled
      async: 45
      poll: 5
Example 4-26 shows how you achieve the first use case: long-running tasks. You simply modify these timers accordingly. However in this case, Ansible does not move to the next task but blocks further tasks until it either succeeds, fails, or goes over the async timer.
You can achieve concurrent tasks by defining a poll interval of 0. In this case, Ansible starts the next task immediately. The playbook finishes without checking the status of the task because it simply starts it.
You can insert the task code shown in Example 4-27 in a playbook and execute it more than once against the same switch. If you do, you see that the result always displays the changed status, even though the VLAN already exists after the first execution. This behavior is different from what you are accustomed to seeing from the previous examples. The reason for this is that Ansible is not checking the task status at all; it is simply executing the task.
Example 4-27 Asynchronous Nonblocking Ansible Task
  tasks:
    - name: Configure vlan 656
      cisco.ios.ios_vlans:
        config:
          - name: test_vlan
            vlan_id: 656
            state: active
            shutdown: disabled
      async: 45
      poll: 0
Not verifying the status is sometimes referred to as “fire and forget.” It involves more overhead because it might mean executing actions that are not needed. However, there is a way to have concurrent tasks in a playbook and still check their status. You achieve this by registering the ID of a previously triggered action and verifying its status later on.
Example 4-28 registers the configuration task and, in the second task (Check on an async task), verifies every 10 seconds whether it has completed; it makes five attempts, using the async_status module. These are sequential tasks, but you can have any number of tasks in between the asynchronous task and its verification to achieve true concurrency.
Example 4-28 Asynchronous Ansible Task Status Verification
  tasks:
    - name: Configure vlan 656
      cisco.ios.ios_vlans:
        config:
          - name: test_vlan
            vlan_id: 656
            state: active
            shutdown: disabled
      async: 45
      poll: 0
      register: vlan_status

    - name: Check on an async task
      async_status:
        jid: "{{ vlan_status.ansible_job_id }}”
      register: job_result
      until: job_result.finished
      retries: 5
      delay: 10
Roles
Ansible playbooks can become long and hard to read if they accomplish complex workflows that entail several tasks. Ansible roles try to address this issue. Ansible roles are used to collate together several tasks that have a common purpose.
An Ansible role has a specific directory structure that is modular and easily reusable. A role contains several directories: defaults, vars, tasks, files, templates, meta, and handlers. Each directory must contain a main.yml file. You do not need to populate all the directories but only the relevant ones for your role. Table 4-2 describes these directories.
Table 4-2 Ansible Role Directories

An easy way to create the directory structure is by using ansible-galaxy, but you can also do it manually. The syntax to achieve it automatically is as follows:
$ ansible-galaxy init new_role
- Role new_role was created successfully
Example 4-29 shows the Ansible Galaxy role default folder structure.
Example 4-29 Ansible Galaxy Role Default Folder Structure
$ tree
.
└── new_role
    ├── README.md
    ├── defaults
    │   └── main.yml
    ├── files
    ├── handlers
    │   └── main.yml
    ├── meta
    │   └── main.yml
    ├── tasks
    │   └── main.yml
    ├── templates
    ├── tests
    │   ├── inventory
    │   └── test.yml
    └── vars
        └── main.yml
After you have created a folder structure, you can add to the specific main.yml file content that is relevant from your role definition.
Example 4-30 shows a role to create VLANs. In this example, you see only the tasks folder within the role directory because it is the only one you need as you are only defining tasks. More complex roles may need other folders.
Example 4-30 Creating a VLAN on a Switch by Using a Custom Ansible Role
$ tree
.
├── inventory.yml
├── roles
│   └── vlans
│       └── tasks
│           └── main.yml
└── vlans.yaml

$ cat vlans.yaml
---
- hosts: ios
  vars:
    req_vlan : { name: 'test_vlan1', vlan_id: '656' }
  roles:
    - vlans

$ cat roles/vlans/task/main.yml
---
  - name: print facts
    debug:
      msg: "{{ ansible_net_hostname }}"

  - name: Configure vlans
    cisco.ios.ios_vlans:
      config:
        - name: "{{ req_vlan.name }}”
          vlan_id: "{{ req_vlan.vlan_id }}”
          state: active
          shutdown: disabled

$ ansible-playbook -i inventory.yml vlans.yaml
PLAY [ios]
*******************************************************************************

TASK [Gathering Facts]
*******************************************************************************
ok: [switch_1]

TASK [vlans : print facts]
*******************************************************************************
ok: [switch_1] => {
    "msg": "POD2-GB-01"
}

TASK [Configure vlans]
*******************************************************************************
changed: [switch_1]

PLAY RECAP
*******************************************************************************
switch_1                   : ok=3    changed=1    unreachable=0    failed=0    skipped=0
rescued=0    ignored=0

POD2-GB-01#show vlan

VLAN Name                             Status    Ports
---- -------------------------------- --------- -----------------
656  test_vlan1                       active
You can see in Example 4-30 that inside the playbook, you only import the role and define the variables for the VLAN. All the task logic (that is, how to achieve the task) is defined in main.yml, inside the role’s task directory.
The playbook in Example 4-30 is much simpler (with only five lines) than the one shown in Example 4-15, although they achieve the same goal, configuring VLANs on a switch. You can clearly see the power of roles when it comes to a playbook’s readability; roles offload complex and long task logic to a different domain.
Tip
There are thousands of pre-created roles in the Ansible Galaxy repository that you can use. Before implementing your own roles, verify whether a role you want already exists. Using a pre-created role will save you a lot of time and effort.
Summary
This chapter describes a number of Ansible concepts. It starts by showing how to install Ansible and its requirements. Then it shows how to build an Ansible inventory from scratch, describing different ways of grouping hosts, possible data formats, and best practices.
This chapter also covers playbooks and their components:
• Plays
• Tasks
• Modules
• Variables
• Conditionals
• Loops
• Handlers
This chapter looks at each of these components to help you understand how to use them in network automation scenarios. Furthermore, this chapter explains how playbooks are executed against different types of target devices and the available execution options.
Finally, this chapter touches on Ansible roles. Roles help you modularize your playbooks so they are easier to read and understand. Roles are also great for sharing what you have created.
Chapter 5, “Using Ansible for Network Automation,” shows how to use the concepts presented in this chapter to build playbooks that perform common networking tasks, such as modifying device configurations or gathering information from show commands.
Review Questions
You can find answers to these questions in Appendix A, “Answers to Review Questions.”
1. What programming language was Ansible written in?
a. Java
b. Python
c. Ruby
d. JavaScript
2. Which of the following are valid data formats for representing an Ansible inventory? (Choose two.)
a. YAML
b. INI
c. XML
d. Python
3. In the following inventory file, which hosts are part of the ungrouped group?
---
all:
  children:
    Portugal:
      hosts:
        10.10.10.1:
          status: "prod"
        switch01.example.com:
    Spain:
      hosts:
       10.20.20.1:
  hosts:
    10.30.30.1:
a. 10.20.20.1
b. 10.10.10.1
c. switch01.example.com
d. 10.30.30.1
4. In the inventory file shown in question 3, what does status: “prod” represent?
a. Group variable
b. Host variable
c. Child
d. Host
5. If you want to upload your playbooks to a shared repository, where should you typically define your variables?
a. In the host variables folder
b. In a separate file that is uploaded to the repository
c. In the playbook
d. In the execution CLI
6. When writing an Ansible playbook, which of the following do you use to refer to a variable named example?
a. {{ example }}
b. [[ example ]]
c. (( example ))
d. 'example'
7. What is Ansible Vault used for?
8. A playbook is composed of an ordered list of ____.
a. tasks
b. plays
c. modules
d. variables
9. True or false: By default, Ansible runs every task on a host in the inventory before moving to the next host.
a. True
b. False
10. True or false: Ansible does not support asynchronous tasks.
a. True
b. False
11. A includes a verification task that may not always succeed on the first try. Which Ansible keyword would you use to retry this task several times?
a. loop
b. with_items
c. until
d. when
12. When executing a playbook, the default number of forks is five. Which flag can you use to change this value?
a. -i
b. -f
c. -u
d. -e