
Chapter 6
Creating and manipulating names in VBA
In this chapter, you will:
Learn the difference between global and local names
Learn how to add and delete names
Include information about a name by adding a comment
Learn about the different types of names
Make names invisible
Check for the existence of a name
You’ve probably named ranges in a worksheet by highlighting a range and typing a name in the Name box to the left of the formula bar. You also might have created more complicated names containing formulas. For example, perhaps you created a name with a formula that finds the last row in a column. The ability to name a range makes it much easier to write formulas.
The ability to create and manipulate names is also available in VBA, which provides the same benefits as naming ranges in a worksheet. For example, you can store a new range in a name.
This chapter explains different types of names and the various ways you can use them.
Global versus local names
Names that are global are available anywhere in a workbook. Names that are local are available only on a specific worksheet. With local names, you can have multiple references in the workbook with the same name. Global names must be unique to the workbook.
The Name Manager dialog box (accessed via the Formulas tab) lists all the visible names in a workbook, even a name that has been assigned to both the global and the local levels. The Scope column lists the scope of the name, whether it is the workbook or a specific sheet, such as Sheet1.
For example, in Figure 6-1, the name Apples is assigned to Sheet1 and also to the workbook.
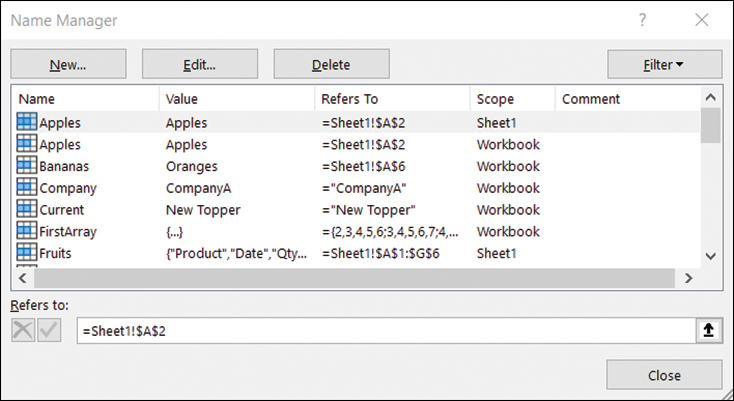
FIGURE 6-1 The Name Manager lists all local and global names.
Adding names
If you record the creation of a named range and then view the code, you see something like this:
ActiveWorkbook.Names.Add Name:="Fruits", RefersToR1C1:="=Sheet2!R1C1:R6C6"This creates a global name Fruits, which includes the range A1:F6 (R1C1:R6C6). The formula is enclosed in quotes, and the equal sign in the formula must be included. In addition, the range reference must be absolute (that is, it must include the $ sign) or in R1C1 notation. If the sheet on which the name is created is the active sheet, the sheet reference does not have to be included. However, including the sheet reference can make the code easier to understand.
To create a local name, include the sheet name with the Name parameter:
ActiveWorkbook.Names.Add Name:="Sheet2!Fruits", RefersToR1C1:="=Sheet2!R1C1:R6C6"
Alternatively, specify that the Names collection belongs to a worksheet:
Worksheets("Sheet2").Names.Add Name:="Fruits", RefersToR1C1:="=Sheet2!R1C1:R6C6"![]() Note
Note
If a reference is not absolute, the name might be created, but it will not point to the correct range. For example, if you run the following line of code, the name is created in the workbook:
ActiveWorkbook.Names.Add Name:="Citrus", RefersTo:="=Sheet1!A1"
However, as you can see in Figure 6-2, the name hasn’t been assigned to the correct range. The reference will change depending on which cell is the active cell when the name is viewed.
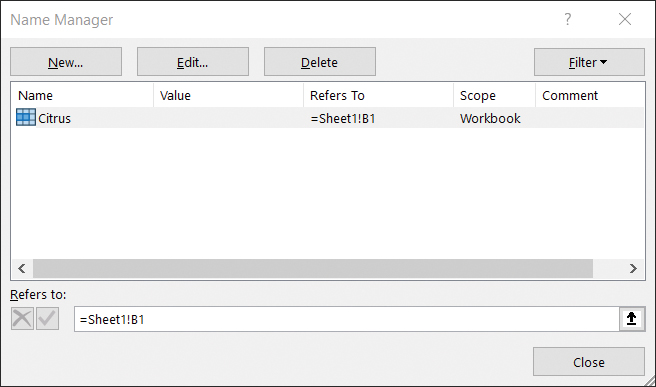
FIGURE 6-2 Despite what was coded, because absolute referencing was not used, Citrus refers to the active cell.
The preceding example shows what you would get from the macro recorder. There is simpler code to get the same result:
Range("A1:F6").Name = "Fruits"Alternatively, for a local variable only, you can use this:
Range("A1:F6").Name = "Sheet1!Fruits"When creating names with these methods, absolute referencing is not required.
![]() Note
Note
You can use table names like defined names, but you don’t create them the same way. See the “Tables” section later in this chapter for more information about creating table names.
Although this method is much easier and quicker than what the macro recorder creates, it’s limited in that it works only for ranges. Formulas, strings, numbers, and arrays require the use of the Add method.
The name you create becomes an object when referenced like this:
Names("Fruits")The object has many properties, including Name, which you can use to rename the existing name, like this:
Names("Fruits").Name = "Produce"Fruits no longer exists; Produce is now the name of the range.
When you are renaming names in which a local reference and a global reference both carry the same name, the previous line renames the local reference first.
Deleting names
Use the Delete method to delete a name:
Names("ProduceNum").DeleteAn error occurs if you attempt to delete a name that does not exist.
![]() Note
Note
If both local and global references with the same name exist, be more specific about which name is being deleted because the local reference is deleted first.
Adding comments
You can add comments about names, such as why a name was created or where it is used. To insert a comment for the local name Local_Name, do this:
ActiveWorkbook.Worksheets("Sheet7").Names("Local_Name").Comment = _
"Holds the name of the current office"
The comments appear in a column in the Name Manager, as shown in Figure 6-3.
![]() Warning
Warning
The name must exist before a comment can be added to it.
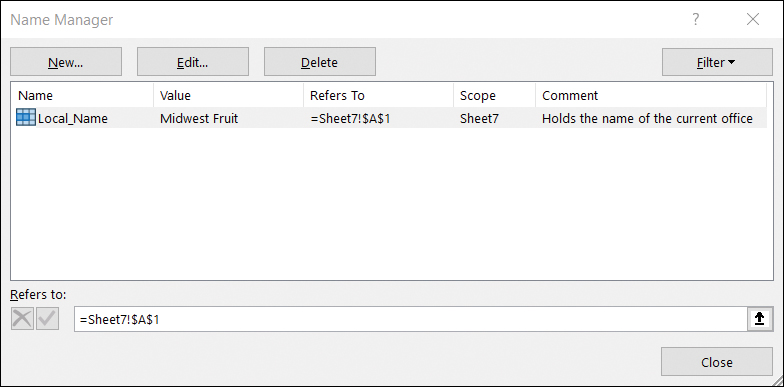
FIGURE 6-3 You can add comments about names to help remember their purpose.
Types of names
The most common use of names is for storing ranges; however, names can store more than just ranges. After all, names store information. Names make it simple to remember and use potentially complex or large amounts of information. In addition, unlike variables, names remember what they store beyond the life of the program.
You know how to create range names, but you can also assign names to name formulas, strings, numbers, and arrays, as described in the following pages.
Formulas
The syntax for storing a formula in a name is the same as for a range because the range is essentially a formula. The following code allows for a dynamic named column with the product listing starting in A2:
Names.Add Name:="ProductList", _
 RefersTo:="=OFFSET(Sheet2!$A$2,0,0,COUNTA(Sheet2!$A:$A))"
This code is useful for creating dynamic data sets or for referencing any dynamic listing on which calculations may be performed, as shown in Figure 6-4.
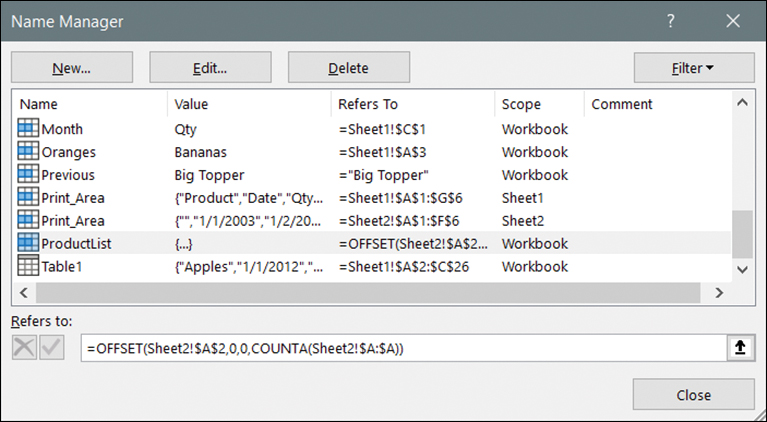
FIGURE 6-4 You can assign names to dynamic formulas.
Strings
When using names to hold strings such as the name of the current fruit producer, enclose the string value in quotation marks. Because no formula is involved, an equal sign is not needed. If you were to include an equal sign, Excel would treat the value as a formula. Let Excel include the equal sign shown in the Refers To column of the Name Manager:
Names.Add Name:= "Company", RefersTo:="CompanyA"
Figure 6-5 shows how the coded name appears in the Name Manager dialog box.
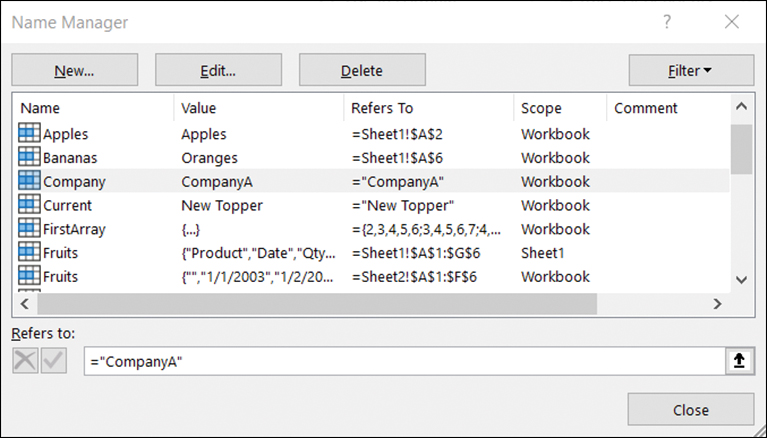
FIGURE 6-5 You can assign a name to a string value.
![]() Tip
Tip
Because names do not lose their references between sessions, using names is a great way to store values as opposed to storing values in cells from which the information would have to be retrieved. For example, to track the leading producer between seasons, create the name Leader. If the new season’s leading producer matches the name reference, you could create a special report comparing the seasons. The other option is to create a special sheet to track the values between sessions and then retrieve the values when needed. With names, the values are readily available.
The following procedure shows how cells in a variable sheet are used to retain information between sessions:
Sub NoNames(ByRef CurrentTop As String)
TopSeller = Worksheets("Variables").Range("A1").Value
If CurrentTop = TopSeller Then
 MsgBox "Top Producer is " & TopSeller & " again."
Else
 MsgBox "New Top Producer is " & CurrentTop
End If
End Sub
The following procedure shows how names are used to store information between sessions:
Sub WithNames()
If Evaluate("Current") = Evaluate("Previous") Then
 MsgBox "Top Producer is " & Evaluate("Previous") & " again."
Else
 MsgBox "New Top Producer is " & Evaluate("Current")
End If
End Sub
If Current and Previous are previously declared names, you access them directly rather than create variables in which to pass them. Note the use of the Evaluate method to extract the values in names. The string being stored cannot have more than 255 characters.
Numbers
You can use names to store numbers between sessions. Here’s an example:
NumofSales = 5123
Names.Add Name:="TotalSales", RefersTo:=NumofSales
Alternatively, you can use this:
Names.Add Name:="TotalSales", RefersTo:=5123
Notice the lack of quotation marks and an equal sign in the RefersTo parameter. Using quotation marks changes the number to a string. With the addition of an equal sign in the quotation marks, the number changes to a formula.
To retrieve the value in the name, you have a longer and a shorter option:
NumofSales = Names("TotalSales").Valueor this:
NumofSales = [TotalSales]
![]() Note
Note
Keep in mind that someone reading your code might not be familiar with the use of the Evaluate method (square brackets). If you know that someone else will be reading your code, avoid the use of the Evaluate method or add a comment explaining it.
Tables
Excel tables share some of the properties of defined names, but they also have their own unique methods. Unlike with the defined names you are used to dealing with, you cannot manually create tables. In other words, you cannot select a range on a sheet and type a name in the Name field. However, you can manually create them via VBA.
Tables are not created using the same method as defined names. Instead of Range(xx).Add or Names.Add, use ListObjects.Add.
To create a table from cells A1:C26, and assuming that the data table has column headers, as shown in Figure 6-6, use this:
ActiveSheet.ListObjects.Add(xlSrcRange, Range("$A$1:$C$26"), , xlYes).Name = _
"Table1"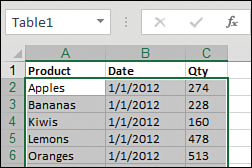
FIGURE 6-6 You can turn a normal table into an Excel table by assigning a name to it using VBA.
xlSrcRange (the SourceType) tells Excel that the source of the data is an Excel range. You then need to specify the range (the source) of the table. If you have headers in the table, include that row when indicating the range. The next argument is LinkSource, a Boolean indicating whether there is an external data source. This argument is not used in the preceding example because the SourceType is xlSrcRange. xlYes lets Excel know that the data table has column headers; otherwise, Excel automatically generates them. The final argument, which is not shown in the preceding example, is the destination. This is used when SourceType is xlSrcExternal, indicating the upper-left cell where the table will begin.
Using arrays in names
A name can hold the data stored in an array. The array size is limited by available memory. See Chapter 8, “Arrays,” for more information about arrays.
An array reference is stored in a name the same way as a numeric reference:
Sub NamedArray()
Dim myArray(10, 5)
Dim i As Integer, j As Integer
'The following For loops fill the array myArray
For i = 0 To 10 'by default arrays start at 0
 For j = 0 To 5
 myArray(i, j) = i + j
 Next j
Next i
'The following line takes our array and gives it a name
Names.Add Name:="FirstArray", RefersTo:=myArray
End Sub
Because the name references a variable, no quotation marks or equal signs are required.
Reserved names
Excel uses local names of its own to keep track of information. These local names are considered reserved, and if you use them for your own references, they might cause problems. You should also be careful about mixing numbers and letters in names since they may actually be cell addresses, such as LOG2 and R123C7. And even though R123Y is not a valid cell reference, it’s close enough that Excel displays an error message.
Highlight an area on a sheet. Then from the Page Layout tab, select Print Area, Set Print Area.
As shown in Figure 6-7, a Print_Area listing is in the Name field. Deselect the area and look again in the Name field drop-down menu. The name is still listed there. Select it, and the print area that was previously set is now highlighted. If you save, close, and reopen the workbook, Print_Area is still set to the same range. Print_Area is a local name reserved by Excel for its own use.
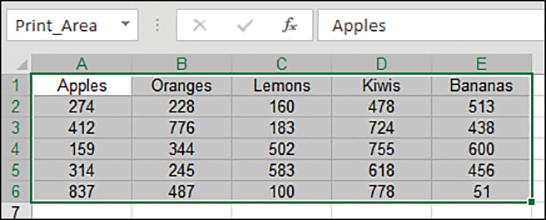
FIGURE 6-7 Excel creates its own names.
![]() Note
Note
Each sheet has its own print area. In addition, setting a new print area on a sheet that has an existing print area overwrites the original print-area name.
Fortunately, Excel does not have a large list of reserved names:
Criteria
Database
Extract
Print_Area
Print_Titles
Criteria and Extract are used when Advanced Filter (on the Data tab, select Advanced from the Sort & Filter group) is configured to extract the results of the filter to a new location.
Database is no longer required in Excel. However, some features, such as Data Form, still recognize it. Legacy versions of Excel used it to identify the data you wanted to manipulate in certain functions.
Print_Area is used when a print area is set (from the Page Layout tab, select Print Area, Set Print Area) or when Page Setup options that designate the print area (from the Page Layout tab, Scale) are changed.
Print_Titles is used when print titles are set (select Page Layout, Print Titles).
You should avoid using these reserved names, and you should use variations on them with caution. For example, if you create the name PrintTitles, you might accidentally code this:
Worksheets("Sheet4").Names("Print_Titles").DeleteIf you do this, you delete the Excel name rather than your custom name.
Hiding names
Names are incredibly useful, but you don’t necessarily want to see all the names you have created. Like many other objects, names have a Visible property. To hide a name, set the Visible property to False. To unhide a name, set the Visible property to True:
Names.Add Name:="ProduceNum", RefersTo:="=$A$1", Visible:=False
![]() Tip
Tip
If a user creates a Name object with the same name as the hidden one, the hidden name is overwritten without any warning message. To prevent this, protect the worksheet.
Checking for the existence of a name
You can use the following function to check for the existence of a user-defined name, even a hidden one:
Function NameExists(ByVal FindName As String, _
 Optional TargetBook As Workbook) As Boolean
If TargetBook Is Nothing Then
 If ActiveWorkbook Is Nothing Then
  NameExists = False
  Exit Function
 End If
 Set TargetBook = ActiveWorkbook
End If

On Error Resume Next
NameExists = CBool(Len(TargetBook.Names(FindName).Name) <> 0)
On Error GoTo 0
End Function
Keep in mind that this function does not return the existence of Excel’s reserved names. Even so, this is a handy addition to your arsenal of “programmers’ useful code.” (See Chapter 14, “Sample user-defined functions,” for more information on implementing custom functions.)
The preceding code is also an example of how to use errors to your advantage. If the name for which you are searching does not exist, an error message is generated. By adding the On Error Resume Next line, you force the code to continue. Use On Error GoTo 0 to reset error trapping; otherwise, other errors may be skipped. The use of CBool ensures that a Boolean is the value returned to the function.
Next steps
Names are a useful way of storing information between sessions. It’s simpler to remember a name than a cell address, and names make the code a little easier to read. In Chapter 7, “Event programming,” you find out how you can write code to run automatically based on a person’s actions, such as activating a sheet or selecting a cell. This is done with events, which are actions in Excel that you can capture and use to your advantage.