4
Collaborate on documents
In this chapter
It’s not unusual for several people to collaborate on the development of a document. Collaboration is simplest when contributors review electronic documents in files on a computer screen rather than review paper printouts. On-screen review is very efficient; you can provide legible feedback, implement specific changes, and save trees at the same time.
If you save a file in a shared location, multiple people can review and edit the document at the same time. This highly efficient method of collaboration is called coauthoring. Another method of gathering feedback from multiple reviewers is to send a file to each reviewer and then merge the reviewed versions into one file that displays all the changes. This is less efficient but has its benefits.
Word has many tools that simplify the process of collaboratively creating documents. You can make changes without deleting the original content, provide feedback in comments, and respond to comments and queries from other reviewers. To protect a document from unwanted changes, you can restrict the editing options so that Word tracks all changes, allows only certain types of changes, or doesn’t allow changes at all.
This chapter guides you through procedures related to marking up and reviewing documents, comparing and merging document versions, restricting the changes that people can make to documents that you share with them, and coauthoring documents.
Mark up documents
Comments and tracked changes are collectively referred to as markup. Markup is used during the content-development and review processes and is particularly useful for bringing changes, suggestions, and comments to the attention of multiple members of a collaborative authoring group.
Insert comments
A comment is a note attached to an anchor within the text. The anchor can be text or any type of object, or simply a location; wherever it is, Word displays the comment in the right margin of the document.

Word automatically adds your name and a time stamp to the comment
Each comment is inside a container that is fully visible when the comment is active (when you point to or select it). Comment containers are referred to as balloons. Balloons can be used for the display of various types of markup.
You can insert comments for many reasons, such as to ask questions, make suggestions, provide reference information, or explain edits. You insert and work with comments by using the commands in the Comments group on the Review tab and on the Comments menu at the right end of the ribbon.
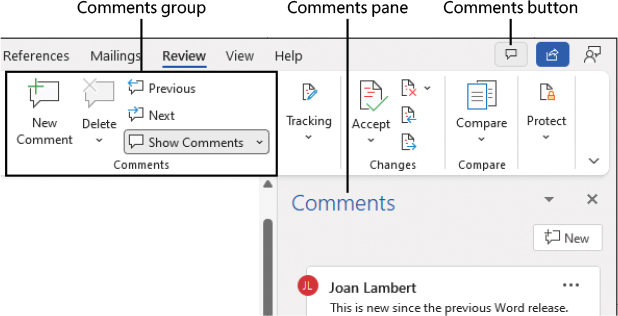
The commands in the Comments group make it easy to navigate and remove comments
![]() Important
Important
Word uses standard colors to mark content moves, edits, and structural changes in tables but doesn’t track the editor, time, or date of the change. It is possible to customize these markup colors, but there really isn’t any point to doing so because the custom colors don’t travel with the document.
![]() Tip
Tip
Display documents in Print Layout view so that all the collaboration commands are available.
To display the Comments pane
To the right of the ribbon tabs, select the Comments button.
On the Review tab, in the Comments group, select the Show Comments arrow (not the button), and then in the list, select List.
To insert a comment
Select the text or object you want to anchor the comment to.
Do one of the following:
On the Review tab, in the Comments group, select New Comment.
In the Comments pane, select New.
Press Alt+I+M.
In the comment balloon that appears in the right margin or in the Comments pane, enter the comment.
Press Ctrl+Enter to post the comment.
![]() Tip
Tip
Comments are usually simple text but can include other elements and formatting, such as images and active hyperlinks.
Track changes
When two or more people collaborate on a document, one person usually creates and “owns” the document, and the others review it—adding or revising content to make it more accurate, logical, or readable. When reviewing a document in Word, you can track your changes so they are available for review and retain the original text for comparison or reversion. You manage change tracking from the Tracking group on the Review tab.

A shaded button indicates that change tracking is active
![]() Tip
Tip
Turning on the change-tracking feature tracks changes only in the active document, not in any other open documents.
When change tracking is on, Word tracks insertions and deletions and the movement and formatting of content. When you display a document in All Markup view, tracked changes are indicated by different font colors and formatting. The default formatting is as follows:
Insertions are in the reviewer-specific color and underlined.
Deletions are in the reviewer-specific color and crossed out (struck through).
Formatting changes are indicated in balloons in the markup area.
Moves are green and double-underlined.
In All Markup view or Simple Markup view, all changes are indicated in the left margin by a vertical line.
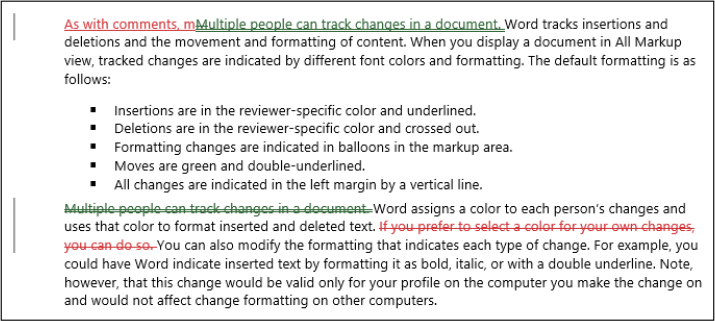
Moved text is green, and a double underline indicates its new location
Multiple people can track changes in a document. Word assigns a color to each person’s changes and uses that color to format inserted and deleted text. If you prefer to select a color for your own changes, you can do so. You can also modify the formatting that indicates each type of change. For example, you could have Word indicate inserted text by formatting it as bold, as italic, or with a double underline. Note, however, that this change would be valid only for your profile on the computer you make the change on and would not affect change formatting on other computers.
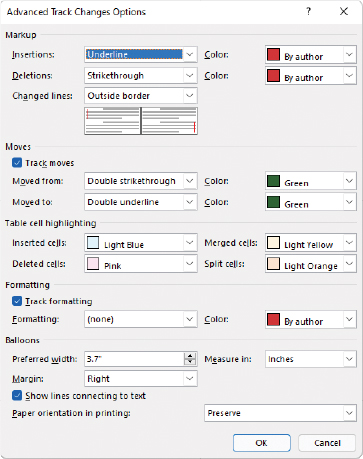
You can modify the types of changes that are tracked and the markup colors
If you want to ensure that other reviewers track their changes to a document, you can turn on and lock the change-tracking feature and (optionally) require that reviewers enter a password to turn it off.
A new feature in this version of Word allows you to turn on change tracking only for yourself or for everyone who edits the document.
![]() See Also
See Also
For information about forcing change tracking by restricting editing, see “Control content changes” later in this chapter.
To turn on change tracking for everyone
On the Review tab, in the Tracking group, select the Track Changes button (not its arrow).
On the Review tab, in the Tracking group, select the Track Changes arrow, and then select For Everyone.
Press Ctrl+Shift+E.
![]() See Also
See Also
For information about keyboard shortcuts, see the appendix, “Keyboard shortcuts.”
To turn on change tracking for only yourself
On the Review tab, in the Tracking group, select the Track Changes arrow, and then select Just Mine.
To turn off change tracking
On the Review tab, in the Tracking group, select the Track Changes button (not its arrow).
To track changes without displaying them on the screen
On the Review tab, in the Tracking group, select the Display for Review arrow.
In the Display for Review list, select Simple Markup or No Markup.
![]() See Also
See Also
For more information about the markup views, see “Display and review document markup” later in this chapter.
To specify the color of the changes you track in any document
On the Review tab, select the Tracking dialog launcher to open the Track Changes Options dialog.
Select Advanced Options to open the Advanced Track Changes Options dialog.
In the Color lists adjacent to Insertions, Deletions, and Formatting, select the color you want to use for that type of change in Word documents on the current computer.
Select OK in each open dialog to close them and save your changes.
To prevent reviewers from turning off change tracking
On the Review tab, in the Tracking group, select the Track Changes arrow, and then select Lock Tracking.
In the Lock Tracking dialog, enter and reenter a password to prevent other people from turning off change tracking.
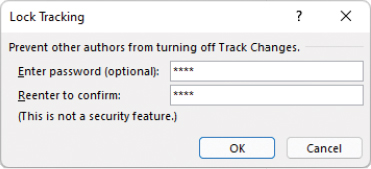
Use a password that you will remember, or make a note of it in a secure location so you can find it later
In the Lock Tracking dialog, select OK. The Track Changes button becomes unavailable.
To unlock change tracking
On the Review tab, in the Tracking group, select the Track Changes arrow, and then select Lock Tracking.
In the Unlock Tracking dialog, enter the password you assigned when you enabled this feature, and then select OK.
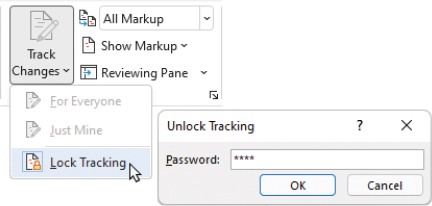
Unlocking tracking doesn’t turn off change tracking; you must do that separately
Display and review document markup
After reviewers provide feedback by making changes and entering comments, you can review the tracked changes and comments and choose how you would like to process them.
Display markup
Usually you would display and review all types of markup at one time—insertions, deletions, moves, formatting changes, and comments. However, if you prefer, you can choose to display only certain types of markup, or only markup from specific reviewers.
Word has four basic Display For Review options that govern the display of tracked changes in a document. The settings are as follows:
Simple Markup This default markup view displays a red vertical line in the left margin adjacent to each tracked change. Markup is hidden.
All Markup This view displays a gray vertical line in the left margin adjacent to each tracked change, and formats inserted, deleted, and moved content to reflect the settings in the Advanced Track Changes Options dialog.
 See Also
For information about controlling markup formatting, see “Mark up documents” earlier in this chapter.
No Markup This view hides comments and displays the current document content as though all changes have been accepted. Changes that you make in this view are tracked (if change tracking is turned on) and visible when markup is shown.
Original This view displays the original document content without any markup.
Depending on your view settings, comments are shown in the following ways:
In balloons in the Comments pane
In balloons in the right margin
Hidden and indicated by highlighting in the text
You can select the comment icon or point to the highlight to display the comment text.
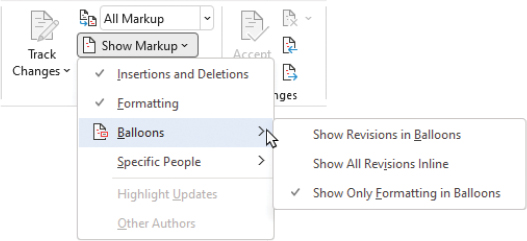
The individual markup display options
After you select a Display For Review option, you can additionally filter the display of markup in these ways:
You can individually control the display of comments, insertions and deletions, and formatting.
You can show all markup inline or in balloons, or keep comments in balloons and insertions, deletions, and moves inline.
You can display or hide markup by reviewer.
You can display and manage all the comments in the document in the new Comments pane, which opens to the right of the document text. From within the Comments pane, you can create, edit, reply to, resolve, and delete comment threads.
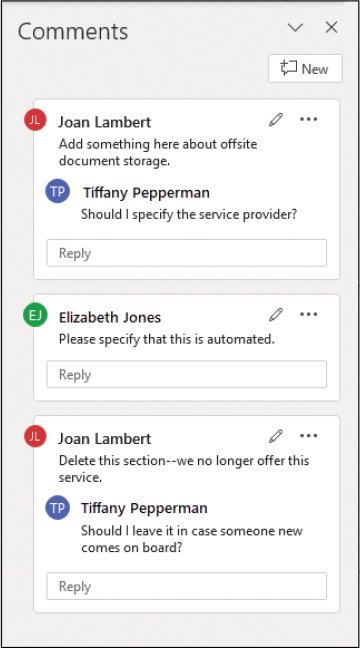
Manage comment threads in the Comments pane
If you prefer to display all comments and tracked changes in a document at one time, you can do so in the Revisions pane. By default, this pane opens to the left of the document text (and to the right of the Navigation pane, if that is open) at the same height as the document content area. If you want to, you can dock it on the right side of the window instead.
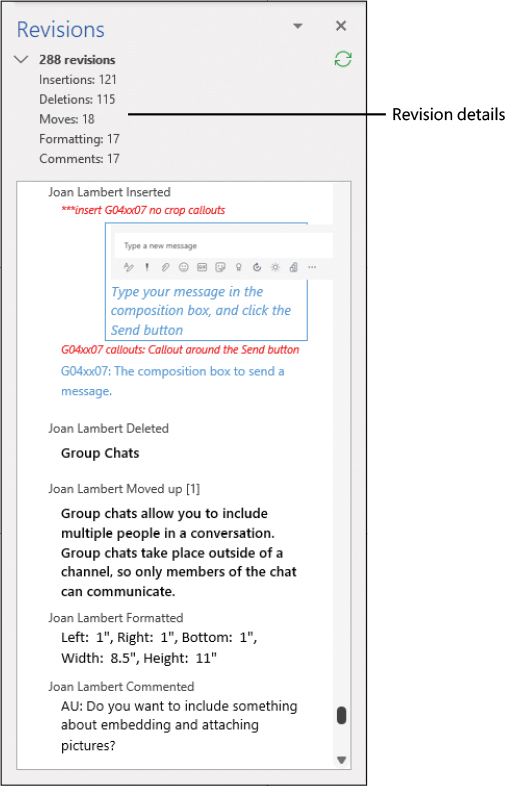
Information about the number and type of revisions is available at the top of the Revisions pane
From the ribbon, you can also display the Revisions pane horizontally. By default, the horizontal pane stretches across the bottom of the Word app window. If you prefer, you can drag it to the top of the window.
When the Comments pane or Revisions pane is docked, the content pane becomes narrower (or shorter, if you display the horizontal Revisions pane) to make space for the pane. You can undock the pane so that it floats independently of the app window and doesn’t take space away from the content pane. The floating pane has a vertical format, but you can change its height and width to fit wherever it’s convenient. The best display location depends on the amount of space you have available on your device screen or screens.
To change the display of markup in a document
To switch between Simple Markup view and All Markup view, select the red or gray vertical line in the margin to the left of any tracked change.
Or
On the Review tab, in the Tracking group, select the Display for Review arrow (to the right of the current markup view).
In the Display for Review list, select Simple Markup, All Markup, No Markup, or Original.
To display specific types of markup in balloons
In the Display for Review list, select All Markup.
In the Show Markup list, select Balloons, and then select Show Revisions in Balloons, Show All Revisions Inline, or Show Only Formatting in Balloons.
To hide or display all markup of a specific type
On the Review tab, in the Tracking group, select Show Markup, and then select Comments, Insertions and Deletions, or Formatting.
 Tip
TipA check mark to the left of a markup type indicates that elements of that type are visible in views of the document that display those elements.
To display only markup by a specific person
On the Review tab, in the Tracking group, select Show Markup.
In the Show Markup list, point to Specific People. If a check mark appears to the left of All Reviewers, select it to remove the check mark. Then select the name of the reviewer whose comments you want to display.
To display individual comments in Simple Markup view
Select a comment icon to display the comments on that line in comment balloons.
Point to a comment icon to highlight the comments on that line in the colors associated with the comments’ authors.
![]() Tip
Tip
The reviewer name is taken from the user information stored with the user account. If you’re signed in to Word with a Microsoft account, Word tracks revisions by the name associated with your Microsoft account. If the instance of Word you’re working in is not linked to a Microsoft account, you can change the stored user information on the General page of the Word Options dialog. Changing your user information affects revision tracking only when you aren’t signed in with a Microsoft account.
To display comments in the margin
On the Review tab, in the Comments group, select the Show Comments button.
On the Review tab, in the Comments group, select the Show Comments arrow (not the button), and then select Contextual.
To display the Comments pane
To the right of the ribbon tabs, select the Comments button.
On the Review tab, in the Comments group, select the Show Comments arrow (not the button), and then in the list, select List.
To display the Revisions pane
On the Review tab, in the Tracking group, select the Reviewing Pane button (not the arrow).
 Tip
TipSelecting the button opens the Revisions pane in its most recent location. The default location in each new Word session is to the left of the page.
Or
In the Tracking group, select the Reviewing Pane arrow.
In the Reviewing Pane list, do either of the following:
Select Reviewing Pane Vertical to display the pane to the left or right of the document.
Select Reviewing Pane Horizontal to display the pane below the ribbon or above the status bar.
To display a breakdown of revision types
In the Revisions pane, to the left of the revision summary, select the Expand button (the v).
To change the location of the Comments pane or Revisions pane
Drag the pane by its header to any of the following locations:
Dock the pane vertically to the left or right side of the app window or against any other vertical pane.
Dock the pane horizontally below the ribbon or above the status bar.
Drag the pane inside or outside the app window to float it independently.
To change the width or height of the floating Comments pane or Revisions pane
Point to the right or top border of the pane.
When the pointer changes to a double-headed arrow, drag the border.
To close the Comments pane or Revisions pane
In the upper-right corner of the pane, select the Close button.
On the Review tab, in the Tracking group, select Reviewing Pane.
Review and respond to comments
All the comments in a document are available for review, regardless of who created them. You can scroll through a document and review the comments as you come to them, or you can jump from comment to comment by selecting comments in the Comments pane or buttons on the ribbon, or by using the commands on the Comments menu.
![]() Tip
Tip
If a document contains both comments and tracked changes, selecting the Next or Previous button in the Changes group on the Review tab moves sequentially among these elements, whereas selecting the Next or Previous button in the Comments group or Comments menu moves only among comments.
When reviewing comments, you can take the following actions:
Respond to individual comments to provide further information or request clarification.
Mark individual comments or comment threads as Resolved to indicate that you’ve processed them and retain them for later reference.
Delete individual comments that you no longer require.
-
Filter the comments by author.
Delete all visible comments at the same time.
Delete all comments in the document at the same time.
The ability to mark comments as Resolved is a useful feature. Marking a comment as Resolved leaves the comment intact but minimizes and recolors the comment elements so that it doesn’t distract from the document content in the way that an active comment does.
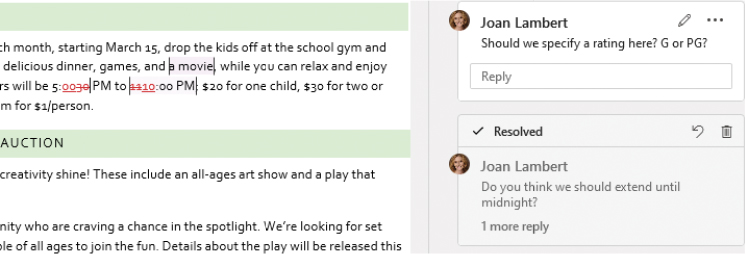
An example of a tracked comment before and after being marked as Resolved
To move only among comments
In the Comments pane or Revisions pane, select any comment to move to that comment in the document.
On the Review tab, in the Comments group, select the Next or Previous button to jump from balloon to balloon.
Scroll through the document to visually locate comment balloons.
To activate a comment for editing
In the comment balloon, select the Edit comment icon (the pencil).
To respond to a comment
In the comment balloon, enter your comment in the Reply box and then select the Post reply button or press Ctrl+Enter to post your reply.
To mark a comment as Resolved or reactivate a Resolved comment
Right-click or long-press (tap and hold) the comment highlight (in the text), and then select Resolve Comment.
In the comment balloon, select the More thread actions button (…) and then select Resolve thread.
 Tip
TipIt isn’t possible to resolve individual comments in a multi-comment thread. The first comment in a thread is treated as a thread.
To delete a comment
In the comment balloon, select the More thread actions button (…) for a comment without replies, and then select Delete thread.
In the comment balloon, select the More comment actions button (…) for any reply within a thread, and then select Delete comment.
Right-click the comment highlight (in the text) or the comment balloon, and then select Delete Comment.
To delete a comment thread
Activate the comment balloon, and then on the Review tab, in the Comments group, select the Delete button.
In the comment balloon, select the More thread actions button (…) for the first comment in a thread, and then select Delete thread.
Review and process tracked changes
As with comments, you can scroll through a document and review insertions, deletions, content moves, and formatting changes as you come to them, or you can jump from change to change by selecting buttons on the ribbon or using the Revisions pane. You also have the option of accepting or rejecting multiple changes at the same time.
Here are some typical scenarios for reviewing and processing changes that you might consider:
Display a document in Simple Markup view or No Markup view so you’re viewing the final content. If you are happy with the document content in that view, accept all the changes at the same time.
Display a document in All Markup view. Scan the individual changes visually. Individually reject any change that doesn’t meet your requirements. As you complete the review of a section that meets your requirements, select the content of that section and approve all the changes within your selection.
Display a document in All Markup view. Move to the first change. Accept or reject the change to move to the next. (You can perform both actions with one click.)
When reviewing tracked changes, you can take the following actions:
Accept or reject individual changes.
Select a section of content and accept or reject all changes therein at the same time.
Filter the changes and then accept or reject all visible changes at the same time.
Accept or reject all changes in the document at the same time.
To move among tracked changes and comments
On the Review tab, in the Changes group, select the Next or Previous button.
In the Revisions pane, select any change or comment to move to it in the document.
To display the time and author of a tracked change
Point to any revision in the text to display a ScreenTip identifying the name of the reviewer who made the change, and when the change was made.
To incorporate a selected change into the document and move to the next change
On the Review tab, in the Changes group, select the Accept button.
Or
On the Review tab, in the Changes group, select the Accept arrow.
In the Accept list, select Accept and Move to Next.
To incorporate a selected change into the document and remain in the same location
Right-click the change, and then select Accept Deletion or Accept Insertion.
On the Review tab, in the Accept list, select Accept This Change.
To remove the selected change, restore the original text, and move to the next change
On the Review tab, in the Changes group, select the Reject button.
On the Review tab, in the Reject list, select Reject and Move to Next.
To remove the selected change, restore the original text, and remain in the same location
Right-click the change, and then select Reject Deletion or Reject Insertion.
On the Review tab, in the Reject list, select Reject This Change.
To accept or reject all the changes in a section of text
Select the text. Then do either of the following:
On the Review tab, in the Changes group, select the Accept button or the Reject button.
Right-click the selected text, and then select Accept Change or Reject Change.
To accept or reject all the changes in a document
On the Review tab, in the Accept list, select Accept All Changes.
On the Review tab, in the Reject list, select Reject All Changes.
To accept or reject all the changes of a certain type or from a certain reviewer
Configure the review display settings to display only the changes you want to accept or reject. Then do either of the following:
On the Review tab, in the Accept list, select Accept All Changes Shown.
On the Review tab, in the Reject list, select Reject All Changes Shown.
Compare and combine documents
Sometimes you might want to compare several versions of the same document. Word supports two types of document-version comparison:
Comparing a document to a separate copy of the document.
Comparing a document to a previous version of the same document.
Compare and combine separate copies of a document
If you have sent a document out for review by several colleagues, you might want to compare their edited versions with the original document. Or if you’ve made changes to a document and you want to compare it to a previous version of the document, you can do that, too.
Instead of comparing multiple open documents visually, you can tell Word to compare the documents and either move the changes from one document into the other or create a new document that contains the changes from both documents.
By default, when you compare documents, Word generates a composite document that shows all the differences between the two documents as tracked changes. If you want to review the specific changes and the before-and-after versions independently, you can display the source documents in the same window.
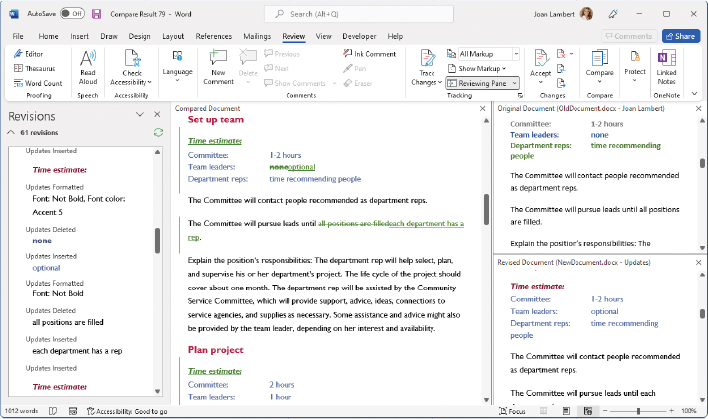
Scrolling any version of the documents you’re comparing or combining scrolls all three
If you’re working on a document that’s stored in a SharePoint document library, the Compare menu also includes options for comparing the open document to other versions of itself.
![]() Tip
Tip
Word can’t compare or combine documents that have Protection turned on to restrict changes.
You can compare any two documents. To compare multiple edited documents to one original, combine all the edited documents into one and then compare them with the original.
To compare or combine two documents and annotate changes
Start from a blank document or any existing document.
On the Review tab, in the Compare group, select Compare to track changes from only one document or Combine to track changes from both documents.
In the Compare Documents or Combine Documents dialog, under Original document, select the arrow to expand the alphabetical list of documents you’ve recently worked with.
If the document you want to designate as the first document appears in the list, select it. If not, select Browse (the first item in the list) to display the Open dialog. In the dialog, navigate to the document you want, select it, and then select Open.
Use the same technique in the Revised document area to select the document you want to designate as the second document.
In the Label changes with box or boxes, enter the name or names you want Word to assign as the reviewer when marking differences between the documents.
 Tip
TipWhen comparing documents, you specify the reviewer for only the revised document; when combining documents, you specify reviewers for both documents.
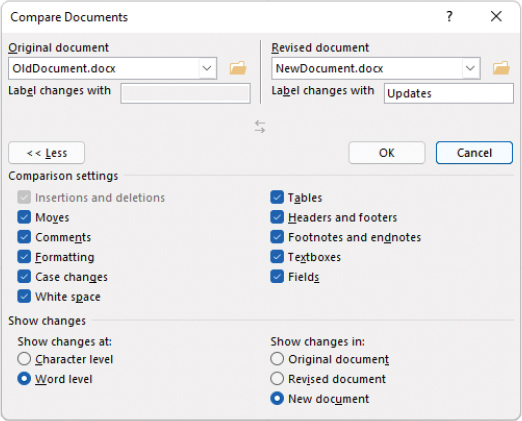
You can indicate the differences to identify and how to label them
If the dialog doesn’t include the Comparison settings and Show changes areas, select the More button to display them.
In the Comparison settings area of the dialog, select the checkboxes of the content differences you want to annotate.
 Tip
TipBy default, Word marks changes at the word level in a new document. You have the option to show changes at the character level and to show them in one of the two documents rather than in a third document. Until you’re comfortable with the compare and combine operations, it’s safest to retain the default settings in the Show Changes area.
In the Compare Documents or Combine Documents dialog, select OK to create the combined document.
![]() Tip
Tip
If you compare documents that contain conflicting formatting, a message box will ask you to confirm which document’s formatting should be used.
To hide or display comparison source documents
In the Compare Result document window, on the Review tab, in the Compare group, select Show Source Documents, and then select Hide Source Documents or the option to show one or both source documents.
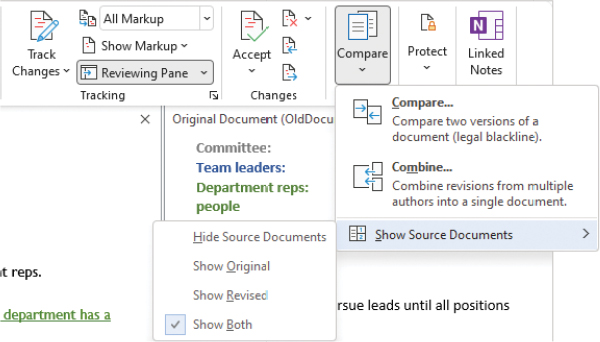
Word shows both source documents by default
Compare separate versions of a document
Word automatically saves a temporary copy of your open documents every 10 minutes. Automatically saved versions of the document are displayed in the Manage Document area of the Info page of the Backstage view.
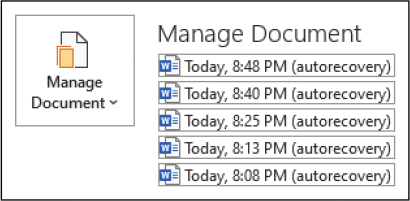
You can easily review or recover an earlier version of a document
To display a previous version of a document
On the Info page of the Backstage view, in the Manage Document list, select the version you want to display.
To compare a document to a previous version
Display the previous version of the document.
On the information bar at the top of the previous version, select Compare.
To roll back to a previous version of a document
Display the previous version of the document.
On the information bar at the top of the previous version, select the Restore button.
To change how often Word automatically saves document recovery versions
Display the Save page of the Word Options dialog.
In the Save AutoRecover information every box, enter the number of minutes Word should allow to pass before saving a recovery version of the document.
Select OK to close the dialog.
Control content changes
Sometimes you’ll want to allow people to display the contents of a document but not make changes to it. Other times you’ll want to allow changes, but only of certain types, or only if they’re tracked for your review. This section includes information about ways that you can protect the content of a document.
![]() Tip
Tip
When considering content protection options, keep in mind that storing documents within a document-management system that has version control can save you a lot of trouble. Word includes a built-in version-tracking system that you can use to compare and restore previous versions of a document that are stored on your computer. Microsoft SharePoint document libraries provide access to previous versions of documents checked in by any team member.
Restrict actions
To prevent people from introducing inconsistent formatting or unwanted changes into a document, you can restrict the types of changes that an individual document permits, in the following ways:
Restrict formatting You can limit formatting changes to a specific list of styles that you select or to the recommended minimum style set, which consists of all the styles needed by Word for features such as tables of contents. (The recommended minimum set doesn’t necessarily include all the styles used in the document.) Restricting formatting prevents anyone from adding or applying styles that you don’t want in your document.
 See Also
For more information about styles, see “Apply character formatting” and “Apply built-in styles to text” in Chapter 3, “Modify the structure and appearance of text.”
Restrict editing You can limit changes to comments, tracked changes, or form field content, or you can permit no changes at all.
You can implement these types of restrictions from the Restrict Editing pane. When restrictions are turned on, the Restrict Editing pane provides information about the actions you can perform in the document. Ribbon buttons that apply restricted formats are unavailable (grayed out).
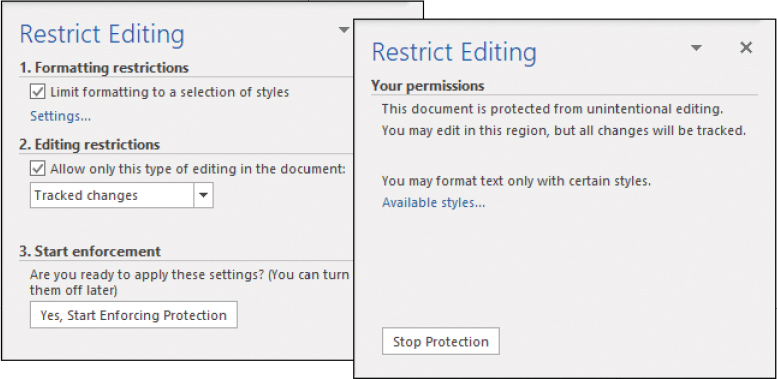
You can restrict formatting so that other people don’t make unapproved content or formatting changes
![]() See Also
See Also
For information about locking the change-tracking feature without restricting editing, see “Track changes” earlier in this chapter.
To display the Restrict Editing pane
On the Info page of the Backstage view, select Protect Document, and then select Restrict Editing.
On the Review tab or Developer tab, in the Protect group, select the Restrict Editing button.
To restrict the styles permitted in a document
Display the Restrict Editing pane.
In the Formatting restrictions area of the Restrict Editing pane, select the Limit formatting to a selection of styles checkbox, and then select Settings to display the Formatting Restrictions dialog.
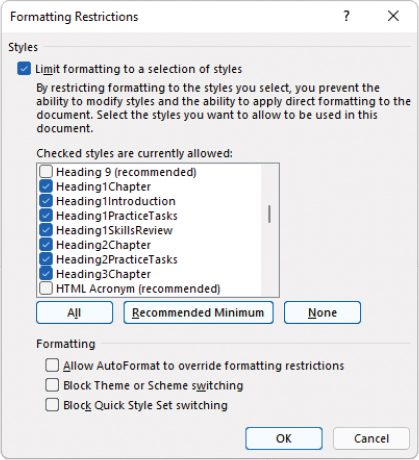
The Allow AutoFormat option permits Word to apply automatic formatting, such as list formatting
Select the permitted styles by doing one of the following:
To allow only the recommended minimum style set, select Recommended Minimum.
To allow only specific styles, select None and then, in the Checked styles are currently allowed list box, select the checkboxes of the styles you want to allow.
To allow all styles and restrict only formatting, select All.
Select the permitted formatting by doing any of the following:
To permit Word to automatically format elements such as hyperlinks, bulleted lists, and numbered lists that aren’t specified by a style, select the Allow AutoFormat to override formatting restrictions checkbox.
To permit only the current document theme, theme colors, and theme fonts, select the Block Theme or Scheme switching checkbox.
To permit only the current style set, select the Block Quick Style Set switching checkbox.
Select OK to implement the restricted set of styles. Word displays a message warning you that restricted styles will be removed.

Word displays this warning regardless of whether the document contains restricted styles
In the message box, select Yes to remove any restricted formatting and revert restricted styles to Normal.
In the Start enforcement area of the Restrict Editing pane, select Yes, Start Enforcing Protection to open the Start Enforcing Protection dialog.
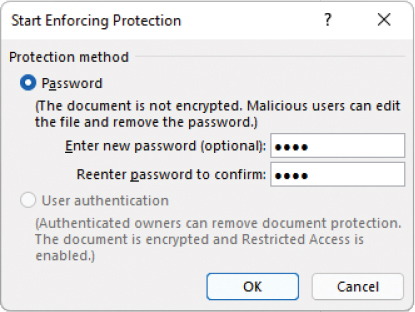
People who don’t know the password can’t turn off the restrictions
If you want to require a password to turn off the restrictions, enter the password in the Enter new password and Reenter password to confirm boxes. Otherwise, leave the boxes blank.
In the Start Enforcing Protection dialog, select OK to turn on the restrictions.
To restrict the editing permitted in a document
Display the Restrict Editing pane.
In the Editing restrictions area of the pane, select the Allow only this type of editing in the document checkbox.
In the Allow only this type of editing in the document list, select one of the following:
Tracked changes
Comments
Filling in forms
No changes (Read only)
In the Start enforcement area of the Restrict Editing pane, select Yes, Start Enforcing Protection to open the Start Enforcing Protection dialog.
If you want to require a password to turn off the restrictions, enter the password in the Enter new password and Reenter password to confirm boxes. Otherwise, leave the boxes blank.
In the Start Enforcing Protection dialog, select OK to turn on the restrictions.
To remove restrictions for specific people
Display the Restrict Editing pane.
In the Editing restrictions area of the pane, select the Allow only this type of editing in the document checkbox and then select either Comments or No changes (Read only) as the type of editing you want to permit for all users. An Exceptions section appears in the pane.
In the document, select the content that you want to permit a specific person or specific people to freely edit.
In the Exceptions area, if the Groups or Individuals box does not list the people or person you want to permit to edit the selection, do the following:
Select More users to open the Add Users dialog.
Enter the user credentials of the person or people you want to allow to freely edit the selection.
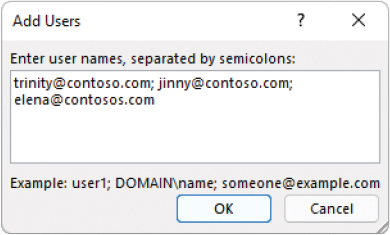
When granting restriction exceptions to multiple people, separate the entries by using semicolons
In the Add Users dialog, select OK.
In the Exceptions area, select the checkbox that precedes each group or person you want to permit to edit the selection.
If you want to permit the editing of additional sections of content, repeat steps 3 through 5.
In the Start enforcement area of the Restrict Editing pane, select Yes, Start Enforcing Protection to open the Start Enforcing Protection dialog shown in the earlier procedure to restrict the styles permitted in a document.
In the Start Enforcing Protection dialog, select User authentication, and then select OK to turn on the restrictions.
To remove editing and formatting restrictions
Display the Restrict Editing pane.
At the bottom of the pane, select Stop Protection.
The Unprotect Document dialog opens regardless of whether a password is required.
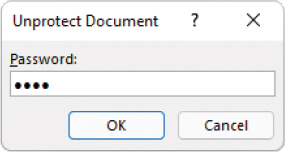
When protecting a document, always use a password you can remember, because it can’t be reset
In the Unprotect Document dialog, enter a password in the Password box if one is required. Otherwise, leave the Password box blank. Then select OK to remove the restrictions.
Restrict access by using a password
Sometimes, you might want to allow only certain people to open and change a document. The simplest way to do this for an individual document is to assign a password to protect the file. Then, anyone who wants to modify the document must enter a password when opening it.
You can assign a password to a document while working in the document or when saving the document. Word offers two levels of password protection:
Encrypted The document is saved in such a way that people who do not know the password cannot open it at all.
Unencrypted The document is saved in such a way that only people who know the password can open it, make changes, and save the file. People who don’t know the password can open a read-only version. If they make changes and want to save them, they must save the document with a different name or in a different location, preserving the original.

Assigning a password to open a document encrypts the document; assigning a password to modify the document does not encrypt it
![]() Important
Important
Don’t use common words or phrases as passwords, and don’t use the same password for multiple documents. After assigning a password, make a note of it in a safe place. If you forget it, you won’t be able to open the password-protected document.
To recommend against changes to a document
Display the Save As page of the Backstage view.
Using locations in the Places list, the current folder, or recent folders as a starting point, navigate to the folder you want to save the document in. If necessary, select Browse to display the Save As dialog.
If you want to protect a copy of the document instead of the original, enter a name for the copy in the File name box.
Near the lower-right corner of the Save As dialog, select Tools. Then in the Tools list, select General Options.
In the General Options dialog, select the Read-only recommended checkbox, and then select OK.
To prevent unauthorized changes by setting a password
On the Save As page of the Backstage view, navigate to the folder you want to save the password-protected document in. If necessary, select Browse to display the Save As dialog.
If you want to protect a copy of the document instead of the original, enter a name for the copy in the File name box.
Near the lower-right corner of the Save As dialog, select Tools. Then in the Tools list, select General Options.
In the General Options dialog, enter the password you want to assign to the document in the Password to modify box. Then select OK to display the Confirm Password dialog.
 Tip
TipAs you enter the password, Word obscures it for security.
In the Confirm Password dialog, enter the same password in the Reenter password to modify box, and then select OK to set the password.
In the Save As dialog, select Save. If Word prompts you to overwrite the original document, select Yes.
To test the security of a password-protected document
Open the document and verify that Word displays the Password dialog.
Enter an incorrect password, select OK, and verify that Word denies you access to the document.
To open a password-protected document for reading
Open the document.
In the Password dialog, select the Read Only button to open a read-only version of the document.
 Tip
TipWhen using the default settings, Word opens the document in Read Mode.
To open a password-protected document for editing
Open the document.
In the Password dialog, enter the password that you assigned to the document, and then select OK to open a read/write version of the document.
To remove password protection from an unencrypted document
On the Save As page of the Backstage view, in the Current Folder area, select the current folder.
At the bottom of the Save As dialog, in the Tools list, select General Options.
In the General Options dialog, select the contents of the Password to modify box, press Delete, and then select OK.
In the Save As dialog, select Save.
To prevent document access by setting a password
Display the Info page of the Backstage view.
Select Protect Document, and then select Encrypt with Password.
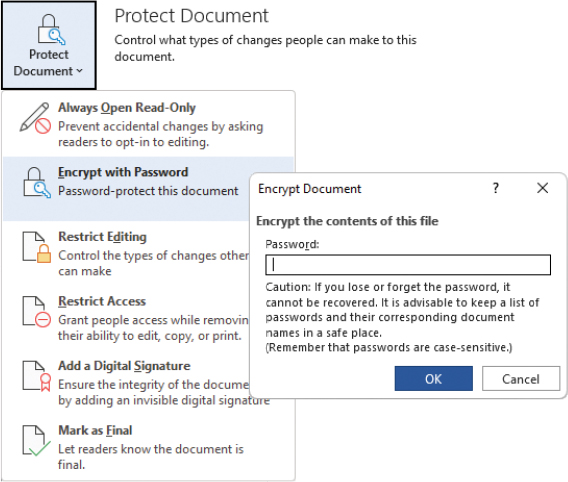
After you assign the password, you will no longer be able to open the document without it
In the Encrypt Document dialog, enter the password you want to assign in the Password box, and then select OK.
In the Confirm Password dialog, enter the same password in the Password box, and then select OK.
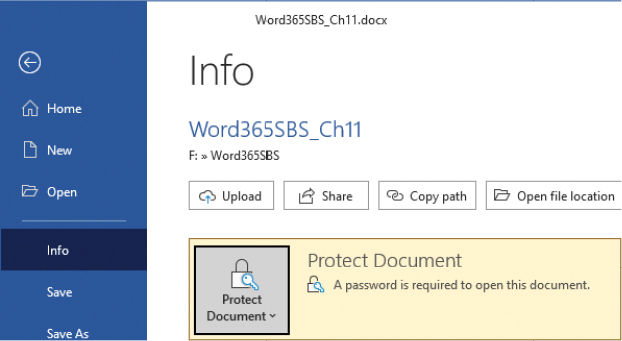
The Info page of the Backstage view displays the protected status of the document
Close the document and save your changes.
Or
On the Save As page of the Backstage view, navigate to the folder you want to save the password-protected document in. If necessary, select Browse to display the Save As dialog.
If you want to make a password-protected copy of the document, enter a name for the copy in the File name box.
Near the lower-right corner of the Save As dialog, select Tools. Then in the Tools list, select General Options.
In the General Options dialog, enter the password you want to assign to the document in the Password to open box. Then select OK to display the Confirm Password dialog.
Enter the same password in the Reenter password to modify box, and then select OK to set the password.
In the Save As dialog, select Save. If Word prompts you to overwrite the original document, select Yes.
To remove password encryption from a document
Open the document and enter the correct password.
On the Info page of the Backstage view, in the Protect Document list, select Encrypt with Password.
In the Encrypt Document dialog, delete the password from the Password box, and then select OK.
Coauthor documents
Whether you work for a large company or a small organization, you might need to collaborate with other people on the development of a document. Regardless of the circumstances, it can be difficult to keep track of different versions of a document produced by different people. If you store a document in a shared location such as a SharePoint document library or Microsoft OneDrive folder, multiple people can edit the document simultaneously.
After you save a document to a shared location, you can open and edit the document just as you would if it were stored on your computer. Other people can also open and edit the document either by browsing to it or from an invitation that you send. This facilitates efficient collaboration between people regardless of location, schedule, or time zone.
The process of inviting people to edit a shared file depends on the storage location. The file is automatically shared with other people who have access to the SharePoint document library or OneDrive folder. You can invite other people to edit or view the file from the Share pane.
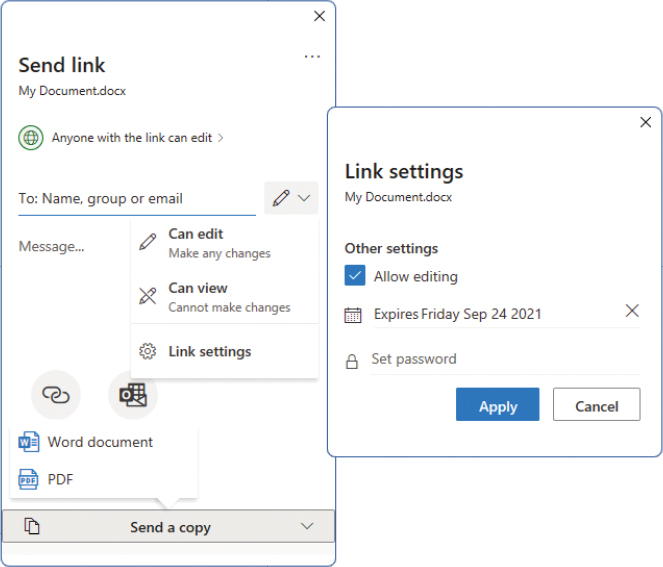
You can send a copy or provide read or write access to an online file
When other people open a shared file for editing, Word alerts you to their presence by displaying their user badge (a round badge displaying a photo or initials) on the ribbon.
Selecting an editor’s user badge displays options for tracking the work that person is doing in the document and communicating with him or her. If the file is stored on SharePoint, you have the option of chatting with other editors directly in the document. Otherwise, you have an email option.
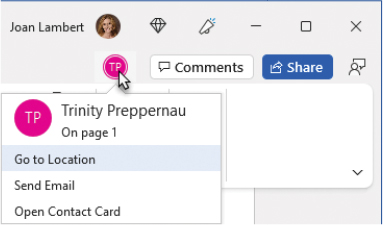
An alert appears as each editor opens the document
Word keeps track of the content that people are editing so you can see where other people are working in a document. If change tracking is turned on, you can see the changes they’re making.

Word indicates the areas of the document that are being edited
When you turn on change tracking in a Word document, you can turn it on for all editors or only for yourself. If each person working in the document tracks his or her changes, the tracked changes remain available so that the document owner can accept or reject them when the team has finished working on the document.
To make a document available for coauthoring
Save the document to a SharePoint document library or OneDrive folder.
To begin coauthoring a document
If the document is stored in a SharePoint document library, do not check it out.
Open the document directly from the document library or OneDrive folder.
Edit the document as you would normally. Other editors can join the document from the same location.
To display the Share pane
To the right of the ribbon tabs, select the Share button.
In the left pane of the Backstage view, in the right pane of the Share with People page, select the Share with People button.
To invite other people to edit a file stored in OneDrive
Display the Share pane.
In the Invite people box, enter the names or email addresses of the people you want to invite to edit the document.
In the permissions list, select Can edit to allow the recipients to make changes to the document.
In the message box, enter any message you want to include in the sharing invitation.
Select Share to send an email message that contains a link to the document on OneDrive.
Or
Display the Share pane.
At the bottom of the pane, select Get a sharing link, and then select Create an edit link.
To the right of the link that is created, select Copy.
Paste the copied link into an email message, instant message, or other communication form, and send it to the people you want to invite to edit the file.
To move to the location in a document where another editor is working
On the ribbon, select the user badge of the editor you want to locate.
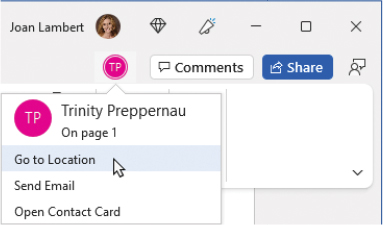
You can easily locate edits other people are making
On the menu, select Go to Location.
To begin a chat in a document stored on SharePoint
On the ribbon, select the user badge of the editor you want to chat with, and then select Chat.
Key points
You can insert comments in a document to ask questions or explain suggested edits.
You can track the revisions you make to a document without losing the original text. Word assigns different revision-tracking colors to multiple reviewers, so you can easily identify change sources.
You can merge multiple versions of a document so that the changes in all versions are tracked in one document.
If only specific people should work on a document, you can protect it with a password. You can also restrict the types of changes people can make or force all changes to be tracked.
Multiple people can simultaneously edit a document stored in a SharePoint document library or on OneDrive.
![]() See Also
See Also
This chapter is from the full-length book Microsoft Word Step by Step (Office 2021 and Microsoft 365) (Microsoft Press, 2022). Please consult that book for information about features of Word that aren’t discussed in this book.
Practice tasks

Before you can complete these tasks, you must copy the book’s practice files to your computer. The practice files for these tasks are in the Office365SBSCh04 folder. You can save the results of the tasks in the same folder.
The introduction includes a complete list of practice files and download instructions.
Mark up documents
Open the TrackChanges document in Word, display the document in Print Layout view, and then perform the following tasks:
Turn on change tracking.
Display the Comments pane.
In the last column of the table, select the words some good, and then attach the comment They carry the new Ultra line.
Configure the review settings to display the All Markup view of changes and to display only formatting in balloons.
If necessary, scroll through the document to display the table. Perform these tasks in the Fabrikam row of the table:
In the Prices column, delete the word much from the phrase Some much lower.
In the Service column, insert but slow after the word Adequate.
Perform these tasks in the Northwind Traders row of the table:
In the Quality column, replace the word Poor with Substandard.
Point to the deleted word and then to the inserted word to display information about the changes in ScreenTips.
Configure the review settings to display revisions in balloons instead of inline.
Restore the inline revision indicators and remove the balloons.
Move the last sentence of the paragraph (Traveling for business…) to the beginning of the paragraph. If necessary, insert a space after the sentence.
Turn off change tracking.
Configure the review settings to display the Simple Markup view.
Save and close the document.
Display and review document markup
Open the ReviewComments document in Word, display the document in Print Layout view, and then perform the following tasks:
Configure the review settings to display the Simple Markup view of changes.
Display only revisions made by Elizabeth Jones.
Move to the first comment shown in the document, which is attached to the word competitors. Delete the comment.
Move to the second comment, which is attached to the word Adequate in the Service column of the table. Point to the word in the table to display a ScreenTip that contains the name of the person who inserted the comment and the date and time the comment was inserted. Notice that the ScreenTip displays more information than the comment bubble.
Select the Reply to Comment button in the second comment bubble. In the reply box, enter If you had been a real customer, would you have left?
Display the Revisions pane on the left side of the app window. Then drag the pane away from the side of the window so that it floats independently.
In the Revisions pane, expand the detailed summary of revisions and note the types of revisions in the document.
Configure the review settings to display revisions made by all reviewers.
Scroll through the revisions in the pane, and then close it.
Configure the review settings to display the All Markup view of changes.
Hide all comments in the document.
Move between the tracked changes in the document.
Accept all the changes in the text paragraph.
Process the changes in the table as follows:
Reject the table formatting change.
Accept the deletion of the word much.
Reject the changes associated with the addition of the words but slow.
Accept both changes associated with the replacement of Poor with Substandard.
Configure the review settings to display the No Markup view of changes. Then change the balloon setting to the one you like best.
Save and close the document.
Compare and combine documents
Open a new, blank document in Word, and then perform the following tasks:
Compare the MergeDocs1 and MergeDocs2 documents by using the following settings:
Label unmarked changes from MergeDocs2 with your name.
Select all available comparison settings.
Mark the differences in a separate document.
When Word completes the comparison, ensure that the Revisions pane is open on the left, the merged document in the center, and the two original documents on the right.
 Tip
TipIf the Revisions pane is not open, select Reviewing Pane in the Tracking group on the Review tab. If the source documents are not displayed, select the Compare button, select Show Source Documents, and then select Show Both.
In the center pane, scroll through the document to review all the revisions, and then in the Revisions pane, scroll through the individual revisions. Before changes can be accepted in the document, conflicting changes must be resolved.
In the Revisions pane, locate the deleted instance of March and then accept the deletion.
Select each change that remains in the Revisions pane to display that location in the three document panes.
Select the merged document in the center pane to activate it. Then accept all the changes in the document at the same time.
Close the Revisions pane, and then close the two windows on the right side of the screen.
Save the merged document as MyMergedDocument, and then close it.
Control content changes
Open the ControlChanges document, and then perform the following tasks:
Save a copy of the document, naming the copy MyControlChanges, and require the password P@ssw0rd1 to modify the document but no password to read the document.
Configure the document options to recommend that people open a read-only copy of the document.
Close the document, and then open a read-only version of it.
Attempt to make a change and verify that you can’t save the changed document.
Close the document, and then use the password to open an editable version of it.
Remove the password protection from the document.
Encrypt the document and require the password P@ssw0rd2 to open it.
Restrict the formatting in the document to only the recommended minimum styles.
Block users from switching schemes or style sets.
Turn on the restrictions and remove any formatting and styles that don’t meet the requirements you selected. Notice the changes to the document.
Configure the editing restrictions so that you can edit only the first paragraph of the document and other people aren’t permitted to make any changes.
Save and close the document.
Coauthor documents
There is no practice task for this topic because it requires that documents be stored in a shared location.
