
5
Set up resources
In this chapter
Resources include the people, equipment, and material needed to complete the work of a project. Effective resource management is one of the most significant advantages of using Project Online desktop client instead of using task-focused planning tools such as ticket-issuing systems.
You can manage three types of resources in Project—work resources and two special-purpose resources, cost and material. Work resources include the people and equipment needed to complete the tasks in a project’s plan. Cost resources represent categories of financial costs, derived from specific tasks, that you need to account for in the plan. Examples include categories of expenses, such as travel and entertainment. Material resources are consumables that get used up as the project proceeds. For example, a construction project might need to track steel or concrete as it is used throughout the project. You’ll work with material resources in Chapter 11, “Fine-tune resource and assignment details.”
Setting up resource information in Project takes a little effort, but the time is well spent if your project is primarily driven by time or cost constraints (as nearly all projects are).
This chapter guides you through procedures related to setting up work resources, entering the maximum capacity for work resources, entering work resource pay rates, adjusting working time in a resource calendar, setting up cost resources, and documenting resources by using notes.
Set up work resources
Work resources are the people and equipment doing the work of the project. Project focuses on two aspects of work resources: their availability and their costs. Availability pertains to when specific resources can work on tasks and how much work those resources can perform. Costs refers to the financial costs incurred by resources performing work on the project.
In Project, work resource names can refer to specific people or to specific job titles. Use whatever naming convention makes the most sense to you and to the people who will see your plan. The important questions are these: Who will see these resource names, and how will they identify the resources? The resource names you choose will appear both in Project and in any resource information shared from Project.
A resource might refer to somebody who’s already on staff or to a position to be filled later. If you haven’t yet filled all the resource positions required, you might not have the names of specific people to enter. In that case, use descriptive placeholder names or job titles when setting up resources in Project.
The following table lists some examples of how you can enter work resource names.
Work Resource | Examples |
|---|---|
An individual person identified by name | Jun Cao, Zac Woodall |
An individual person identified by job title or function | Publisher, Contract specialist |
A group of people who have common skills (when assigning such interchangeable resources to a task, you might not be concerned about who the individual resource is as long as that person has the right skills) | Copyeditors |
Equipment | Offset lithography press |
Project can help you make smarter decisions about managing resources and monitoring financial costs.
To enter work resource names
On the View tab, in the Resource Views group, select Resource Sheet to display the Resource Sheet view.
Select an empty cell in the Resource Name column.
Enter your resource names, pressing the Enter key after each one.
Project applies the default Work resource type in the Type field.
 Tip
TipYou can quickly import resources from your email address book. First, switch to the Resource Sheet view. Then, on the Resource tab, select Add Resources.
To insert a new work resource within a resource list
Display the Resource Sheet view.
Select in the cell in the Resource Name column where you want to insert the new resource.
On the Resource tab, in the Insert group, select Add Resources, and then select Work Resource.
Project inserts a new row with the <New Resource> name in the Resource Name column and renumbers the subsequent resources.
With <New Resource> selected, enter the resource name and press Enter.
To delete a resource
Right-click or long-press (tap and hold) the resource name, and then select Delete Resource.
Enter the maximum capacity for work resources
Work resources don’t have unlimited capacity within the limited duration of a plan, and Project helps you manage this. The Max. Units field represents the maximum capacity of a resource to work on the tasks assigned to that resource. Specifying that a resource has 100% maximum units means that 100 percent of that resource’s working time is available to work on assigned tasks in the plan. Project alerts you with an indicator and formatting if you assign the resource to more tasks than the resource can accomplish. For example, a resource is overallocated if it is assigned to two or more tasks at 100% capacity each, and the tasks overlap. 100% is the default Max. Units value for new work resources.
For a resource that represents not a specific person but a category of interchangeable people with a common skill set, you can enter a larger maximum units value to indicate the number of available people. For example, entering a maximum units value of 200% for such a resource means that you expect two individual people who belong to that resource category to be available to work full time every workday, or four individual people to each work half time, or any equivalent combination.
For a resource that has less than full-time availability, you can enter a smaller maximum units value. For example, entering a maximum units value of 75% for such a resource means that you expect that resource’s capacity to be three-quarters of a full-time resource. For a 40-hour work week, this equals 30 hours of capacity. Note that such a part-time working capacity might apply to a part-time worker or to a full-time worker who is allocated to a specific project only part time.
To adjust a resource’s working capacity
On the View tab, in the Resource Views group, select Resource Sheet.
In the Resource Sheet view, select the Max. Units field for the resource you want to adjust (the Max. portion of the field’s column heading might be the only part visible).
TipWhen you select a numeric value in a field such as Max. Units, up and down arrows appear. You can select these to display the number you want, or you can enter the number directly in the field.
Enter the new value for the resource. For example, enter 200% to represent two resources, or enter 50% for a resource who has only half-time availability.
![]() Tip
Tip
If you prefer, you can display and enter maximum units as partial or whole numbers (such as 0.5, 1, or 4) instead of as percentages (such as 50%, 100%, or 400%). To use this format, on the File tab, select Options. In the Project Options dialog, select the Schedule tab. Under the Schedule heading, in the Show assignment units as a box, select Decimal.
Enter work resource pay rates
Almost all projects have some financial aspect, and cost limits the scope of many projects. Tracking and managing cost information in Project allows the project manager to answer such important questions as these:
What is the expected total cost of the project, based on task durations and resource assignments?
Is the organization using expensive resources to do work that less expensive resources could do?
How much money will a specific type of resource or task cost over the life of the project?
Is the organization spending money at a rate that it can sustain for the planned duration of the project?
In Project, you can enter standard rates and costs per use for work and material resources, in addition to overtime rates for work resources. This is shown in Figure 5-1. Recall that Project uses three types of resources: work, cost, and material.

FIGURE 5-1 You can view a resource’s pay rates and other cost-related details in the Resource Sheet view.
![]() Tip
Tip
Cost resources do not use pay rates and are described later in this chapter. Material resources are introduced in Chapter 11.
You can enter pay rates with a variety of time bases: per minute, hourly (the default), daily, weekly, monthly, or yearly. You enter rates in the format of rate/period—for example, 30/hr for $30 per hour. Period abbreviations are /min for minutes, /hr for hours, /day for day, /wk for week, /mon for month, and /yr for year.
When a work resource has a standard pay rate entered and is assigned to a task, Project calculates the cost of the assignment. Project does so by multiplying the resource’s assigned work value by his or her pay rate—both using a common increment of time (such as hours). You can then see the cost per resource, cost per assignment, and cost per task (and also costs rolled up to summary tasks and the entire plan). You’ll assign resources to tasks in Chapter 6, “Assign resources to tasks.” You’ll work with multiple resource pay rates in Chapter 11.
Project handles overtime expenses differently. Project applies the overtime pay rate only when you specifically record overtime hours for an assignment. Project doesn’t automatically calculate overtime hours and associated costs because there’s too great of a chance that it might apply overtime when you did not intend it.
![]() Tip
Tip
If you work with many resources who have the same standard or overtime pay rates, you can set up Project to apply these pay rates automatically whenever you add a new resource. To do this, on the File tab, select Options. In the Project Options dialog, select Advanced. Under the heading General options for this project, enter the default pay rates you want.
You can specify when work resource standard and overtime costs should accrue. The options are at the start of work on a task, at the end of work on the task, or prorated (the default) evenly over the duration of the task.
In addition to or instead of cost rates, a resource can include a set fee that Project applies to each task to which the resource is assigned. This is called a cost per use. Unlike cost rates, the cost per use does not vary with the task’s duration or the amount of work the resource performs on the task.
To enter a standard rate for a resource
On the View tab, in the Resource Views group, select Resource Sheet.
In the Resource Sheet view, select the Std. Rate field for the resource for which you want to set a standard pay rate.
Depending on the width of the column, you might see only Std. in the column heading.
Enter a standard rate by using the format of rate/period, such as 30/hr.
To enter an overtime rate for a resource
Display the Resource Sheet view.
Select the Ovt. Rate field for the resource for which you want to set an overtime pay rate.
Depending on the width of the column, you might see only Ovt. in the column heading.
Enter an overtime rate by using the format of rate/period, such as 45/hr.
To enter a cost per use for a resource
Display the Resource Sheet view.
In the Cost/Use field, enter the value you want.
Adjust working time in a resource calendar
Project uses different types of calendars for different purposes. Chapter 3, “Start a new plan,” describes the project calendar, which specifies nonworking days for the entire plan. This topic focuses on resource calendars. A resource calendar controls the working and nonworking times of a specific resource. Project uses a resource calendar to determine when work for a resource can be scheduled. Resource calendars apply only to work resources (people and equipment), not to material or cost resources.
When you initially create resources in a plan, Project creates a resource calendar for each work resource. The initial working time settings for resource calendars exactly match those of the project calendar, which, by default, is the Standard base calendar. The Standard base calendar is built into Project and accommodates a default work schedule from 8:00 AM to 5:00 PM Monday through Friday, with an hour off for lunch each day.
If all the working times of your resources match the working time of the project calendar, you don’t need to edit any resource calendars. However, chances are good that some of your resources will need exceptions to the working time in the project calendar—for example:
A flex-time work schedule
Personal holiday (vacation) time
Other times when a resource is not available to work on the project, such as time spent in training or when attending a conference
![]() Tip
Tip
If you have a resource who is available to work on your project only part time, you might be tempted to set the working time of the resource in your project to reflect a part-time schedule, such as 8:00 AM to 12:00 PM daily. However, a better approach is to adjust the availability of the resource as recorded in the Max. Units field accordingly—in this case, to 50%. Changing the unit availability of the resource keeps the focus on the capacity of the resource to work on the project instead of on the specific times of the day when that work might occur. You can set the maximum units for a resource in the Resource Sheet view.
Changes that you make to the project calendar are reflected automatically in resource calendars derived from the same project calendar. For example, in the practice tasks in Chapter 3, you specified a nonworking day for a staff morale event, and Project rescheduled all work to skip that day. Note, however, that after you create an exception in the resource calendar, that exception is not affected by later changes to the project calendar that cover the same time period.
![]() Tip
Tip
If you find that you must edit several resource calendars in a similar way (to handle a night shift, for example), an easier approach might be to assign a different base calendar to a resource or collection of resources. This is more efficient than editing individual resource calendars, and you can use the base calendar to make plan-wide adjustments, if needed. For example, if your project includes a day shift and a night shift, you can apply the Night Shift base calendar to resources who work the night shift. You change a base calendar in the Change Working Time dialog. For collections of resources, you can select a specific base calendar directly in the Base Calendar column on the Entry table in the Resource Sheet view.
To specify a calendar exception for a work resource
On the Project tab, in the Properties group, select Change Working Time.
In the For calendar box, select the name of the resource whose calendar you want to change.
TipWhen working in the Change Working Time dialog, pay close attention to the value in the For calendar box. Accidentally editing the wrong calendar is an easy mistake.
In the Name field on the Exceptions tab in the lower portion of the dialog, enter a description of the exception.
The description for the calendar exception is a handy reminder for you and others who might view the plan later.
In the Start and Finish fields, enter or select the dates you want.
A calendar exception is illustrated in Figure 5-2.
TipTo set up a partial working time exception for a resource, such as a portion of a day when a resource cannot work, select Details. In the Details dialog, you can also create recurring exceptions to the resource’s availability.
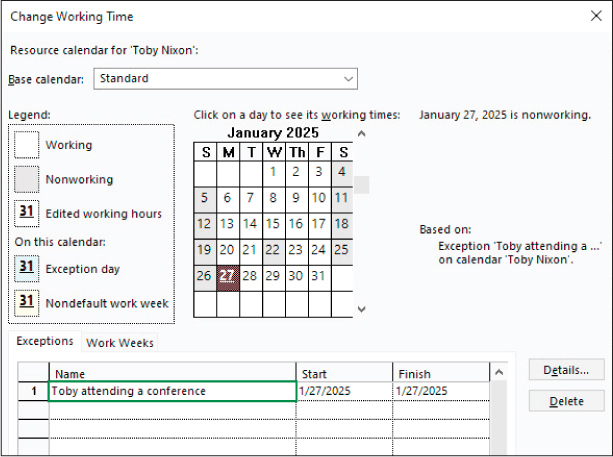
FIGURE 5-2 You can review or create working time calendar exceptions for individual resources in the Change Working Time dialog.
Select OK to close the Change Working Time dialog.
To modify a resource’s default working week days and times
Display the Change Working Time dialog.
In the For calendar box, select the name of the resource whose calendar you want to change.
Select the Work Weeks tab.
Select [Default] directly under the Name column heading, and then select Details.
Under Select day(s), select the day or days you want to adjust.
Do any of the following:
To set the full days to nonworking, select Set days to nonworking times.
To set working times that differ from the base calendar, select Set day(s) to these specific working times and then, in the From and To columns, enter the working times as shown in Figure 5-3.
To return to the base calendar working times, select Use times from base calendar for these days.

FIGURE 5-3 You create nonstandard workweek schedules in the Details dialog.
When you complete your edits to the workweek, select OK, and then select OK again to close the Change Working Time dialog.
![]() Tip
Tip
You can have a different, nondefault working week for a specific time period. For example, you can set up a resource to work four 10-hour days each week for just 1 month. On the Work Weeks tab, select below [Default] and add a name and the start and finish dates of the period. Then select Details to change the working times and days, as described earlier in this procedure.
To assign a different base calendar to a resource
On the Project tab, in the Properties group, select Change Working Time.
In the For calendar field, select the resource you want.
In the Base calendar field of the resource, select the base calendar you want.
![]() Tip
Tip
To quickly apply the same base calendar to multiple resources, in the Resource Sheet view, use the Base Calendar field.
Set up cost resources
Another type of resource you can use in Project is the cost resource. You can use a cost resource to represent a financial cost associated with a task in a plan. Although work resources (people and equipment) can have associated costs (hourly rates and fixed costs per assignment), the sole purpose of a cost resource is to associate a particular type of cost with one or more tasks. Common types of cost resources might include categories of expenses you want to track in a plan for accounting or financial reporting purposes, such as travel, entertainment, or training.
Cost resources do no work and have no effect on the scheduling of a task. The Max. Units, Standard and Overtime pay rate, and Cost Per Use fields do not apply to cost resources. After you assign a cost resource to a task and specify the cost amount per task, you can see the cumulative costs for that type of cost resource, such as total travel costs in a project.
The way that cost resources generate cost values differs from that of work resources. When you assign a work resource to a task, the work resource can generate a cost based on a pay rate (such as $40 per hour for the length of the assignment), a flat per-use cost (such as $100 per assignment), or both. You set up such pay rates and cost-per-use amounts once for the work resource, as described in the “Enter work resource pay rates” topic, earlier in this chapter. However, you enter the cost value of a cost resource only when you assign it to a task. You do this in the Cost field of the Assign Resources dialog or in the Cost field of the Task form with the Cost detail shown. This is described in “Assign cost resources to tasks,” in Chapter 6.
To add a cost resource
On the View tab, in the Resource Views group, select Resource Sheet.
In the Resource Sheet view, select in the Resource Name column where you want to add the cost resource.
On the Resource tab, in the Insert group, select Add Resources and then select Cost Resource.
Project inserts a row for the new cost resource. Project names the new cost resource <New Resource>.
With <New Resource> selected, enter the cost resource name and press Enter.
Document resources by using notes
You might recall from Chapter 4, “Build a task list,” that you can record additional information about a task, resource, or assignment in a note. For example, if a resource has conference time recorded as an exception in their resource calendar, it’s a good idea to record this in a note. That way, the note resides in the plan and can be easily viewed or printed.
Chapter 4 described creating a task note by selecting the Notes button on the Task tab, in the Properties group. You can enter resource notes in a similar way (by selecting the Notes button on the Resource tab, in the Properties group). Another option is to enter notes directly in the Resource Form view. The advantage of using the Resource Form is that you can view and edit notes for multiple resources more quickly.
To enter a note for a resource in the Resource Information dialog
On the View tab, in the Resource Views group, select Resource Sheet.
Select a resource name.
On the Resource tab, in the Properties group, select Notes.
In the Notes box, enter a note for the resource.
To enter a note for a resource by using the Resource Form
On the View tab, in the Resource Views group, select Resource Sheet.
On the Resource tab, in the Properties group, select the Details button.
In this type of split view, details about the item that is selected in the upper pane (a resource, in this case) appear in the lower pane. You can quickly change the selected resource name in the upper pane by selecting a name directly or by selecting Previous or Next in the Resource Form.
The Resource Form view can display one of several details; initially, it displays the Schedule details.
Select anywhere in the Resource Form view to change the focus to the Resource Form. The label of the Resource Sheet Format tab changes to Resource Form Format.
On the Resource Form Format tab, in the Details group, select Notes.
TipYou can also right-click in the gray, empty background area of the Resource Form view and, in the shortcut menu that appears, select Notes.
As shown in Figure 5-4, the Notes details appear in the Resource Form view.
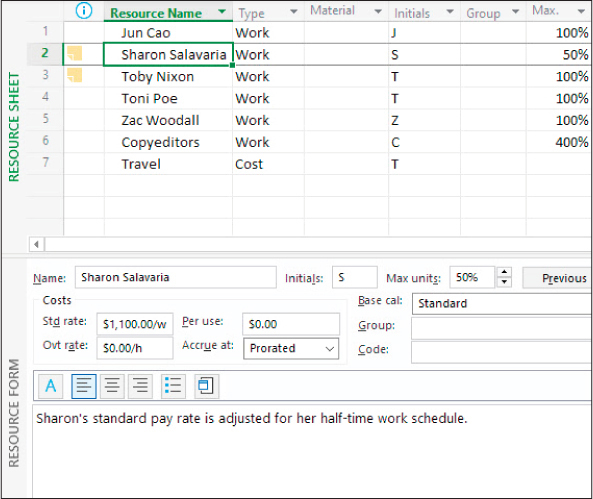
FIGURE 5-4 This split view is great for quickly adding, editing, or reviewing resource details such as notes.
In the Notes box, enter the note for the resource.
Notice that, as soon as you start typing the note, the Previous and Next buttons change to OK and Cancel.
Select OK.
Skills review
In this chapter, you learned how to
Set up work resources
Enter the maximum capacity for work resources
Enter work resource pay rates
Adjust working time in a resource calendar
Set up cost resources
Document resources by using notes

Practice tasks
The SimpleSetUpResources practice file for these tasks is located in the ProjectDesktopSBSCh05 folder. For practice file download instructions, see the introduction to this book.
![]() Important
Important
If you’re running Project Online desktop client or Project Professional, make sure that that Project is not connected to Project Web App and is instead set to Computer mode. For more information, see Appendix C, “Integration with Microsoft 365 solutions for collaboration.”
Set up work resources
The scenario: at Lucerne Publishing, you have a good start on the new book launch’s task list. Task details have been finalized, and all tasks are automatically scheduled. You’re now ready to set up the work resources needed to complete the new book launch. As with the task list, you expect some future changes to the resource details as you learn more about the project, but you have enough information to get started now. Open the SimpleSetUpResources plan in Project and perform the following tasks:
On the View tab, in the Resource Views group, select Resource Sheet.
Enter the following resource names to generate the results as shown in Figure 5-5:
Jun Cao
Sharon Salavaria
Toby Nixon
Toni Poe
Zac Woodall
Copyeditors

FIGURE 5-5 The resource names you entered should look like this in the Resource Sheet.
Enter the maximum capacity for work resources
The scenario: you need to change the default 100% maximum units value for some resources. You learned that the equivalent of four copyeditors will be allocated to the new book launch. You also have one resource in the plan, Sharon Salavaria, who is available for this project half time. Continuing in the SimpleSetUpResources plan, perform the following tasks:
Change the Copyeditors resource maximum units value to 400% as displayed in Figure 5-6.
Change Sharon Salavaria’s maximum units value to 50% as displayed in Figure 5-6.

FIGURE 5-6 After customizing the Max Units values for two resources, the Resource Sheet should look like this one.
Enter work resource pay rates
The scenario: you received the pay rates for the work resources involved in the new book launch from your payroll department. These pay rates are a mix of hourly and weekly rates. You need to enter these pay rates in the new book launch’s plan. Continuing in the SimpleSetUpResources plan, perform the following tasks:
Enter the following pay rates in the Standard (Std.) Rate field:
Resource Name
Standard Rate
Jun Cao
$42.00/hr
Sharon Salavaria
$1,100.00/wk
Toby Nixon
$2,700.00/wk
Toni Poe
Leave at $0.00/hr (Toni is the book author, and you’re not tracking her rate-based costs in this plan.)
Zac Woodall
$55.00/hr
Copyeditors
$45.00/hr
Enter an overtime rate of $63.00/hr for Jun Cao, as shown in Figure 5-7.

FIGURE 5-7 The Resource Sheet should look like this after you enter pay rates.
Adjust working time in a resource calendar
The scenario: you have a couple working time updates to make in the new book launch plan. Toby Nixon has told you he’ll be away at a conference, and Jun Cao works a full-time but nonstandard schedule of 10 hours per day, 4 days per week (a “4-by-10” work schedule). You need to update their resource calendars accordingly. Continuing in the SimpleSetUpResources plan, perform the following tasks:
Make January 27, 2025, a nonworking time calendar exception for Toby Nixon, as shown in Figure 5-8. Name the exception Toby attending a conference.
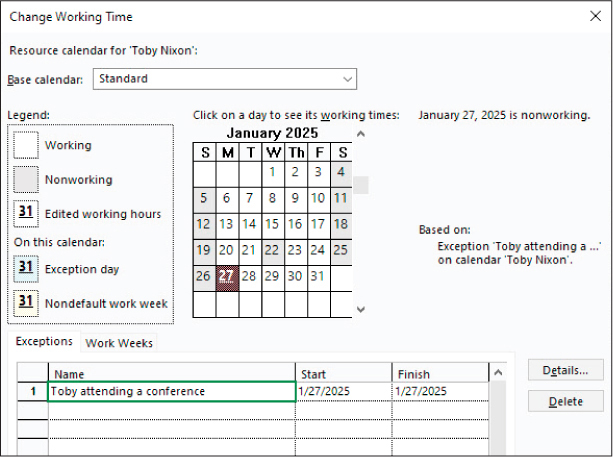
FIGURE 5-8 After you create an exception in the Change Working Time dialog, note the description and formatting of the date in the calendar.
For Jun Cao, change the default work week to a “4-by-10” weekly work schedule (that is, 4 days per week, 10 hours per day Monday through Thursday, with Friday off). You can see in Figure 5-9 that on the days Jun works, she’ll work from 8:00 AM to 7:00 PM, with the noon hour off for lunch.
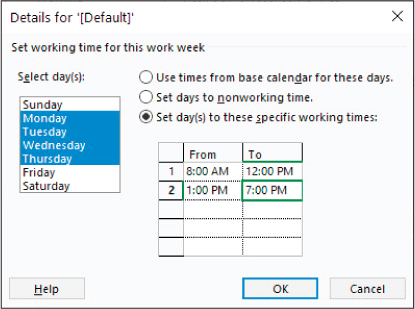
FIGURE 5-9 The working time settings for the selected days appear here; to see Friday’s nonworking settings, select that day.
Set up cost resources
The scenario: for accounting purposes, you need to track travel expenses in the plan. You do so via a cost resource. Continuing in the SimpleSetUpResources plan, perform the following task:
Create a cost resource named Travel as shown in Figure 5-10.
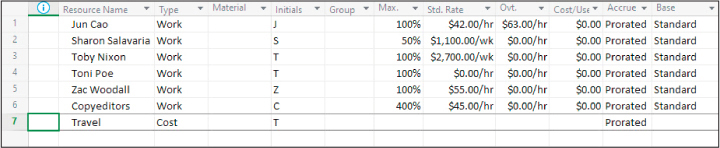
FIGURE 5-10 Your cost resource should look like this in the Resource Sheet.
Document resources by using notes
The scenario: you collected some resource details that are valuable to record in the plan. Continuing in the SimpleSetUpResources plan, perform the following tasks:
Add this note for Toby Nixon in the Resource Information dialog: Toby worked on launch campaigns for Toni Poe’s previous two books. You can see the note in Figure 5-11.
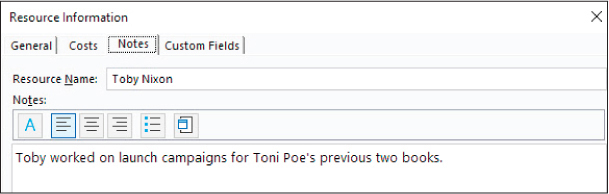
FIGURE 5-11 Your resource note should look like this in the Resource Information dialog.
Use the Resource Form to add this note for Sharon Salavaria: Sharon’s standard pay rate is adjusted for her half-time work schedule. You can see the note in Figure 5-12.
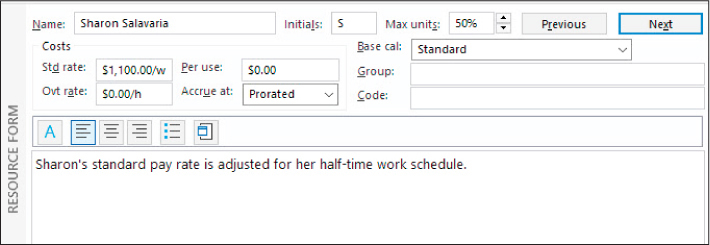
FIGURE 5-12 Your resource note should look like this in the Resource Form.
![]() Tip
Tip
If you want to save your work, remember to save it with a different file name. Renaming preserves the original practice file for future use.