2. Basic Data Retrieval
In this chapter, we’ll begin our exploration of the most important topic in SQL, namely, how to retrieve data from a database. Regardless the size of your organization, the most common request made of analysts is the request for a report. Of course, it’s a nontrivial exercise to get data into a database, but once the data is there, the energies of business analysts turn to the wealth of data at their disposal and the desire to extract useful information from all that data.
The emphasis in this book on data retrieval corresponds to these real-world demands. Your knowledge of SQL will go a long way toward helping your organization unlock the secrets hidden in the data stored in your databases.
A Simple SELECT
The ability to retrieve data in SQL is accomplished through something called the SELECT statement. Without any preliminary explanation, here is an example of the simplest possible SELECT statement:
SELECT *
FROM Customers
In the SQL language, as in all computer languages, certain words are keywords. These words have special meanings and must be used in a particular way. In this statement, the words SELECT and FROM are keywords. The SELECT keyword indicates the start of a SELECT statement. The FROM keyword is used to designate the table from which data is to be retrieved. The name of the table follows the FROM. In this case, the table name is Customers. The asterisk (*) in this example is a special symbol that means “all columns.”
As is the custom, we’ll print keywords in all capital letters. This is done to ensure that they are noticeable. To sum up, this statement means: Select all columns from the Customers table.
If the Customers table looks like this:

then the SELECT will return the following data:
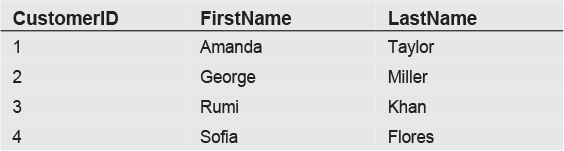
In other words, it brings back everything in the table.
In the previous chapter, we mentioned that it’s a common practice to specify a primary key for all tables. In this example, the CustomerID column is such a column. We also mentioned that primary keys are sometimes set up to automatically generate sequential numbers in a numeric sequence as rows are added to a table. That is the case in this example. In fact, most of the sample data we’ll show throughout the book will include a similar column that is both a primary key and defined as auto-increment. By convention, this is generally the first column in a table.
Syntax Notes
Two points must be remembered when writing any SQL statement. First, the keywords in SQL are not case sensitive. The word SELECT is treated identically to “select” or “Select.”
Second, a SQL statement can be written on any number of lines and with any number of spaces between words. For example, the SQL statement:
SELECT * FROM Customers
is identical to:
SELECT * FROM Customers
It’s usually a good idea to begin each important keyword on a separate line. When we get to more complex SQL statements, this will make it easier to quickly grasp the meaning of the statement.
Finally, as we present different SQL statements in this book, we’ll often show both a specific example and a more general format. For instance, the general format of the previous statement would be shown as:
SELECT *
FROM table
Italics are used to indicate a general expression. The italicized word table means that you can substitute any table name in that spot. When you see italicized words in any SQL statement in this book, that is simply a way of indicating that any valid word or phrase can be substituted in that location.
Comments
When writing SQL statements, it’s often desirable to insert comments within or around those statements. There are two standard methods of writing comments in SQL. The first method, referred to as the double dash, consists of two dashes placed anywhere on a line. All text that follows two dashes on that line is ignored and is treated as a comment. Here’s an example of this format:
SELECT
-- this is the first comment
FirstName,
LastName -- this is a second comment
FROM Customers
The second format, borrowed from the C programming language, consists of text placed between /* and */ characters. Comments between the /* and */ can be written on multiple lines. Here’s an example:
SELECT
/* this is the first comment */
FirstName,
LastName /* this is a second comment
this is still part of the second comment
this is the end of the second comment */
FROM Customers
Specifying Columns
So far, we’ve done nothing more than simply display all the data in a table. But what if we wanted to select only certain columns? For example, working from the same table, we might want to display only the customer’s last name. The SELECT statement would then look like:
SELECT LastName
FROM Customers
and the resulting data would be:

If we wanted to select more than one, but not all, columns, the SELECT might look like this:
SELECT
FirstName,
LastName
FROM Customers
and the output would appear as:

The general format of this statement is:
SELECT columnlist
FROM table
The important thing to remember is that if you need to specify more than one column in the columnlist, then those columns must be separated by a comma. Also notice that we placed each column (FirstName, LastName) in the columnlist on separate lines. This wasn’t necessary but was done to improve readability.
Column Names with Embedded Spaces
What if a column contains a space in its name? Say, for example, that the LastName column was specified as Last Name (with a space between the two words). Clearly, the following would not work:
SELECT
Last Name
FROM Customers
This statement would be considered invalid because Last and Name are not column names, and even if they were proper column names, they would need to be separated by a comma. The solution is to place special characters around any column name containing spaces. The character differs, depending on which database you’re using. For Microsoft SQL Server, the required characters are square brackets, and would look like:
SELECT
[Last Name]
FROM Customers
One additional syntax note: Just as keywords are not case sensitive, it’s also true that table and column names are not case sensitive. As such, the previous example is identical to:
Select
[last name]
from customers
For clarity’s sake, we’ll print all keywords in caps, and we’ll also capitalize table and column names in this book, but that is not truly necessary.
Preview of the Full SELECT
The bulk of this book has to do with the SELECT statement introduced in this chapter. In Chapters 3 through 15, we’ll expand on this statement, introducing new features until the full potential and capabilities of the SELECT are realized and understood. At this point, we have only introduced this portion of the SELECT statement:
SELECT columnlist
FROM table
In the interest of removing any remaining suspense, let’s look at a preview of the full SELECT statement and briefly comment on its various components. The full SELECT statement, with all its clauses is:
SELECT columnlist
FROM tablelist
WHERE condition
GROUP BY columnlist
HAVING condition
ORDER BY columnlist
We’ve already been introduced to the SELECT and FROM clauses. Let’s expand a bit on those clauses and talk about the others. The SELECT clause initiates the statement and lists any columns that will be displayed. As will be seen in later chapters, the columnlist can include not only actual columns from the specified tables, but also calculated columns, usually derived from one or more columns in the tables. The columns in the columnlist can also include functions, which represent a special way to transform data.
The FROM clause specifies the data sources from which data will be drawn. In most cases, these data sources will be tables. In later chapters, we’ll learn that these data sources can also be other SELECT statements, which represent a type of virtual view of data. In this chapter, our tablelist is a single table. One of the key features of SQL to be discussed in later chapters is the ability to combine multiple tables together in a single SELECT statement through something called the JOIN. Thus, we’ll see many examples where the tablelist in the FROM clause is composed of multiple tables joined together.
The WHERE clause is used to indicate selection logic. This is where you can specify exactly which rows of data are to be retrieved. The WHERE clause can utilize basic arithmetic operators such as equals (=) and greater than (>), along with Boolean operators such as OR and AND.
The GROUP BY clause plays a key role in summarizing data. By organizing data into various groups, the analyst has the ability to not only group data, but to summarize the data in each group through the use of various statistics, such as a sum or count of the data.
When data has been grouped, selection criteria become somewhat more complex. One has to ask whether the selection criteria apply to individual rows or to the entire group. For example, when grouping customers by state, one may only want to see rows of individual customers where the aggregate purchases of all customers in the state exceed a certain amount. This is where the HAVING clause comes in. The HAVING clause is used to specify selection logic for an entire group of data.
Finally, the ORDER BY clause is used to sort the data in an ascending or descending sequence.
As will be made clear in later chapters, the various clauses in a SELECT statement, if they exist, must be specified in the same order shown in the above general statement. For example, if there is a GROUP BY clause in a SELECT statement, it must appear after a WHERE clause and before a HAVING clause.
In addition to all of the above mentioned clauses, we will also talk about a number of additional ways to organize the SELECT statement, including subqueries and set logic. Subqueries are a way to insert an entire SELECT statement within another SELECT statement, and are often useful for certain types of selection logic. Set logic is a way to combine multiple queries side by side as a single query.
Looking Ahead
In this chapter, we began our exploration of how to use the SELECT statement to retrieve data. We learned about basic syntax and have seen how to select specific columns. In reality, however, this allows us to accomplish very little of a practical nature. Most significantly, we have not yet learned how to apply any type of selection criteria to our data retrieval efforts. For example, while we know how to select all customers, we don’t yet know how to select only customers from the state of New York.
As it happens, we won’t cover selection criteria until Chapter 6. What will we be doing until then? In the next few chapters, we’ll build on what can be done with the columnlist component of the SELECT statement. In the following chapter, we’ll move on to more variations on column selection, allowing us to create complex calculations in a single column. We’ll also talk about ways to rename columns to make them more descriptive. Chapters 4 and 5 will then build on our ability to create an even more complex and powerful columnlist, so when we finally get to the topic of selection criteria in Chapter 6, we’ll have a full arsenal of techniques available at our disposal.
Column Names with Embedded Spaces