Chapter 4
Secure data and applications
The security of data stored in Azure, the security of SQL, and the security of your secrets, keys, and certificates is as important as the security of any other element of your cloud deployment. One of the most commonly reported cloud data breach types is the storage container full of important customer data that is left open to the world. You’ve also likely heard of application passwords and connection strings left exposed in source code repositories and SQL database data exfiltrated by clever attackers who leveraged SQL injection vulnerabilities that went undetected until breached data started showing up on the dark web. In this chapter, you will learn how to secure your organization’s Azure Storage deployments, the steps that you can take to protect your organization’s SQL Server instances, and how to configure and secure Azure Key Vault so that secrets such as connection strings—as well as keys and certificates—can only be accessed by authorized users and applications.
Skills in this chapter:
Skill 4.1: Configure security for storage
Unsecured data storage containers are the source of many data breaches in the cloud. These breaches occur because storage containers that administrators believe are only accessible to a select group of authorized people are, in fact, configured so that they are accessible to everyone in the world who knows the storage container’s address. This objective deals with how to secure storage in Azure, from how to configure access control for storage accounts through how to manage storage account keys. You’ll learn about shared access signatures, storage service encryption shared access policies, and how to use Azure AD to authenticate user access to storage resources in Azure.
Configure access control for storage accounts
Storage accounts are containers for Azure Storage data objects, such as blobs, files, queues, tables, and disks. Azure supports the following types of storage accounts:
General-Purpose V2 accounts Stores blobs, files, queues, and tables. They are recommended for the majority of storage scenarios. General-Purpose V2 accounts replace General-Purpose V1 accounts, which you should not use for new deployments and should be migrated away from if they are used in existing deployments.
BlockBlobStorage accounts Storage accounts are recommended for scenarios in which there are high transaction rates for block blobs and append blobs. Also, they are recommended for scenarios that require smaller objects or consistently low storage latency.
FileStorage accounts High-performance, files-only storage accounts. Recommended for high-performance applications.
BlobStorage accounts Legacy storage account type that you should not use for new deployments and should be migrated away from if they are used in existing deployments.
The recommended method of managing access control for storage accounts in the management plane is to use RBAC roles. RBAC roles for storage can be assigned at the following levels:
Individual container Role assignments at this scope apply to all blobs in the container. Role assignments also apply to container properties and metadata when the container is accessed at the management plane.
Individual queue Role assignments at this scope apply to all messages in the queue. Role assignments also apply to queue properties and metadata when the queue is accessed at the management plane.
Storage account Role assignments at this scope apply to all containers, all blobs within those containers, all queues, and all messages.
Resource group Role assignments at this scope apply to all storage accounts in the resource group as well as all items within those storage accounts.
Subscription Role assignments at this scope apply to all storage account in the subscription as well as all items within those storage accounts.
Management group Role assignments at this scope apply to all storage accounts as well as all items within those storage accounts within all subscriptions in the management group.
When assigning an RBAC role, remember the rule of least privilege and assign the role with the narrowest possible scope. This means that if an individual user or application only requires access to a specific storage account and there are multiple storage accounts in a resource group, you should only assign the role at the storage account level. In addition to the rule of least privilege, remember to assign roles to groups rather than individual users. This way, role assignment becomes a matter of adding and removing user accounts from a specific group. Rather than assigning roles to individual users or applications, you should assign the role to a group and then add the user and application accounts to that group as a way of managing the role assignments. Table 4-1 lists the RBAC roles that are appropriate for storage accounts:
TABLE 4-1 Storage account RBAC roles
Storage related RBAC role | RBAC role description |
Storage account Contributor | Allows management of storage accounts. Has access to the account key and can access data using Shared Key authorization. |
Storage account Key Operator Service Role | Can list and regenerate storage account access keys. |
Storage Blob Data Contributor | Can read, write, and delete Azure Storage containers and blobs. |
Storage Blob Data Owner | Allows full access to Azure software blob containers and data. |
Storage Blob Data Reader | Can view and list Azure Storage containers and blobs. |
Storage Blob Delegator | Can generate a user delegation key. This key can be used to create a shared access signature for containers or blobs that are signed with Azure AD credentials. |
Storage File SMB Share Contributor | This role allows read, write, and delete access to files and directories on Azure Files file shares. |
Storage File Data SMB Share Elevated Contributor | In addition to read, write, and delete access to files and directories on Azure Files file shares, this role can also modify the Access Control Lists on files and directories. |
Storage File Data SMB Share Reader | Has read only access to files and directories in Azure Files file shares. |
Storage Queue Data Contributor | Read, write, and delete Azure Storage queues, as well as queue messages. |
Storage Queue Data Message Processor | Perform peek, retrieve, and delete messages from Azure Storage queues. |
Storage Queue Data Message Sender | Can add messages to an Azure Storage queue. |
Storage Queue Data Reader | Can read and list the contents of an Azure Storage queue and queue messages. |
To assign a role to a storage account in the Azure portal, perform the following steps:
In the Azure portal, open the Storage account for which you want to assign an RBAC role.
On the Storage account’s page, select Access Control (IAM) from the menu, as shown in Figure 4-1.
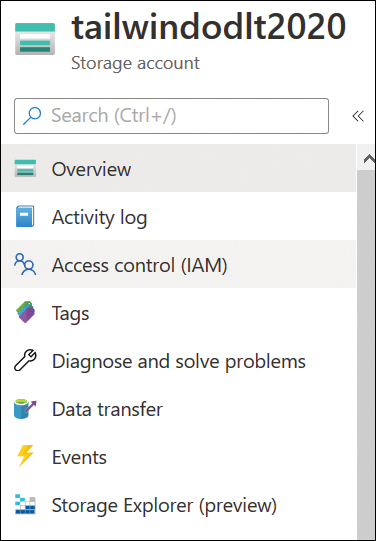
FIGURE 4-1 Access Control (IAM) node of a storage account
On the Access Control (IAM) blade, select Role Assignments and then click Add> Role Assignment, as shown in Figure 4-2. This will bring up the Add Role Assignment page.
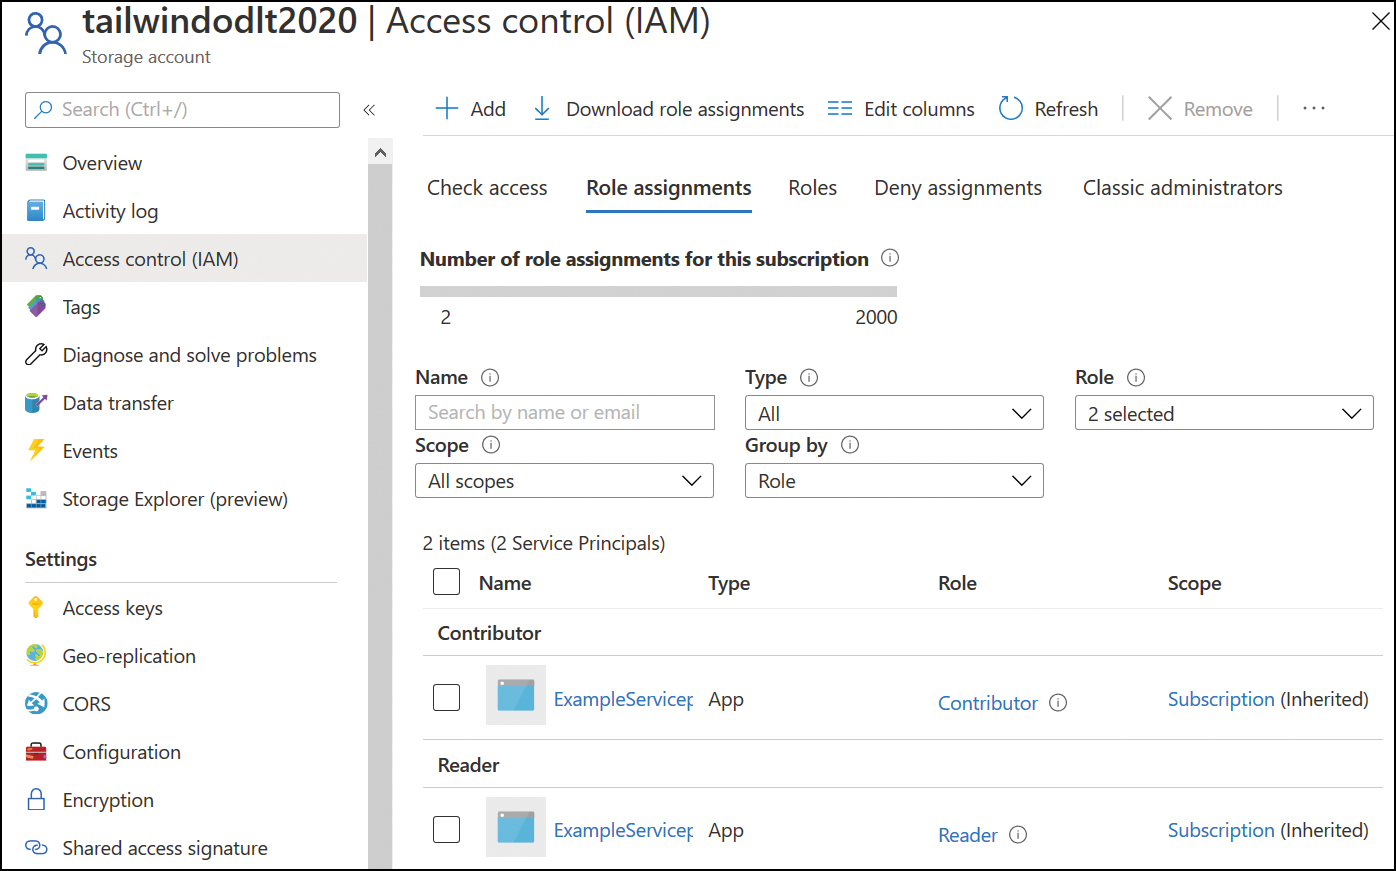
FIGURE 4-2 Role Assignments page
On the Add Role Assignment page shown in Figure 4-3, select the security principal—preferably an Azure AD group—to which you want to assign the role, and click Save.

FIGURE 4-3 Storage account Contributor role assignment
Configure Storage Service Encryption
Azure Storage encryption is enabled by default for all storage accounts regardless of performance or access tiers. This means you don’t have to modify code or applications for Azure Storage Encryption to be enabled. Data stored in Azure is transparently encrypted and decrypted using 256-bit AES encryption. You cannot disable Azure Storage encryption, and it isn’t necessary to alter code or applications to take advantage of Azure Storage encryption.
Any block blobs, append blobs, or page blobs written to Azure Storage since October 20, 2017, is subject to Azure Storage encryption. Microsoft has undertaken a process where all blobs created prior to this date are being retroactively encrypted. If you are concerned that a blob is not encrypted, you can view that blob’s encryption status using the following technique:
In the Azure portal, navigate to the storage account you want to check.
In the Containers section of the Storage account’s page, select Containers under Blob Storage and then locate the container that hosts the blob you are interested in checking. Open that container.
In the container you opened, select the blob you want to check.
On the Overview page, verify that the Server Encrypted setting is set to
true, as shown in Figure 4-4.

FIGURE 4-4 Verify blob encryption status
You can check the encryption status of a blob using the following PowerShell code, substituting the values in the example code for the values of the blob that you want to check:
$account = Get-AzStorageAccount -ResourceGroupName <resource-group> '
    -Name <storage-account>
$blob = Get-AzStorageBlob -Context $account.Context '
    -Container <container> '
    -Blob <blob>
$blob.ICloudBlob.Properties.IsServerEncrypted
To check the encryption status of the blob using Azure CLI, use the following command substituting the values in the example code for the values of the blob that you want to check:
az storage blob show
    --account-name <storage-account>
    --container-name <container>
    --name <blob>
    --query "properties.serverEncrypted"
If you have a blob in Azure that was created prior to October 20, 2017, and which is not encrypted, you can simply rewrite the blob, which will force encryption to occur. One method of doing this is to download the blob to your local file system using AzCopy and then copying the blob back to Azure Storage.
Encryption Key Management
By default, Azure Storage accounts encrypt data stored using an encryption key managed by Microsoft. If having Microsoft managing Azure Storage account encryption keys is considered undesirable, you can manage encryption using your own keys, as shown in Figure 4-5.

FIGURE 4-5 Configure encryption type
When you choose the option of managing encryption with keys that you provide, you have the following options:
Use a customer-managed key with Azure Key Vault In this scenario, you upload your encryption key to an Azure Key Vault or use Azure Key Vault APIs to generate keys. The storage account and the Key Vault need to be in the same Azure region and associated with the same Azure AD tenancy. The storage account and Key Vault do not need to be in the same subscription.
Use a customer-provided key on Blob Storage operations In this scenario, encryption keys are provided on a per-request basis. Customer-provided keys can be stored in Azure Key Vault or in an alternate key store.
Infrastructure encryption
As you learned earlier in the chapter, Azure Storage automatically encrypts all data in an Azure Storage account using 265-bit AES encryption. When you enable infrastructure encryption, the data in the storage account will be encrypted twice. Data is first encrypted using one encryption algorithm and one key at the service level and then is encrypted at the infrastructure level using a separate encryption algorithm and encryption key. This double encryption protects data if one of the encryption algorithms or keys becomes compromised. While service-level encryption allows you to use either Microsoft-managed or customer-managed keys, infrastructure-level encryption only uses a Microsoft-managed key. Infrastructure encryption must be enabled during storage account creation. It is not possible to convert an existing storage account to support infrastructure encryption if it was not created with that option enabled.
Encryption Scopes
Azure Storage accounts use a single encryption key for all encryption operations across the storage account. Encryption scopes allow you to configure separate encryption keys at the container and blob levels. This allows for scenarios such as storing customer data from different customers in the same storage account while having each customer’s data protected by a different encryption key.
To create a new encryption scope, perform the following steps:
In the Azure portal, open the storage account for which you want to configure encryption scopes.
On the storage account’s page, select Encryption, as shown in Figure 4-6, and then select Encryption Scopes.
FIGURE 4-6 Encryption scopes
On the Encryption Scope page, click Add.
On the Create Encryption Scope page, provide an encryption scope name and then specify whether the encryption scope will use Microsoft-Managed Keys or Customer-Managed Keys, as shown in Figure 4-7.
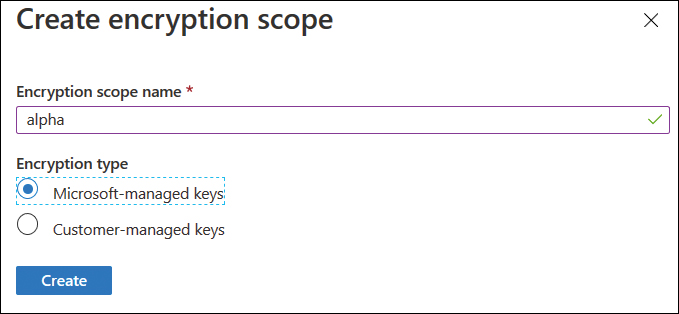
FIGURE 4-7 Create Encryption Scope
Once you have encryption scopes present for a storage account, you can specify which encryption scope will be used for individual blobs when you create the blob or specify a default encryption scope when you create a container, as shown in Figure 4-8.

FIGURE 4-8 New Container Encryption Scope
You can modify the encryption key for an encryption scope by performing the following steps:
In the Azure portal, open the storage account for which you want to configure encryption scopes.
On the storage account’s page, select Encryption > Encryption Scopes.
Select the More button next to the encryption scope for which you want to update the encryption key.
On the Edit Encryption Scope page shown in Figure 4-9, change the Encryption Type and click Save.

FIGURE 4-9 Edit Encryption Scope
Microsoft Defender for Storage
Microsoft Defender for Storage (previously known as Advanced Threat Protection (ATP) for Azure Storage) allows you to detect unusual and malicious attempts to interact with Azure Storage accounts. When you enable Microsoft Defender for Storage, security alerts will trigger when Azure detects anomalous storage account activity. These detections are based on existing recognized patterns of malicious activity identified by Microsoft security researchers. These alerts are integrated with Microsoft Defender for Cloud and can also be forwarded by email to administrators of the subscription. The alert information will detail the nature of the suspicious activity as well as provide recommendations on how to further investigate and remediate these issues. Specifically, a Microsoft Defender for Storage alert will inform you of
The nature of the anomaly
Storage account name
Event time
Storage type
Probable causes
Investigation steps
Remediation steps
Microsoft Defender for Storage is available for Blob Storage, Azure Files, and Azure Data Lake Storage Gen2. General-Purpose V2, block blob, and Blob Storage accounts support this service.
Configure storage account access keys
Storage account access keys allow you to authorize access to storage account data. Each Azure Storage account has an associated pair of 512-bit storage account access keys. If someone has access to an Azure Storage account key, they have access to the storage account associated with that key. The best practice is to only use the first key and to keep the second key in reserve. You then switch to using the second key when you perform key rotation. This allows you to then generate a new primary key, which you will switch to when you perform key rotation in the future. The recommended location for storing storage account access keys is Azure Key Vault. You will learn more about Azure Key Vault later in this chapter.
Because there is only a single pair of access keys associated with a storage account, you should rotate and regenerate access keys periodically. Rotating storage account access keys ensures that if a storage account key leaks, the leak will be automatically remediated when existing storage account keys reach their end of life. For example, if you rotate keys every six weeks, the maximum amount of time a leaked key remains valid is six weeks. Even if you don’t have reason to believe that a storage account key has leaked, the best practice is to rotate them periodically. Just because you don’t have reason to believe that a storage account key hasn’t leaked doesn’t mean that it isn’t accessible to someone who shouldn’t have access to it.
View storage account access keys
Viewing a storage account access key requires Service Administrator, Owner, Contributor, or Storage account Key Operator Service roles on the storage account the key is associated with. You can also access the key if you have been assigned an RBAC role that includes the Microsoft.Storage/storageAccounts/listkeys/action permission on a scope that includes the Storage account.
To view a storage account’s storage account keys in the Azure portal, perform the following steps:
In the Azure portal, navigate to the storage account for which you are interested in learning the storage account access key details.
On the Storage account page, select Access Keys under Settings, as shown in Figure 4-10.

FIGURE 4-10 Access Keys in the Storage Account keys menu
On the Access Keys page shown in Figure 4-11, you can view and copy the first and second keys.

FIGURE 4-11 Storage account Access Keys
To view the storage account access keys using PowerShell, use the following PowerShell command:
$storageAccountKey = '
    (Get-AzStorageAccountKey '
    -ResourceGroupName <resource-group> '
    -Name <storage-account>).Value[0]
To view the storage account access keys via Azure CLI, use the following command:
az storage account keys list
  --resource-group <resource-group>
  --account-name <storage-account>
Manually rotating storage account access keys
The best practice is to rotate storage account access keys periodically. You should only use one storage account key at a time. Using only one key at a time will allow you to switch any application to the second storage account key of the pair before rotating the first. As discussed earlier, after some time has passed, you repeat the process, switching the application to the newly rotated storage account key before then regenerating the second key in the pair. To manually rotate your storage account access keys using the Azure portal, perform the following steps:
Ensure that you have updated the connection strings in any application code that reference the storage account access key you will be replacing.
Navigate to the Access Keys page for the storage account.
To regenerate the key, select the regenerate icon shown in Figure 4-12. This will generate a new storage account access key and connection string. (The regenerate icon appears as a pair of curved arrows.)
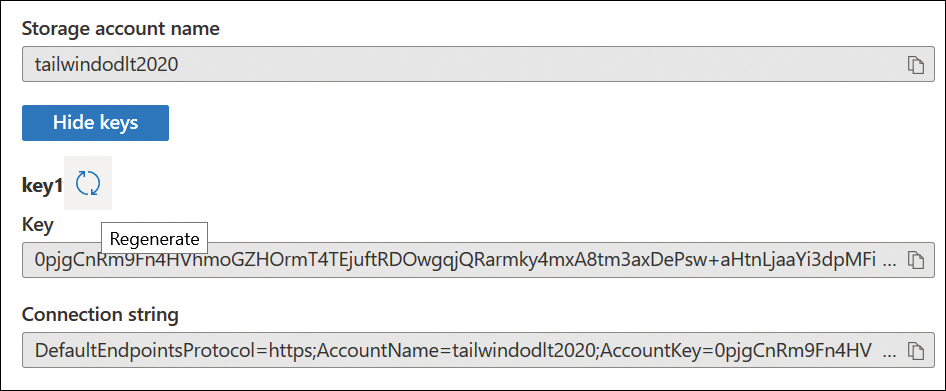
FIGURE 4-12 The regenerate icon
To regenerate the storage account key using PowerShell, use the following command, substituting resource group name and storage account name and either key1 or key2, as appropriate.
New-AzStorageAccountKey -ResourceGroupName <resource-group> '
  -Name <storage-account> '
  -KeyName key1
To regenerate the storage account key using Azure CLI, use the following command, substituting resource group name and storage account name and specifying whether the key you want to regenerate is either the primary or secondary key.
az storage account keys renew
  --resource-group <resource-group>
  --account-name <storage-account>
  --key primary
There are mechanisms that allow you to automate the rotation of storage account access keys. You will learn about these mechanisms later in this chapter.
Configure Azure AD authentication for Azure Storage and Azure Files
Azure AD authenticates a security principal’s identity and then returns an OAuth 2.0 token. The client includes this token in the request to the Blob or Queue Storage being accessed by the security principal. You need to register an application with an Azure AD tenant before tokens can be issued in this manner. You can use Azure AD to authorize access to Blob and Queue Storage.
The method that you use to assign specific rights to blob or queue storage is to configure RBAC permissions against the appropriate container, queue, or storage account. You determine what access is required by the user or application, create an Azure AD group, assign the group the appropriate RBAC permission, and then add the user account or service principal to the Azure AD group.
Azure includes the following built-in roles for authorizing access to blob and queue data:
Storage Blob Data Owner Allows the security principal to set ownership and manage POSIX access control for Azure Data Lake Storage Gen2.
Storage Blob Data Contributor Grants the security principal read/write/delete permissions to Blob Storage resources.
Storage Blob Data Reader Allows the security principal to view items in Blob Storage.
Storage Blob Delegator Allows the security principal to acquire the user delegation key, which in turn, can be used to create a shared access signature for a container or blob. This shared access signature is signed with the security principal’s Azure AD credentials.
Storage Queue Data Contributor Grants the security principal read/write and delete permissions to Azure Storage queues.
Storage Queue Data Reader Allows the security principal to view the messages in Azure Storage queues.
Storage Queue Data Message Processor Allows the security principal to peek, retrieve, and delete messages in Azure Storage queues.
Storage Queue Data Message Sender Allows the security principal to add messages in Azure Storage queues.
Configure Azure AD Domain Services authentication for Azure Files
When you enable AD DS authentication for Azure Files, your Active Directory Domain Services (AD DS) domain-joined computers can mount Azure File shares using AD DS user credentials. Access occurs over an encrypted Server Message Block (SMB) protocol connection. You can secure Azure Files using identity-based authentication over Server Message Block (SMB) where either Azure AD DS or an on-premises Active Directory Domain Services Domain (AD DS) functions as the identity provider. Azure AD Domain Services authentication for Azure Files currently supports the following scenarios:
If you are using AD DS as your identity provider, you must use Azure AD Connect to synchronize identities to Azure AD.
If you are using AD DS as your identity provider, you can access the file share using a computer that is a member of an AD DS domain. You cannot access the file share using a computer that is joined to the Azure AD DS domain.
If you are using Azure AD DS as an identity provider, you will need to access the file share using a computer that is a member of the Azure AD DS domain.
When enabled, this form of authentication supports Azure file shares that are integrated with Azure File Sync.
This form of authentication supports single sign-on.
This form of authentication only supports access from accounts in the AD DS forest in which the storage account is registered unless a specially configured forest trust is present.
Your first step when enabling AD authentication for Azure file shares is to create a storage account that is in a proximate region to the users who will access the files stored in the file share on that storage account. You should do this simply because accessing a storage account that is closer to you will provide a much better user experience than trying to open and save files to a file share located on the other side of the world. At the start of the process, you won’t need to create any file shares from the storage account. Before creating the file shares, you’ll need to enable Active Directory authentication at the storage account level rather than at the individual file shares level.
Enabling AD DS authentication
When enabling AD DS authentication, the first step is to create an identity to represent the storage account in your on-premises Active Directory instance. To do this, first create a new Kerberos key for the storage account using the following Azure PowerShell commands from Cloud Shell:
$ResourceGroupName = "<resource-group-name-here>"
$StorageAccountName = "<storage-account-name-here>"
New-AzStorageAccountKey -ResourceGroupName $ResourceGroupName -Name $StorageAccountName
-KeyName kerb1
Get-AzStorageAccountKey -ResourceGroupName $ResourceGroupName -Name $StorageAccountName
-ListKerbKey | where-object{$_.Keyname -contains "kerb1"}
Once the key has been generated, create a service account in your on-premises domain and configure the account with the following service principal name (SPN): "cifs/your-storage-account-name-here.file.core.windows.net" using the setspn.exe command. Set the account password to the Kerberos key, configure the account’s password to never expire, and note the account security identifier (SID). You can use the Get-AdUser PowerShell cmdlet to determine the SID of a user account.
The next step is to use Azure PowerShell to enable Active Directory authentication. You can do this with the following command, substituting the appropriate values:
Set-AzStorageAccount '
        -ResourceGroupName "<your-resource-group-name-here>" '
        -Name "<your-storage-account-name-here>" '
        -EnableActiveDirectoryDomainServicesForFile $true '
        -ActiveDirectoryDomainName "<your-domain-name-here>" '
        -ActiveDirectoryNetBiosDomainName "<your-netbios-domain-name-here>" '
        -ActiveDirectoryForestName "<your-forest-name-here>" '
        -ActiveDirectoryDomainGuid "<your-guid-here>" '
        -ActiveDirectoryDomainsid "<your-domain-sid-here>" '
        -ActiveDirectoryAzureStorageSid "<your-storage-account-sid>"
You also have the option of using the AzFilesHybrid PowerShell module to perform steps similar to these. Using the AzFilesHybrid PowerShell module involves downloading the most recent version of the module from Microsoft’s website, installing it on a domain-joined computer, and performing the following steps:
First, change the execution policy to allow the
AzFilesHybridPowerShell module to be imported:Set-ExecutionPolicy -ExecutionPolicy Unrestricted -Scope CurrentUser
Switch to the directory where
AzFilesHybridhas been decompressed and copy the files into your path so that the files can be called directly:.CopyToPSPath.ps1
Import the module into the current PowerShell session:
Import-Module -Name AzFilesHybrid
Initiate a session to your Azure subscription using an Azure AD credential that has either storage account–owner or contributor access to the storage account you created to host the Azure file share instance:
Connect-AzAccount
Populate the PowerShell session with the appropriate parameter values and then select the appropriate subscription if your account is associated with multiple subscriptions:
$SubscriptionId = "<your-subscription-id-here>"
$ResourceGroupName = "<resource-group-name-here>"
$StorageAccountName = "<storage-account-name-here>"
Select-AzSubscription -SubscriptionId $SubscriptionId
The next step involves registering the target storage account with your on-premises AD environment. You should choose an appropriate OU. Use the
Get-ADOrganizationalUnitcmdlet to determine the name andDistinguishedNameof the OU that you want to host the registered account:Join-AzStorageAccountForAuth ' -ResourceGroupName $ResourceGroupName ' -StorageAccountName $StorageAccountName ' -DomainAccountType "<ComputerAccount|ServiceLogonAccount>" ' -OrganizationalUnitDistinguishedName "<ou-distinguishedname-here>" # If you don't provide the OU name as an input parameter, the AD identity that represents the storage account is created under the root directory.
The Debug-AzStorageAccountAuth cmdlet allows you to conduct a set of basic checks on your AD configuration with the logged-in AD user once you have performed account registration:
Debug-AzStorageAccountAuth -StorageAccountName $StorageAccountName -ResourceGroupName
$ResourceGroupName -Verbose
If you are unable to configure the on-premises service account so that its password does not expire, you’ll need to use the Update-AzStorageAccountADOjbectPassword cmdlet to update the Azure Storage account each time your on-premises service account password changes. This cmdlet is a part of the AzFilesHybrid module and must be run on a computer in the on-premises AD DS-joined environment with an account that has permissions within AD DS and owner permissions to the storage account. The following command—with appropriate variable substitutions—acquires the second storage account key and updates the password of the service account registered in AD DS:
# Update the password of the AD DS account registered for the storage account
# You may use either kerb1 or kerb2
Update-AzStorageAccountADObjectPassword '
        -RotateToKerbKey kerb2 '
        -ResourceGroupName "<your-resource-group-name-here>" '
        -StorageAccountName "<your-storage-account-name-here>"
Configuring share-level permissions
You configure share-level permission by assigning RBAC roles at the Azure file share. The following three roles are available for assigning file share permissions:
Storage File Data SMB Share Reader This role provides read access to Azure file shares over SMB to users who have this role.
Storage File Data SMB Share Contributor This role allows users who hold it read, write, and delete access to the Azure Storage file shares over SMB.
Storage File Data SMB Share Elevated Contributor This role allows read, write, and delete access, as well as the ability to modify Windows Access Control Lists (ACLs) of Azure Storage File shares over SMB.
When multiple roles are assigned, permissions are cumulative. The exception to this rule is when a deny permission applies; in this case, the deny permission overrides any allow permissions. While it is possible to assign RBAC roles and therefore, configure share-level permissions at the storage account level, you should instead assign RBAC roles at the individual file share-level. Full administrative control of file shares, which includes the ability to take ownership of files, currently requires the storage account key. You cannot take ownership of a file using Azure AD credentials.
Configuring file and folder permissions
Once you have assigned share-level permissions to an Azure File share using RBAC, you should then configure file and folder permissions on the contents of the share. When reading the Azure documentation, most Windows Server administrators will recognize that NTFS permissions are referred to as Windows ACLs.
You can configure file and folder permissions using the Set-ACL PowerShell cmdlet, using the icacls.exe command, or using Windows File Explorer if you have mounted the shared folder on a computer running a Windows Client or Windows Server operating system.
Azure AD DS authentication
Earlier in the chapter, you learned about using on-premises AD DS authentication to secure Azure File shares. Also, you can use Azure AD Domain Services to configure authentication for SMB connections to Azure File shares. Azure AD Domain Services is an Azure service that works with Azure AD to provide the functionality of domain controllers on an Azure subnet. When you enable Azure AD DS, you can domain join a Windows client or server VM that is hosted on an Azure subnet without having to deploy VMs that function as domain controllers. You can’t use on-premises Active Directory authentication and Azure AD DS authentication on the same storage account or file shares.
Once you have enabled Azure AD DS on a subscription, you can enable identity-based access through AD DS when creating the storage account by selecting the Azure Active Directory Domain Services (Azure AD DS) identity option. You can also enable this option on the Configuration page of the storage account, as shown in Figure 4-13.

FIGURE 4-13 Enable Azure AD DS authentication
You can also use the Set-AzStorageAccount PowerShell cmdlet with the EnableAzureActiveDirectoryDomainServicesForFile parameter to enable Azure AD DS authentication for an Azure file share. For example, to enable Azure AD DS authentication for the Azure file share named tailwind-files stored in the resource group FilesRG, run this PowerShell command:
Set-AzStorageAccount -ResourceGroupName "FilesRG" '
    -Name "tailwind-files" '
    -EnableAzureActiveDirectoryDomainServicesForFile $true
You can use the az storage account update Azure CLI command with the --enable-files-adds option to enable Azure AD DS authentication for an Azure file share. For example, to enable Azure AD DS authentication for the Azure file share named tailwind-files stored in the resource group FilesRG, run the Azure CLI command:
az storage account update -n tailwind-files -g FilesRG --enable-files-adds $true
Once Azure AD DS authentication has been enabled on the storage account, you can use the Access Control (IAM) page of the storage account’s properties to assign one of the Storage File Share RBAC roles discussed earlier in this chapter as a share-level permission. Figure 4-14 shows that the Tailwind-Engineers Azure AD group has assigned the Storage File Data SMB Share Contributor role to the tailwind-share Azure File share.

FIGURE 4-14 File share Role Assignments
The process for configuring NTFS permissions on files and folders is the same as it is when you enable authentication for on-premises AD DS accounts. You first mount the file share on a Windows client or server computer, and then you use tools such as Windows File Explorer, PowerShell, or the icacls.exe utility to configure the permissions.
Configure delegated access
Shared Access Signatures (SAS) allow you to provide secure, granular, and delegated access to storage accounts. Using an SAS, you can control what resources a client can access, the permissions the client has to those resources, and the length of time that access will persist. An SAS is a signed Uniform Resource Identifier (URI) that provides the address of one or more storage resources and includes a token that determines how the resource may be accessed by the client.
Azure Storage supports the following types of SAS:
User delegation SAS User delegation SAS can only be used with Blob Storage. User delegation SAS are secured by Azure AD and the permissions configured for the SAS.
Service SAS Service SAS is secured with storage account keys. This SAS delegates access to one type of storage resource. Service SAS can be configured for Azure Files, Blob Storage, Queue Storage, or Table storage.
Account SAS Account SAS is secured with the storage account keys. These keys can be used to delegate access. In addition to all the operations that can be made available using User delegation SAS or Service SAS, Account SAS allows you to delegate access to operations that apply at the service level, such as Get/Set Service Properties. Account SAS also allows you to delegate access to read, write, and delete operations on blob containers, file shares, tables, and queues that are not possible with a Service SAS.
SAS comes in the following two forms:
Ad hoc SAS An ad hoc SAS includes the start time, expiry time, and resource permissions within the SAS URI. All SAS types can be ad hoc SAS.
Service SAS with stored access policy Stored access policies are configured on resource containers, which include blob containers, tables, queues, or file shares. A service SAS with stored access policies inherit the start time, expiry time, and permissions that have been configured for the stored access policy.
As is the case with storage account access keys, if an SAS is leaked, anyone who has access to the SAS has access to the storage resources to which the SAS mediates access. Application developers should also remember that SAS periodically expire, and if the application is not configured to automatically obtain a new SAS, the application will lose access to the storage resources to which the SAS mediates.
Microsoft has a list of best practices for the use of SAS, which includes:
Use user delegation SAS when possible This type of SAS has the best security because it is secured through a user’s Azure AD credentials. This means that account keys will not be stored with application code.
Be ready to revoke an SAS when necessary If you determine that an SAS has been compromised, ensure that you can quickly revoke the SAS and replace it with one that is not compromised.
Configure stored access policies for service SAS An advantage of stored access policies is that you can revoke permissions for a service SAS without having to regenerate storage account access keys.
Configure short expiration times for ad-hoc SAS If an ad hoc SAS is compromised, the short expiration time will ensure that the compromised SAS isn’t valid for a long time.
If necessary, ensure clients renew SAS If clients regularly make requests to storage using SAS, configure the application so that the client can request SAS renewal before the SAS expires.
Create user delegation SAS
To create a user delegation SAS for a storage container using PowerShell, first create a storage context object by substituting the appropriate values into the following PowerShell code:
$ctx = New-AzStorageContext -StorageAccountName <storage-account> -UseConnectedAccount
Create a user delegation SAS token by substituting the appropriate values in the following PowerShell code:
New-AzStorageContainerSASToken -Context $ctx '
    -Name <container> '
    -Permission racwdl '
    -ExpiryTime <date-time>
To create a user delegation SAS for a blob, substitute the appropriate values in the following PowerShell code:
New-AzStorageBlobSASToken -Context $ctx '
    -Container <container> '
    -Blob <blob> '
    -Permission racwd '
    -ExpiryTime <date-time>
    -FullUri
You can revoke a user delegation SAS using the Revoke-AzStorageAccountUser DelegationKeys command. For example, use the following PowerShell code, substituting the appropriate values where necessary:
Revoke-AzStorageAccountUserDelegationKeys -ResourceGroupName <resource-group> '
    -StorageAccountName <storage-account>
To create a user delegation SAS for a storage container using Azure CLI, run the following Azure CLI command, substituting the appropriate values where necessary:
az storage container generate-sas
    --account-name <storage-account>
    --name <container>
    --permissions acdlrw
    --expiry <date-time>
    --auth-mode login
    --as-user
To create a user delegation SAS for a blob using Azure CLI, run the following Azure CLI command, substituting the appropriate values where necessary:
az storage blob generate-sas
    --account-name <storage-account>
    --container-name <container>
    --name <blob>
    --permissions acdrw
    --expiry <date-time>
    --auth-mode login
    --as-user
    --full-uri
To revoke a user delegation SAS using Azure CLI, run the following command, substituting the appropriate values where necessary:
az storage account revoke-delegation-keys
    --name <storage-account>
    --resource-group <resource-group>
It is important to note is that because Azure Storage caches user delegation keys and Azure role assignments, the revocation process might not occur immediately.
Create an account SAS
The first step when creating an account SAS is creating an Account SAS URI. The Account SAS URI includes the URI of the storage resource to which the SAS provides access and the SAS token. SAS tokens are special query strings that include the data used to authorize resource requests and determine the service, resource, and access permissions. SAS tokens also include the period for which the signature will be valid.
Table 4-2 lists the required and optional parameters for the SAS token:
TABLE 4-2 SAS token parameters
SAS Query Parameter | Description |
Api-version | Optional Allows you to specify the storage service version to use when executing the request. |
SignedVersion (sv) | Required Specifies the signed storage service version to authorize requests. Must be configured to 2015-04-05 or later. |
SignedServices (ss) | Required Allows you to specify the services accessible with the account SAS. Options include
|
SignedResourceTypes (srt) | Required Allows you to specify which resource types the SAS provides access to
|
SignedPermission (sp) | Required Permissions for the account SAS. Permissions include
|
SignedStart (st) | Optional The time the SAS becomes valid. |
SignedExpiry (se) | Required The time the SAS becomes invalid. |
SignedIP (sip) | Optional Allows you to specify an allowed range of IP addresses. |
SignedProtocol (spr) | Optional Determines which protocols can be used for requests made with the account SAS. Options are both HTTPS and HTTP or HTTPS only. |
Signature (sig) | Required Used to authorize the request made with the SAS. Signatures are hash-based message authentication codes calculated over the signed string and the storage account access key using the SHA256 algorithm. This signature is then encoded using Base64 encoding. |
To construct the signature string, you need to encode the string as UTF-8 that you want to sign from the fields included in the request and compute the signature using the HMAC-SHA256 algorithm.
Stored Access Policies
Stored access policies allow you to specifically control service-level shared access signatures. You can configure stored access policies for blob containers, file shares, queues, and tables. Stored access policies consist of the start time, expiry time, and permissions for an SAS. Each of these parameters can be specified on the signature URI rather than in a stored access policy. You can also specify all these parameters on the stored access policy or use a combination of the two. It is important to note that it is not possible to specify the same parameter on both the SAS token and the stored access policy without problems occurring.
Azure allows you to set a maximum of five concurrent access policies on individual containers, tables, queues, or shares. To create or modify a stored access policy, you need to call the Set ACL operation for the resource you want to protect with the request body of the call that lists the terms of the access policy. The following is a template that you can use for the request body where you substitute your own start time, expiry time, abbreviated permission list, and a unique signed identifier of your choosing:
<?xml version="1.0" encoding="utf-8"?>
<SignedIdentifiers>
  <SignedIdentifier>
    <Id>unique-64-char-value</Id>
    <AccessPolicy>
      <Start>start-time</Start>
      <Expiry>expiry-time</Expiry>
      <Permission>abbreviated-permission-list</Permission>
    </AccessPolicy>
  </SignedIdentifier>
</SignedIdentifiers>
To change the existing stored access policy parameters, call the access control list operation for the resource type and specify new parameters while ensuring that the unique ID field remains the same. To remove all access policies from a storage resource, call the Set ACL operation with an empty request policy.
Skill 4.2: Configure security for databases
This objective deals with the steps that you can take to secure Azure SQL database instances. To master this objective, you’ll need to understand how to configure database authentication, the options for database auditing, the benefits of Azure SQL Database Advanced Threat Protection, how to configure database encryption, and how to enable Azure SQL Database Always Encrypted on specific database table columns.
Enable database authentication by using Azure AD
When you create an Azure SQL database server instance, you create an administrator login and a password associated with that login. This administrative account granted full administrative permissions on all databases hosted off the Azure SQL instance as a server-level principal. This login has all the possible permissions on the Azure SQL instance and cannot be limited.
A separate user account called dbo is created for the administrator login for each user database. The dbo user has all database permissions and is mapped to the db_owner database role. You can determine the identity of the administrator account for an Azure SQL database on the Properties page of the database in the Azure portal, as shown in Figure 4-15.

FIGURE 4-15 Server Admin Login
The admin log-in identifier cannot be changed once the database is created. You can reset the password of this account by selecting the Azure SQL server in the Azure portal and selecting Reset Password from the Overview page, as shown in Figure 4-16.

FIGURE 4-16 Reset Password
When adding administrative users, the following options are available:
You can create an Azure Active Directory Administrator account. If you enable Azure Active Directory authentication, you can configure a user or group account in Azure AD with administrative permissions. You can do this by selecting the Active Directory Admin section under the Azure SQL Instances setting and then configuring an admin account by clicking the Set Admin button (see Figure 4-17).

FIGURE 4-17 Configuring Active Directory Admin for Azure SQL Server
Create an additional SQL login in the master database, create a user account associated with this login in the master database, and then add this user account to the
dbmanagerrole, theloginmanagerrole, or both roles in the master database using theALTER ROLEstatement.
To create additional accounts for non-administrative users, create SQL logins in the master database and then create user accounts in each database to which the user requires access and associate that user account with the SQL login.
Enable database auditing
Auditing allows you to track database events, such as adding or dropping tables. Audit logs for Azure SQL databases can be stored in an Azure Storage account, in a Log Analytics workspace, or in Event Hubs. Auditing for Azure SQL can be defined at both the server and database levels. The differences are as follows:
If you configure a server policy, it will apply to all existing and any newly created databases on the Azure SQL server instance.
When server auditing is enabled at the instance level, it will always apply to the database.
Enabling auditing on individual Azure SQL databases will not override any server auditing settings, with both audits existing in parallel.
Microsoft recommends against enabling both server auditing and database blob auditing unless you want to use a different storage account, retention period, or Log Analytics Workspace for a specific database or if you want to audit a separate set of event types of categories for a specific database.
To enable auditing for an SQL instance, perform the following steps:
In the Azure portal, open the Azure SQL instance on which you want to configure auditing.
Under the Security node, select Auditing, as shown in Figure 4-18.

FIGURE 4-18 Auditing in an Azure SQL Server’s properties page
Set the Auditing slider to On, as shown in Figure 4-19. Specify the audit log destination. You can choose between Storage, Log Analytics, or Event Hub and click Save.

FIGURE 4-19 Azure SQL auditing settings
You can configure audit logs to be written to Azure Storage accounts, Event Hubs, and to Log Analytics workspaces, which Azure Monitor logs can consume. You can choose to have data written to multiple locations should you so choose. When auditing to a storage destination, the retention period is unlimited. You can modify retention settings to keep audit logs for a shorter amount of time. Figure 4-20 shows the Retention (Days) setting configured to 14 days.

FIGURE 4-20 Auditing storage retention
You can view audit logs by clicking on the View Audit Logs item from the Auditing page of the Azure SQL server’s instance. You can view audit information from the server or database level from this page, as shown in Figure 4-21.

FIGURE 4-21 Audit records
You also can click Log Analytics to view the logs in the Log Analytics workspace. If you click View Dashboard, you’ll be able to view an auditing dashboard that will include access to sensitive data and security insight information, as shown in Figure 4-22.

FIGURE 4-22 Auditing dashboard
Configure dynamic masking on SQL workloads
Dynamic masking allows you to configure SQL Server to hide sensitive data stored in the database from users who don’t have the appropriate privileges. For example, a query run against a table in a database that stores credit card information by an unprivileged user might only reveal the final four digits of the credit card with the rest of the credit card number hidden through dynamic masking.
Dynamic data masking can be configured through dynamic data masking policies available under Security in the SQL Database configuration pane. Dynamic data masking cannot currently be configured in the Azure Portal for an SQL Managed Instance. Dynamic data masking policies have the following elements:
SQL users excluded from masking This is the set of SQL users or Azure AD identities who can retrieve unmasked data when performing SQL queries. Users that have administrative privileges on the database will always be able to view complete data without masks being applied.
Masking rules These are the rules that determine which fields will be masked and how the masks will be applied. You can identify fields using database schema name, table name, and column name.
Masking functions These are a set of functions that manage the display of data for different scenarios.
The masking functions available for Azure SQL are listed in Table 4-3.
TABLE 4-3 Masking functions
Masking function | Masking logic |
Default |
|
Credit card | Masking method that exposes only the final four digits of a credit card and substitutes a constant string (such as XXXX-XXXX-XXXX-1234) for the masked parts of the result. |
This masking method displays only the first letter of an email address and replaces the email domain with XXX.com. | |
Random number | Masks data using random numbers. |
Custom text | Exposes the first and last characters of the data and substitutes a custom string in the middle in the form prefix[padding]suffix. |
Implement database encryption for Azure SQL Database
Transparent data encryption (TDE) allows you to protect Azure SQL databases by encrypting data at rest. When you enable TDE, the databases, associated backups, and transaction log files are automatically encrypted and decrypted, as necessary. TDE is enabled by default for all new Azure SQL Databases. TDE is configured at the server level and is inherited by all databases hosted on the Azure SQL Server instance.
Azure SQL TDE has a database encryption key (DEK) protected by a built-in server certificate that is unique to each Azure SQL instance and leverages the AES 256 encryption algorithm. Microsoft automatically rotates these security certificates.
Customer-managed TDE, also known as “Bring Your Own Key” (BYOK), is supported in Azure SQL. When you configure BYOK, the TDE protection key is stored within Azure Key Vault. When you configure BYOK, you configure an Azure Key Vault with permissions so that the Azure SQL instance can interact with the Key Vault to retrieve the key. The database will be inaccessible if the Key Vault is removed or the Azure SQL instance loses permissions to the Key Vault in a BYOK scenario.
You can verify that TDE is enabled for an Azure SQL instance by selecting the Transparent Data Encryption section of a database server instance’s properties page in the Azure portal, as shown in Figure 4-23.
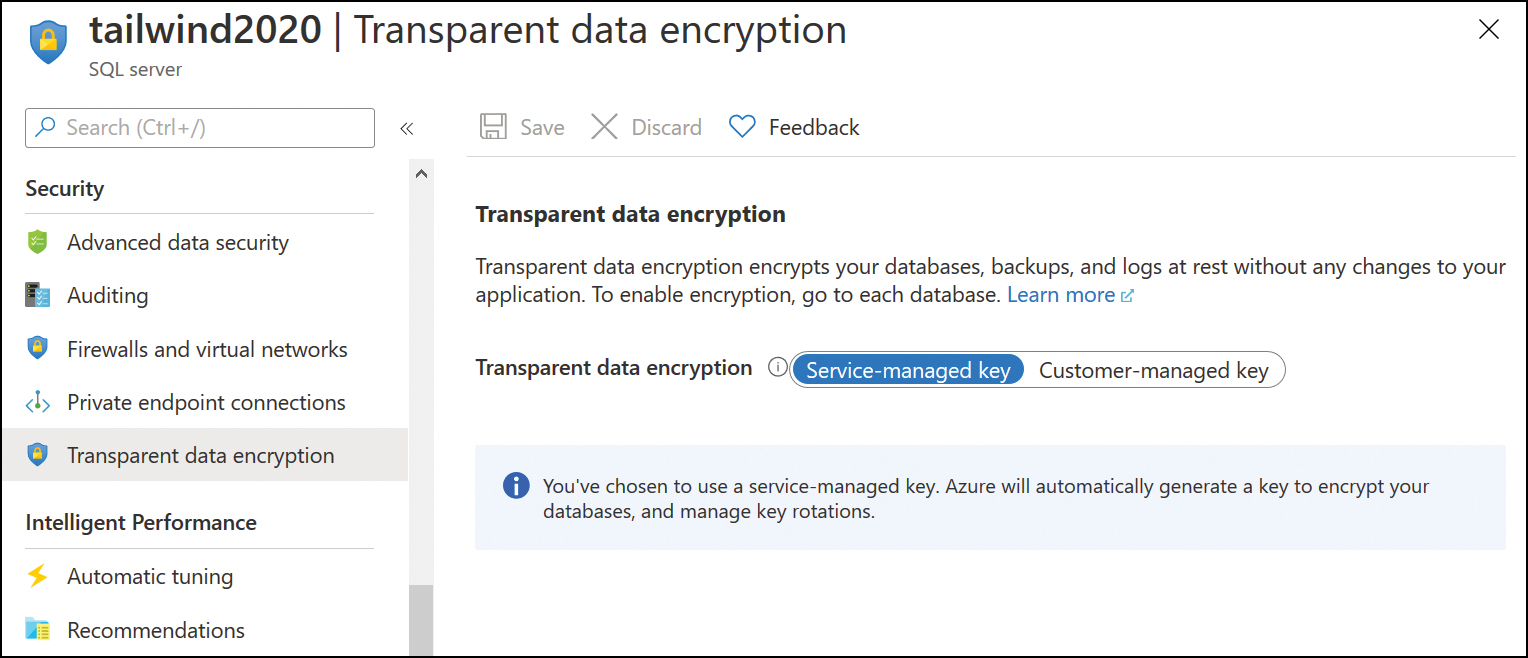
FIGURE 4-23 TDE Service-Managed Key
If you want to switch to a customer managed key for an Azure SQL instance, you should first create and configure an Azure Key Vault in the same region as the Azure SQL instance. You can then use the portal to create a key in the Key Vault and configure the Azure SQL instance with the appropriate permissions. To switch a database to a customer-managed key, perform the following steps:
On the Transparent Data Encryption page of the Azure SQL database instance, select Customer Managed Key.
The Key Selection Method offers two choices: You can choose Enter A Key Identifier, or you can choose Select A Key and then click the Change Key link, as shown in Figure 4-24.

FIGURE 4-24 Configure Customer-Managed Key
On the Select Key From Azure Key Vault page, select the subscription and the Key Vault that will host the key.
If no suitable key is present in the Key Vault, you can click Create New. This will allow you to create a key, as shown in Figure 4-25.

FIGURE 4-25 Create a key for BYOK
On the Select Key From Azure Key Vault page, select the version of the key, as shown in Figure 4-26. If you’ve just created the key, only the most recent version available will be available.

FIGURE 4-26 Selecting a key for BYOK
Click Save to configure Azure SQL to use your customer key.
Implement Azure SQL Database Always Encrypted
Always Encrypted is a technology available for Azure SQL that allows you to protect specific types of sensitive data that has a known recognizable pattern, such as passport numbers, tax file identification numbers, and credit card numbers. When Always Encrypted is enabled, clients interacting with the database server will encrypt the sensitive data inside the client applications and will not forward the encryption keys used to decrypt that data to the database server that will store that data. This ensures that administrators who manage Azure SQL servers cannot view sensitive data protected by Always Encrypted.
Deterministic or Randomized Encryption
Always Encrypted supports two forms of encryption: deterministic encryption and randomized encryption:
Deterministic encryption When you use deterministic encryption, the same encrypted value will always be generated for the same plain text value, though this value will be unique to each database. Implementing deterministic encryption will allow you to perform point lookups, equality joins, grouping, and indexing on encrypted columns. It may, however, allow unauthorized users to guess information about encrypted values by looking for patterns in encrypted columns. This is especially true if there are a small set of possible values. Deterministic encryption requires that the column collation is configured with a binary2 sort order for character columns.
Randomized encryption When you configure randomized encryption, data is encrypted less predictably. While randomized encryption is more secure than deterministic encryption, enabling randomized encryption prevents searching, grouping, indexing, and performing joins on encrypted columns.
In general, you should plan to use deterministic encryption if columns will be used for searchers or where you will be grouping parameters. An example of this is where you need to search for a specific passport number. The client will be able to perform the hash of the query value and then locate values within the database that match that encrypted hash. You should use randomized encryption if your database has information that isn’t grouped with other records and isn’t used to join tables, such as medical notes.
Configuring Always Encrypted
Configuring Always Encrypted is an activity that requires the use of client-side tools. You can’t use Transact SQL statements to configure Always Encrypted; instead, you must configure Always Encrypted using SQL Server Management Studio or PowerShell. Configuring Always Encrypted requires performing the following tasks:
Provisioning column master keys, column encryption keys, and encrypted column encryption keys with corresponding column master keys
Creating key metadata in the database
Creating new tables with encrypted columns
Encrypting existing data in selected database columns
Always Encrypted is not supported for columns that have the following characteristics:
Columns with
xml,timestamp/rowversion,image,ntext,text,sql_variant,hierarchyid,geography,geometry,alias, and types or user-defined typesFILESTREAMcolumnsColumns with the
IDENTITYpropertyColumns with
ROWGUIDCOLpropertyString columns with non-
bin2collectionsColumns that are keys for clustered and non-clustered indexes (if you are using randomized encryption)
Columns that are keys for full-text indexes (if you are using randomized encryption)
Computed columns
Columns referenced by computed columns
Sparse column set
Columns referenced by statistics (if you are using randomized encryption)
Columns using alias types
Partitioning columns
Columns with default constraints
Columns referenced by unique constraints (if you are using randomized encryption)
Primary key columns (if you are using randomized encryption)
Referencing columns in foreign key constraints
Columns referenced by check constraints
Columns tracked using change data capture
Primary key columns on tables that have change tracking enabled
Columns masked using Dynamic Data Masking
Columns in Stretch Database Tables
To configure Always Encrypted on an Azure SQL database using SQL Server Management Studio, perform the following steps:
Connect to the database that hosts the tables with columns you want to encrypt using Object Explorer in SQL Server Management Studio. If the database does not already exist, you can create the database and then create the tables that you will configure to use Always Encrypted.
Right-click the database and select Tasks > Encrypt Columns. This will open the Always Encrypted Wizard. Click Next.
On the Column Selection page, expand the database tables, and then select the columns that you want to encrypt.
For each column selected, you will need to set the Encryption Type attribute to Deterministic or Randomized.
For each column selected, you will need to choose an Encryption Key. If you do not already have an encryption key, you can have one automatically generated.
On the Master Key Configuration page, choose a location to store the key. You will then need to select a master key source.
On the Validation page, select whether you want to run the script immediately or use a PowerShell script later.
On the Summary page, review the selected option and click Finish.
Implement network isolation for data solutions, including Azure Synapse Analytics and Azure Cosmos DB
You can isolate data solutions, including Azure Synapse Analytics and Azure Cosmos DB, using IP firewall rules, private endpoints, and managed virtual networks. These network isolation technologies work in the following ways:
Service endpoints
IP firewall rules
Azure Private Link
Service endpoints
Virtual network service endpoints provide access to Azure services over the Azure backbone networks. You can use virtual network service endpoints to allow private IP addresses on a specific virtual network to reach a specific service without requiring the hosts on the virtual network to have a public IP address. Virtual network service endpoints are supported for the following Azure services:
Azure Storage
Azure SQL Database
Azure Synapse Analytics
Azure Database for PostgreSQL server
Azure Database for MySQL server
Azure Database for MariaDB
Azure Cosmos DB
Azure Key Vault
Azure Service Bus
Azure Event Hubs
Azure Data Lake Store Gen 1
Azure App Service
Azure Cognitive Services
Azure Container Registry
Azure Service Endpoints allow access to the service but don’t limit access to a specific instance of that service. For example, if you configure a service endpoint to Azure SQL Database, a host on the configured virtual network will be able to connect to all SQL database instances rather than a specific instance.
IP Firewall rules
Most Azure services allow access to authenticated connections from any host on the Internet, with unauthenticated connections automatically dropped. Using IP firewall rules, organizations that want to go further can limit access to a specific known range of IP addresses used by the organization. IP firewall rules can be used in conjunction with other technologies such as Azure Service Endpoints or Azure Private Link. IP firewall rules limit traffic based on IP address. When configuring IP firewall rules for an Azure data source, you don’t configure rules to include a port or protocol. Firewall rules can be configured on the Networking section of the Azure service’s properties.
Azure Private Link
Azure Private link allows you to connect a data solution such as Azure Synapse Analytics or Azure Cosmos DB to a private endpoint. Private endpoints are collections of private IP addresses in a subnet in a virtual network. When you use Private Link you can limit access to the data solution so that it can only be accessed by hosts that use those specific private IP addresses. You can combine Private Link with network security group rules. Private link can be used to limit access so that it can only occur from a specific virtual network or any peered virtual network as long as the IP addresses on that virtual network or peered virtual network are specified when configuring the private endpoint.
Azure Private Link provides the following benefits:
Private access to Azure services. Allows you to connect virtual networks to services without requiring a public IP address at the source or destination. Communication occurs over the Azure backbone network.
Access to on-premises and peered networks. Private Link can be configured to allow access from on-premises networks connected to a configured virtual network through ExpressRoute private peering, VPN tunnels, and peered virtual networks.
Data leakage protection. You map private endpoints to a specific Azure Cosmos DB, Azure Synapse Analytics, or Azure PaaS instance. This means that connections using the Private Link can only access that specific instance of the data service, not all data services such as the case that occurs when you use a service endpoint.
Configure Microsoft Defender for SQL
Microsoft Defender for SQL (previously Azure SQL Database Advanced Threat Protection) allows you to detect unusual activity that indicates that a third party might be trying to attack your organization’s Azure SQL databases. When you enable Microsoft Defender for SQL, you will be notified when unusual database activity occurs, when there are potential database vulnerabilities given the current configuration, and when SQL injection attacks occur. Microsoft Defender for SQL integrates with Microsoft Defender for Cloud, so you will also be provided with recommendations on how to further investigate and remediate suspicious activity and threats.
To configure Microsoft Defender for SQL, perform the following steps:
In the Azure portal, open the Azure SQL Server instance for which you want to configure Microsoft Defender for SQL.
Under the Security node, click Microsoft Defender for Cloud, as shown in Figure 4-27.

FIGURE 4-27 Microsoft Defender for Cloud item
Click Configure next to Microsoft Defender for SQL as shown in Figure 4-28.
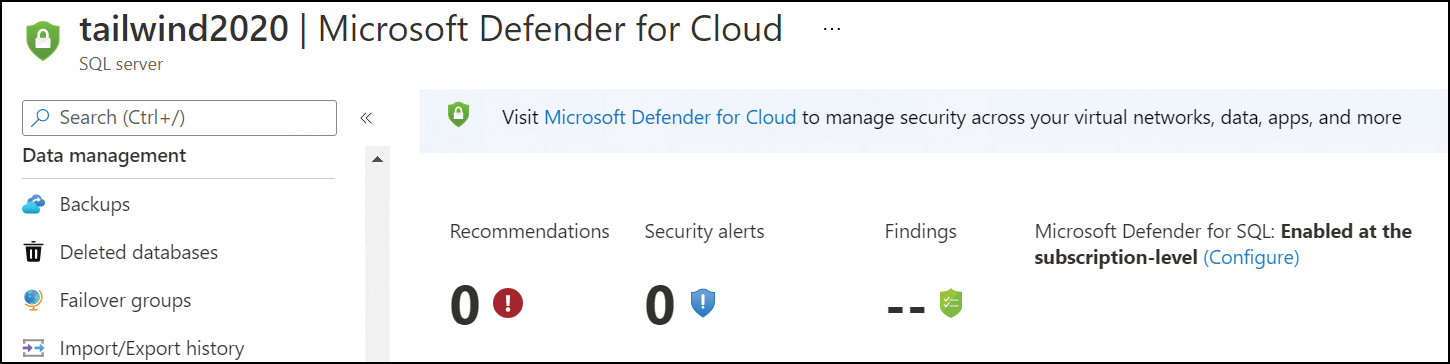
FIGURE 4-28 Configure Microsoft Defender for SQL
On the Microsoft Defender for SQL page shown in Figure 4-29, configure the following settings:
Microsoft Defender for SQL This functionality has a per-month cost, which includes Data Discovery, Classification, Vulnerability Assessment, and Advanced Threat Protection. These services allow you to detect data that might be at risk, such as personal data stored within the database, as well as vulnerabilities that might not be detected by other means but which become apparent through analysis of database activity. Can be set to On or Off.
Subscription This setting determines which subscription the vulnerability assessment settings will be billed against.
Storage account This is where data from assessments will be logged.
Periodic recurring scans This setting determines whether periodic vulnerability assessment scans are run against the Azure SQL instance. You can specify the email address to which scan reports will be sent.
Advanced Threat Protection Settings You can configure where advanced threat protection information will be forwarded in Defender for Cloud.
Advanced Threat Protection for SQL allows you to detect and be notified about the following threats:
SQL Injection SQL injection has occurred against a monitored SQL instance.
SQL Injection Vulnerability An application vulnerability to SQL injection was detected.
Data Exfiltration Activity resembling data exfiltration was detected.
Unsafe Action A potentially unsafe action was detected.
Brute Force A brute force attack was detected.
Anomalous Client Login A login with suspicious characteristics was detected.

FIGURE 4-29 Microsoft Defender for SQL options
Skill 4.3: Configure and manage Key Vault
This objective deals with configuring and managing Azure Key Vault, which can be thought of as a cloud hardware security module (HSM). You can use Azure Key Vault to securely store encryption keys and secrets, including certificates, database connection strings, and virtual machine passwords. In this section, you’ll learn how to ensure that the items stored in Azure Key Vault are only accessible to authorized applications and users. To master this objective, you’ll need to understand how to manage access to Key Vault, including how to configure permissions to secrets, certificates, and keys. You’ll also need to understand how to configure RBAC for managing Key Vault. You’ll also need to understand how to manage the items within Key Vault, including how to rotate keys and how to perform backup and recovery on secure Key Vault items.
Create and configure Key Vault
Azure Key Vault allows you to store information that should not be made public, such as secrets, certificates, and keys. To create an Azure Key Vault using the Azure Portal, perform the following steps:
In the Azure portal menu, select Create A Resource.
In the Search box, type Key Vault and then select Key Vault from the list of results. Click Create.
On the Create Key Vault page, provide the following information:
Name Provide the Key Vault with a name unique within the subscription you are creating the Key Vault in.
Subscription Select which subscription the Key Vault will be associated with.
Resource Group Select which resource group will host the Key Vault. You have the option of creating a new resource group.
Location Select which Azure location will host the Key Vault.
Pricing Tier Allows you to choose between Standard and Premium. Premium tier provides a dedicated Hardware Security Module (HSM) for the vault.
To create a Key Vault using Azure CLI, use the following command, specifying a unique Key Vault name, existing appropriate resource group, and location:
az keyvault create --name "<your-unique-keyvault-name>" --resource-group
"myResourceGroup" --location "EastUS"
To create a Key Vault using Azure PowerShell, use the following command, specifying a unique Key Vault name, existing appropriate resource group, and location:
New-AzKeyVault -Name "<your-unique-keyvault-name>" -ResourceGroupName "myResourceGroup"
-Location "East US"
Configure access to Key Vault
Because Key Vaults can store sensitive information, you naturally want to limit who has access to it rather than allowing access to the entire world. You manage Key Vault access at the management plane and at the data plane. The management plane contains the tools you use to manage Key Vault, such as the Azure portal, Azure CLI, and Cloud Shell. When you control access at the management plane, you can configure who can access the contents of the Key Vault at the data plane. From the Key Vault perspective, the data plane involves the items stored within Key Vault, and access permissions allow the ability to add, delete, and modify certificates, secrets, and keys. Access to the Key Vault at both the management and data planes should be as restricted as possible. If a user or application doesn’t need access to the Key Vault, they shouldn’t have access to the Key Vault. Microsoft recommends that you use separate Key Vaults for Development, pre-production, and production environments.
Each Key Vault you create is associated with the Azure AD tenancy linked to the subscription that hosts the Key Vault. All attempts to manage or retrieve Key Vault content require Azure AD authentication. An advantage of requiring Azure AD authentication is that it allows you to determine which security principal is attempting access. Access to Key Vault cannot be granted based on having access to a secret or key and requires some form of Azure AD identity.
Manage permissions to secrets, certificates, and keys
You use Key Vault access control policies to manage permissions to secrets, certificates, and keys at the data plane level. Each Key Vault access control policy includes entries specifying what access the designated security principal has to keys, secrets, and certificates. Each Key Vault supports a maximum of 1,024 access policy entries.
An access policy entry grants a distinct set of permissions to a security principal. A security principal can be a user, service principal, managed identity, or group. Microsoft recommends assigning permissions to groups and then adding and removing users, service principals, and managed identities to and from those groups as a way of granting or revoking permissions.
You can configure the permissions for the keys, secrets, and certificates outlined in Table 4-3.
TABLE 4-3 Key Vault permissions
Certificate Permissions | Key Permissions | Secrets Permissions |
|
|
|
Key Vault access policies don’t allow you to configure granular access to specific keys, secrets, or certificates. You can only assign a set of permissions at the keys, secrets, or certificates levels if you need to allow a specific security principal access to only some and not all keys, secrets, or certificates. Instead, you should store those keys, secrets, or certificates in separate Key Vaults. For example, if there are three secrets that you need to protect using Key Vault, and one user should only have access to two of those secrets, you’ll need to store the third of those secrets in a separate Key Vault from the first two.
You use the Set-AzKeyVaultAccessPolicy Azure PowerShell to configure a Key Vault policy using Azure PowerShell. When using this cmdlet, the important parameters are the vault name, the resource group name, the security principal identifier, which can be UserPrincipalName, ObjectID, ServicePrincipalName, and then the parameters that define permissions to Keys, Secrets, and Certificates. The Set-AzKeyVaultACcessPolicy cmdlet has the following format:
Set-AzKeyVaultAccessPolicy -VaultName <your-key-vault-name> -PermissionsToKeys
<permissions-to-keys> -PermissionsToSecrets <permissions-to-secrets>
-PermissionsToCertificates <permissions-to-certificates> -ObjectId <Id>
If you prefer Azure CLI, you can use the az keyvault set-policy command to configure access policies to Key Vault Items. The az keyvault set-policy command has the following format:
az keyvault set-policy -n <your-unique-keyvault-name> --spn <ApplicationID-of-your-
service-principal> --secret-permissions <secret-permissions> --key-
permissions <key-permissions> --certificate-permissions <certificate-permissions>
Configure RBAC usage in Azure Key Vault
RBAC allows you to secure Azure Key Vault at the management plane. In mid-2020, Microsoft introduced a new set of RBAC roles that provide a simplified way of assigning permissions to the contents of Key Vaults. Going forward, you should only configure access policies when you need to configure complex permissions that are not covered by the new RBAC roles. You assign Key Vault RBAC roles on the Access Control (IAM) page of a Key Vault’s properties, as shown in Figure 4-30. While you can also assign Key Vault RBAC roles at the resource group, subscription, and management group level, security best practice is to assign roles with the narrowest-possible scope.

FIGURE 4-30 Add Role Assignment
The RBAC roles for Azure Key Vault are as follows:
Key Vault Administrator Can perform any action on secrets, certificates, and keys in a Key Vault, except managing permissions
Key Vault Certificates Officer Can perform any actions on Key Vault certificates, except managing permissions
Key Vault Contributor Allows for the management of Key Vault but does not allow access to the items within a Key Vault
Key Vault Crypto Officer Can perform any actions on Key Vault keys, except managing permissions
Key Vault Crypto Service Encryption Has read access to key metadata and can perform wrap and unwrap operations
Key Vault Crypto User Can perform cryptographic operations on keys and certificates
Key Vault Reader Can read Key Vault item metadata but not Key Vault item contents
Key Vault Secrets Officer Can perform all actions on Key Vault secrets except managing permissions
Key Vault Secrets User Can read the contents of secrets
Key Vault Firewalls and Virtual Networks
The Networking page of a Key Vault’s properties page, shown in Figure 4-31, allows you to configure the network locations from which a specific Key Vault can be accessed. You can configure the Key Vault to be accessible from all networks or specific virtual networks and sets of IPv4 address ranges.

FIGURE 4-31 Firewalls And Virtual Networks
When configuring network access rules for Azure Key Vault, keep the following in mind:
Each Key Vault can be configured with a maximum of 127 virtual network rules and 127 IPv4 rules.
/31 and /32 CIDR subnet masks are not supported. Instead of individual IP addresses, rules should be allowed when allowing access from these subnets.
IP network rules can only be configured for public IP address ranges. You should use virtual network rules for private IP address ranges.
IPv6 addresses are not presently supported by Azure Key Vault firewall rules.
You can configure Key Vault firewalls and virtual networks in the Azure portal by performing the following steps:
In the Azure portal, open the Key Vault that you want to configure.
Under Settings, select Networking. On the Networking page, select Firewalls And Virtual Networks.
By default, the Key Vault will be accessible from all networks. Select the Private Endpoint And Selected Networks option. When you enable this option, trusted Microsoft services can bypass the firewall. You can disable access from trusted Microsoft services if you choose.
To add an existing virtual network or a new virtual network, click the Add Existing Virtual Networks or Add New Virtual Networks items, as shown in Figure 4-32.
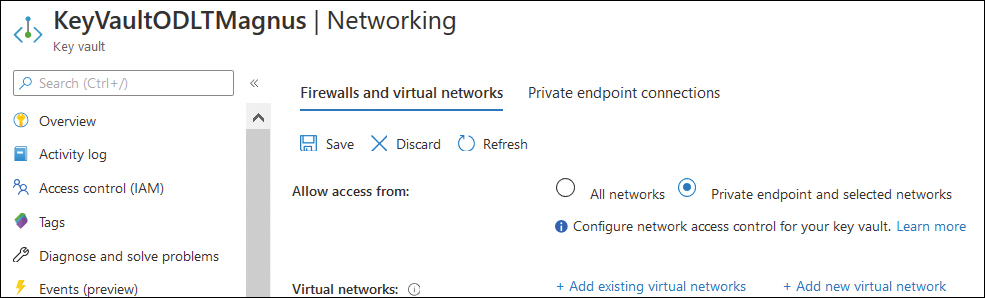
FIGURE 4-32 Private Endpoint And Selected Networks
When you add a virtual network, you must select the subscription, virtual network, and subnets that you want to grant access to the Key Vault, as shown in Figure 4-33. If a service endpoint isn’t present on the virtual network subnet, you can enable one.

FIGURE 4-33 Add Networks
To add an IPv4 address range, enter the IPv4 address or CIDR range, as shown in Figure 4-34.

FIGURE 4-34 Key Vault Firewall
Click Save to save the Firewall And Virtual Networks configuration.
You can use the Private Endpoint Connections tab to add private endpoint access to a specific Key Vault. An Azure Private Endpoint is a network interface that allows a private and secure connection to a service using an Azure Private Link. Azure Private Link allows access to Azure PaaS Services, such as an Azure Key Vault over a private connection on the Microsoft network backbone. No traffic that traverses a private link passes across the public Internet.
Manage certificates, secrets, and keys
Azure Key Vault supports the following management actions for x509 certificates:
Allows for the creation of an x509 certificate or for importing an x509 certificate
Supports Certificate Authority-generated certificates and self-signed certificates
Allows a Key Vault certificate owner to store that certificate securely without requiring access to the private key
Allows a certificate owner to configure policies that allow Key Vaults to manage certificate lifecycles
Allows certificate owners to provide contact information so that they can be notified about lifecycle events, including certificate expiration and renewal
Can be configured to support automatic certificate renewal with specific Key Vault partner x509 certificate authorities
Certificate policies provide information to the Key Vault on how to create and manage the lifecycle of a certificate stored within the Key Vault. This includes information on whether the certificate’s private key is exportable. When you create a certificate in a Key Vault for the first time, a policy must be supplied. Once this policy is established, you won’t need the policy for subsequent certificate creation operations. Certificate policies contain the following elements:
X509 certificate properties Includes subject name, subject alternate names, and other properties used during the creation of an x509 certificate.
Key properties Specifies the key type, key length, whether the key is exportable, and how the key should be treated in renewal fields. These properties provide instruction on how a Key Vault generates a certificate key.
Secret properties Specifies secret properties, including the type of content used to generate the secret value when retrieving a certificate as a Key Vault secret.
Lifetime actions Specifies lifetime settings for the Azure Key Vault certificate. This includes the number of days before expiry and an action option, which either emails specified contacts or triggers autorenewal of the certificate.
Issuer Includes information about the x509 certificate issuer.
Policy attributes Lists attributes associated with the policy.
Azure Key Vault presently can work with two certificate-issuance providers for TLS/SSL certificates: DigiCert and GlobalSign. When you onboard a certificate authority provider, you gain the ability to create TLS/SSL certificates that include the certificate authority provider as the apex of the certificate trust list. This ensures that certificates created through the Azure Key Vault will be trusted by third parties who trust the certificate authority provider.
Certificate contacts information includes the addresses where notifications are sent when specific certificate lifecycle events occur. Certificate contacts information is shared across all certificates generated by a Key Vault. If you have configured a certificate’s policy so that auto-renewal occurs, notifications will be sent
Prior to certificate renewal
After successful certificate auto-renewal
If an error occurs during auto-renewal
If manual renewal is configured, you are provided with a warning that you should renew the certificate
Creating and importing certificates
You can add certificates to Key Vault by importing them or generating them using the Key Vault. When generating certificates, you can have the certificate self-signed or have it be generated as part of a trust chain from a trusted CA provider.
To create a self-signed certificate using the Azure portal, perform the following steps:
In the Azure portal, open the Key Vault properties page and click Certificates, as shown in Figure 4-35.

FIGURE 4-35 Certificates section of Key Vault
Select Generate/Import. On the Create A Certificate page shown in Figure 4-36, set the Method Of Certificate Creation as Generate. You can also set this to Import An Existing Certificate, which you will learn about later in this chapter. Ensure that Type Of Certificate Authority (CA) is set to Self-Signed Certificate. Provide a Certificate Name, a Subject, and any DNS Names, and then click Create.

FIGURE 4-36 Create A Certificate
You can use Azure Key Vault to create TLS/SSL certificates that leverage a trust chain from a trusted CA provider after you have performed the following steps to create an issuer object:
Performed the onboarding process with your chosen Certificate Authority (CA) provider. At present, DigiCert and GlobalSign are partnered with Microsoft to support TLS/SSL certificate generation. Certificates generated in this manner will be trusted by third-party clients.
The chosen CA provider will provide credentials that can be used by Key Vault to enroll, renew, and implement TLS/SSL certificates. You can enter these credentials on the Create A Certificate Authority page in the Azure portal, as shown in Figure 4-37. You get to this page by selecting Certificate Authorities on the Certificates page of Key Vault and then clicking Add.
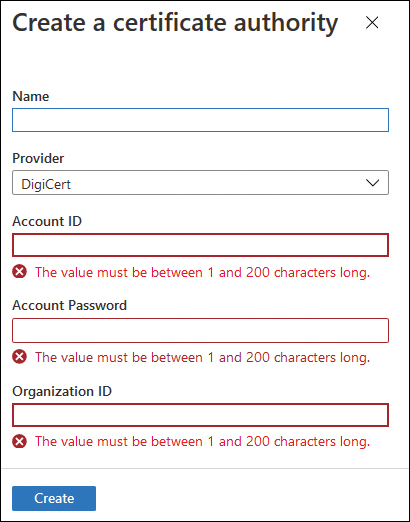
FIGURE 4-37 Create A Certificate Authority
Add the certificate issuer resource to the Key Vault.
Configure Certificate Contacts for notifications. This step isn’t required, but it is recommended. You can do this on the Certificate Contacts page, available through the Certificates page, as shown in Figure 4-38.

FIGURE 4-38 Certificate Contacts
Once you have configured the relationship with the issuing CA, you will be able to create TLS/SSL certificates using the portal or by creating a request using JSON code similar to the following. (This requires the CertificateIssuer resource created earlier, and this example assumes a partnership with DigiCert.)
{
  "policy": {
    "x509_props": {
      "subject": "CN=TailwindCertSubject1"
    },
    "issuer": {
      "name": "mydigicert",
      "cty": "OV-SSL",
    }
  }
}
The POST method to send this request URI is similar to the following, with your Key Vault’s address substituted where appropriate: https://mykeyvault.vault.azure.net/certificates/mycert1/create?api-version={api-version}.
To create a Key Vault certificate manually instead of relying on the partner certificate authority provider, use the same method as outlined above, but don’t include the issuer field. As an alternative, you can create a self-signed certificate by setting the issuer name to "Self" in the certificate policy, as shown here:
"issuer": {
       "name": "Self"
    }
You can import an x509 certificate into Key Vault that has been issued by another provider, as long as you have the certificate in PEM or PFX format and you have the certificate’s private key. You can perform an import through the Azure portal, as shown in Figure 4-39, by using the az certificate import Azure CLI command or by using the Import- AzKeyVaultCertificate PowerShell cmdlet.
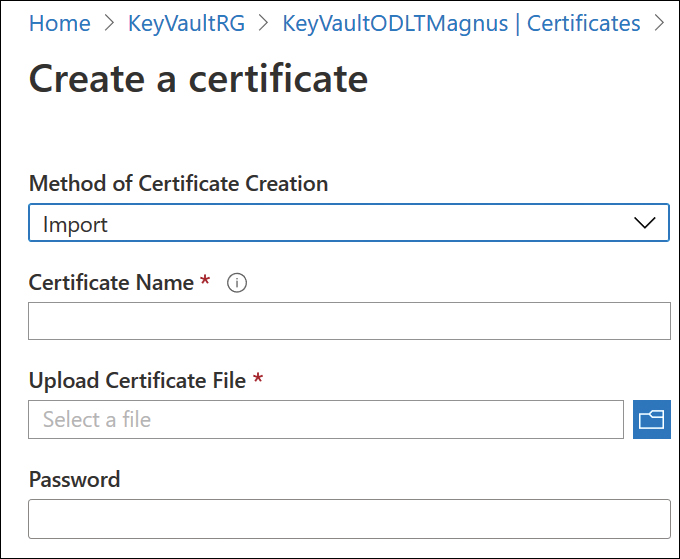
FIGURE 4-39 Import a certificate
You can use the PowerShell cmdlets in Table 4-4 to manage Azure Key Vault certificates:
TABLE 4-4 PowerShell cmdlets for managing Azure Key Vault certifications
| Description |
| Adds a certificate to Azure Key Vault |
| Adds a contact for certificate notifications |
| Backs up a certificate already present in an Azure Key Vault |
| Views a Key Vault certificate |
| Views the contacts registered with the Key Vault for notifications |
| Views the certificate issuers configured for a Key Vault |
| Views the status of any operations in the Key Vault |
| Views the policy for certificates in a Key Vault |
| Creates an in-memory certificate administrator details object |
| Creates an in-memory organization details object |
| Creates an in-memory certificate policy object |
| Removes a certificate from a Key Vault |
| Removes a contact registered for Key Vault notifications |
| Removes a configured issuer certificate authority from a Key Vault |
| Removes an operation that is running in a Key Vault |
| Restores a certificate from backup |
| Configures an issuer certificate authority for a Key Vault |
| Creates or modifies a certificate policy in a Key Vault |
| Cancels a pending operation in a Key Vault |
| Recovers a deleted certificate and places it in an active state |
| Modifies editable attributes of a certificate |
If you prefer to use Azure CLI to manage certificates in Azure Key Vault, you can use the commands shown in Table 4-5:
TABLE 4-5 Azure CLI commands for managing Azure Key Vault certifications
Command | Description |
| Backs up an x509 certificate in an Azure Key Vault |
| Manages informational contacts for certificates in an Azure Key Vault |
| Adds informational contacts for certificates in an Azure Key Vault |
| Deletes informational contacts for certificates in an Azure Key Vault |
| Lists informational contacts for certificates in an Azure Key Vault |
| Creates a certificate in an Azure Key Vault |
| Deletes a certificate from an Azure Key Vault |
| Downloads the public part of a certificate from an Azure Key Vault |
| Views the properties of the default Key Vault certificate policy |
| Imports a certificate into a Key Vault |
| Manages issuer certificate authorities |
| Manages administrators for issuer certificate authorities |
| Adds an administrator for an issuer certificate authority |
| Removes a configured administrator for a specific issuer certificate authority |
| Lists the administrators configured for a specific issuer certificate authority |
| Configures an issuer certificate authority for an Azure Key Vault |
| Deletes an issuer certificate authority from an Azure Key Vault |
| Lists the issuer certificate authorities for a specific Azure Key Vault |
| Views information about a specific issuer certificate authority |
| Updates information about issuer certificate authority |
| Lists certificates in an Azure Key Vault |
| Views a list of deleted certificates that can be recovered |
| Views the versions of a certificate |
| Manages certificate-creation operations |
| Terminates the pending creation of a certificate |
| Merges a certificate or a certificate chain with a key pair that is present in the Key Vault |
| Views the status of a certificate’s creation operation |
| Permanently deletes a deleted certificate |
| Recovers a deleted certificate |
| Restores a backed-up certificate to a Key Vault |
| Updates a certificate’s attributes |
| Views certificate information |
| Views information on a deleted certificate |
Manage secrets
Secrets, in the context of Azure Key Vault, allow you to securely store items such as passwords and database connection strings. Key Vault automatically encrypts all stored secrets. This encryption is transparent. The Key Vault will encrypt a secret when you add it, and it decrypts the secret when an authorized user accesses the secret from the vault. Each Key Vault encryption key is unique to an Azure Key Vault.
Key Vault secrets are stored with an identifier and the secret itself. When you want to retrieve the secret, you specify the identifier in the request to the Key Vault. You can add a secret to a Key Vault using the az keyvault secret set command. For example, to add a secret to the Key Vault named TailwindKV where the secret identifier name is Alpha and the value of the secret is Omega, you would run this command:
az keyvault secret set
    --name Alpha
    --value Omega
    --vault-name TailwindKV
You can view a secret using the azure keyvault secret show Azure CLI command, and you can delete a secret using the azure keyvault secret delete Azure CLI command. To add the same secret to the same Azure Key Vault used in the example above using PowerShell, run the command:
$secretvalue = ConvertTo-SecureString 'Omega' -AsPlainText -Force
$secret = Set-AzKeyVaultSecret -VaultName 'TailwindKV' -Name 'Omega' -SecretValue
$secretvalue
You can view an Azure Key Vault Secret with the Get-AzureKeyVaultSecret cmdlet. You can modify an existing Azure Key Vault secret with the Update-AzureKeyVaultSecret Azure PowerShell cmdlet, and you can delete an Azure Key Vault secret with the Remove- AzureKeyVaultSecret cmdlet.
You can manage secrets using the Azure portal from the Secrets section of a Key Vault’s properties page, as shown in Figure 4-40.
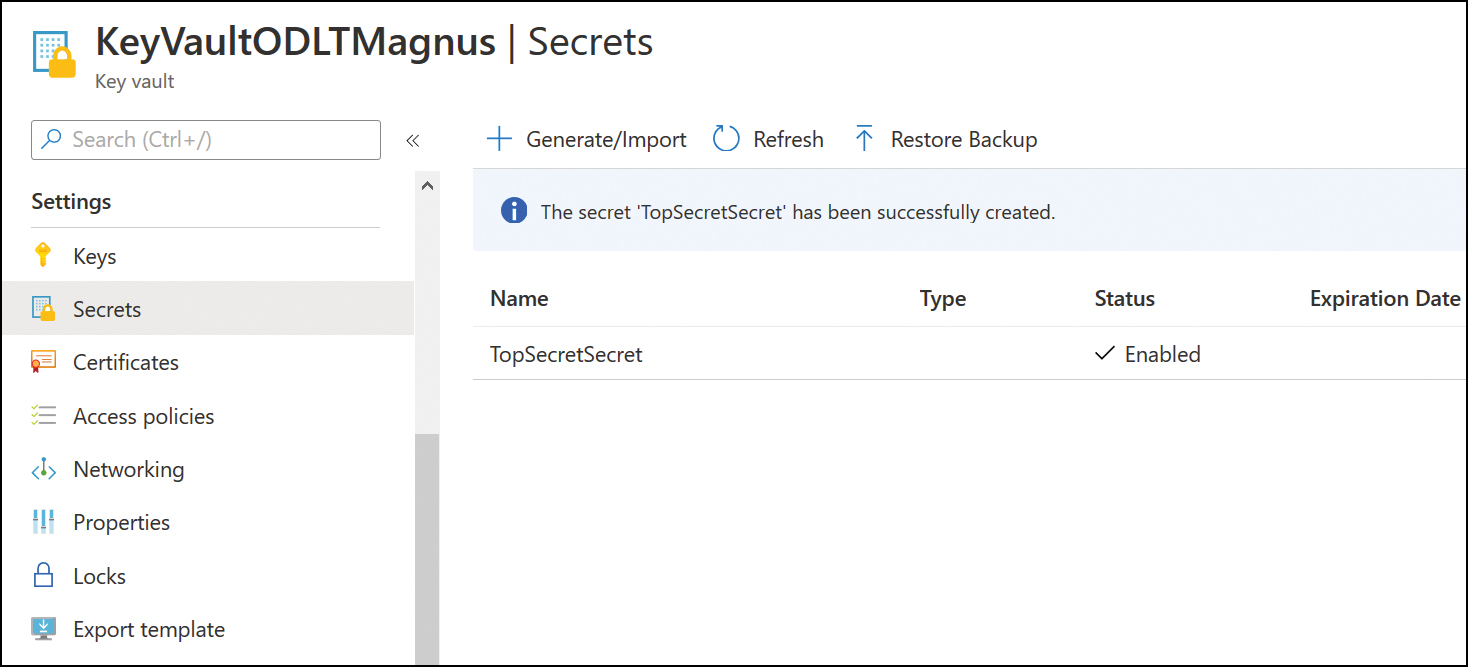
FIGURE 4-40 Key Vault secrets
Beyond the secret ID and the secret itself, you can configure the following attributes for Azure Key Vault secrets.
Expiration time (exp) Allows you to specify a specific time after which the secret should not be retrieved from the Key Vault. Using this attribute does not block the use of the secret, just as the expiration date on food doesn’t stop you from eating it after that date has passed. The expiration time attribute simply provides the secret keeper with a method of recommending that a secret is beyond its use-by date.
Not before (nbf) Similar to the expiration time attribute, the
not beforeattribute allows the secret keeper to specify the time at which a secret becomes valid. For example, you could store a secret in a Key Vault and set thenot beforeattribute to2030, which would inform anyone retrieving the secret that the secret information itself won’t be useful until 2030.Enabled Allows you to specify whether secret data is retrievable. This attribute is used in conjunction with the
expandnbfattributes. Any operation that involves theEnabledattribute that doesn’t include theexpornbfattributes will be disallowed.
You can use the Azure PowerShell cmdlets in Table 4-6 to manage secrets in Azure Key Vault.
TABLE 4-6 PowerShell cmdlets for managing Key Vault secrets
PowerShell cmdlet | Description |
| Securely backs up a Key Vault secret |
| Views the secrets in a Key Vault |
| Deletes a Key Vault secret |
| Restores a Key Vault secret from a backup |
| Creates or modifies a secret in a Key Vault |
| Recovers a deleted secret that has not been permanently removed |
| Updates the attributes of a secret in a Key Vault |
You can use the Azure CLI commands in Table 4-7 to manage Key Vault Secrets.
TABLE 4-7 Azure CLI commands for managing Key Vault secrets
Azure CLI command | Description |
| Backs up a specific secret in a secure manner |
| Deletes a specific secret from the Key Vault |
| Downloads a secret from the Key Vault |
| Lists secrets in a specific Key Vault |
| Lists secrets that have been deleted but not purged from the Key Vault |
| Lists all versions of secrets stored in the Key Vault |
| Permanently removes a specific secret so that it cannot be recovered from the Key Vault |
| Recovers a deleted secret to the latest version |
| Restores a backed-up secret |
| Creates or updates a secret in Key Vault |
| Modifies the attributes associated with a specific Key Vault secret |
| Retrieves a specific secret from an Azure Key Vault |
| Views a specific deleted, but not purged, secret |
Manage Keys
Cryptographic keys stored in an Azure Key Vault are stored as JSON Web Key (JWK) objects. Azure Key Vault supports RSA and Elliptic Curve (EC) keys only. Azure Key Vault supports two types of protection for keys, software protection, and hardware secure module (HSM) protection. These differences manifest in the following manner:
Software-protected keys The key is processed in software by Azure Key Vault. The key is protected using encryption at rest, with the system key stored in an Azure HSM. RSA or EC keys can be imported into an Azure Key Vault configured for software protection. You can also configure Azure Key Vault to create a key that uses these algorithms.
HSM-protected keys The key is stored in a specially allocated HSM. Clients can import RSA or EC keys from a software protected source or from a compatible HSM device. You can also use the Azure management plane to request that Key Vault generate a key using these algorithms. When you use HSM-protected keys, the
key_hsmattribute is appended to the JWK.
Azure Key Vault allows the following operations to be performed on key objects:
Create This operation allows a security principal to create a key. The key value will be generated by Key Vault and stored in the vault. Key Vault supports the creation of asymmetric keys.
Import Allows the security principal to import an existing key into Key Vault. Key Vault supports the importation of asymmetric keys.
Update Allows a security principal to modify key attributes (metadata) associated with a key that is stored within Key Vault.
Delete Allows a security principal to remove a key from Key Vault.
List Allows a security principal to list all keys in a Key Vault.
List versions Allows a security principal to view all versions of a specific key in a Key Vault.
Get Allows a security principal to view the public elements of a specific key stored in a Key Vault.
Backup Exports a key from the Key Vault in a protected form.
Restore Imports a previously exported Key Vault key.
You can use keys that are stored within an Azure Key Vault to perform the following cryptographic operations:
Sign and Verify
Key Encryption / Wrapping
Encrypt and Decrypt
You can manage Key Vault keys using Azure portal by navigating to the Key Vault and selecting Keys under Settings, as shown in Figure 4-41.

FIGURE 4-41 Keys page
To create a key using Azure Key Vault in the Azure portal, perform the following steps:
In the Azure portal, open the Key Vault that you want to create the key in and navigate to Keys in the Settings section.
On the Keys page, click Generate/Import. This will open the Create A Key page.
On the Create A Key page, make sure that the Options drop-down menu is set to Generate. Provide a name for the key, specify the key properties, specify whether the key has an activation or expiration date, and specify whether the key is enabled. Azure Key Vault will generate the key when you click Create.
You can use the Azure PowerShell cmdlets in Table 4-8 to manage Azure Key Vault keys:
TABLE 4-8 PowerShell cmdlets for managing Azure Key Vault keys
PowerShell cmdlet | Description |
|
|
|
|
|
|
|
|
|
|
|
|
|
|
You can use the Azure CLI commands in Table 4-9 to manage Azure Key Vault keys.
TABLE 4-9 Azure CLI commands to manage Azure Key Vault keys
Command | Description |
| Backs up an Azure Key Vault key |
| Creates a new Azure Key Vault key |
| Uses an Azure Key Vault key to decrypt data |
| Deletes an Azure Key Vault key |
| Downloads the public part of a stored key |
| Encrypts data using a key stored in Azure Key Vault |
| Imports a private key |
| Lists the Azure Key Vault keys in a specific vault |
| Lists Azure Key Vault keys that have been deleted but can be recovered |
| Lists Azure Key Vault key versions |
| Permanently deletes an Azure Key Vault key from the Key Vault |
| Recovers a deleted key |
| Restores a key from a backup |
| Allows you to configure the attributes of an Azure Key Vault key |
| Views the public portion of an Azure Key Vault key |
| Views the public portion of a deleted Azure Key Vault key |
Configure key rotation
Key rotation is the process of updating an existing key or secret with a new key or secret. You should do this on a regular basis in case the existing key or secret has accidentally or deliberately become compromised. How often you do this depends on your organization's needs, with some organizations rotating keys every 28 days and others rotating them every six months.
Earlier in this chapter, you learned about the concept of key rotation that followed this process:
The access keys to a storage account were rotated through a process by which the applications that used the first key were switched to the second key.
The first key was retired and replaced.
Eventually, the applications were migrated back to use the first key.
Once the applications were migrated back to the first key, the second key was replaced, and the process could start again.
While Microsoft recommends the use of identity rather than secrets for authentication, there are workloads that run in Azure that cannot leverage identity-based authentication and which must instead rely upon keys and secrets for authentication.
When you publish a secret into an Azure Key Vault, you can specify an expiration date for that secret, as shown in Figure 4-42. You can use the publication of a “near expiry” event to Azure Event Grid as the trigger for a functions app that would generate a new version of the secret and that then updates the relevant workload to use the newly generated secret, allowing the existing secret to be discarded.

FIGURE 4-42 Creating a secret
Configure backup and recovery of certificates, secrets, and keys
The items stored in Key Vault are, by their nature, valuable and something to which you don’t want to lose access. As Key Vault items are valuable, you should ensure that these items are backed up and can be recovered if something goes wrong. “Something goes wrong” can include items being accidentally deleted or corrupted, or it can mean an administrative error that causes you to lose access to the Key Vault itself. For example, you could lose access to the Key Vault if a malicious actor gains control of your subscription or if a distracted administrator incorrectly reconfigures RBAC permissions or the Key Vault’s Access policy. Unlike on-premises hardware security modules that store secrets, Azure Key Vaults will failover to a paired Azure region without requiring intervention should something disastrous happen to the datacenter that hosts the primary instance of the Key Vault.
When you back up a Key Vault Item, the item will be available for download as an encrypted blob. Recovery involves recovering this encrypted blob to the same or another Key Vault within the same subscription. It is important to note that this encrypted blob can only be decrypted inside a Key Vault within the same Azure subscription and Azure geography as the Key Vault the item was first backed up from. For example, if you backed up a secret stored in a Key Vault that was hosted in Australia in subscription A, you wouldn’t be able to restore that secret to a Key Vault in an Azure geography outside Australia or in a Key Vault associated with any subscription other than subscription A.
At the time of writing, Azure Key Vault does not allow for the entirety of a Key Vault in a single back-up operation. Microsoft cautions that you should perform Key Vault back up operations manually rather than automatically. This is because automatic operations using the currently available tools are likely to result in errors. It’s also possible, using automatic operations, to exceed the Key Vault’s service limits in terms of requests per second. If this occurs, the Key Vault will be throttled causing any back-up operation to fail. Using scripts or automated actions to back up Key Vault items is not supported by Microsoft or the Azure Key Vault development team.
To back up objects in an Azure Key Vault, the following conditions must be met:
Contributor-level or higher permissions on the Key Vault
A primary Key Vault that contains items that you want to back up
A secondary Key Vault where the secrets will be restored
To back up an item in the Azure portal, perform the following steps:
In the Azure portal, open the Key Vault. On the Settings page, select the item type that you want to back up and then select the item you want to back up. In Figure 4-43, the Secrets section is selected.

FIGURE 4-43 Secrets in Key Vault
Select the item that you want to back up and on the item’s page, shown in Figure 4-44, and select Download Backup.

FIGURE 4-44 Download backup
Select Download to download the encrypted blob.
To restore an item using the Azure portal, perform the following steps:
In the Azure portal, open the Key Vault to which you want to restore the item. On the Settings page, select the item type that you want to restore.
Click Restore Backup (see Figure 4-45).
On the File Upload page, select the encrypted blob that you want to restore to the Key Vault and then select Open. The encrypted blob will be uploaded to the Key Vault. An item will be restored as long as the Key Vault is in the same subscription and geographic region as the Key Vault that hosted the originally backed up item.
FIGURE 4-45 Restore backup
You can use the Azure CLI commands in Table 4-10 to back up Key Vault Items.
TABLE 4-10 Azure CLI commands for backing up Key Vault items
Azure CLI command | Description |
| Use this command to back up specific certificates stored in an Azure Key Vault. |
| Use this command to back up specific keys stored in an Azure Key Vault. |
| Use this command to back up specific secrets stored in an Azure Key Vault. |
You can use the Azure CLI commands shown in Table 4-11 to back up Key Vault Items.
TABLE 4-11 Azure CLI commands for backing up Key Vault items
Azure CLI commands | Description |
| Use this command to restore a specific certificate to an Azure Key Vault. |
| Use this command to restore a specific key to an Azure Key Vault. |
| Use this command to restore a specific secret to an Azure Key Vault. |
You can use the Azure PowerShell commands shown in Table 4-12 to back up Key Vault items.
TABLE 4-12 Azure PowerShell commands to back up Key Vault items
Azure PowerShell commands | Description |
| Use this cmdlet to back up specific certificates stored in an Azure Key Vault. |
| Use this cmdlet to back up an Azure Key Vault Key. |
| Use this cmdlet to back up a specific secret that is stored in an Azure Key Vault. |
You can use the Azure PowerShell commands in Table 4-13 to restore Key Vault items.
TABLE 4-13 Azure PowerShell commands to restore Key Vault items
| Description |
| Use this cmdlet to restore specific certificates stored in an Azure Key Vault. |
| Use this cmdlet to restore an Azure Key Vault Key. |
| Use this cmdlet to restore a specific secret that is stored in an Azure Key Vault. |
Thought experiment
In this thought experiment, demonstrate your skills and knowledge of the topics covered in this chapter. You can find answers to this thought experiment in the next section.
Securing data at Tailwind Traders
Tailwind Traders has migrated some of their operations to Azure and are now attempting to improve the security of the data stored in their Azure subscription. With this information in mind, Tailwind Traders has the following challenges they need to address:
Members of the product research team need to be able to add and remove data in Blob Storage across several storage accounts. They should not be assigned any unnecessary permissions.
To comply with local government regulations, Tailwind Traders needs to manage the keys used for transparent data encryption on their Azure SQL instance. They will be configuring BYOK.
Members of the sales team at Tailwind Traders need to be able to regularly perform cryptographic operations with keys and certificates stored in an Azure Key Vault but should not be assigned any unnecessary permissions.
With this information, answer the following questions:
Which RBAC role should you assign to the product research team?
Where should Tailwind Traders store its TDE key?
Which RBAC role should the sales team be assigned to the Key Vault?
Thought experiment answers
This section contains the solution to the thought experiment. Each answer explains why the answer choice is correct.
The product research team should be assigned the Storage Blob Data Contributor role as this provides the minimum necessary permissions to add and remove data from Blob Storage.
Tailwind Traders should store the TDE key in an Azure Key Vault as this is the only location in which you can store a key in a BYOK scenario.
The sales team should be assigned the Key Vault Crypto User RBAC role because this allows them to perform cryptographic operations on keys and certificates.
Chapter summary
There are two storage account access keys that can be used to provide access to a storage account. You should only use one at a time so that you can perform key rotation on a regular basis:
Shared Access Signatures (SAS) allow you to provide secure granular delegated access to storage accounts.
Stored access policies allow you to specifically control service-level shared access signatures.
Rather than rely upon storage account keys or shared access signatures, you can use Azure AD to authorize access to Blob and Queue Storage. Azure AD authenticates a security principal’s identity and then returns an OAuth 2.0 token.
When you enable AD DS authentication for Azure Files, your Active Directory Domain Services (AD DS) domain-joined computers can mount Azure File shares using AD DS user credentials.
You configure share-level permission by assigning RBAC roles at the Azure File share-level. Once you have assigned share-level permissions to an Azure File share using RBAC, you should then configure file and folder permissions on the share's contents.
Azure Storage encryption is enabled by default for all storage accounts regardless of performance tier or access tier. This means you don’t have to modify code or applications for Azure Storage Encryption to be enabled.
Encryption scopes allow you to configure separate encryption keys at the container and blob level.
Advanced threat protection for Azure Storage allows you to detect unusual and malicious attempts to interact with Azure Storage accounts.
When you create an Azure SQL database server instance, you create an administrator login and a password associated with that login. This administrative account granted full administrative permissions on all databases hosted off the Azure SQL instance as a server-level principal.
Auditing allows you to track database events, such as tables being added or dropped. Audit logs for Azure SQL databases can be stored in an Azure Storage account, in a Log Analytics workspace, or in Event Hubs.
Azure SQL Database Advanced Threat Protection allows you to detect unusual activity that might indicate that a third party might be trying to attack your organization’s Azure SQL databases.
Transparent data encryption (TDE) allows you to protect Azure SQL databases by encrypting data at rest. When you enable TDE, the databases, associated backups, and transaction log files are automatically encrypted and decrypted, as necessary.
Always Encrypted is a technology available for Azure SQL that allows you to protect specific types of sensitive data that has a known recognizable pattern, such as passport numbers, tax file identification numbers, and credit card numbers.
Azure Key Vault allows you to store information that should not be made public, such as secrets, certificates, and keys.
You use Key Vault access control policies to manage permissions to secrets, certificates, and keys at the data plane level. Each Key Vault access control policy includes entries specifying the designated security principal's access to keys, secrets, and certificates.