

Doing your own film processing and printing gives you much more control over your results than passing them over to the local laboratory. You probably won’t save money, but mastering the skills is enjoyable and will allow you to produce prints just the way you want them to look. This grows more important the further you progress in your photography – aiming for your own style of pictures or perhaps tackling specialized subjects beyond the range of the average commercial laboratory.
By far the best way to start is to process black and white film and make black and white prints (by contact and by enlargement). This will get you familiar with handling chemicals and setting up and working in a darkroom. Later, you can progress to the extra challenge of judging color test prints and working in the near darkness of a color printing darkroom.
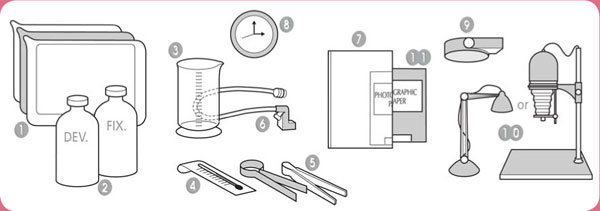
Processing black and white negatives is in many ways like cooking – you use liquids, and have to control time and temperature quite carefully. You also need some basic equipment. The ten most important items are shown in Figure 35.1.
Loading the tank
Before you try using a tank for the first time, practice loading with a scrap film, or an unwanted (and uncut) length of negatives. Do this first in the light, then with your eyes closed, then in a darkened room. It’s important not to force and buckle the film during loading, or you may get results as shown in the film trouble shooting section (Part 11) later in this book. The shaped tongue must be cut off the front end of the film to give a square shape for loading. If necessary, use a retrieving tool to slip into the cassette without fogging film (Figure 35.1, step 1). Having pulled out the tip, you can then do your trimming in the light (Figure 35.1, steps 2 and 3).
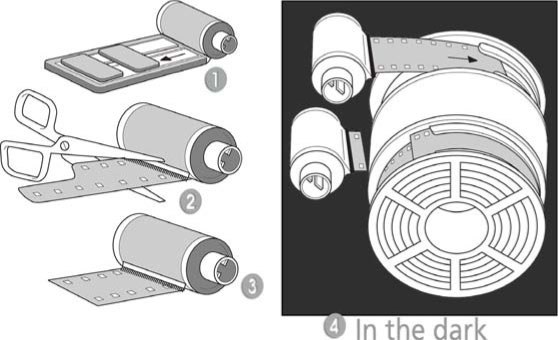
Figure 35.1 (Left) Retrieving and trimming the film end, in normal lighting. (Right) Loading into the film reel, in darkness.
The stage after this – winding a whole exposed film into the reel – only takes a few minutes but must be done in total darkness. If you don’t have a darkroom use a large cupboard. It is also possible to untuck one side of your bed, pushing your hands in deep under the blankets in between the sheets. Alternatively, buy a light-proof ‘changing bag’ (Figure 35.3), which pushes onto your arms. Feed film in direct from the cassette (as shown in Figure 35.1, step 4) or use a cassette or bottle opener to take off one end and withdraw the spool of film. The actual way the film slides into the reel grooves depends upon your particular make of tank. Some are cranked in, others just pushed. As soon as the whole film is loaded, place the reel in the empty tank and fit on the lid. After this point you can then do all your processing in ordinary lighting.
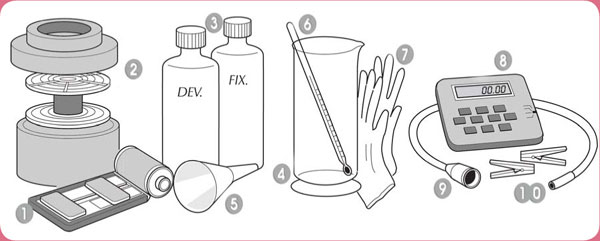
Figure 35.2
Basic equipment for processing film
1 35 mm film-end retrieving tool. Used to extract the first inch or so of film if wound fully into the cassette, so it can be prepared for tank loading (see Figure 35.1 for the precise steps involved).
2 Light-tight plastic tank containing a reel. You push or wind your film into the spiral groove of the reel in the dark; the whole length is held only along its edges, with each turn slightly separated from the next so that processing solutions act evenly over its entire surface. Each solution is poured in through a light-proof hole in the tank lid. You block off the hole and invert the tank at set intervals to agitate the solutions; some tanks have a plastic rod to rotate the reel for the same purpose.
3 Bottles containing developer and fixing solutions. Start off by using the developer recommended on your film’s packing slip. A standard fine-grain developer such as Ilford ID11 or Kodak D76 (made up from powder) is a good choice. You can also buy most developers in liquid concentrate form, which are quicker and easier to prepare. Made-up developer can be stored for weeks in a stoppered container. The acid hardener fixing solution is simpler and cheaper, and is also known by its main constituent ‘hypo’ (sodium thiosulfate). Unused fixer keeps indefinitely. Never let developer and fixer mix, because they will neutralize each other.
4 Measure. A plastic measuring graduate holding sufficient solution to fill your tank.
5 Funnel. A plastic funnel for re-bottling solutions.
6 Thermometer. A photographic thermometer clearly scaled from about 13ºC (55ºF) to 24ºC (75ºF).
7 Thin plastic gloves for handling chemicals (see the safe handling recommendations in Appendix O before using any chemicals).
8 A minute timer.
9 A flexible plastic tube for directing wash water down into your tank through the lid hole.
10 Plastic pegs to attach to the top and bottom of your processed film when it is finally hung up to dry on a nylon cord.
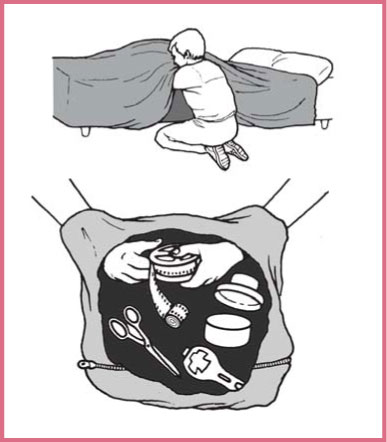
Figure 35.3 A changing bag (bottom) or just using your bed (top) saves having a darkened room.
Using the solutions
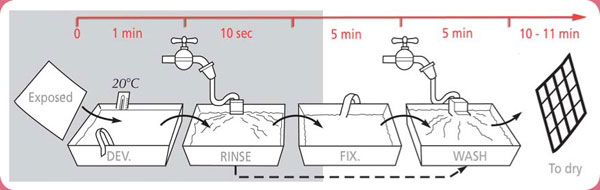
The various stages and typical times of processing are shown in Figure 35.4. Developer solution, waiting in the graduate at the recommended temperature (normally 20ºC), is poured into the tank and the clock started. The time required depends upon the developer and type of black and white film you are processing. The hotter the developer, the faster it will work. Conversely, developer that is cool will take longer to process the negatives. It is critical for you to measure the temperature of the developer and then use the time/temperature/film chart (usually supplied with the developer or film) to calculate the length of time that your specific film must be processed. In addition, you must regularly agitate the solution to avoid streaky development, typically by gently inverting the tank several times during the first 30 seconds, and then for 5 seconds every half minute. At the end of development you pour the solution out through the light-tight tank top. It is either poured away (if one-shot only) or returned to its bottle for reuse.
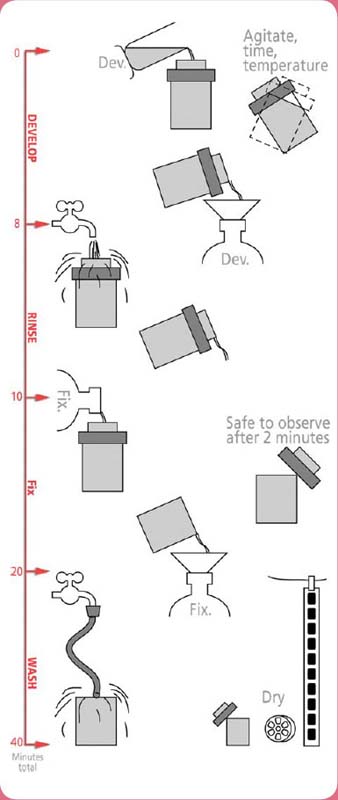
Although you cannot yet look, inside the tank the creamy surface of your film now carries a black image corresponding to where it received light in the camera. For the next step, which is a rinse, you fill the tank to overflowing with water and immediately empty it again. Repeat this process at least five times. This helps to remove developer from the film (alternatively use a ‘stop bath’ solution, which halts development faster).
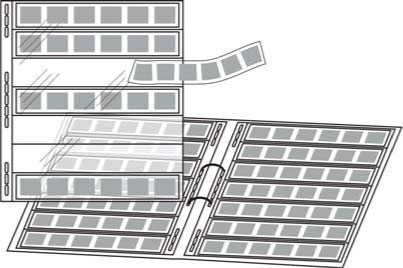
Figure 35.5 Sleeved pages hold strips of processed 35 mm negatives and fit into a ring binder.
Now fixer solution is poured into the tank and initially agitated. Fixer temperature is less critical than developer – room temperature is adequate. The fixer turns creamy silver halides unaffected by development into colorless compounds that can later be washed out of the film. Generally, but depending on your film and developer type, you will need to immerse your film in the fixer solution for about 10 minutes, but after 1–2 minutes most of the film’s milkiness will have cleared and you can remove the tank top without having light affect your results. When the film has finished its fixing time, the solution is returned to its bottle.
Next, a 20-minute wash in cold water removes all remaining unwanted chemicals and you can remove the processed film from the reel and carefully hang it up to dry, with a peg attached to each end. A few drops of photographic ‘wetting agent’ in the final wash water will help the film dry evenly. Always hold film by its edges only. Once it has fully dried, cut it into convenient strips of five or six negatives and immediately protect these in sleeves made for the purpose (see Figure 35.5).
Film processing faults
Don’t put the fixer in first – this will destroy all your pictures! Check temperatures before and during development, and be careful with timing, otherwise it is easy to under- or overdevelop (see Figure 35.6). Avoid putting finger-marks or splashes of any kind on your film – remember too that the film surface is easily damaged by scratches, dust and hairs when drying.
If your film is clear with no images, check to see if edge printing is present. If the information is there you have either processed an unused film or the camera was faulty – shutter not opening or film not winding on. If the edge data is not present, the fault is almost certainly processing. Perhaps the developer was totally exhausted or solutions used in the wrong order.
Film that is still creamy has not been fully fixed; further fixing time, use fresh fixer, will probably result in good negatives. Patches of uneven tone usually mean uneven development. Perhaps adjacent coils of film touched each other in the reel. Dark crescent-shaped marks (Figure 35.7) and kinks or creases in the film itself are due to rough handling. The film was most likely buckled after removal from its cassette, when you were trying to load the reel in the dark.
Most of the time, however, faults are concerned with negatives that are a bit too dark (‘dense’) or too pale (‘thin’). At first, it is difficult to tell whether, say, a thin negative is due to underexposure or insufficient development. Of course, if every picture on your film looks thin, the fault was probably development – although it could also be the ISO rating having been incorrectly set on the camera.
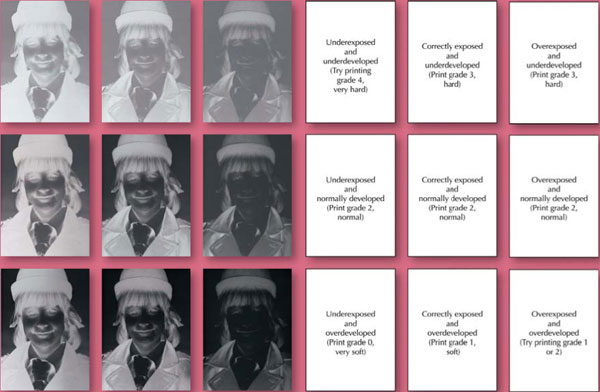
Figure 35.6 The effects of over- and underexposure, and over- and underdevelopment. The key is on the right.
As Figure 35.6 shows, though, an underexposed negative is characteristically transparent and empty of detail in subject shadow areas, such as the girl’s hair. A correctly exposed but underdeveloped negative (top center) shows more detail here, but looks generally weak and gray (‘flat’). A dense negative due only to overexposure records the subject’s lightest parts as so solid that finer details are destroyed. Notice how shadows have ample detail, though. Overdevelopment instead gives a negative that is contrasty and ‘bright’ – dense in highlights but carrying little more shadow detail than a correctly developed film.
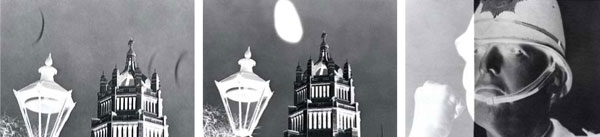
Figure 35.7 Processing faults. (Left) Dark, crescent-shaped kink marks. (Center) Undeveloped clear patch, where this part of the film remained in contact with another. (Right) All negatives throughout the film show part of the picture pale. The cause is probably insufficient developer in the tank.
Film processing does not really require a darkroom, but before you can print or enlarge your negatives you will have to organize yourself some kind of blacked-out room to work in. This might have to be the family bathroom, quickly adapted for the evening (see Figure 36.2). Maybe you can convert a spare room, or perhaps you are lucky enough to have use of a communal darkroom designed for the purpose at a school or club, as shown in Figure 36.1.
The darkroom
The most important features to consider when you are planning a darkroom are:
• blackout;
• ventilation;
• water supply; and
• electricity.
Excluding the light
Existing windows have to be blocked off – either temporarily using thick black plastic sheeting or paper, or more permanently with hardboard. Alternatively, buy a fabric roller blind blackout. As long as you have kept out unwanted white light, the walls of the room can be quite pale toned – a matt white finish helps to reflect around the colored illumination from your safe light, designed not to affect the photographic paper.
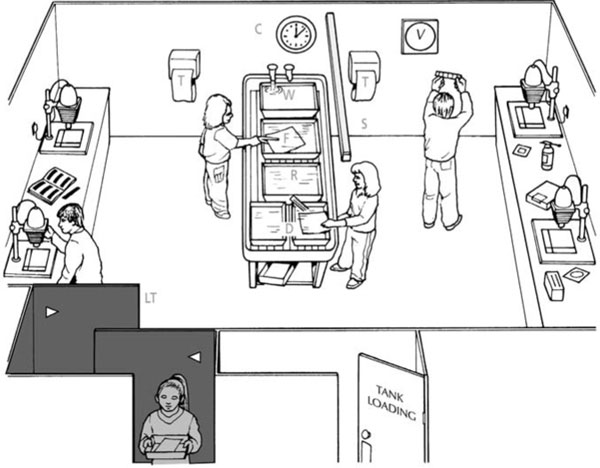
Figure 36.1 Purpose-built school darkroom. D – developer. R – rinse. F – fixer. W – wash. S – safe light. T – towel. V – ventilator. C – clock with large second hand. LT – light trap.
Working alone for an hour in the darkroom you may not find the air too stuffy, but for groups working for longer times you need a light-tight air extractor fan. A communal darkroom also needs a light trap instead of a door. This helps the circulation of air and makes it easy for people to enter or leave without disturbing others. Wall surfaces inside the light trap are painted matt black, to reduce reflections.
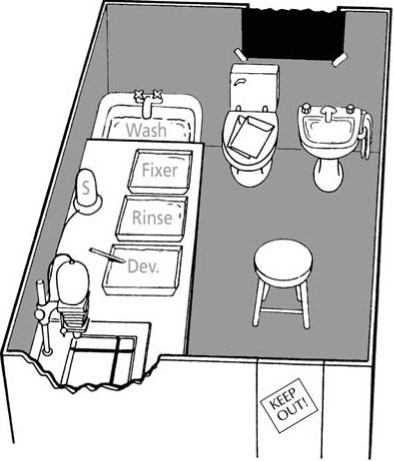
Figure 36.2 Darkroom in adapted bathroom (S – safe light).
Water supply
In the bathroom, use the bath to wash prints and the hand basin to rinse your hands, free of chemicals. The permanent darkroom has a large, flat-bottomed PVC sink to hold trays for processing solutions, and a tank or tray for print washing. Always separate the wet stages of darkroom work from ‘dry’ work, such as handling the enlarger and packets of paper. In the larger darkroom, each activity can take place on different sides of the room.
Electricity
Take special care over your electricity supply, needed for the enlarger and safe light, because electricity and water can be a lethal combination. Never let wires or switches come into contact with water or wet hands. Take your supply from a three-pin socket, and include a circuit-breaker of the type sold for garden tools. Metal parts of your enlarger or safe light should be connected to the earth wire (‘grounded’). This is especially important in any board-over-the-bath bench arrangement. Take out any temporary wiring as soon as you have finished work, even though you intend to return within a few hours.
Equipment for contact printing
Print processing
Most of the items necessary for contact printing are shown in Figure 36.3. You need at least three plastic trays (1) big enough for your prints – 12 in × 10 in is a good size. One is for developer, one for rinsing and washing, and the other for fixing. Print developer (2) is similar to, but much faster-acting than, negative developer. It comes as a concentrated solution, diluted just before use and discarded after your printing session. The fixer is a less concentrated form of negative fixer, and can be reused.
You also need the measuring graduate (3) used for films and a photographic tray thermometer (blue spirit or LCD with red display). The thermometer (4) stays in the developer tray to tell you if the solution is too warm or cold. Plastic tongs (5) – one for developer, the other only for fixer – allow you to keep your hands out of solutions. A washing hose (6) connects the cold water tap to the rinse tray and turns it into a print washing device. Have a clock (8) to time minutes during processing and (if you have no enlarger timer) seconds during exposure.
Suitable orange lighting is permissible in the printing darkroom (7), as black and white paper is not sensitive to this color. You can buy a bench or hanging safe light (9), which contains a 25-watt bulb behind dyed glass, or use a fluorescent strip light with a special colored sleeve (10). The safe light is positioned near the developer tray (Figure 36.1) but no closer than specified, usually 1 m (3 ft).
Exposing equipment
To expose your contact print you need an even patch of white light, which will shine through the negatives laid out on the paper. You could use a reading lamp fitted with a 15-watt bulb, but as an enlarger will be needed later for making bigger prints of individual negatives, this can conveniently provide your contact printing light. All you have to do at this stage is raise it to a height where it provides a large enough patch of light for your print, as shown in Figure 36.4.
The negative strips can be held down in tight contact with the light-sensitive printing paper during exposure by a sheet of thick glass. Better still, buy a proper contact printing frame – glass with thin plastic grooves on its underside to hold the film, and hinged to a baseboard.
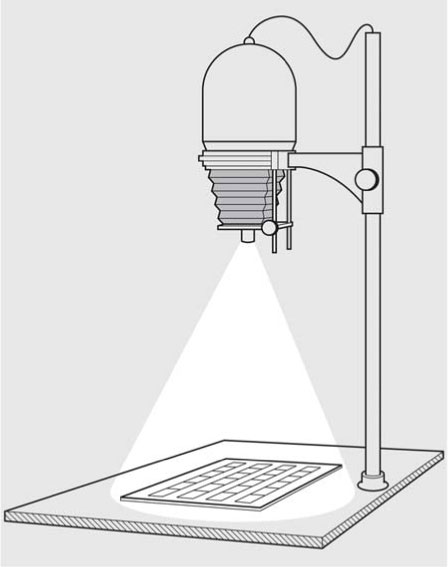
Figure 36.4 Using an enlarger to give a patch of light for exposing a contact print.
The light-sensitive paper
Most black and white photographic paper is known as bromide paper (due to the silver bromide used in its light-sensitive emulsion). It comes in different sizes, surfaces and types of base, and is available in either grades of contrast or the more popular multi-contrast variety. The 10 in × 8 in size just accommodates seven strips of five 35 mm negatives. Start off with a packet this size of glossy, resin-coated (RC), multigrade paper. You will also need a set of simple enlarger filters to adjust the contrast of the paper.
Printing a contact sheet
It is best to make a contact print from every film you shoot. This way you have a visual file of all your pictures from which to choose the ones to enlarge. Prepare the solutions in their trays and bring the developer to its recommended temperature (usually about 20°C). Now you can change the lighting in your darkroom to safe lighting and open your packet of paper. Position one sheet, glossy side upwards, under the switched off enlarger and re-close the packet. Lay out your negatives in rows on the paper with their emulsion (dull) side downwards. Have all the edge numbers running the same way – it is irritating later to discover one row of pictures upside down. Then cover over the negatives with the glass.
Insert a grade 2 (normal contrast) filter into the enlarger lamphouse. Then, with the enlarger near the top of its column and the lens stopped down two f settings from widest aperture (usually about f8), give a trial exposure of about 20 seconds (see Figure 36.6). Remove the glass and put your negatives carefully to one side. As shown in Figure 36.5, slide the exposed sheet of paper smoothly under the surface of the developer. Note the time on the clock and rock the tray gently to keep the paper fully submerged. Magically, the shapes of the frames on your film appear on the paper, then the pictures themselves – growing darker and stronger all the time. But keep one eye on the clock and remove the print when its recommended development time is up (typically 1 minute at 20°C for RC paper).
Maintain the same time in the developer for each successive print no matter how fast or slowly the print darkens – in the printing process you alter the results by exposure, and always keep development consistent. The print next has a quick rinse (approximately 30 seconds in running water) and then goes face down into the fixer tray. Full fixing generally takes about 5 minutes, although after 1 minute or so you can switch on normal lighting. In the example (Figure 36.7), the exposure given is correct for most pictures on the sheet.
If results were too dark, you would give a shorter exposure time (less than the original 20 seconds) or reduce the lens aperture (change to a bigger aperture number); if too pale, increase exposure time (more than 20 seconds) or widen the aperture (change to a smaller aperture number).
Prints can be allowed to accumulate in the fixer – for up to half an hour if necessary – before you put them to wash as a batch. Washing also takes about 5 minutes, but keep separating the prints now and again, and prevent any floating face upwards to the surface, where washing will be ineffective. After washing, sponge off surplus water from the front and back surfaces and dry your print by pegging it on a line or laying it out on photo blotting paper. RC plastic paper dries quickly, but the process can be hastened with warmed air from a hair drier.
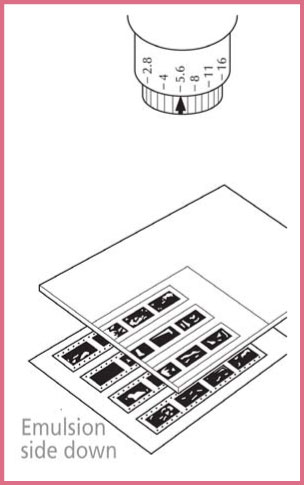
Figure 36.6 Stop down the lens for the first trial exposure.
Often, you find that when exposure is correct for some pictures on the sheet it is too much or too little for others. This occurs because of the way that your original negatives vary. This difference is evident in Figure 36.7, where the four frames at the bottom left are underexposed. The easiest way to solve the problem would be for you to make two sets of contacts, one exposed for dark pictures, one for light. But better still, you can use a shaped card (Figure 36.9) to give 50 per cent extra exposure time to this corner of the sheet. Figure 36.8 shows the improvement that this extra light makes. Note also that an ordinary wooden ruler is about the same width as 35 mm film. You can cover up individual rows or ends of rows of pictures by laying rulers on top of the glass, and then remove them according to the exposure times required.

Figure 36.7 The result – correct for most, but not all, pictures.
Figure 36.8 The corrected reprint. Compare the bottom left frames with those in Figure 36.7.
Color negatives can be contact printed to give black and white results in just the same way as monochrome negatives, but often need about two to three times the exposure (see also the section on photograms).
Drying prints
The simplest way to dry your washed prints is to first wipe off surplus water with a sponge or a flat (window-cleaning type) squeegee. Then peg them on a line, or lay them face up either on clean photo blotting paper or a fiber-glass drying screen or muslin stretched on a frame (see Figure 36.10). Special hot-air driers are made that accept RC black and white paper and all color papers. They give you dry results in a few seconds, but even when left at room temperature these plastic papers will dry within about 15 minutes.
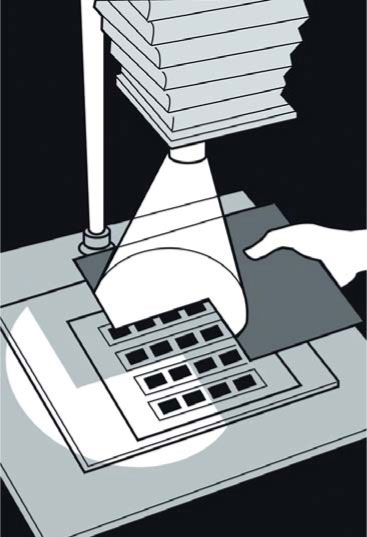
Figure 36.9 Shading to correct unevenness in the set of contact prints.
If you have made black and white prints on fiber-based paper, which is more like drawing paper, peg them up in pairs back to back to avoid curling. Never attempt to put fiber paper through an RC drier. A few drier/glazers are designed for fiber-based printing papers. Don’t try glazing RC papers of any kind – the face of your prints will become stuck to the equipment! Glossy RC paper air dries with a shiny finish.
When the print is dry, number your contact sheet on the back with the same reference number you put on your set of negatives. Check carefully to see which images are sharp enough to enlarge, what people’s expressions look like, whether the composition works, and so on. Using grease pencil drawn on the print surface, mark up your best shots, showing possible cropping (see Figure 36.11). As you will probably be checking these contacts in the darkroom, don’t use pencil marks in a color (reds or oranges) that makes them invisible under safe lighting. If you have several very similar images in your contacts, double-check the edge number to ensure you put the negative that you selected into the enlarger.
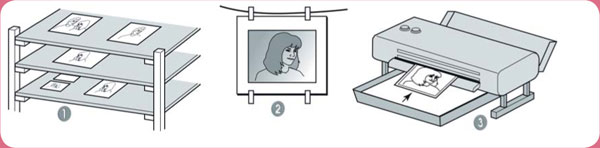
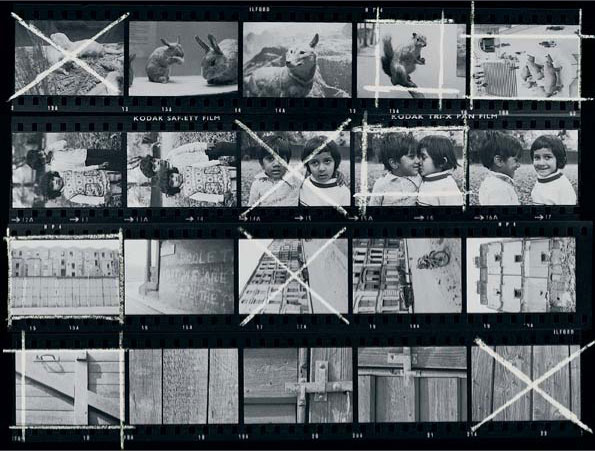
Figure 36.11 Contact sheet with shots chosen for enlarging framed up in wax crayon.
Making an enlargement reveals details and gives an impression of ‘depth’ to your pictures that is lost in a small print. During enlarging you can decide to exclude parts of the negative in order to improve composition, darken or lighten chosen local areas of the picture, and juggle with contrast and density so that (within limits) you can compensate for negatives that are slightly dark (overexposed) or pale (underexposed). It is even possible to construct pictures with the enlarger, by combining parts of different negatives into one print.
The 35 mm enlarger
Up to now, the enlarger has just been a handy source of light for contact printing, but before making enlargements you need to understand it in more detail. Basically, an enlarger is like a slide projector, although it has a much less powerful lamp and is attached to a vertical stand. Inside, to ensure that your negative is evenly illuminated, the light first passes down through large condenser lenses, or a plastic diffusing screen. The negative itself is held flat, its dull (emulsion) side downwards, between two halves of a carrier having a rectangular cut-out the size of one film frame. Alternatively, some models have two sheets of glass in the carrier that sandwich the negative to keep it in place. The negative carrier pushes into a slot in the enlarger just below the condensers or diffuser.
Below the negative is a lens (typically 50 mm focal length), which you can move up or down to focus a sharp image on the enlarger baseboard. Adjustable bellows prevent the escape of any light between carrier and lens. An enlarging lens needs no shutter but has an adjustable aperture, usually scaled in f-numbers. As is the case with our camera lenses, changing from one f-number to another doubles or halves the amount of light, which in turn alters the brightness of the image. (As you can feel and hear the position of each setting by a ‘click’, it is unnecessary to keep peering at numbers.)
Your enlarger may also contain a filter drawer in the lamphouse, as Figure 37.1 shows, to accept contrast-changing filters for variable contrast (‘multigrade’) paper. Alternatively, a filter holder can be attached to the lens or you can ‘dial-in’ colored filtration using the dials at the top of the enlarger head.
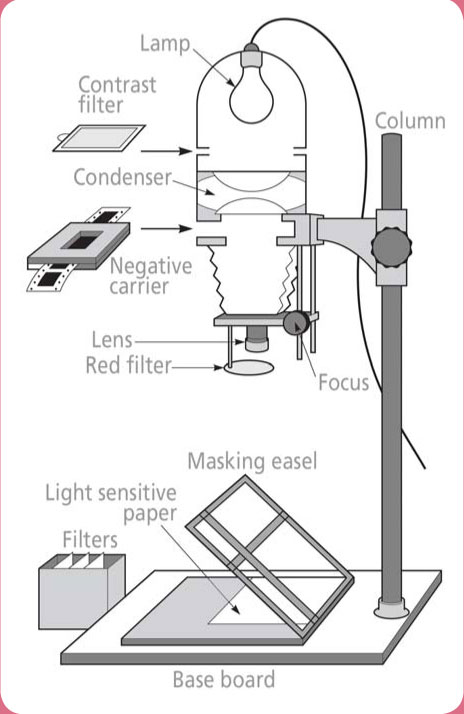
The whole enlarger head can be moved up or down a firm metal column and locked at any height to control the size of enlargement. On the base board, you will need to place a masking easel, which has a white base surface and a hinged frame with adjustable metal strips. You can move the easel around to compose your enlargement, adjusting the side-strips to give a picture of the chosen size and proportions. During exposure, the bromide paper is held down flat and correctly positioned under the strips on all four sides. The strips also prevent light reaching the paper and so give your enlargement neat white borders. Avoid holding paper down by glass – this upsets sharpness and may introduce dust specks and scratch marks.
If possible, have an enlarging exposure timer – a clock-based switch that plugs in between enlarger and power supply. You set the estimated number of seconds needed, press a button and the lamp switches on for a duration of exactly this time. Another useful aid is a focusing magnifier. This is a tool used to magnify a small part of the image to help fine-tune the print focus. You place this on the masking easel and look through it whilst focusing the enlarger.
The printing paper
For making enlargement prints, you use the same type of light-sensitive paper as for contact printing. In other words, it can have a plastic RC base and so be a fast processing type that uses the same process as outlined in Figure 36.5. Or you might prefer a fiber-based paper (better for mounting and retouching, but less readily available and slower to process and dry). The surface may be glossy or semi-matt (again better for any additional handwork later).
Contrast
You can control the contrast of your enlargement – normal, hard (more contrast), soft (less contrast) – in two ways. Either buy packets of graded paper – grade 1 (soft), grade 2 (normal) and grade 3 (hard), or instead use one packet of variable contrast or ‘multigrade’ paper and buy a range of filters to tint the enlarger light for each of the different grade effects. Using graded papers means you must buy several packets at once and it can mean that you may run out of a particular grade right when it is needed. ‘Multigrade’ paper is therefore a more economical approach (once you have bought your multi-contrast filters). In addition, you can make prints that differ in contrast between one chosen part and another.
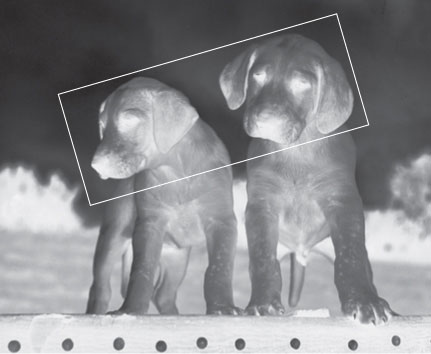
Figure 37.2 Positioning the test strip.
Making a test print
Start by picking a negative that has plenty of detail and a good range of tones (see Figure 37.2). Set the masking frame for the size of paper you are using. Position the negative dull side downwards so that the shot you want to enlarge fills the cutout part of the carrier. Check that there is no dust on the film surface (a can of compressed air is useful here) and then insert your negative into the enlarger. Fit a grade 2 filter (normal contrast) if you are using multigrade paper. Open the lens aperture fully. Switch on the enlarger and change the darkroom from ordinary light to safe lighting. You can now visually focus the projected image on the white easel surface, making further adjustment to enlarger height if necessary until the picture is exactly the size you want, and sharp. Close down the lens aperture by about two clicks (three clicks if the negative is pale, or one if rather dark). Switch off the enlarger.
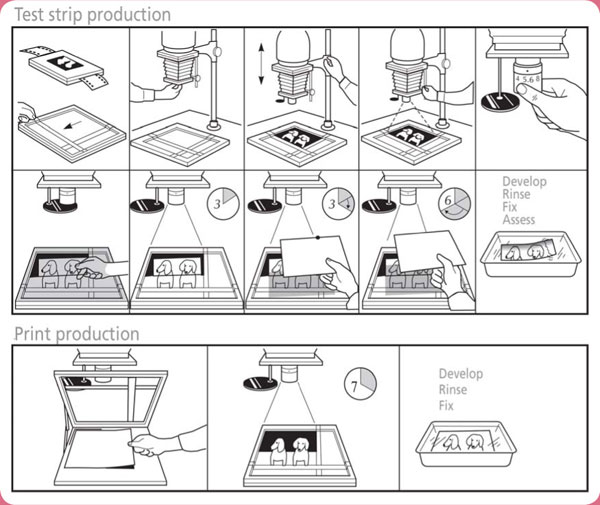
Figure 37.3 Enlarging. (Top sequence) Making an exposure test strip (see result in Figure 37.4). (Bottom row) Making the final enlargement (see Figure 37.5).
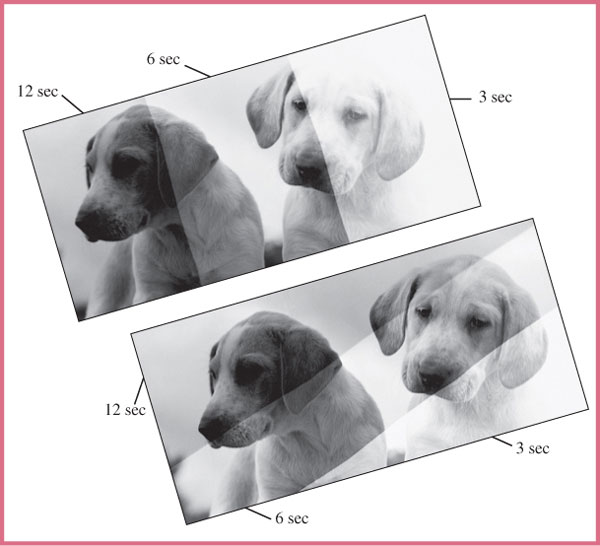
Figure 37.4 Processed series of test exposures – the bottom version gives the most information.
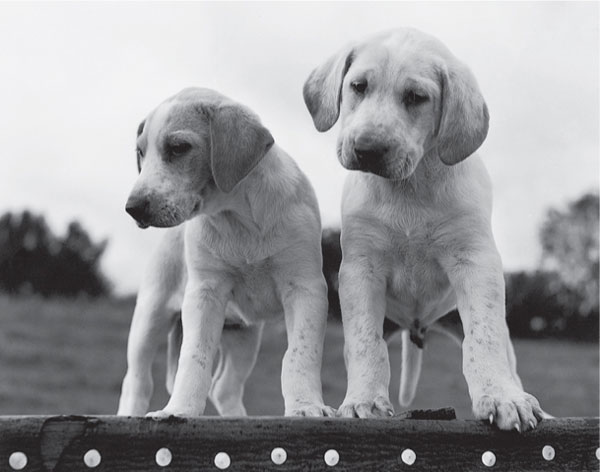
Figure 37.5 The final enlargement.
Cut or tear part of a sheet of your printing paper to form a test strip, and lay it face upwards on the easel, where it will receive an important part of the image (the puppies’ heads in Figure 37.2). Now, by shading with a piece of card, give the paper three different exposure times, in strips as shown in Figure 37.3. Carefully decide the most informative way for each strip of exposure to run. Don’t arrange them like the top test strip in Figure 37.4, which only shows you how the longest exposure affects one puppy and the shortest exposure the other. Instead, by making each band run lengthways, it allows you to discover how much each exposure time affects the tone of both the dogs.
To get this result, the whole test piece of paper was first given 3 seconds. Then, holding thick card an inch or so above it, two-thirds of the paper received 3 seconds more. Finally, the card was shifted to give the final third another 6 seconds. The combined effect was therefore to give strips of 3, 6 and 12 seconds. By holding the card quite still, a noticeable line of tonal change records on the print, which helps you pick out the different exposure bands when you judge results.
The test strip is processed in the same way as the contact sheet on the previous pages. You can then switch on normal lighting to decide which is the best exposure. If all three strips are too pale, make a further test using longer exposure times, or a wider lens aperture. In the example picture, an exposure time of about 7 seconds was judged correct for the puppies. So next a whole sheet was given this exposure and, when processed, produced the result shown in Figure 37.5.
Controls in printing
If you look along the middle row of pictures in Figures 37.6–37.17, you see what happens when a normal contrast negative is printed onto different contrast grades of paper. On grade 1 paper (or multigrade paper printed through a grade 1 filter) you get more grays between pure black and white than when using grade 3 paper (or a grade 3 filter on multigrade paper). Grade 1 is your best choice when you are printing a contrasty negative like the one in the bottom row. Similarly, you might use grade 3 for a flat, low-contrast negative. In other words, the contrast grade (or filter) of the paper compensates for negative contrast. Although not shown here, you can buy other graded papers or use further filters for multigrade paper, to give more extreme grades 0 or 5.
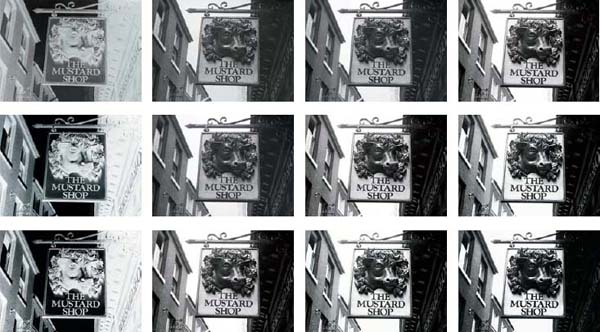
Figures 37.6–37.17 Low, normal and contrasty negatives (listed top to bottom).
Negatives printed on grade 1 (soft) paper; filter 0 or 1 for multi-contrast paper.
Negatives printed on grade 2 (normal) paper; filter 2 or 3 for multi-contrast paper.
Negatives printed on grade 3 (hard) paper; filter 4 or 5 for multi-contrast paper.
To get the best out of a set of negatives, expect to use at least three different contrast grades, or filters. Even with the most accurate film processing the range of subjects recorded on any one film means that differences in lighting and the subjects themselves are bound to result in negatives of differing contrasts. The usual way to decide which grade to use is by simply examining the contrast of the image projected on the white surface of your masking easel, and comparing it with how previous negatives have printed.
Don’t expect miracles, however, when your film exposing technique has been faulty. Very pale and flat negatives caused by underexposure and underdevelopment, and dark negatives caused by overexposure and overdevelopment, are both too lacking in shadow or highlight details respectively to be correctable by any contrast grade in printing.
Another reason for grades is to intentionally distort contrast. This may just be to give extra ‘punch’ and emphasis to a picture. Though the contrast in these types of pictures is not strictly ‘correct’, relative to the actual subject, manipulation of contrast can help to emphasize both shape and pattern in the final image.
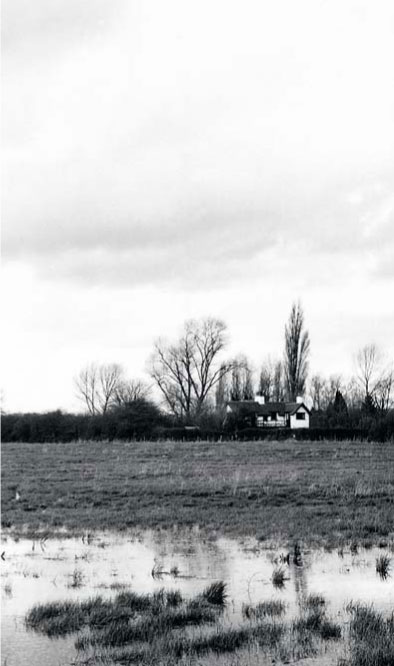
Figure 37.18 A ‘straight’ print shows washed out sky, although the land detail is reasonably correct.
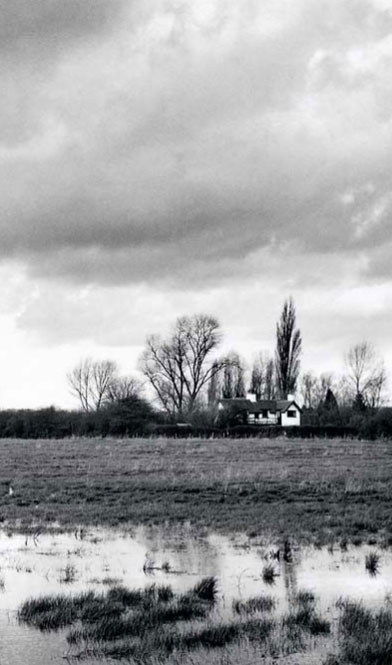
Figure 37.19 The same negative printed with an additional 12 seconds given to the sky (totalling 22 seconds here) prints in missing detail.
Since a longer exposure gives a darker print, it is possible to give extra exposure time to just part of the paper where you want to darken your picture. You can use this ‘printing-in’ technique to bring up detail in a pale sky, as in Figure 37.19. Of course, such details have to be present in the negative in the first place, but often cloud information is quite dense on the film and the sky records as white paper when you give your whole print correct exposure for ground details. Figure 37.18 was given a 10-second exposure all over. Figure 37.19 had the same exposure but then the sky alone was exposed for a further 12 seconds while an opaque card prevented light reaching the landscape portion of the picture.
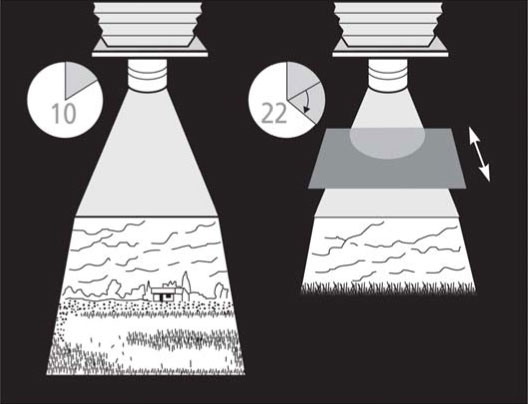
Figure 37.20 Printing-in sky detail.
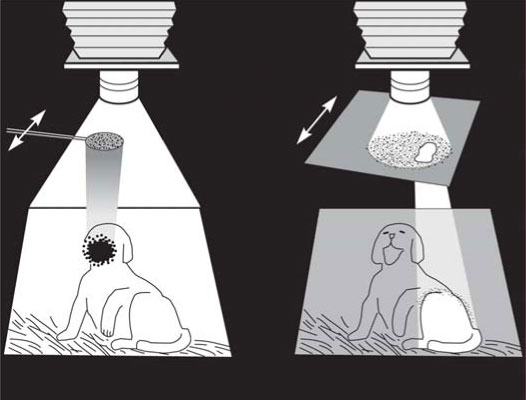
Figure 37.21 Shading with a ‘dodger’ (left) and printing-in using a hole in a card (right).
Unlike the making of test strips, you do not normally want a sharp-edged line to show where change of exposure has taken place. So, while you are printing-in, blur the line by keeping the card continuously on the move and holding it nearer to the lens than to your paper (see Figure 37.20). If you use multigrade paper it’s also possible to change filters between the main and printed-in parts of the exposure. In this way, landscape ground information can be printed with grade 2 contrast, but dense, low-contrast sky detail can be emphasized by being printed in grade 4.
Printing-in, or ‘burning-in’ as it is sometimes called, an entire sky is a useful technique, but you will more often want to darken some relatively small, isolated part of a picture – the over-lit side of a face perhaps, or the window part of a room interior. The best way to do this is to add your printing-in exposure with a card carrying a hole about the size of a small coin.
For the opposite effect – making an isolated central area paler, or ‘dodging’ – use a small disc of card taped to a thin but rigid piece of wire. You can then push this ‘dodger’ into the enlarger light beam a few inches above the paper during part of the main exposure, to keep back light from the area that prints too dark. Again, keep the dodger moving to ensure a soft edge to the tonal change in the final print.
The enlargement (Figure 37.22) was given a straight, overall exposure of 14 seconds. The result looks correct over most of the image, but the dog’s mouth is too dark and its hindquarters too light. The second version (Figure 37.23) also received 14 seconds, but during this time a disc-on-wire dodger was pushed into the light beam about 2–3 inches above the paper, and allowed to cast a shadow over the open mouth for 3 seconds. Then, when 14 seconds had elapsed, a card with a hole in it about the same size as the disc was used to give extra exposure to the dog’s hindquarters only, for another 5 seconds. In each instance, the dodger and the printing-in card were kept on the move.
Using this technique of adding and subtracting exposure, you can change the way that the tones in the final print are created. Careful photographers can use this approach to further enhance the appearance of their images and to help direct the viewer’s eye to the parts of the picture that are important.
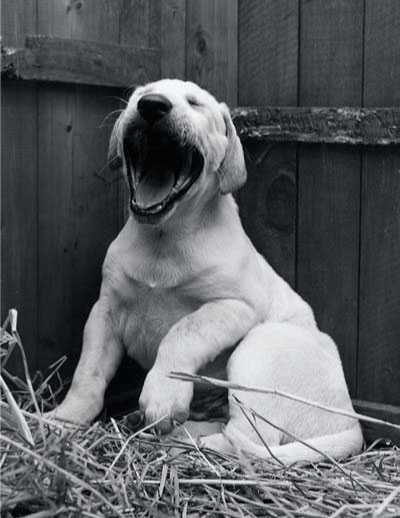
Figure 37.22 Straight print.
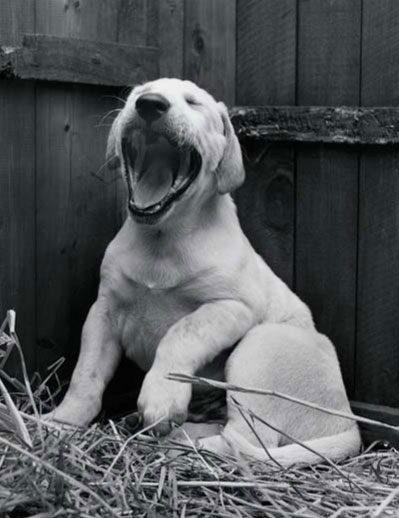
Figure 37.23 Corrected print.
Print faults to avoid
If your printing paper still just looks white after processing or carries a ghost-like pale image, you may have processed an unexposed sheet, or exposed it upside down, or put it in the fixer first … or it may simply be grossly underexposed. Perhaps your developer was exhausted, contaminated or much too diluted.
If the print goes dark all over, including its white borders, the whole sheet was fogged to light – maybe the safe light is too bright, or someone has opened the printing paper packet in room lighting? If borders remain white the fault is probably gross overexposure or light reaching the easel other than through the enlarger lens.
Figure 37.24 Print from unsharp negative.
Figure 37.25 Unsharp print from sharp negative.
Figure 37.26 Hair and debris on negative.
Figure 37.27 Damp finger-marks, solution splashes.
A yellowish all-over stain suggests that your print was developed for a very long period (possibly in exhausted developer) or has not yet fixed properly. Yellow or purplish patches are due to uneven fixing – for example, when prints are left face up and allowed to float to the surface of the fix solution.
Your print may show smears or blobs of darker or lighter tone (Figure 37.27) not present on the negative. The most likely cause is odd spots of water or developer getting onto the paper before processing. Perhaps your ‘dry’ bench was splashed with liquid, or you handled dry paper with wet fingers.
White specks or hairs and other clear-cut squiggle shapes, as in Figure 37.26, are often magnified debris on the negative itself – although they are sometimes due to dirt on the enlarger lamphouse condenser or diffuser, which only appears clearly at a small lens aperture.
If your enlargement is not quite sharp, check closely to see if the grain pattern of the negative has printed clearly; if it has (Figure 37.24), then the image shot in the camera was unsharp. But if the grain is also unsharp your enlarging lens is improperly focused (Figure 37.25).
Sometimes a print from a perfect negative reveals a double image – either overall or just some part you have printed in. This is because you jogged the enlarger or paper part way through exposure.
Double printing
Shading and printing-in also allows you to combine parts of several negatives into one picture. For Figure 37.28, the mouth negative was enlarged and exposed first, shading the child’s tongue and bottom left quarter the whole time. Then the negative was changed and the unexposed parts of the paper exposed to the train shot, this time shading the top and right-hand side of the paper.
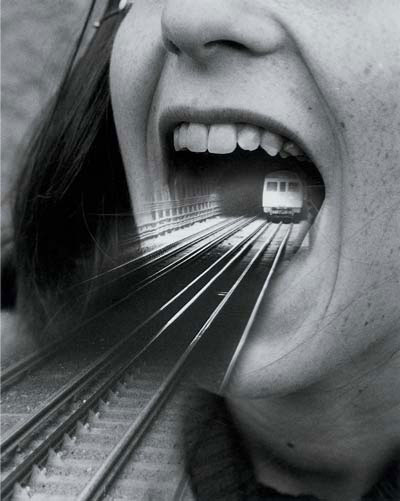
Figure 37.28 One print from two negatives.
Photograms
‘Photograms’ are pictures created from the shadows of objects placed directly on or above the paper. For Figure 37.29, the enlarger was set as if for contact printing, but instead of negatives, chocolate buttons were just scattered on the surface of the paper. Then, after giving half the exposure time needed for a good black, all the buttons were shifted around and the same time repeated. Figure 37.30 goes further, using three pressed leaves in a pile on the paper, two of which were removed in turn after 3 and 6 seconds of a 9-second exposure. After processing, this negative print was contact printed face down under glass onto another sheet of paper to give a positive result.

Figure 37.29 Chocolate button photogram.
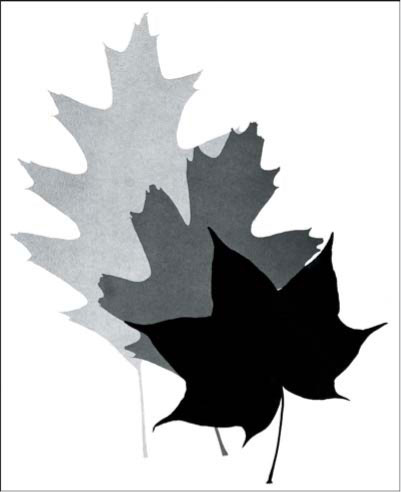
Figure 37.30 Print from photogram of leaves.
1 Create a series of photograms using household objects found in the kitchen or the garden shed. Remember that to create a variety of tones using this technique, you will need to remove objects at different times during the exposure.
2 To see the changes in contrast that different filters produce on multigrade paper, take the same negative and print it with 0, 2 and 5 filters. Keep in mind that most multigraded papers require a change in exposure (usually double) for the filter numbers between 4 and 5. Check the instructions that came with your paper or make a test strip for each print. A similar test can be produced using sheets of different graded papers if your darkroom is not set up for multigrade use.
3 Select a negative with interesting foreground detail that ends neatly at a distant horizon line. Choose another photograph with a good sky. Expose the first negative onto a portion of your photographic paper whilst shielding the upper portion of the print. Change negatives and then expose the second image on the upper section (whilst shielding the bottom).
4 Choose an underexposed negative (too light) that you have previously rejected because of its lack of detail and by using a high filter (or paper grade) number try to make an acceptable print. You can also try to rescue an overexposed negative (too dark) using different filter grades as well.
5 Select a landscape or cityscape picture with good foreground detail and a cloudy sky area that also contains detail but usually prints very pale. Expose the whole of the picture using standard filtration and then change to a higher filter number and print-in (burn-in) the missing detail of the sky with extra exposure. Be sure to shield the foreground part of the picture from the extra light.