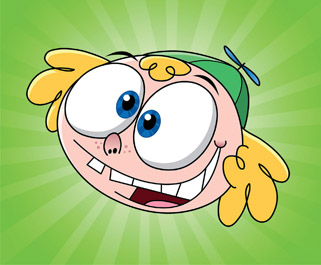
4
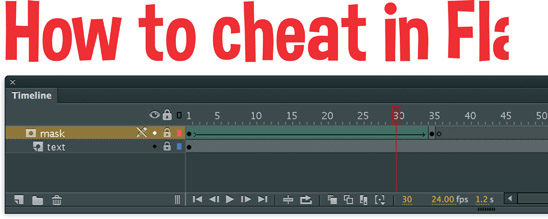
Masking
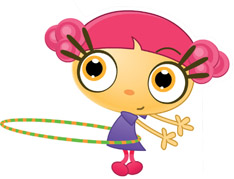
■ The hula hoop appears to be around the hulagirl’s waist, or is it? In the original image, above, the hula hoop is clearly in a layer above the hulagirl. By creating a mask for the hula hoop, we can hide the portion of it that overlaps the girl’s waist, making it appear to be around her.
MASKS ARE POWERFUL. THEY CAN BE USED IN MYRIAD ways to achieve limitless results. Masks can make your daily workflow easier, less time-consuming and, in most cases, become your most indispensable tool.
Having the ability to control the way two or more layers interact with each other through the use of masks is vital to your abilities as a designer and animator. The coolest thing about using masks in Flash is that not only do they help you to create stunning images, they can also be animated; a very powerful concept that can be mastered quite easily.
Rotating globe

WHENEVER I WORK WITH MASKS, I FEEL like a magician. Masks provide the ability for you to create illusions, much like a magician’s “sleight of hand” technique. It’s all about what the viewer doesn’t see and you, as the designer, have the ability to control that.
One of the more popular animation requests from Flash users is how to make a rotating globe. The first thought is that a globe is a sphere and to animate anything rotating around a sphere requires either a 3D program or painstaking frame-by-frame animation. Not so if you can use a mask. Remember, it’s not what you see, but rather, what you don’t see.

1 First step is to create the continents. A quick online image search will yield plenty of examples. Import the image into Flash and leave it as a bitmap, use the Trace Bitmap feature or manually trace it using Flash’s drawing tools. Convert it to a symbol.

2 Create a new layer and move it below your continents. Draw a perfect circle using the Oval tool ![]() while holding down the
while holding down the ![]() key. Select this circle and copy it, then paste it in place on a new layer above your continents.
key. Select this circle and copy it, then paste it in place on a new layer above your continents.
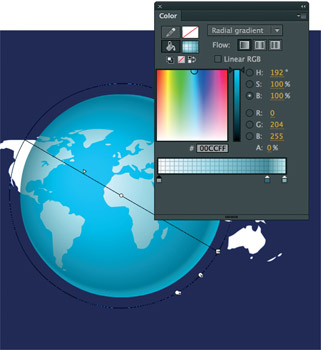
3 Mix a radial gradient similar to the one shown and fill the circle in the layer above your continents. Make sure to mix enough alpha into each color, so the continents will show through. Using the Gradient Transform tool ![]() , edit your gradient so that the highlight edge is off-center to one side.
, edit your gradient so that the highlight edge is off-center to one side.
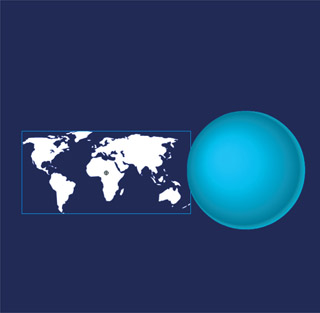
4 The next step is to create a mask layer using yet another copy of the circle in the bottom layer. Create a new layer above your continents, paste in place the circle and then convert this layer to a mask layer. This layer mask will prevent the continents from being visible outside this circle. All you need to do now is motion tween the continent symbol across this circle.

5 To avoid too much of a delay in the animation between the first and last frames, you can add a new masked layer with a new instance of your continent symbol. The best way to make this looping animation as seamless as possible is to copy the first frame of the continents and paste it in place into the last frame of your Timeline. Then work backwards in the Timeline and position the continents outside of the circle to the right.

6 Since the first frame is exactly the same as the last frame, and each frame in between represents a slightly different position for the continents, select the symbol in the last frame and use the arrow keys to nudge it over a few pixels. This will avoid the two-frame “hesitation” in the movement of the continents every time the playhead returns from the last frame to frame 1.
Hot Tip

You can always move your entire animation into a Movie Clip symbol so that it can be easier to position, add multiple globes and/or target with ActionScript. To make it a Movie Clip, drag across all frames and layers to highlight them in black. Right-click or Command-click over them and select “Copy Frames” from the context menu. Open your Library and create a new Movie Clip symbol. Right-click or Command-click over frame 1 of this new symbol and select “Paste Frames”.
Flag waving
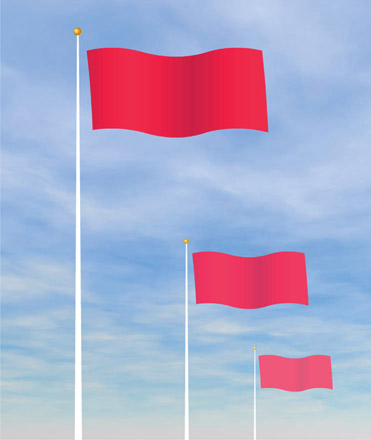
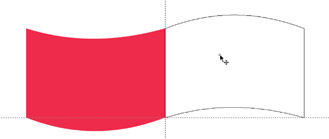
THE WAVING FLAG IS A POPULAR “how do I…?” request in the Flash community. To be honest, it plagued me for quite some time as to how best to achieve this animation. My initial reaction was to use shape tweens and frame-by-frame animation, but that proved time-consuming and had unconvincing results. Then one day, out of the blue, it hit me; if I slide the right shape across a masked area, I could create the illusion of a flag waving without having to kill myself animating it in a traditional way. It suddenly became so easy anyone can do it.
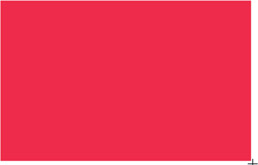
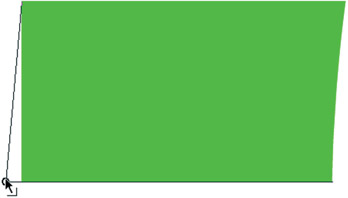
1 You will begin by making a nice long repeating ribbon shape. Start with a simple rectangle with any color fill and no outlines. Make it a little wider than it is taller.
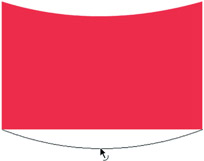
2 Use the Selection tool ![]() to bend the top and bottom edges slightly, so they have a nice arc to them. You will want to repeat this shape to create a pattern, so select it and copy it.
to bend the top and bottom edges slightly, so they have a nice arc to them. You will want to repeat this shape to create a pattern, so select it and copy it.
3 Paste your shape and then flip it vertically. Use the Selection tool to drag it so that it connects to the original shape. Once these shapes are joined together, select it and copy it.
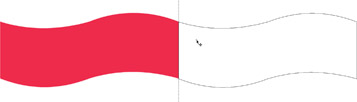
4 Repeat step three by pasting your new shape and flipping it vertically. Then attach it to the side of the shape again. See the ribbon pattern taking shape? But your ribbon is a solid color and lacking some depth, so let’s continue by adding some shading.
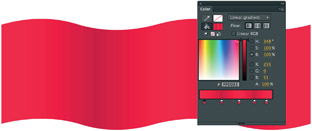
5 Mix two colors and add them to the Swatch panel. Mix a linear gradient with several color pointers alternating between these two color values. Fill your ribbon shape with this gradient and edit it so that the darker tones are in the concave sections of the ribbon shape.
6 Once you have the ribbon the way you want it, select it using ![]() , copy it using
, copy it using ![]() and then paste it using
and then paste it using ![]() . Align it edge to edge with the original shape to essentially double its length. Convert it to a symbol.
. Align it edge to edge with the original shape to essentially double its length. Convert it to a symbol.

7 Create a mask layer above the ribbon layer. Using the Rectangle tool, make a shape big enough to cover a section of the ribbon as shown. It helps to use a high contrast color.
8 Next, create a keyframe somewhere down the timeline and reposition the ribbon to the left of the mask shape. Apply a motion tween.
9 To create a seamless loop of the ribbon, copy and paste in place a new instance to a second masked layer (using the same mask). Motion tween it so that it follows the original ribbon shape without creating any gaps.
10 Test your movie using ![]() to see the effect of the flag waving as it passes through the mask. But let us not stop there. Let’s animate the mask using shape tweens to further emphasize the left and right edges of the flag waving. Use the Selection tool to bend the left and right edges. Create a keyframe further down the mask layer.
to see the effect of the flag waving as it passes through the mask. But let us not stop there. Let’s animate the mask using shape tweens to further emphasize the left and right edges of the flag waving. Use the Selection tool to bend the left and right edges. Create a keyframe further down the mask layer.
11 In this new keyframe, bend the left and right sides of the mask shape in the opposite direction. Apply a Shape tween. Repeat this procedure until the last frame is reached. The animated mask adds an extra animated touch to the overall flag waving effect. Presto! You are done.

12 Don’t forget to add a flag pole and sky background for an even more convincing illusion. Try placing this animation in a Movie Clip symbol and drag a few instances of it to the stage. Scale them and arrange them in perspective for the ultimate flag waving effect.
Hot Tip

This example is a looping animation. For best results, make sure the first and last frames are identical by using copy frames and paste frames or by copying the object in the first frame and pasting it in place in the last frame
Iris transition
ROAD KILL REMOVAL UNIT: COPYRIGHT MUDBUBBLE PRODUCTIONS
THERE ARE USUALLY SEVERAL WAYS TO go about creating the same animations and effects in Flash. Whether it be animated on the Timeline or dynamically generated using ActionScript, it allows us as users to work within our own comfort zones. A simple iris transition is an example of an effect that could be done several different ways. I personally wouldn’t know where to begin coding this kind of animation, but give me a Timeline and some keyframes and I am in my element. Using a mask for this example provides us with even more options; we can easily control the direction and focus of the iris itself, where it starts and where it ends. Animating the iris can be a nice touch to your storytelling if you want to focus the viewer’s attention to a very specific area of the screen.

1 First step is to create a simple circle using the Oval tool ![]() . The fill color is insignificant. Hold down
. The fill color is insignificant. Hold down ![]() while dragging to constrain its proportions. Do not convert this shape to a symbol but, rather, convert the layer to a Mask layer.
while dragging to constrain its proportions. Do not convert this shape to a symbol but, rather, convert the layer to a Mask layer.
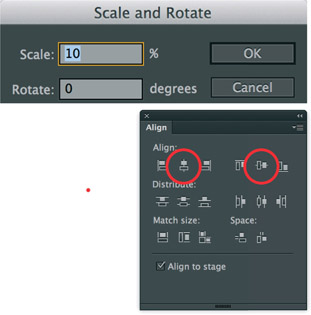
2 In frame 1, scale this circle as small as possible. Open the Scale and Rotate panel using ![]()
![]() , type in a percentage and click OK. Use the Align panel using
, type in a percentage and click OK. Use the Align panel using ![]() to center the circle to the stage.
to center the circle to the stage.
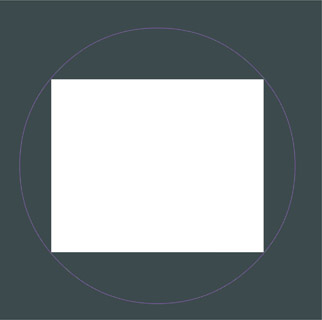
3 Create a keyframe a few frames down your Timeline in the same mask layer. Scale the circle so that it covers the stage completely. Convert the shape to outlines, so you can see the stage underneath it. Apply a Shape tween so that the circle grows from small to large, filling the stage completely.
4 Add a new layer and drag it over the mask layer, so it becomes linked to it as a “masked” layer. This layer is where your content will reside. If your content requires multiple layers, then make sure they are all masked or move all content into a new symbol and drag an instance of the symbol to the masked layer.
5 Create a new layer (not masked) below all the other layers and create a black rectangle the size and shape of the stage. The color can be anything you choose, but black typically works well for this type of effect. At this stage you can reverse the animated mask by copying keyframes in reverse order and applying another Shape tween.
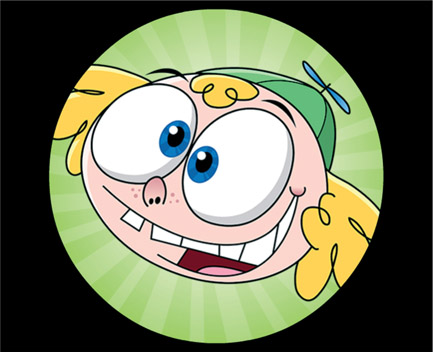
6 Since you are creating the iris effect with an animated mask, you can easily control the iris’ focus on a particular area of the stage. In the last keyframe, position the circle in the last frame over the character’s eye. When the animation plays, the iris will animate and close in on the eye, a typical technique used in several cartoons.
Hot Tip

Feel free to experiment with colors other than black. Sometimes radial gradients can add some fun depth to this transition effect. It is easy to substitute different colors or textures by changing the background layer art to whatever you want.
Handwriting
THIS ANIMATED EFFECT is one of my favorites because I am asked frequently how it can be achieved, yet it is quite simple in technique. Every time I demonstrate how to make text “write” itself, the reaction is almost always the same: “Oh wow! That’s all there is to it?”
The example here uses an animated mask which yields a very small file size, ideal for large blocks of text.

1 The first step is to type some text on the stage. It doesn’t matter what it says; just choose a font and start typing. By default, text fields in Flash are set to Dynamic. In some situations this setting may be fine, but when an effect is added to the text field, the text may not render correctly in the Flash player. Such effects include masking, alpha, rotation and scaling. If you need to use Dynamic text, embed the font outlines.
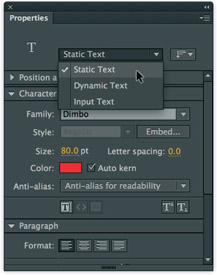
2 If you choose to change the behavior of your text field to Static, the font will be embedded in the compiled SWF, and the Flash player will render it correctly even with an effect added to it. Another option is to break apart the text until it becomes raw shapes. Breaking it apart will ensure the text renders correctly but also creates a larger file size, and it will be harder to edit the text if need be in the future.

3 Add a new layer above your text layer and convert it to a mask layer. The text layer will automatically be linked to it as a “masked” layer. In frame one, draw a rectangle just to the left of your text, making sure it is as tall as the text itself.

4 In this same layer, create a keyframe further down the Timeline and select the Free Transform ![]() tool. Hold down the
tool. Hold down the ![]() key while using the Free Transform tool to anchor the left edge of the shape in place. Grab the middle transform handle on the right side of the selected shape and drag it to the right until is spans the width of the text.
key while using the Free Transform tool to anchor the left edge of the shape in place. Grab the middle transform handle on the right side of the selected shape and drag it to the right until is spans the width of the text.
5 Now apply a Shape tween in between the 2 keyframes. Lock both layers and play the timeline to see the effect of the text appearing to write itself. If you want the animation to play faster or slower, insert more frames or remove frames respectively.
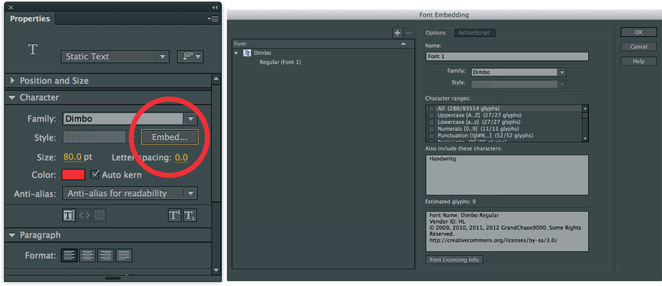
6 If you need to use Dynamic text, you must include the font outlines so that the text renders correctly in the Flash player. To embed the font, select the Dynamic text field and then click the “Embed…” button in the Properties panel. The Font Embedding panel will appear, allowing you to choose the range of characters used in your animation. Try to select the minimum number of characters because embedding all characters can increase file size significantly. There’s a section in the Options panel that allows you to type in just the characters that you are using on the stage. These are the only characters that will be embedded, and as a result keep the file size as small as possible.
Hot Tip

If you want a more realistic technique to make text look like it is writing itself, check out the frame-by-frame method in Chapter 7.
Spotlight
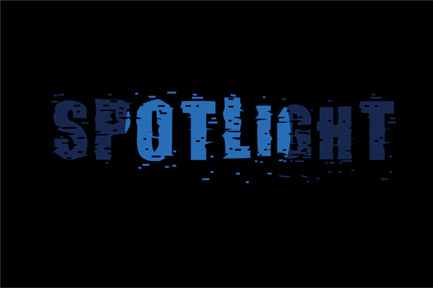
ANIMATED MASKS, AS WE’VE SEEN, CAN provide an interesting dimension to your animation. It really doesn’t take much effort to create various visual effects using an animated mask, such as this spotlight effect for a client’s logo.

1 The first thing you need is some text or other image where you can shine a spotlight. Convert it to a symbol. The background should be dark if not completely black. In order to show light, we first need to create darkness. This technique wouldn’t have the same effect if the background was very light.
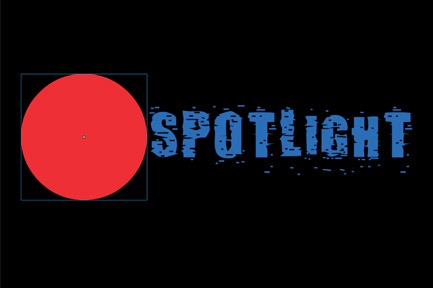
2 Create a new layer above your image layer and convert it to a mask layer. The image layer will automatically be linked to it as a “masked” layer. Draw a shape using the Oval tool ![]() while holding down the
while holding down the ![]() key to constrain its proportions. Convert it to a symbol.
key to constrain its proportions. Convert it to a symbol.
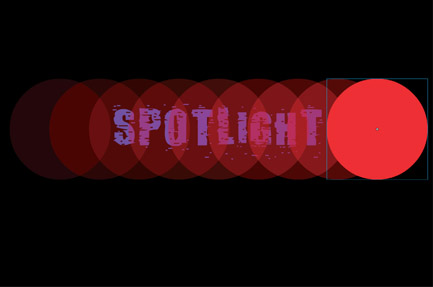
3 Add a keyframe further down the timeline and position the mask shape to the opposite side of the image. Apply a Motion tween so that the mask shape passes across the image.

4 The key to making this technique convincing is to copy and paste in place the image to a new layer below the original layer. Make sure it is a normal layer (not masked). Select the symbol and tint it to a dark color. This layer will not be affected by the mask.

5 Test your movie to see your animated mask pass over the original image layer while the darker instance remains unmasked and visible throughout the animation.
Hot Tip

Don’t be afraid to add more keyframes in your mask layer and place the mask symbol in various positions relative to the image it is revealing. You can also animate the mask getting larger and smaller by scaling it. Be creative and change the shape of the mask to say two circles side by side to suggest we are looking through binoculars.
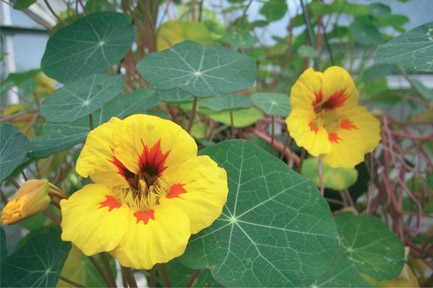
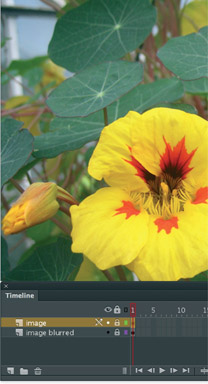
Focus

PHOTO: CHRIS GEORGENES
ONE OF THE MOST EXCITING features in Flash is the PSD and AI importer. Since CS3, we finally have wonderful integration between Photoshop and Illustrator alike. For this example we will edit an image in Photoshop, save it as a PSD file and import it into Flash via the PSD Importer wizard.
We will also add a slight touch of ActionScript for some added interactivity. If you suffer from ActionScript-phobia, don’t panic; adding only a couple of lines of code will be painless. If I can do it, you can as well. The code will simply hide the cursor in the Flash player and allow us to drag a Movie Clip around the stage. The trick here is the mask itself, allowing us to see the sharper image through the mask shape only. Open wide and say “Ahhhh”. This won’t hurt a bit.
1 First you need to start with an image, of course. This might be a good time to browse your hard drive or grab your digital camera. It doesn’t have to be a raster-based image or even a photograph. It can be vector art drawn in Flash or imported from a different program. Whatever image you choose, you will need two versions: the original and a blurred version of the original.
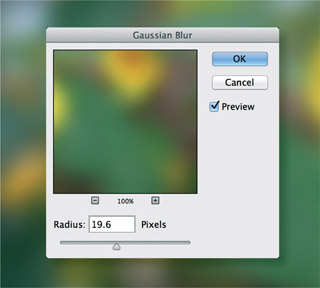
2 Open your image in Photoshop and duplicate its layer, so you have two copies of the same image. Apply a Gaussian Blur to one of your images. Save the file as a PSD file.
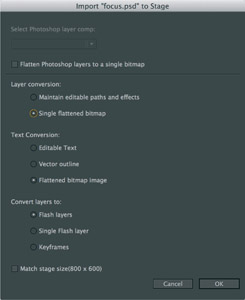
3 In Flash, import the PSD file you just created. The PSD import wizard will appear and prompt you with a variety of options. The left panel will display all the layers of the PSD file. Click on them to display options for each. You will also want to convert layers to Flash layers, place layers at original position and set your Flash stage to the same size as your Photoshop image.
4 Once the import process is complete, your Flash document should contain both images on different layers. Make sure the blurred image is below the sharper image.
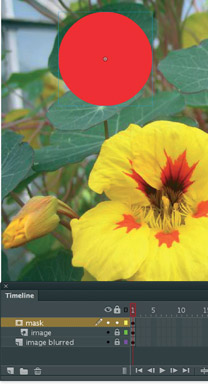
5 Create a new layer above the sharper image, draw a shape on that layer and convert it to a Movie Clip symbol. Convert that layer to a mask to automatically link it to the layer below. Both layers will be locked to show the effect of the mask.
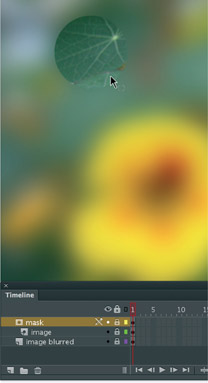
6 You are almost done! Lock all layers to see the effect. It works, but it is pretty boring as the mask just sits there. Time to add some functionality.
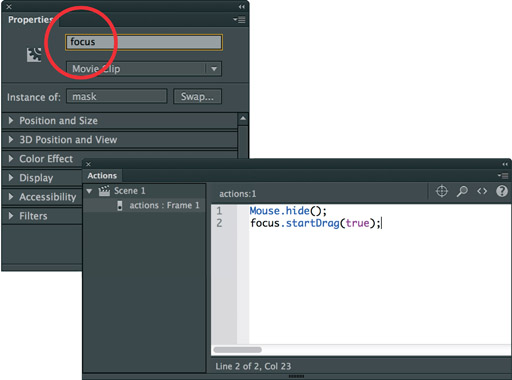
7 Use the Selection tool ![]() to select the Movie Clip symbol containing the mask shape. In the Properties panel, type in an instance name. I chose “focus” for this example. With the Movie Clip still selected, open the Actions panel and type the following
to select the Movie Clip symbol containing the mask shape. In the Properties panel, type in an instance name. I chose “focus” for this example. With the Movie Clip still selected, open the Actions panel and type the following
ActionScript exactly:
ActionScript 3.0:
Mouse.hide();
focus.startDrag(true);
Hot Tip

The shape of your mask doesn’t have to be a circle. It can be as simple or as complex as you wish to make it. Experiment in Photoshop with image effects beyond blurring. There’s enough to choose from to keep you busy for a while. I particularly like the Glass filter (Filter > Distort > Glass…).
Feathered mask (ActionScript)
PHOTOS: CHRIS GEORGENES
SINCE FLASH 8 AND THE INTRODUCTION OF A feature called “runtime bitmap caching”, we have had the ability to create masks with that desired feathered edge. I know that oftentimes when the designer world overlaps the developer world, things can get a little blurry. To be honest, even the most code-phobic designer can use ActionScript to integrate dynamic masks into their designs. All that is required is a few lines of very simple code.
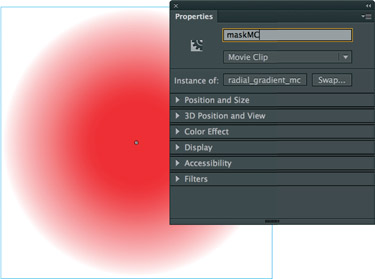
1 The first step is to create a radial gradient with two colors. The middle color should be solid and the outer color should be mixed with 0% alpha. The alpha transition from 100% to 0% will create the feathered edge that will later be used for the mask. Using this gradient as your fill color, select the Oval ![]() tool and draw a circle on the stage. To constrain the circle so that it is perfectly round, hold down the
tool and draw a circle on the stage. To constrain the circle so that it is perfectly round, hold down the ![]() key while dragging. Convert this shape containing your radial gradient to a Movie Clip symbol. With this Movie Clip symbol selected, give it the instance name “maskMC” in the Properties panel.
key while dragging. Convert this shape containing your radial gradient to a Movie Clip symbol. With this Movie Clip symbol selected, give it the instance name “maskMC” in the Properties panel.
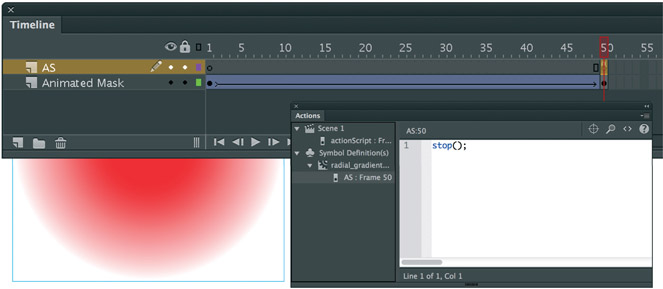
2 Double-click the Movie Clip to enter Edit mode. Select the radial gradient again and convert it to another symbol. Now we can create a nice transition effect by animating it. Using a tween, scale the symbol from very small to very large, large enough so that it covers the stage completely. Place a stop(); action at the end of this timeline.
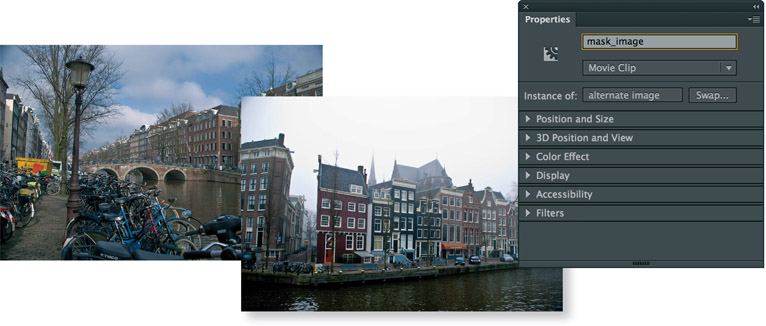
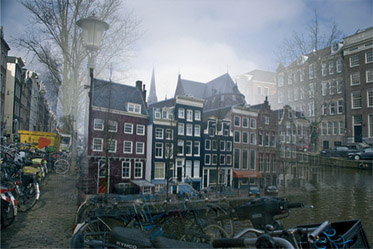
3 You will need two different images to make the transition. Here I have chosen images from my trip to Amsterdam as a speaker at FITC (Flash in the Can). Place both images on different layers, one directly over the other. For clarity, I will refer to these as “Image A” and “Image B”. Image A will simply reside on the bottom-most layer. Image B will be the one we reveal with the feathered mask using ActionScript.
4 Since the mask itself will be controlled with ActionScript, we will need to use actionScript to composite it to the image that will be revealed during the transition. Convert Image B to a Movie Clip symbol and give it the instance name “mask_image”. The only thing left to do is apply the code that tells the radial gradient to act as a mask and apply itself to Image B.
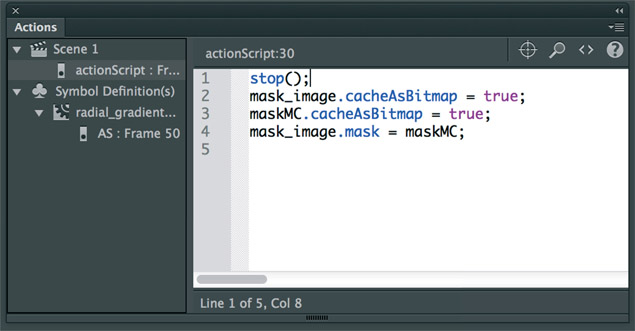
5 In the Actions panel (F9) type in the following code: mask_image.cacheAsBitmap = true;
This code caches the image so that it can be masked at runtime in the Flash Player.
maskMC.cacheAsBitmap = true;
The code on Line 2 will assign the Movie Clip “maskMC” to act as a mask at runtime.
mask_image.mask = maskMC;
This last line of code will assign the mask and the image to be composited together.
That’s all there is to it. Make sure you open the source file “feathered_mask_actionScript.fla” that you downloaded from www.howtocheatinflash.com to see this effect in action.
Hot Tip

Caching Movie Clip symbols has huge advantages in Flash. You will gain significant performance increases because there is less demand on the processor to calculate the math necessary to render certain property effects. Caching also allows for more advanced levels of compositing that can not otherwise be done in prior versions of Flash.
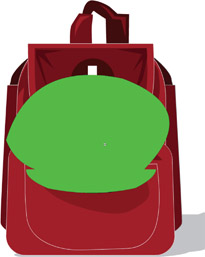
Medical pack

AS WE’VE SEEN THROUGHOUT this chapter, masks can be used to help create compelling animations. But often the best animated effects are a combination of different techniques that come together to perform a single effect. In this medical pack animation, I needed to animate the front pocket unzipping and then opening to reveal the items inside. I used a combination of Shape tweens, Motion tweens and an animated masks. Each of these techniques alone aren’t as compelling as when used together harmoniously.

1 The medical pack is drawn as vectors inside Flash. The front pocket and zipper are the only objects to be animated, specifically the zipper, the shadow and the white “stitching”. Each of these objects are placed on different layers.

2 The zipper requires just a horizontal motion tween across the pouch opening. The black shape represents the opening of the pocket. I created a Mask layer above the pouch opening and drew a thin green rectangle shape inside it.

3 Using a Shape tween, animate the green shape in the Mask layer to span the black pocket opening below it. Make sure the pocket layer is assigned to the Mask layer. Lock both layers and play back the timeline to see the mask reveal the black pocket, providing the illusion of it opening.
4 Create a second mask shape that generously occupies the area above the pocket. The mask is drawn in the same shape as the opening from step 3, as well as a larger area to accommodate the space the objects will eventually occupy.
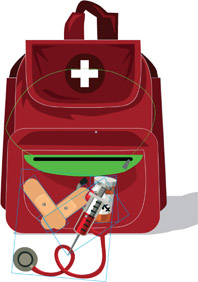
5 With the mask layer converted to outlines, we can position the objects “inside” the pocket just below the shape of the mask. The objects will not be seen because they are outside the area of the mask. Each object is a symbol on its own layer.
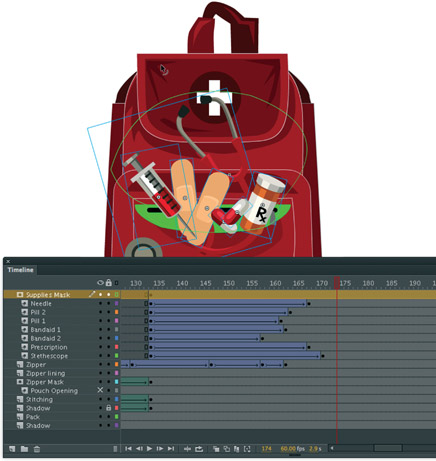
6 Using Motion tweens, animate each object vertically over the “opening” of the pocket area. As long as each object is inside the mask shape, they will be visible. If by chance one or more objects needs to animate beyond the shape of the mask, you can edit the mask shape to accommodate the space needed. Make sure each object layer is assigned to the Mask layer.
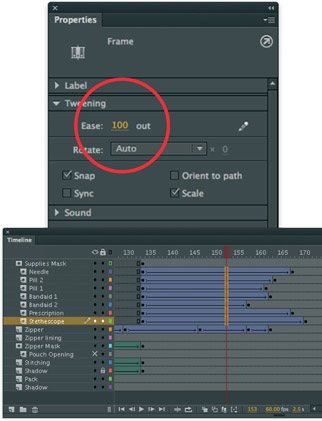
7 Add some Easing out to the Motion tweens and some rotation to each symbol. Lock both the mask and all masked layers to watch the objects appear to rise up from inside the pocket of the medical pack.

8 Here’s the final frame of the animated effect. The use of masks helped solve the issue of literally creating a pocket for the medical pack.
Hot Tip

The shadow of the pocket along with the white line that represents the stitching are animated using Shape tweens independent of the masks and masked layers. It’s just the extra steps I like to take to provide a sense of added realism to the animation.
Learning to be simple
ONE OF THE MOST DIFFICULT CHALLENGES FOR ME AS AN ARTIST WAS TO learn how to simplify my drawing style. Early in my career my work consisted of large scale lithographs depicting weeks of painstakingly complicated imagery. Spending days and often weeks on each print wasn’t uncommon for me. But if you asked me to whip up a simple cartoon character, I wouldn’t even know where to start.
Fact is, simplifying my drawing style didn’t come easily. I was thrown into the world of cartoon animation when asked to join an animation team at a local production company. They already had an established series on a popular cable network channel (Dr. Katz, Comedy Central), and my job was to design and animate a pilot for Dreamworks. It was a nice way to get thrown into the world of animation, resulting in a very diverse artistic direction for me. I embraced the challenge.
The next several years provided me the experience of designing and animating several successful television series and animated content for the Internet. We used Flash for everything, including storyboards, animatics, character and background design and, of course, animation. We were a paperless studio and Flash was our Swiss army knife of software tools. As Flash matured with each version, my skill level using it was maturing also.
Strict deadlines and cut-throat delivery dates meant working fast. Working fast meant keeping the drawing style simple, which I became very good at through practice. Not unlike a classical musician ending up performing children’s pop music, I had my fine art training to help pave the road to cartoon animation.

Ironically today, I am considered a cartoonist and character animator as opposed to a fine artist. The ability to draw with simple shapes and lines did not come easy to me. Admittedly, I continue to find it a challenge creating graphics that are iconic in style. To break down an image into a few simple shapes and have it still be appealing and even the least bit amusing is a daunting task. Sometimes I can nail it in a few minutes of sketching; other times it can take a few hours of pushing and pulling shapes until I think they work together. All too often my efforts get tossed aside and spend the rest of their lives stored on a cold and dark back-up hard drive. Being asked to author this book has granted me the opportunity to choose some of the more successful designs as feature topics for the sole reason that they help make the book more visually appealing. What you don’t see are the hundreds of failed attempts and design blunders I have created to reach this level in my career. There does exist an island of misfit characters where the majority of habitants are the result of my own
Michelangelo was once quoted as saying “I saw the angel in the marble and carved until I set him free.” As modest as he may have been, his perspective on design is timeless. Apply this thinking to your own approach when designing anything from a character, logo, background or even a website. All the best details are there in front of you; it’s everything else that needs to be removed.