8
Working with sound
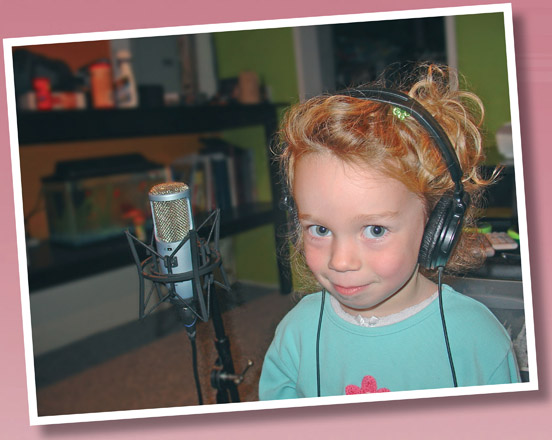
■ Having the ability to record your own high-quality sound effects, vocals and musical soundtracks opens up a world of artistic possibilities. Many of my daughter’s candid recording sessions have inspired popular original animations, one of which was chosen as a Flashforward Film Festival finalist.
FOR ME, ANIMATION IS ABOUT TIMING AND RHYTHM. I’ve always been visually sensitive to the moving image. As a drummer for the past 35 years, I’m very fixed on musical patterns. The combination of animation and the right soundtrack can be a wonderful experience for both senses. When the right sound complements the perfect animation, it can produce a most memorable experience for the viewer.
In this chapter, we’ll look at how you can incorporate sounds into your animations, where to find them, and how to record, edit and load them dynamically.
Recording sounds
SOUNDS CAN ENHANCE YOUR ANIMATION in wonderful ways. Recording and designing sounds is an art form all of its own and a job typically left to dedicated sound editors who have an innate ability to edit, mix and craft sounds into works of audible art. But chances are you don’t have a dedicated sound designer at your disposal 24 hours a day. Since Flash does not record or create sound files, you need to find or record your own and import them into Flash. So the best way to find, edit and incorporate sounds into your Flash projects is to purchase sound effects from your local music store or online. A quick search on Amazon.com for “sound effects” will return a few dozen audio CDs available for purchase. These are handy to have around but may include some legal restrictions as to how you can use the sounds. Some publishers may retain the royalty rights to the contents of CDs, limiting you to non-commercial usage. These limits may pose some legal issues for you and most importantly your client, who would rather avoid paying legal fees for a few thumps, swooshes and pops sound effects. Another potential issue with published sound effect CDs is their sound quality. Depending on the equipment used to record and edit the sounds, there is no guarantee they are of high enough quality to justify using them. It’s always a good idea to try to find out the technical information regarding the actual sound files before you purchase the CD. You will want sounds that are high quality, usually 44 kHz, 16-bit stereo. You may also want to edit your sounds by applying effects or editing loops, or you may even want to compose original soundtracks. For editing you’ll need to choose decent audio editing software. Some of you may already be using an audio editing application, but for those of you who are unfamiliar in the area, we’ll take a look at what’s available a bit later in this chapter.
Get yourself a good microphone. I’ll be honest – you get what you pay for when it comes to the quality of recording. There are several different microphones designed to record sounds for almost every situation imaginable. The cheapest solution would be something like the Logitech USB microphone that can be found at your local computer supply store for around $20 US. A microphone like that is great for transferring your voice during an Internet phone conversation, but I wouldn’t rely on it for high quality recordings.
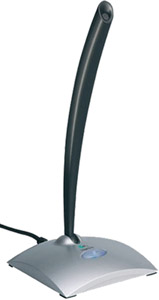
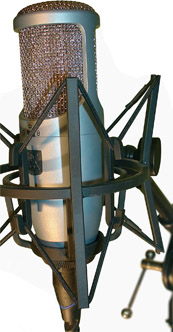
PHOTO: AKG PERCEPTION 400
On the other hand, you don’t need to spend your next five paychecks on the most professional studio microphone either. The microphone pictured on the right is an AKG Perception retails for around $249 US. It produces great sound whether you are recording voice, sound effects or musical instruments. It is a condenser microphone, which tends to be more sensitive and responsive, making it well-suited to capturing subtle nuances in sounds. The best feature of all is being able to switch between the three different recording settings depending on the recording situation. You can set it to record only what is directly in front of the microphone, which is great for voice, sound effects and instruments. If you have two voices or instruments next to each other, there’s a setting to record bidirectionally. The third is an omnidirectional setting that will record sounds in a 360 degree pattern around the mic. This setting is great for picking up general room or ambient sounds.
Next, you need a way to get your shiny new microphone to connect with your computer. Once again you have a variety of audio interfaces to choose from. Assuming you don’t need every bell and whistle available, a good choice is something like M-Audio’s FireWire Solo mobile audio interface. It has a standard XLR microphone input and a 1/2” guitar input, allowing you to record guitar and vocals simultaneously. There are also dual line inputs for effects, drum machines and other outboard gear. The biggest decision to make when purchasing an interface like this is whether you want to use USB or FireWire connectivity. FireWire may provide faster data transfer over USB, but double check that your computer’s hardware supports FireWire. If not, you can purchase a FireWire card separately.
So now how much can you expect to spend? An audio interface is between $200 and $400 US depending on how many features it offers. The M-Audio FireWire Solo mentioned here will set you back about $250 US, but I found one on sale for $200 at my local music vendor. Throw in a microphone stand and cable and you could be looking at spending around $600. Keep in mind this information is based on equipment I feel provides the best bang for your buck. There are many less expensive microphones to choose from, some with USB connectivity that avoid the need to purchase a FireWire interface. It’s a balance between the level of quality you prefer and the size of your budget.
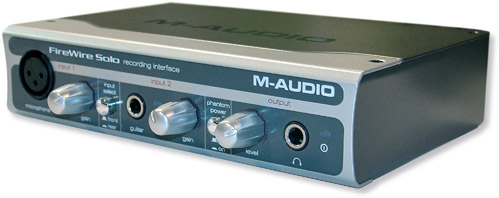
PHOTO: M-AUDIO FIREWIRE SOLO
Samson USB Microphones
CONDENSER MICROPHONE technology is becoming increasingly sophisticated. There are a number of quality microphones that connect to your computer using USB only. There’s no need to purchase additional hardware and cables and, in most cases the microphones are extremely portable due to their small size.
Any one of the following microphones is an affordable way for the casual or professional animator to capture high quality sounds for their animations. Learn more at samsontech.com.
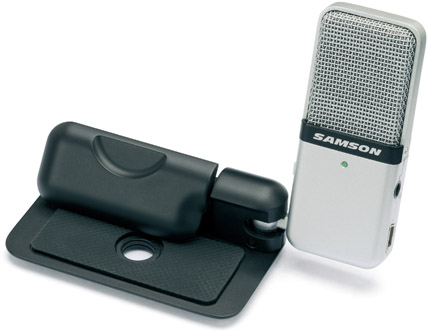
The best bang for your buck may be the Samson Go Mic. The Go Mic is a portable USB condenser microphone that literally fits in the palm of your hand. The microphone chassis alone is only two and a half inches in height and just over an inch wide. The microphone is attached to a weighted base using a ball joint, allowing it to be angled in almost any direction. The base can sit on any flat surface or be mounted to the top of your laptop screen using the integrated clip. The base has four integrated rubber feet to help limit external vibrations and a hole that lets you mount it to a microphone stand.
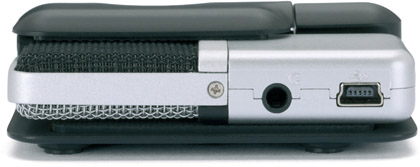
The Go Mic provides a 1/8-inch output, so you can connect your headphones. The Mini-B size USB connector is also located on the same side of the microphone.
The Go Mic comes bundled with Cakewalk Music Creator software, but I opted to stick with Adobe Audition because of my familiarity with it. The Go Mic is designed to work with a variety of editing software such as Apple Logic, Garage Band, Sony Sound Forge, Cubase and more. Out of the box, the Go Mic connected to my MacBook Pro was instantly recognized by OS X and Adobe Audition. No need to download drivers. The Go Mic just works. I was recording within seconds, and my initial spoken-word tests were surprisingly crisp and balanced.
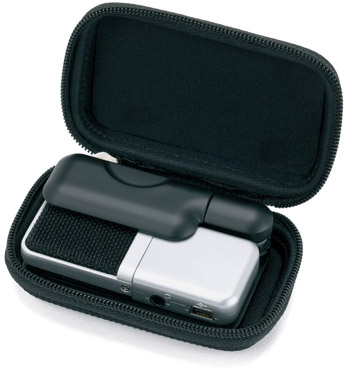
What good is portability if it doesn’t come with some form of protection when bouncing around the bottom of your laptop bag? Samson includes a zipper case with the Go Mic to eliminate the fear of the microphone getting dirty or damaged in transit.
You can also tailor the Go Mic to your recording environment by switching between cardoid and omni-directional polar patterns. The cardoid setting records sound in one direction while omnidirectional captures sound in all directions. Use the cardoid setting for recording vocals in front of the microphone. Sounds from the sides and behind the Go Mic will be rejected. Omnidirectional is great for situations where you are recording the environment - perfect for ambient sounds or live music situations. Good news for those of you on a limited budget; as of this writing, the Go Mic can be found on amazon.com for under $40 US. The Samson Go Mic is an outstanding product for recording high quality sounds with portability. With a Go Mic and a laptop, the world is your stage.
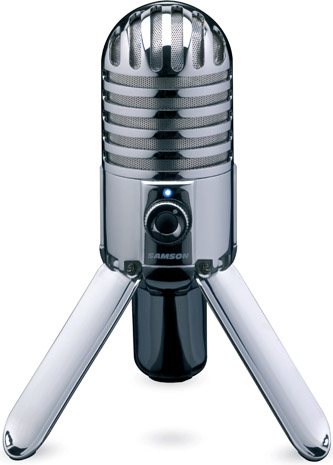
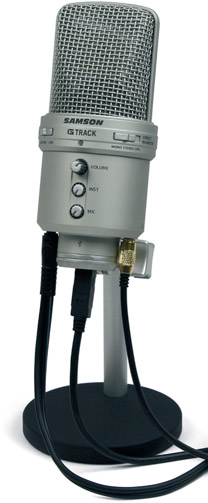
Other quality products from Samson are the Meteor Mic and G-Track microphones. Both are USB/condenser microphones with additional features that go beyond the Go Mic. The Meteor Mic (pictured left) has a large 25mm condensor diaphram (the Go Mic diaphram is 10mm). The G-Track (picured right) boasts a built-in audio interface and mixer and a 19mm diaphram. The power of the G-Track is its ability to record vocals and an instrument at the same time, making it ideal for studio musicians.
Audacity®

AUDACITY PRODUCT SCREEN SHOT(S) REPRINTED WITH PERMISSION FROM AUDACITY(R) SOFTWARE COPYRIGHT (c) 1999–2008 AUDACITY TEAM.
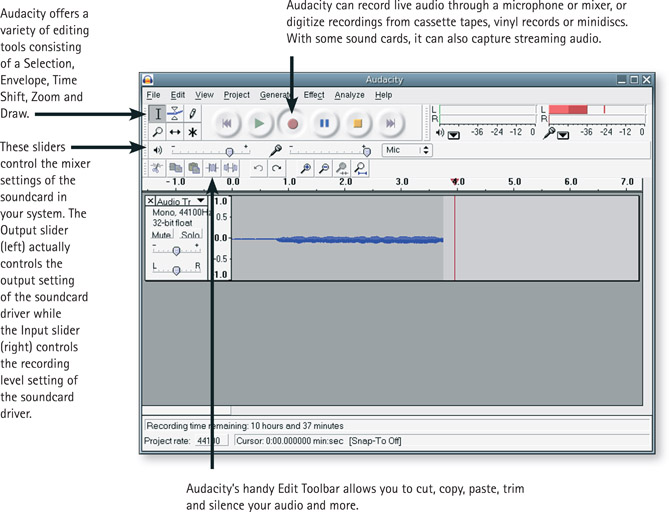
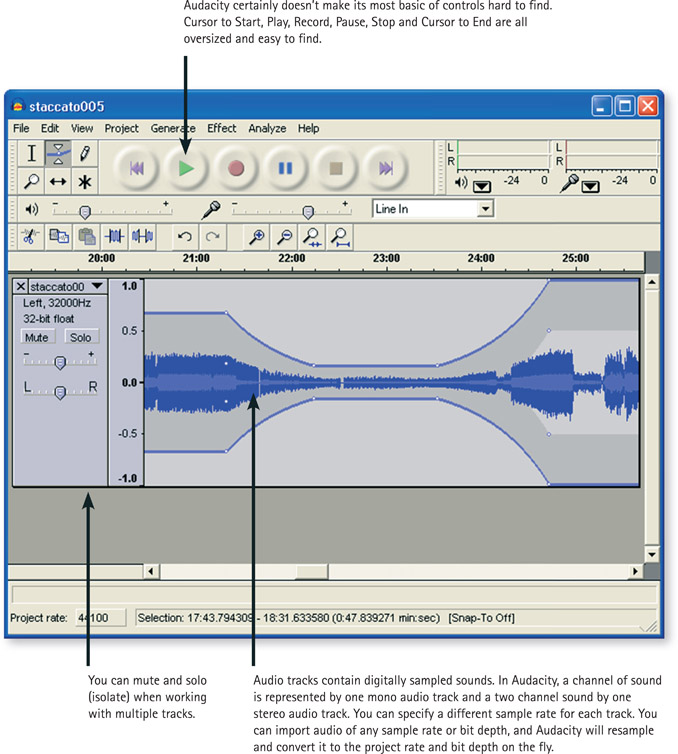
AUDACITY IS A FREE DOWNLOADABLE audio editing application that boasts a surprisingly robust feature set. Audacity can record live audio through a microphone or mixer, or digitize recordings from cassette tapes, vinyl records or minidiscs. With some sound cards, it can also capture streaming audio. Audacity supports several popular audio file formats, allowing you to cut, copy, splice and mix various files together as well as change their pitch and speed. If you have a limited budget, look no further – and even if youcan afford software that offers more, Audacity still might be enough to satisfy your needs. Go to http://audacity.sourceforge.net/ to learn more and download the installer.
Hot Tip
It’s free! I can’t think of a hotter tip than that. Audacity does a great job of handling a majority of your audio editing needs.
Adobe® Audition® CC
ADOBE PRODUCT SCREEN SHOT(S) REPRINTED WITH PERMISSION FROM ADOBE SYSTEMS INCORPORATED.
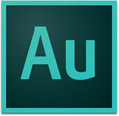
AUDITION IS A VERY robust audio editing program from Adobe that offers a fully integrated set of audio-editing and restoration tools. Audition is a complete audio-editing program, from recording and editing to mixing and exporting.
If you’re an experienced sound editor and composer, Audition delivers a full suite of features that rivals the competition. I use it for recording voice overs, sound effects and also sounds from my digital keyboard. I can then switch over to Multitrack View and mix all my sounds together using an unlimited amount of stereo mixing tracks. Audition offers over 50 real-time audio effects including echo, flange, reverb and more. You can even record and edit MIDI.
Simply put, if you need a complete audio studio out of the box, Audition delivers.
When I’m creating Flash animations for video export, I’ll often export a mixdown of the soundtrack from Adobe Audition in MP3 format to animate to in Flash. An MP3 version helps keep the FLA source file smaller. I’ll then export a mixdown of the soundtrack in high quality WAV or AIF format for when it comes time to edit the animation to the audio in Premiere Pro.
Sound in Flash
THE EDIT ENVELOPE WINDOW offers some limited sound editing features without having to leave the Flash environment. There are enough features here to control the starting and ending points of your sound file, as well as some basic fading effects. But don’t expect much more beyond that.
As much as Flash could use a few more bells and whistles in this area, it was never meant to be a sound editing program in the first place. Let’s leave that for the dedicated sound editing applications and use Flash for what it is. We can’t expect Flash to do everything, can we?
1 Select frame 1 in your Flash document, and then go to File > Import > Import to Stage and select your WAV or AIF file. Your sound will be in frame 1, but you will need to insert enough frames to accommodate its length. By default, the sound will be set to Event. Use the drop-down to change the sound’s behavior.
Event: This setting is used to play a sound at a particular point in time but independently of other sounds. An Event sound will play in its entirety even if the movie stops. An Event sound must be fully downloaded before it will play.
Start: This setting is the same as Event except that if the sound is already playing, no new instance of the sound plays.
Stop: This setting stops the selected sound.
Stream: This setting is used to synchronize a sound with the Timeline and, subsequently, the animation. Streaming sounds will start and stop with the playhead.

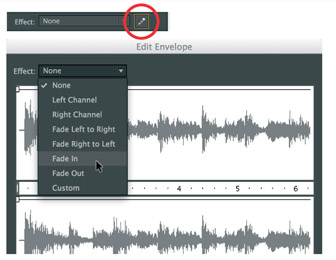
2 Click the Edit button in the Properties panel to open the Edit Envelope window. Here you will see the waveform of your sound file and a few basic control features. The Effect drop-down menu offers some convenient effects to add to your sound.
Left Channel/Right Channel: Plays sound in the left or right channel only.
Fade Left to Right/Fade Right to Left: Shifts the sound from one channel to the other.
Fade In/Fade Out: Gradually increases/decreases the volume of a sound over its duration.
Custom: Lets you create custom in and out points of sound using the Edit Envelope.
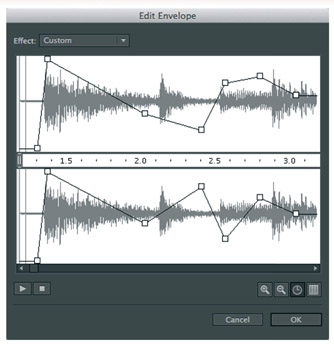
3 You can add up to eight envelope handles by clicking anywhere within the sound window. Each handle can be dragged around to control the volume of the sound at that point in the sound file. The higher the handle is positioned, the louder the sound. To remove a handle, drag it out of the window. To change the sound envelope, drag the envelope handles to change levels at different points in the sound. Envelope lines show the volume of the sound as it plays.
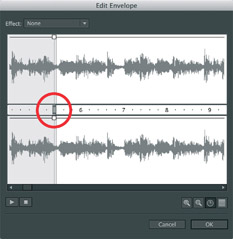
4 To change the start and end points of a sound, drag the Time In and Time Out controls in the Edit Envelope. The tricky thing about moving these points is, without the ability to scrub the waveform in the envelope window, it’s a game of hit or miss (mostly miss). If you need to continue a long sound file across multiple Scenes, you will have to add a new instance of the sound to each scene. Next, determine where the sound ended in the previous Scene and manually adjust the Time In controller for the current Scene so that the sound starts where the previous Scene ended. It’s not an exact science and not an ideal solution if your audio file is one continuous sound (such as a musical score).
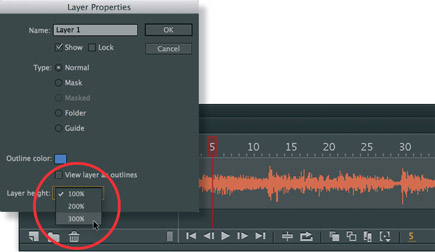
5 In some situations, having the ability to view the waveform is helpful. For example, having a clear visual indicator of when sounds start and stop can help speed up this tedious process. Right-click over the layer name containing your sound and select Properties from the context menu. In the Layer Properties panel, locate the Layer Height drop-down menu and select 300% to increase the height of the layer to its maximum.
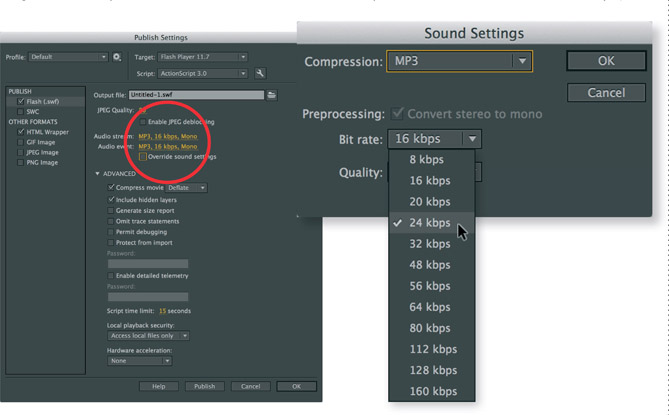
6 Many have experienced an issue with sounds when set to “stream” that manage to fall out of sync with the animation in the Flash Player. The only solution I have found to keep it in sync is to change the default MP3 compression in the document’s Publish Settings panel. Go to File >
Publish Settings and click on the Flash tab. The default MP3 compression is 16 kbps, Mono. Click the “Set…” button next to the “Audio stream…” and change the bit rate to 20 kbps or higher. I personally recommend 24 kbps as the minimum compression setting. Click “OK” and test your movie.
Hot Tip
Once the sound has been set to Stream behavior, you can then drag the play-head across the Timeline to hear your soundtrack. The default Event setting sends the sound to your system’s sound card and forgets about it. It is no longer part of the Timeline and will not maintain sync with any animation. The only way to stop an Event sound from playing while in the Flash authoring environment is to hit the Esc key. Event sounds are typically used with shorter sounds and attached to buttons.
Dynamic sounds (AS3)
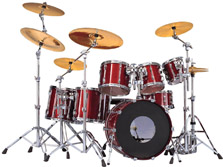
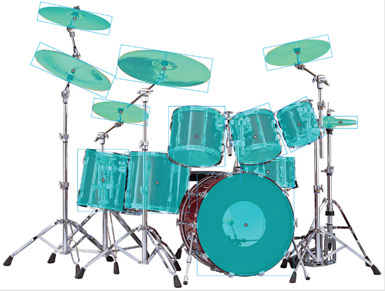
IT’S ALWAYS FUN WHEN SOUND and graphics come together to create an engaging and dynamic experience. This example uses ActionScript 3.0 to assign sounds to invisible buttons. The sounds are triggered when you roll over individual drums and cymbals. Each sound file in the Library is exported for ActionScript, allowing you to assign each sound to a different keyboard command as well. As a result, the Flash movie converts your keyboard to a musical instrument.
This example is just one of an infinite number of ways sound and ActionScript can be combined to create a fun, interactive experience.
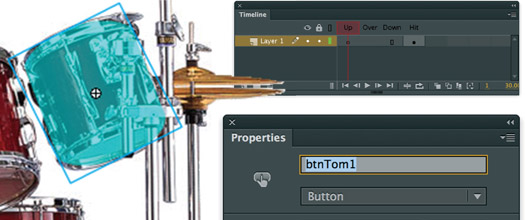
1 The first step is to create an invisible button for the area where you want to assign a mouse command. On a new layer above your image, draw a solid color in the same shape as your image. Convert the shape to a Button symbol and then double-click it to enter Edit Mode. Drag the Up keyframe to the Hit frame. The Hit state dictates the active area of the Button and will not be visible in the compiled movie. Back on the main Timeline the button is semi-transparent for editing purposes. With the instance of the Button selected, type in a descriptive instance name in the Properties panel, so you can assign some commands to it.
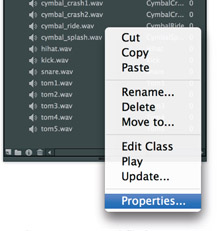
2 Import your sound file into your Flash document. In the Library panel, right-click over the sound and select Linkage from the context menu.
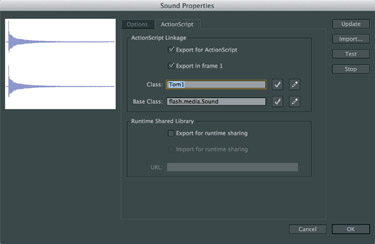
3 In the Linkage Properties panel, click the Export for ActionScript checkbox. That checkbox will automatically check the Export in the first frame for you. Provide a unique Class name. Here, I’ve named it “Tom1”. The Base class must be “flash.media.Sound,” but Flash is smart enough to fill that in for you. When you click OK, Flash may give you a warning about a missing class in the classpath. That’s the Tom1 class you just named, so let Flash generate its automatic fix. If you like, check “Don’t warn me again” to avoid a repeat warning. Click OK.
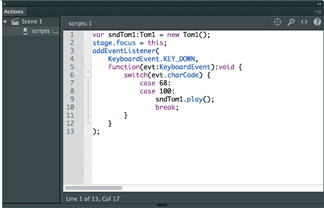
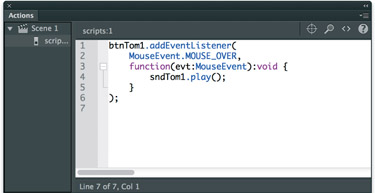
4 The first line creates a suitably named variable and sets it to an instance of Tom1. You’ll do this step for each sound clip class, which preps each sound for play. The other lines here show how to trigger the sound with a keystroke. Set the focus to the stage and then add a “key down” event that checks for the event’s charCode. In case it’s 68 or 100, play the sndTom1 sound. What are 68 and 100? These happen to be ASCII codes for the letter D. See asciitable.com for a chart (you’ll want the Dec column).
5 If you want to trigger the sound with a mouse movement, add the desired mouse event handler to your btnTom1 button and have the function play the corresponding Sound instance. Check out the sample file to see how easy it is to repeat this small block of code as often as necessary.
6 Now that you have created a hit area and assigned a mouse and key command to trigger a sound dynamically, repeat steps 1 through 5 for each additional sound you want to add to your project.
7 Open the Library, and you’ll find a total of 13 sounds, each exported to ActionScript and given a unique Class name. Open the Actions panel, and you’ll see all the ActionScript has been provided as well.
This example was written by David Stiller (quip.net) in AS3. He has also written a version in AS2 which has also been provided with the example files. We hope that these samples will provide a springboard for your own dynamic sound projects and experiments. Have fun!

Hot Tip

Choose instance names carefully to help “sort” things in your code. At a glance, it’s easy to see that the Tom1 class relates to the sndTom1 instance, which is a sound, and to the btnTom1 instance, which is a button.
My wish list for Flash CC
IK
Inverse Kinematics has been deprecated in Flash CC. It is down but not necessarily out. The Bone tool or something very similar could return to Flash someday. If we see an inverse kinematics tool in a future update, I’m hopeful it will boast new and improved pinning and morphing features.
Layer Parenting
This feature is found in other programs (After Effects and Toon Boom Animate) that allows you to drag and link layers to create a hierarchical relationship between them. This hierarchical relationship means that if I have a symbol of a hand on Layer 1 and a symbol of a forearm on Layer 2, I can drag the hand layer to the arm layer, and they will become linked together in a parent/child relationship. On the stage, if I tween the arm, the hand will follow – and most importantly on an arc.
Convert a range of frames and layers to a symbol
Wouldn’t it be great to have a button on the Timeline that when pressed, turns on brackets that work the same as the Onionskin and Edit Multiple Frames tools? But this feature would allow us to convert the range of frames across all layers to a Graphic or Movie Clip symbol.
Naming and organizing color swatches
This feature is found in other animation programs that allows you to name and organize color swatches.
After Effects-style timeline
The Motion Editor has been deprecated in Flash CC and may return in a future update after much needed redsigned. The Motion Editor panel demanded a lot of screen real estate and unless you had a second monitor, it was very cumbersome to use. One thought is to integrate the Motion Editor into the existing timeline in a style similar to the After Effects timeline.
A single tween model
As of CS4, the introduction of an additional tween model has been quite confusing for most newcomers to Flash. I get asked frequently what the difference is between the two tween models and when to use one tween type over the other. Fact is, the Motion tween is object-based while the Classic tween is frame-based. To the seasoned veteran Flash user, both tweens have their distinct purpose. But to the user just launching Flash for the first time, it’s not obvious as to what the differences are between the two tween models. A single tween model that combines all the features of both tweens would be an ideal solution.
Filters and Blend Mode support for Graphic symbols
Animators demand frame-accurate sequences, which is why Graphic symbols are favored over Movie Clips. As a result, animators seldom take advantage of the many filters and blend modes offered only for Move Clip objects. I would love to see these features carried over to Graphic symbols someday.
Layer properties
Having the ability to adjust the alpha transparency of an entire layer (and all the contents on that layer) across all frames and keyframes would be very useful. Add to that the ability to apply blend modes to layers and also merge layers together.
Graphic symbol management tools
Flash animators rely on the nesting of assets, especially animations within animations, etc. Managing these Graphic symbols can be blind work because the Flash Properties panel provides limited information as to the symbol’s nested content. It would be very valuable to scrub and see a thumbnail preview of the nested frames of a graphic symbol and then have the ability to display the desired frame on the parent timeline using the Properties panel.
There will always be features we’ll want to see added or improved in future versions of Flash, which is why Adobe offers us our own wishing well: adobe.com/cfusion/mmform/index.cfm?name=wishform
Feel free to drop in a coin or two and make your voice heard. The best part is, Adobe is listening.