2
Creating the Face
This chapter discusses three aspects of the face: proportions, character types, and facial expressions. Faces vary widely in shape and appearance, and they constantly appear at different angles, so there is a lot of information to learn. In costume design, figures are presented in full from head to toe. The face is only one-eighth of the whole body, but it is a very important part, because it reflects personality. In my drawings and designs, I put great effort in emphasizing facial expressions as well as figure movements and actions in order to produce attitudes and personalities that create real-life characters full of vivid spirit and soul. This helps me to present my design concept, define the characters of a play, and enhance the design presentation.
Common poses include front, side, and three-quarter views, and sometimes a back view is needed. I will use these different angles to explain the basic measurements and principles of the characteristic facial expressions. The three-quarter view is the most popular and beneficial view for costume design, because it is generally more descriptive and expressive than either the profile or front views. It shows a clear front view as well as a good portion of the back view while displaying a side-portion of the head and more of one cheek than the other. Also, it shows the three-dimensional masses of the brows, eyes, nose, cheeks, and jaws. The way I describe and divide the basic proportions of the face may be slightly different from the way other art books do because I use a simpler, easier method. I will start here with the basic proportions of the face, and then get into facial expressions.
PROPORTIONS OF THE FACE: FRONT, PROFILE, AND THREE-QUARTER VIEWS
When drawing the front view of the face, all the features should be symmetrically balanced and proportioned. When drawing the profile view, catch the detailed curves and angles, and keep the relationships between the features connected and accurately proportioned. When drawing the three-quarter view, perspective (foreshortening) of the view will be involved. Remember, the features are placed on a round three-dimensional mass, the head. Between the front and profile views, the centerline may take an intermediate position resulting in a three-quarter view that is curved and off-center.
Step One: Establish the Head as an Abstract Form or Mass
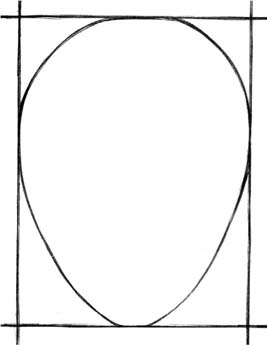
![]() The front view of the face can be developed by using a rectangle with proportions of about
The front view of the face can be developed by using a rectangle with proportions of about ![]() or
or ![]() (see Figure 2-1).
(see Figure 2-1).
![]() The proflie of the face can be developed by using a square (see Figure 2-2).
The proflie of the face can be developed by using a square (see Figure 2-2).
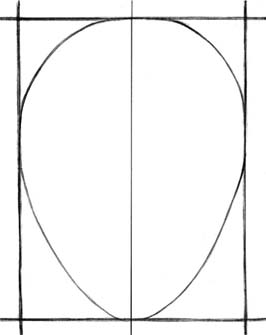
![]() The three-quarter view of the face can be developed by using a rectangle wider than the front-view rectangle but narrower than the side-view square, about
The three-quarter view of the face can be developed by using a rectangle wider than the front-view rectangle but narrower than the side-view square, about ![]() or
or ![]()
![]() (see Figure 2-3).
(see Figure 2-3).
![]() Treat the head as an oval shape inside a block. The block will help you recognize the three-dimensional shape of heads. Think of all the features as curving around the oval block, rather than being flat. This will help you to be aware of all the planes and perspectives of the features when drawing the head.
Treat the head as an oval shape inside a block. The block will help you recognize the three-dimensional shape of heads. Think of all the features as curving around the oval block, rather than being flat. This will help you to be aware of all the planes and perspectives of the features when drawing the head.
![]() Draw oval shapes in the front, profile, and three-quarter views for the basic head forms (see Figures 2-4 through 2-6). The oval in the profile view is placed from corner to corner in any direction. The oval in the three-quarter view can be placed in either direction.
Draw oval shapes in the front, profile, and three-quarter views for the basic head forms (see Figures 2-4 through 2-6). The oval in the profile view is placed from corner to corner in any direction. The oval in the three-quarter view can be placed in either direction.
2-1 Rectangle for Front View

2-2 Square for Profile View

2-3 Rectangle for Three-Quarter View

2-5 Placement of Oval Shape Inside Profile View Square

2-6 Placement of Oval Shape Inside Three-Quarter View Rectangle

Step Two: Block In the Features
The primary placement of the features determines the unique appearance of the face. When drawing a full figure, it is important to catch and emphasize the action lines; when drawing a face, capture the mood of the character and put particular feature changes in the right place to make them stand out.
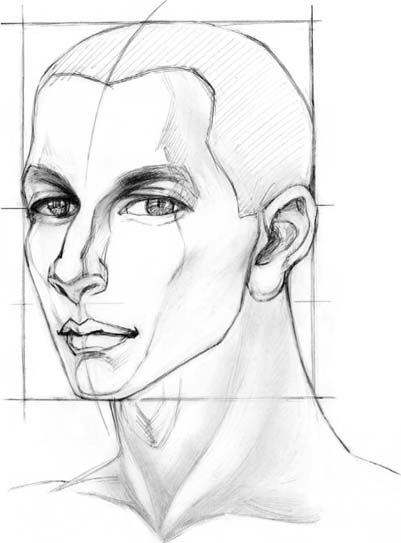
It is very important when developing a face to first block all the features, rather than drawing them one at a time. If the features are drawn separately, the result is often lopsided and unbalanced. Each individual feature may look perfectly fine, but when looking at the features as a whole, they are out of proportion. You must consider the features in relation to one another and establish the correct proportions to produce a balanced, realistic face. The placement of the features for front, profile, and three-quarter views is determined by the same rules, but the centerline in the proflie and three-quarter views becomes curved. Follow these steps:
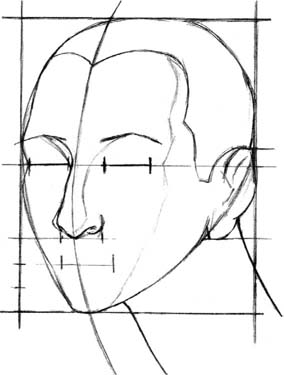
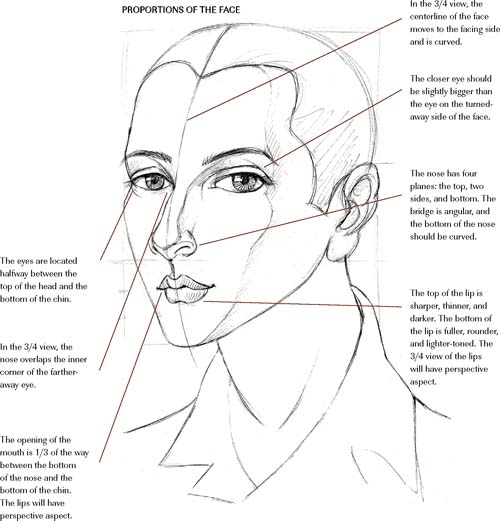
![]() To establish the placement of the features for the front view, draw a centerline running vertically inside the block. This will be the center of the face (see Figure 2-7). The centerline will be between the eyes and will divide the nose and mouth into equal halves. When the head moves to different views, the centerline moves as well. Thus, the centerline of the profile will be at the edge of the profile block (see Figure 2-8). In the three-quarter view, the centerline moves to either side of the block, depending on which way the head turns (see Figure 2-9). When facing left, the centerline moves to the left; when facing right, the centerline moves to the right. The centerline is curved, regardless of whether the head is facing left or right.
To establish the placement of the features for the front view, draw a centerline running vertically inside the block. This will be the center of the face (see Figure 2-7). The centerline will be between the eyes and will divide the nose and mouth into equal halves. When the head moves to different views, the centerline moves as well. Thus, the centerline of the profile will be at the edge of the profile block (see Figure 2-8). In the three-quarter view, the centerline moves to either side of the block, depending on which way the head turns (see Figure 2-9). When facing left, the centerline moves to the left; when facing right, the centerline moves to the right. The centerline is curved, regardless of whether the head is facing left or right.
![]() Draw horizontal lines inside each of the three oval shapes to indicate the placement of the eyes. The eyes are located halfway between the top of the head and the bottom of the chin (see Figures 2-10 through 2-12).
Draw horizontal lines inside each of the three oval shapes to indicate the placement of the eyes. The eyes are located halfway between the top of the head and the bottom of the chin (see Figures 2-10 through 2-12).
2-7 Placement of the Centerline for Front View
2-8 Placement of the Centerline for Profile View

2-9 Placement of the Centerline for Three-Quarter View

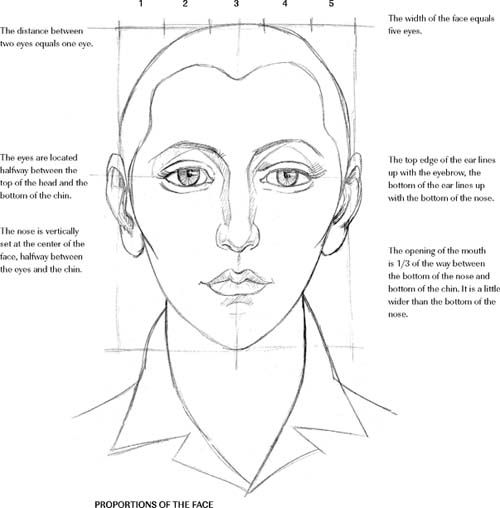
![]() In the front view (Figure 2-10), divide the length of the horizontal line into five equal parts. One part equals the length of an eye. The distance between the two eyes equals one eye.
In the front view (Figure 2-10), divide the length of the horizontal line into five equal parts. One part equals the length of an eye. The distance between the two eyes equals one eye.
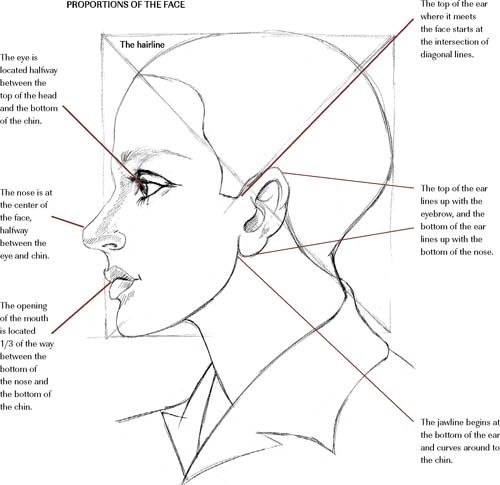
![]() In the profile view (Figure 2-11), draw diagonal lines running from corner to corner inside the square to establish the hairline and the top of the ear where it connects to the face.
In the profile view (Figure 2-11), draw diagonal lines running from corner to corner inside the square to establish the hairline and the top of the ear where it connects to the face.
![]() The nose is vertically set at the center of the face. Draw a horizontal line halfway between the eyes and chin to indicate the bottom of the nose. The width of the nose is a little bit wider than the distance between the two eyes.
The nose is vertically set at the center of the face. Draw a horizontal line halfway between the eyes and chin to indicate the bottom of the nose. The width of the nose is a little bit wider than the distance between the two eyes.
![]() Draw a horizontal line one third of the way down from the bottom of the nose to the chin to indicate the opening of the mouth. The width of the mouth is a little wider than the width of the nose.
Draw a horizontal line one third of the way down from the bottom of the nose to the chin to indicate the opening of the mouth. The width of the mouth is a little wider than the width of the nose.
![]() The top edge of the ear lines up with the eyebrow; the bottom of the ear lines up with the bottom of the nose.
The top edge of the ear lines up with the eyebrow; the bottom of the ear lines up with the bottom of the nose.
![]() The distance from the hairline to the eyebrows will be about equal to the distance from the bottom of the nose to the eyebrows.
The distance from the hairline to the eyebrows will be about equal to the distance from the bottom of the nose to the eyebrows.
![]() Add eyebrows above the eyes, according to the shape of the eyes.
Add eyebrows above the eyes, according to the shape of the eyes.
![]() As the head turns or tilts, the lines will change shape, direction, and position. As the head changes position, the distance between these lines will change, but they will still remain parallel to one another.
As the head turns or tilts, the lines will change shape, direction, and position. As the head changes position, the distance between these lines will change, but they will still remain parallel to one another.
2-10 Placement of Features in Front View

2-11 Placement of Features in Profile View

2-12 Placement of Features in Three-Quarter View
Step Three: Contour the Features
Contouring Eyes and Eyebrows (see Figure 2-13)
![]() The eye is formed around a sphere-shaped setting in the eye socket. The eyelids are wrapped around the eyeball in a curve that shows the contour of the three-dimensional eyeball.
The eye is formed around a sphere-shaped setting in the eye socket. The eyelids are wrapped around the eyeball in a curve that shows the contour of the three-dimensional eyeball.
![]() The upper eyelids look darker and thicker than the bottom eyelids because of the eyelashes and cast shadows. Following the shape of the upper eyelids, draw a curved line to create a double eyelid.
The upper eyelids look darker and thicker than the bottom eyelids because of the eyelashes and cast shadows. Following the shape of the upper eyelids, draw a curved line to create a double eyelid.
![]() The side view of the eye is a curved line formed around the eyeball.
The side view of the eye is a curved line formed around the eyeball.
![]() The three-quarter view of the eye will have a perspective aspect. The eye that is turned away should be slightly smaller than the closer eye.
The three-quarter view of the eye will have a perspective aspect. The eye that is turned away should be slightly smaller than the closer eye.
![]() The iris is a perfect circle, but the top of the iris is partially covered by the upper eyelid when motionless. You should never color the iris in solid, because that will cause the eye to lose its life and sparkle. The eyes mirror emotions and moods and are the windows to the spirit of the soul. They are crystal-like; highlighted spots are always favorable.
The iris is a perfect circle, but the top of the iris is partially covered by the upper eyelid when motionless. You should never color the iris in solid, because that will cause the eye to lose its life and sparkle. The eyes mirror emotions and moods and are the windows to the spirit of the soul. They are crystal-like; highlighted spots are always favorable.
![]() Eyelashes are not all the same length. The inner part of the eyelashes is shorter than the outer corners. They grow along the eyelids, curved up on the top eyelid, and curved down at the lower eyelid.
Eyelashes are not all the same length. The inner part of the eyelashes is shorter than the outer corners. They grow along the eyelids, curved up on the top eyelid, and curved down at the lower eyelid.
![]() Eyebrows grow above and protect the eyes. Eyebrow shape follows the shape of the eye. The middle part of the eyebrow is thicker and darker than the ends because the eyebrow hairs overlap each other. Don't draw the eyebrow as a solid thick line.
Eyebrows grow above and protect the eyes. Eyebrow shape follows the shape of the eye. The middle part of the eyebrow is thicker and darker than the ends because the eyebrow hairs overlap each other. Don't draw the eyebrow as a solid thick line.
2-13 Contouring Eyes and Eyebrows

Contouring the Nose (see Figure 2-14)
![]() The nose is symmetrically set in the center of the face. There are four basic planes that structure nose shape—the top, the two sides, and the bottom. It is narrower at the top and wider near the bottom. The profile of the nose is easiest to draw, whereas the frontal view is most difficult. The three-quarter view of the nose usually overlaps with the corner of the eye farthest away. Only three planes of the nose are visible in the three-quarter view. Angular and straight lines should be used for the middle of the nose bridge; curved and less angular lines should be used for the bottom of the nose. Applying some shadows around the nose bridge will help to define the shape.
The nose is symmetrically set in the center of the face. There are four basic planes that structure nose shape—the top, the two sides, and the bottom. It is narrower at the top and wider near the bottom. The profile of the nose is easiest to draw, whereas the frontal view is most difficult. The three-quarter view of the nose usually overlaps with the corner of the eye farthest away. Only three planes of the nose are visible in the three-quarter view. Angular and straight lines should be used for the middle of the nose bridge; curved and less angular lines should be used for the bottom of the nose. Applying some shadows around the nose bridge will help to define the shape.
Contouring Ears (see Figure 2-14)
![]() Keep the ears simple. They should never be the prominent feature. The ears stand out from the side of the head and slant back at an angle. The top edge of the ear lines up with the eyebrow; the bottom of the ear lines up with the bottom of the nose and merges with the jawline. Contour lines of the ear overlap one another. Some lines overlap in the front, and some lines stay behind to show the particular curves and shapes of the ear.
Keep the ears simple. They should never be the prominent feature. The ears stand out from the side of the head and slant back at an angle. The top edge of the ear lines up with the eyebrow; the bottom of the ear lines up with the bottom of the nose and merges with the jawline. Contour lines of the ear overlap one another. Some lines overlap in the front, and some lines stay behind to show the particular curves and shapes of the ear.
Contouring the Mouth (see Figure 2-14)
![]() The mouth displays a large amount of emotional expression. The degree of change can be from subtle to extreme. The upper and lower lips are different in shape. The shape of the upper lip is usually sharper, thinner, more curved, and darker-toned, because of the shadow cast from natural light; the bottom lip is usually fuller, rounder, and lighter-toned. The three-quarter view of the lip should have perspective aspect.
The mouth displays a large amount of emotional expression. The degree of change can be from subtle to extreme. The upper and lower lips are different in shape. The shape of the upper lip is usually sharper, thinner, more curved, and darker-toned, because of the shadow cast from natural light; the bottom lip is usually fuller, rounder, and lighter-toned. The three-quarter view of the lip should have perspective aspect.
2-14 Contouring the Nose, Ear, and Mouth

Contouring the Outline of the Face (see Figures 2-15 through 2-20)
![]() The shapes of the forehead and hairline are related to each other, because if the hairline is higher, the forehead will be larger, and vice versa. The hair along the temple has little peaks, and the temple area slightly dents in.
The shapes of the forehead and hairline are related to each other, because if the hairline is higher, the forehead will be larger, and vice versa. The hair along the temple has little peaks, and the temple area slightly dents in.
![]() The widest part of the face is the cheekbone area. The contour lines of the cheek overlap with the jawline, since the cheeks are more prominent than the jaws.
The widest part of the face is the cheekbone area. The contour lines of the cheek overlap with the jawline, since the cheeks are more prominent than the jaws.
![]() The jawline begins from the bottom of the ear and curves around to the chin.
The jawline begins from the bottom of the ear and curves around to the chin.
Contouring the male face follows the same principles as contouring the female face except that the contour lines on the male face are more angular and firm. The differences between the male and female face include the following:
Face:
M: egg- or rectangular-shaped with an angular jawline
F: egg-shaped with a pointed chin and a smooth, curved jawline
Eyebrows:
M: natural, usually thicker and angular in shape
F: fine and curved, usually plucked or outlined with makeup
Space between the eyebrow and eye:
M: narrow space
F: wider and more spacious
2-15 Contouring the Head and Facial Features; Front View, Female
M: angular with a well-defined nose bridge and nostrils
F: well-defined with soft curves
Lips:
M: well-defined, thick and angular
F: well-defined with soft curves
Neck:
M: thick and muscular, more skeletal, shows two sternocleidomastoideus muscles, neck outline usually starts between outer corner of eye and outline of side face, noticeable throat bones
F: thin and smooth, outline of neck usually lines up with outer corner of eye, throat bones are less visible, the sternocleidomastoid muscles much smoother
2-16 Contouring the Head and Facial Features; Profile View, Female


2-20 Contouring the Head and Facial Features; Three-Quarter View, Male
Create shadows and reflecting lights to emphasize the three-dimensional structures of the bottom of the nose and chin. Cheekbones can be defined by subtle shadows, but do not over-stress them.
The positions of facial features are associated with the turning of the head and face. I discussed the relationships between the head, chest, and pelvis masses in Chapter 1. I also discussed how the arms and chest move as one unit, and how the legs and pelvis move as the other unit. Among these masses, the head is most visible. The head, face, and facial features are also related to one another as a unit. When the head turns or tilts in a certain direction, the facial features will follow. The head and face have subtle planes in a three-dimensional egg-shaped form. All the features sit on an egg- shaped curved surface, not a two-dimensional fat surface. When the head is in a straight position, the centerline of the face is straight and all the features are lined up with horizontal lines, as explained earlier. When the head turns up or down, or left or right, the horizontal lines curve (see Figures 2-21 and 2-22). If the head turns up, larger portions of the bottom of the nose, lip, and chin will show, compared to the top. Also, the distance between the features shortens as the head turns. The same philosophy occurs when the head turns down (more of the top of the head, forehead, nose bridge, cheeks, lips, and chin will be seen). The amount of top and bottom portions of each feature seen is based on the degree that the head turns. If you block all features together, situate them in relation to one another first, balance the proportions of the features, and remember that the face is not a fat surface, you will not make mistakes when drawing a face.
2-21 Head in Different Positions


TYPES AND CHARACTERISTICS OF FACES
Clearly, the face is an important part of the human body—it identifies who you are, conveys emotions, and exhibits new fashions in current hairstyles and makeup. Today, especially in the United States, there is a diverse society. Theatre productions, films, television shows, and the fine arts strongly refect this multicultural uniqueness—a globalized universe requires the ability to draw different facial features and body types. A costume designer should not only portray the beauty of the costume, but should also be capable of creating a figure of any ethnicity.
Every race has a distinct and unique face. The following discussion is based on my studies and observations of faces through living abroad, watching movies and television, and interacting with people from different cultures. Living in the United States actually has helped me to understand my own culture better. This opportunity shaped and inspired me to create my own unique characterization of design.
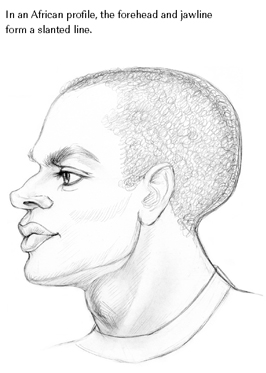
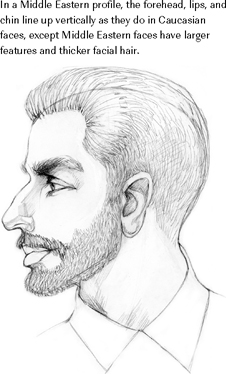
If you use the profile view to start the four face types, you will immediately notice the differences between them. Use a vertical line as a guideline (see Figure 2-23). In Caucasian profiles, the forehead, lips, and chin line up in a vertical line. In African profiles, the vertical line is at an angle because of the forward jawlines. The Asian profile line angle is between the Caucasian's and African's line. In Middle Eastern profiles, facial features line up the same as they do in Caucasian profiles, except that Middle Eastern faces have larger features and thicker facial hair. The vertical line is used as a drawing guide, but adjustments will be made when the face is tilted or in up or down positions.
As examples, I discuss four major ethnic groups (see Tables 2-1 through 2-4).
2-23 Characteristics of Faces

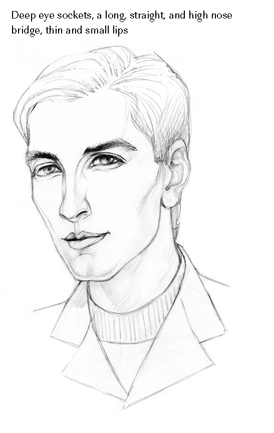
| Table 2-1 | Characteristics of Caucasian Faces (see Figures 2-24 though 2-26) |
|---|---|
| Face shape | Egg- or oval-shaped |
| Face color | Pinkish or white |
| Eyebrow texture | Medium-thick and well defined |
| Eyebrow color | Black, shades of brown, red, and blonde |
| Eye shape | Large with a double eyelid and long eyelashes; deep eye socket |
| Eye color | Black, dark brown, brown, blue, green, or hazel |
| Nose shape | Long and straight with a high nose bridge |
| Lip shape | Well defined; generally small and thin |
| Lip color | Red or pinkish |
| Hair | Wavy or straight, fine, colored |
2-24 Characteristics of a Caucasian Face, Female Profile

2-25 Characteristics of a Caucasian Face, Male Front View

2-26 Characteristics of a Caucasian Face, Three-Quarter View
| Table 2-2 | Characteristics of African Faces (see Figures 2-27 though 2-29) |
|---|---|
| Face shape | Egg-, oval-, or rectangular-shaped |
| Face color | Dark, dark brown, brown, or light brown |
| Eyebrow texture | Medium-thick and wel defined |
| Eyebrow clolor | Black, dark brown, brown |
| Eye shape | Large with double eyelid and long eyelashes; deep eye socket |
| Eye color | Black, shades of brown |
| Nose shape | Angular or curvy with an elevated nose bridge; wider nostrils |
| Lip shape | Well defined; thick and luscious; jaw is forward |
| Lip color | Darker color in upper lip, red or reddish-brown in lower lip |
| Hair color | Black or dark brown |
| Hair type | Thick; small and tight curves, medium-thick facial hair |
2-27 Characteristics of an African Face, Male Profile
2-28 Characteristics of an African Face, Female Front View

2-29 Characteristics of an African Face, Male Three-Quarter View

| Table 2-3 | Characteristics of Asian Faces (see Figures 2-30 though 2-32) |
|---|---|
| Face shape | Egg-, square-, rectangular-shaped, or round; wide and flat |
| Face color | Light brown, yellow, shades of tan |
| Eyebrow texture | Fine and well defined |
| Eyebrow color | Black, shades of brown |
| Eye shape | Small, narrow, and slanting upward at the outer corner; thin and short eyelashes; single or small double eyelid and shallow eye socket |
| Eye color | Black, shades of brown; small iris |
| Nose shape | Generally short; lower nose bridge |
| Lip shape | Well definied, medium-thick (thicker than Caucasian's); jaws are forward |
| Lip color | Red, pinkish, brown |
| Hair type | Black, dark brown/thick, thin and straight; very thin facial hair |
2-30 Characteristics of an Asian Face, Female Profile

2-31 Characteristics of an Asian Face, Female Front View

2-32 Characteristics of an Asian Face, Male Three-Quarter View

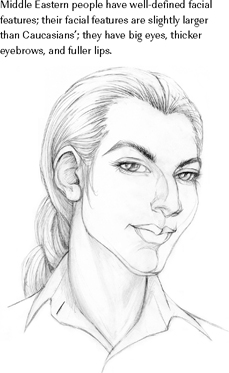
| Table 2-4 | Characteristics of Middle Eastern Faces (see Figures 2-33 though 2-35) |
|---|---|
| Face shape | Egg-, oval-, or rectangular-shaped |
| Face color | Olive or tan |
| Eyebrow texture | Thick and well defined in shape |
| Eyebrow color | Black, dark brown |
| Eye shape | Big; double eyelid with thick and long eyelashes; deep eye socket |
| Eye color | Black, shades of brown |
| Nose shape | Long, straight, and high nose bridge |
| Lip shape | Well defined, medium thick |
| Lip color | Red or pinkish |
| Hair type | Black or dark brown; wavy; very thick facial hair |
2-33 Characteristics of a Middle Eastern Face, Male Profile
2-34 Characteristics of a Middle Eastern Face, Male Front View

2-35 Characteristics of a Middle Eastern Face, Female Three-Quarter View
FACIAL EXPRESSIONS
Facial expressions in art have always amazed me and attracted my attention. When I look at a painting of a deeply emotional character, I feel like I am inside the character's soul. I studied Gary Faigin's book, The Artist's Complete Guide to Facial Expression, which is an excellent reference for any costume designer. It helped me to understand facial movements and how the facial muscles function during a particular emotion. I also find Norman Rockwell's paintings fascinating, and I greatly admire his work. All his characters are alive and tell stories. The viewer is able to look into their souls and relate to their feelings. I can spend hours looking at his paintings, studying how he portrays his characters and what specific details he used to capture the spirit of the people in his paintings. I am always encouraged and inspired by these works of masters. Facial expressions are important to my costume designs because they create a unique expression that shows the character's feelings, emotions, and demeanor. They distinguish the character's age, sex, occupation, status, personality, nationality, and so on. Facial expression and body language enhance individuality and portray realistic people with developed personalities.
Design or creative artwork has a wide diversity of styles just like cooking. When you add spices to food, you create a special flavor. If you don't add spice to your food, the taste will be bland and plain. When you draw a figure without defined facial features, the figure looks like a mannequin. When you add facial features to the face, the figure will look like a human being and will come to life. The facial expression is equally significant to the costume in portraying the character's mood, personality, occupation, age, gender, and so on.
How Can Proper Facial Expression Be Achieved?
When creating facial expressions, you should feel comfortable and do it with interest so that you do it well. A positive attitude must be the starting point.
Traditionally, most drawing books show facial movements and expressions from the bone structure to the musculature. Then they show how the muscles relate to bone structure and how the muscles move the surface of the face to create facial expressions.
Most of the drawings I present show the visible surface of the face. I will not discuss the deep layers of muscles and bones at this time, but the subject is important, because the deep layers will help you to understand how the surface of the face moves. I will focus only on the surface for simplicity.
Emotions
A person's moods and actions direct their expressions or movements of features. Those movements are revealed on the surface of the face and occur the same way in any human race, sex, age, or nationality group. The brain controls emotions; the emotions change the forms of the features. The eyes are the windows to the soul; they mirror the emotions and moods of the character. When a character is laughing, the eyes are narrowed and wrinkled at the outer corners. Anger, pleasure, sadness, and joy are refected in the eyes, nostrils, mouth, cheeks, and jaws. When facial features are affected by emotions, they are each directly affected, but they also collaborate and affect each other as a team. When you create a facial expression, imagine all the features moving with one another to form that expression. If you change just one feature for an expression, you will not capture true emotions—just false ones. Working all the features as a whole is important.
Again, drawing is like cooking. A spicy favor may not suit everyone's taste, but it creates a different favor. In art, the special favor is a unique style. Sometimes I spend more time on facial features and their expressions than on other parts of the body. I strictly demand that from myself because I consider it an important part of the creative work that completes my costume design. Putting more time into the facial expressions may not work for everybody. Just like a food preference—some people like a spicy taste, while others may like a sweeter or more sour flavor—each artist should develop his or her own style and preference in expressing himself or herself.
I categorize four major facial expressions that are often used for costume design figures:
![]() Happy/Smiling/Laughing
Happy/Smiling/Laughing
![]() Sad/Crying/Depressed
Sad/Crying/Depressed
![]() Angry/Shouting/Hatred
Angry/Shouting/Hatred
![]() Surprised/Fear/Frightened
Surprised/Fear/Frightened
These four major expressions can be demonstrated with the simple abstract forms in Figures 2-36 through 2-39.
2-36 Abstract Form of Happy/Smiling/Laughing

2-37 Abstract Form of Sad/Crying/Depressed

2-38 Abstract Form of Angry/Shouting/ Hatred

2-39 Abstract Form of Surprised/Fear/ Frightened

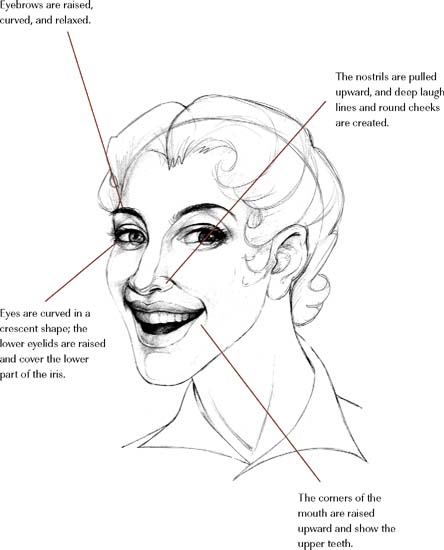
HAPPY/SMILING/LAUGHING
When a person is smiling or laughing, keep the following in mind (see Figures 2-40 through 2-47):
![]() Muscles of the face are stretched or spread outward from the center of the face.
Muscles of the face are stretched or spread outward from the center of the face.
![]() Eyebrows are relaxed and slightly raised.
Eyebrows are relaxed and slightly raised.
![]() Eyes will narrow and curve up in a crescent shape. The outer corner of the eyes may have some crow's feet. When a person is smiling, the lower eyelid will rise up and cover the lower part of the iris.
Eyes will narrow and curve up in a crescent shape. The outer corner of the eyes may have some crow's feet. When a person is smiling, the lower eyelid will rise up and cover the lower part of the iris.
![]() Nostrils will be pulled up, which develops laugh lines along them. Cheeks are pushed up.
Nostrils will be pulled up, which develops laugh lines along them. Cheeks are pushed up.
![]() Cheeks are raised and round like an apple. The shape and position of cheekbones are basically defined by laugh lines, subtle lights, and shadows. Shadows faintly appear, but are not overdone.
Cheeks are raised and round like an apple. The shape and position of cheekbones are basically defined by laugh lines, subtle lights, and shadows. Shadows faintly appear, but are not overdone.
![]() Corners of the mouth rise upward and the mouth widens, opens, and usually shows upper teeth. Lower teeth may not be seen or are seen only slightly. Both the upper and lower lips stretch tightly around the teeth and jaws.
Corners of the mouth rise upward and the mouth widens, opens, and usually shows upper teeth. Lower teeth may not be seen or are seen only slightly. Both the upper and lower lips stretch tightly around the teeth and jaws.
![]() Lower jaw drops. The bigger the open mouth, the lower the jaw will drop.
Lower jaw drops. The bigger the open mouth, the lower the jaw will drop.
![]() The mouth can be difficult to draw. It can easily change in shape and appearance. Even a slight downward or upward modification around the corners will alter the character's entire emotional presence. Degree of change can also affect the shape and size of the lips.
The mouth can be difficult to draw. It can easily change in shape and appearance. Even a slight downward or upward modification around the corners will alter the character's entire emotional presence. Degree of change can also affect the shape and size of the lips.
![]() Be aware that hair grows above the skull and has fullness. Do not draw hair as if it is painted on the skull.
Be aware that hair grows above the skull and has fullness. Do not draw hair as if it is painted on the skull.
2-40 Happy/Smiling/Laughing Expression, Front View
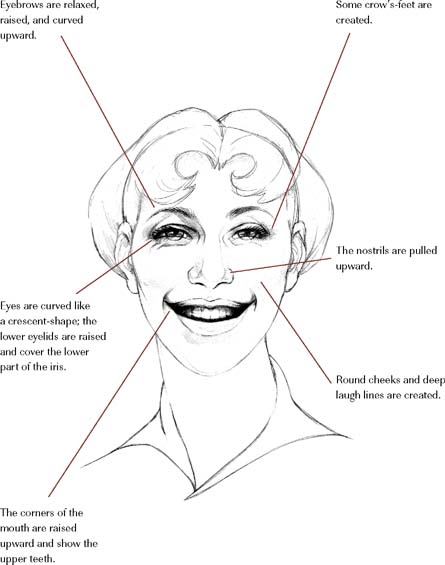
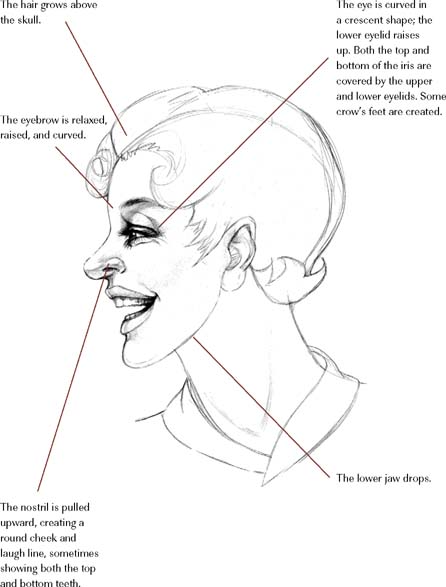
2-42 Happy/Smiling/Laughing Expression, Three-Quarter View
2-44 Design Sample of Happy Expression—Big River


2-47 Design Sample of Happy Expression—Look Homeward, Angel

SAD/CRYING/DEPRESSED
The movements of the features of a sad person are in the opposite direction of a happy person. All the lines are downward. See Figures 2-48 through 2-53. Examples of movement include the following:
![]() Inner corners of the eyes and eyebrows pull upward together, and lower corners drop down. This will create some vertical lines between the eyebrows.
Inner corners of the eyes and eyebrows pull upward together, and lower corners drop down. This will create some vertical lines between the eyebrows.
![]() Eyes tend to be closed or half-closed and show frowns. The upper and lower eyelids cover both the top and bottom of the iris.
Eyes tend to be closed or half-closed and show frowns. The upper and lower eyelids cover both the top and bottom of the iris.
![]() Nostrils tend to open wide and stretch to the side, sometimes creating downward deep folds along the nostrils.
Nostrils tend to open wide and stretch to the side, sometimes creating downward deep folds along the nostrils.
![]() Corners of the mouth will drop. If the mouth closes, it will squeeze tight. If the mouth opens, the upper lip usually covers the upper teeth. Lower teeth are sometimes shown.
Corners of the mouth will drop. If the mouth closes, it will squeeze tight. If the mouth opens, the upper lip usually covers the upper teeth. Lower teeth are sometimes shown.
![]() Lower jaw drops to some degree.
Lower jaw drops to some degree.
![]() Hair grows from the skull and should be above it and have fullness.
Hair grows from the skull and should be above it and have fullness.
2-48 Sad/Crying/Depressed Expression, Front View


2-50 Sad/Crying/Depressed Expression, Three-Quarter View


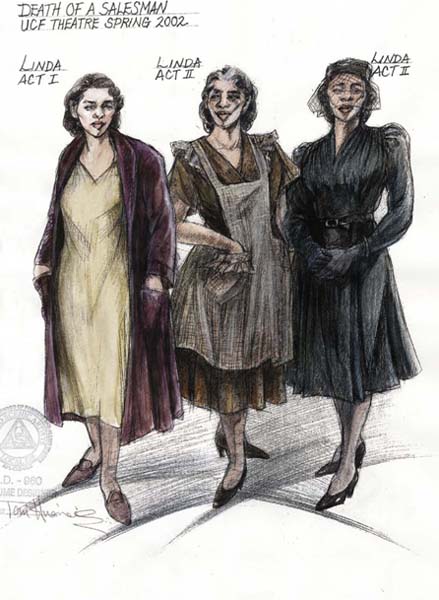
2-52 Design Sample of Sad Expression—Death of a Salesman

ANGRY/SHOUTING/HATRED
When people get mad, their features create intense and angular shapes (see Figures 2-54 through 2-58):
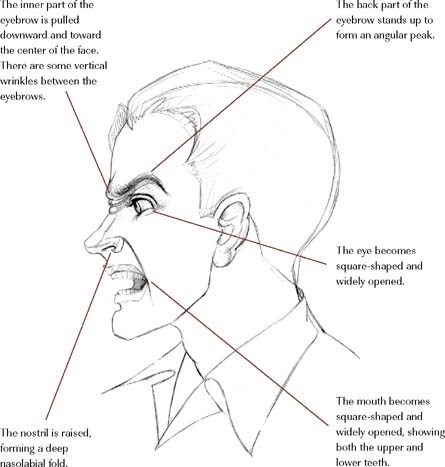
![]() Inner corners of the eyebrows pull downward and toward the center of the face, close to the inner corners of the eyes. Back of the eyebrows stand up to form angular peaks.
Inner corners of the eyebrows pull downward and toward the center of the face, close to the inner corners of the eyes. Back of the eyebrows stand up to form angular peaks.
![]() Eyes are more square-shaped and widely opened. The iris seems to be ready to fall out of the eye socket, and the top edge of the iris is exposed. Space between the eyebrows and eyes diminishes, showing vertical wrinkles.
Eyes are more square-shaped and widely opened. The iris seems to be ready to fall out of the eye socket, and the top edge of the iris is exposed. Space between the eyebrows and eyes diminishes, showing vertical wrinkles.
![]() Nostrils rise and open widely, forming deep, sharp, downward nasolabial folds.
Nostrils rise and open widely, forming deep, sharp, downward nasolabial folds.
![]() Mouth is square-shaped, widely open, and shows both the upper and lower teeth. The wider the mouth, the more extreme the shouting.
Mouth is square-shaped, widely open, and shows both the upper and lower teeth. The wider the mouth, the more extreme the shouting.
2-54 Angry/Shouting/Hatred Expression, Front View

2-56 Angry/Shouting/Hatred Expression, Three-Quarter View


SURPRISED/FEAR/FRIGHTENED
Surprise, fear, and fright have common characteristics (see Figures 2-59 through 2-63):
 Forehead wrinkles are developed.
![]() Eyebrows lift upward as far as possible.
Eyebrows lift upward as far as possible.
![]() Eyes open as wide as possible.
Eyes open as wide as possible.
![]() White part of the eye shows the most.
White part of the eye shows the most.
![]() Whole circle of the iris is exposed.
Whole circle of the iris is exposed.
![]() Mouth opens widely and downward with tension. When the person is in fear, sometimes the lower teeth are visible.
Mouth opens widely and downward with tension. When the person is in fear, sometimes the lower teeth are visible.
![]() Mouth opens in an oval or circle when the person has a very surprised look. Also, lips are relaxed and teeth are hidden.
Mouth opens in an oval or circle when the person has a very surprised look. Also, lips are relaxed and teeth are hidden.
![]() Mouth is closed together and pulled forward when person is slightly and pleasantly surprised.
Mouth is closed together and pulled forward when person is slightly and pleasantly surprised.
![]() Lower jaw drops in proportion to the opening of the mouth.
Lower jaw drops in proportion to the opening of the mouth.
2-59 Surprised/Fear/Frightened Expression, Front View

2-61 Surprised/Fear/Frightened Expression, Three-Quarter View


POSITIONING THE HEAD AND NECK AND DIRECTING THE EYESIGHT
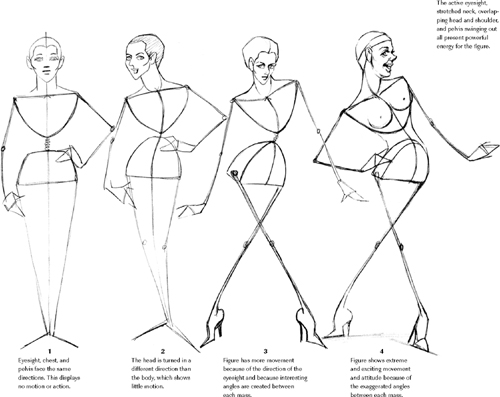
Positioning the head and neck and directing eyesight are essential in establishing the mood and action of the figure in any character drawing. Striking head positions that have meaning are beneficial to the action figure, for reasons of expression and composition. A centered or tilted head, sagging or erect neck, or the direction the eyes are staring in, bring spirit and energy to the figure. An overlapping head and shoulder, squashed or stretched neck, and the various directions and angles of the face, eyesight, chest, and pelvis are all factors that play a significant role in portraying action statements.
Very little stretch and twist action produces a soft voice, whereas a big stretch and twist action produces a screaming voice. For example, front poses show a stable and motionless action. Pointing eyesight in different directions will add motion. The same applies if you draw the head at an angle to the chest and pelvis. If eyesight looks in a nonforward direction, the figure will seem more alive and expressive.
In Figure 2-64, four abstract figures show the different actions and motions in four stages/degrees. Figure 1 stands with the head, face, eyes, chest, and pelvis all facing forward, possessing little or no motion. Figure 2 stands with the chest and pelvis facing in one direction with the head in another direction while the eyes are looking off. This figure gains some motion. Figure 3 stands with the head and pelvis in one direction while the eyesight and chest are facing an opposite direction, and the head, chest, and pelvis are angled differently. The Figure 3 position presents a more interesting pose and expresses even more motion. Body movement and attitude are increased. In Figure 4, the angle degrees between the three masses and the eyesight are exaggerated some (eyes look to one side and three masses face the other side). Figure 4 shows exciting movement and attitude. Active eye motions, a stretched neck, the overlapping head and shoulder, and the swinging pelvis all convey powerful energy.