
CHAPTER 5
Camera Basics
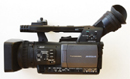
▲ Single Purpose Video Camera. A well-made video camera is designed with most of the controls you need on the body of the camera within easy reach while shooting.
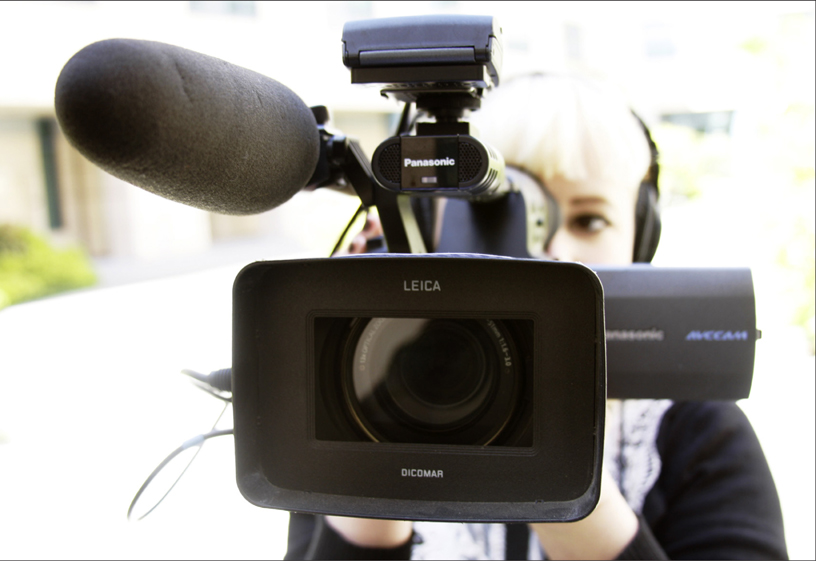
(Photo by Ken Kobré)
This symbol indicates when to go to the Video journalism website for either links to more information or to a story cited in the text. Each reference will be listed according to chapter and page number. Links to stories will include their titles and, when available, images corresponding to those in the book. Bookmark the following URL, and you’re all set to go: http://www.kobreguide.com/content/videojournalism.
If you are used to shooting still pictures, making the transition to video may feel like a big step. Don’t be alarmed. Many of the skills you have already acquired about shooting stills— skills such as focus, lens selection, and controlling exposure—will transfer seamlessly to video. There are, however, some skills that are specific to video. You will be obliged to learn about these in order to make full use of this new visual medium.
SELECTING A CAMERA
Cameras today are ubiquitous. An employer might hand you a camera and tell you to go out and shoot a video story. Or you might check out one camera brand and then another from your school. In a pinch, you might even shoot a video using your cell phone.
But sooner or later you will probably wind up buying a camera for yourself—one that you can use all the time.
Sizes, prices, and functionality of video cameras and/or cell phones can turn choosing a brand and model into a daunting task. Today’s cameras range from pocket-sized point-and-shoots that sell for less than $200, through smart phones and tablet computers, all the way up to full-featured, shoulder-held professional video cameras costing thousands of dollars.
▲ Smart phone. Smart phones are becoming better at recording high definition (HD) video. Many are equipped with multi-million pixel sensors that produce sharp pictures and some even sport software to edit the video on the fly and of course send it any where in the world with a finger’s touch.

(Photo by Ken Kobré)
Smart cell phones with complete video capability are growing in popularity. These sophisticated cell phones can shoot high-definition (HD) video as well as record sound. Some even allow you to manually focus one section of the image or another by touching the screen. They often have a built-in light for shooting in dark areas. With these devilishly capable devices, you can edit your video directly on the phone itself. Then you can share it by simply sending it to a friend or posting it on Facebook or some other social network. Or you can upload it to an Internet video site such as YouTube or Vimeo.
A cell phone is small and compact. It’s already with you most of the time. For that reason alone, many users find the cell phone preferable to standalone video cameras or single-lens reflex (SLR) cameras that shoot video. Because you can send video directly from your cell phone, many users prefer these devices over similar-sized but dedicated pocket video cameras.
The automatic and manual controls on these high-end cell phones are constantly improving. Soon there will be easy ways to plug external mics and headphones into your cell phone so that you can simultaneously record and monitor your audio. Although they don’t quite measure up to the quality of a dedicated video camera, cell phone videos are fast improving. One thing is sure: smart phones are more and more pervasive. The number of homemade videos shot with cell phones on YouTube alone is staggering.
The tablet computer with its video capability is following in the footsteps of smart phones that shoot video. Users are shooting videos with their tablets and immediately showing the footage on the tablet’s relatively large screen.
Many cameras, also called camcorders, are designed specifically for shooting video. These cameras are the culmination of 60 years of perfecting equipment for this sole task. These video cameras have grown increasingly smaller. Makers have produced a wide range of models offering a vast array of different features, but the function of camcorders continues to serve primarily for recording moving images and sound for video. Single-purpose video cameras provide an ease of use for capturing high-quality images that make them ideal for documentary shooting.
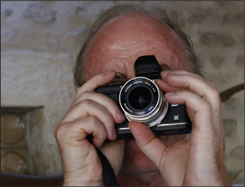
▲ Camera for both stills and video. Small, light hybrid cameras allow shooting both stills and video. The photographer has attached a viewfinder adapter to the camera shown here. (Photo by Ken Kobré)
◀ Single Lens Reflex Camera with Add On Viewfinder. This digital Single Lens Reflex (DSLR) hybrid has been outfitted with an optical viewfinder to make focusing with the small rear LCD screen easier in bright daylight. Shooting video on a DSLR camera requires viewing on the rear screen and manually focusing with some models. The combination of a very small screen, manual focus, and razor thin shallow depth-of-field makes focusing challenging. When shooting in either outdoor or indoor settings, any kind of glare makes it nearly impossible to see the LCD screen. Also, holding the camera out in front to view the screen while trying to focus on it leaves the camera unstable and shaky. The first essential item to help with these challenges is a DSLR optical viewfinder.
(Photo by Ken Kobré)
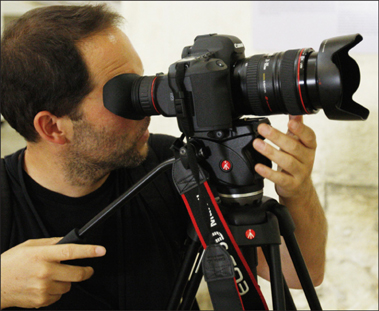
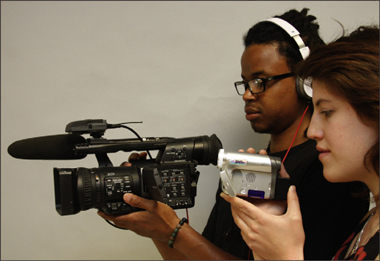
▲ Single Lens Reflex Camera + Devices. Using a DSLR (Digital Single Lens Reflex) as a full functioning video camera can require buying a number of add-on devices. Here the photographer is using an external viewer, shoulder-mount support and portable light.

(Photo by Melissa Morley)
Several cameras designed originally to capture still images now shoot video as well. They are what we call hybrids. Hybrids come in at least two flavors. One is the standard Digital Single Lens Reflex (DSLR) camera with interchangeable lenses that can now shoot both stills and video. A second kind of hybrid that is smaller and lighter than a DSLR has interchangeable lenses and still shoots stills and video. With this type of hybrid camera you can’t view the image optically, only electronically, on a viewing screen. By eliminating the DSLR mirror, however, the camera designer saved space, bringing the lens closer to the sensor.
This reduced distance means the camera can use smaller, lighter lenses.
A powerful cinematic effect also allows the shooter to achieve sharp subjects and blurry backgrounds. The hybrid cameras have a relatively large sensor chip. That additional sensor size allows the video shooter using a hybrid camera to determine how much of the area in front of and behind the subject will be sharp. The effect is difficult, if not impossible, to achieve with many of the smaller single-purpose, video-only cameras because their sensor chips are smaller.
Switching between shooting stills and shooting video with the hybrid is easy enough. The trouble is that some hybrid cameras lack the ergonomics and functionality of the advanced video cameras. With hybrids, the audio options are quite limited. The audio controls are sometimes buried in menus that are time-consuming to find. Most don’t have the capability to allow the user to record directly with professional-level microphones. Focusing is also more difficult with some of the hybrids. In fact, videojournalists often add external focusing aids to help their cameras along because the screen on the back of the camera that shows the video, sometimes called “Live View,” is nearly impossible to focus in bright sunlight. The hybrids lack a number of the options found in dedicated video cameras, such as power zooms. As technology improves, however, many of the limitations of the hybrid video camera will surely disappear.
▶ A Range of Cameras for Video Shooting. Here is a subject being shot with three different cameras. From left, a pocket video cam, center, a DSLR hybrid, and a dedicated full-feature video camera.
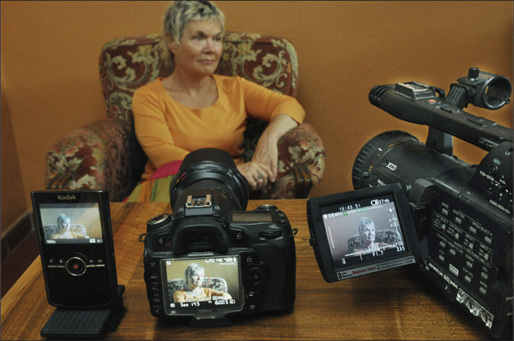
(Photo by Ken Kobré)
“It’s good to try out a camera before you buy one,” says Lisa Berglund, a former director of photography at KNSD-TV San Diego, California, and the first woman to win the National Press Photographers Photographer of the Year award. Berglund now is a senior producer at World Vision. “That might mean borrowing it, or renting it from a production house, or checking it out at your school. Doing this could save you lots of headache, time, and money in the future. When you actually use it, you will quickly notice a camera’s limitations and will find out if the camera quality is suited to your project”.
How can you make sense of all the different video choices? In the following subsections, you will find some of the most important elements to pay attention to when choosing a video camera to use as your own.
Picture Quality
Most video cameras shoot clear, sharp images in bright sun or even in deep shade. What really separates the sheep from the goats when it comes to video quality is how the cameras handle very low light like that in a dimly lit room. Though a multitude of factors determine how well a camera shoots in low light, the critical variables are the number and size of the sensor chips that the camera uses to record images.
Some cameras have only one sensor; others have three. In this case, three is better than one. Color will be crisper when it is taken with a camera with three sensors, especially indoors in rooms without much illumination or outdoors at night. The larger each sensor is, the more light it collects. Collecting more light results in brighter, sharper pictures with better colors—especially in low light. A camera with three large sensors produces crisper pictures than one with three small sensors.
Three-chip video cameras delegate each primary color—red, green and blue— to its own sensor chip. These provide vivid, natural colors over a wide range of lighting conditions. These 3-chip models usually feature high resolution as well.
Most small video cameras use just one sensor to capture images. The physical size of the sensor in most home camcorders is between 1/6-inch and 1/3-inch. The sensor in professional video cameras is larger—usually 2/3-inch and greater.

In a full-frame SLR hybrid the sensor is almost 1 inch by 1–1/2 inches (24×36 mm) or ten times larger than a 1/4-inch video sensor.

Pocket video cameras are easy to shoot but have tiny sensors and lack manual override controls.
![]()
Of course, even sensors of equal size are not always equal in quality. Those with higher resolution are more densely packed, with more than a million pixels; those with lower resolution have half a million or fewer pixels. In theory, more pixels mean sharper images.
Also, the most basic video cameras make all the exposure decisions for you—but they do not always make the right choices.
When purchasing your own video camera, take all these factors into consideration. Ask advice of pros. Keep lists of brands you see and try. Check off what each one offers. Then, after due analysis, choose the one that’s right for your personal and professional needs.
Features and Functionality
The only camera control you’ll find on some pocket video cameras consists of a single on/off button. Moving up from there, better-performing cameras include automatic features and also allow for manual controls of brightness, focus, color balance, and a slew of other variables.
Whether you like just pointing and shooting or you are a professional one-man-band and prefer doing everything yourself, the automatic settings on the camera—either located as a menu setting or a dedicated button—will be useful. There will, however, be conditions where more control is necessary. Even if you’re new to shooting and don’t want to use all the controls, as you become more familiar with the equipment, you’re going to find them extremely useful.
All of the following factors affect picture quality. Check to see if your video camera has these manual controls:
• Exposure: An adjustable iris, the opening in the lens, lets in more or less light. On still cameras, this opening is called an aperture.
• Focus: Your eye focuses naturally, but sometimes your camera needs help.
• White balance: Cameras must adjust for the change in color tint from the blue of the sky to the yellow of a desk lamp or the green of a fluorescent tube.
• Shutter speed: You rarely need to change the speed at which the shutter opens on a video camera. This is one manual control videojournalists don’t often use.
• Video gain control: This feature changes the electronic sensitivity of the sensor to brighten the picture in low light.
Recording Media and Playback
Does the camera record to tape, flash memory cards, DVD, or an internal hard drive? Although tape served the industry well for many years, most of today’s digital cameras record directly on removable flash memory cards (for example, Compact Flash or Secure Digital), or more expensive proprietary memory cards unique to the manufacturer.
In general, for shooting documentaries, consider a camera that uses the SD card. SD cards are small, cheap, and hold a lot of data. Their size and price allow carrying many cards at a time. Carrying multiple cards will greatly extend your productive time in the field.
▲ Secure Digital (SD) card (left) and Compact Flash (CF) card for shooting and storing video.

Whether you have recorded one scene on a flash memory card or a thousand, you can review your handiwork in the video camera itself. If you have shot on tape, the camera controls work just like a VCR player with “rewind” and “forward” buttons. If your clips are stored on a flash memory card or a hard drive of some sort, you can just select the scene you want and review it immediately. Reviewing your most recent footage while still in the field is crucial because it allows you to identify problems on the spot and immediately strategize on how to solve them.
Tip
Avoid cameras that record to an internal hard drive. They require stopping to download when the drive is full, which renders the camera useless during the download phase. Those that burn a DVD while the camera is recording also are poor choices because processing the material from DVD for editing takes far longer than it does with other formats. No sense buying a time drain. Videojournalists are busy people.
Zoom Capability
Many video digital cameras offer two ways to zoom: optical and digital. Optical zooms physically adjust the lens from wide angle to telephoto to bring the image closer. Picture quality remains excellent. On the other hand, digital zooms create the illusion of coming closer by basically cropping out part of the image and enlarging what remains. This cropped image thus has fewer pixels. Digital zooming results in blurry footage. Make sure your camera has optical zoom instead. Avoid the digital zoom like the plague.
◀ Digital Zoom. Many smart phones and pocket videos have a digital, not optical, zoom. Avoid the digital zoom option. This fake zoom produced by electronically rather than optically enlarging the image produces blurry footage. If you feel you really need to zoom digitally, stop. Instead, walk closer to your subject.

Essential Audio Features for a Video or Hybrid Camera
All video cameras can record sound. However, most built-in microphones also collect too much room noise. For this reason, they are rarely effective at isolating human conversation. They often even pick up the noise of the camera as it is being handled.
For video documentaries of any length and for any medium, you need a camera with an audio-in port so you can use at least one or— even better—two good external microphones. Many pros say the ability to add good microphones is even more important than the choice of camera itself.
Equally critical is an audio-out port on the camera for adding headphones in order to monitor the quality of what you are recording.
If a video camera can’t accept an external mic or headphones, it’s just not up to speed for shooting documentaries. Don’t be tempted by low prices. You get what you pay for.
Here’s your audio checklist:
• Audio-in ports for adding one or more external microphones
• Audio-out ports for adding headphones to monitor sound
• Both manual and automatic control of sound levels
▼ Compact Video for Travel. Many decisions go into selecting a camera for shooting online video including weight, clarity of color, ease of use and, of course, cost.

(Photo by Ken Kobré)
Finding a Camera that Fits You
Some cameras fit in your hands like soft kid gloves. Others seem clunky and confusing. Where are the camera’s controls located? Where are the important buttons and switches located on its body? Are they buried in a series of menu items that you must scroll through on the camera’s LCD screen? Check each of these features and think about how they might eventually impact your use of the camera. Use Internet forums to learn about other shooters’ opinions. Before buying, download and study the camera’s manual. Make your final choice only after thoughtful research.
There are various sites that contain information valuable for researching camera choices. The KobreGuide link will take you to them. ![]()
Of course, camera equipment comes secondary to your story. Great storytellers can shoot with an iPhone and tell a powerful story. The power is not hidden somewhere in the equipment. The power still lies in what you do with it.
◀ Size versus Quality. While small video cameras are convenient and easy to carry, they don’t produce crisp pictures in low light. Larger video cameras handle low-light situations and have many more manual control options. (Photo by Ken Kobré)
THE GEEKY STUFF
Frame Rate
Video footage looks continuous but is really constructed from a series of individual images or “frames” presented to the eye so quickly that they seem like an uninterrupted stream. In fact, at any rate greater than about 15 frames per second (fps), our brains cannot distinguish individual images. Instead, our brains interpret the rapid series of frames as a stream of visual information. To our eyes it looks like continuous, smooth motion. Most videos are recorded at twice the 15 frames per second rate. They run by our eye at about 30 fps.
Format
Format, or aspect ratio, refers to the proportions of the individual video frame—in other words, the relationship of width to height. When setting up your video camera, you may be asked to select from one of these formats before shooting. It’s best to know which one you want before you start shooting.
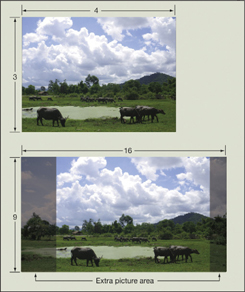
Standard 4:3. The TV screen for many years was more or less the shape of a slightly oblong box. This relative shape was referred to as four by three format (standard definition, or SD, 4:3). If you could have frozen the picture on the screen and counted the lines in each frame, you would have seen that image was really made of 640 distinct vertical lines and 480 horizontal lines. No matter how big your TV screen, it was the same relative shape, and 640×480 lines formed each frame that flashed by at 30 times a second. This was the SD format. (On some cameras, this format is referred to as DV Normal.)
Wide-screen 16:9. Because TV programming began featuring so many Hollywood movies that had been created for viewing on a wide screen, manufacturers next developed televisions that were wider and introduced a new format they called 16:9. The picture quality wasn’t really much better—the line count had been increased only a little—but the screen itself was wider and could play the movies without cutting off the sides of the picture or putting a black band on the top and bottom of the screen, a technique known as letterboxing. (Some cameras call this format DV Wide.)
High definition. Then, along came high definition—HD. Any new television is HD, and most of the better video cameras sold today shoot HD. The size of the picture is in the wider 16:9 format but consists of many more lines of information—1280×720 or even 1920×1080— resulting in a much sharper the image.
◀ Aspect Ratio. Aspect ratio is the ratio of width to height for an image or screen. The North American NTSC television standard uses the nearly square 4:3 (1.33:1) ratio. High-definition television (HDTV) uses the wider 16:9 ratio (1.78:1) to better display widescreen material like HD broadcasts and DVDs.
Progressive versus interlaced. Video can be shot and displayed as either “progressive” or “interlaced.” A progressive video, as indicated by a “p” after the capture rate (30p), shows a complete frame, one at a time, on your television screen or computer monitor. An interlaced video, as indicated by an “i” after the frame rate (60i), shows only half of the frame at a time, with the second half appearing 1/60th of a second later. As with frame rate, your brain is fooled into seeing the two interlaced half-images as one whole image. In high definition, there are two common choices: 720p, with progressive images (720 lines high and 1280 lines wide) and 1080i, with interlaced images (1080 lines high and 1920 lines wide).
Setting Up Your Camera
So what does all this geek-talk about 4:3, 16:9, HD, interlaced, progressive, and so on mean to the videojournalist? Well. The menus on video cameras require you to decide which format to use. You are likely to be offered four or more choices:
• Standard definition—4:3
• Wide-screen—16:9
• High-definition progressive—720p
• High-definition interlaced—1080i
Select high definition (HD) when available if you expect your video to be seen on either a computer or a television screen. HD footage looks fine on an older television also; standard widescreen 16:9 will not be as sharp on an HD television.
But which of the HD formats—interlaced or progressive? Pros debate this. Some claim that 720p is a better choice for shooting sports and grabbing still photos. Others say that interlaced results in more of a film-like look.
If your camera offers different format choices, try running your own tests to see which option best fits your needs. Take time to experiment with both HD formats. Then you will be able to make an informed choice.
STARTING AND STOPPING THE VIDEO CAMERA
For anyone accustomed to taking still pictures, the most difficult habit to overcome when shifting to video is the tendency to push the video camera’s start button and use it as if it were the shutter release on a still camera. Pushing the button turns on the camera. But pushing it again puts the camera on standby. So if the camera is already running, hitting the button at the peak moment stops the recording and leaves nothing, nada, zip. And you are left standing there as the critical moment plays itself out unrecorded. Once you’ve mastered this twist of logistics, you’ll probably find the video controls relatively straightforward. Most video cameras have a “record” indicator visible in the viewfinder or on the LCD screen. Get in the habit of checking this onscreen indicator to make sure the camera is actually recording before the subject starts speaking or the dog does his trick or the baby performs his Michael Jackson imitation.
CARRY EXTRA BATTERIES AND MEMORY CARDS
Battery And Memory Card
Never leave home without extra charged batteries and flash memory cards. Left to right, SD card and a 180-minute video battery. No matter how short you think your shoot will be, you never know when you will need the extra recording capacity. You can never have enough.

STAYING FOCUSED
The optics in today’s lenses produce laser-sharp, clearly focused video pictures under almost any conditions. Even low-end cameras with fixed-focus lenses capture sharp pictures as long as the subject is three feet or farther away. Higher-end cameras offer a choice of automatic, manual focus, or a number of options in between.
How to Use Autofocus
In most circumstances, you just put the camera on autofocus and shoot, but you do have to continue monitoring the screen or viewfinder to make sure that the camera is producing the results you want.
The camera will usually focus on the subject in the center of the frame and nearest to the lens. As you reframe from one subject to another, the lens will gradually readjust and sharpen the newly framed image.
With sufficient light, the camera adjusts focus quickly. When tracking someone, for example, the camera can maintain sharp focus as the person moves toward or away from the camera.
▲ Focus. On many video cameras, you can focus manually or automatically. Pros prefer manual, but automatic works well in most fast-moving situations. (Photo by Ken Kobré)

Maintaining sharp focus on a subject coming toward the camera can be difficult with manual focus. Use autofocus for fashion shows, sports, street altercations, or other fast-moving situations when you will not have time to follow focus manually. Autofocus is remarkably good and often better and easier than manual focus, but certainly not perfect in all situations. However, for the one-man-band faced with simultaneously controlling exposure, sound levels, framing, and interviewing, autofocus makes it possible to more or less manage all the various elements and produce sharp footage as well.
Face Detection Recognition
Some autofocus cameras employ face recognition software that literally recognizes, hones in, and focuses the lens on a human face. This function is great if you want, say, a porcelain vase collector in focus and not the Chinese teapot in front of her. One advantage of face recognition when shooting video is that once a face has been detected, the camera follows that person through all movements in the scene, from side to side, up and down, and off-center. Of course, the face recognition software does not know which subject in the scene is central to your story and which is just an unimportant interloper.
When Autofocus Fails
Autofocus can be fooled. Under certain circumstances, autofocus does not perform well. That’s why it is not a panacea for all situations. In these circumstances, seasoned videojournalists use a combination of autofocus and manual focus.
▼ Autofocus. As the woman approaches the camera, autofocus keeps her face in focus. The autofocus option also works well when the subject moves away from the camera. (Photo by Ken Kobré)

Staying Sharp with Manual Focus
John Goheen, a 12-time Emmy winner, has shot for 30 years. He has never used autofocus. He manually focuses every shot, as do many longtime professional television shooters.
Here are the steps pros like Goheen use to achieve sharp results with manual focus for an interview before starting to shoot:
1. Turn on the camera.
2. Locate the focus control.
3. Set the focus to manual (M).
4. Either look through the camera’s viewfinder or watch the image on the LCD screen. Pros tend to use the viewfinder, claiming that the image is sharper and more precise for critical focusing than on the LCD screen. That claim may be changing as LCD screen resolution improves.
5. Zoom in on the face.
6. Focus on the subject’s eye, adjust focus until the eyelashes are perfectly sharp.
7. Zoom out to achieve the composition and framing you want.
8. Begin shooting.
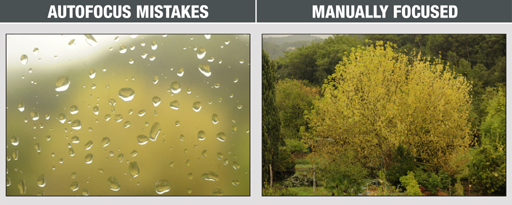
Focusing through a glass spotted with water droplets, the camera will lock on the drops and leave the subject behind the glass out of focus.
Focusing through vertical stripes like a fence or bars on a prison cell, the camera will focus on the bars and not on what is behind.
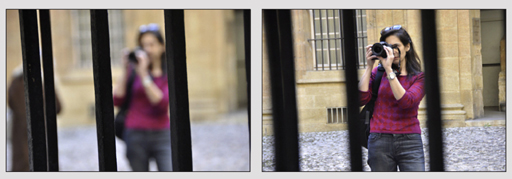
In low light, the camera will not always focus properly, nor will the face detection function accurately.

With some autofocus cameras, the camera will not detect that the main subject is off-center, and focus on whatever it finds in the middle of the picture. (Photos by Ken Kobré)

Tip
Some video cameras allow you to adjust the eyepiece to your particular vision. The adjustable part of the eyepiece is known as the viewfinder diopter. Even if you have nearly 20/20 vision, always adjust the viewfinder diopter (if available on your camera) to suit your individual prescription. Rotating the diopter does not change the focus of the lens. It personalizes the optics of the viewfinder for your unique vision. If you usually wear glasses, adjusting the diopter may eliminate the need to wear them while shooting. When shooting with an unfamiliar camera, be careful to adjust the diopter of the new viewfinder before anything else. Adjusting the diopter beforehand is critical when focusing manually.
High-End Focusing Aids
Because nothing kills audience interest in your video quicker than blurry images, camera manufacturers have come up with ways to aid focusing in difficult situations.
Edge detection. Some sophisticated cameras have an electronic edge detection program (sometimes called Edge Detection Focus Detail or EDF DTL). This option emphasizes the outlines of the images in the viewfinder or on the LCD screen (not in the final footage) in order to make manual focusing easier.
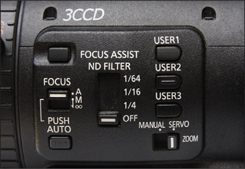
▲ Focusing Options. Some video cameras offer several alternatives for auto and manual focus, as well as the capability to switch between the two quickly. The buttons in this photo include FOCUS ASSIST (enlarges the image in the viewfinder for more critical focusing); FOCUS A (Automatic); M (Manual); ∞ (goes immediately to infinity, focusing at the farthest point available); PUSH AUTO (with the camera still on manual, the lens will switch to auto as long as you continue to push this button).
Focus assist. High-end cameras offer a focus assist switch that magnifies images in the viewfinder and on the LCD screen for the sole purpose of helping focus manually—without changing the actual image being recorded.
Momentary autofocus. If, while recording, you suddenly realize the subject is not sharp, push the momentary autofocus button. This feature switches the camera to autofocus, and the subject will pop into sharp focus—even though the camera remains on manual focus. Releasing the momentary autofocus button returns the camera to manual adjustment. This is a good technique for capturing a moving item, animal, or person when you don’t have time to adjust the focus by hand.
Infinity button. There’s also a “rescue” button on some cameras. It’s for suddenly changing focus from something near to something far away. The infinity button pops the lens to its farthest focus point with a one-button push. Say, for example, you’re photographing a baggage handler at the airport. Suddenly you see a jumbo jet ascending on a take-off. The plane will have disappeared by the time you correctly focus by hand. By hitting the infinity button, you can immediately catch footage of the distant plane.
WHY MANUAL FOCUS FOR INTERVIEWS?
Almost all pros switch to manual focus for recording interviews. Though the interview setup is static, with the camera on a tripod and the subject sitting in a chair a fixed distance from the camera, the camera on autofocus constantly rechecks itself automatically to verify sharpness. A slight rock forward or backward by the interviewee sets off the automatic search for a new focus point and results in the annoying effect of the image going from sharp to blurry and then back to sharp again. Using manual focus, the videographer sets the distance, so a slight movement by the subject won’t change the sharpness of the picture.
DEPTH OF FIELD
In still cameras, the adjustable opening in the lens that lets in light is called an aperture. With video cameras, the same opening is called an iris. If you are not already familiar with these terms and their uses, they can be confusing. Adjusting the iris on your video camera not only allows you to get the correct exposure, but it also provides creative control of how your shots look and how viewers respond. As with still cameras, the diameter of the iris is described as changes in f-stops, also called f-numbers. A larger f-stop number (f/16, say) allows less light into the camera than a smaller f-stop number. For example, f/2 opens the iris wide and allows in more light than f/16.
◀ Frame 1. The image has great depth of field. The point of focus is the face sporting the sunglasses, but the foreground and background are both in focus. For this shot, the lens was set to a small iris (f/16).

▲ Frame 2. The image has shallow depth of field. The point of focus is the face wearing the sunglasses. Only that face is sharp because the lens was set to a large iris (f/2). (Photos by Ken Kobré)

The reason for this seemingly backward system for f-stops is that f/16 really represents the fraction 1/16. Likewise, f/2 really represents the fraction 1/2. One-half (1/2) is bigger than one-sixteenth (1/16), so that is why the iris at f/2 lets in more light than the iris at f/16. Over the years, the industry convention has dropped the fraction and retained just the bottom number: f/2 and f/16.
Depth of Field Explained
Depth of field is a technical term that actually means the “zone of sharpness” in an image—the area that is sharp in front of or behind the point on which you focused. The demonstration photos above illustrate how adjusting the iris controls depth of field. Although a lens can focus on just one point at a time—the sunglasses in these pictures, for instance—the area in the pictures in front of and behind the sunglasses can also appear to be sharp, or it can be blurry, depending on depth of field.
Adjusting the size of the camera’s iris alters the “zone of sharpness.” Closing the iris to its smallest size (Frame 1, f/16) produces the greatest depth of field. The statues lined up before and after the sunglasses (the point of focus) are sharp.
Opening the iris to its widest limit (Frame 2, f/2) produces a shallow depth of field, with only the point of focus, the sunglasses, remaining completely sharp.
Other factors will also affect depth of field. For instance, depending on whether you are physically closer to a subject or are using a telephoto lens to get a closer image of it, you will have less apparent depth of field.
In many circumstances, you will be better off shooting with the least depth of field in order to visually isolate your subject from a busy background.
To keep the subject sharp but the foreground and background blurry (shallow depth of field):
• Use the longest focal length possible (telephoto).
• Come as near as possible to your subject.
• Use the widest iris (aperture) possible (such as f/2).
Creative Use of Depth of Field
The human eye naturally gravitates toward the part of a scene that is sharply focused—and glosses over what is blurry. Within the image frame, cinematographers and videographers use the eye’s instinctive reaction to control viewers’ attention.
▲ Sharp Front to Back. Sometimes you want everything in a scene to look sharp. This requires the maximum amount of depth of field. To achieve deep depth of field, as in this photo, the photographer focused on the farthest haystack, just before the green grass started. The photographer then closed the iris to its smallest opening (f/16). This setting kept the nearest haystack as well as the farthest conical towers in the distance in sharp relief. (Photo by Ken Kobré)

◀ Controlling Attention with Depth of Field. Here the focus is on the grasshopper. The iris is at its widest setting (f/2). The photographer wanted minimum depth of field in order to show only the insect and the subject’s hand in sharp relief. The person holding the grasshopper is completely out of focus, thereby assuring that the insect gets all the viewers’ attention. (Photo by Ken Kobré)

DEPTH OF FIELD FOR DIFFERENT TYPES OF CAMERAS
Wonder why a Hollywood film looks so different from a video documentary? It’s quite simple, really. If all other factors are equal, the size of the camera’s sensor determines the area of sharpness. The sensor in most small video cameras is a lot smaller than the sensor in large Hollywood cameras.
HOW DEPTH OF FIELD DIFFERS FOR DIFFERENT TYPES OF CAMERAS
In this illustration, all cameras are 5 feet from the subject, and all cameras are taking the same shot. The iris/opening on each is f/2.8. The white number on each camera shows the actual focal length of its lens (so each camera frames the subject the same way). The green bar indicates the distance that will be in sharp relief for each scene.

1 35mm movie camera used in Hollywood
2 16mm movie camera (or a 2⁄3-inch broadcast camera)
3 1⁄3-inch professional DV or mini-DV camera (Canon XL1, Sony VX2000)
4 Consumer 1/4-inch mini-DV camera (Canon GL1, TRV900)
Tip
The extreme depth of field of most video lenses poses some extreme technical problems. The slightest speck of dust or dirt on a lens shows up in final footage as a recurring spot visible in every frame. Avoid the problem before it occurs—and recurs.
• Install an ultraviolet (UV) protective filter on the front of the lens.
• Cover the lens with a lens cap when the camera is not in use.
• Clean the filter and the lens with a soft cloth to eliminate foreign objects.
• Use a lens hood at all times to avoid lens flare (see p. 96).
LENS
Selecting the Right Lens Length
Many video cameras allow the user to shift from a telephoto to a wide-angle shot simply by zooming the lens in or out. Changing the lens’ focal length allows directing attention to one detail or including a wider perspective.
Most video cameras have a rocker switch or moveable collar on the lens itself that allows the user to smoothly change the lens from wide-angle to telephoto or vice versa. Some cameras even offer control over the speed of the motorized zoom.
SLR cameras and other hybrids with a video option have the advantage of an enormous assortment of lenses to use—from a fish eye all the way to a 600mm telephoto and beyond. Using the entire assortment of lenses available for SLR or other hybrid cameras, however, does require removing one lens and putting on the next. Even the available zoom lenses on an SLR still require changing the focal length manually.
Going wide. The wide-angle setting on the lens allows one to work in small, cramped spaces like this tiny bookshop. With the lens set at a wide angle, the videojournalist can capture everything from precarious stacks of books to overflowing shelves without having to pan the camera. Many pros, regardless of the camera they’re using, employ a wide-angle lens most of the time. With a wide-angle lens, they can either fill the entire frame with their subject by standing extremely close or can stand back and take in the whole scene.
▼ Wide-angle Lens. With the lens set on wide-angle you can show an entire room without panning. (Photo by Ken Kobré)

When shooting outdoors to achieve a broad vista effect, the videographer can call on the same wide-angle lens used indoors. Capturing Les Gorges du Verdon, known as the Grand Canyon of France, required a wide-angle lens to take in the huge sweep of landscape that included the river, the pedal boats in the foreground, and the mountains in the distance.
Manufacturers sell wide-angle adapters that fit onto a camera’s original lens. They usually cost much less than a separate, standalone wide-angle lens. The wide-angle adaptors are designed to fit a variety of cameras. Be careful when buying a wide-angle adaptor, though. Make sure it is sufficiently wide so as not to cut off the edge of the image produced by the parent lens.
• Videojournalists say the wide-angle lens, which lets them work near their subjects, gives their pictures more of an intimate feel. Because this lens allows coming in really close, the viewer almost becomes a part of the conversation.
• When working in tight proximity to a subject, people irrelevant to the story can’t wander into the picture frame and block the camera’s view.
• Getting near a subject sometimes is the only way to get clear audio in the field. If using a wireless mic is impossible, shooting with a wide-angle allows you approach your subject and be near enough to record the person’s voice with the on-camera mic.
• A wide-angle lens allows for steadier handheld shots.
◀ Wide-angle Lens. Wide-angle settings on the lens help capture grand vistas like this shot of Les Gorges du Verdon, in southern France. (Photo by Ken Kobré)

◀ Wide-angle Lens. Wide-angle lenses help you work close to your subjects. (Photo by Ken Kobré)

TOO CLOSE FOR COMFORT
It’s true that you can focus very close to a subject with a wide-angle lens. But the closer anything is to the lens, the bigger it will appear in the picture. Standing relatively close to and above someone and then tilting the camera down to include the subject’s full length will cause the person’s head to appear to be the size of a basketball and his feet small enough to fit into baby shoes. Obviously, try to avoid using the wide-angle lens when it distorts someone’s features.
Wide-angle lens

Medium telephoto lens

A wide-angle lens close to the subject and pointed down distorts the person’s whole body.

(Photos by Ken Kobré)
Standing on the ground and pointing a wide-angle lens up to include a building’s full height causes the structure to look as if it’s falling over. This happens with any lens, but the phenomenon is particularly exaggerated with a wide-angle lens because it allows the photographer to stand close to the base of the structure while still including the entire building in the image. Photo 1 was taken at the base of the building. Photo 2 was taken with a normal lens and farther away.
(1) Wide-angle lens

(2) Normal lens

TELEPHOTO LENSES BRING ACTION NEARER
When a photo’s subject is far away, a telephoto lens can be a videojournalist’s best friend.
Videojournalists also deploy telephoto lenses when getting close is prohibited, such as at ceremonies like this Bar Mitzvah. (Photo by Ken Kobré)

Although you can get shaky video with any lens length you use, the problem is particularly exaggerated with a telephoto setting.
Everyone’s hands shake just a bit, and this slight trembling is magnified by the telephoto lens. This tremor can translate to images that bounce up and down on the screen. And if you’re walking while shooting video, the final footage can be decidedly unfortunate.
Some cameras have a built-in mechanism in either the camera’s body or the lens that can, to some extent, electronically or optically counterbalance shaky hand movements and smooth out the resulting video. Software can also come to the rescue of bouncing video to help smooth out the screen images. But eliminating all shakiness is impossible.
See a side-by-side demo of a camera’s optical stabilization/vibration reduction feature. ![]()
Remember that most camera makers recommend that you not use the anti-shake feature when the camera is on a tripod.
(See Chapter 6 for information about using tripods to eliminate shaky shots.)
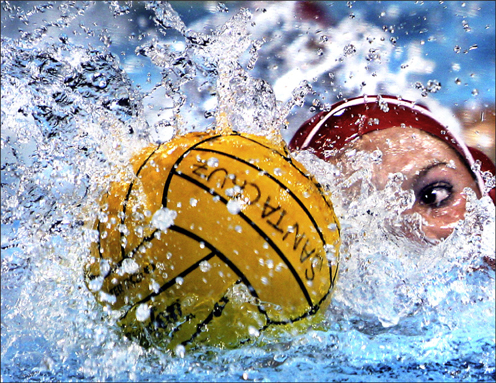
◀ Telephoto Lens. Shooting athletes in action is an obvious example of when the telephoto lens is indispensable. (Shmuel Thaler, Santa Cruz Sentinel)
Limited to One Lens
You don’t have to use a zoom lens to shoot everything from close-ups to wide shots. Many pocket-sized video cameras have a fixed lens that does not zoom. And with most smart phone cameras, you are better off not zooming because they accomplish this task digitally.
To frame tightly with these fixed-lens cameras, just walk up close to your subject. For a wide shot, back away as far as you possibly can. Being limited to a fixed lens in a low-end camera is not as great a hindrance as you might imagine. Using a video camera no larger than a cell phone, this writer produced a short video about a 300-year-old olive mill still powered by a water wheel that turns a huge millstone inside to crush the olives. For a detail shot of a worker’s face, the videojournalist approached him and held the video camera about three feet away. For an overall shot, the shooter backed up as far as possible in the room and held the camera as high as he could reach. The final video might certainly have looked different had a larger camera with a built-in zoom lens been used, but the visuals from the pocket camera looked entirely professional. Below is a set of pictures showing what’s possible with a fixed-length lens.
▲ One Lens. This series of images was taken with a fixed-focal-length lens. For close-ups, the shooter brought the camera close to the subject or to the olives. (Photos by Ken Kobré)
