
CHAPTER 10
Shooting a Sequence
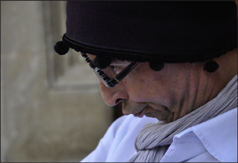
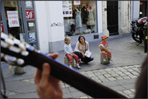
▲ Powderpuff Cheers. Keep the camera rolling so you won’t miss funny moments like this one at a powderpuff football game.
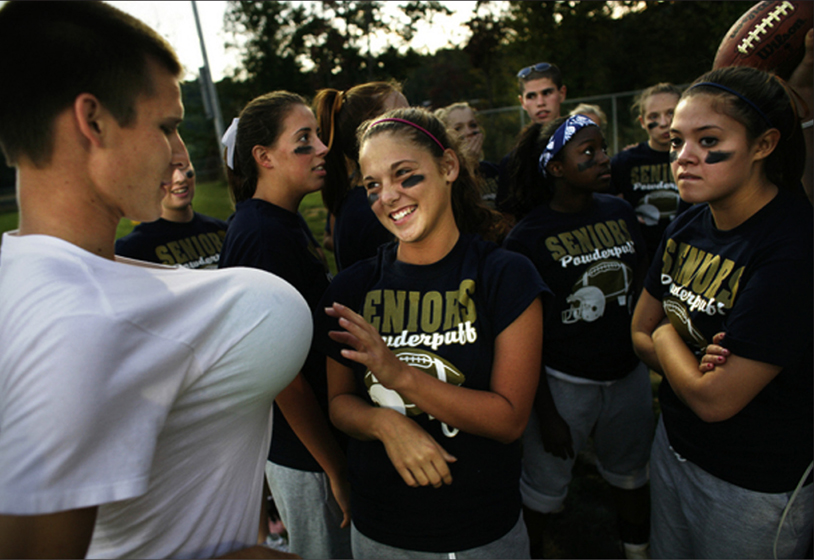
(Photo by Josh Meltzer, Roanoke Times)
This symbol indicates when to go to the Videojournalism website for either links to more information or to a story cited in the text. Each reference will be listed according to chapter and page number. Links to stories will include their titles and, when available, images corresponding to those in the book. Bookmark the following URL, and you’re all set to go: http://www.kobreguide.com/content/videojournalism.
Videos and multimedia projects are assembled from individual shots, and those shots are collected into sequences and scenes. Then, the scenes are stitched together in the editing process to form a seamless whole. Think of writing an essay: you put words together into sentences, then string the sentences into paragraphs, and then assemble the paragraphs into sections. Once you have your sections in order and they read coherently, you have your essay! A similar process is at work in video and multimedia.
THE FIVE-SHOT FORMULA
“One shot is never enough,” warns Rolf Behrens, a veteran freelance video shooter from South Africa. For Rolf, just one shot of an incident will not produce enough footage to edit. And each shot must run for a minimum of 10 seconds. For a usable sequence, multiple shots of each scene are a must. Memorize this mantra—“one shot is never enough”—and your footage will be more professional right from the start.
When you watch documentaries or go to a movie, observe that they consist of a series of individual shots stitched together into a story that holds your attention. Though you can identify a wide range of different camera placements, zooms, dollies, and pans, most documentaries— and even fictional films—are built with five basic camera shots:
• Wide shot (WS)
• Medium shot (MS)
• Close-up shot (CU)
• Point-of-view shot (POV)
• Reaction shot (RS)
These five shots are your “bread-and-butter” coverage.
Recording the five basic shots for every situation may sound tedious. It is sometimes even impossible … and doing so surely will produce more footage than will ever make it to the final documentary. But just as the goods in a pantry don’t make a meal until the proper ingredients are mixed in a recipe, all those shots seem unrelated only until it’s time for the final edit. Like a chef who doesn’t use every ingredient in a pantry, you may not need every single shot in order to blend a satisfying story. But although the chef can run to the store to pick up a missing spice, there’s no going back for the essential footage you may have overlooked. The five basic shots for each situation may seem like overkill, but if you have shot them all, you will see that they provide all the necessary ingredients for cooking up a visually rich story.
Ideally, shoot all of the five basic shots for each different scene of the video. You read that right—at least one of each basic shot for each scene.
PUTTING THE SHOTS TOGETHER TO BUILD A SEQUENCE
Let’s think about telling the story of the members of a local climbing club and their activities off as well as on the mountain.
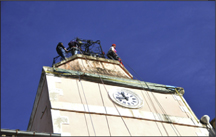
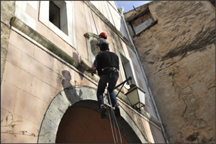
You obviously need footage of the climbers preparing for, ascending and subsequently descending a mountain; you should also include how the club members put their sport to good use in order to actively support their local community. A public demonstration that includes teaching local children how to rappel down a town’s ancient five-story clock tower offers the ideal opportunity to capture not only this exciting event but also the members’ commitment to the townspeople. Over the course of the day, each willing child will trot up to the roof, be harnessed, and then will descend from the top of the tower to the ground.
You could shoot this whole event by standing back and recording one child descending the clock tower from start to finish. Most amateurs would press the button to “start” when the child appears at the top of the tower and press it again to “stop” once the child touches the pavement below.
The descent might take five minutes. Unless you are closely related to the youngster, can you imagine watching all five minutes?
A professional handles the same situation by recording at least 10 seconds of each step in the series with a number of different kinds of shots. Edited together, the shots will form one sequence in the larger story. The edited sequence will last a much shorter time than five minutes.
This series of images that you will use to build into a sequence when editing the piece includes wide, medium, close-up, close-up detail, reaction, and point-of-view as well as low- and high-angle shots. When edited together, a sequence holds far more visual interest than does an uninterrupted five-minute clip taken from a static camera positioned in one location.
Five minutes of real-time footage from a static camera position is almost unwatchable. With a well-edited series of short shots, however, the same five-minute event can be quite thrillingly revealed to the viewer in less than 20 seconds. The viewer has no trouble accepting that time has been compressed. Knowing where to place each scene is the very nature of visual storytelling. As you cut from one shot to another in a sequence, you are urging the viewer to suspend disbelief and allow emotions to do the watching.
Note that the little story told in the rappelling sequence is but one part of the greater story about the climbing club and its members. The boy being helped out of his harness is the end of the sequence, not the end of the story.
1 From the ground take a low-angle wide shot, also called an establishing shot, to show the top of the tower. Looking straight up, this shot gives a sense of distance from the ground. An additional wide shot could have been taken from farther away to show the height of the building.
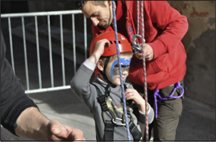
2 Now, head up the stairs for a medium shot of the child being helped into his climbing harness.
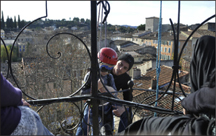
3 From a lower tower window, shoot up for a close-up of the child’s face and his reaction to what he can see below.

4 Now shoot down to show what the child sees—the boy’s point of view.

5 Head to the ground and from a low angle shoot up as the youngster and his coach slowly descend.
6 Try a medium close-up of the belayer as he handles the safety ropes for the pair.
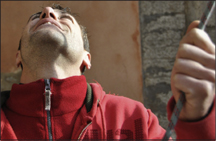
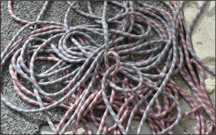
7 Look for a close-up detail (often called a cutaway) such as the ropes lying on the ground. During editing, you will use this shot to take the viewer away from the action for a second.
8 Aim up at the youngster and his mentor and shoot from a low angle.

9 Here’s a high-angle medium shot you would have taken while still on the tower, placed here to demonstrate that in the final edit, you will be able to include the anxious parents looking up at their son as he gradually progresses downward.

10 Back off a few feet to take a wide shot of the youngster when he’s finally soloing toward the ground.

11 Capture in a medium shot where the future mountaineer is being guided to the ground with the help of his sister and the rope handler on the ground.

12 End the sequence with a medium shot of the boy being helped out of his harness.
▼The ship M/Y Steve Irwin is dwarfed by an iceberg as it sails Antarctica’s Southern Ocean.

(Photo by Adam Lau)
The more individual shots a sequence contains, the more visually exciting the reportage. Television ads, which are most absorbing and excruciatingly expensive on a per-second basis, sometimes contain more than 100 separate shots for a brief 30-second spot.
Tip
For ease of editing later, every shot should be recorded for a minimum of 10 seconds. Of course, the shots can be longer. But anything shorter than the minimum 10 seconds will be almost impossible to trim during the editing process.
STRATEGIES FOR NAILING THE BASIC FIVE
Here are some strategies to make sure you capture all the shots required to produce a great video or multimedia piece.
Wide Shot Shows a Location
The term wide shot is also referred to as the long shot or establishing shot. Don’t worry about the precise name. Just concentrate on the reason for shooting it and don’t come home without it.
“For a good wide shot, you shouldn’t have to tilt the camera to see everything,” warns Steve Sweitzer, former news operations manager of WISH TV, Indianapolis, and adjunct professor at Indiana University-Purdue University Indianapolis.
Observers present at any event move their eyes from side to side to take in the entire scene. The wide shot allows viewers to orient themselves to a scene. Without a wide shot, viewers’ brains cannot very easily evaluate the others. They don’t know where they are or what they are supposed to be seeing.
To establish location for each sequence or the entire story itself, video shooters typically use a wide shot. The overall result shows where the story is taking place: inside, outside, country, city, land, sea, day, night, and so on. This shot defines the relative position of the participants. In a confrontation, for example, an overhead wide angle shot would show whether the demonstrators and police were a block apart or across the street from one another. The overall shot also allows viewers to judge crowd size and evaluate the magnitude of an event.
As part of every sequence, the wide shot shows the location of the unfolding action. For some stories, a wide shot might include only an overall view of a room. For others, it might encompass a city block, a neighborhood, or even a whole town. The scope of the shot depends on the size of the scene and its eventual use in the story.
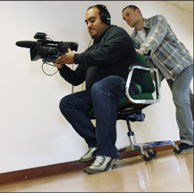
To photograph an overall of a room, you’ll want to find a ladder, get up on a chair, or—if nothing else is available—stand on a table or a desk. Anyway, it’s always advisable to bring your own ladder. It’s difficult to know ahead of time what you might or might not be allowed to stand on. So come prepared.
Your ladder may come in handy outside unless you can find a telephone pole, a leafless tree, or a nearby building that will give you the height necessary for an effective wide shot.
When caught in a flat area, even the roof of your car will add some height to your view.
The wider the angle on your zoom lens, the less distance from the scene you will need to be. Your simplest option may be to set the lens on wide angle and hold the camera high above your head with the LCD screen tilted down. This position of the camera itself will give you some height, while you will still be viewing what you’re photographing with the monitor. However, for a major story that encompasses a vast area, such as a flood, hurricane, or conflagration, try getting a ride in or—if it’s important enough—renting a helicopter or small airplane to capture the magnitude of the destruction.
Medium Shot Shows the Action
The job of the medium shot is to carry the bulk of the story. Frame the shot close enough to see the participants’ action, yet far enough away to show their relationship to one another and to their environment. The medium shot contains all the storytelling elements of a scene. Like a news story lead, the MS footage must tell the whole story quickly.
Medium shots allow viewers to follow the action and observe body language but still observe peoples’ faces. You will need to shoot many medium shots because most videos usually contain more medium shots than any other kind.
▲ A ladder comes in handy when you need to shoot from a high angle.
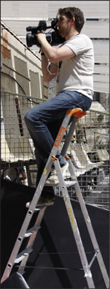
(Photo by Ken Kobré)
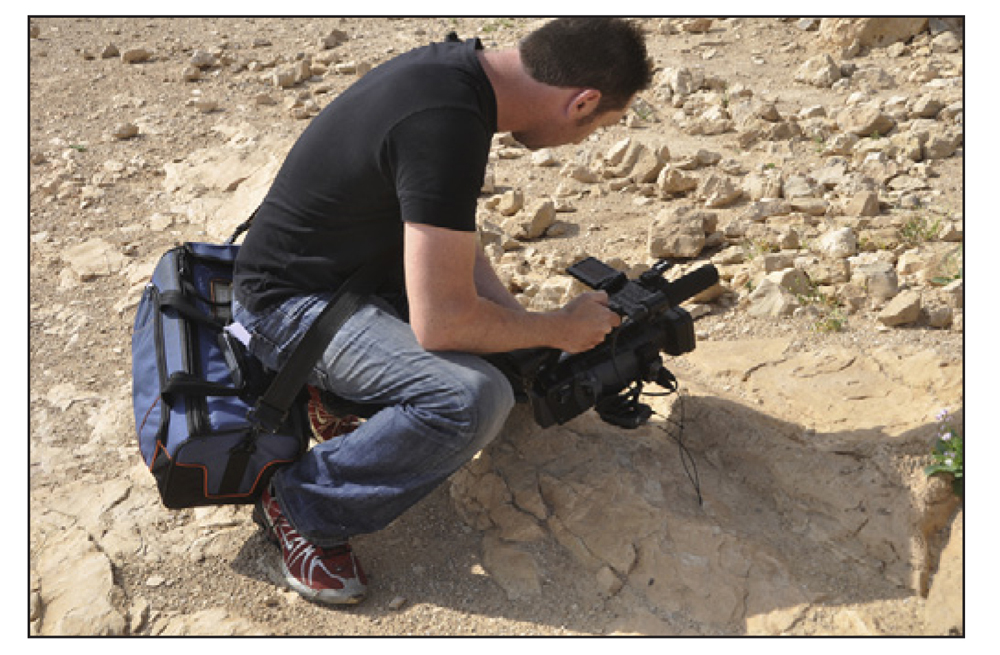
▼ The medium shot of this food giveaway in Jerusalem shows the action. It is wide enough to show the physical setting in which the action is taking place, yet close enough to see facial expressions.

A medium shot gains dramatic impact when it captures action. Action often happens quickly and leaves the shooter little time to prepare. Shooting action is like shooting sports. For both, you must anticipate when and where the action will take place. If a man engages in a heated argument with a police officer, you might predict that an arrest will follow. Aim the video camera when the argument starts and don’t stop shooting until the confrontation has ended— peaceably or not.
Whenever possible, start shooting before the action begins and let the camera roll. Don’t interrupt. You can always edit out the dull moments later. If you hesitate to shoot, waiting for just the right moment, the quarrel might end while you’re still fiddling with the equipment. In addition to starting to shoot before the action begins, you must anticipate where the action is going next and position the camera there in time to record the next segment of the conflict.
“Let the camera observe the action,” says John Hewitt, Emeritus Professor of Broadcast at San Francisco State University. Set up the shot and wait for the action. “Keep the camera still and let the characters’ action take place within the frame.” Sometimes the action will end in a few seconds; other times, you will need to keep rolling for minutes.
Don’t distract your audience by constantly readjusting the composition and lens focal length as you record the scene. Relax. Let the action roll out. Follow the action if it moves. Have patience. Something will happen. Remember to let each shot tell a tiny story before hitting the pause button.
Of course, if the action is repetitive, you will need to move around with your camera in order to capture different angles. Editing together the shots taken from different angles of a repetitive action will help add zest to the final footage.
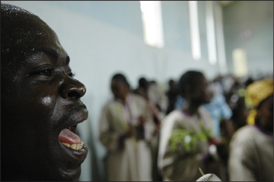
▶ In a Congolese church on Easter Sunday, the close-up image of a choir member singing pulls in the viewer.

(Photo by Ken Kobré)
For the medium shot, a wide-angle lens setting works well if you can stay in close to your subjects. Many videographers shoot almost everything with the lens set to wide angle. They move away or come in close but keep the camera’s zoom lens on its widest focal-length setting. Shooting close in with a wide angle provides intimacy by bringing viewers into the middle of the action. Shooting the same scene on a telephoto setting—even framed in the same way—requires standing much farther away and leaves viewers feeling as if they are peeking into a private moment as an outside observer.
Of course, when covering a dangerous situation or one in which your own movement is severely restricted, the telephoto setting still captures a fine medium shot, even though it will not net the same intimacy.
Close-Up Adds Drama
Nothing beats a close-up for drama. The close-up slams the viewer into eyeball-to-eyeball contact with the subject. At this intimate distance, a subject’s face, whether contorted in pain or beaming happily, elicits viewer reaction.
A close-up is like an intimate portrait. The video camera can catapult the viewer to within inches of a stranger’s face. This type of shot eliminates the normal space barriers most people maintain during a routine conversation. According to Michael Wohl in “The Language of Film,” this is one reason fans often feel they actually “know” famous actors. (Though the feeling is certainly not mutual!)![]()
When shooting close-ups, avoid the wide-angle setting on your lens. At a close distance, the wide-angle perspective causes objects in the center of the picture to be unnaturally enlarged.
People’s noses look out of proportion. It’s quite unflattering (see Chapter 5, “Camera Basics”). The medium-to-telephoto setting is best for photographing faces close up.
“Although most stories only contain a few wide shots, there should be lots of tight shots. I’ve seen some great stories that were primarily close-up shots,” says Steve Sweitzer, a seasoned professional who has been shooting and editing video news for 30 years.
The close-up detail shot, sometimes called a cutaway, is used during editing to shift viewers’ attention from the flow of the action. The best cutaways are the ones that have some logic to them and relate to the scene.
Close-up detail shots also play a big role when being viewed on the small screen of an iPod, smart phone, or tablet. Although objects in a wide shot are likely to be lost, a close-up detail shot practically rises and says hello from a tiny screen.
Watch for telling close-up details—like a trumpeter’s lips or a card dealer’s hands—which will add relevant, visual variety to the story. In a piece for Time magazine, “The Lord’s Resistance Army Hunts Children in Sudan,” Ed Robbins came in close when a young escapee showed the actual wound resulting from being stabbed with a bayonet. The close-up of the boy’s awful injurydrives home the rogue army’s brutality.![]()
Cutaways are crucial for editing. Cutaways will bridge together shots in the edited piece. A cutaway draws visual attention from the action for a few seconds so that directional movement in one shot, for example, doesn’t conflict with any action that follows (see “Obey the 180-Degree Rule,” described shortly).
◀ Close-up detail of grapes in the early morning.

(Photo by Ken Kobré)
Tip
A close-up of a detail alone is useless. The close-up detail shot needs context—where it is located, who is involved. If you have shot a close-up detail of an object in someone’s hands, your story also needs a shot showing the person. The close-up shot is just one of the five basic shots needed for each situation you are photographing.
Point-of-View Shot
A point-of-view shot captures what a subject sees by putting the camera in almost the same position as the subject. In a hypothetical shooting situation, your first shot may show a side view of an artist dabbing oils on a canvas. The next shot then could show how the canvas appears to the painter’s eye—from his or her “point of view”.
▼ This point-of-view shot shows what the boat captain sees as he guides his canoe down the Congo River in the Democratic Republic of the Congo.

(Photo by Ken Kobré)
ACTION/REACTION
Action. The first shot shows a man pretending to drive a motorcycle.
(Photo by Ken Kobré)
Reaction. The second shot shows the reaction of his hypothetical rider.
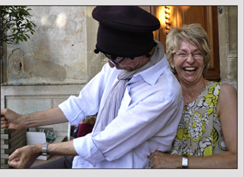
(Photo by Ken Kobré)
Reaction Shot
When someone says or does something exceptional, shocking, or funny, the viewer wants to see how others respond. The reaction shot is often (but not always) a close-up of someone reacting to a comment or action. This shot helps define the effect of the shot that came just before it. In the pair of images on this page, a man pretends to drive an imaginary motorcycle. The reaction shot shows his partner laughing. The woman’s tickled reaction is almost contagious.
“I often refer to these shots as ‘Action’ and ‘Re-action,’ ” says John Goheen, of Terranova Pictures. “For every action there is going to be a re-action. The action part is usually pretty easy to identify, while identifying the re-action can take more effort, especially for the inexperienced eye.”
In a Hollywood movie, the camera captures the action and reaction of a conversation by cutting back and forth between two people as they talk. If a man and a woman are arguing, the camera might focus on the woman as she waves her hands or sticks her index finger in the man’s chest to make her point. Then the camera might cut to the man as he winces, sticks out his tongue, or otherwise reacts to her vituperations.
For any situation with an audience, always shoot a number of reaction shots. In pure visuals, the reaction shot shows the impact of what they are watching. If the story is about a performer, the reaction shot might capture whether the crowd is wide-eyed in amazement, teary-eyed in sympathy, or just slumped in their seats looking bored.
Framing. When shooting people, be sure to frame the shot so the characters have “looking room.” If looking to the left, your character should be positioned on the right side of the screen. Usually, when shooting a person or an animal moving across the screen, try to lead the action. If something is moving right to left across the screen, you want to keep the moving body on the right side of the screen with extra space on the left of the screen. The person or animal now has room to “move” into the picture frame. If a dog is meandering from right to left, pan the camera with the dog so it always has some “ running room” on the left, ahead of him.
▶ Framing. Videographers make use of foreground treatment, such as in this shot in a sewing school. The use of a foreground object can add another dimension to a two-dimensional medium.

(Photo by Ken Kobré)
Alternatively, you might want to keep the camera stationary and let the dog enter and leave the frame. When a subject enters or leaves the frame, the clip might be invaluable during editing.
▲ Eye direction. Usually try to compose the shot so the subject is looking into rather than out of the frame.
(Photo by Ken Kobré)
FIVE-SHOT FORMULA
| Type Of Shot | Lens Setting | Advantage | Technique | |
 | Wide WS | Wide angle | Shows where the action takes place | Chair, ladder, building, monopod |
 | Medium MS | Normal | Moves the story forward | |
 | Close-up CU | Telephoto | Telling details | Move in close |
| Face | Use telephoto setting | |||
| Macro or close-up setting | Objects | |||
 | Point of view PoV | All lengths | What the subject is watching | Place yourself behind subject |
 | Reaction RS | All lengths | Shows the effect of the speaker or the action | Capture the audience reaction |
A-, B-, AND C-ROLL
A Bit of History: The Origins of A-Roll and B-Roll
The terms A-roll and B-roll are leftovers from the days when television news crews used film and not videotape. As late as the 1970s, news photographers recorded images with a film camera, and audio was documented with a separate sound recorder.
A news photographer shooting film often shot only silent footage. Later, in the editing room, a soundtrack that might include an announcer’s voice, music, and perhaps even sound effects were married to the silent images that had been shot in the field. Separate film rolls allowed the editor to dissolve between shots.
The A-roll carried the narration track, images, and sound for reporter stand-ups and interviews—all the synced sound. The silent footage containing action was called the B-roll.
▼ B-Roll of Action. A clip of this dramatic scene of a Japanese whaling boat bearing down on a group of an anti-whaling demonstrators in a light pontoon could be used as B-roll footage while a voice-over narration or an interview with members of the group, recorded later, could be used to clarify what is going on.
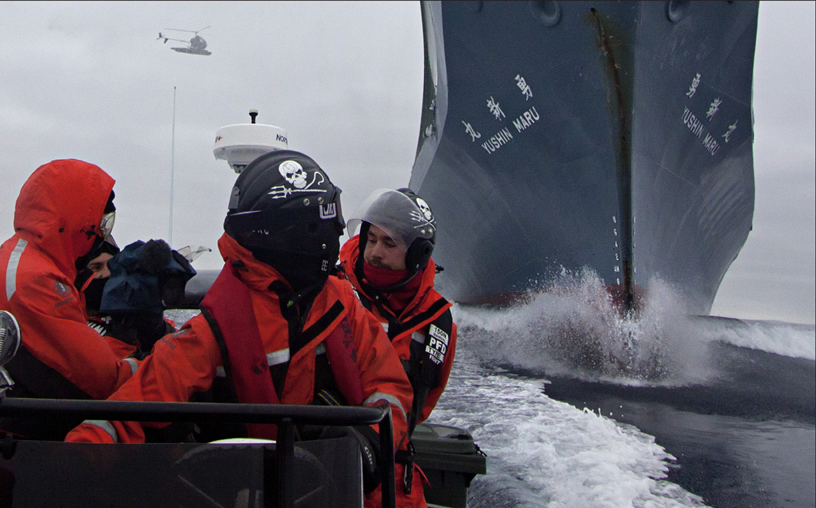
(Photo by Adam Lau)
The B-roll was made up of all the pictures used to illustrate the A-roll. The two rolls were paired, and mixed during projection, and the result was called A/B-roll editing.
Filmmakers and videographers often include in B-roll footage in which visuals don’t have to be synced to sound. This distinction has nothing to do with the quality of the footage.
A-Roll
A-roll typically includes all interview footage and reporting commentary. In this kind of situation, the viewer can see the person and hear what he or she is saying. Likewise, the viewer would expect to hear a correspondent’s voice while seeing the reporter’s mouth move in sync with the sound.
B-Roll
B-roll comes in two flavors: specific and generic.
Suppose you are working on a story about a group that is trying to stop the killing of whales. If your voice-over describes a specific incident that took place when a small group of demonstrators tried to block a Japanese whaling boat from operating near Antarctica, the B-roll would show that particular incident.
Separate A-roll interviews with the group members might describe the reason for the protest. Then, during editing, the shots of the Japanese whaling vessel bearing down on the demonstrators’ inflatable pontoon boat (B-roll) could be combined with the voice-over of interviews explaining their cause. The B-roll footage of the incident would run while the demonstrators’ voices tell what was happening and why. The B-roll images help to “verify” what the demonstrators describe in their A-roll interview.
Generic B-roll, on the other hand, sometimes referred to as wallpaper, is footage that doesn’t advance the story. Wallpaper simply keeps the screen filled with images as the dialog spills out. For instance, to accompany the story on anti-whaling protests, the producer could use generic B-roll “wallpaper” file footage featuring whales swimming in some ocean, somewhere. The pictures would flow across the screen but not advance the story. The generic images of whales would not tell the viewer anything about the actions of this particular anti-whaling group.
“ ‘Wallpaper’ is a derogatory term describing the random inclusion of unrelated video to cover timeline space,” says John Hewitt, Emeritus Professor of Broadcasting at San Francisco State University. “Wallpaper shots do not comprise a sequence and often lead to confusion.”
Notice how traditional six o’clock television news often reports and illustrates stories about the economy using generic B-roll “wallpaper.” The correspondent will recite the employment figures, for example, while showing footage of carpenters hammering at construction sites. The pictures of construction workers nailing boards are so generic that the footage can be used whether the economy goes up or down. These “wallpaper” pictures do not serve a real journalistic purpose except to fill visual airtime. Avoid them whenever possible by shooting lots and lots of B-roll directly related to the topic you are documenting.
C-Roll
There should now be a third category called C-roll, in which the C stands for candid.
Today’s video cameras record and synchronize audio and video at the same time. This setup is sometimes referred to as “SOT” or Sound On Tape terminology that soon will make no sense since digital video is recorded directly to a hard drive or compact flash card instead of to tape. Yet the concept of SOT is ideal for candid shooting of active situations.
SOT is the most compelling footage you will record. Candid SOT moments are often more revealing and storytelling than a formal interview in which the main character or even a correspondent’s voice-over explains a situation. Recording candid action with natural conversation conveys the sense that viewers are overhearing what subjects really say to one another while involved in an activity. In fact, they are.
CATCHING MOMENTS
As Brian Kaufman, staff videojournalist for the Detroit Free Press says, “Moments are really key. Most videos are built through a series of interviews, sound bites and maybe some natural sound breaks. But the best stories also capture those naturally occurring moments that happen between people.”
Moments will reinforce interview sound bites and/or strengthen the narrative. In “The Boys of Christ Child,” a modern orphanage on Detroit’s West Side, Kaufman uses moments to enhance key points being made in the story. In an interview with Mr. Dave, one of the home’s counselors, he talks about teaching the boys— many of whom suffer from severe emotional scars and developmental issues—to learn from their mistakes, work hard to do the right thing, and not be a quitter. To bolster that message, Kaufman uses a scene where Kevin, an older boy, is teaching Jalen, a younger boy, to tie his shoes.
▲ The Boys of Christ Child. An orphanage setting gave the videojournalists who worked on this story ample opportunity to shoot candid pictures.![]()
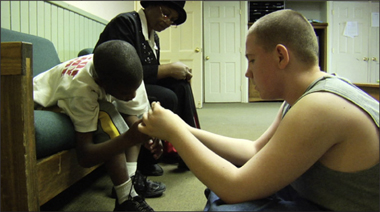
(Lead Photographer: Kathleen Galligan; Videographer and Producer: Brian Kaufman; Photographers: Regina Boone, Brian Kaufman, Romain Blanquart, Detroit Free Press)
Kevin says, “Don’t ever let me hear you say that you can’t do something. You can. You just don’t want to. You can do anything you set your mind, heart and soul to. Now tie that shoe.” The scene then cuts to a medium shot of Jalen attempting to tie his own shoe. The visual cuts back to a wide shot of Kevin actively helping Jalen tie his shoe. Then there is a cut to Mr. Dave, who says, “I think they are pretty prepared. If they’re not, they soon will be.” A cut back to Jalen and Kevin in a wide shot just as Jalen looks up at Kevin and says, “I got it right?” That interaction between the boys spoke to the very essence of the message that Mr. Dave was making in his efforts as a counselor.
As important as moments are, they are not always easy to get. Capturing moments requires a great deal of patience and results in a great deal of footage. Grabbing real, unscripted moments is the very peak of videojournalism. They let viewers see and hear what is happening rather than hear a reporter telling them what they should think and feel. Only by hanging out with your subjects for hours, days, and sometimes even weeks, can you capture real moments.
If you are trying to record natural, revealing moments, it helps to be able to sense when something dramatic is likely to take place. Cultivating this sense comes with experience, but it eventually helps make your available shooting time more efficient. Using the wireless mic, smaller video or hybrid cameras and unfettered access, the modern videojournalist can record poignant, honest moments that infuse a story with soul.
This style of shooting is called observational, or sometimes cinéma vérité. Frederick Wiseman’s documentaries are known for this approach. Wiseman shoots unstaged and unmanipulated action as he simultaneously records audio and images. He lets the camera roll as real life unravels before his lens. His films High School, Hospital, and Welfare allow audiences to watch and listen to the real lives of high school teachers, nurses, doctors, and welfare clients.
Capturing candid footage takes time, a lot more time than doing an A-roll interview and finding B-roll footage to support it. If you want candid footage, you will have to hang around with the primary character and wait patiently for things to happen. Television shooters meeting deadlines for the 6:00 p.m. news rarely have the luxury of hanging out and waiting for storytelling candid moments. But videojournalists shooting features for the Web find this an invaluable technique for capturing compelling footage.
BUILDING THE STORY VISUALLY
Good stories generally have a beginning, a middle that has a complication and resolution, and an ending. Those elements form a story arc that typically begins by building toward the complication, reaches the climax with a resolution, and then offers a satisfactory conclusion. (See Chapter 1, “Telling Stories.”)
In a documentary, characters often tell their own stories, whether they are primary participants, witnesses, or experts. They quite naturally reveal who is involved, what is engaging them, and when, where, why, and how the story is unfolding.
Visually, the parts of the documentary, opening, complication/resolution and closing are built from a series of shots—similar to the way a written story is built with sentences and paragraphs. Each raw shot from the camera begins when the videographer starts recording and ends when the shooter stops or rests the camera on standby. The shot may be as short as 10 seconds (the very minimum) or may roll on for a minute or more. Longer shots can be shortened during editing.
So think of the shots as sentences. As sentences, shots will be joined into sequences (paragraphs) and the sequences into scenes (chapters). In literature, writers use transitions to link paragraphs and chapters together. Likewise, transition shots bridge one scene to another. Scenes, linked by transitions, will support the story arc as it builds and unfolds.
Along the way, the visual shots will show the subjects telling their story and present in sequences, scenes and transitions the how, what, when, and why that form the story. The establishing shot will tell the viewer where the action is taking place. And, finally—after the buildup— the complication and the resolution are shown, and the piece will end with a closing shot.
Shooting Order for Features Is Unimportant
Generally, you can shoot the five basic bread-and-butter shots without regard to order. As you will arrange the order of the shots when editing, your first shot could be the one that ends your story. In the sequence described earlier of the little boy rappelling down the clock tower, the high-angle medium shot of the parents was taken while the videographer was descending the tower but used later in the sequence of the final edited footage.
Your subject’s action and dialog will dictate some of your shooting options. Always record action immediately, as it is taking place. Never assume that the person will do or say something again. You don’t want to miss real, candid moments that might not recur.
And, of course, don’t ask your subjects to repeat anything just for the camera.
▲ Think Ahead to Avoid Confusing Cuts. Editing Clip Two to run immediately after Clip One will cause the subject’s head to appear to suddenly swivel on-screen. Avoid this problem (called a jump cut) ahead of time by shooting a cutaway clip of the subject’s hands or some other close-up to place between clips One and Two.

(Photos by Ken Kobré)
Aside from the fact that repeating dialog is unethical in most journalistic situations, people simply never sound the same when they repeat something said in earnest or with emotion.
Don’t Depend on Reshoots
Don’t bank on coming back on another day to pick up the shots you missed on the first pass. Your subject will surely have changed clothing by then, or the sky will have transformed from clear blue to overcast. Trying to edit shots taken at different times and under different lighting conditions is difficult, if not impossible, to execute smoothly. Collect all the fundamental shots— those basic five mentioned earlier—when you are on the scene the first day.
Look for Transitions
Just as writers need transition words to link changes in topics, you will need visual transitions—a scientist entering her laboratory, a busy subject driving from one place to another—some kind of action that brings the viewer to a new place with the character.
Tight shots also make great transitions from one section of the story to another. You may also want to consider using a “natural wipe,” like a car passing through the frame, that can serve as a transition shot between two different scenes of the story.
Tip
Sometimes, out of the blue, a character’s most revealing quotes start coming once the formal shooting session has ended. Even if you have packed your bags and are ready to leave, don’t hesitate to grab your camera and start shooting again.
Shoot to Avoid Jump Cuts
The jump cut typically occurs with interview footage in which the camera was locked on the subject. A subject always moves slightly during an interview. When it’s necessary to edit an interview using two clips taken from different parts of it, the subject’s head appears to jerk on screen at the edit point. The audio will sound perfectly normal, but the footage will convey an abnormal and often distracting twitch.
Interview cutaway shots may include a reporter taking notes or listening, or a detail of the interviewee’s hands. You can place the cutaway between the two parts of the interview and the viewer will not notice that the subject’s face has moved a bit.
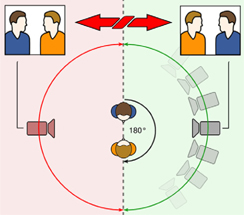
The 180-Degree Rule
Two subjects (or other elements) in the same scene should always have the same left/right relationship to each other. Changing position from one side to another while shooting can create editing problems later because the subjects themselves will appear to change sides on screen.
Maintaining consistent screen direction is referred to as the 180-degree rule (see diagram). Think of an imaginary line running between the noses of your two subjects. This line is referred to as the axis of action or the line of action. You have 180 degrees within which to shoot on one side of the line, but if you cross over it, your characters will appear to flip sides. To avoid editing problems later, never cross that imaginary line.
◀ Obey the 180-Degree Rule. Stay on one side of an imaginary 180-degree line when shooting two people talking. This will help avoid the problem of the subjects’ heads appearing to change screen direction when the clips are edited. If you cross over the 180-degree line, the couple will appear to reverse sides of the screen.
COLLIDING FOOTAGE
▲ When edited together, clips taken from the north and south side of the street make the carts look like they changed direction.

▲ Note how the cutaway of the horse’s head provides a visual buffer between the shots of the carts. The horse’s headshot neutralizes the conflicting screen directions of the two other shots. (For more detail on the 180-degree rule, see KobreGuide.com.)![]()

(Photos by Ken Kobré)
If the problem of screen direction strikes you as complicated for two people talking, how about when you’re shooting a parade celebrating ancient farming methods? You’ve set up your tripod on the south side of the street. You start the camera rolling as a line of horse carts approaching from the left passes in front of you. What happens if you then cross to the opposite side of the street to photograph the rest of the parade from that side?
Yes, the horses are still coming from the same direction. However, editing together the footage of them shot from both sides of the street will make it appear as if they are running into each other. One shot will show the horses going from left to right on the screen, when suddenly the second shot will show them rolling from right to left. This apparent reversal in direction is visually confusing to viewers, to say the least.
Maintaining the same apparent screen direction is crucial to avoiding this kind of visual confusion. Fortunately, the thoughtful shooter has plenty of options from which to choose in order to avoid colliding footage while editing.
PICK A SIDE
One obvious solution is simply to stay on the same side of the street. The ensuing shots will show the next group continuing from left to right. The direction for everyone will stay consistent.
Think of an imaginary line drawn down the middle of the street (the 180-degree line) with an arrow going in the direction in which the parade is advancing. Any number of the shots taken on one side of the line can be edited together with shots taken from that same side.
LOOK FOR VISUAL BUFFERS
Sometimes you must shoot from both sides of the street. How can you reverse the cinematic direction on the screen without disturbing the viewer? This is a case where the prepared shooter must think way ahead to editing the final piece.
Shoot from a Neutral Position
Take a shot with no left or right direction. For example, photographing from an overpass as the parade passes beneath will cause action to come from the top of the screen toward the bottom. When edited, the overhead shot can be followed by action coming from either right or left.
Another solution is to shoot from the middle of the street as the parade continues toward or around you. Now the direction is neutral because the horses are coming straight at you. Again, this neutral shot can be edited between shots from either side.
These kinds of shots edited between footage from the two different sides of the street allow viewers’ minds to accept the sequence as natural.
Shoot Cutaways
In addition to shooting the action from a neutral direction, shoot a detail in the scene that has no implied movement at all. Cutaway shots like this include close-ups, audience reaction, and objects that typically have no particular left-right direction. A shot of bystanders, for example, will provide a visual buffer to prevent the horses from appearing to collide on screen regardless of the apparent direction from which they are coming.
ADDING VISUAL VARIETY
By default, most amateur video is shot strictly from eye level. Guessing at a reasonably average height, think of this habit as the 5’6" syndrome. Avoid the 5’6" syndrome at all costs. Otherwise, all your shots will have a dull sameness to them.
Shoot down from a 30-story building or up from inside a manhole. Either way, the viewer gets a new, sometimes jarring, but almost always refreshing look at a subject. Even when covering a meeting in a standard-sized room, standing on a chair or sitting on the floor while shooting can add interest to your images.
Get High, Legally
Even before you start shooting, look for ways to take the high ground. Whether going out on a catwalk or shooting from the balcony, find some way to look down on the scene. High angles often are used to establish location or to show the size of a crowd.
The digital video camera enables shooting from above your head. To do so, open the LCD screen and point it down. With the lens set to wide angle, hold up your camera, extend your arms far above your head, and aim the lens in the general direction of your intended target. Watch the LCD flip-out screen to frame the shot. Start shooting.
As mentioned earlier, some photographers go so far as to bring their own stepladders to ensure they can shoot from an elevated position.
You can extend your height by mounting the camera on a monopod or tripod. Start the camera rolling, hoist the whole affair as high as possible into the air, anchor it in your belt or hold your arm close to your body, and monitor the scene with the flip-out screen. Photographers call this over-the-head leap of faith a Hail Mary shot.
Even if the LCD on your camera doesn’t flip out, you can use this technique by simply aiming the camera in the approximate direction of your subject. Now, regardless of your religion, say a few Hail Marys and pray that the pictures will come out well framed and in focus.
Remember that the camera is not very steady swaying above you, so shoot a lot of footage to assure getting at least a few seconds or, at best, minutes of rock-solid video.
▼ Shoot from the Balcony. Former president Gerald R. Ford lies in state in the Capitol Rotunda.

(Photo by Shmuel Thaler, Santa Cruz Sentinel)
▶ Arm’s Length for a Higher Angle. To get a point of view shot of a wax figure of Obama being delivered to Madam Tussaud’s, the vid-eographer held the camera as high as possible.
(Photo by Jeff Chiu)
Sometimes used to create an overall or establishing shot, this kind of overhead shot can provide an unusual view and works especially well when in crowds or when competing with other photographers for footage of the winning athlete after a sports event.
The Hail Mary is also effective on dance floors or at street fairs, where it’s hard to isolate people from distracting, busy backgrounds. Coming up close to a person, holding the camera high, pointing it down, and shooting for at least ten seconds, you will see that the ground or pavement provides a visually clean, nondistracting background.
How Low Can You Go
“Get down. Get dirty. Get your camera where the action is,” says Bruce Chambers, an outstanding feature photographer for the Orange County Register.
▼ Low Angle. For a really low angle, place the camera directly on the pavement.
(Photo by Kaia Means)
Video cameras and their flip-out LCD screens allow shooting from (literally) ground level. With the lens on wide-angle, place the camera as low as possible—even on your toes— aim, and shoot. If you don’t have an LCD screen that tilts, you can check the results right away, and if your aim was off, reorient and shoot again.
“We can take viewers to places they haven’t been before,” says John Goheen, photographer and producer at Terranova Pictures. “Few people are going to lie flat on the ground to see the texture of the cobblestone or practically taste the water from the stream rushing past the lens. But these types of scenes can do that” for them.
When to Move the Camera
The five basic shots listed earlier, whether taken from a high angle or low, typically involve the camera remaining stationary while the action unfolds in front of the lens. However, you also can move the camera itself or zoom the lens while shooting to add visual variety to footage. Panning, tilting, and zooming may seem familiar if you have been using a still camera, but don’t be fooled!
▲ Ground Angle. With the LCD screen flipped out, you can place the camera low for a dramatic angle.
(Photo by Betsy Brill)
Although still and video photographers each pan, tilt and zoom, the visual results are completely different. The still photographer shooting at a slow shutter speed while panning the camera or zooming the lens produces a partially blurred image—an often-striking effect in stills. The same pan or zoom shot in video, though, produces sharp continuous footage. Additionally, the video camera can move while the subjects are moving—either parallel to them, or toward or away from them. All of these techniques can be used to enhance or detract from the visual appeal of your video.
Avoid Zooming the Lens
The most overused button on a video camera is the zoom control. Yet zoom shots rarely add much to any story. “The eye can’t zoom,” says Pulitzer Prize-winning photojournalist Kim Komenich, “so a zoom instantly puts the viewer into a situation that is not real.”
In his book iMovie: The Missing Manual (O’Reilly), David Pogue observes, “For the camcorder operator, zooming imparts a sense of control, power, and visual excitement. For the viewer, zooming imparts a sense of nausea. Overly zoomed and swish panned shots are a quick giveaway that a rank amateur has shot the footage.”
Tip
“Another good reason not to zoom is that it’s tough to handhold a steady shot if you are zoomed in,” notes Steve Sweitzer, former news operations manager for Channel 8 WISH in Indianapolis. “To prove the point, handhold your camera, zoom in on something across the room and try to hold that shot steady. Then put the lens in the wide position and walk up to the object and take the same shot; you’ll instantly see the difference.”
Okay. Okay. What about MTV?
You might have seen a shot that zooms so fast you feel like you’re in a time-travel machine, pans executed as if they were shot from a centrifuge, and camera tilts violent enough to throw off a pinball machine. And then there were those angles so severe that even teetotalers think they’ve been on a night of serious binge drinking. What is going on here?
▶ If you must zoom, do it in one direction—either in or out— but avoid going in both directions in the same shot. Hold the shot steady for at least 10 seconds at the beginning and at the end of the zoom.
(Photos by Ken Kobré)
MTV’s shooting style provides eye-candy to accompany music. The music’s driving beat powers the piece while the sometimes-chaotic images add visual spice to the mix. For MTV, the fast-cut, zoom-in-zoom-out style maintains a large audience and has spawned a unique visual shooting language of its own. Most documentaries, on the other hand, try to emphasize a story’s content rather than to support the beat of popular music or to show of a photographer’s shooting style.
Generally speaking, we want the camera to bring us into situations as if we were there. We walk toward something to see it more closely. To achieve the natural equivalent of walking into a scene, you need to physically move the camera itself forward. This is called a “dolly in” shot (more on this shortly). We walk up to something or someone; we don’t zoom with our eyes to get there. Keep in mind that the “zoom-in” shot actually changes the focal length of the camera lens from wide angle to telephoto.
Having warned against excessive zooming, there are times when zooming the lens will be necessary.
If you absolutely must zoom, hold the shot steady for 10 seconds before starting. Begin gradually. When you end the zoom, hold the shot for another 10 seconds at the new focal length. These pauses before and after the zoom allow the viewer to become oriented before the movement starts. As you zoom, it’s usually necessary to gradually tilt the camera up or down a bit to maintain proper framing throughout the shot.
Again, zoom-in-and-out changes the lens’ focal length from telephoto to wide angle and then back to telephoto. Professionals consider a zoom-in followed by a zoom-out within the same shot exceptionally poor camera work. Also, during editing, avoid putting two zoom shots together. The effect for the viewer is like being on a horrible roller-coaster ride.
The exception to the zoom rule: emotional faces. Sometimes during a painful interview, videojournalists carefully zoom in and hold tight to capture a particularly emotional moment.
You must know when to hold and when to zoom in a touchy circumstance such as shooting a character in tears. Also, the speed of the zoom is crucial. Ideally, the speed of the zoom should be so subtle that the viewer won’t even notice that the framing is changing. A quick “whip zoom” is too obvious, draws attention to the technique, and pulls the viewer’s concentration away from the emotional situation.
If you suspect that your subject may say something emotional or dramatic during your on-camera chat, try to adjust the framing of the shot in the lens before starting to record the actual interview. Without recording, zoom in for the eventual close-up to adjust the composition. Then widen the lens for a looser shot to start the interview. This will prepare the camera to zoom smoothly should the need arise later.
Although zooming in to an extreme close-up of an emotional face can be seen as a cliché, used sparingly and shot professionally it can also be an effective story-telling tool.
Remember never to use a camera’s “digital zoom,” which results from software manipulation rather than lens movement. Digital zoom produces undesirable electronic noise in the final footage. (See Chapter 5, “Camera Basics.”)
Some video cameras zoom with a turn of the lens barrel, others via a press of the finger on a rocker switch that causes the lens to zoom at a steady speed. Even the speed of a zoom can be selected on some cameras. Others zoom faster or slower depending on how much pressure is applied to the rocker switch.
Tip
For more about using the zoom watch (1) “Video Sequence With and Without Zoom: French Café” and (2) “Video Sequence With and Without Zoom: Fabric Merchant.”![]()
Pan Cautiously
Pan shots result from slowly swinging the camera to follow action without changing the camera’s position. Suppose you are covering the Tour de France. As the riders pass, you will follow them with the video camera to keep the lead rider continuously in the frame. A smooth pan is one in which the rider stays in the same approximate place in the frame during the entire shot.
Videographers also pan to mimic the action of a human head. We turn our heads in a semicircle to take in a wide view of a scene. Someone arriving at a mountaintop, for example, is likely to absorb the vastness of the scene below by surveying it with a continuous sweep of the head.
The pan shot can take in as much area as the photographer likes and can also be used effectively to establish location.
It is difficult to shoot pans without creating shaky images. A sturdy tripod with a “fluid” head and steady hands are a must for swinging the camera at a slow, steady pace. Also, position your body so that you are facing the direction in which you will end the pan, called “the position of comfort.” Your body will be slightly twisted to start the pan, but you will relax during it. Start your pan slowly, speed up slightly, and then slow down just before the pan comes to rest at the finish.
“Pans work best if you can follow something, like a car or bike” according to Steve Sweitzer, a seasoned video professional. “Also, pans are more likely to succeed if the movement is left to right; because we read left to right, our eyes are more comfortable moving in that direction.” Says John Goheen of Terranova Pictures, “If you are going to pan, use it to follow action. I believe the camera was created to capture action … not create action.”
Tilt Up or Down Rarely
Besides panning left or right, slowly tilting the camera up or down during a shot can help establish location, such as outside a tall building. Tilting the camera is a way to show the height of person, a structure, or a mountain or to emphasize relationships between something high and something low. If possible, always allow the viewer to discover something at the end of a tilt. For example, a tilt may start at a man’s tennis shoes, but as it moves up, it might then reveal that he is wearing a tux. The best reason to tilt is to convey height—and to provide a payoff at the end of the shot.
Motivated Zooming, Panning, and Tilting
If you are going to zoom, pan, or tilt, remember that each camera action should have a logical starting place and a visual destination, a payoff, for the viewer when the movement ends.
If photographing a flower vendor, for example, you might position the camera across the street in order to encompass the flower stand. The zoom would start out wide and hold for at least 10 seconds in the wide position. Only then would the camera slowly zoom onto the merchant and his customer—and hold there for at least another 10 seconds. The close-up view of the florist is the payoff at the end of the zoom.
The movement starts at a logical place and arrives at a satisfactory destination. A camera move that ends in a payoff like the flower vendor is called a “motivated” pan, zoom, or tilt. The motivation of the shot is to find a particular person, place, or thing. Aside from motivation, speed of the camera movement is important—keep it slow so that your viewers don’t feel seasick.
Tip
Keep in mind that editing pans, zooms, or tilts for the final piece is often a challenge. It is almost impossible to cut a zoom or pan in a way that makes visual sense. Pans and zooms really need starting and ending points, so an editor is obliged to use the whole segment. Because some zooms or pans can run as long as 20 seconds, they can slow down an otherwise well-paced documentary.
Dolly Shot
A dolly shot refers to moving the camera toward or away from a subject while keeping the lens at the same focal length. It takes its name from the sturdy wheeled cart—a dolly—used by Hollywood photographers to roll a mounted camera on a track or a smooth surface toward or away from the subject. The camera itself is completely stable, and the cart provides smooth movement.
The dolly shot has more impact when the camera moves past objects. A camera moving toward someone working in a factory would pass people, machinery, and so on, and provide a sensation of real forward movement that is completely different from the effect of zooming the lens. That is why cinematographers prefer the dolly shot to the zoom. The effect is more natural. In the real world, we walk up to greet a person or to view something. We cannot zoom our eyes.
▲ Example of a motivated zoom with a payoff.

(Photo by Ken Kobré)
▲ Tracking Shot. Here, the camera was on a boat going at the same speed as the cyclists.

(Photo by Ken Kobré)
Tracking Shot
The tracking shot, also called a truck shot, describes a camera moving with, and often parallel to, the subject. Also shot from a dolly or “truck” in the world of movies, an effective tracking shot can add energy and variety to footage. Though shot without a dolly, the series of photos above is an example of a tracking shot. The photos were shot from a canal boat moving at the same speed as the bicycles. The framing remains the same, with the couple as main subjects; the camera’s speed and distance from the subjects also remain the same. The trees between the camera and the subjects cause the viewer to lose the riders momentarily but then see them reemerge an instant later further along the trail.
Documentary shooters and videojournalists rarely have the luxury of using a dolly for mov-ing-the-camera shots. Shooters often imitate dolly shots and tracking shots by just walking or running with their subject while handholding the camera. Very occasionally, the jerky footage that results from the camera bouncing in rhythm with footsteps can be effective. Most of the time, its impact is distractingly stomach-churning.
The success of a dolly shot and or a tracking shot rests with keeping the camera stabilized while moving it. Think wheels. Find a shopping cart, a wheeled office chair, or maybe even a bicycle, skateboard, or other contraption that can be rolled relatively smoothly toward, away from, or alongside the subject.
▲ For a do-it-yourself dolly, try a chair with wheels.
(Photo by Ken Kobré)
Camera Stabilizers for Better Handheld Shooting
Hollywood cinematographers who don’t want to be restricted to shooting on a cart of any sort often use a camera stabilizer, such as a Steadicam, for “handheld” dolly shots or tracking shots. This contraption, which attaches the camera to the mobile photographer, absorbs sudden movements, including the up-and-down motion of walking. The device allows the camera to remain level even as the cinematographer walks, climbs stairs, or just swings the camera from left to right.
Some videojournalists use a lightweight camera stabilizer for the same purpose. An Internet search will turn up some of these gadgets as well as plans for making an inexpensive DIY version.
Here’s some really good news. If you did not use a dolly or a camera stabilizer when you shot in the first place, software solutions can electronically remove a lot of—not all—shakes after the fact. Check it out.![]()
WHEN TO STOP SHOOTING AND REFRAME
Regardless of what you’re shooting, you must always decide when to keep rolling and when to stop and change angles for a new shot.
In general, let the action finish before you move to start another shot from a different angle or before zooming the lens.
While photographing an arrest at a demonstration, this writer shot the action as a policeman handcuffed a young woman. But he had to decide whether to keep rolling with a medium shot that included the action or to come in for a close-up of the protester’s face. Documentary shooting requires constant trade-offs between continuing to record one shot or stopping to get a new perspective by changing position or lens length.
▶ Lightweight camera stabilizers for small cameras come in all shapes and sizes.
Tip
Sometimes you must keep shooting to avoid missing important action. Other times you must keep the camera rolling so as not to lose important dialog. In both circumstances, you can later separate the audio and video during editing and use one or the other, as you deem necessary.
Each Shot Can Tell a Tale
Shoot each shot as if it were telling a short tale. Press the button to start and let the camera roll until an action is complete. The videojournalist must keep the camera rolling as each short, short tale unfolds.
PRACTICING WITHOUT A CAMERA
As you start to watch a documentary, a news show, or a movie, concentrate for a few minutes not on the plot or subject matter, but on the camera work. Notice the nature of each camera move. Observe. Analyze the choices.
For example, if the piece starts with a wide shot and then cuts to a close-up and back to a wide shot, what was the purpose? What was achieved? See if you can start to anticipate the next type of shot the editor will use.
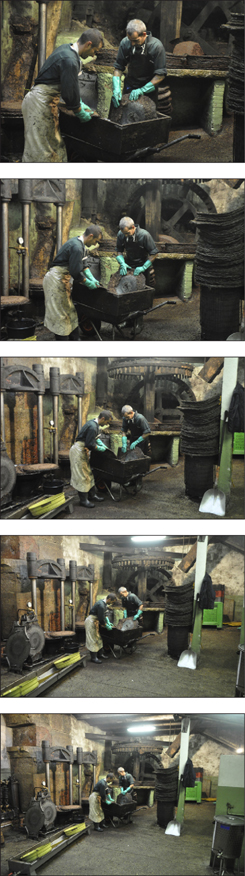
▼ Let the Action Finish Before Finishing the Shot. This series of images comprise a single medium shot of a woman trying on a hat. The shot begins with her picking up the hat, climaxes with her putting it on her head, and ends with her returning the hat to the table.
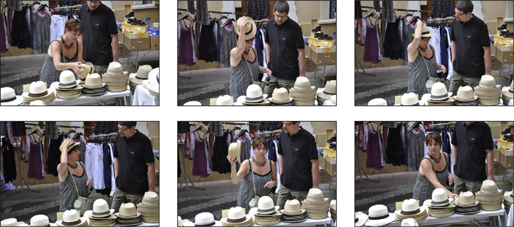
(Photo by Ken Kobré)
As you watch any fiction or nonfiction film, mentally flipping your concentration from run-of-the-mill viewer to analytic observer is a bit like having an “out-of-body” experience. You will drift back and forth between being an observer of the technique and being an engaged, standard viewer—then back again.
Another way to accomplish this kind of shot-by-shot visual self-training is to watch a movie without sound. Keep your eyes peeled to analyze the shots and scrutinize the editing. Learn by watching. Just as an athlete learns from reviewing game action during a playback session, you can improve your own shooting by studying the work of others.
Finally, here is some “homework” that will really expand your mind. Try counting the number of individual shots—from close-up to wide, zoom, pan, tilt, and more—in a TV commercial. Note how many shots are squeezed into a 30-second ad.
To return to the basic rule of thumb for shooting video discussed at the beginning of the chapter: shoot and move, shoot and move to edit and produce a satisfactory, successful documentary. One shot is never enough.
See KobreGuide.com for a video on how to shoot and edit a sequence.![]()