
16
As sound people we are required to know a plethora of obscure and seemingly unrelated information. We are also ridiculed for our endless fount of useless knowledge. Two sound people can hold a lengthy conversation using only numbers and letters, which has caused my wife to boycott dinners with more than one sound person in attendance. We are required to know basic electronics and microphone techniques. We must know how to mix and what TV stations are broadcasting. We need to know that midi can only travel 50′ without an extender and how humidity and temperature affect the sound we hear. We also must know how to properly attach a lavaliere to an actor and how to prevent sweat-outs. We should know the name of a good medical supply company as well as a place to get cheap defective condoms. We should be able to hold a meaningful conversation with the nurse in the delivery room about Tegaderm, although my wife doesn’t agree with this. It really is a profusion of minutiae. We also must possess the strength to make everyone happy, the wisdom to know what to say when they are unhappy, and the patience to know we will never make them happy. And of course we have to know intercom and video.
Part of that minutiae includes knowing what equipment you need in your RF toolkit and the secrets of dealing with wireless mics. I talked to one of the most experienced deck sound people on Broadway to get the lowdown. Mary McGregor has worked as an A2 or deck sound on dozens of shows. She currently works at the Metropolitan Opera and has recently worked on Book of Mormon, Spring Awakening, Chicago, In the Heights, Spamalot, and dozens of other shows. McGregor explains how to rig and place mics: “The optimal placement of a mic on an actor seems to be the center of the forehead. The first questions to be asked and answered are: Is there hair or no hair? Is there a wig or no wig? Is there a hat or no hat? These things help determine the actual placement and rigging parameters. Tailoring a mic to an actor, the next step, moves into the ‘craftsy’ area of being an A2.”
She explains the arts and crafts: “The basic three toupee clip rig with the mic head at the center of the forehead will work for a healthy head of hair. If we are using a beige mic, it is necessary to paint the cord to match the actor’s hair. I really like the Copic art markers best for this. When they fade due to sweat and hair products, the color isn’t horrible. Pantone and Letraset art markers are also good. Do not use a black Sharpie EVER. It will always go blue. Color the mic the length of the actor’s head from forehead to nape. Add 2″ of Craft wire in a color that matches the hair color at the element end. This helps to focus the mic toward the actor’s mouth. String three toupee clips onto the cord. The clips should be prepped with 1/8″ elastic tied through the holes. The clips should come close to actor’s hair color. I also paint the very head of the mic with black/brown/beige nail color. This way the color won’t sweat off onto the actor’s forehead.”
A bald or balding actor is a challenge. For that McGregor suggests an ear clip: “Over the ear is the next best placement. I have placed mics on the temple using the standard 3-clip rig. With a DPA, I like the clear plastic ear clip. With a MKE2, I like the heavier metal clip. I try to get the head of the mic on the actor’s cheekbone away from the sideburn. Craft wire on the mic for the distance from the ear to the cheekbone helps hold the mic close to the face. Using a Hellerman tool, attach the mic cord to the ear clip with 2 or 3 Hellerman Sleeves. If the actor has hair on the back of his neck, you probably need a small toupee clip after the ear clip. Otherwise, plan on taping the mic behind the actor’s ear and at the neck.”
She explains how wigs make life easier: “If the mic is worn with a wig, very little needs to be done. I have had quite a bit of success with putting them under the lace front of wigs. The head and maybe 2″ can be painted to match the hair color or skin tone. I have also had the head peek out from a hard front wig. Sometimes, depending on movement, it may be necessary to go to a hi-boost cap on a DPA, because the curved screen on the soft-boost cap scrapes against the lace.”
McGregor has found an inventive way of painting mics temporarily: “Lately, I have been dealing with mics in a ‘rep’ situation; I have started carefully covering the mic cord, where it gets painted, with paper adhesive tape and painting the tape. Then, when the show is finished, I can remove the paper tape and have a plain mic to use for the next show. The paper can last two to three shows, but will need to be redone for more shows.”
McGregor explains the delicate art of how to stick the mic to the actor’s skin: “Generally I put one small piece of tape on the actor’s neck. This is mostly to strain relief the last toupee clip so it won’t be pulling on the actor’s nape hair. It’s also to counter-act ‘loopage.’ That is, when the cord ‘loops’ out of the actor’s collar and can be seen by the audience. Three kinds of tape are in general usage: Transpore, Blenderm and Tegaderm. I have also used paper tape, fabric tape and band-aids. Whatever the actor is comfortable with, and doesn’t irritate his/her skin is what I go with. The last choice is Tegaderm, because it is so expensive. It does, however, come in large sheets for naked or plunging back taping. If the actor is sweaty, you can use alcohol pads or skin prep pads to wipe the neck or ear area before taping. This will give you a drier surface for the tape.”
And what can you do about those pesky sweat-outs? McGregor explains, “Sweat control is another actor-specific situation. Moleskin, available at drug stores near the shoelaces, is the easiest to find. Elastoplast is better because it doesn’t get furry, but it is harder to find. I take a small piece of the Elastoplast the length of the mic head’s diameter and wrap it around the cap not covering the windscreen. These wraps need to be changed regularly as they become messy and stop absorbing. If the actor is a heavy sweater and the mic belt is next to the skin or a really wet undershirt, the pack might need to be bagged. The cheapest are sized plastic bags taped closed. A cotton puff or two at the top around the connectors can be added before you tape the bag close. Sheathes or condoms can also be used. I don’t like long-term condom use because the talc can gunk up the battery compartment and the off/on switch on the transmitter. Sheathes, ordered from a medical supply company, don’t have the talc.”
But your job is not done when the curtain comes down as McGregor explains, “Maintaining the microphones after the show has been set is also very important. I like to use non-acetone spirit gum remover on the cords to remove tape goo. Krylon makes one and so does Ben Nye. Most hair products can be removed with soapy water. Painting always needs to be touched up, and the elastic on the toupee clips should be checked often. The windscreens can also get clogged with sweat. I like to use an ultrasonic jewelry cleaner for the caps. A $60 one is usually just fine. The battery operated ones aren’t powerful enough, and the ones with digital controls and heat are too much. Mr. Clean, a low suds anti-bacterial cleaner, is fine, but there are others on the market.” For hygienic reasons everyone should have his or her own mic. Budget constraints may limit this possibility.
McGregor explains the differences she has found among designers and actors: “I find that some designers care more about hiding the mics than others. Some actors care more about the comfort of the pack placement than others, which can have more to do with the costume than anything. The bottom line is to maintain the sound quality. The main job of an A2, in my mind, is maintaining the consistency of that sound. Once the EQ is set for a particular actor with a particular placement, every show thereafter should be the same, even if there is just one rehearsal and one show. Live theatre is a fluid thing and no two shows are ever the same performance wise. The mic placement on the actors at least takes one more variable out of the equation so the mixer doesn’t have to chase EQ and attenuation all night.”
Items Mary McGregor recommends in your RF Toolkit include:
Masque Mic Check Box: MTB-50
Battery checker
Hellerman Tool
Hellerman Sleeves 15 mm & 20 mm Beige and Black
Craft wire: black, eggshell, white and gray 20 ga and 22 ga
1/8″ elastic black and white
Toupee clips in black, brown, and beige in Small,
Medium and Large
Nail polish in black and shades of brown also clear
Selection of ear clips Alcohol pads Skin prep pads
Art markers: Copic, Pantone, or Letraset in “hair colors”
Tape: Transpore, Blenderm, and Tegaderm
Krylon MME- mic cleaner
Ultrasonic cleaner
Sharpie, for labeling only
Cotton puffs
Safety pins
Scissors
Rat-tail comb
Selection of tie clips, barrettes and bobby pins
Plastic bags and/or condoms
Extra mic caps, an assortment
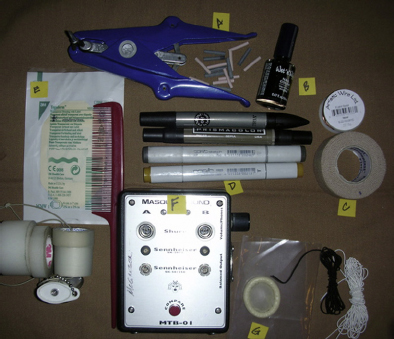
Figure 16.1. Some of the supplies in Mary Mcgregor’s RF Kit. The following list shows the definitions of the tag items in the picture.
A-Hellerman tool with black/beige sleeves
B-Black nail polish and craft wire
C-Elastoplast in beige
D-Coloring pens
E-Tegaderm, Transpore and Blenderm
F-Mic testing box MTB-01
G-Sheathes and plastic bags for transmitters
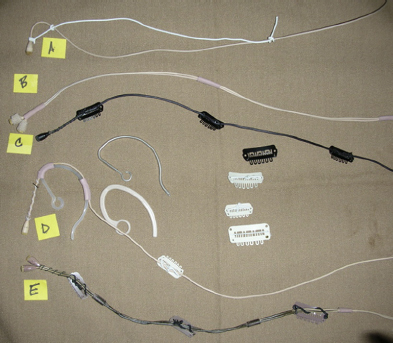
Figure 16.2. Some rigged mics prepared by Mary McGregor. The following list shows the definitions of the tag mics in the picture.
A-Elastic headband
B-Double rig with Hellerman sleeves and Elastoplast on the heads
C-Mic painted black with craft wire on the front and three small toupee clips
D-Ear clip with Hellerman sleeves, craft wire on the front and one small beige toupee clip
E-Brown painted double rig with craft wire on the front, and three small brown clips.