Chapter Three
The Six Visual Sins
Historically, 3D movies have been associated with audience eyestrain and headaches due to technical issues and poor planning. The real problem was not eyestrain; it was brain strain. A viewer’s eyes can only send images to the brain with a note attached: “Here are two pictures, figure it out.” If the brain can’t “figure it out” it will unnaturally realign the eyes or become confused by the two conflicting images sent from the eyes. Eventually, the brain goes into strain mode and the audience gets headaches, eyestrain, and occasionally nausea.
In 3D, there are specific technical issues that can cause audience brain strain. We’ll call these problems the Six Visual Sins. They are:
- Divergence
- Coupling and Decoupling
- Geometry Errors
- Ghosting
- Window Violations
- Point-of-Attention Jumps
There are three main factors that contribute to the negative effects the Six Visual Sins can have on the audience:
1. Where is the audience looking? The Six Visual Sins can’t cause problems if the audience doesn’t look at them. Every shot has a subject and a lot of non-subjects. The audience spends most of its time, or all of its time, looking at the subject. The subject is the actor’s face, the speeding car, the alien creature, the adorable dog etc. If the Six Visual Sins have impacted the subject, the audience sees the problem and gets brain strain.
But most of a scene is not the subject. Peripheral objects, backgrounds, unimportant characters, crowds etc. are all non-subjects that the audience acknowledges but tends to ignore in favor of the subject. Non-subjects can tolerate most of the Six Visual Sins because the audience is looking elsewhere.
2. What’s the screen size? The problems caused by the Six Visual Sins can occur on any size screen, but the problems become more severe as the screen gets larger.
3. How long is the screen time? Time is critical. The longer the audience looks at the Six Visual Sins the greater the risk of brain strain. All of the Sins have degrees of strength and may cause instantaneous discomfort or take more time to have a negative effect on the audience. Brief 3D movies like those shown in theme park thrill-rides can get away with using the Six Visual Sins in ways that would be unsustainable in a feature-length movie. An audience can even tolerate the Six Visual Sins in a long movie if the Sins’ appearance is brief.
Fortunately, all of the Six Visual Sins can be avoided or controlled to create a comfortable 3D viewing situation. The following discussion of the Six Visual Sins assumes the 3D is being presented on a 40-foot theatre screen.
Sin #1: Divergence
A stereoscopic 3D movie may require the audience’s eyes to diverge. This can be a serious viewing problem and can cause brain strain.
Divergence occurs when the viewer’s eyes turn outward in opposite directions to look at the subject in a scene. In real-life, our eyes don’t diverge. Ever. Look at yourself in a mirror and try to simultaneously force your left eye to look at your left ear and your right eye to look at your right ear. It’s impossible to do. Both eyes want to look at the same ear at the same time.
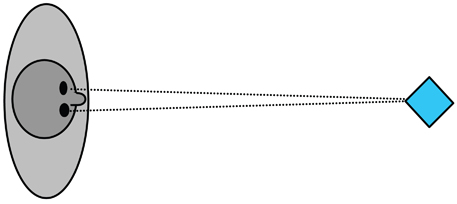
In the real world, both eyes converge on the same object at the same time.
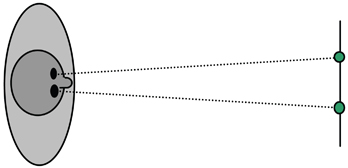
But when watching 3D, our eyes can be forced to diverge or angle outwards in opposite directions to look at an image pair. Divergence can be a problem when it involves the subject of the shot because that’s where the audience is looking.
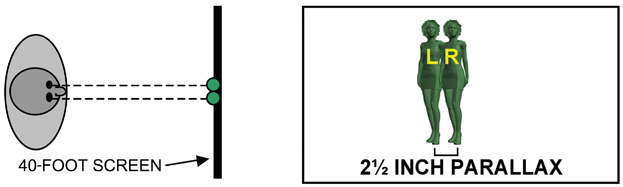
Consider how our eyes see a stereoscopic image pair for a subject that appears behind the screen. The left eye sees the screen left image and the right eye sees the screen right image. Human eyes have a 2.5-inch IO. If an image pair’s actual measured parallax on the screen surface is 2.5 inches or less, the audience’s eyes will not diverge.
On a 40-foot theater screen with 2K resolution, a 10-pixel parallax will measure 2.5 inches or about 0.5 percent of the screen width. The 2.5-inch parallax separation forces the audience’s eyes to look in parallel but that will not cause eyestrain. In real life, we do the same thing when we look at any object more than about 40 feet away.
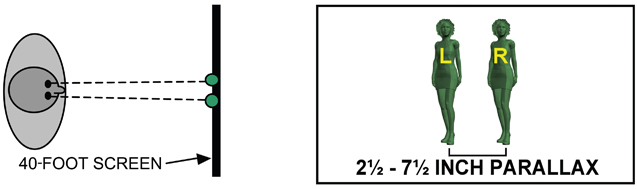
As the measured parallax widens past 2.5 inches, divergence will occur. The tolerance for subject divergence varies, but most people can watch subject divergence up to about 7.5 inches of measured screen parallax without feeling eyestrain. A 7.5-inch parallax is +30 pixels or about 1.5 percent of the screen’s width.
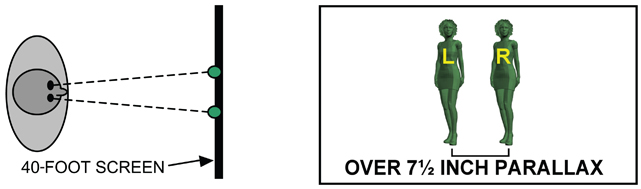
A parallax separation greater than 7.5 inches is called hyper-divergence. It can be used briefly for extreme subject punctuations but sustained hyper-divergence for a subject can cause eye-strain and headaches. Hyper-divergence can be used successfully for peripheral non-subjects without causing eyestrain because the audience isn’t looking at them directly; it’s watching the subject. Non-subject divergence can add depth that would be difficult to assign to the subject.
Watching hyper-divergence can be aesthetically distracting, and visually tiring. It’s like trying to hold a heavy weight. Initially, the weight feels tolerable but as time passes your muscles fatigue, the weight feels heavier, and eventually you collapse. The same pattern occurs with hyper-divergence and it becomes visually stressful.
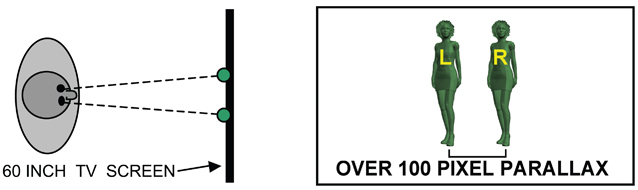
Hyper-divergence is less likely to occur on television screens. A 60-inch (measured diagonally) consumer HD 2K television has an actual measured screen width of approximately 52 inches. A parallax of +92 pixels (4.75 percent of the screen width) measures about 2.5 inches. Any background object with a +92 pixel parallax places that object at infinity, and will not cause divergence.
A pixel parallax up to +280 or 14.25 percent is theoretically tolerable but is unusable in practice because other problems occur like ghosting. In practice, a television background object’s parallax of up to +92 pixels is tolerable, won’t cause eyestrain, and is extremely useful directorially. Placing objects farther away than +100 (5.25 percent of the screen width) isn’t necessary.
Divergence’s eyestrain is actually due to a combination of screen-measured parallax and the viewer’s distance from the screen. See Appendix C for a full explanation.
Hyper-divergence can cause another problem for the audience. If an object’s image pair is too far apart, the audience won’t be able to fuse them into a single 3D image. Even when wearing 3D glasses, the image pair appears as two identical objects rather than a single, fused stereoscopic image. The non-fused image pair visually disconnects the stereoscopic depth and the 3D illusion collapses.
Sin #2: Coupling and Decoupling
In the real world, when we look at an object, convergence and focus work together.
Convergence refers to our point-of-attention or the subject we’re looking at.
Focus refers to an object being in sharp focus (not blurred).
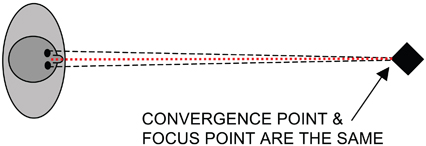
Our two eyes converge on a subject and the lenses of our eyes automatically focus on that same subject. Convergence and focus are coupled.
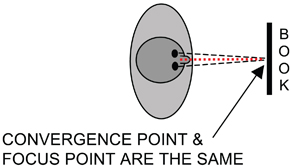
When you read this book, your eyes converge on a word and your eyes instantly bring that word into sharp focus. Convergence and focus are coupled and remain on the page surface.
The same coupling occurs when we watch a traditional 2D movie or television screen.
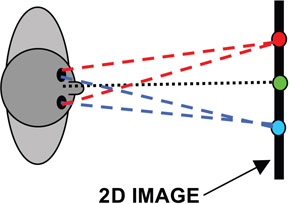
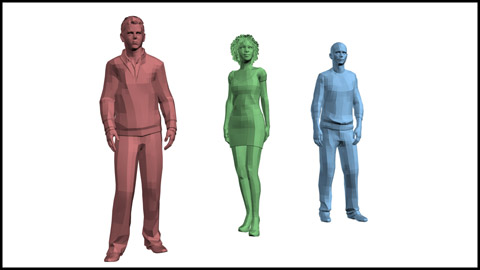
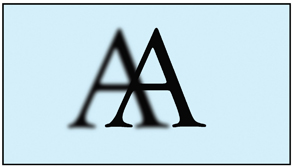
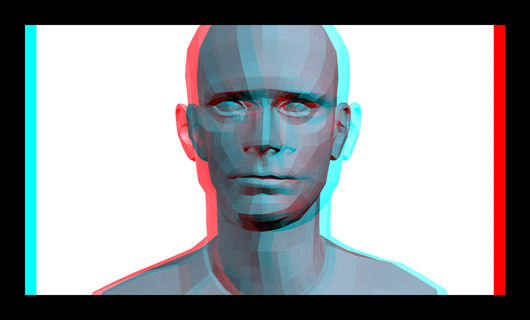
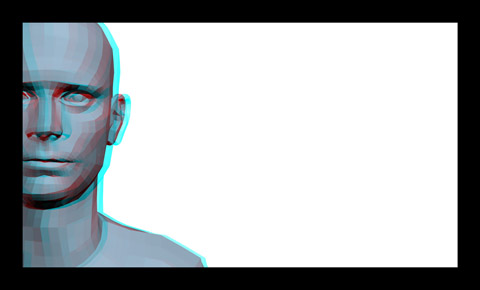
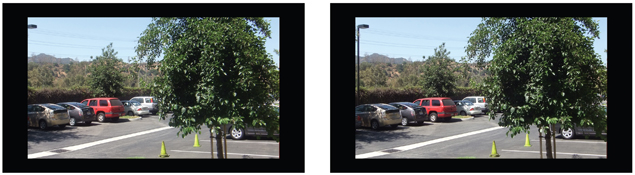
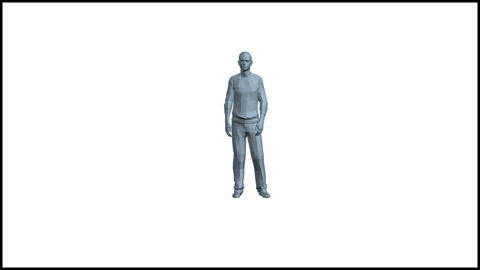
In the above 2D illustration, the blue actor may seem to be “in the distance” and the red actor may appear “in the foreground” but all of the actors are only on the page surface. Convergence and focus remain coupled together, no matter where you look within the picture.

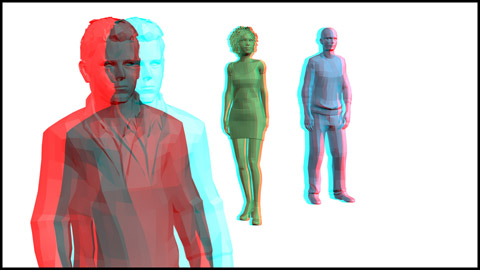
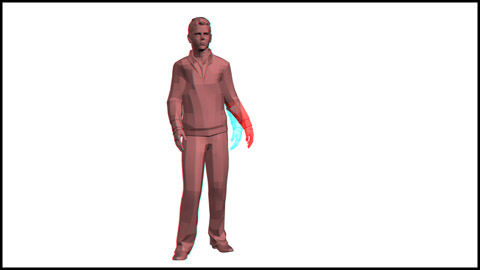
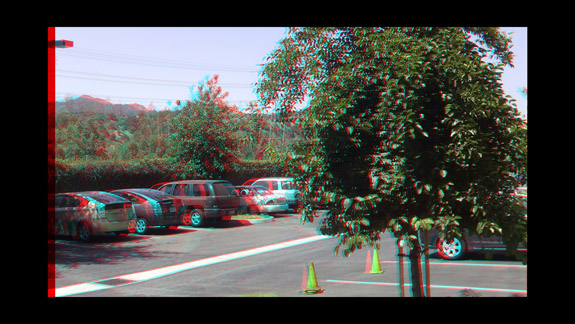
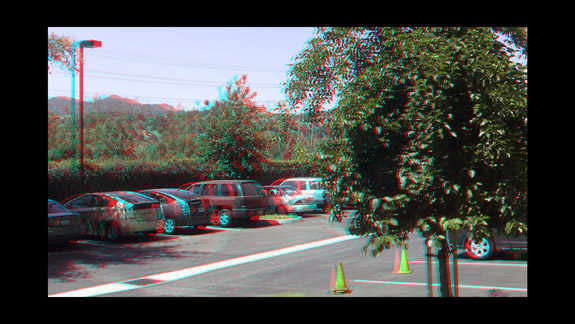
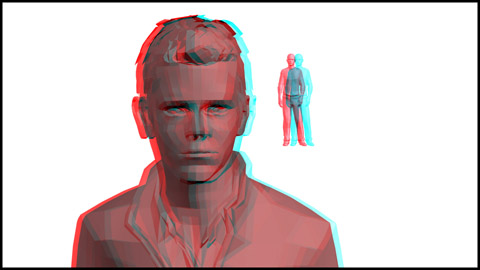
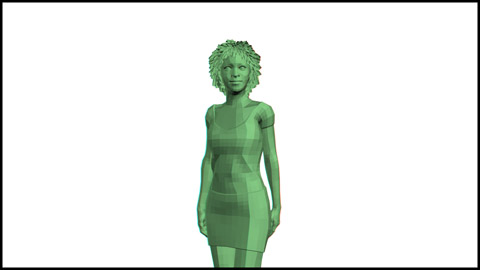
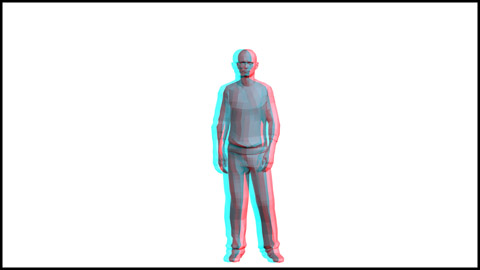
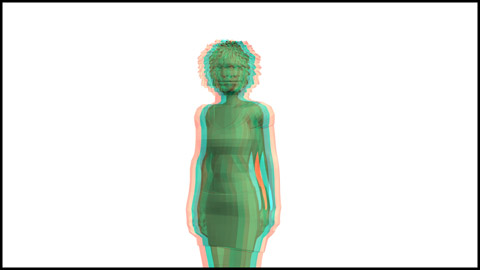
Put on your 3D glasses. In this 3D photo only the green actor appears on the page surface. The red actor actually appears closer and the blue actor actually appears farther away.
3D pictures are presented on a two-dimensional screen, so the viewer must focus on the screen surface to make the image sharp. But the viewer may converge on an object in front of or behind the screen. Therefore, in 3D, it would seem that the viewer must decouple focus (on the screen) and convergence (on an object in front of or behind the screen). But decoupling of focus and convergence does not occur in most 3D viewing situations. Coupling and decoupling is determined by the viewer’s visual depth-of-field.
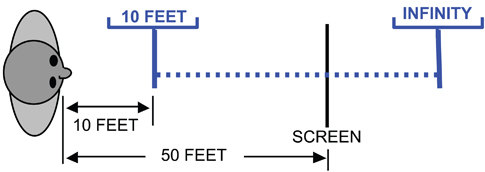
In a darkened theater, a viewer watching a 40-foot-wide movie screen from a distance of 50 feet has a depth-of-field from approximately 10 feet to infinity. Everything more than 10 feet from the viewer will be in focus.
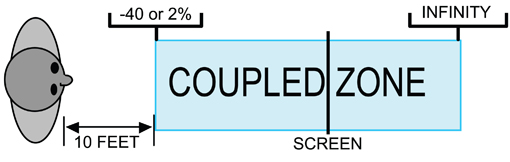
The area from 10 feet to infinity is the Coupled Zone. Any object that appears within the zone will not require decoupling. The Coupled Zone extends from –40 or 2 percent in the foreground to the most distant background object at infinity.

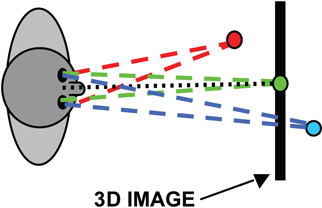
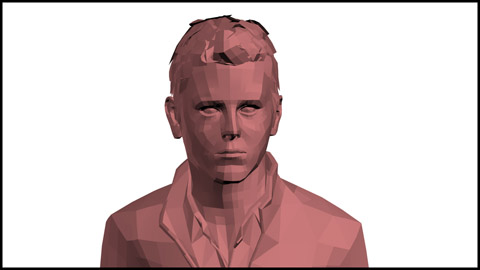
In this illustration, all three actors have been staged within the Coupled Zone.
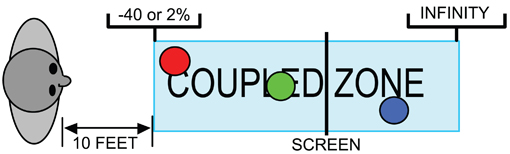
The red actor is at –40 pixels or 2 percent and the blue actor is at +10 pixels or 0.5 percent. The audience can look at any actor and their convergence and focus remains coupled.
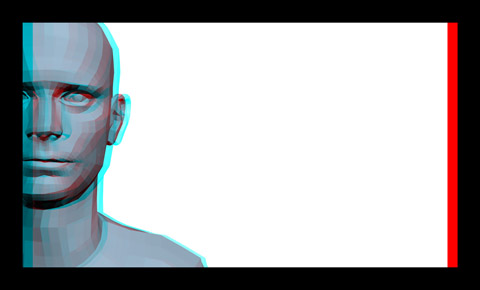
Objects can be placed outside the Coupled Zone.
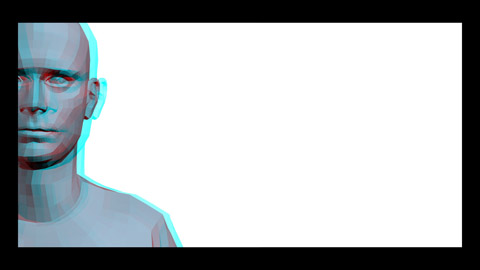
The red actor has been moved forward.
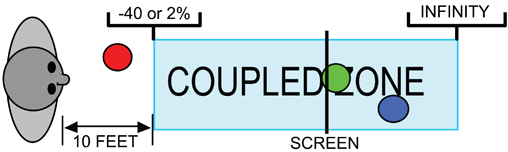
The red actor is now in the extreme foreground, beyond the limits of the Coupled Zone. Decoupling will occur when the audience looks at the red actor at –100 or 5.25 percent. Decoupling forces the audience to separate the visual mechanism for focus and convergence. Sustained decoupling, over time, can cause eyestrain.
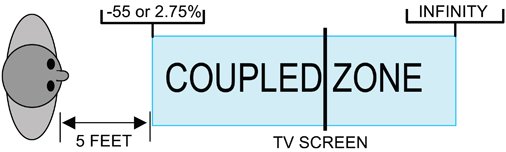
The same decoupling issue occurs with television. The viewer is 8 feet away from a 60-inch (measured diagonally) television screen. The Coupled Zone begins about 5 feet from the viewer at −55 pixels or 2.75% but no longer extends to infinity. Decoupling in television or computer screen viewing occurs more often because viewers sit close to the screen. As the viewer sits closer, the depth-of-field no longer extends to infinity.
Extreme foreground subject decoupling on any size screen is called hyper-convergence because the eyes are forced to look at (or converge) on a very close foreground object and simultaneously focus on the more distant screen surface. Hyper-convergence becomes fatiguing because it’s difficult to decouple convergence and focus for long periods of time. The greater the decoupling distance, the faster brain strain will set in.
On a 40-foot 2K movie screen, hyper-convergence of –150 pixels or almost 8 percent creates an image pair that many viewers will struggle to fuse into a single, extreme foreground image. However, even non-fusing image pairs with extreme hyper-convergence can be used for quick visual punctuations.
The Coupled Zone can be validated by observing movie-theatre viewers who have had lens replacement eye surgery. Lens replacement patients can’t change eye focus so they must rely on their visual depth-of-field to keep objects in focus. Even in a darkened theatre, lens replacement patients are able to keep objects in focus from approximately 10 feet to infinity. They can’t decouple yet they can see 3D movies in depth.
Sin #3: Geometry Distortions
Geometry distortion refers to visual problems in the geometric shape of the stereoscopic pair if they are viewed or photographed incorrectly. This can lead to eyestrain or brain strain because the brain tries to realign each eye independently to compensate for the misaligned geometry.
Although the audience prefers to look at the subject, geometric distortions in non-subjects can still be a problem because they’re so odd-looking that they attract the audience’s attention.
Geometric Viewing Distortion: Head Position
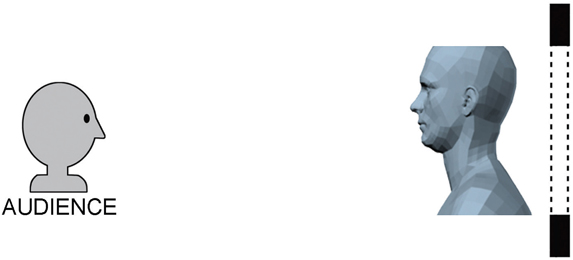
It’s important for a 3D movie audience to view the stereoscopic pair of images correctly. When watching a 3D movie, the audience must, ideally, keep their head perfectly level.

If a viewer angles or skews their head, their eyes are not level and that causes a vertical misalignment of the stereoscopic pair. The brain tries to independently realign each eye to compensate for the problem and eventually the viewer gets eyestrain.
Geometric Viewing Distortion: Seat Position
The seating position of the audience is important.
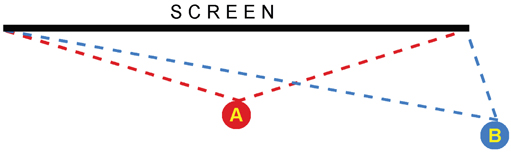
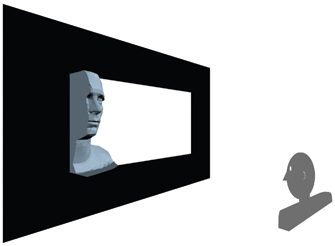
In this overhead diagram, Viewer A has the best seat because it’s centered on the screen. Viewer B, sitting far to one side, sees a distorted view of the 3D stereoscopic pair.
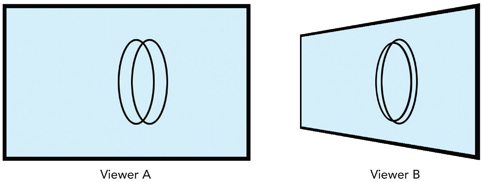
Viewer A will see the stereoscopic pair without any geometric distortion. Viewer B sees a stereoscopic pair (in an exaggerated illustration) where each image in the pair is a different size and shape. This distortion increases as the Depth Bracket expands.
Geometric Viewing Distortion: Distance From Screen
Visual fatigue caused by divergence is worse for viewers sitting closer to the screen.
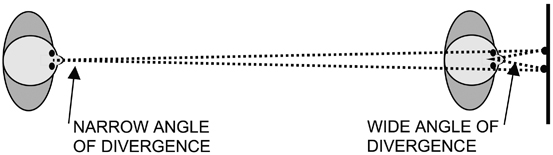
Sitting closer to the screen causes the viewer’s eyes to diverge more when watching a stereoscopic image pair with a measured screen parallax greater than 2.5 inches. See Appendix C for a complete explanation.
Geometric Photography and Projection Distortion
In 3D photography and display, the images in the stereoscopic pair must be perfectly aligned or rectified. Digital cinema has solved most of these alignment problems but they can still cause brain strain if left unchecked. Without getting too technical, here is a list of the most common problems that can provoke visual fatigue and brain strain.
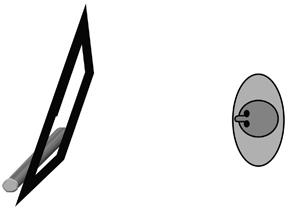
1. Keystone distortion. Toe-In cameras, often used for live action 3D production, distort the stereoscopic pair.
This is an overhead view looking down on a pair of Toe-In cameras photographing a wall.

The two cameras are not parallel so each image will keystone in opposite directions (these illustrations are exaggerated to reveal the problem). This creates a stereoscopic image pair with geometric distortion. An audience will have difficulty watching image pairs with excessive opposing distortion. This distortion can be greatly reduced in digital postproduction. Using HIT cameras eliminates the problem.
2. Alignment errors. The stereoscopic pair can be misaligned vertically or rotationally.

Any misalignment on any axis is immediately difficult to watch.
3. Scale mismatch. The stereoscopic pair is not matched in size.

This occurs in live-action 3D because the cameras’ prime or zoom lenses are mismatched in focal length due to a manufacturing error or incorrect calibration. A similar problem can inadvertently occur during a rack focus. Some lenses, especially zooms, may “breathe” or change focal length slightly during focus shifts, which affect the image pair’s sizes. Any scale mismatch is immediately difficult to watch although the problem can be corrected in postproduction.
4. Focus inconsistencies. One image in the stereoscopic pair can be out of focus.
This problem occurs when one of the stereoscopic camera lenses is improperly focused, the lens bokeh is mismatched, or the lenses are not parallel to the image sensor.
5. Synchronization errors. 3D live action cameras must be precisely synchronized so that the stereoscopic pair is photographed simultaneously. If the cameras are even minutely out of sync the stereoscopic pair’s action won’t match. This turns a temporal displacement into a spatial disparity and on-screen movement looks rubbery.

These errors are very difficult to watch because each eye receives an image from a different moment in time.
The visual geometry of the stereoscopic pairs doesn’t match, which instantly confuses the perception of depth.
6. Left/right reversal. The left and right eye images of the stereoscopic pair are accidentally reversed in projection.
This problem destroys the 3D depth and is instantly impossible to watch. You can temporarily solve the problem by wearing 3D glasses upside down.
7. Reflection/polarization inconsistencies.
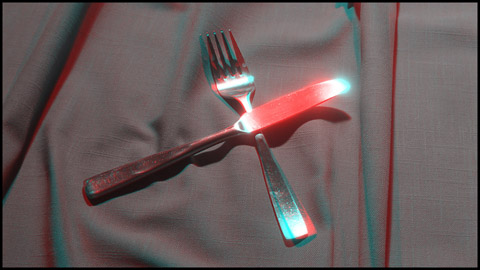
For a variety of technical and mechanical reasons, reflections or specular highlights may appear in one eye’s image and not the other eye. This happens with objects like moving water and any shiny surface. A variety of special lens filters can help alleviate these problems. Lens flares may occur in only one lens or appear differently in each lens. Any of these inconsistencies can lead to retinal rivalry, which can cause brain strain. Retinal rivalry is explained on page 86.
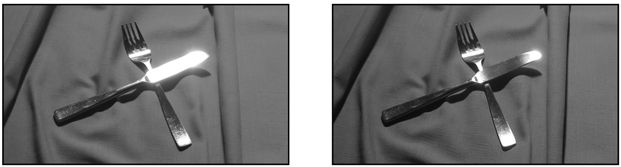
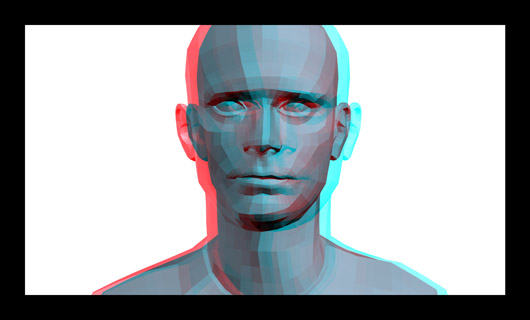
The retinal rivalry is easy to see when the left and right eye images are separated.
8. Lens design geometry errors. All lenses, no matter how carefully manufactured, have minute optical flaws that can distort the image’s geometry or shape. These minor errors go unnoticed until two lenses are used to simultaneously photograph the same object in 3D.
9. Color or brightness mismatches. This is not a geometry problem, but the stereoscopic pair must be matched in brightness and color. Due to exposure errors or mismatched lenses, the image pair may have color or brightness inconsistencies from eye to eye.

Even minor variations in brightness can be quite uncomfortable to view. Although color inconsistencies in the stereoscopic pair are bothersome, minor mismatches may go unnoticed.
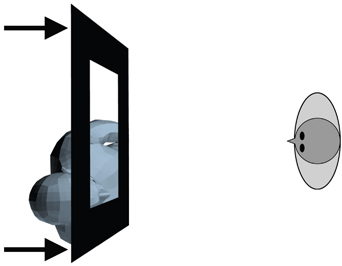
Sin #4: Ghosting
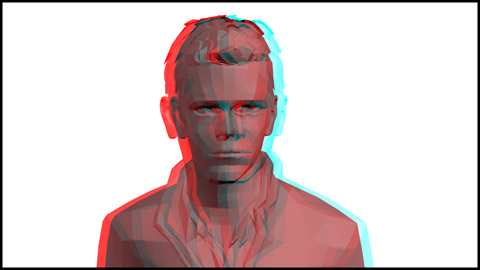
Ghosting (sometimes called cross-talk) appears because most 3D viewing systems cannot completely separate the left and right eye images of the stereoscopic pair. Each eye gets some “contamination” and sees a faint “ghost” of the image meant for the other eye. Ghosting is most visible in high contrast image pairs with a large parallax.
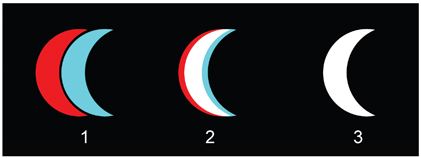
Put on your 3D glasses and look at these photos. Moon #1’s stereoscopic pair shows severe ghosting because it has high contrast and a large parallax. Even with your 3D glasses on, you can still see two moons instead of one. The ghosting is less noticeable in Moon #2 because there is less parallax. Moon #3’s ghosting has been eliminated by completely removing the parallax but it’s lost its depth.
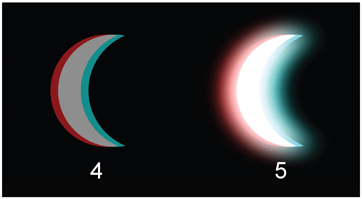
Lowering the tonal contrast between Moon #4 and the background reduces the ghosting. Moon #5 uses a glow to decrease the contrast and minimize the ghosting.
Ghosting can be reduced by art direction and lighting. Avoiding high tonal contrast in sets, locations, set decoration, and costumes can reduce the problem. A fill light can reduce the tonal contrast and add light to deep shadows to avoid the ghosting.
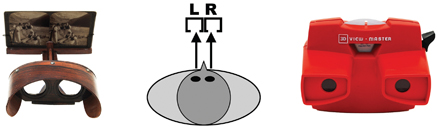
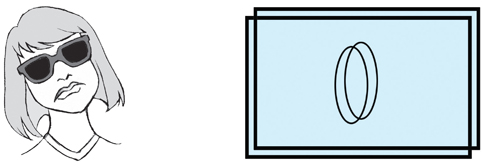
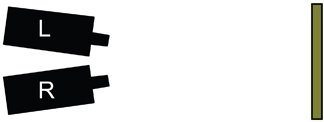
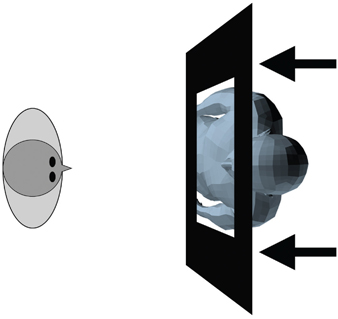
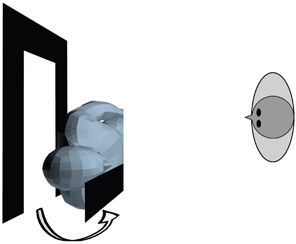
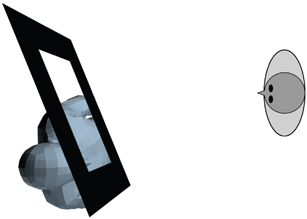
Single person 3D viewing systems, like those pictured here, eliminate ghosting because their mechanics completely isolate the image for each eye.
Sin #5: Window Violations
These violations can occur when objects appear closer than the window that is cropping the object. Window violations are more noticeable when they involve the subject of the shot. When the window is beyond the audience’s field of view or involves a non-subject, most violations are difficult to notice. Window violations occur along the horizontal or vertical edges of the window.
Horizontal Violations
Horizontal window violations are visually minor because we only perceive depth information from verticals. For an explanation of this, see Appendix E. A horizontal violation occurs when an object in front of the window in the Personal Space is cut-off or cropped by the horizontal upper or lower frame of the window.
Put on your 3D glasses. The actor appears in front of the window but the actor’s head and shoulders are cropped by the horizontals of the window behind the actor. The violation: how can a foreground object be cropped by a window that’s behind it?
Essentially, the audience sees the screen image like this. The window is behind the actor and the actor’s head and torso appear to be unnaturally sliced off. Fortunately, the audience’s brain immediately compensates for this physical impossibility.
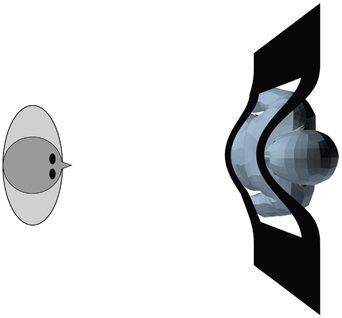
The audience assumes the window curves around the object. This is purely an optical illusion created in the audience’s head. This overhead view illustrates how the audience imagines the window crops the foreground subject. There are two ways to reduce or eliminate this horizontal window violation.
SOLUTION #1: Move the entire window.
Moving the window forward in front of the object eliminates this minor window violation.

Violation
Violation Corrected
Put on your 3D glasses and look at the violation and its corrected version with the window moved in front of the actor. It’s also possible to leave the window alone and move the actor behind the window, but this may create a new problem. Moving the actor back may increase the size of the Depth Bracket and create hyper-divergence in the background.
SOLUTION #2: Recompose the shot.

Strong Horizontal Violation (top & bottom)

Minimal Horizontal Violation (bottom only)
Avoid window violations that crop the subject on the frame’s top and bottom. Cropping along the bottom frame line is unavoidable, but cropping on top can be minimized or eliminated.
In a close-up, the audience notices the violation because they’re looking at the actor’s eyes, which are near the upper horizontal frame line. The lower horizontal window violation is farther from the actor’s eyes and more likely to be ignored.
Vertical Violations
Vertical window violations are more problematic because we perceive our depth information in verticals. See Appendix E for an explanation. A vertical stereoscopic window violation occurs when the vertical sides of a background window crop a foreground object.
To the audience, the foreground object appears to be sliced off vertically. The basic violation is the same: how can a foreground object be cropped by a window behind it?
There are three ways this problem can be eliminated using the stereoscopic window.
SOLUTION #1: Move the entire window.
Violation
Violation Corrected
The entire window can be moved in front of the subject removing the violation. The left photo is the violation and the right photo is the correction with the window moved in front of the subject.
SOLUTION #2: Move part of the window.
Placing part of the window in front of the subject corrects the window violation. Most of the window remains behind the subject.
Moving one side of the window usually creates the illusion that the window is angled.
The left side of the window was manipulated forward using the above configuration.
The violation has been eliminated by moving only the left vertical masking.
SOLUTION #3: Another solution is to leave the window alone and move the subject behind the window, but this may create a new problem. Like the horizontal violation solution, moving the subject back may increase the size of the Depth Bracket and create hyper-divergence in background image pairs.
Vertical Window Violations and Retinal Rivalry
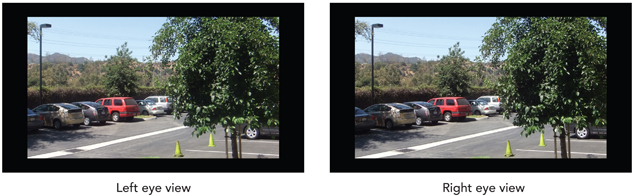
Other vertical window violations can occur when the vertical frame edge blocks one eye’s view of an object’s image pair.
Look at this photo with and without your 3D glasses. Your right eye can see the screen left light pole but your left eye can’t. You feel like you want to peek around the left frame edge to find the missing pole.
Because the pole only appears in one eye, it may seem to visually vibrate. This is called retinal rivalry. Human vision prefers to see a complete image pair; one image for each eye. When only one eye sees an image, the brain gets confused.
Retinal rivalry can be caused by inappropriate camera compositions, staging mistakes, or any mismatch in the image pair. Bright, small background objects like lights at night are particularly problematic. If the retinal rivalry involves the subject, the audience will become aware of the problem immediately. If it’s only a non-subject, it may go unnoticed because the audience is looking elsewhere in the picture. There are two solutions to the retinal rivalry problem.
SOLUTION #1: Add vertical masking.
A solution is to introduce window masking over the pole’s image that only one eye sees. Neither eye sees the pole and the retinal rivalry is eliminated.
This added masking also pushes the left side of the window away from the viewer. Although the retinal rivalry problem is solved, the window placement may look odd or unmotivated.
Window manipulations can occur on the edit from shot-to-shot or during a shot. Cutting to a new shot is a perfect opportunity to invisibly change the window position. Window moves during a shot can go unnoticed if they’re motivated by camera or object movement.
SOLUTION #2: Recompose the shot.
Adjusting the composition eliminates the window violation and the retinal rivalry.
The pole’s image pair is now visible to both eyes.
Sin #6: Point-of-Attention Jumps
In real life there are no visual jumps. We wake up, open our eyes, and see our day like a long, continuous scene. We look at our alarm clock, our family’s faces, breakfast, traffic, our work etc. We constantly decide where to look or aim our point-of-attention. If we see something important, it holds our point-of-attention and becomes the subject. Our point-of-attention looks for subjects all day long. Eventually, we close our eyes, fall asleep, and our continuous search for a visual subject rests.
When we watch a movie or TV screen our eyes are doing the same thing that we do in real life: they’re looking for the subject. But movies and television are not as continuous or visually smooth as real life. Traditional 2D movies or TV shows have two kinds of visual jumps that interrupt our point-of-attention’s search for the subject. These jumps can occur within a shot or, when we edit, from shot-to-shot.
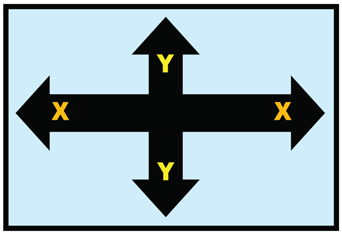
The traditional 2D screen is physically flat. There is no depth. When our point-of-attention searches a 2D picture for the subject we only move our eyes across the screen surface left to right (X-axis) or up and down (Y-axis) or a diagonal combination of the two. This is simple, easy eye movement.
In this 2D picture, your point-of-attention jumps within the shot between the two subjects (the red actor and the blue actor).

The point-of-attention jump is simply a horizontal move along the X-axis.
A point-of-attention jump can also occur between shots. On the edit from shot-to-shot, your point-of-attention jumps from one subject to another. Edits never happen in real life so this is a forced, artificial jump that we’ve learned to accept as a standard filmmaking convention.
When the two shots are superimposed, the point-of-attention jump is easy to see. Even though the red actor seems close and the blue actor seems far away, both subjects are only flat images on a flat 2D screen. This is an easy and comfortable X-axis move for the audience.
3D Point-of-Attention Jumps Within the Shot
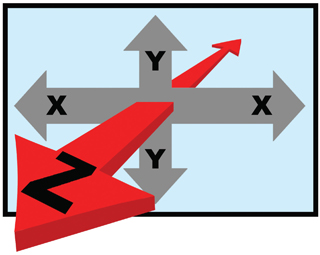
In stereoscopic 3D, the subject can be placed anywhere along the X-, Y-, and Z-axis. This can force complex point-of-attention jumps within a shot that may cause visual fatigue.

This 3D picture has two actors but there isn’t a point-of-attention jump because both subjects occupy nearly the same area of the frame (on the X- and Y-axis) and the same depth (on the Z-axis). No visual jump will occur.

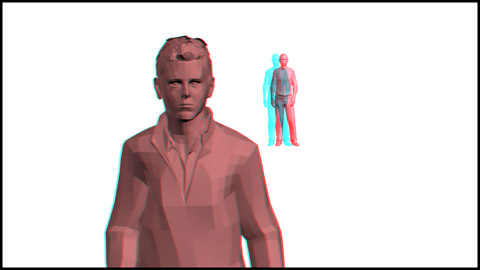
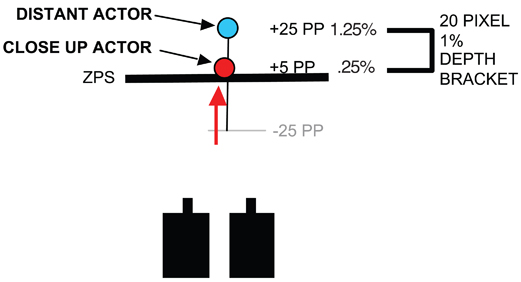
In this 3D shot, the two subjects’ positions on the X- and Y-axis are fairly similar, but the Z-axis will require a large jump as the audience shifts its point-of-attention from the foreground subject to the background subject.
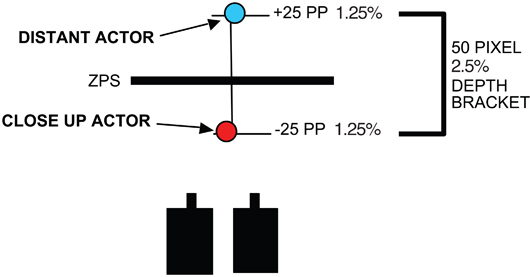
This diagram reveals the point-of-attention jump along the Z-axis. The audience will move its point-of-attention between the foreground subject at –25 pixels and the background subject at +25 pixels. The size of the Depth Bracket is a reasonable 50 pixels (2.5 percent), but the Z-axis jump will be uncomfortable as the audience shifts its point-of-attention between the two subjects.
There are four ways to avoid eyestrain caused by extreme point-of-attention Z-axis jumps within the shot:
- Restage the scene.
- Reduce the interaxial distance.
- Shift the convergence.
- Compositing techniques.
SOLUTION #1: Restage the scene.
Restaged, the scene has less Z-axis contrast.
Moving the foreground actor from –25 to +5 reduces the Depth Bracket to 20 pixels or 1 percent. Now, the audience has a smaller Z-axis jump from subject to subject. This lessens the eyestrain but the shot’s composition has been changed, which may compromise the shot directorially. Fortunately, there are other ways to solve the Z-axis jump problem.
SOLUTION #2: Reduce the IA. Reducing the IA alleviates the problem because it decreases the parallax in the stereoscopic pair. The actors are in their original positions but the reduced IA shrinks the Depth Bracket’s size.

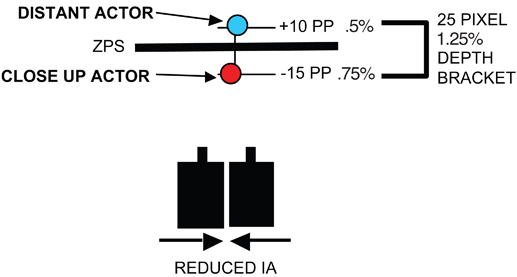
Reducing the IA shrinks the Depth Bracket to 25 pixels or 1.25 percent. The disadvantage is the objects lose 50 percent of their volume.
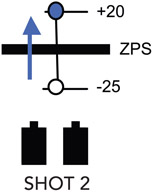
SOLUTION #3: The third method for reducing point-of-attention eyestrain is to shift the convergence from one subject to the other as their importance changes during the shot. The convergence shift is usually linked to the lens focus as it racks from one subject to the other.
The director must decide when the audience’s point-of-attention will shift from one subject to the other and change the convergence at the right moment. This convergence technique places the more important subject on the ZPS, which is the most comfortable viewing position along the Z-axis. When done correctly, the convergence shift from subject to subject occurs simultaneously with the audience’s change in its point-of-attention. This technique minimizes or eliminates the point-of-attention subject jump.

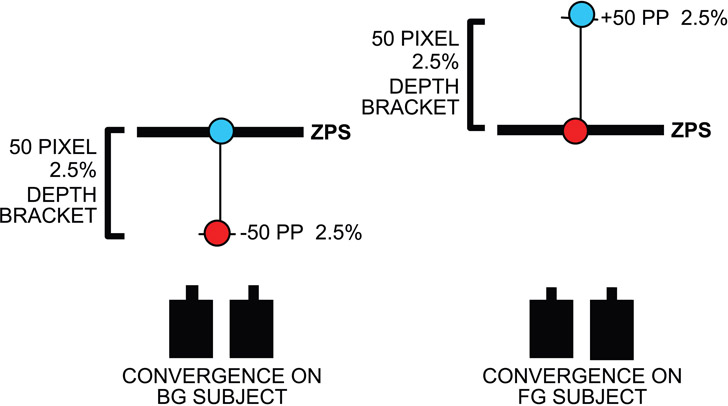
This pair of diagrams illustrates the convergence shift as the audience’s point-of-attention changes from the background subject to the foreground subject. This keeps the more important subject at the ZPS. When the foreground actor is placed at the ZPS, the background subject’s parallax is +50, which will cause hyper-divergence. You must be confident that the audience will ignore the background subject at +50 pixels in favor of the foreground actor at the ZPS.
The advantage to shifting the convergence during a shot is that multiple subjects can be placed at various depths without causing eyestrain since the audience never has to move their point-of-attention from the ZPS. The disadvantage is the danger of shifting convergence at inappropriate times, which will make the point-of-attention jumps worse and create eyestrain.
In general, the best technique for reducing or eliminating Z-axis subject jumps is to use all three techniques and find a combination that maintains the composition, retains good looking volume, and keeps the audience comfortable.
SOLUTION #4: The fourth technique to correct Z-axis point-of-attention jumps is to use digital compositing. Often this is done with a multi-rig technique. Multi-rigging allows each object in a shot to have independent parallax settings so the ideal Depth Bracket can be created without affecting the objects’ volume or size. This avoids the side-effects of adjusting the IA, which can reduce or eliminate volume.
In CG animation, multi-rigging is a relatively simple procedure because objects are rendered separately and then composited together into one shot. This makes it possible to give each object its own IA. In live action, this same technique is used by shooting objects separately on green screen and compositing them together. This style of shooting is costly and needs to be planned well in advance.
A version of the multi-rig technique is used in the conversion of 2D movies to stereoscopic 3D. The difference is that each object in a 2D shot must be isolated by rotoscoping. Using rotoscoping, each object can be independently manipulated in depth to create the ideal 3D composition.

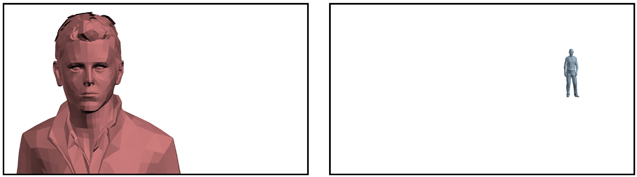
Before
Put on your 3D glasses. The “before” shot was photographed using a single, conventional 3D rig that photographs the entire scene at once. The point-of-attention jump from foreground to background may be too large.

After
In the “after” shot, using a multi-rig technique, the adjusted foreground actor has been recombined with the scene. The point-of-attention jump has been reduced. The multi-rig preserves the original IA and volume while reducing the parallax to keep both actors within a comfortable Depth Bracket.
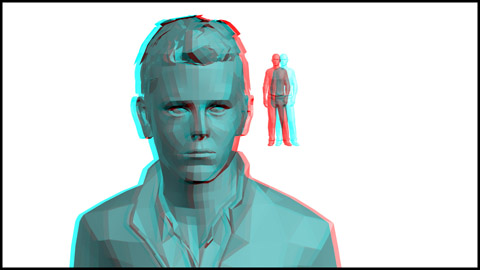
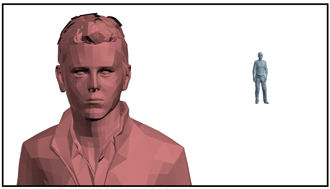
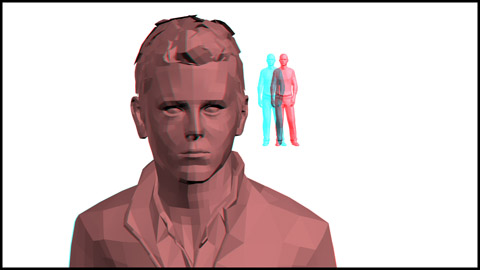
The multi-rig technique cannot solve every depth problem. Spatial errors can occur if the multi-rigged Z-axis rearrangement conflicts with the reality of the shot’s depth. This photo illustrates how multi-rigged 3D can look artificial. The background actor appears to be a tiny person hovering above the foreground actor’s shoulder.
Manipulation of a scene using multi-rig techniques presents all kinds of typical and unique problems that occur in any postproduction compositing situation. Experience is needed to understand all of the issues involved.
Any of the four techniques (restaging, IA reduction, convergence shifts, or multi-rig) can be used in various combinations to solve point-of-attention jumps.
3D Point-of-Attention Jumps from Shot-to-Shot
Editing presents new challenges in 3D. Some filmmakers feel that the best 3D experience is to duplicate real-life vision, which has no edits at all. But editing is a necessary filmmaking tool in both 2D and 3D so it’s important to understand the visual problems 3D editing can create and prevent them from occurring.
As the audience watches a series of shots in 3D, its point-of-attention will be drawn to the subject. If the subject jumps too much from shot-to-shot along the Z-axis, visual fatigue can set in.
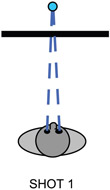
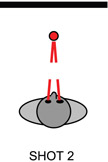

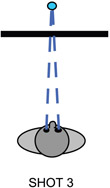
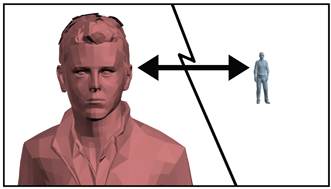
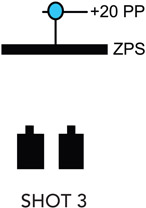
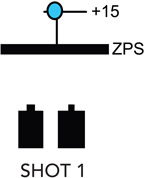
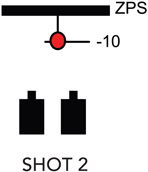
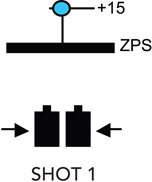
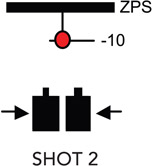
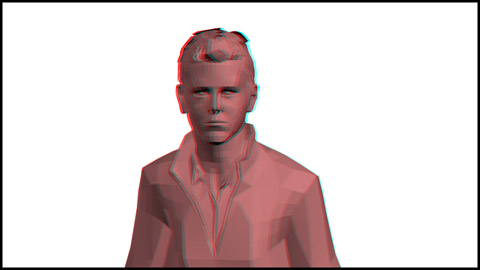
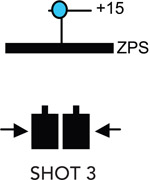
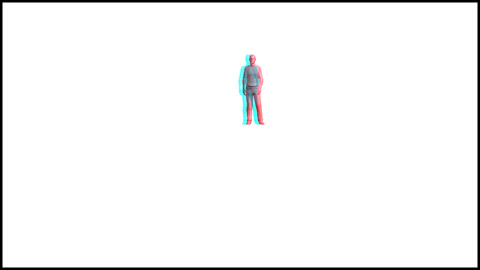
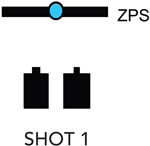
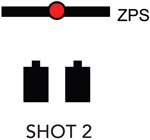
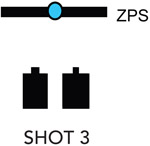
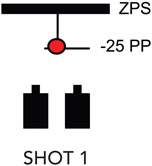
Here are three shots. The editing pattern cuts from Shot 1 (distant blue actor) to Shot 2 (closeup of a red actor), and then Shot 3 (distant blue actor). Both subjects are in the center of the screen so when these shots are edited together, the audience will not move its point-of-attention on the X- or Y-axis. But the audience will move its point-of-attention along the Z-axis to and from the blue actor in the background to the red actor in the foreground. The abrupt jump created by the intercutting of these Z-axis depth changes can create visual fatigue.
These three shots will be used to demonstrate various solutions to this problem. The visual jumps can be reduced or eliminated using one of five solutions:
- Accept the jump.
- Restage the scenes.
- Reduce the Depth Bracket.
- Subject Convergence consistency.
- Shot-to-shot blending.
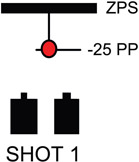
SOLUTION #1: Accept the Z-axis depth jump. Don’t fix the problem. You intend to ‘jolt’ the audience so the point-of-attention jump is exactly what you need.


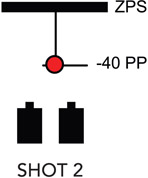

Shot 1 is a distant, wide shot. Shot 2 is a close-up designed to startle the audience. On the edit, the subject jumps 60 pixels or about 3 percent. The instantaneous Z-axis subject jump from the background to the foreground adds visual impact that the story requires.
SOLUTION #2: Restage the shots. Restaging the subjects closer together along the Z-axis reduces the subjects’ parallax and the Depth Bracket’s size. Of course, this also changes the shot’s composition.

The actors are closer together along the Z-axis making the point-of-attention jumps from shot-to-shot smaller and less stressful. The subject jump is 25 pixels or about 1.25 percent. But filmmakers may find the new compositions weak and the visual storytelling compromised.
Peripheral non-subjects with larger parallaxes may remain, which can preserve a larger Depth Bracket.
SOLUTION #3: Reduce the Depth Bracket. The IA controls the size of the Depth Bracket. As the IA is reduced, the parallax for each shot decreases.

Now, the three shots have a smaller Z-axis jump of 25 pixels or 1.25 percent. But reducing the IA is always at the expense of stereoscopic volume. Too much IA reduction can eliminate volume, making objects look like flat cardboard cutouts. The IA balance between Depth Bracket size and volume is discussed on pages 128–132.
SOLUTION #4: Subject Convergence consistency. The jumps can be eliminated by keeping the audience’s point-of-attention at the same Z-axis depth in every shot. This consistent depth can be anywhere along the Z-axis but is most typically set at the screen surface or ZPS.


The convergence is locked to the subject, no matter where the subject is located in depth. In this example, all subjects have zero parallax and are placed at the ZPS.
The audience’s point-of-attention will predictably remain with the subject. By placing the subject of every shot at the same depth, all of the subject point-of-attention jumps are eliminated. This plan is called Subject Convergence. Its advantages and disadvantages are discussed beginning on page 122.
SOLUTION #5: Blending. The point-of-attention jumps from shot-to-shot can be blended or softened by manipulating the convergence for each shot in postproduction using HIT. This is sometimes called depth grading. Blending techniques can be used in a variety of ways, which are somewhat subjective. The most effective technique will depend on the specific shots and their time length on screen.
There are three basic types of blending:
- Adjustment
- Bridge
- Ease-Out
Blend A: The Adjustment
Here is the problem. Edited together, these three unadjusted shots create a 45 pixel (2.25%) point-of-attention jump when seen on a 40-foot screen. This jump may be too severe and cause eyestrain.


The adjustment changes the parallax of Shot 2 only. Shots 1 and 3 dominate because they’re most critical to the story. Shot 2 is a less important cutaway shot.


Changing the convergence of Shot 2, adjusts its parallax from +20 to –10 pixels.

This diagram shows the blended sequence of shots. The smaller jump is more comfortable to watch and maintains a sense of depth change between shots.
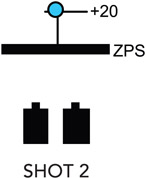
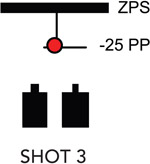
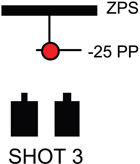
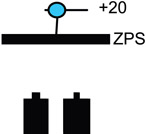
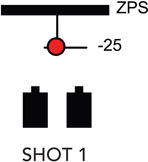
Blend B: The Bridge
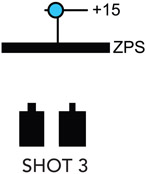
There is a shot-to-shot jump between Shot 1 (–25) and Shot 3 (+20).


Shot 2 will become a bridge between Shots 1 and 3.
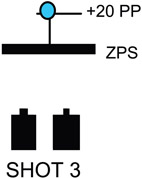

The diagram reveals how Shot 2 will slowly change its parallax.
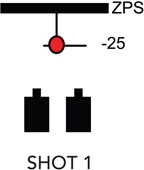

The subject in Shot 2 begins at –25 parallax (the same setting as the Shot 1 subject) and steadily changes to +20 (the setting of the Shot 3 subject). Shot 2 seamlessly bridges Shots 1 and 3 together.

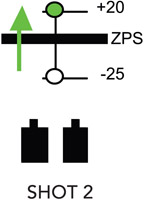
Blend C: The Ease-Out
This technique is used between two shots of equal importance.

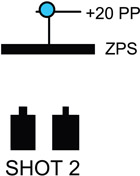

The edit between these two shots creates a potentially stressful subject point-of-attention jump of 45 pixels. To solve the problem, Shot 2 begins with a parallax similar to Shot 1 and then eases out to a parallax setting more appropriate for its own composition. Shot 1 remains unchanged.
Adjusting Shot 1 with an ease-in to Shot 2 rarely works because audiences notice the parallax manipulation. Audiences are rarely aware of ease-outs because they’re acclimating to the new shot and in a few seconds the ease-out is completed.
Ideally, ease-outs are hidden by camera or subject movement. But ease-outs can be used without any visual camouflage as long as the manipulation is gradual.
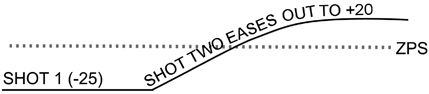
Shot 1 remains unchanged. The subject of Shot 2 begins with a parallax setting of –25 pixels (matching Shot 1) and then eases-out to +20, which is the appropriate setting for Shot 2.


The ease-out eliminates the point-of-attention jump and preserves the preferred depth setting of each shot.
Generally, ease-outs are visually undetectable at a rate of 1 pixel per two frames. So a 45-pixel ease-out would take 90 frames or about four seconds of screen time to complete. Ultimately, the duration of an ease-out is subjective and depends on the visual specifics of the shots and their length of time on screen.