
4. Behind the Curtain: Scripting in Creative Suite
Trust that little voice in your head that says, “Wouldn’t it be interesting if?” And then do it.
—Photographer Duane Michals
Do you remember the scene in The Wizard of Oz in which Toto pulls back the curtain to reveal the man/wizard operating levers behind it? As a kid, what caught my attention wasn’t the revelation or the treachery of the man; it was those levers. They were the tickets to doing wonderful wizardish things. If only I knew how to move those levers, I could escape all the indignities of childhood, I thought. Pull this one, push that one, and the world would be my marionette—a seductive idea for a kid. And to tell you the truth, I didn’t even care about how the levers were operated. What mattered to me was knowing that they existed and where they were. Naturally, I assumed, there was a manual tucked away somewhere.
If you could peel back the interface of a Creative Suite program, as if sweeping aside curtains, you would see little packets of instructions zipping all over the place. These packets are Creative Suite’s invisible levers. When you click a button in the interface, for instance, behind the curtain a command is shot to its target. What you see on the screen of a program is its graphical user interface (GUI), which consists of the file you’re working on, panels, dialog boxes, and the informational windows that are occasionally presented to the user. All of this appears onscreen for our benefit—both to collect information from us and to provide feedback about what the program is up to.
We use this GUI to communicate with the program and it with us. However, we humans—even after a couple of cups of coffee—are a relatively slow and distractible lot, so the process can be less than efficient. It involves perceiving what’s onscreen, making decisions based on those perceptions, and then applying hand-eye coordination to move the mouse and press the keys. Think of the time it takes (and the dialogs you have to wade through) just to launch a program, find and open a document, locate and edit text, replace a photograph, and then save and close the document.
What if instead all you had to do was send the program a simple message stating something like the following: “Open the program; open that file; change this text; replace that picture; and then save and close”? There’d be no clicking of icons or buttons, no reading and responding to dialog boxes, no navigating the document, and no keystrokes.
Sending a program messages in this way is hundreds of times faster than manually performing the described steps. These messages can “think” and make decisions on the fly just like we do, only faster and with far more accuracy. What’s more, such messages can be modular (with parts reused in other messages), and they can be sent based upon certain circumstances—meaning you don’t even have to be there to trigger them.
What Is Scripting Really?
Write down the steps you take to do something—feed the cat, do the laundry, check e-mail, anything. Include every little step. Then edit your words down to a set of bare-bones statements: Do this; make that decision; take that action. What you’re left with will look surprisingly similar to a script. Providing a kind of shorthand, or to-do list of what it takes to complete a task or series of tasks (a workflow), scripts can be used to control existing applications.
The main difference between programming and scripting is that programming is used to create applications, while scripting is used to control them. Since the Macintosh and Windows operating systems are, in fact, applications, you can use scripting to control them as well.
Logic allows your scripts to assess and respond to different situations. Your job is to anticipate the situations a script might encounter and write them into your scripts. Compared with the logic we apply in the “real world,” scripting logic is limited in scope. But remember: Scripts live in a far simpler environment than we do. Thus, the logic applied to them doesn’t need to be nearly as robust.
Now, let’s revisit the hypothetical example of feeding the cat: You go to the pantry to get the cat food. If there isn’t any, then you go to the store to buy some more. Otherwise, you proceed to put the food in the bowl. That’s logic: If this, then that. Although other forms of logic exist, the if/then statement is the type most often used in scripting. Logic provides a means of distilling your thought processes so that you can turn your scripts into “mini-yous,” applying the decisions you would make—only a lot faster and far more accurately.
Why Would You Want to Script?
The phrase “to automate repetitive work” has become the mantra of the “scripterati,” and I’ve used the phrase as much as anyone. But I’ve begun to think it probably causes people’s eyes to glaze over. Instead, I’ve started comparing writing and running scripts to text messaging: Like text messaging, scripting uses its own language, is text based, and is often used to get the entity on the other end to do something (such as answer a question or complete a task). Sending someone a message in text form is often faster than talking to that person face-to-face; the same is true for scripting.
Scripting is the most fascinating of all the graphics automation tools. Opening a portal into the inner workings of the familiar graphics applications that designers know and sometimes love, scripting gives designers newfound power over their workspaces. For those of a certain bent, it also provides an entree into the exclusive clubhouse of programming. Like preparing gourmet cuisine or building a robot, scripting involves assembling parts, tinkering, experimenting, and testing.
In addition to automating soul-draining repetitive tasks, scripts can be used to:
• Perform jobs that are difficult or time-consuming to do manually, such as sorting large lists
• Set up self-running automation agents that respond to requests or react to situations
• Make multiple applications act in concert—for example, automatically editing an image in Photoshop and then placing it in a brochure layout in InDesign
• Create “watched folder” systems that trigger a script when files are added to a folder (AppleScript)
• Create automated solutions that work equally well on Macs and PCs (JavaScript)
• Add logic to automated agents
• Perform complex calculations automatically
• Serve as a stepping stone to building actual applications (AppleScript and AppleScript Studio)
• Ease the process of learning more complex programming languages
• Write custom Automator actions (AppleScript)
Although you can use scripts to perform small single tasks, that’s not what they’re generally used for. Since creating, testing, and maintaining scripts is a more involved process than using Creative Suite actions or general productivity tools like QuicKeys, scripts tend to be reserved for longer, more complicated workflows.
What Is Scripting Like?
Scripting represents a conversation between you and an application, its documents, and the objects inside those documents. Via the script, you ask questions, issue commands, and decide on courses of action. As objects, the application and its components respond to your questions and commands. Scripting involves asking, thinking, and telling—pretty much what humans are capable of on a good day. Although scripting may appear cryptic at first glance, when you dig a little deeper you’ll find that it’s actually quite human-like, replicating human actions and at least some human thinking.
When you boil it down, scripts spend a lot of time directing commands to particular objects, which they identify via their unique addresses. To understand how this works, let’s consider your own mailing address, which (assuming you live in the United States) includes the following:
Your Name
House Number, Street
City, State, Zip
If you were to state your mailing address in a way that made sense to a computer, it would appear as follows: State > City > Zip > Street > House Number > Your Name. In other words, you are in the house; the house is on a street; the street falls within a Zip code; the Zip code exists within a city; and the city is located within a state.
You don’t have to memorize object containment hierarchies. Online reference materials describing the object containment hierarchies for all of the scripting languages mentioned here are readily available. For JavaScript, use the Object Model Viewer in the ExtendScript Toolkit; for AppleScript, while in Script Editor choose File > Open Dictionary; and for VBScript, while in Visual Basic go to Tools > References and select the target application, then go to View > Object Browser and again select the target application.
Now consider how a script identifies an object: A circle resides in a document, and the document itself is “in” an application. Thus, the circle’s address might appear as follows: Application > Document > Circle. This concept is also known as object containment: The circle is contained within the document, and the document is contained within the application. By tracing the object containment hierarchy, you can arrive at an object’s address.
Adobe includes excellent scripting reference PDFs in each Creative Suite application folder. These PDFs provide complete documentation for the scripting language as well as sample scripts that you can adapt and reuse.
Properties—which for a person might be things like height, language, hair color, and shoe size—represent another important concept in scripting. Assuming I could change the aforementioned human properties with scripting, I might phrase a command like this: Set the height of person 1 of house 2 to 5′3″. Or I might use the following: Change the location of person 1 of house 2 from kitchen to garage. The same principle can be applied to change the properties of Creative Suite objects (all objects have properties). Circles have heights and widths, fill and stroke colors, locations, and so on—all properties that you can change via scripting.
When you combine these two concepts—addresses and properties—you get what is called the object model; each application has its own custom object model. Much of what scripting entails, frankly, is using the object model to figure out how to talk to an object—a process that often takes the form of guessing and testing.
What Can You Script in Creative Suite?
A better question might be what can’t you script in Creative Suite? By laying bare the inner workings of Creative Suite to scripting, Adobe has made it possible for users to control almost every aspect of its programs. For me, the question is not so much about what to control but rather what I can do with that control. In Photoshop, for example, you can write scripts for creating layers, adding type, replacing text, and running filters. In Illustrator, you can write scripts for creating and moving objects, changing colors, and saving documents in different formats. And with InDesign, you can write scripts to import type, create PDFs, change linked images, and more.
The real magic, however, comes from the workflows and projects you can facilitate via scripting. One example would be a script that allows you to open a batch of files, resize them, add a watermark to each, change their color space, and save them with different names to another directory via just one command. Take a look at your own workload, and you should be able to come up with more examples. The scripts I’m going to show you in this chapter are fairly simple, but once you get a feel for the process, you’ll be able to build more complex scripts and even workflows.
When developing scripts, it’s often helpful to evaluate their return on investment: If, down the line, you can save more time by using the script than it took to write and test it, your scripting efforts represent a sensible investment. If that’s not the case, however, you should consider another form of automation, such as using Creative Suite actions. I can’t say I’ve always followed this reasonable rule though. Learning and experimenting are hard things to put a value to, so keep it in mind but don’t let it hinder you unduly.
Scripting Benefits
By using scripting with Creative Suite, you can reap the following benefits:
• Speed. In my own informal testing, I’ve watched scripts complete tasks hundreds of times faster than a human could complete the same tasks.
• Accuracy. What if we made a mistake in the previous bullet point? What if we typed an i instead of an o? To catch mistakes in text, we generally have to read what we’ve typed, perceive the error, and then reenter the text to correct it—not a time-consuming task for a single document. Apply this same process to tens or hundreds of documents, however, and you begin to see how scripting can help.
• Lowered costs. Increased speed and accuracy equal an improved bottom line. You’re not only saving in labor and reprinting costs, you’re also fostering happier, more productive, potentially healthier employees, and you’re able to redirect resources from graphics production to higher-value work such as brand development and graphic design.
• Design and brand consistency. Thanks to both faulty operator decisions and inadvertent errors, a certain amount of inconsistency is inherent in any manually produced work. Scripting, in contrast, ensures consistency, making sure that things are done the way you want them to be.
• Multiplier effect. With scripting you can be in two or more places at once, as well as do two or more times the work.
• Logic. By applying the logic you’ve written into them, scripts can react to situations and make decisions on the fly—consistently and with lightning speed. Logic also gives scripts the flexibility to react to unanticipated situations.
A Bit of Tough Love
Now that I’ve outlined the benefits of scripting, I’m going to reveal what few scripting evangelists are willing to divulge—namely, that scripting can be one of the most infuriating and confusing tasks you’ll ever wrestle with ... and you won’t always win. But in the right hands, scripting is a beautiful thing—even an art form. In writing scripts you will practice some of the same processes as those in design or music or literature. Simplicity, form following function, flow, and balance. There are ways to turn a phrase, lead the eye, make interpretations. In short, a script can have grace.
I may be overstating the case, but if all you want to see is a boring, geeky tool, that’s what you’ll see. Do yourself a favor: Check your preconceptions at the door and keep your brain open as we explore what scripting has to offer.
Three Scripting Languages
Creative Suite is somewhat singular in that it supports not one but three scripting languages: AppleScript, JavaScript, and VBScript. Why go to all the trouble when most programs only support one? To its credit, Adobe has done its best to meet the needs of the entire creative community by providing multiple avenues into scripting its programs.
AppleScript
Made by Apple (who else?) and only capable of running on Macs, AppleScript’s claim to fame is its similarity to the English language—which should make it easier to learn than other scripting languages. Like all marketing claims, however, this one should be taken with a healthy dose of skepticism. Like English, AppleScript also can be convoluted, offers many ways of saying the same thing, and at times makes absolutely no sense (at least to me).
On the plus side, a wealth of AppleScript learning resources and free scripts for Creative Suite are available. What’s more, if a Macintosh graphics program supports scripting, it probably supports AppleScript. Plus, you can use AppleScript to control multiple applications simultaneously; it is a relatively easy scripting language to start learning; and nonprogrammers will find it easier to get the gist of what AppleScript is saying and doing than with the other scripting options.
JavaScript
Hailing from the Web side of the tracks, JavaScript is often used to create dynamic, interactive Web pages—and it was dynamic and interactive long before Flash was born. Although its name suggests a relationship with the Java programming language (and Sun Microsystems licenses both), JavaScript and Java actually have little in common. JavaScript is the only one of the three languages we’re looking at that works on both Macs and PCs, and that feature alone makes it very attractive.
You can trigger JavaScripts from within AppleScript and VBScript, making it easy to take advantage of prewritten JavaScripts.
In addition to producing great free instructional PDFs for all three scripting languages, Adobe publishes the Creative Suite JavaScript reference in book form. And with Creative Suite 3, Adobe has even included a robust script editor for JavaScript. There are also plenty of free JavaScripts on the Web for Creative Suite, and its relatively strong user base means that you have a built-in support group.
Like Microsoft and its JScript brand of JavaScript, Adobe has implemented its own version of JavaScript, called ExtendScript. It is basically JavaScript that’s been “extended” to add a few additional features and it works across the board with all Creative Suite applications.
On the minus side, ExtendScript can only control one application per script (unless you’re using the ExtendScript Toolkit; see the sidebar on page 55). JavaScript can be confusing to the nonprogrammer because it may look too “programmy.” And most of the JavaScript learning resources you’ll find are focused on building Web pages and making interactive forms in Adobe Acrobat. In fact, you’d be hard pressed to find learning resources other than Adobe’s on topics other than writing JavaScripts for Web pages or Acrobat. That is a serious limitation at times.
VBScript
If you know the Visual Basic programming language, you’ll pick up the Windows-only VBScript easily, because it was derived from Visual Basic. I suspect that most people who script Creative Suite with VBScript either already know it from another context or are Visual Basic programmers. There are practically no VBScript learning resources or free scripts for Creative Suite and, as with JavaScript, you can only control one application at a time with VBScript.
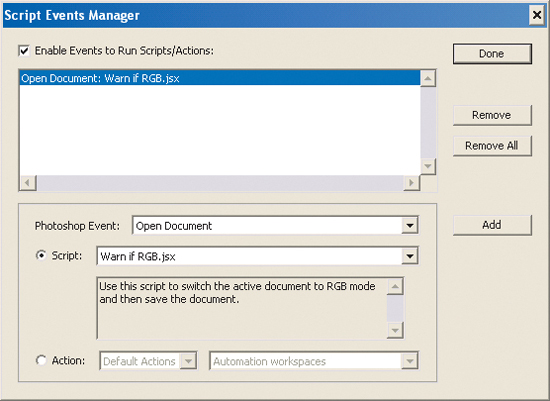
Script Events Manager
Figure 4.1. Photoshop’s Script Events Manager lets you set scripts or actions to run when a specified event occurs, such as opening a Photoshop document or starting the application.
Scripting Listener Plug-In
Figure 4.2. To install the Scripting Listener, drag the plug-in into the folder Adobe Photoshop CS3 > Plug-Ins > Automate, and restart Photoshop.
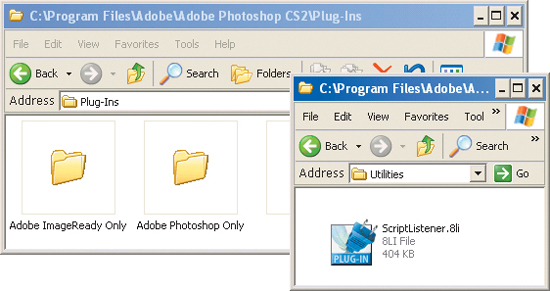
Image Processor
• Convert open files (or a folder of files) to one or all of the JPEG, PSD, or TIFF formats
• Resize images according to specific pixel dimensions
• Embed color profiles
• Convert a folder of images to sRGB and save them all for the Web
• Process a folder of camera raw files using the same settings
• Add copyright metadata
Scripting the User Interface
Which Scripting Language Should You Choose?
Here are my guidelines for choosing a Creative Suite scripting language:
• If you spent all of your parents’ money on a liberal arts education, you’ll probably be most comfortable with AppleScript.
• If you need your scripts to work on both Windows and Mac machines, go with JavaScript.
• If you’re familiar with Visual Basic, shake hands with VBScript.
The scripting language you choose will likely depend more on preexisting factors and personal tendencies than any rational criteria. I chose AppleScript because it came free on my Mac, and I was in a culture that supported AppleScript. It was covered in the design magazines I already read, people I knew were dabbling in it, and programs I used to make my living were AppleScriptable. Now that I’ve been using AppleScript for awhile, I can use it to write Automator actions and full-blown Macintosh applications with AppleScript Studio—but these capabilities are just gravy.
If you are the type who’s into rational decisions—and you’re starting from scratch—JavaScript is probably the best all-around choice because it’s cross-platform; lots of free scripts are available for it; and its strong online culture means that you might be able to get answers to your JavaScript questions at 3 a.m. With JavaScript, you can also program forms in Acrobat and add interactivity to Web pages; plus, you get a nice free JavaScript editor in the box with Creative Suite, called the ExtendScript Toolkit.
I’ve chosen AppleScript for the simple tutorial later in this chapter because it tends to be easier for newbies to follow, and those familiar with either of the other languages shouldn’t have any problem translating.
Scripting Editors
Scripts are text files—which means that (at least in theory) you can write them in any old text editor. Scripting editors, in contrast, supply some tools that you’ll soon find you can’t live without.
A decent script editor should do three things:
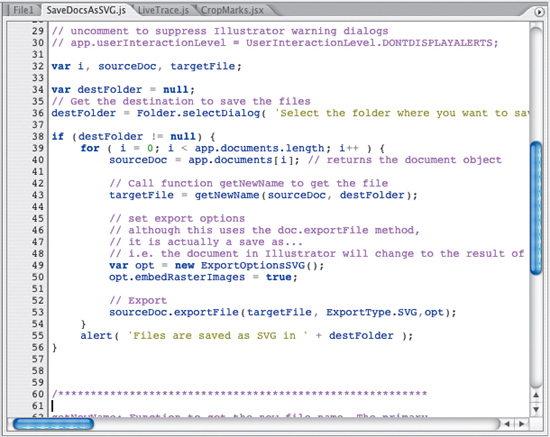
1. Provide color-coding and indenting. This makes the script much easier to read (Figure 4.3).
Figure 4.3. Color coding and indenting in the ExtendScript Toolkit. Both serve to visually organize the script.
2. Check syntax. Each scripting language follows its own syntax, or grammatical structure. The editor should check that syntax and warn you when you’ve run afoul of the law.
3. Run the script. You should be able to run a script in a scripting editor by clicking a single button, as you can with Apple’s Script Editor. Windows, in contrast, doesn’t include a scripting editor. Without a third-party editor, in Windows you have to write your script in Notepad and then save the file with the correct extension (.js or .vbs). To run your script, you have to navigate to the file and double-click it. To debug the script, you have no option but to go back and forth until it finally runs successfully (or you die of old age).
Apple also provides a free application development tool for AppleScript called AppleScript Studio. With it, you can develop full-blown Macintosh applications.
AppleScript
Apple provides a free scripting editor called Script Editor with every Mac. Not only does it fulfill all of my requirements for script editors, it’s perfect for beginners. Because some applications are “recordable” in AppleScript, you can record yourself manually performing tasks in a program, and they will be written out as AppleScript code in the editor—similar to recording Actions in Creative Suite or recording a macro in Microsoft Office. Before you get too excited, though, you should understand that few applications have been written to take advantage of this feature.
Script Debugger provides the same powerful debugging features (breakpoints, pausing, a view of changing values as the script runs, and more) as the ExtendScript Toolkit.
Two other AppleScript editors to consider are Satimage’s Smile (available free at www.satimage.fr/software/en/index.html) and Late Night Software’s Script Debugger (free demo, $199, available at www.latenightsw.com).
JavaScript/ExtendScript
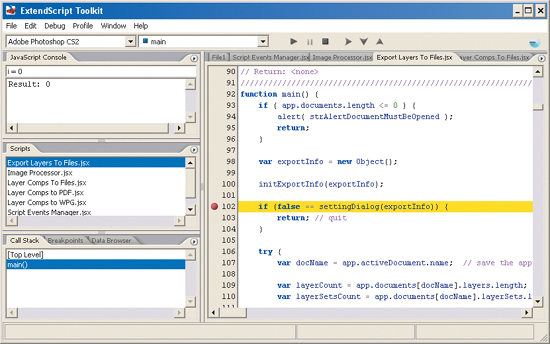
If you own Creative Suite, you’re in luck because you also own Adobe’s ExtendScript Toolkit, an “extended” implementation of JavaScript. The ExtendScript Toolkit works with both ExtendScripts and good old JavaScripts. It meets all of my basic script editor requirements, plus throws in some features typically found only in editors you pay good money for (see “The ExtendScript Toolkit”). These extra features generally fall into the category of helping you figure out what you’ve done wrong. Debugging is the process of tracking down and identifying errors other than syntax errors, incorrect math, and generally harebrained commands.
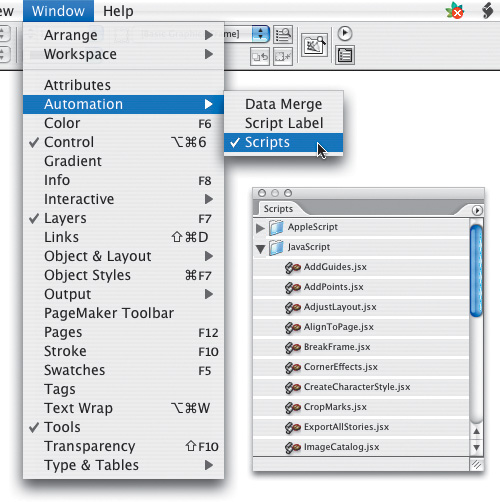
You can trigger scripts from within any of the three Creative Suite graphics applications. In Photoshop and Illustrator, go to File > Scripts and select a script that appears there. Any JavaScript that includes the .js or .jsx extension and is saved in the /Presets/Scripts folder will appear in that menu. InDesign is a little different. Put either Java-Scripts or AppleScripts (Mac only) in the same folder (/Presets/Scripts) but access them in InDesign via the Window > Automation > Scripts panel (Figure 4.4).
Figure 4.4. The Scripts panel menu and the panel itself in InDesign. Any AppleScript (Mac only) or JavaScript/ExtendScript in the Adobe InDesign CS2 > Presets > Scripts folder will appear in this panel.
- Does the error I get give me any clues? (Probably not.)
- From what happened or didn’t happen, can I locate the error in the script? (Maybe.)
- Try changing something and run the script again.
- Repeat ad nauseam.
Figure 4.5. The ExtendScript Toolkit interface in Windows XP. You can drag or close any tab. Here the Data Browser, Call Stack, and Breakpoints tabs are stacked together in the lower left window.
VBScript
As mentioned earlier, the Windows operating system does not provide a free scripting editor. Instead, you must type your script in a text editor like Notepad, save it with the .vbs file name extension, and then double-click the file itself to run the script.
Some scripting VBScript editors to consider are Adersoft’s VbsEdit ($49, available at www.vbsedit.com) and Modelworks’ SitePad Pro (starting at $129.95, available at www.modelworks.com).
The Obligatory “Hello World” Tutorial
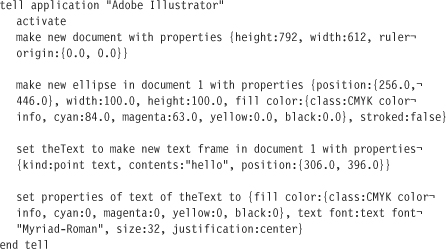
Tradition dictates that the first project you attempt with a new computer language be the “Hello World” project (look up the history on http://en.wikipedia.org). The project usually entails creating a small program to write “Hello World” onscreen. Not very exciting maybe, but tradition is tradition. Thus, our first project will be to draw, with the aid of AppleScript, a circle in Illustrator (the world) with a blue fill and no stroke. Our script will then write the word hello centered in the circle with a white fill.
To begin the tutorial, carefully type the following script in Script Editor:
AppleScript uses the convention of adding the continuation character (¬) to show that a line of code continues on to the next line. Lines are arbitrarily broken in print because of space constraints. So when typing in an AppleScript simply ignore the continuation characters or treat them as spaces.
Click the Run button (if Illustrator isn’t already open, Script Editor will automatically open it for you). You should see the Hello World circle and text as shown in Figure 4.6.
Figure 4.6. The output of your Hello World script.

After you’ve typed the text in Script Editor, click the Compile button (which resembles a hammer). This causes the editor to check the script’s syntax to ensure that it’s consistent with the AppleScript language. If you get an error message, make sure you typed it in exactly as shown.
Creating a New Page
Take a look at the preceding script and see if you can make some sense of it. The line tell application "Adobe Illustrator" directs the script to Illustrator. It’s a way of saying, “Take this note to Illustrator and have it do the things that follow.” The last line of the script is end tell which closes what’s called the tell block. Because an AppleScript can change which application it’s referring to mid-script, application tell blocks provide a means of indicating where the instructions for a particular program are contained.
Save your script before making any changes to it, and the editor will check the script’s syntax before saving the file.
The second line (activate) brings Illustrator to the front so that you can watch the show.
The third line starts with make new document—which is precisely what the script does. Documents have properties, and this specifies its height and width in pixels (AppleScript’s default). Since the Macintosh has 72 pixels per inch, we can see that this creates a page that is 11 inches tall (792 pixels divided by 72 pixels per inch) and 8.5 inches wide (612 pixels divided by 72)—or a letter-size page. The ruler origin {0.0, 0.0} portion of the script sets the horizontal ruler to start in the top left corner and the vertical ruler to start in the lower left corner—important because all commands will use this origin to set or return positioning properties.
Building the Circle
As you’ve already learned, all objects have properties. In this case, the ellipse, or circle, is drawn using five characteristics, or properties. The first property is its position (256.0, 446.0), which is its x, y coordinates on the page expressed in pixels. (You could substitute inches for pixels by typing 3.5 inches, 6.2 inches.) Our circle will be drawn 256 pixels (3.5 inches) from the left edge of the page and 446 pixels (6.2 inches) down from the top of the page.
The second and third properties we’ll use to draw our circle are its width (100.0) and height (100.0). Again, these measurements are expressed in pixels and will result in a circle about 1.4 inches in diameter (100 pixels divided by 72). If we wanted an ellipse, we’d only have to specify two measurements.
The fourth property of our circle is its fill color, which we build by specifying its CMYK mix (though we could also use an RGB mix or even a swatch color).
The fifth and final property is the stroke. Known as a Boolean data type, the stroke can only be one of two values: If its value is “true,” our circle will have a stroke; if it’s “false,” it won’t. So stroked:false means no stroke.
There are many other properties you can set, and if you don’t specify a property, AppleScript will use Illustrator’s defaults. For instance, one of the circle’s properties is “fill overprint.” Again, it’s a Boolean data type, and the default is false. Since the circle is not on top of another object, the default of no overprint is fine—and we don’t need to specify it.
Adding the Text
Let’s look at the line that starts with set theText. “theText” is a variable name I created so that I could refer to the text by that name in the next line. Variables are nothing more than placeholders—like the x’s and y’s in your high school algebra class—used to store values that change over time. We use variables all the time in our daily lives—take, for example, the expression “my car.” You may have many cars over the years; “my car” simply serves as the label (or variable name) for the vehicle that’s sitting in your driveway right now.
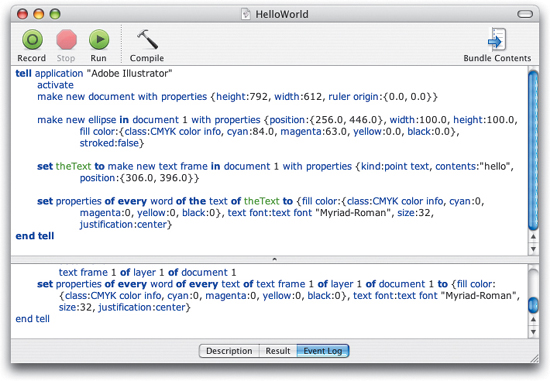
In Figure 4.7, the variable text shows up in green thanks to color-coding (you can change the color in Script Editor’s Preferences), which helps you quickly understand a script’s structure. In this example I’ve also used blue to indicate language and application keywords, and black for operators and values.
Figure 4.7. The Hello World AppleScript in Script Editor. The events that result from running the script are shown in the lower pane because the Event Log button has been selected. The bar separating the two panes is draggable to adjust the size of or hide either window.
A text frame is Illustrator’s scripting term for any text created using the Text tool. The three types (or “kinds”) of text frames are point (text anchored by a single point), area (text within an object), and path (text attached to a path). We can see that the three properties specified in this script are kind (point text), contents ("hello"), and position (306.0, 396.0).
Position is not actually a property of a text frame. Text frames inherit properties (including position) from their parent class, called the “page item” class. This is another example of the object model. Not only are classes contained within other classes, they also inherit certain properties from their parent class and have certain properties of their own.
We now want to set the fill color, font, size, and justification of the word hello. These are not properties of a text frame but of the text contained within the frame. Thus, in the next line (starting with set properties), we set those properties for the text of theText. This may seem weird, but remember that everything is contained within something else, and certain objects have certain properties. The fill color is set the same way it was for the circle. The font thing is a little interesting because text font:text font looks like a mistake but it’s not. The first “text font” is the property and the second “text font” is the class of the value. Size and justification are self-explanatory.
During the early stages of scripting, you’ll spend some (OK, a lot) of your time trying to figure out how to address objects (containment) and what properties you can change. This is where using (read: stealing) someone else’s scripts (with that person’s explicit or implied consent, of course) can come in handy. If you can find a script that does approximately what you want, it’s often easier to adapt code that someone else has written than to write your own from scratch. Not only do you save yourself time and grief, it’s a great way to learn.
Playing with Your Script
Now it’s time to make a copy of your script (copying and pasting it into a new window) and start moving and changing things—in short, play. Some of the most important lessons we learned as children were acquired through play. And playing is a great way to learn scripting, too. For instance, what would happen if you were to change the ellipse bounds? Would its shape change? And what if you were to change the contents of the text frame to, say, your name? Or if you were to change the font and color? What would happen if you were to change the text frame position, add other text frames, or change the “stroked” property to “true”? Try to get into the mode of experimentation. If you screw up, your script won’t work, but nothing will catch fire. Just as you would do when editing an image, make a copy so that you can’t destroy all your previous work (in this case, typing in all that code).
You can’t change every property of an object. While most properties are changeable, some are “read only” and are usually set by the application.
Here’s something cool: In Illustrator select just the circle and then go back to Script Editor and type the following in a new window:
![]()
Click the Result button (in the middle at the bottom of the window), and you’ll get back a wealth of information about our little circle (Figure 4.8).
Figure 4.8. After running this script, the bottom pane will display information that Illustrator records for your circle. If the bottom window is hidden, drag the horizontal bar (with the dot in the center of it) up to reveal the Result text.
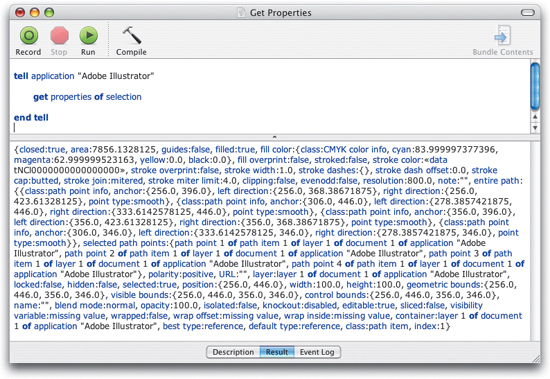
You’ll get an idea of what Illustrator tracks for every object and what you potentially have access to. Unfortunately, you can’t modify the Result window’s tangle of text in Script Editor to make it more readable. Still, it’s worth taking some time to wade through it, seeing if you can use any of the information there to change the circle. For instance, toward the bottom of the window you’ll see that the name property has a value of nothing (name:""). Let’s go ahead and name our circle Gaia, which means “living planet.” To do that, return to Script Editor, create a new script window, and type the following (with the circle still selected in Illustrator):
![]()
Click the Run button in Script Editor, then go to the Layers panel in Illustrator and expand Layer 1 to see Gaia in the lineup (Figure 4.9). Note that Illustrator automatically gave the text frame a name matching its contents—“hello.”
Figure 4.9. The circle is now named Gaia, as shown in the Layers panel. In future scripts you can refer to it by name.
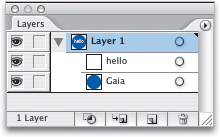
If you run the “get properties of selection” script again (with the circle selected in Illustrator), you’ll see that the value for the name property is now, in fact, Gaia. In future scripts you can refer to our little planet by its name—which means you could write and run something like the following (the circle doesn’t need to be selected now since you’re referring to it by name):
![]()
I’ve tried to stick to Apple’s Script Editor program for this tutorial because it’s free and not as intimidating to the first-time scripter as some other editors. After you get the hang of scripting, you should at least look at the free demos of more robust editors such as Script Debugger. In Script Debugger, for instance, the Result window is not only much easier to read but you can change values there and have them sent on to the target program. Features like this make scripting easier to learn.
This sets the circle’s transparency to 50 percent. Just to confuse you, in the Illustrator application this property is called transparency. But when scripting Illustrator you have to refer to it as opacity. It seems Adobe used the scripting word transparency already as a GIF property and had to call it something else for path items.
Now, let’s change the text as follows:
![]()
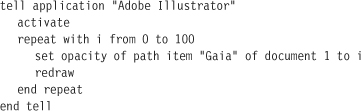
For our last trick, let’s do something more interesting. Although I’m sure I’m not the first to discover it, I’ve found that scripting lets you animate objects in the host program (in our case, Illustrator). The following script will fade the circle Gaia from white (or zero opacity) to full blue (100 percent opacity). You can also make objects fade in or out and move incrementally (as if sliding), and you can incrementally change text (to make it look as if someone were typing it manually). Here’s the fade-in script:
When we created the circle, we used the word ellipse, which provides a shorthand way of creating a complex “path item”—Illustrator’s name for an object built out of paths and path points. By using the word ellipse, we didn’t have to specify the number of points on the path or things like each point’s right and left direction (curvature). Once the ellipse is created, we have to refer to it as a path item since ellipse is only available during the make command.
The preceding script introduces the concept of loops, which are useful for controlling the flow of scripts. Loops generally repeat a task until a condition is met, usually changing something incrementally with each pass. In this case, the stop, or end, condition occurs when the variable i equals 100. (For no particular reason, the letter i is commonly used in AppleScript for loops. I could have just as easily used the letter g or z, or a variable name like LoopCounter.) In AppleScript, a loop starts with repeat and ends, appropriately enough, with end repeat. The part that says with i from 0 to 100 means that it will loop 100 times (actually 101 times, since we’re starting with 0 instead of 1).
For the first go-round, i has a value of 0; the second time it’s 1; and so on. At the end of the set opacity line, we see the variable i again. In our example, i is doing double duty, acting as both a counter for the loop and as the opacity percentage for the circle. If we didn’t use variables, we would have to write 101 set opacity lines in the script, which would look something like the following:
![]()
and so on up through 100.
If we decided that we wanted to change the progression of opacity and had, in fact, written 101 lines of code, we’d have to go back and rewrite the whole thing. Since the script uses a variable, however, all I would have to do to change it would be to alter the values. For instance, if I wanted the circle to fade out rather than in, all I’d have to do is change one line, which would look like this:
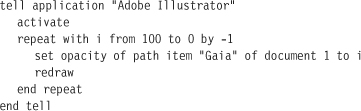
Illustrator sometimes has difficulty updating the view when you change something with scripts. The redraw command in the script forces it to refresh the screen on every pass of the loop.
You’ll notice that I added by –1, which tells the script to count backwards by 1. I didn’t have to write by 1 in the first script because AppleScript defaults to the value of 1 when counting loops. If the animation fades out too slowly for your tastes, try setting the count to –2 or –5 and see what happens. Can you make it fade in faster?
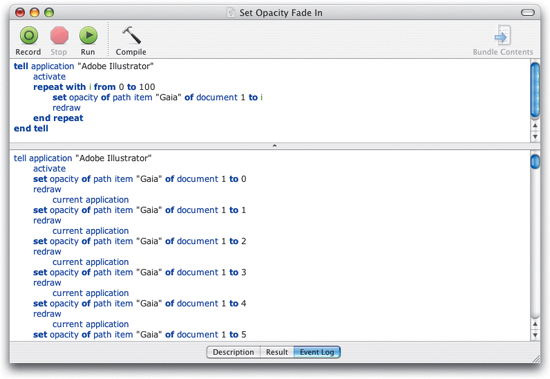
If you click the Event Log button at the bottom of the AppleScript window before running the script, you can actually watch as AppleScript writes those very lines internally to get the job done (Figure 4.10).
Figure 4.10. The log for the fade-in script (note the Event Log button selected at the bottom). The Event Log provides a written record of what happens while the script is running, showing all the events the script generates. These logs are invaluable for troubleshooting.
Give It a Go
I’m no scripting expert, and you don’t have to be one either. We don’t need to be Jedi masters to say we script. Start out slowly; try some simple scripts; and see what you can do. If your interests or needs take you further, more power to you.
Here are three things you can do to learn more:
• Rip off any script not nailed down. No kidding. First look on the Creative Suite Resources and Extras discs for some starter scripts. Then look on the Web. Read some of the articles that occasionally pop up in magazines, and buy a book or two (see the Resources appendix for some suggestions). Copy and paste with a vengeance. Adobe’s scripting reference documents, which should have come with your software but are also available online, are actually very good sources of information and scripts. Check out the Web sites listed in the next paragraph for additional scripts.
• Ask for help. Web sites, such as http://macscripter.net, javascript.internet.com, and http://visualbasicscript.com, have forums where you can post your questions. People are generally nice and want to help, but don’t let the occasional insensitive reply bother you (nobody knows it all, even those who act as if they do). Read the frequently asked questions section first and then skim the posts to make sure your question hasn’t already been answered; then be specific in what you’re asking and mindful of people’s time.
• Play. There are very few times in adult life when playing is encouraged, so take advantage of this one. Mess around with scripts. Try to do something weird or even wrong. Treat scripting as if it will give you clues to a mystery. If this does that, then what will this other thing do? Every time you solve a mystery, you get closer to understanding what scripting can do. Try out some scripts for applications you like other than Creative Suite, like iTunes.
One last piece of advice: As people help you and you learn more, try to give back to the community by helping others who aren’t as far along as you are. The real teaching and learning comes from the interaction of people helping each other.