
6. From One, Many: Data-Driven Publishing with Creative Suite
Isn’t life a series of images that change as they repeat themselves?
—Andy Warhol
Travel back in time with me to June 2004 and imagine that you’re one of Reason magazine’s 40,000 subscribers. You get your monthly issue, and on the cover you see an aerial photograph of your neighborhood—with your house circled in red (Figure 6.1). And that’s not all: Inside is a customized editor’s page peppered with stats from your community, a street map of your mailing address, customized ads (that incorporate your street address), and your Congress member’s name and voting record.
Figure 6.1. A representative cover of Reason magazine’s June 2004 issue. If you were a subscriber, the aerial photo would have been of your neighborhood with your house circled in red.

Reason magazine and Reason.com
Now, let’s deconstruct the moment you began flipping through that magazine. You were probably thinking something like the following: Magazines are mass-produced, so typically the only thing distinguishing one copy of an issue from another is the mailing label (which is actually produced by a form of data-driven publishing, or DDP). Since magazines generally concern themselves with just about anything but you, and high-quality printing isn’t economical for single copies (remember, you’re back in 2004), just how did Reason get that neighborhood picture and street map?
For a moment, you forget your surroundings and become completely focused on and open to the thing in front of you. That Reason magazine cover epitomizes the stop-you-in-your-tracks power of data-driven publishing—a potent combination of data, graphics, and high-speed quality printing. The magazine is also unsettling in its Big Brother implications—but that too illustrates the power of DDP, and was very much a part of the statement the issue was trying to make with its personalized cover and contents. The great graphical DDP advances brought about in part by features in Creative Suite mean that anyone who works in this field needs to be conscious of privacy issues and vigilant about avoiding even the appearance of breaching customers’ privacy. For instance, Reason’s subscribers freely gave their information to the magazine (as we all do), but they didn’t expect it to be translated into the product they held in their hands.
But what if the recipient found the issue intriguing or exciting (as some Reason readers most likely did)? What if that magazine engaged subscribers, excited their imaginations, or gave them customized information they could actually use? DDP is nothing if not targeted marketing: It means you don’t have to blast your message to the masses and hope it sticks with enough of them.
Although today’s media-savvy consumers may be more cynical about personalized communications than they were in the past (making them harder to reach via standard DDP), Creative Suite’s DDP features help you grab and hold their attention by enabling you to create more interesting customized graphic messages. And keep in mind that DDP is not just for direct-mail pieces: As you will see in the following sections, you can employ it to create production files for a wide range of products, including packaging, ads, business cards, contact sheets, and more.
Data-Driven Publishing
Data-driven publishing technology—also known as variable-data publishing, data merge, and dynamic publishing—describes an efficient way of producing many variations of a document by changing out specific text and images.
Producing multiple variations of a project by hand isn’t a new task for any graphic designer—but producing hundreds or thousands of slightly different documents is a whole different ballgame from creating a half-dozen comps or revisions. Take the standard business card: Across a company they look pretty similar, with the exception of personal data like names, phone numbers, e-mail addresses, and so on. If you had to type in the data for 100 of these, you’d shoot yourself. You’d be hunched over the keyboard, looking at some photocopied sheet of everyone’s information, building file after file after file after file. Your mind would wander. You’d begin to wonder where your life went off track, and sooner rather than later, you’d screw up 10 files by looking at the wrong line.
DDP automates processes like the one described above and—as long as your data source has the correct information—it doesn’t mess up by putting Jean Smith’s phone number on John Doe’s card. If you were to use DDP to produce the same business card described above, the basic card layout would contain all the information common to every card, such as the company logo and address, filled in (this is known as a parent file) and data fields for the information that changes from card to card (the variables). A parent file with variables is called a template, and that photocopied sheet with everyone’s info is now a text file called a content file. The program plugs each set of personal info into the template and produces a file for each (these are known as child files or children). In other words, Template + content = output.
To give you an idea of how useful this type of automation can be, I built a 10,000-business-card DDP test project in Illustrator, and the program cranked them out at a rate of about 1,700 files per hour. Granted, business cards are relatively small (in terms of file size), but that rate is at least 100 times faster than a human—even an experienced operator working at full tilt—could produce without a single mistake. Of course, not every project will result in such dramatic time savings, but you get the idea.
A Little History
Data-driven publishing has been around a long time. If you’re old enough, you may remember when Publishers Clearing House started sending out its famous mailers. They varied in style, but an individual’s name was always prominently featured in the best-quality dot-matrix printing available. That was the visual hook, and what a hook it was. Until then, most people had only seen their names printed like that on certificates commemorating special moments in their lives.
DDP has also been available to individuals for quite some time. Microsoft Word’s Mail Merge feature, for example, brought the Avery 33-up mailing label project to the masses. You simply set up your template and imported data from a spreadsheet, and all the labels for that month’s newsletter mailing would be set up to print in one pass. If you think about it, it was a critical piece of the desktop publishing revolution. My first Word mailing-label project actually used a dot-matrix printer and a one-up roll of self-adhesive labels, but those 33-up sheets weren’t far behind—and of course printing them all at once was the revolutionary part.
Data-Driven Benefits
The economic advantages of DDP don’t end with improved response rates. Since they target narrower niches, DDP mailings tend to be smaller than other mailings and thus consume less paper, ink, and fuel. The result is reduced costs all around. And, frankly, DDP pisses off fewer people than traditional direct junk mail. At its best, DDP can be an elegant form of communications that may even bring a little wonder into the world—not a bad use of technology.
DDP in Creative Suite
Photoshop, Illustrator, and InDesign all employ their own versions of DDP. All handle text and linked images, and both Photoshop and Illustrator also provide users with the option of showing or hiding elements (known as visibility). That, however, is where the feature consistency ends: Photoshop and Illustrator offer tools for creating data sets within the application, while InDesign doesn’t. Photoshop and InDesign import simple tab- or comma-delimited text files, while Illustrator requires XML-format data sets. Illustrator exports data sets, whereas the other two don’t (Table 6.1). Finally, Illustrator has a great but little-known capability to generate data-driven graphs, in which each iteration can have a different design and orientation.
Table 6.1. Data-Driven Publishing Across Creative Suite
It’s not easy to pick a favorite, but of these three programs, InDesign offers the most robust DDP. It points toward where I hope Adobe plans to take Creative Suite’s DDP across the board: error reporting for text-frame overflow and missing images; maintaining links to external data files; and flexible text handling, with the capability to handle inline variable text (variable text that doesn’t need its own frame).
The Clock Project
In this project, I’ve placed a logo on a clock face; however, it will be a variable that sits behind the clock’s hands and their shadows. I also placed a variable trademark line running along the right side of the image.
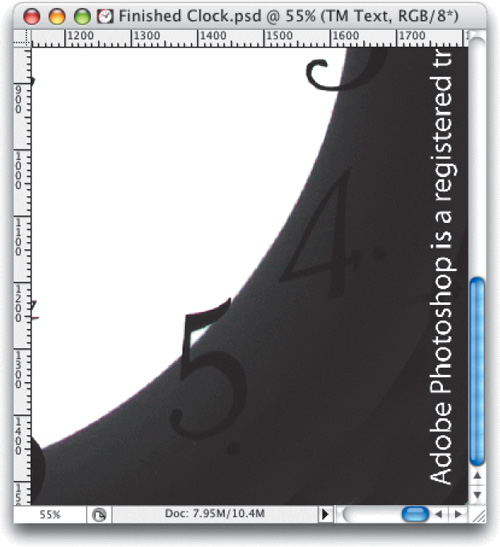
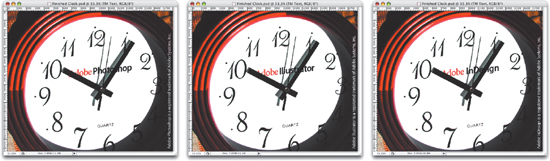
Take a look at a sample of the results (Figure 6.2), and you’ll see that there are two variables in this image: The first is the logo (in this sample, the Adobe Photoshop logo), and the second is the trademark line running up the right-hand side (Figure 6.3). One of the keys to designing a successful DDP image is to make it look utterly real: The casual viewer should never think that the logo wasn’t in the original photograph, or that it could be replaced with another logo.
Figure 6.2. A sample of the output, or child file: The Photoshop logo and the legal text on the right are both variables.
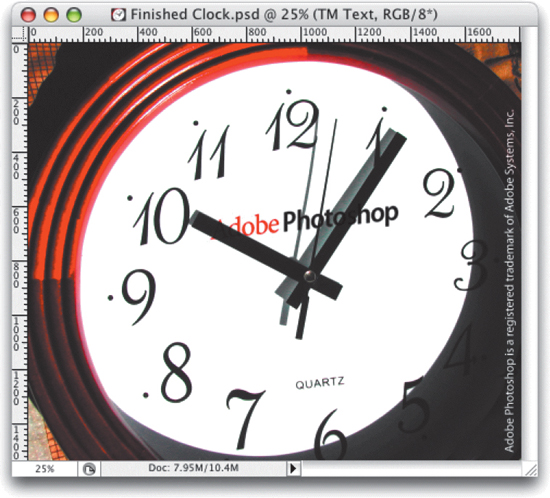
Figure 6.3. A close-up of the variable text on the right side.
Building the Template
1. To begin building my clock face, I opened an image of a clock in Photoshop and named its single layer Clock Face.
2. I then opened a logo file that I’d previously skewed to fit the perspective of the clock face, copied and pasted it into the clock file, and named the layer Variable Logo.
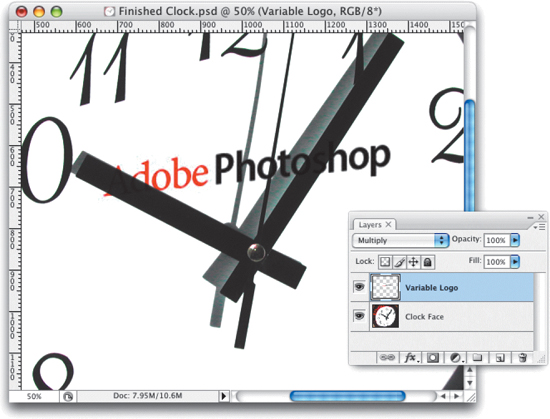
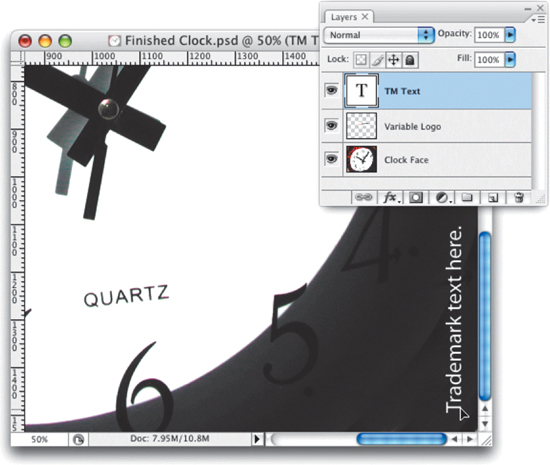
3. After positioning the logo, I gave its layer a blending mode of Multiply, to make it appear behind the clock hands and beneath their shadows (Figure 6.4).
Figure 6.4. Close-up of the “convincing shadow” and the layer order. Note that the Variable Logo layer has been assigned a blending mode of Multiply.
4. Next, I added a text layer and named it TM Text. With the text still selected, I rotated it 90 degrees counterclockwise and positioned it in the lower-right corner (Figure 6.5). In this project, the text will be replaced with trademark copy from an external text file.
Figure 6.5. The placeholder trademark text, placed in the lower right corner.
Creating the Variables
1. To make two of the layers in my template into variables, I chose Image > Variables > Define. This brought up the Variables dialog box: From its Layer pull-down menu (which lists all layers in a document), I chose Variable Logo. Since I planned to replace all the pixels in this layer, I checked the Pixel Replacement box. I then gave this variable the name Logo in the Name field and left the Method pull-down at the default choice, Fit (Figure 6.6).
Figure 6.6. You define a file’s variables in the Variables dialog box: Simply pick the layer from the pull-down menu and make your selections.
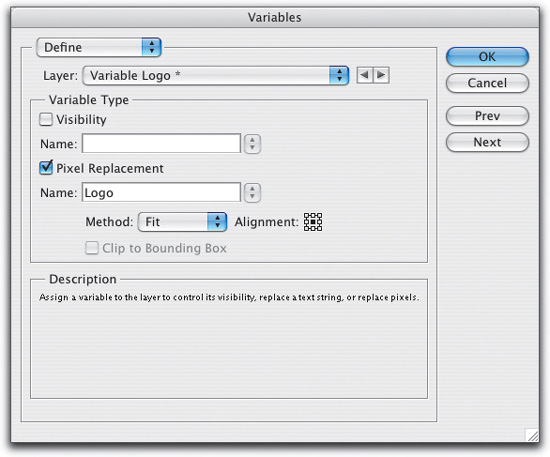
Note that there are four choices for Method: Fit, which fits the image in the bounding box while maintaining proportions; Fill, which fills the bounding box while maintaining proportions; As Is, which inserts the replacement image while maintaining its size; and Conform, which fills the bounding box but doesn’t maintain the original proportions. For both Fill and As Is, the Clip to Bounding Box check box is available, which allows you to mask any part of the image that extends beyond the bounding box.
To avoid trouble, start variable names with a letter and don’t use spaces or nonalphanumeric characters.
2. Next, from the Layer pull-down menu I selected the TM Text layer. You’ll notice that because this layer contains text, the Pixel Replacement option has changed to Text Replacement. I checked that box and named the variable TMtext. Note that for both of these layers (in addition to their other variables), I could have chosen to make their visibility variable by checking Visibility in the Variable Type area. Each layer can thus have as many as two variables assigned to it.
Creating Variable Logo Files
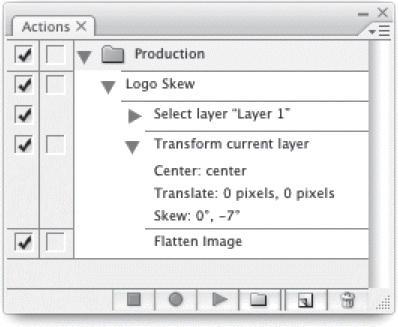
Using the test logo that I’d skewed to the clock face, I determined the correct skew angle to match the perspective of the clock. After getting the angle, I recorded a quick action for a −7 percent skew, and then ran it as a batch action on three logos (Figure 6.7).
Figure 6.7. I set up a batch action to skew my logo files −7 percent to match the perspective of the clock face.
Creating the External Data Sets File
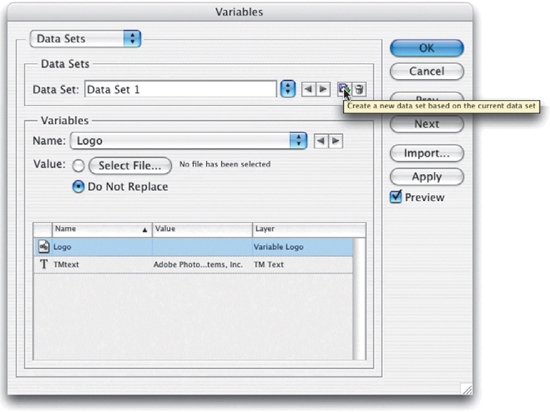
A data set consists of a group of variables and the data used to populate them. You can create data sets within Photoshop by manually populating the variables and saving the resulting data set (for this project, that means replacing the image on the Variable Logo layer with another image and typing new text in the TM Text layer). To save the data set, choose Image > Variables > Data Sets and click the New Data Set button (Figure 6.8). Repeat this process (replacing the variable content and saving the data set) for as many iterations of your image as you need.
Figure 6.8. Click the disk icon to save a data set that captures the current content.
A far more common scenario, however, would be to import a text file containing the data sets. A file of external data sets usually comes out of a spreadsheet or database as a text file, but you can also build one by typing the data in almost any text editor. Photoshop will import either a tab- or comma-delimited text file.
1. For this project I used my favorite text editor to type the data in a text document. I set up the file like a spreadsheet, with columns, rows, headers, and tabs separating the columns (Figure 6.9).
Figure 6.9. The content text file containing pointers to the variable graphics and the actual variable text. Each row is one data set.

2. The first line of the text file must contain the variable names. It doesn’t matter what order the “columns” of variable data are in as long as the variable names on the first line (the “column headers”) exactly match the variable names in the Photoshop file. I decided to put the Pixel Replacement variable data first, so I typed Logo (precisely matching the variable name I assigned in Photoshop). I then pressed the Tab key and typed TMtext for the name of the text variable.
3. On the second line of the text file (beneath Logo), I typed the path to the Adobe Photoshop logo file. Note that data set files point to images via their file paths rather than containing the actual images. To quickly find a document’s file path on a Mac, open Terminal (Applications > Utilities > Terminal) and drag the file from its location into the Terminal window. You’ll immediately see the path name, which you can then copy and paste into the content file. To locate a document’s file path in Windows, choose Start > Run and then drag the file into the Run field. The file path will appear, and you can then copy and paste it into the text file. After pasting the file path, I pressed the Tab key and entered the trademark line for the Photoshop logo.
4. I repeated the same steps for the last two data sets and saved the data sets file as ClockData.txt.
Importing the Data Sets File
For the next task, I had to return to Photoshop, where I imported the external data sets file by choosing Image > Variables > Data Sets and clicking the Import button on the right side of the dialog box that appeared. I then navigated to the ClockData.txt file and clicked OK. (Adobe has crammed a lot into this dialog box, so it’s a little hard to make out what’s going on sometimes.) Photoshop matches up the data under each of the headers in the content file with the same-named variables. If you click the Preview check box, you can flip through the data sets and watch the image and text change in the template file. You can do this by clicking the Back and Forward arrows in the Data Sets area or by choosing them from the Data Set drop-down menu. When I had verified that my data sets were correct, I clicked the OK button.
The headers in the content text file (in this case, Logo and TMtext) must exactly match the variable names set up in the template, or Photoshop won’t be able to match them up when importing the content file.
Outputting the Child Files
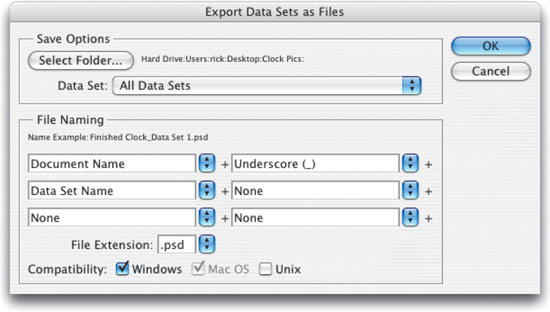
1. To build the final files, from the File menu I chose Export > Data Sets as Files. Then, in the Save Options area, I chose the destination folder by clicking the Select Folder button and navigating to the folder I’d set up for my final images (called Clock Pics).
2. In the File Naming portion of this dialog box, I used the pull-down menus to tell Photoshop how to construct the filenames for the child files (Figure 6.10). Notice the Name Example at the top of the File Naming area.
Figure 6.10. You select the destination folder for your finished files in the upper area of the Export Data Sets as Files dialog box. In the bottom area you determine how your child files will be named. Click OK, and you’re off to the races.
3. When I’d set up everything the way I wanted, I clicked OK, and the files were built and saved in the destination folder (Figure 6.11). Ta da.
Figure 6.11. Like human children, these files inherit some traits from their parent but contain enough variables to make them unique.
The Future
Despite its usefulness, the future of data-driven publishing remains cloudy. An underutilized technology—due either to its obscurity or poor usability—it hasn’t seen much technological progress lately.
In the meantime, just as progress in data-driven print technologies was stalling, the Internet revolution ushered in an era of communicating with very small and focused audiences—via advertising on customized e-greeting cards and e-invitations and personalized e-mail (much of it unwanted, aka spam). Both happily and unhappily, this microcasting trend exposed us all to a wealth of personalized imagery and messages—so we’ve grown, at least partly, sickened by it. As a result, we now look at personalized marketing materials with a great deal more skepticism and wariness. Long gone are the wide-eyed and heady days of the Publishers Clearing House envelope.
But remember that DDP can be used for more than just personalized marketing communications. There will always be a demand for elegantly designed, respectful personalized marketing materials targeted to audiences that have opted in (either implicitly or explicitly) for the experience.
As for the evolution of the technology, I think DDP tools could be fine-tuned to make tying external data to variables much easier—InDesign’s drag-and-drop method of data merging represents a step in the right direction. Now that Adobe’s suites are one, big, happy standardized family, it also wouldn’t hurt to expand and standardize DDP tools across the product lines.