
3. A Call to Actions: Creative Suite’s Native Automation Tool
Action is eloquence.
—From Coriolanus (William Shakespeare)
Actions are Creative Suite’s version of application macros—mechanisms that record and play back the steps a user performs manually. Able to act on both single files and (in Batch mode) multiple files, actions are easy to create, edit, and use, and they provide a great introduction to automation.
Actions are perfect for smaller automation routines that don’t require a great deal of customization, such as a typical Photoshop workflow of resizing, cropping, and changing the resolution and color space of a small batch of images. Using an action, you can quickly and easily record the steps you perform manually for the first file and then automatically play the action back for the remainder of the images.
You can also halt actions and allow user input. And since actions can trigger scripts (and scripts can trigger actions), actions can communicate (to some degree) with other applications. Actions are available in Photoshop and Illustrator but not, unfortunately, in InDesign. (Some reasons for this are that page layout tends to be less repetitive than image preparation, and InDesign has its own automation tools that handle some of what actions do.)
To create an action, you simply open the Photoshop or Illustrator file you want to use and then open the Actions panel, push the Record button, and perform whatever tasks you wish to automate. When you’re finished, push the Stop button. When you want to apply those same steps to another file, all you need to do is choose the action from the menu in the Actions panel and press Play. What can be even more useful is the ability to apply an action to an entire folder of files as a batch.
Occasionally, you’ll need to edit an action to correct small mistakes or adapt it to new workflows. To do so, you simply drag and drop the action’s steps (or commands) to change their order and double-click to modify them. You can also save actions to a file so that you can share them with colleagues or friends.
Actions are perfect for throwing together quick automations: They aren’t nearly as difficult to create and maintain as scripts, and thanks to their ability to process batches and pause for user input, they can serve as flexible and powerful automation agents.
The Reflecto Action Tutorial
As you proceed through this tutorial, you’ll learn how to write and edit your own actions by creating a Photoshop action that produces an image reflection (like the effect that’s used in a lot of Apple’s advertising and marketing materials). The effect makes an image appear to be sitting on a shiny surface (Figure 3.1).
Figure 3.1. The finished product of the Reflecto action. You can adjust the length of the reflection in the action.
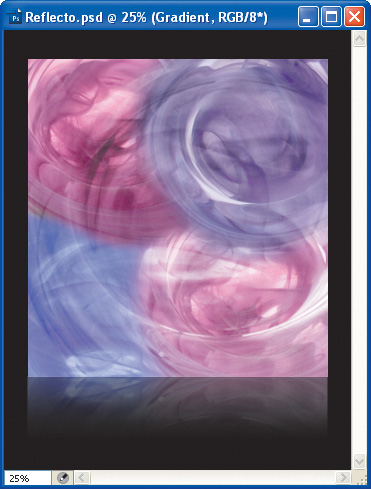
For this tutorial, you’ll be working with the Layer Comps.psd image, which is located in Photoshop’s Samples folder. Save this file as Reflecto.psd in your documents folder. Once you’ve done this, hide both the “text” and “votive” layer sets (by clicking the Eye icons next to the layer names in the Layers palette) and flatten the image (Layers palette > Flatten Image). You should now have an image that’s 4 inches wide by 4.24 inches high at 100 pixels per inch. You can copy and paste any image you like into this file for the tutorial—just make sure to flatten it before proceeding; if you fail to do so, the action won’t work. Save this image as Reflecto.psd.
Creating a New Action Set
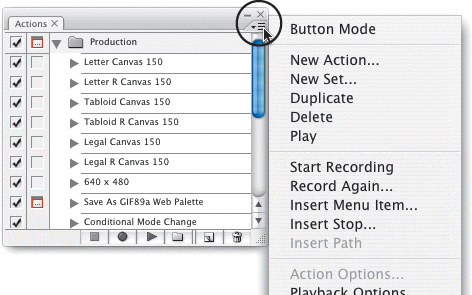
Begin setting up your action by creating a new action set—which you can think of as a folder that will contain different actions. Sets are useful both in organizing your actions and when it comes time to save them (since actions can only be saved in sets). To open the Actions panel (if it’s not already open in Photoshop), choose Window > Actions. To create a new action set, click the Actions panel menu arrow and choose New Set. Name this set Reflecto Set (Figure 3.2).
Figure 3.2. To access the Actions panel menu, click the menu icon in the top-right corner.
Watch the Actions panel as you record. You’ll see the steps (or commands) being added as you complete them, which is kind of cool.
Creating a New Action
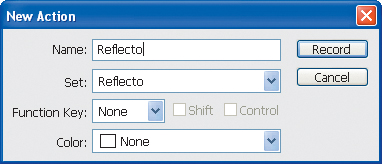
Now it’s time to create the Reflecto action. To do so, go to the Actions panel menu and choose New Action (Figure 3.3). In the New Action window that appears, name your action Reflecto and make sure that Reflecto is selected in the Set pull-down menu (Figure 3.4). When you click the Record button, Photoshop will begin recording most of your mouse movements and menu selections into this new action; it continues to record until you click the Stop button.
Figure 3.3. To create a new action, from the Actions panel choose New Action.
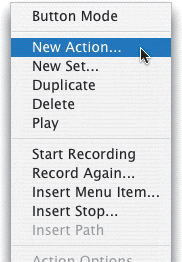
Figure 3.4. The New Action window.
Recording the Action
Here are the steps you’ll record to create the Reflecto action.
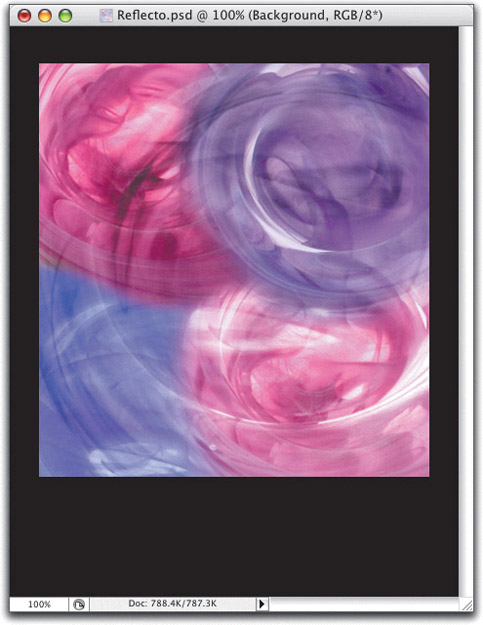
1. Double-click the single layer named Background, and in the New Layer window that appears rename that layer Original.
The Background layer is a special kind of layer: As such, it cannot contain transparency or be moved from its position at the bottom of the layers stack. By renaming it, we’re converting it to a regular layer.
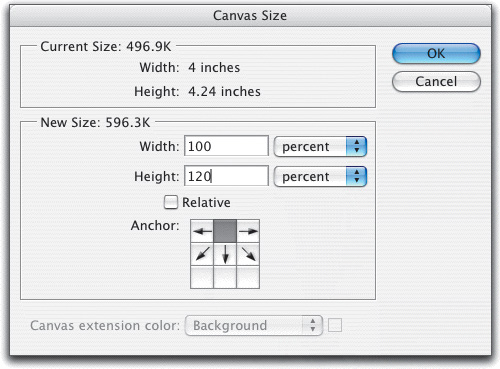
2. Set the canvas size (Image > Canvas Size) height to 120% with the anchor at the top center (Figure 3.5), and then click OK.
This will give you the space at the bottom for the reflection.
Figure 3.5. The Canvas Size command gives the image space at the bottom for the reflection. You can change the percentage or make it an absolute size by specifying pixels or inches.
3. Set the canvas size again to give the image a nice border by giving it 115% for both the width and height, and set the anchor in the middle (Figure 3.6). Your image should now look like Figure 3.7.
Figure 3.6. The second Canvas Size gives the image a border. Specifying percentages makes this action more adaptable to other image sizes. Using absolute measurements would restrict this command to the size of the tutorial image.
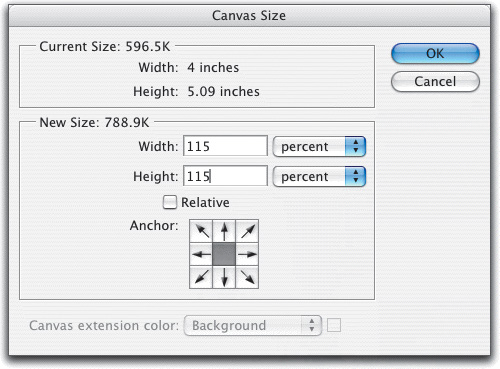
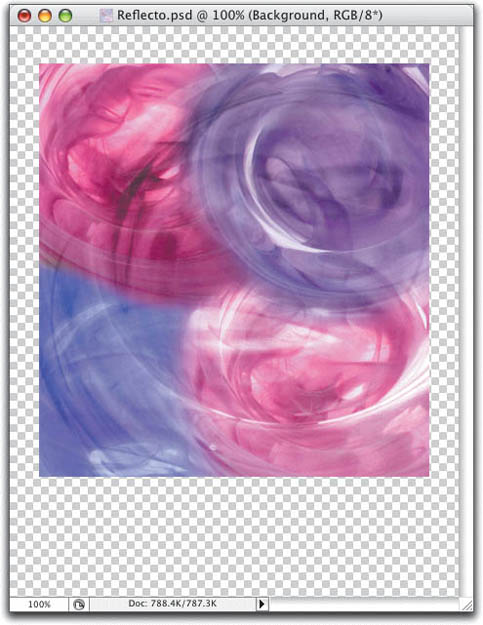
Figure 3.7. The Reflecto tutorial image after setting the second Canvas Size.
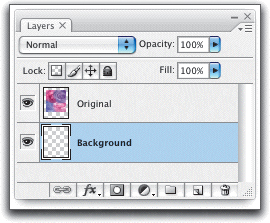
4. Create a new layer (Layer > New > Layer), double-click it, and name it Background. Now drag it below the Original layer (Figure 3.8).
Figure 3.8. After creating and naming the Background layer, click and drag it so that it appears under the layer named Original. Note that you could have also created the new layer by clicking the second icon from the right at the bottom of the Layers panel (the one that looks like a turning page).
5. With the Background layer still selected, fill it (Edit > Fill) with black (Figure 3.9).
Figure 3.9. After completing Step 5, your image should look like this.
6. In the Layers palette, click the Original layer to select it, then duplicate it (Layer> Duplicate Layer) and name it Reflection.
This layer will eventually become the reflection at the bottom.
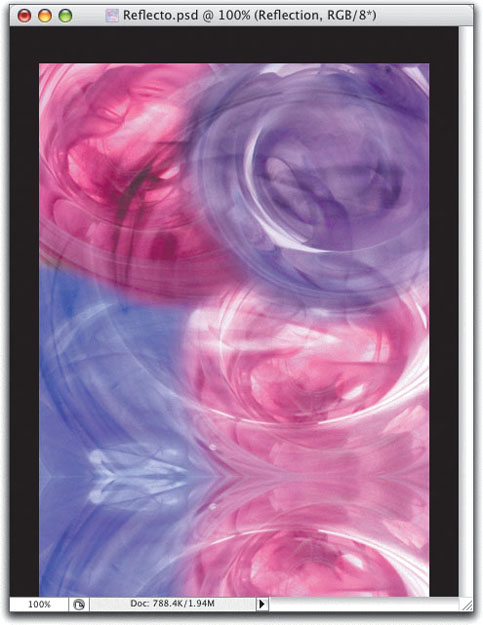
7. With the Reflection layer still selected, flip it (Edit > Transform > Flip Vertical). Then, using the Move tool, drag this flipped layer until its top snaps to the bottom of the Original layer (Figure 3.10).
Figure 3.10. You can start to see how this effect is coming together. The flipped duplicate layer will, with some tweaking, become the shiny reflection.
8. Using the slider at the top of the Layers panel, set the opacity of the Reflection layer to 60% (Figure 3.11).
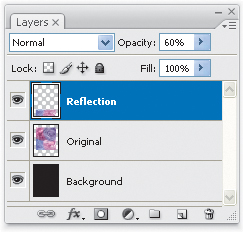
This will give you a nice reflection, but you still need to make it fade out toward the bottom of the image.
9. Create a new layer (Layer > New > Layer) and name it Gradient.
10. Press the D key.
This will reset the Foreground and Background swatches to the default black and white.
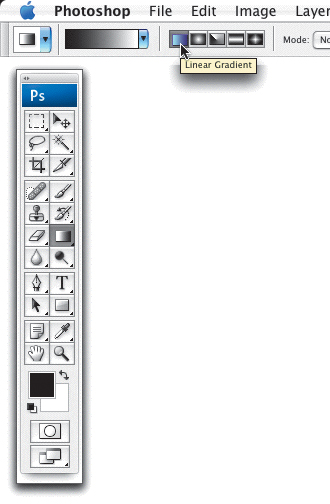
11. Select the Gradient tool, making sure that Linear Gradient is selected (Figure 3.12).
Figure 3.12. Note that the action does not record you selecting the Gradient tool, only the gradient you draw. Make sure you select Linear Gradient from the Tool Options bar.
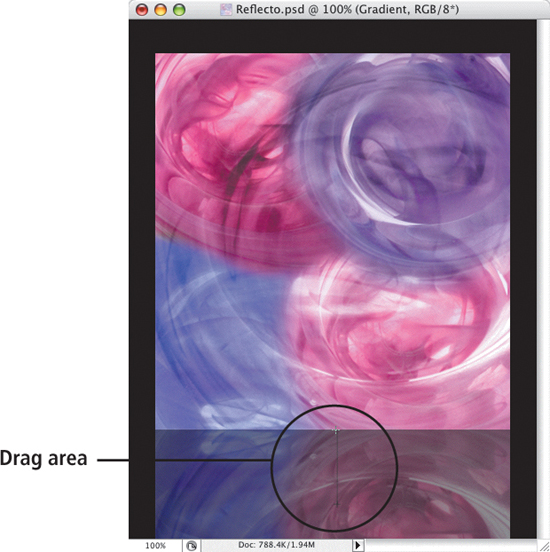
12. With the Gradient layer still selected, click in the Document window with the Gradient tool, starting about a quarter-inch from the bottom and dragging up to where the Original and Reflection layers meet (Figure 3.13).
Figure 3.13. Using the Gradient tool, I started about a quarter-inch from the bottom and dragged up to where the two image layers meet. You might want to adjust this for a larger and stronger reflection.
13. In the Layers palette, set the Gradient layer’s Blending Mode to Multiply (Figure 3.14).
Figure 3.14. The Blending Mode options determine how one layer’s pixels blend with the layer beneath it. The Multiply option just happened to give me the effect I was after.

14. To halt recording, click Stop.
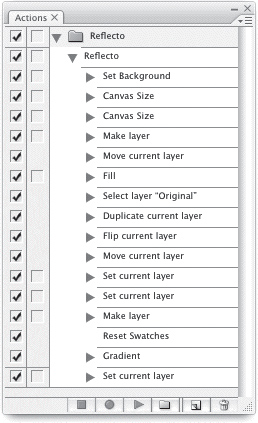
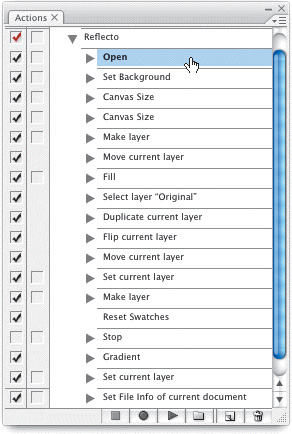
Congratulations—you’re finished! The Reflecto action should look like Figure 3.15.
Figure 3.15. The Reflecto action in all its glory: It’s interesting to see your physical actions captured in distinct steps. Thinking in steps helps you plan automations.
Playing Back the Action
To activate an action, select it and click the Play button at the bottom of the Actions panel (Figure 3.16). Note that the action you recorded in the tutorial only works with an original image the size of the one used in the tutorial. As the action plays, notice how the successive steps (or commands) are highlighted as they’re carried out.
Figure 3.16. The following buttons are lined up along the bottom of the Actions panel (from the left): Stop, Record, Play, New Set, New Action, and Delete.
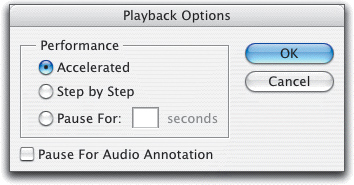
You have a number of options for playing back actions, all of which you can access via Actions panel menu > Playback Options (Figure 3.17). The three options that appear under Performance determine how fast an action runs. The Accelerated option (the default) plays an action without updating the file onscreen until it is completed. The Step by Step option redraws the screen at every step, which is interesting to watch but slower. And the third option (“Pause For: [ ] seconds”) allows you to set the number of seconds that an action will pause between commands. This option, like Step by Step, redraws the screen at each command. These last two options can be useful for building a self-running tutorial of sorts.
Figure 3.17. You’ll probably use the Accelerated performance option most often.
The last setting among the Playback Options—the Pause For Audio Annotation check box—is an interesting one. Audio annotations are sound files you can record using the Audio Annotation tool in Photoshop (but not Illustrator). Generally, voice annotations are used to communicate some special circumstances about the file. You can record an action command to play back an audio annotation. First, record an audio annotation (see Chapter 9 on Photoshop projects). Once you’ve done this, a small, nonprinting icon of a speaker will appear next to the image. As you’re recording an action, double-click the icon at the point where you want it to play. If you have Pause For Audio Annotation checked, the action will pause and wait for the audio to finish before proceeding to the next command. You can create fairly sophisticated self-running tutorials and slide shows with voice-overs using this feature.
Editing Your Action
At some point you will undoubtedly need to edit your action to get it to run the way you want—for example, adding commands that weren’t recordable, adapting the action for specific situations, or simply changing your mind about how you want it to perform. The following subsections demonstrate how you can adapt your actions.
Activities that can’t be recorded in an action include painting and drawing, setting tool options, making certain tool selections, and carrying out View and Window commands (among others). If your action missed recording a step in your task, from the Actions panel menu choose Insert Menu Item and then choose the appropriate command or option from the application pull-down menus.
Adding Commands
In the same Reflecto action you created earlier, you’ll now record a command to add copyright information to the file’s metadata.
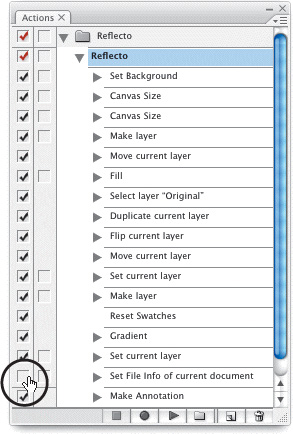
1. Click the last command in the Reflecto action (“Set current layer”) and then click the Record button (the circle at the bottom of the Actions panel).
Photoshop will now begin recording again and append any new commands.
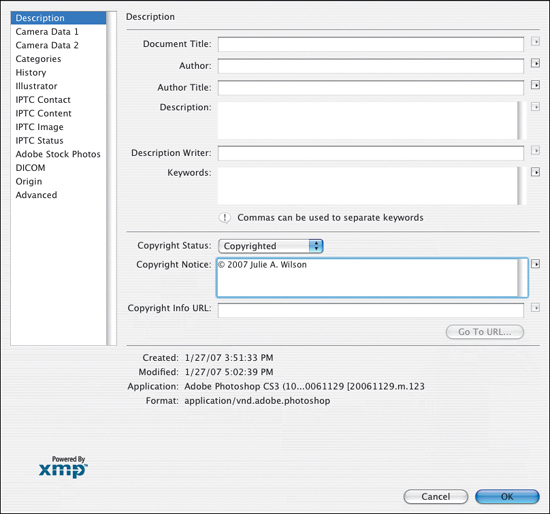
2. Open the file’s metadata by choosing File > File Info. In the left pane make sure that Description is selected. Now, from the Copyright Status pull-down menu, choose Copyrighted and in the Copyright Notice box type © 2007 Julie A. Wilson (Figure 3.18).
Figure 3.18. Each item in the pane on the left represents a metadata category. If you import digital photos, the Camera Data 1 and Camera Data 2 fields will display metadata recorded by the camera along with the shot.
The term metadata—which you’ll hear from time to time in your Creative Suite work—means “data about data” and usually refers to text describing the data file in which it resides. For example, digital photo files often contain metadata describing the date they were captured, the camera they were taken with, their pixel dimensions, and more. You can view the various types of metadata that Photoshop lets you store by choosing File > File Info. Some workflow tools can act on a file based on its metadata (for example, routing a file or applying a setting).
While you can enter any text you like, for this example I’m using the copyright information for the photographer who took the pictures that will be used in the Batch feature (explored later in this chapter).
In addition to the above, there are three other ways to add commands to an action. To add unrecorded commands, from the Actions panel menu select Insert Menu Item, to bring up a dialog box that will instruct you to select a menu item. When you select one, it’s added to the dialog box.
Another way to add commands is to copy them from another action by dragging and dropping. And finally, you can duplicate a command (Actions panel > Duplicate), which you can then drag to where you want it to take place in your action workflow. After moving the command, you can double-click it to open and change its settings (if it has options).
Since the Reflecto action produces layered files, you might want to add a command to flatten the image (Layers panel > Flatten Image) at the end.
Deleting and Moving Commands
You can delete commands from an action by selecting them and doing one of three things: choosing Delete from the Actions panel menu, dragging the command onto the Trash icon at the bottom of the Actions panel, or clicking the Trash icon. (Dragging the command onto the Trash icon is the only one of these three methods that doesn’t bring up a dialog box asking if you really want to delete.) You can select more than one command to delete by holding down the Shift key for adjacent commands or the Command key for nonadjacent commands.
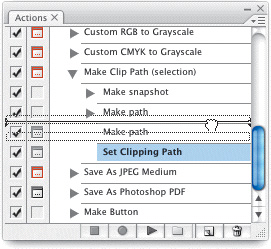
You can also reorder commands by clicking and dragging them to their new locations. When the divider line is highlighted in the spot where you want the command to be carried out, release the mouse button (Figure 3.19).
Figure 3.19. To reorder commands, click and drag them, releasing the commands when the new location is highlighted with a black bar.
Toggling Commands
You can turn individual commands on and off by clicking the check boxes to the left of their names. This is a great way to test your actions or to customize them for different uses. You can also turn complete actions and action sets on and off with the toggle box, though this seems to have limited uses.
Let’s say that you don’t want to include the copyright metadata in some images. Select the check box to the far left of the command name to deselect it (Figure 3.20).
Figure 3.20. If you don’t want to add copyright metadata to every image or batch of images, you could delete this command; however, it probably makes more sense to simply turn it off.
Inserting Stops
Sometimes you’ll need to halt an action and get input from the user—usually either to perform a step that can’t be recorded (such as selecting part of an image or painting with the Brush tool) or to enter a value. Your Stop command can display a message to users directing them to take the required step.
Let’s assume that the Reflecto action will be used on images of different sizes from our tutorial original. If you look back to the Reflecto action setup, you’ll see that the canvas size was changed using percentages instead of pixels (making the action more flexible). However, the gradient can’t be sized that way; it has to be drawn by hand. Thus, you will now turn off the Gradient command and insert a Stop command so that users can set custom gradients before letting the action run its course.
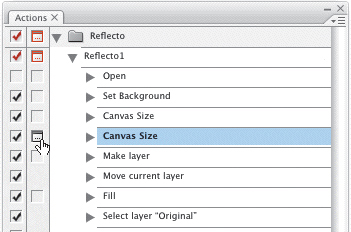
1. In the left column of the Actions panel deselect the toggle check box for the Gradient command.
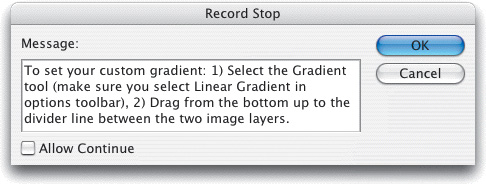
2. Click the Reset Swatches command (directly above the Gradient command) to highlight it, and from the Actions panel menu choose Insert Stop. In the blank message window that appears, type the user instructions, in this case telling users to draw their own custom gradients (Figure 3.21).
Figure 3.21. It’s a good idea to provide instructions (or some kind of message) for the user when creating a Stop command.
Now, when the user plays this action, he or she will see your message dialog box and know to click the Stop button in the message window, set a gradient, and click the Play button in the Actions panel.
You can also use stops to display information about an action—for example, explaining a step’s purpose. The Allow Continue check box at the bottom of the Record Stop window lets users read the message and then click Continue to let the action proceed. Take care, however, to use these “informational” stops only when absolutely necessary: Users will quickly become irritated if an action is interrupted repeatedly. And if a user has to be present to close the dialog box, the advantages of automation are mostly negated.
Using Modal Controls
Some commands have associated dialog boxes. For instance, when you record the steps you take to fill a selection with the foreground color, the command records the settings you choose. However, you can change those settings when you run the action again by double-clicking the command, which opens its associated dialog box. In this way you can customize actions for different uses without re-recording them.
To pause your action so that users can enter needed information, click the check box in the second column from the left, next to the affected command (Figure 3.22). This is known as the Modal Control box: When you enable modal control, a boxy-looking icon appears. (I’m not sure what the icon is supposed to look like, but it refers to a dialog box.)
Figure 3.22. When you check a command’s Modal Control box, the action halts and the user is presented with a dialog box, where he or she can enter custom values. The user must then click the OK button to proceed.
You’ll use modal controls when a command needs to be customized for each image on which you run your action, such as when you need to use different Save settings or if you don’t always merge layers when converting from RGB to CMYK. Like stops, modal controls should be used sparingly because they halt the action and await user input (which of course requires the user to be present).
To get a feel for how modal controls work, imagine that your users need to set a custom border for each image: To facilitate this, activate the modal control for the second Canvas Size command by clicking the empty box next to it.
Running Batch Actions
Running actions on individual files is a huge time-saver in and of itself; however, you can save even more time by using the Batch feature in Photoshop and Illustrator. Using the Batch feature lets you not only run an action on an entire folder of files at once, it also lets you rename the files (in the same operation).
In Photoshop you access the Batch feature by choosing File > Automate > Batch (Figure 3.23); in Illustrator you choose Batch from the Actions panel menu (Figure 3.24).
Figure 3.23. Photoshop’s Batch window.
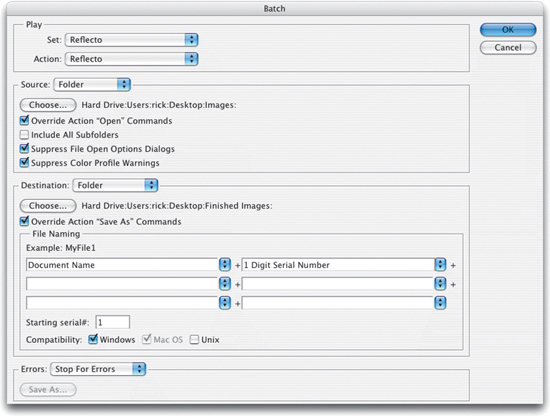
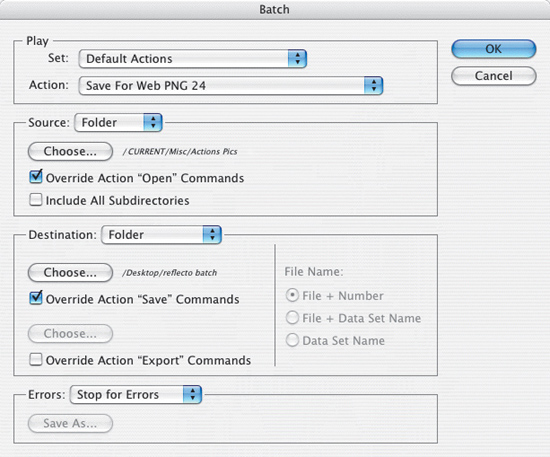
Figure 3.24. Illustrator’s Batch window doesn’t have the elaborate File Naming section found in Photoshop’s Batch window.
1. Choose Actions panel menu > Start Recording (or click the Record button) to start recording again and then open any file. Click the Stop button to stop recording. The Open command will appear at the bottom of the list; click and drag it to the top, making it the first command (Figure 3.25).
Figure 3.25. After you record the Open command, drag it to the top of the list.
2. Start recording again and from the File menu choose Save As and then save the file anywhere. (It doesn’t matter where you save because you’ll be overriding that choice in the Batch window.) Now close the file and click the Stop button.
You are now finished with the action and ready to run a Batch.
3. Open the Batch window in Photoshop (File > Automate > Batch), and in both the Set and Action pull-down menus (at the top of the window), choose Reflecto. Set Source to Folder and click Choose to locate and select the folder that contains your batch of images. Make sure your settings match the default settings shown in Figure 3.23.
You’ll probably want to create a new folder for the processed images; also note your file-naming options here. At the bottom of the window, Batch lets you indicate whether you want it to halt when it encounters an error or continue on its merry way, making note of the problem in a log file of your choosing.
The Image Processor in Photoshop (File > Scripts > Image Processor) is another way to run actions in batch mode (see the “Mom Likes Photoshop Best” sidebar in Chapter 5). The only advantage to running an action in batch mode from here is if it would benefit from running in tandem with Image Processor’s strengths in converting file formats and resizing images.
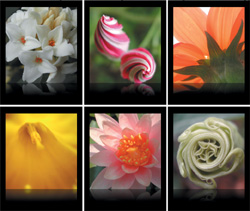
Figure 3.26 displays the results of running the Reflecto action on six photographs of flowers.
Figure 3.26. The results of running the Reflecto action as a batch on six images.
Action Management
By taking advantage of the tools Photoshop and Illustrator offer for actions and action sets, you can customize the Actions panel, color-code actions, tidy up the Action panel (by only displaying the actions and sets you need), and save and distribute actions and sets to friends and coworkers.
Saving and Loading Action Sets
Since you can lose actions if Photoshop or Illustrator crashes (or if you accidentally choose Replace or Reset Actions), it’s a good idea to get in the habit of saving all new actions you create. To do this, you must save the entire set containing the action; however, there’s no real downside to saving a whole set at a time.
Take care when using the Replace Actions command—or even better, don’t use it at all. When executed, this command replaces all action sets in the current document, which means you could easily lose your unsaved actions.
To save a new action, from the Actions panel menu choose Save Actions and then save the file wherever you wish. To load an action set, choose Load Actions from the same menu.
Sharing
Saved sets are basically text files, so you can share them with friends and colleagues. One of the great things about actions is that they’re cross-platform—which means they get along well in today’s mixed-platform environments.
When too many actions are open in the Actions panel, applications can slow or start to act weird. If you notice anything odd, close any unused actions or sets by dragging them to the Actions panel trash can. And if they’re important actions, make sure that you’ve saved them (and backed them up) before closing.
Droplets
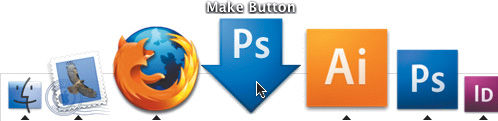
Droplets provide a means of saving an action in Batch mode into a small application. In fact, the Create Droplet window appears virtually identical to the Batch window (shown in Figure 3.23). You simply drag a file (or files) onto the Droplet icon to run the batch operation. You can create more than one and place them on the Desktop or anywhere, really—even in the Dock on the Mac (Figure 3.27). But (teeth clenched) droplets are available only in Photoshop and Acrobat, not Illustrator and certainly not InDesign.
Figure 3.27. Drop a file or files on the droplet, and it will launch Photoshop (if it’s not already open) and run your action with the batch settings.
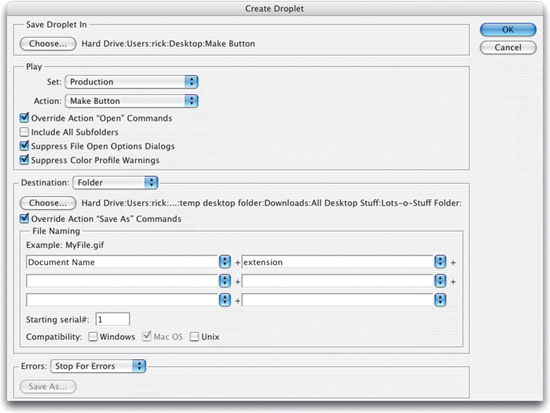
To create a droplet, choose File > Automate > Create Droplet (Figure 3.28), and the Create Droplet window will appear. The settings here will be the same as those you used to create a batch (see the Running Batch Actions section earlier in this chapter); however, you must also select a location and name for the droplet.
Figure 3.28. The Create Droplet window.
Droplets are cross-platform, but you have to jump through a couple of hoops to make sure they work. To get a Windows droplet to work on a Mac, drag it onto the Photoshop application icon and it will update. To make a Mac droplet work in Windows, add the .exe file extension.
Clearing, Resetting, and Replacing Actions
Though handy, the following commands for clearing, resetting, and replacing actions can wipe out your hard work if you don’t save often. Thus, you should always think twice before pressing any of these buttons.
Clearing actions (Actions panel menu > Clear All Actions) does just what it says—which means that if you haven’t saved an action, it’s gone. If you need to delete certain actions or sets, select them and choose Actions panel menu > Delete. You can also delete actions by dragging them to the Actions panel trash can or selecting them and clicking the trash can.
Resetting actions (Actions panel menu > Reset Actions) sets the actions in the Actions panel to the default set that came with the program—which means you stand to lose any unsaved action sets, so be very careful. Like some of the other features associated with actions, I can’t imagine ever actually using this feature.
Replacing actions (Actions panel menu > Replace Actions) replaces all the current action sets in the panel with another of your choosing. This is another feature I can’t really envision using; however, if you do, keep in mind that it will wipe out any unsaved action sets.
Button Mode and Color Coding
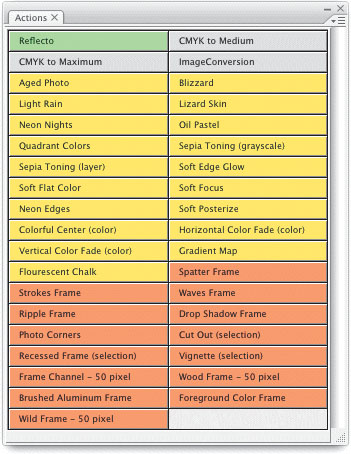
If you work with a lot of actions and need to access them quickly, Button mode might be just the thing for you. When you select Button Mode from the Actions panel menu, that panel’s appearance changes into a panel of colored buttons (Figure 3.29). Each button represents an action and is displayed in whatever color you choose to associate with that action (select the action, then choose Actions panel menu > Action Options).
Figure 3.29. In Button mode you can visually organize actions by selecting one of eight available colors.
This is a great way to visually organize sets of actions. Note, however, that you have to take the Actions panel out of Button mode to do anything other than run the actions. To edit an action, deselect Button Mode in the Actions panel and return to Normal mode.
Advanced Actions
So far, you’ve learned four ways to start an action: by choosing it and clicking Play, by using the Batch feature, by dragging a file onto a droplet, and by using Photoshop’s Image Processor. Now you can go beyond the basics and put actions to work with even less effort.
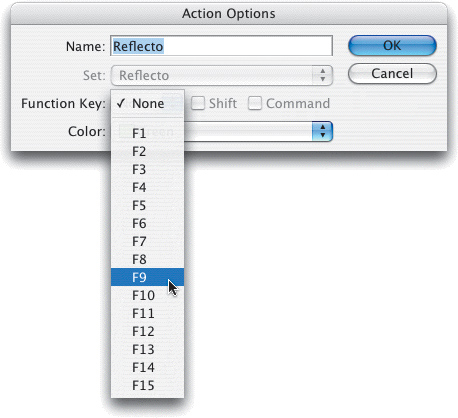
One way to do so is to assign your action a Function key (commonly referred to as F keys) by selecting the action, choosing Action panel > Action Options, and then choosing a Function key from the Function Key pull-down menu (Figure 3.30). When you now press the Function key, an action will be triggered—just as if you had pressed the Play button (as long as the Function key you chose doesn’t conflict with system-assigned Function keys such as F12, which is assigned to Dashboard widgets by default on Mac OS X).
Figure 3.30. The Action Options window is where you can set a Function key to trigger your action as well as assign a color code to your action.
If you want to go one better with your automation, you can have Photoshop trigger an action based on events. The program’s Script Events Manager (File > Scripts > Script Events Manager) can trigger scripts or actions when certain events occur, such as whenever Photoshop starts, quits, or opens a file. This option could come in handy for adding copyright information to every image opened or converting every image from RGB to CMYK. Or in a multiuser work environment, you might want Photoshop to load your chosen workspace when the application starts. The Script Events Manager comes loaded with 7 events, but more than 200 are available (they’re listed in the appendix of the JavaScript Reference Guide installed with Photoshop).
Triggering Scripts
Although you’ve learned a few tricks for adapting actions to Photoshop files with different characteristics—including relative values, modal controls, and inserting stops—actions are actually fairly limited in their flexibility. In addition, actions may be cross-platform, but they’re not cross-application—which means you can’t run a Photoshop application in Illustrator or vice versa (nor would you want to), and an action can’t send instructions to any other application, such as an e-mail program or compression utility. Actions can, however, be triggered by external scripts (and vice versa).
For in-depth information on linking scripts to actions, see the individual scripting guides that came with Photoshop (in the Scripting Guide folder) and Illustrator (Scripting > Documentation folder).
To incorporate a script into an action, first create the script and place it in the Presets > Scripts folders for the same application as your action. The script should appear in the submenu accessed via File > Scripts. If you don’t see it, you’ll need to restart the application.
To add a trigger for the script to your action, highlight the command you want the script to follow, and from the Actions panel menu choose Insert Menu Item. Then choose File > Scripts and select your script. That’s it.
Keep in mind that scripting is more difficult to learn and requires more setup and testing than writing actions. The upside, though, is that scripts let you handle varying conditions in a workflow and can operate across more than one application. For more detail on working with scripts, see Chapter 4.